How to upgrade to macOS Mojave?

Having spent some years coding applications for macOS, we’ve created a tool that everybody can use. The all-round problem fixer for Mac.
So here’s a tip for you: Download CleanMyMac to quickly solve some of the issues mentioned in this article. But to help you do it all by yourself, we’ve gathered our best ideas and solutions below.
Features described in this article refer to the MacPaw site version of CleanMyMac X.
One of the latest operating systems from Apple isn’t going to drastically change how you use your Mac — but it does offer a couple of updates that are going to make it a lot easier and more enjoyable, including the following:
The most obvious change you can implement is Mojave’s improved dark mode. Although this has been a feature since 2015 in macOS El Capitan (albeit a very basic version consisting of turning the Dock and menu bar to black), macOS Mojave has integrated its dark mode across the display and apps, both Apple’s own and from third-party developers. Easily controlled through your settings, the entire interface or select aspects can be made darker — perfect for working in a dark room to prevent eye strain, watching movies, or working with images.
Desktop Stacks are now available to keep your files and folders ultra-organized. Stacks, as the name suggests, are folders collated into categories. Photos, for example, will be automatically grouped together in an ‘Images’ stack to keep a clearer, cleaner desktop.
A new Gallery view in the Finder gives a snapshot of files and images as you browse, making it easier to find what you’re searching, particularly with files that can look similar when viewed in Cover Flow. An additional sidebar will give you more information about the file.
New apps for macOS have been imported from iOS: News, Home (to manage connected HomeKit devices, such as light bulbs and thermostats), and Voice Memos (which may not be as useful on a Mac as on an iPhone but will make it easier to sync those files from your phone to your Mac) are available on macOS Mojave.
Speaking of apps, the App Store is getting a redesign. Editorial content is being added, as well as apps from other developers like Microsoft and Adobe. App developers will also offer free trials directly through the App Store.
Editing a screenshot of your screen can now be done from a thumbnail immediately after taking the screenshot instead of going through Preview or Photoshop.
You’ll be able to use your phone as a capture device when working on your Mac. No more emailing over photos to integrate into your files across devices.
Safari has been made even tighter to protect browsers from tracking cookies and hide some of the more irritating social media aspects, such as comment bars and share buttons.
Sounds good, right? As long as your Mac is compatible with the update, which it should be, if you’re using a Mac product from 2012 onwards, and your apps aren’t 32-bit (Apple is withdrawing support for 32-bit apps in Mojave, so they will need an upgrade from the developer), then it makes sense to update your Mac to macOS Mojave.

Before updating your Mac to macOS Mojave
Excited to try out the updates on Mojave? It’s tempting to dive straight in, but there’s a little preparation to do first to ensure your Mac is ready for the upgrade.
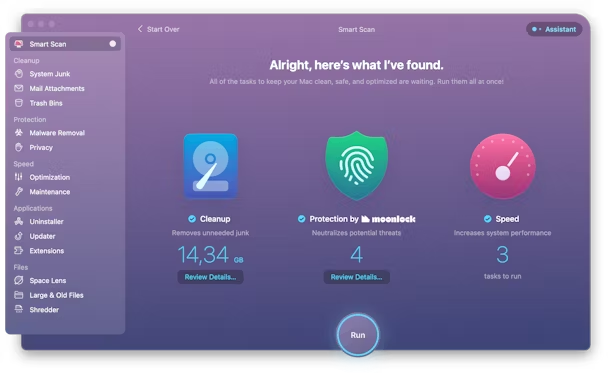
Step 1: Clean up the system from junk files
Just like moving house, you need to clean out the junk and figure out what’s to be transferred over before you leave it behind for good. Clearing out your old files also frees up space for the new installation.
You can manually save the files you want and delete those you don’t, but you run the risk of leaving behind files in odd locations or failing to erase file extensions. Old cache files, duplicates in different locations, and useless downloads all stick around and often go unnoticed. Using an app like CleanMyMac X rids your system of all its junk in preparation for the update, ensuring you have a better experience with Mojave without it lagging from dead weight. Apple recommends 8 GB for the macOS Mojave update, but it’s always best to have a few extra gigabytes if you can get it.
Step 2: Run diagnostics
Once your files have been trimmed to the essential, it’s time to run a diagnostic on your Mac. Overhauling your OS with a new upgrade isn’t recommended if you have any underlying problems, most of which you wouldn’t immediately pick up on.
To check that your Mac doesn’t have any issues, it’s easy to run a simple yet effective scan:
- Open Disk Utility.
- Select your startup drive from the left-hand pane.
- Click on the First Aid tab from the top bar.
- Hopefully, your Mac will be running smoothly, and you won’t have to perform any repairs. If the First Aid function has found any issues, follow the steps to get it back on track.
Step 3: Back up your Mac
You’ll need some form of external storage to save your files when your update to macOS Mojave. You might prefer physically holding a copy of your files in your hand with a USB flash drive or portable hard drive, particularly if you have a poor or unreliable internet connection or if you don’t have a portable drive, a cloud-based platform like Google Drive or OneDrive means you don’t have to worry about losing your copy. For peace of mind, create two backups, just in case.
macOS has its own application for backing up files. Locate Time Machine on your system using the Finder, and if you have it set for automatic backups, check that you have a recent copy of your files. If you haven’t used Time Machine before or you haven’t set it to automatically back up your files, follow the instructions to save a copy before you begin upgrading to macOS Mojave.

How to upgrade to macOS Mojave
Now that you’ve done all the preparations, you can upgrade to Mojave. Here are 4 easy steps:
1. Make sure you have everything you need
When upgrading an entire operating system, you’ll need somewhere with an internet connection to download Mojave as well as perform any other updates. Avoid public networks like hotels and coffee shops, and preferably use secure Wi-Fi at home or at work.
However long-lasting your battery is, make sure you’re connected to a power source. Both the download and the installation process will drain your power, so get yourself a spot next to the power outlet.
2. Log into iCloud
Since many apps are integrated with iCloud, you’ll need to be logged in to upgrade.
3. Update your current macOS
Sounds counterintuitive, right? But you can’t upgrade your OS if there are any bugs or issues affecting your Mac, so check for updates to the macOS you’re already using in the App Store. You’ll also need to check your apps individually by the same method. If you’ve purchased apps from outside of the App Store, these will need to be manually updated through the website.
4. Download macOS Mojave
You should now have a fully-functioning version of your current macOS, which has been stripped of its junk files. All of the files you want to keep have been copied to an external drive separate from your OS. You’re now ready to upgrade to Mojave.
Go to the App Store, choose the Updates tab, and click Update. Follow the instructions and start enjoying the latest Mac operating system.
How do i upgrade my imac from high sierra to mojave?

Also the question is, is it worth updating from High Sierra to Mojave? It also brings improvements and enhancements to the overall system of the machine. If you were facing a major issue in your High Sierra or Sierra running Mac, the Mojave update will likely fix it for you.
Correspondingly, should I update my Mac from High Sierra to Mojave? Most Mac users should upgrade to the all-new Mojave macOS because its stable, powerful, and free. Apple’s macOS 10.14 Mojave is available now, and after months of using it, I think most Mac users should upgrade if they can.
Likewise, is High Sierra better than Catalina? Most coverage of macOS Catalina focuses on the improvements since Mojave, its immediate predecessor. But what if you’re still running macOS High Sierra? Well, the news then it is even better. You get all the improvements that Mojave users get, plus all the benefits of upgrading from High Sierra to Mojave.
Similarly, how do I know if my Mac is compatible with Mojave? For details about your Mac model, click the Apple icon at the top left of your screen and choose About This Mac. These Mac models are compatible with macOS Mojave: MacBook (Early 2015 or newer)Apple said that would run happily on a late 2009 or later MacBook or iMac, or a 2010 or later MacBook Air, MacBook Pro, Mac mini or Mac Pro. … This means that if your Mac is older than 2012 it won’t officially be able to run Catalina or Mojave.
Is High Sierra Good for older Macs?
Yes, High Sierra on Older Macs Really Does Boost Performance.
Is macOS High Sierra still supported?
In keeping with Apple’s release cycle, Apple will stop releasing new security updates for macOS High Sierra 10.13 following its full release of macOS Big Sur. … As a result, we are now phasing out software support for all Mac computers running macOS 10.13 High Sierra and will end support on December 1, 2020.
Can I go back to High Sierra from Catalina?
But first, if you want to downgrade from macOS Catalina to Mojave or High Sierra using a bootable drive, follow these steps: … Open System Preferences > Startup Disk and select the external drive with your installer as the startup disk. Click Restart. Your mac should then restart in Recovery mode.
Which is better Catalina or Mojave?
Clearly, macOS Catalina beefs up the functionality and security base on your Mac. But if you can’t put up with the new shape of iTunes and the death of 32-bit apps, you might consider staying with Mojave. Still, we recommend giving Catalina a try.
Is Mac High Sierra older than Catalina?
Prior to the release of Catalina was macOS 10.14 Mojave. … Before Mojave was macOS High Sierra. High Sierra is available here. If you want an even older version of macOS take a look at our article about getting old versions of macOS and Mac OS X.
How long will Mojave be supported?
Support Ending November 30, 2021 In keeping with Apple’s release cycle, we anticipate, macOS 10.14 Mojave will no longer receive security updates starting in November 2021. As a result, we are phasing out software support for all computers running macOS 10.14 Mojave and will end support on November 30, 2021.
What Macs can run high Sierra?
- MacBook (Late 2009 or newer)
- MacBook Pro (Mid 2010 or newer)
- MacBook Air (Late 2010 or newer)
- Mac mini (Mid 2010 or newer)
- iMac (Late 2009 or newer)
- Mac Pro (Mid 2010 or newer)
How do I update my Mac when it says no updates available?
Click on the top left of your screen click on About This Mac to find out the year of your mac. Go to Check Compatibility to see if your mac qualifies for the OS upgrade you want. Then go to the Download OS section and click on the OS you want to install. Before upgrading make a full back up of your Mac.
How do I update my old imac?
If you are running any version of OS X Snow Leopard that is older than the 10.6. 8 update, you will need to update to the latest version before you can download OS X Yosemite. This can be initiated by clicking the Apple icon at the top left of your screen and selecting the Software Update option.
What versions of macOS are still supported?
- Mountain Lion OS X 10.8.x.
- Mavericks OS X 10.9.x.
- Yosemite OS X 10.10.x.
- El Capitan OS X 10.11.x.
- Sierra macOS 10.12.x.
- High Sierra macOS 10.13.x.
- Mojave macOS 10.14.x.
- Catalina macOS 10.15.x.
Why will my Mac not update?
There are several reasons you might be unable to update your Mac. However, the most common reason is a lack of storage space. Your Mac needs to have enough free space to download the new update files before it can install them. Aim to keep 15–20GB of free storage on your Mac for installing updates.
How to Upgrade Your Mac from High Sierra to Mojave
If your Mac is running macOS High Sierra (10.13), you may not be able to get new versions of certain apps to work. For instance, Lightroom and Photoshop’s latest versions might not be compatible, which means you will need to upgrade to a higher version like macOS Mojave (10.14). This article shows you how to upgrade or do a clean install of macOS Mojave on a Mac currently running macOS High Sierra. Of course, this assumes that your Mac supports macOS Mojave.
If you’re doing an upgrade, you can directly download and run Mojave installer app on your High Sierra system. The process is simpler than doing a clean install because you won’t need an external USB drive for installation. The first method is explained below.
Warning: Not all Mac models are eligible for upgrading to macOS Mojave. Please check the hardware requirement first.
- MacBook Pro (Mid 2012 or newer)
- MacBook (Early 2015 or newer)
- MacBook Air (Mid 2012 or newer)
- Mac mini (Late 2012 or newer)
- iMac (Late 2012 or newer)
- iMac Pro (2017)
- Mac Pro (Late 2013)
Method 1: Direct Upgrade from macOS High Sierra to macOS Mojave
Since the first release of macOS, Mac users can directly upgrade to a new version via macOS installer app, which you can get from App Store. This is the official way to upgrade macOS from old version to a new version.
Step 1: The first step whenever you install a new OS version is to take a back up of your data, so you can do that now via Time Machine on an external drive.
Step 2: Go to Mac App Store and search for "Mojave"; alternatively, you can open this link provided by Apple. (It is recommended to use Safari browser if you’re using the link.)
Step 3: Mojave installer app is pretty big and you have to wait some time to fully download it from Mac App Store.
Step 4: When the download is finished, the app (called Install macOS Mojave) will be open automatically. Now, follow the instructions on your screen to complete the installation.
- Simple enough and no extra step.
- Less error and no data loss.
- Completely free of charge.
- Can not find macOS Mojave app in Mac App Store.
- May download a damaged copy of macOS Mojave app .
- Your Mac should be working normally.
This method is much easier so most people use this way to upgrade to a higher version of macOS once that is no longer the latest version. However, it is not always working as expected and you may see error like the following one:
If you can not get in your Mac or you prefer to do a clean install, then the direct upgrade is not suitable. You need to create a bootable macOS Mojave USB drive first and use it to install Mojave on your Mac. Hence, this is an indirect way to upgrade to Mojave from High Serria. We will share more details about this method in next section.
Method 2: Upgrade from High Serria to Mojave via Clean Install (Bootable USB)
A clean install ensures that your hard drive is wiped clean and formatted before installing a new version of macOS, which means your apps and data will all be gone. Sometimes, that’s the desired result, especially when your Mac is running slowly because of heavy data and you want to refresh it along with the upgrade to the latest or at least a higher macOS version. If you need to do a backup, do that now using Time Machine and an external drive. You will also need an additional external drive for the installer.
Part 1: Create macOS Mojave Bootable USB in Easy Way
There are two different approaches to create macOS bootable USB. The simple way is via third-party apps, which usally involves less steps and has a GUI. The other way is by using a set of combined text commands in Terminal app. We will go with the easy one first.
Step 1: Get a copy of macOS Mojave DMG file.
- Download Link 1: https://archive.org/download/macOS_Mojave.dmg
- Download link 2: https://sundryfiles.com/9tz
Step 2: Plug in an USB drive to your computer (PC or Mac) and install UUByte DMG Editor on it.


Step 3: Open UUByte DMG Editor software and click the ‘Next’ icon at the right side of Burn menu. At this time, you will be redirected to a new window.
Step 4: Click the ‘Browse’ button to locate the macOS Mojave DMG file you downloaded previously. And choose the right USB drive in second column.
Step 5: When the above steps are completed, hit the ‘Burn’ button at bottom to start creating macOS Mojave USB installer from DMG file. Wait about 5-10 minutes.
You will see a success message at the end of process and this means a bootable USB installer is ready! You can now use it to install macOS Mojave on your Mac and start the upgrade process.
Bonus: Create Bootable Mojave USB Installer on Mac via Commands
You can create any macOS bootable USB installer on a PC or Mac with UUByte DMG Editor but text command is only available on Mac. This means you should get a working Mac in order to apply this trick.
First, download macOS Mojave app from App Store. Quit the app when it is launched after download. Now, open Terminal and type in ‘sudo’ (without quotes) and a space, and leave it like that. Now, go to Finder and right-click on the installer file to select Show Package Contents.
Open Terminal and type in ‘sudo’ (without quotes) and a space, and leave it like that. Now, go to Finder and right-click on the installer file to select Show Package Contents.
Locate the file called createmediainstaller inside the Resources subfolder in the main Contents folder. Keep your Terminal window visible and drag this file into Terminal. You’ll see that a location has been added after your sudo command.
Type —volume and then a space, and leave it for now. Back in Finder, go to /Volumes using the Go → Go to Folder option. You can now connect your USB drive to your Mac. From Finder, drag your device’s icon into Terminal again.
Hit Enter and then enter your password for the Mac when prompted to do so. When you see the prompt on Terminal asking you if you want to continue, type Y and hit Enter.
The USB installer will be created in a few moments. Now that you have the installer ready, you can proceed to the installation part.
Part 2: How to Install macOS Mojave on Mac from Bootable USB
Step 1: Restart your Mac and hold the Option key down when you hear the startup chime.
Step 2: Select Install macOS Mojave in the list you see on your screen. You may need to use the arrow keys and the Enter button if you can’t use the mouse.
Step 3: When the Utility window appears, select Disk Utility. Then, choose your main hard drive and click Erase.
Step 4: When the formatting is done, go back to the Utility window and choose Reinstall macOS. Follow the instructions on your screen to install macOS Mojave.
You have successfully done a clean install of macOS Mojave from a USB installer on a machine running macOS High Sierra. Be sure you follow all the instructions in this article, especially where the command line inputs in Terminal are concerned.
- Universal applicable.
- Work on both PC and Mac.
- Can be used on multiple Macs once bootable USB being made.
- No need to download macOS install app when it is not available.
- Has to install additional software or use text commands.
- Require an external USB drive.
- Installation may fail on unsupported Mac models.
Summary
In conclusion, you can upgrade from High Serria to Mojave in both direct and indirect way. It is up to you what kind of situation you are in. If you could find macOS Mojave app in Mac App Store, then it is recommended to finish the upgrade within the app. If not, then you can create a bootable macOS Mojave USB and use it to install macOS Mojave on your High Serria powered Mac.
Petty is editor in chief at UUByte and writes various topics about Windows and Mac to help people make the most of current technology.
КАК ОБНОВИТЬ HIGH SIERRA ДО MOJAVE MAC OS
Если у вас установлена операционная система High Sierra на вашем устройстве Mac, есть несколько шагов, чтобы обновить ее до Mojave.
1. Проверьте совместимость: Убедитесь, что ваш Mac может поддерживать Mojave. Некоторые старые модели Mac могут быть ограничены в возможности обновления.
2. Резервное копирование данных: Рекомендуется сделать резервную копию всех важных данных перед обновлением операционной системы. Таким образом, вы сохраните важные файлы в безопасности на случай каких-либо проблем во время процесса обновления.
3. Загрузка и установка: Откройте Mac App Store и найдите Mojave. Щелкните «Загрузить» и дождитесь окончания загрузки. После этого запустите программу установки и следуйте указаниям на экране.
4. Ждите завершения: После запуска установки Mac OS Mojave система сама будет выполнять обновление. Это может занять некоторое время в зависимости от скорости вашего интернет-соединения и производительности Mac.
5. Настройка: По завершении обновления вам, возможно, придется внести некоторые настройки и активировать новые функции Mojave. Следуйте инструкциям на экране, чтобы завершить настройку.
СТАРЫЙ MACBOOK PRO! КАК УСТАНОВИТЬ MACOS MOJAVE 10.14.6 ?!
How to update MacBook pro from high sierra
Как обновить Mac os? На любую версию с любой версии
Как обновить свой Mac до macOS Catalina
How to update macOS High Sierra to macOS Mojave in 2021
установка macOS Mojave на старый Mac / macOS Mojave on an unsupported Macs
How to fix Apple iMac or MacBook error: The Recovery Server could not be contacted. High Sierra.
Как откатиться от MacOS Catalina с флешки до MacOS Mojave 2020
Какую операционную систему установить на старый Mac в 2022 году? Спроси у Хакинтошника