How to Scan From HP Printer/Scanner to Mac: Complete Guide
Written by  Ujjwal Reviewed by Editorial Team
If you buy through affiliate links, we may earn a commission at no extra cost to you. Full Disclosure Here…
In this post, I will discuss various ways to scan using your HP printer on your Mac. I will also give some troubleshooting guides on how you can set up your HP printer wirelessly in different ways via the HP Smart app or Mac’s Image Capture. If you’re having problems with your HP printer, especially when you are trying to scan a document, the guides in this article will be able to help you out.
How to Scan From HP Printer to Mac?
To scan from an HP printer to a Mac, open the HP Easy Scan app, select the printer, select “Scan a Document or Photo,” choose your scan settings, and click “Scan.”
Use HP Easy Scan
HP has lots of dedicated software for your printing and scanning jobs and all of them are available for free from their website. In addition, you can download your HP printer’s driver to your Mac, including HP Easy Scan, for extended support.
The HP Easy Scan is pretty much what it is, ensuring that your scanning experience is smooth and hassle-free. It also offers more functionality that allows you to edit your scanned images before saving them. This adds another layer of personalization by making it your one-stop experience for your imaging needs.
To scan your document using HP Easy Scan:
Look up your printer driver from the HP Website. Depending on your printer model, you might need to go to different sites.
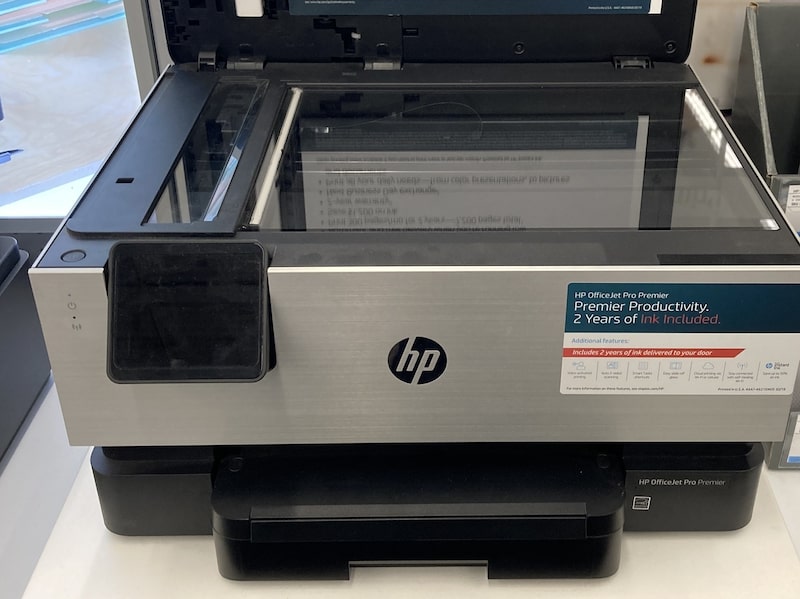
Note: If your device is not listed, download the HP Smart for Desktop app from the Apple App Store and go to the HP Smart scan tutorial below to guide you through the process.
- Download the HP Easy Start utility from the website and install the app by following the on-screen instructions. Make sure both Essential Software and HP Easy Scan are checked during the installation process.
- Once HP Easy Scan is installed, place your document into the document feeder or scanner flatbed.
- On your Mac, go to Finder> Applications > HP Easy Scan.
- The HP Easy Scan window will appear and select your printer from the Scanner drop-down list.
- Select the type of scan job you would like to initiate from the Presets drop-down menu, depending on the document you would like to scan.
- Click on Scan at the upper-right hand corner of the window to start scanning your document.
- Once the scan is complete, a popup window will appear confirming if you are finished scanning your document. You can click Done once you are finished scanning your document. Otherwise, you can consecutively scan multiple documents once the scan is complete by changing the document on your scanner bed and then click on Scan Next Item.
- After the scan is complete, you can click the preview of your scanned image/s and edit them by clicking on Edit to adjust, straighten, and crop your scanned image as desired.
- Save your image by clicking on Send > Folder. You can name your image, designate where to save your scanned image, and select which format you would like to save your image. Then click Save once you are finished.
Note: If you scanned multiple images or documents, you can select PDF as the format and tick the Save all items into a single file checkbox.
On the other hand, you can also scan your documents using your HP printer to your Mac without installing any third-party software.
In reality, you will only need the correct driver to your printer installed on your Mac to get your scan work done. Today, the Macs are intelligent enough to automatically search for your HP printer’s driver software once you connect them to your computer.
There are different ways that you can scan your document using your Mac. However, if you prefer a direct experience scanning your document, you can check out these alternatives in scanning your document to your Mac.
Use Mac’s Image Capture
If you do not have HP’s Easy Scan program on your Mac, you can still perform scan tasks using Image Capture. Image Capture is Mac’s imaging software that can be used to scan documents from any image scanning device, as long as it can be detected and recognized by your Mac.
To scan using Image Capture on your Mac:
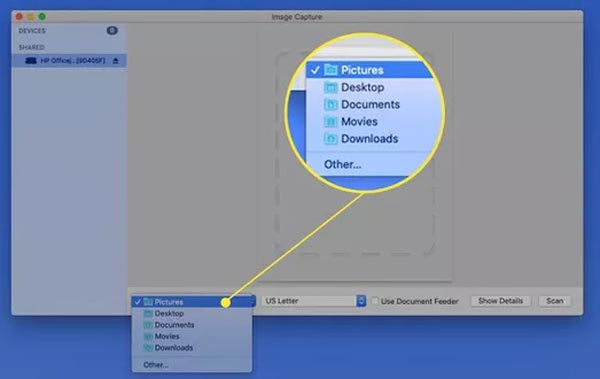
- Go to Finder > Image Capture.
- You should see your scanner or printer on the left panel of the window if you’re using a 2-in-1 printer scanner.
- Once you double-click on your printer, you may be prompted to install the printer if it’s not already installed. Your Mac will automatically search for available drivers online and install them for you.
- Once your printer is installed, you will see a grey area on the window where the scanned image will be.
- Now, make sure that the document you are going to scan is either on the scanner flatbed or document feeder, whichever one you are using, and click Show Details on the lower right of the window.
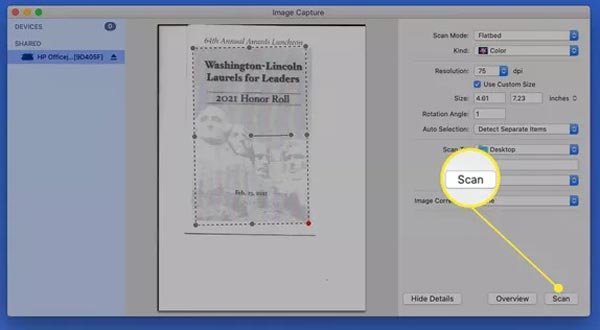
- Give it a moment to scan your document until the settings become clickable. Once the scan completes, you can set the settings on the right panel depending on your scanner and the document you are about to scan.
- After configuring all the settings you need, you can now click Scan on the lower-right corner of the screen.
- Once the scan is complete, a preview of the scanned image will show in the window. In addition, the folder location of the image file shall automatically open.
Scan from the Printer & Scanner window

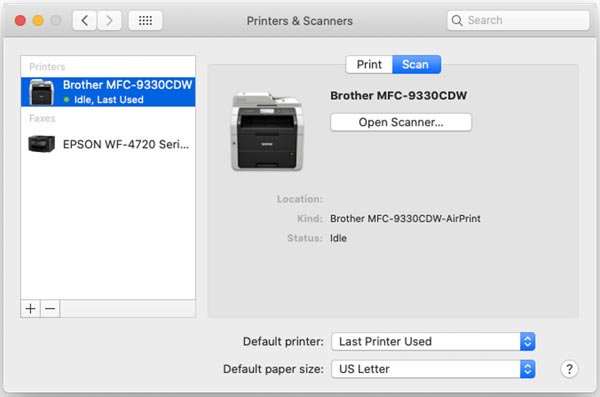
You can also scan from the Printers & Scanners menu of your Mac. With this, you can also perform image scans with your HP printer with a scanner without installing additional software.
To scan from your HP printer to your Mac from the Printer & Scanner window:s
- Go to Apple Logo > System Preferences (System Settings on macOS Ventura and above) > Printers & Scanners.
- On the left panel of the window, select your scanner.
- If your scanner is not listed, click on the Add“+” button on the lower-left corner of the panel and make sure that your scanner is turned on and connected to your Mac. You should see the model of your scanner or your printer if you are using a 2-in-1 HP printer.
- Click on the model of your HP printer/scanner and click Add.
- Once your printer is added to the list, click on Scan on the right panel of the window.
- Click Open Scanner.
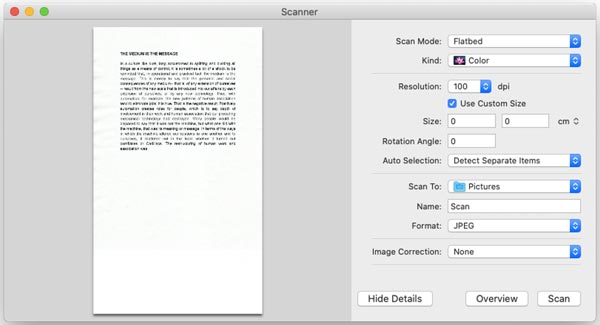
- A scanner preview will pop up and wait for the scanner to warm up and proceed with the overview scanning process.
- Once the overview scan is completed, you can configure the settings you would like to apply to your image. You can then select which part of the image preview you would like to save.
- Once you have selected the areas you would like to save, click Scan.
- After the scan is complete, you can go to your set destination folder for the scanned image and view the scanned document.
Just in case if your Canon Printer is not working, then you can checkout MacMyths guide.
Use Apple Preview
Using Apple Preview to scan images and documents from your scanner may be unknown for some, but you can do it by just opening the Preview app.
To scan using Apple Preview on your Mac:s
- Make sure that the printer is properly connected to your Mac. Then, place the document properly on the scanner flatbed or document feeder.
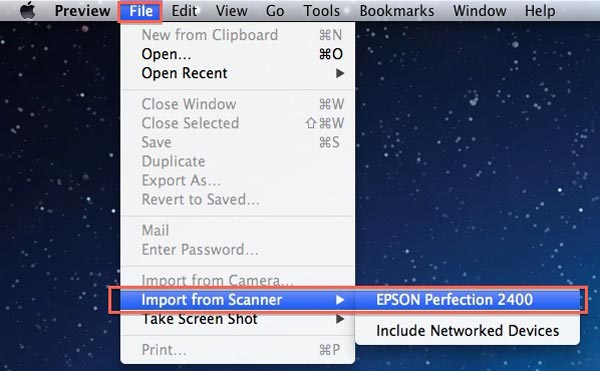
- Go to Applications > Preview.
- Once Preview is opened, go to File > Import from Scanner.
Note: If you’re using a printer with a scanner, the name of your printer or scanner should appear on the list of devices. Also, if you’re using a network printer, you should click Include Networked Devices > Import from Preview File.
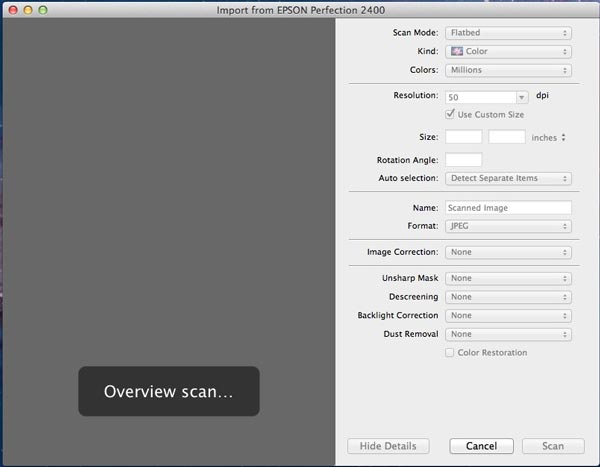
- Once you selected your printer, a scan window will appear.
- Select Show Details and wait until your scanner starts the overview scan for your document.
- Once finished, you can configure the details of your scanned image on the left-hand panel.
- Select and configure all settings that you desired, then select Scan.
- Wait for the scan to finish and Preview will automatically open your scanned file.
Scan using HP Smart for Desktop
Another cool thing with HP printers is that they have a tremendous software support for their user. Another thing that you can use to scan documents on your Mac using HP printers is via the HP Smart for Desktop.
To scan using the HP Smart for Desktop on your Mac:
- Ensure that your document is correctly placed on your document feeder or scanner bed before proceeding with the following steps.
- Download the HP Smart for Desktop app that you can from the Apple App Store.
- Install HP Smart and launch it once it finishes installing.
- On the HP Smart dashboard, click on Add Printer to add your device.
- Ensure that your printer is connected to your Mac as HP Smart will automatically detect any HP printer connected to your computer. Once your printer is detected, select your printer and click on Continue.
- On the HP Smart dashboard, select Scan.
- Change any necessary scan settings you will need for the scan job and once you are finished, select Scan.
- Once the scan is complete, you will be directed to the Scan preview window to edit, add another image, print, share, and save your scanned image.
- Click on Save to finalize your scanned image.
Fix Problems with HP Scanners on Mac

If you are encountering problems with wireless printing or scanning with your HP printer on your Mac, check the following troubleshooting guides below:
Wireless Connection Issues With HP LaserJet
If you have wireless connection problems, such as AirPrint connection or Image Capture problems with your HP LaserJet or HP PageWide printers, you might need to enable eSCL on your printer.
Before proceeding with the following steps, make sure that you have the IP address of your printer. There are different ways that you can view your printer’s IP address depending on the model of your printer:
- If your printer has 2-line LCD control panels: go to your printer’s Control Panel menu and then head to the Network Setup menu. Next, select Show IP Address to view your printer’s IP address.
- If your printer has touchscreen control panels: from your home screen, touch the Wireless icon or the Ethernet icon on the screen to display the printer’s IP address.
Once you have your printer’s IP address, you can proceed to the following steps to enable the eSCL in the Embedded Web Server (EWS)
- Make sure that you have the updated HP Easy Start printer driver for your LaserJet and PageWide from the 123.hp.com website:
- For LaserJet
- For PageWide
- Once the download is complete, install the HP Easy Start driver and follow the on-screen instructions. Then, let the application automatically install your printer drivers.
- Next, access the Embedded Web Server (EWS). Then, go to your Mac’s web browser and type your printer’s IP address on the address line.
- On the EWS page, select the Networking tab.
- Click Advanced or Other Settings, whichever is available to you.
- Select “eSCL” or “WebScan” among the available options in the EWS menu. Since the names may vary depending on your printer model, you should be able to select one of these to enable eSCL on the EWS menu:
- eSCL
- Secure eSCL
- WebScan
- Secure WebScan
- Select Apply.
- Go to the Security tab and select Enable Remote User Auto Capture and Webscan Auto Capture Jobs if it’s available on your EWS menu.
- Click Apply and select OK to finish the setup.
Diagnose HP printer using HP Smart App on Mac
If you’re experiencing printing and scanning problems with your HP printer, you can always diagnose it using the HP Smart app on your Mac. Common problems such as connectivity issues and printer activity error can be fixed using this method. To do this:
- Open HP Smart by going to Applications > HP Smart app.
- On the dashboard, click on your printer.
- You will see the properties of your printer. Go to the menu bar and click on Printer > Diagnose & fix.
- Click Start to initiate the diagnostics.
- Wait until the diagnostics process is complete.
- Follow the on-screen instructions on your computer and check if they fix your printer problems.
Improper Wireless setup of your HP printer
Setting up the wireless function of your HP printer can be a bit tricky, and it is very common to run into some problems when connecting your printer wirelessly to your network and Mac.
Before doing the following solutions below, make sure that your printer has a Wi-Fi function. You can check your printer manual and look for your printer’s wireless settings to verify if your printer has wireless functionality. If you are experiencing printing and scanning issues that pertain to Wi-Fi connection, do the following:
Use the HP Smart app to set up your HP printer wirelessly on Mac
You can also follow the steps from HP’s video tutorial here.
- Make sure that you have HP Smart on your Mac and have an active wireless internet connection.
- Put your wireless printer in Setup Mode:
- If your printer has a touchscreen: select Restore Network Defaults from the Wireless, Settings,orRestore Settings menu.
- If your printer does not have a touchscreen: press and hold the Wireless and Cancel buttons until the lights beside Wireless and Powers start to blink.
- For HP Laser printers: press and hold the Wireless button until the Attention light starts blinking.
- For Tango printers: press and hold the Wirelessbutton until the Edgelighting flashes blue.
- Once your printer is setup mode, on your Mac, go to Application > HP Smart.
- Choose Set up a New Printer option on the window.
- The application will automatically search for your HP printer and select it once it shows on the list.
- Select Continue and the app will ask your permission to access your Wi-Fi network and see its password. Allow the application and select Continue to set up your printer wirelessly. You might need to enter your user login credentials and do so once prompted.
- The HP Smart app will begin the process by connecting your Mac to your printer via Wi-Fi connection.
- The application will prompt you to check your proximity to the printer.
- If your printer has a touch screen: tap Allow on the confirmation message that appears on your printer’s screen.
- If your printer does not have a touch screen: press the Information button.
- The HP Smart app will proceed to connect your printer to your Mac via Wi-Fi. Once the process is complete, press Continue to finalize the printer installation.
- You might need to sign in to your HP account (or sign up if you still don’t have an account) to sync your HP printer data with your account. Then, follow the on-screen instructions to complete the process.
- You should see your printer in the dashboard if the installation process is successful.
Ujjwal is a tech enthusiast with a special interest in everything Apple! He manages and writes on MacMyths.com where sharing anything and everything related to Apple devices and services is his daily thing to do.
Recent Posts
Mirroring your iPhone to a MacBook Pro is a handy task you might find essential for presentations, media sharing, or simply managing your content. Thankfully, this connection isn’t elusive; it can be.
We’ve all been there – a slip of the finger, an unintended deletion, and suddenly you need to revert a mistake on your Mac. Thankfully, using Command + Z to undo and Command + Shift + Z to redo is.
About the Author
 Ujjwal is a tech enthusiast with a special interest in everything Apple! He manages and writes on MacMyths.com where sharing anything and everything related to Apple devices and services is his daily thing to do.
Как сканировать изображения и документы на Mac без потери качества
Сегодня почти в каждом доме и на предприятии есть принтер, сканер документов или фотосканер. Поэтому Apple представила функции для сканировать на Mac чтобы помочь пользователям конвертировать физические документы в цифровые файлы. Это означает, что MacBook может самостоятельно настраивать и выполнять сканирование без использования какого-либо другого программного обеспечения. Это руководство поделится с вами самыми простыми способами и практическими рекомендациями. Кроме того, ниже вы можете узнать, как лучше всего запустить сканирование Mac на вирусы.
- Часть 1. Как сканировать изображение или документ на Mac
- Часть 2: профессиональный совет по сканированию Mac на наличие вредоносных программ
- Часть 3. Часто задаваемые вопросы о Scan Mac
Часть 1. Как сканировать изображение или документ на Mac
Перед сканированием на Mac необходимо подключить принтер и сканер к компьютеру. Затем следуйте инструкциям на экране, чтобы настроить его правильно. Вот три способа сканирования изображения или документа, и мы объясним их ниже.
Способ 1: как сканировать на Mac с помощью планшета сканера
Почти все сканеры поставляются с планшетом, который обычно автоматически устанавливается на диск при настройке сканера. Это один из инструментов сканирования Mac, который позволяет вам сканировать на Mac напрямую.
Способ 2: как сканировать на Mac с помощью Image Capture
Image Capture — это встроенный инструмент сканера на Mac. Когда сканер включен и подключен к вашему компьютеру, приложение захватит документ или изображение на вашем сканере, если вы выполните следующие действия.
Примечание: В отличие от планшета сканера, Image Capture показывает изображение или документ при сканировании на Mac.
Способ 3: как сканировать на Mac с помощью предварительного просмотра
Предварительный просмотр — это встроенный менеджер документов и средство просмотра. Он также оснащен функцией сканирования на Mac. Кроме того, вы можете редактировать свой документ или изображение в приложении после сканирования.
Часть 2: профессиональный совет по сканированию Mac на наличие вредоносных программ
Сканировать изображения и документы на Mac безопасно; однако цифровые файлы, загруженные из Интернета, не являются. Скорее всего, вы загружаете вредоносное ПО при доступе к веб-сайтам или электронной почте. Поэтому вам нужно сканировать Mac на наличие вредоносных программ, используя Aiseesoft Mac Cleaner регулярно.

161,522 Скачать
- 1. Сканируйте компьютеры Mac и ноутбуки на наличие вредоносных программ.
- 2. Удалите вредоносные программы, вирусы и многое другое с Mac.
- 3. Защитите свои файлы и жесткий диск.
- 4. Доступно для широкого спектра компьютеров Mac.
Как сканировать Mac на наличие вредоносных программ
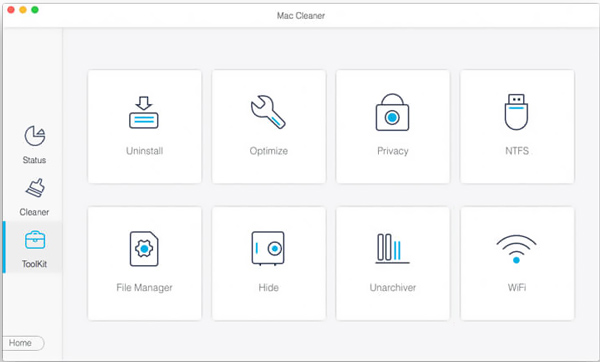
Запустите инструмент сканирования на Mac после установки. В домашнем интерфейсе есть три кнопки. Чтобы просканировать Mac на наличие вредоносных программ, щелкните значок Инструментарий и выберите Удалить .
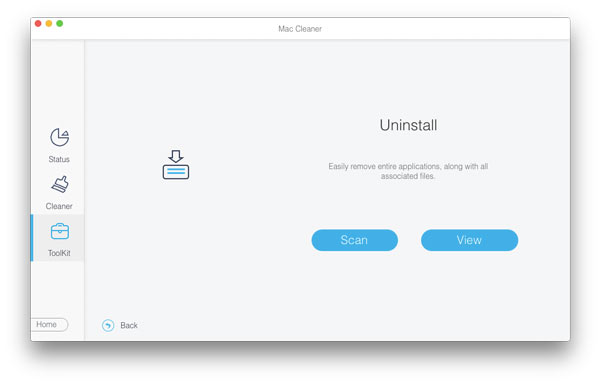
Нажмите Сканировать кнопку, чтобы начать поиск вредоносных программ и приложений, установленных на вашем Mac. Это займет некоторое время в зависимости от того, сколько приложений находится на вашем диске. Когда он завершится, нажмите кнопку «Просмотр», чтобы двигаться дальше.
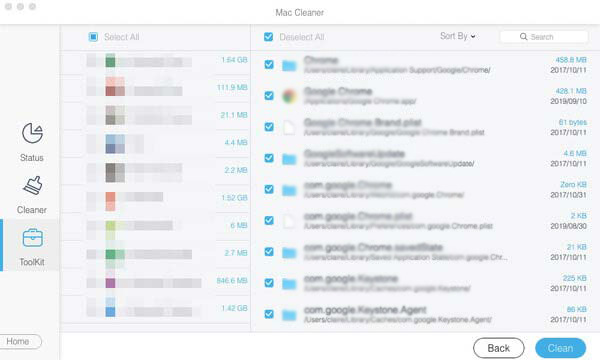
Просмотрите список приложений и выберите любое из незнакомых. Затем установите флажок рядом с Выбрать все вверху и нажмите кнопку Чистка кнопку, чтобы избавиться от вредоносного ПО.
Часть 3. Часто задаваемые вопросы о Scan Mac
Какие сканеры лучше всего подходят для Mac?
Согласно нашему исследованию, лучшие сканеры для пользователей Mac включают в себя:
Цветной сканер ScanSnap iX1500 от Fujitsu
Сканер офисных документов ImageFORMULA R40 от Canon
WorkForce ES-500W Wireless от Epson Duplex Document Scanner
Портативный сканер ScanSnap S1300i от Fujitsu.
Цветной сканер фотографий и документов Perfection V600 от Epson.Как сканировать изображения на Mac?
Пока вы подключаете сканер к своему Mac, следуйте методам, которыми мы поделились выше, чтобы отсканировать изображение, помещенное на сканер, в цифровое изображение.
Что такое антивирусный сканер Mac?
Сканер вирусов — это приложение, которое может сканировать жесткий диск и обнаруживать вирусы и вредоносные программы на вашем Mac.
В этой статье продемонстрированы самые простые способы сканирования на компьютерах и ноутбуках Mac. Планшет, который поставляется со сканером, является одним из вариантов. Image Capture — это встроенный инструмент сканирования на Mac. Кроме того, доступно приложение Preview. Aiseesoft Mac Cleaner — лучший сканер вредоносных программ для Mac. Больше вопросов? Пожалуйста, оставьте сообщение под этим постом.
Что вы думаете об этом посте.
Рейтинг: 4.8 / 5 (на основе голосов 122) Подпишитесь на нас в
Как долго длится история FaceTime? Как посмотреть историю FaceTime на Mac? Как очистить историю FaceTime? В этом посте рассказывается, как очистить историю FaceTime на Mac.
Что произойдет, если я очищу кеш в WhatsApp? Где на iPhone хранится кеш WhatsApp? Как очистить кеш WhatsApp? Научитесь очищать кеш WhatsApp на iPhone.
Что такое кеш Waze? Как очистить кеш приложения Waze на моем iPhone? Как удалить приложение Waze? Получите подробное руководство по очистке кеша Waze на iPhone из этого сообщения.
Оставьте свой комментарий и присоединяйтесь к нашему обсуждению
Blu-Ray плеер
Blu-ray Player — это мощный проигрыватель, который может воспроизводить диски Blu-ray, папку Blu-ray, DVD-диск / папку / файл ISO, выступая в качестве общего медиаплеера для любых видеофайлов HD / SD.
HP LaserJet Pro MFP M521 series — Сканирование при помощи ПО HP Scan (Mac OS X)
HP LaserJet Pro MFP M521 series — Сканирование при помощи ПО HP Scan (Mac OS X)
Сканирование при помощи ПО HP Scan (Mac OS X)
Откройте ПО HP Scan, которое находится в подпапке Hewlett-Packard папки
Приложения.Следуйте инструкциям на экране, чтобы отсканировать документ.
После сканирования всех страниц нажмите кнопку Отправить, чтобы распечатать их или
сохранить в файл.HP LaserJet Pro MFP — Сканирование с помощью ПО HP Easy Scan (macOS)
Hp Easy Scan можно использовать на macOS-компьютере вместо панели управления принтера.
Приложение HP Smart можно также использовать для сканирования документов и фотографий с принтера, для съемки изображений с помощью камеры компьютера или с помощью инструментов сканирования, сохраненных на компьютере. Используя HP Smart и проведя сопряжение принтера с учетной записью HP, можно получить доступ к расширенным функциям сканирования, например сканированию в облако.
Сведения о настройке и использовании функций сканирования с помощью HP Smart см. на веб-сайте hpsmart.com.
Сканирование с компьютера MacOS
Выполните указанные действия для использования HP Easy Start.
Загрузите документ в устройство подачи документов или положите его на стекло сканера в соответствии с метками на принтере.
На компьютере откройте HP Easy Scan из папки Приложения .
Следуйте инструкциям на экране, чтобы отсканировать документ.
После сканирования всех страниц выберите Файл , затем выберите Сохранить , чтобы сохранить файл на компьютере.