How to Reinstall Windows Defender in Windows 11
If you can’t open Windows Defender or access any of its settings, or if you have accidentally uninstalled Windows Defender, this guide will show you how to reinstall Windows Defender in Windows 11 via PowerShell command lines.
Although Windows Defender has always been the default antivirus software that comes preinstalled with Windows, some users may find the app missing after certain events such as after updating Windows or after installing or uninstalling certain third party antivirus software.
When the problem occurs and you try to open Windows Defender, Windows may prompt you the “You’ll need a new app to open this Windows Defender link” pop up that ask you to find a compatible app from Microsoft Store to open Windows Defender related link or setting. This indicates that Windows Defender is either missing or corrupted in Windows 11.
Reinstall Windows Defender in Windows 11
You can reinstall Microsoft Windows Defender in Windows 11 by executing a single line of command through PowerShell or Windows Terminal. However, you will need administrator rights to be able to execute the command.
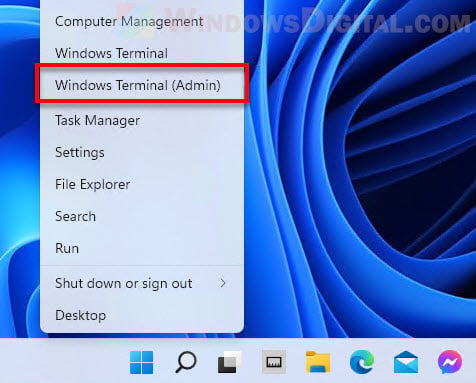
Thus, you will need to first open Windows Terminal or PowerShell with admin rights. To do so, right-click the Start button on the taskbar and select “Windows Terminal (Admin)“.
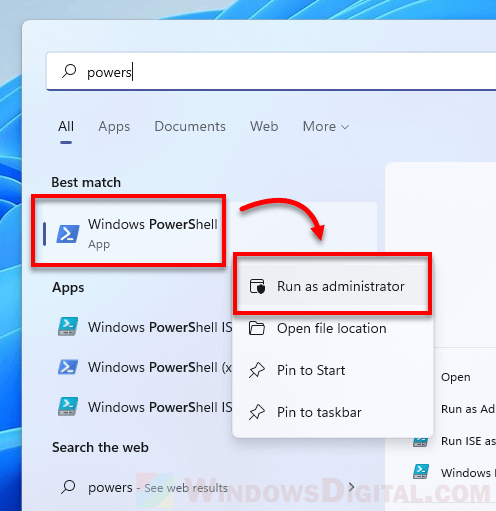
Alternatively, you can search for PowerShell through Start menu. Then, right-click Windows PowerShell from the search result and select Run as administrator.
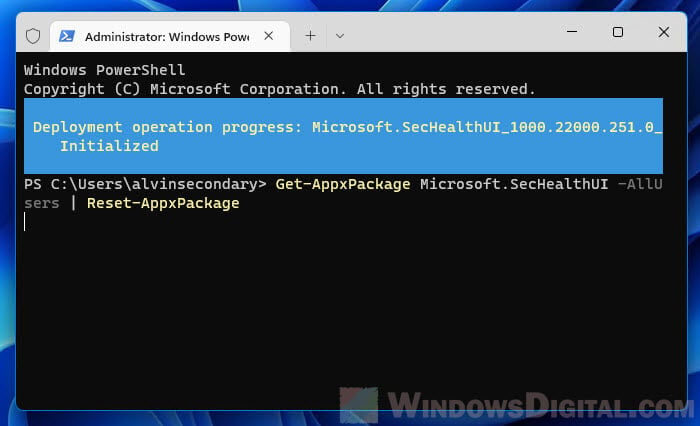
Once you have an elevated (admin) Windows Terminal or PowerShell window opened, enter the following command to reset and reinstall Windows Defender in Windows 11.
After executing the command, Windows Terminal will begin to reset Windows Defender and show a progress message that says “Deployment operation progress”. It may take a while for the process to complete.
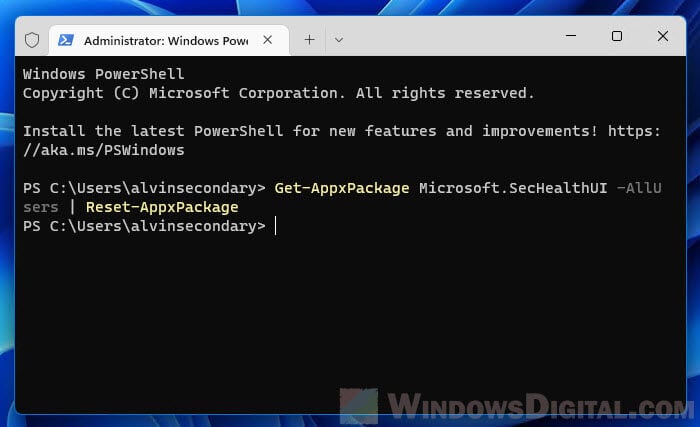
Once completed, the progress message will disappear and Windows Terminal will start at a new line, which indicates the previous command has been executed.
Now, you can press Win + i keys to open Settings and go to Privacy & security > Windows Security. This should open up the Windows Security (Windows Defender) settings like it used to.
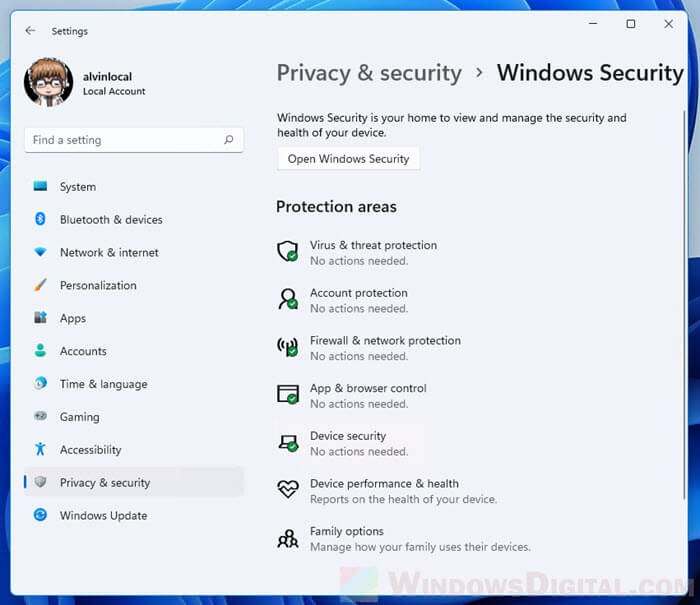
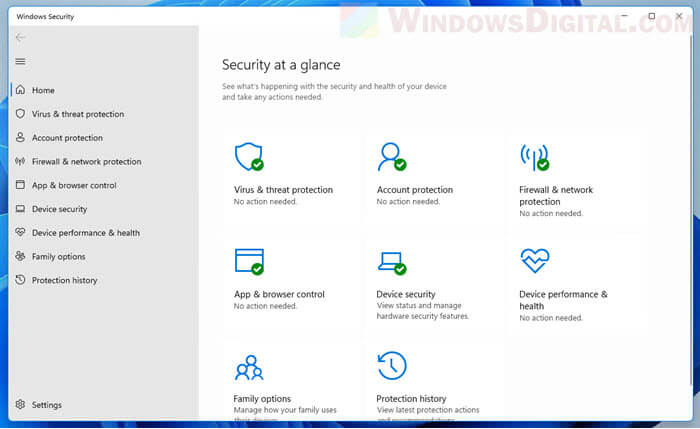
To further verify if Windows Defender is successfully installed, click on the “Open Windows Security” button to open the Windows Security window. From there, you can manage your computer’s security such as virus protection, firewall, network protection, browser control, etc.
PowerShell shows errors when executing the command
If the command above doesn’t work or if you receive errors when you execute the command, try the following commands instead to reinstall Windows Defender in Windows 11.
In an elevated (admin) Windows Terminal or PowerShell window, enter the following commands in the following order.
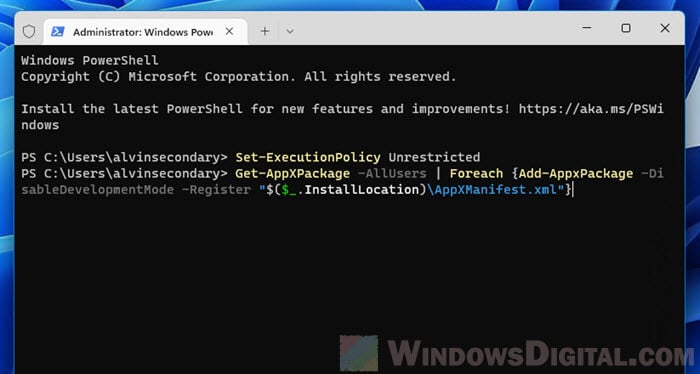
Since the command requires execution policy to be set to unrestricted in order to be executed successfully, you should set the execution policy back to its default (by running the third line of command as shown above) after the Get-AppXPackage process is completed.
If you receive an error that says “Access is denied”, it indicates that you do not have the rights to run the command. As mentioned above, you need to open Windows Terminal or PowerShell as administrator in order to execute the command successfully.
How to enable Windows Defender if you already have an existing antivirus software
If you already have an existing third party antivirus program actively running and protecting your PC, Microsoft Defender Antivirus will be disabled. However, you can re-enable Microsoft Defender periodic scanning to have it periodically check for threats in conjunction with your other antivirus software.
To enable Windows Defender with periodic scanning when you are already using an existing third party antivirus software, open Settings and navigate to Privacy & Security > Windows Security, then click the Open Windows Security button.
Next, select Virus & threat protection and click Microsoft Defender Antivirus options. This will expand the setting and you should then be able to see a toggle option. Toggle on the Periodic scanning option to enable Windows Defender periodic scan while also using your other antivirus software.
Microsoft Defender update for Windows operating system installation images
The first hours of a newly installed Windows deployment can leave the system vulnerable because of a Microsoft Defender protection gap. This is because the OS installation images may contain outdated antimalware software binaries.
The devices on which these deployments are made are inadequately protected until they receive the first antimalware software update. Defender updates also contain critical performance fixes that will improve the user experience. Devices using either the Windows built-in antivirus or another security solution can benefit from these updates. We recommend you regularly service OS installation images to update Microsoft Defender binaries and minimize this protection gap in new deployments. A 3-month update frequency is recommended.
No ordering is required to apply the latest cumulative update (LCU) versus the Microsoft Defender update offline.
This article describes antimalware update package for Microsoft Defender in the OS installation images (WIM and VHD files). This feature supports the following OS installation images:
Windows 10 (Enterprise, Pro, and Home editions)
Windows Server 2019
Windows Server 2016
Version information
After a new package version is released, support for the previous two versions will be reduced to technical support only.
Versions prior to the previous two versions will no longer be supported. For more information, see Manage Windows Defender Antivirus updates and apply baselines.
Defender package version: 20230809.1
This package updates the anti-malware client, anti-malware engine, and signature versions in the OS installation images to following versions:
Platform version: 4.18.23070.1004
Engine version: 1.1.23070.1005
Security intelligence version: 1.395.68.0
Package information
The package size is approximately:
Known issues in this update
Update information
This package includes monthly updates and fixes to the Microsoft Defender antimalware platform and engine that is used by Microsoft Defender Antivirus in Windows 11. This package should be applied offline on Windows Images/VHD(x) file.
This package also includes the latest security intelligence update that is available up to the date of release. Learn more about security intelligence updates including the release notes here.
How to obtain this update
Different update packages are required for different Windows OS image architectures. Select the architecture that matches the installation image to which you will apply this update:
Microsoft Defender update for Windows Operating system installation image: 32-bit | 64-bit | ARM64
Note: These links point to defender-update-kit-[x86|x64|arm].zip. Extract this .zip file to get the Defender update package (defender-dism-[x86|x64|arm].cab) and an update patching tool (DefenderUpdateWinimage.ps1) that assists the update operation for OS installation images.
Package update tool
The following prerequisites apply to running this patching tool (DefenderUpdateWinImage.ps1):
You must be running a 64-bit Windows 10 or later OS environment that includes PowerShell 5.1 or a later version.
The Microsoft.Powershell.Security and DISM modules must be installed.
You must start PowerShell on the device by using administrator privileges.
Do not use this package to update live images because it can damage the Windows installation that Is running inside the Virtual Machine.
The DefenderUpdateWinImage.ps1 tool provides an option to remove the update. However, you may still want to keep a backup copy of images before you apply the update.
How to apply this update
PS C:\> DefenderUpdateWinImage.ps1 -WorkingDirectory <path> -Action AddUpdate -ImagePath <path_to_Os_Image> -Package
How to remove or roll back this update
PS C:\> DefenderUpdateWinImage.ps1 -WorkingDirectory <path> -Action RemoveUpdate -ImagePath <path_to_Os_Image>
How to list the details of installed update
PS C:\> DefenderUpdateWinImage.ps1 -WorkingDirectory <path> -Action ShowUpdate -ImagePath <path_to_Os_Image>
References
Learn about the terminology that Microsoft uses to describe software updates.
How to Reinstall Windows Defender in Windows 11
Tim Fisher has more than 30 years' of professional technology experience. He's been writing about tech for more than two decades and serves as the SVP and General Manager of Lifewire.
- Western Governors University
In This Article
Jump to a Section
What to Know
- You don't need to download Windows Defender, because it's integrated into Windows 11.
- Enter this in a PowerShell window: Get-AppxPackage Microsoft.SecHealthUI -AllUsers | Reset-AppxPackage.
- Or, go to Settings > Apps > Installed apps > Windows Security > three dots > Advanced options > Reset.
This article explains when and how to reinstall Windows Defender through the command line or Settings app in Windows 11.
How to Reinstall Windows Defender in Windows 11
Windows Defender (aka, Microsoft Defender) isn’t installed on your computer like a typical program, so you can’t reinstall it like you can regular software. Instead, follow these directions to use a PowerShell command to get the job done. It might take anywhere from 5 seconds to a few minutes to complete. If you can open Settings normally, there’s an easier method after these steps.
Right-click the Start button and select Terminal (Admin).
If that doesn't work for whatever reason, use the search bar on the taskbar to search for PowerShell, and then right-click it to find the Run as administrator option.
Copy the command exactly as it's shown here, and then right-click in the PowerShell window to paste it (Ctrl+V works, too):
Press Enter to immediately start the process to reset Windows Defender to its original settings so that it performs as a freshly installed app.
You'll know when it's finished because you'll see the blinking cursor again on a new line below the command you entered. In the meantime, you might briefly see a Deployment operation progress message.
If you see lots of red text, and an "Access is denied" message, return to step 1 and make sure you're opening PowerShell as an administrator.
Another way to reset Windows Defender is through Settings. If Settings opens fine for you, you don't need to bother with a PowerShell command. Instead, go to Settings > Apps > Installed apps > Windows Security > three dots > Advanced options > Reset.
When to Reinstall Windows Defender
Technically, you're not really reinstalling the program because Windows doesn't actually let you uninstall it. That said, you might run the above command to reset Windows Defender if it's just not working correctly.
The most obvious sign you need to do this is if you see an error when you try to open it. If it's not opening as it should, and you see this message, the above command should fix it right away:
Or, maybe it does open, but some of its toggles won't turn on or off, or you can't even find a link to it on your computer. In these cases, the PowerShell command should refresh the tool back to working order.
Windows Defender Might Just Be Off
It's possible that you've considered reinstalling Windows Defender because it isn't catching malware, when in reality, it's just not turned on. You might think it's been uninstalled or is broken, but really it's just disabled.
This is completely possible since Windows 11 lets you turn off its built-in antivirus program if you'd rather not use it.
Как вернуть пропавший «Защитник Windows» в Windows 11

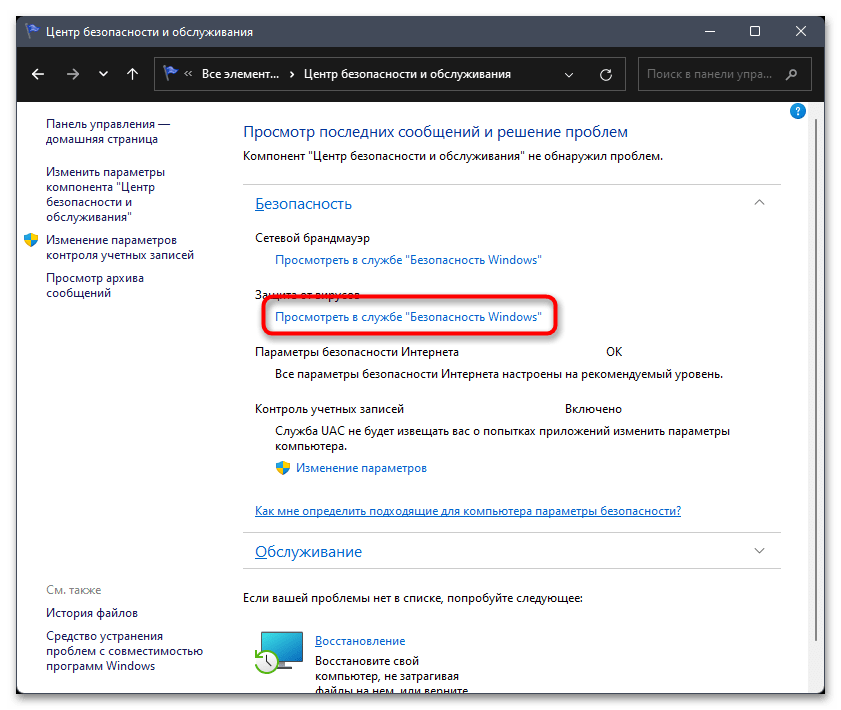
Перед тем как вы перейдете к реализации более сложных методов, позволяющих восстанавливать работу «Защитника Windows» в Виндовс 11, советуем попробовать один из других вариантов открытия классического приложения. Возможно, у вас возникли проблемы только с конкретным методом или не удается найти нужную кнопку, поэтому альтернативные варианты могут оказаться полезными. Детальнее о них читайте в материале по следующей ссылке.
Способ 2: Исправление или сброс приложения
«Защитник Windows» является классическим приложением и представлен в ОС точно так же, как и другие стандартные программы. Для него тоже поддерживаются настройки и дополнительные параметры, среди которых можно отыскать сброс и исправление. Мы рекомендуем использовать эти инструменты в первую очередь, поскольку от вас требуется просто их запустить.
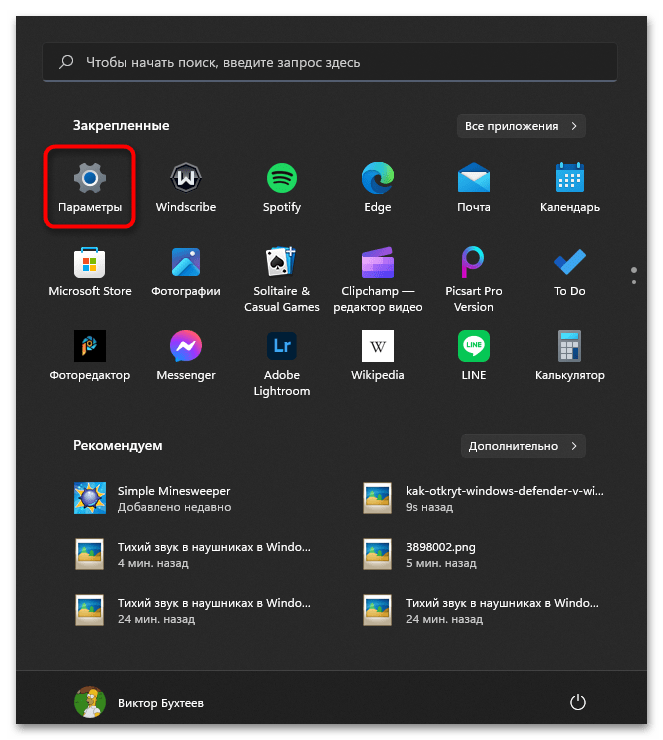
- Откройте «Пуск» и перейдите в «Параметры», кликнув по значку с изображением шестеренки.
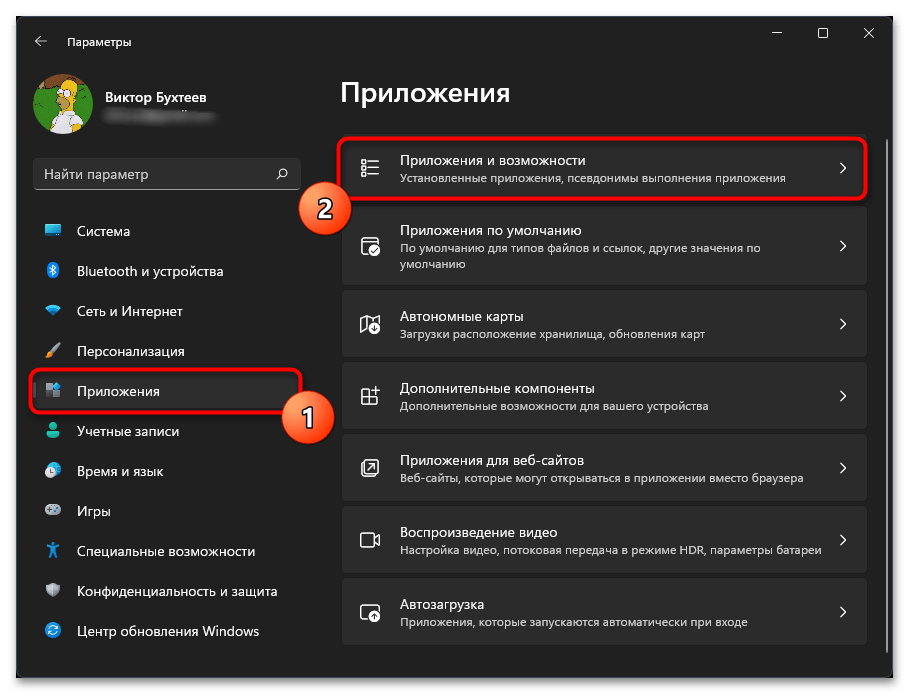
- Далее в разделе «Приложения» выберите категорию «Приложения и возможности».
Способ 3: Установка недостающих пакетов через «PowerShell»
Этот вариант следует попробовать, если при выполнении предыдущего вы даже не нашли приложение с названием «Безопасность Windows». Это может означать, что оно просто отсутствует в операционной системе или файлы являются поврежденными. Для установки недостающих компонентов понадобится воспользоваться «PowerShell». Только учитывайте, что вместе с Защитником будут добавлены и пакеты других стандартных программ, отсутствующих в вашей сборке или удаленных вручную.
- Щелкните правой кнопкой мыши по «Пуску» и из появившегося контекстного меню выберите пункт «Терминал Windows (Администратор)».

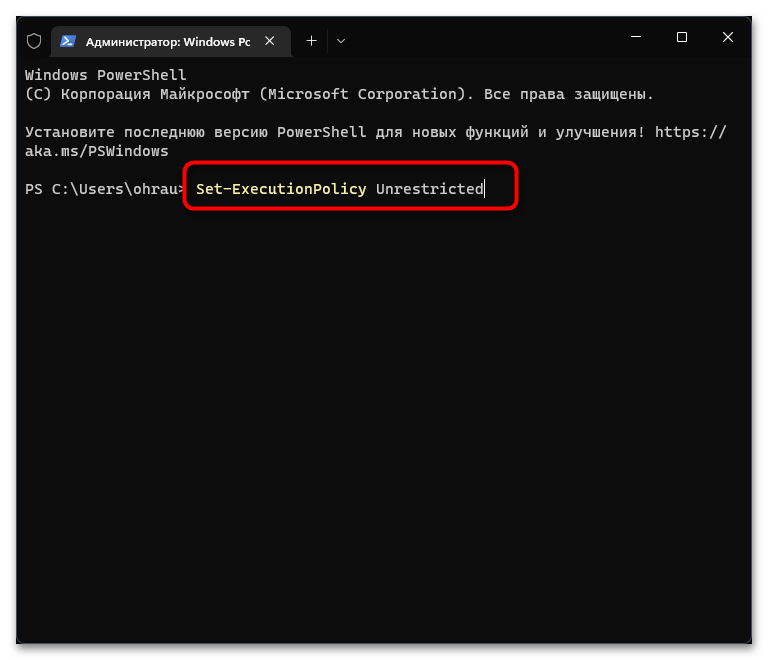
- Введите команду Set-ExecutionPolicy Unrestricted для получения списка недостающих пакетов.
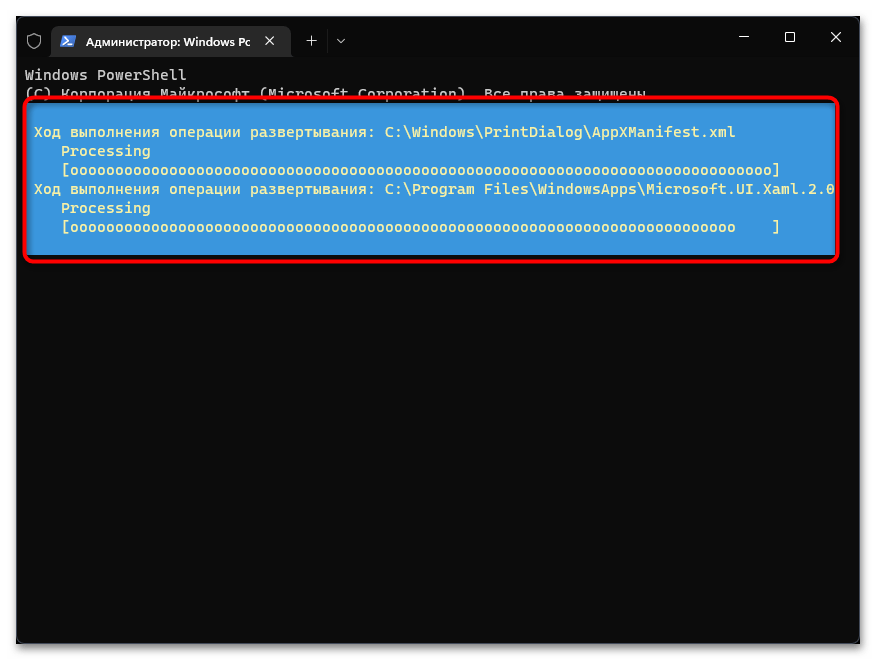
- После ее выполнения используйте Get-AppXPackage -AllUsers | Foreach
и нажмите Enter для применения. 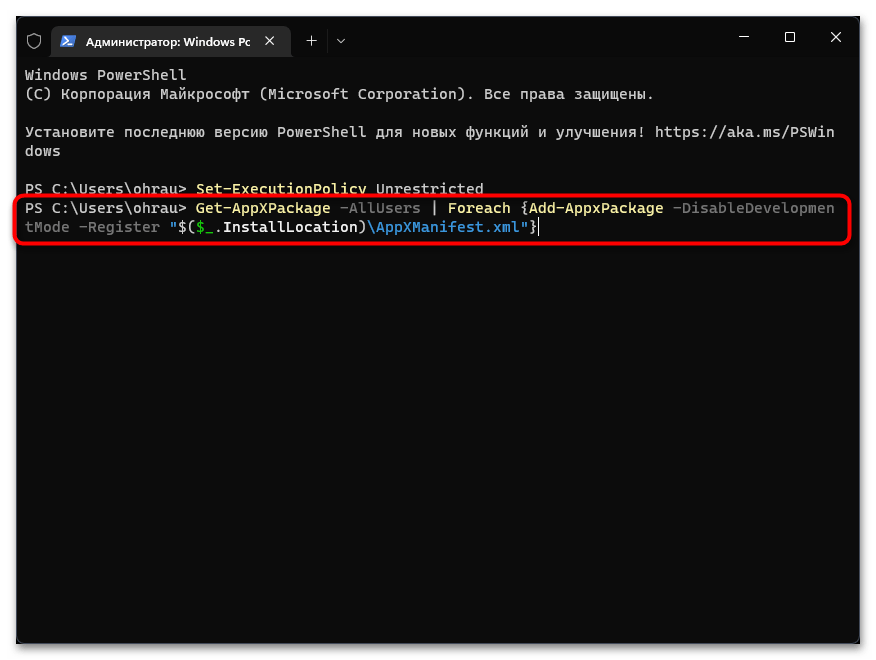
- Начнется процесс поиска и инсталляции файлов. Это может занять много времени, что зависит от количества отсутствующих пакетов и скорости вашего интернета. Как только вы увидите сообщение об успехе, попробуйте перезагрузить ПК и снова поискать Windows Defender на вашем компьютере.
Способ 4: Восстановление и переустановка через «PowerShell»
Следующий метод снова подразумевает использование консоли, но на этот раз команда будет всего одна и предназначена она исключительно для работы с «Защитником Windows». Она проверит его файлы, а при их отсутствии произведет повторную установку, что часто позволяет наладить работу стандартного компонента.
- Обязательно запускайте «Терминал Windows» от имени администратора, как это было показано в предыдущей инструкции.

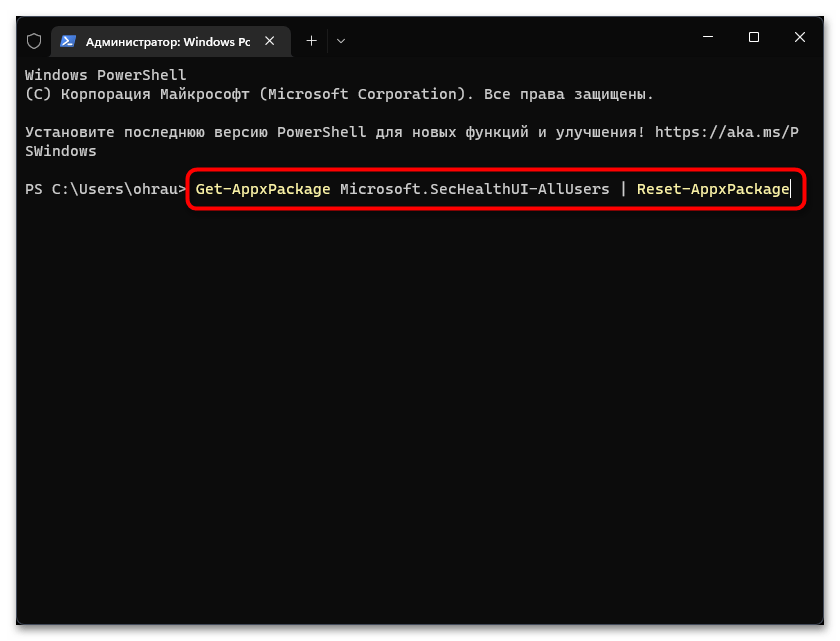
- Введите команду Get-AppxPackage Microsoft.SecHealthUI-AllUsers | Reset-AppxPackage и нажмите Enter для ее применения.
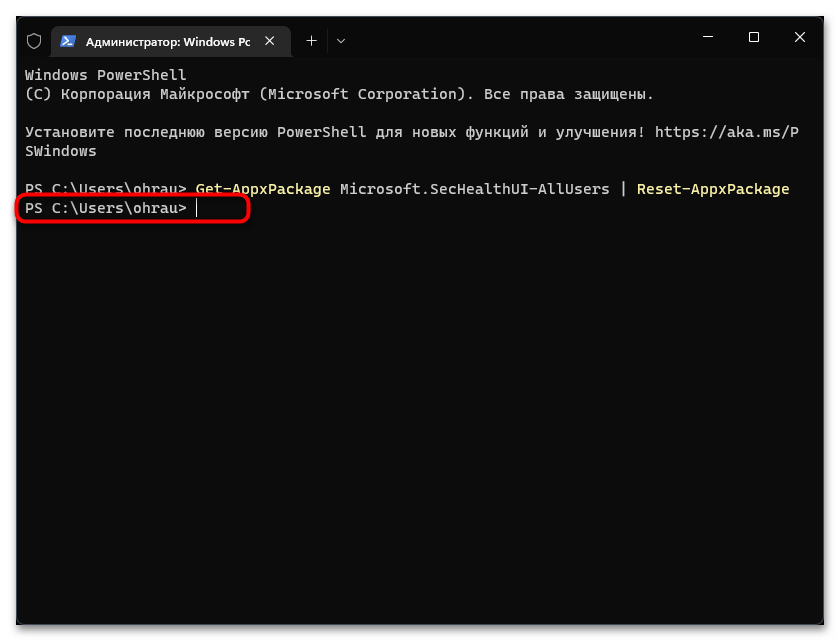
- Через несколько секунд на экране должна появиться новая строка ввода. Это означает, что операция уже завершена, а вы можете переходить к проверке работы «Безопасности Windows».
Способ 5: Проверка системных обновлений
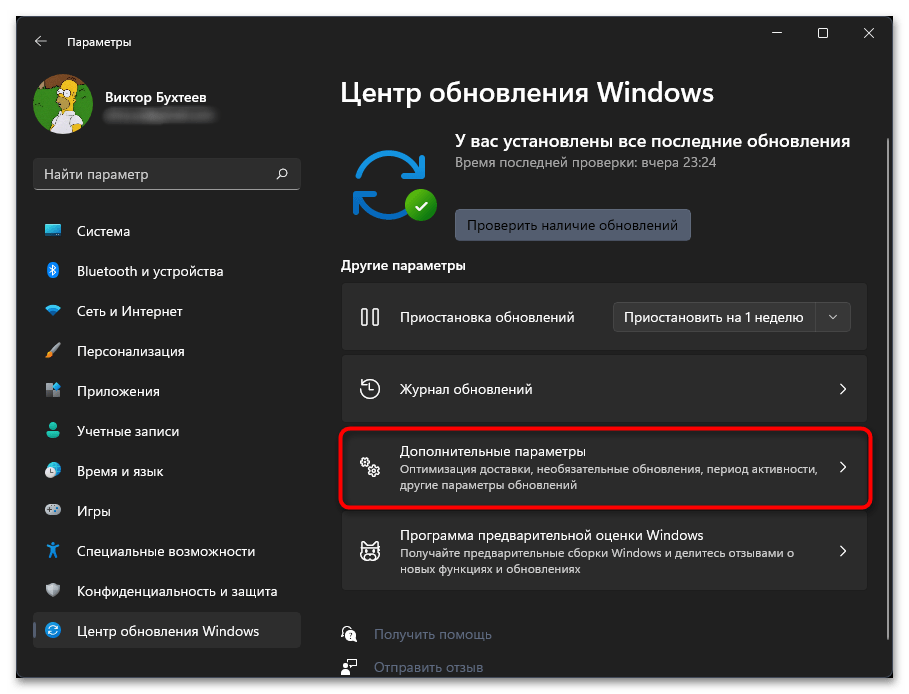
Сейчас очень активно выходят обновления для Windows 11, особенно это относится к различным апдейтам KB, связанным с безопасностью. Определенные из них вносят исправления в работу «Защитника Windows», что может вернуть компонент и наладить его запуск конкретно в вашем случае. Понадобится найти системные и необязательные обновления, затем произвести их инсталляцию.
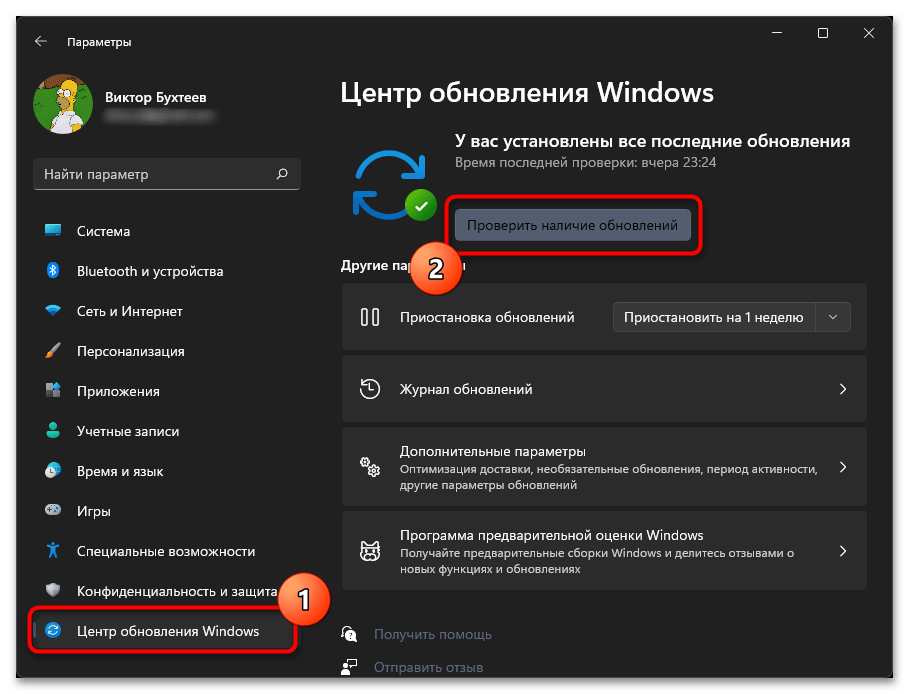
- В «Параметрах» выберите раздел «Центр обновления Windows» и запустите процесс поиска апдейтов.
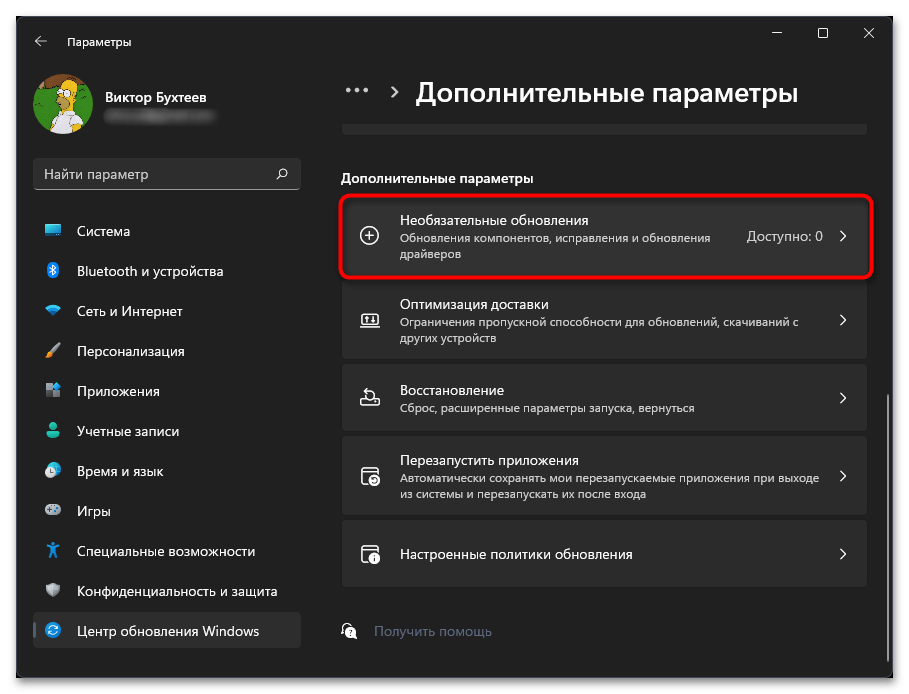
- Параллельно с этим можете перейти к просмотру необязательных обновлений, среди которых тоже могут быть патчи безопасности.
- Щелкните по списку «Необязательные обновления» для его открытия. Если апдейты будут найдены, отметьте их галочками и подтвердите инсталляцию (обновления драйверов в этом случае можно пропустить).
Способ 6: Проверка целостности системных файлов
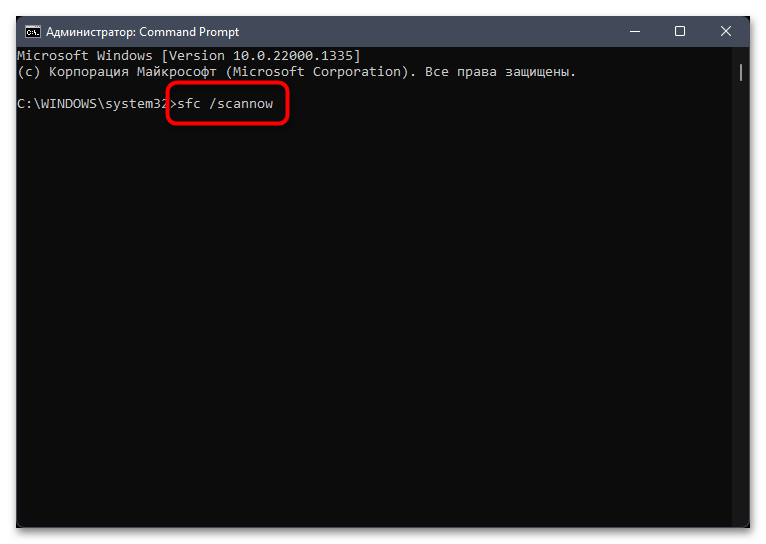
Нередко причиной отсутствия или неудачного запуска «Защитника Windows» становятся поврежденные или отсутствующие системные файлы. Если ничего из перечисленного выше не помогло вам решить ситуацию, рекомендуем запустить системные утилиты, которые как раз и предназначены для сканирования и исправления подобных проблем. Детально о них рассказывает другой наш автор в своей статье по следующей ссылке.
Способ 7: Возвращение Windows 11 к исходному состоянию
Прибегать к реализации этого метода стоит в тех случаях, когда при помощи предыдущих вам так и не удалось вернуть «Защитник Windows» в операционную систему. Возможно, его установка изначально прошла неуспешно по каким-то причинам или вы используете пиратскую сборку ОС, где компонент просто отсутствует. Можете попробовать выполнить переустановку путем возвращения Виндовс к исходному состоянию. Для этого не нужны специальные программы, обойтись можно штатным средством.