Как проверить версию Java
Java — один из самых популярных языков программирования в мире, используемый для создания различных типов кроссплатформенных приложений.
В этой статье объясняется, как с помощью командной строки проверить, какая версия Java установлена в вашей системе Linux. Это может быть полезно при установке приложений, требующих определенной версии Java.
Управление версиями Java
Java использует семантическое управление версиями . Версии готовых к выпуску релизов представлены по следующей схеме:
Например, в Java 11.0.8 11 — это основная версия, 0 — дополнительная версия, а 8 — версия безопасности.
- MAJOR — Основные выпуски содержат новые возможности и функции.
- MINOR — второстепенные выпуски содержат различные исправления ошибок и совместимые улучшения.
- SECURITY — выпуски безопасности содержат критические исправления безопасности.
Проверка версии Java
Чтобы узнать, какая версия Java установлена в вашей системе, выполните команду java -version :
Команда отобразит версию Java по умолчанию:
В этом примере в нашей системе установлена Java версии 11.0.8 . Версия, установленная в вашей системе, может отличаться.
Если вы получили сообщение «java: command not found», это означает, что Java не установлена в системе. Чтобы установить Java, воспользуйтесь одним из следующих руководств в зависимости от вашего дистрибутива Linux:
В системе также может быть установлено несколько версий Java одновременно. Чтобы проверить, есть ли на вашем компьютере несколько установок Java:
Если у вас только одна установка Java, результат будет выглядеть примерно так:
В противном случае, если у вас несколько установок Java, команда отобразит меню, в котором вы можете выбрать, какая версия будет версией Java по умолчанию:
Чтобы изменить версию Java по умолчанию, просто введите номер версии (число в столбце «Выбор») и нажмите Enter .
Выводы
Узнать, какая версия Java установлена в вашей системе Linux, очень просто, просто введите java -version .
How to Check Java Version On Linux | Ubuntu/Debian/CentOS
Java is one of the most popular and widely used programming languages around the globe. If you are a Java developer then you must have a knowledge of “how to check java version”. There are several methods to check which Java version installed in your system.
If you don’t know how to install Java, you should read my guide on How to Install Java on Ubuntu 20.04.
In the post, we will show you how to check java version on CentOS, Ubuntu and Debian operating systems.
Prerequisites
- A server running Debian 10.
- A root password is set up in your server.
Check Java Version on Linux
If you want to check the Java version on Ubuntu, Debian or CentOS operating systems, open a command-line terminal and run the following command:
This will display the installed version of Java as shown below:

You can also check the Java compiler version using the javac command as shown below:
You should see the Java compiler version in the following output:

Check Java Version Using the Java Installation Path
You can also check the java version with the help of Java installation path. There is two way to find the Java installation directory or path.
The first method to find the Java installation path with the following command:
This will display the complete path of the Java as shown below:
Note: For CentOS and RHEL operating system, run the following command:
You can also use the whereis command to check the Java path.
Run the whereis command as shown below:
You should see the following output:
Next, run the ls command to list the content of /usr/bin/java:
You should see the following output:
In the above output, you should see that /usr/bin/java point to symbolic link /etc/alternatives/java.
Now, run the ls command again to list the content of /etc/alternatives/java.
This will display the complete path of the Java as shown below:

Check Java Version by Searching in Installed Package List
You can also check the Java version to list installed packages and search for Java. For Ubuntu and Debian operating systems, follow the below steps:
You can use either apt or dpkg command to list all installed packages.
List all installed packages and search for Java using the apt command:
You should see the installed version of Java in the following output:
List all installed packages and search for Java using the dpkg command:
You should see the installed version of Java in the following output:
For CentOS and RHEL operating systems, follow the below steps:
You can use yum or dnf command to list all installed packages and search for Java as shown below:
This will display the installed version of Java as shown below:
Conclusion
In the above guide, you learned a different method of how to check the Java version on Linux. You can now any of the above methods to check the Java version.
How to check Java Version on Linux Ubuntu
It is practically a Turing-complete language so anything can be done on it. Most of the things one can do in Python can also be done in Java. Jpython is a Python version that runs on Java in the JVM (Java Virtual Machine). In this guide, we will dive into the procedure of looking up the Java version on Ubuntu Linux and install it if it is not already available.
Understanding the Java Version
The Java version is an indicator of the release of Java software currently under use by your OS.
It is highly recommended that the version be updated for better performance, stability, sophisticated features, and the latest security patches. This can go a long way and help you in preventing many unwanted issues and staying up to date.
Many websites, packages, or libraries require you to update to the latest Java version. So, it is preferred to stay one step ahead and have the latest release downloaded on your system. For instance, the latest Java version enables you to view 3D images along with other exciting features.
So, without further ado, let’s delve into the procedure of Java version verification and installation.
Checking Your Java Version
Start by checking your Java version. To do this, simply type the following in the terminal window.
This will give us the Java version that’s currently in use.
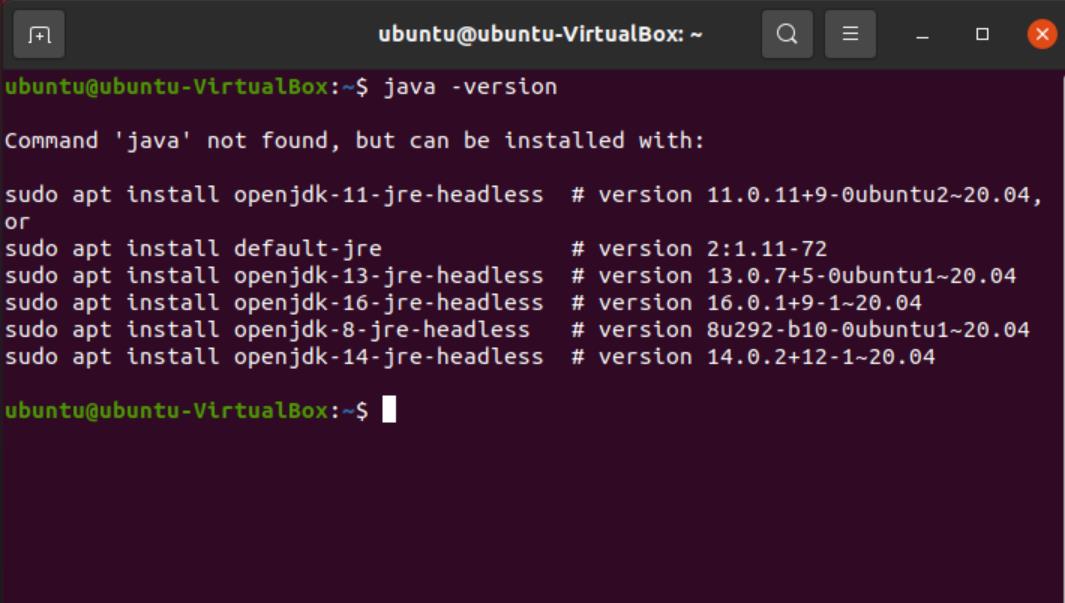
However, as evident from the picture above, Java isn’t installed on our system. But the terminal gives us options to install packages. Copying these commands and running them should get you the version installed directly via the terminal. All these versions are “headless”, meaning they don’t require a graphical user interface.
However, to download the latest release (16.02), you can use the browser method. Now, let’s go through the step-by-step process of installation.
Installing Java Using the Browser
Follow the steps to download Java.
Go to Google and search “download java JDK” and open the first link from the search results.
JDK is the “Java Development Kit” used to develop programs that run on Java. Alternatively, you can click on the link here to go directly to the page.
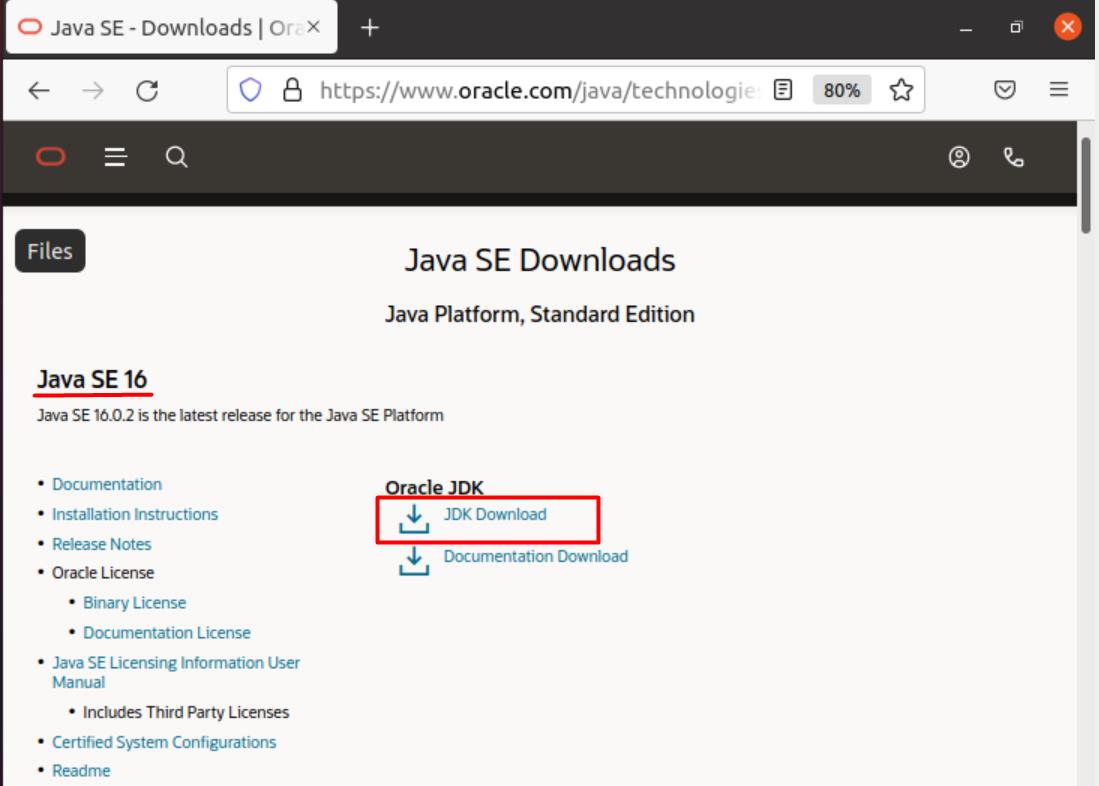
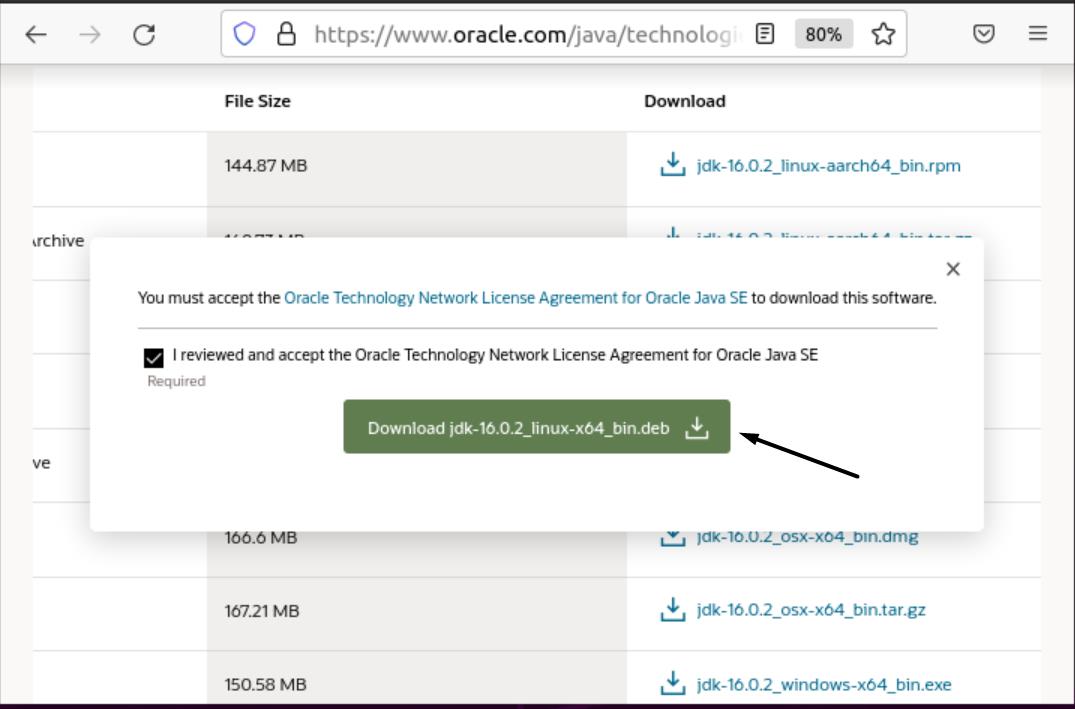
Under the “Java SE downloads”, go to “Java SE 16” as that is the latest version. The next step is to download JDK.
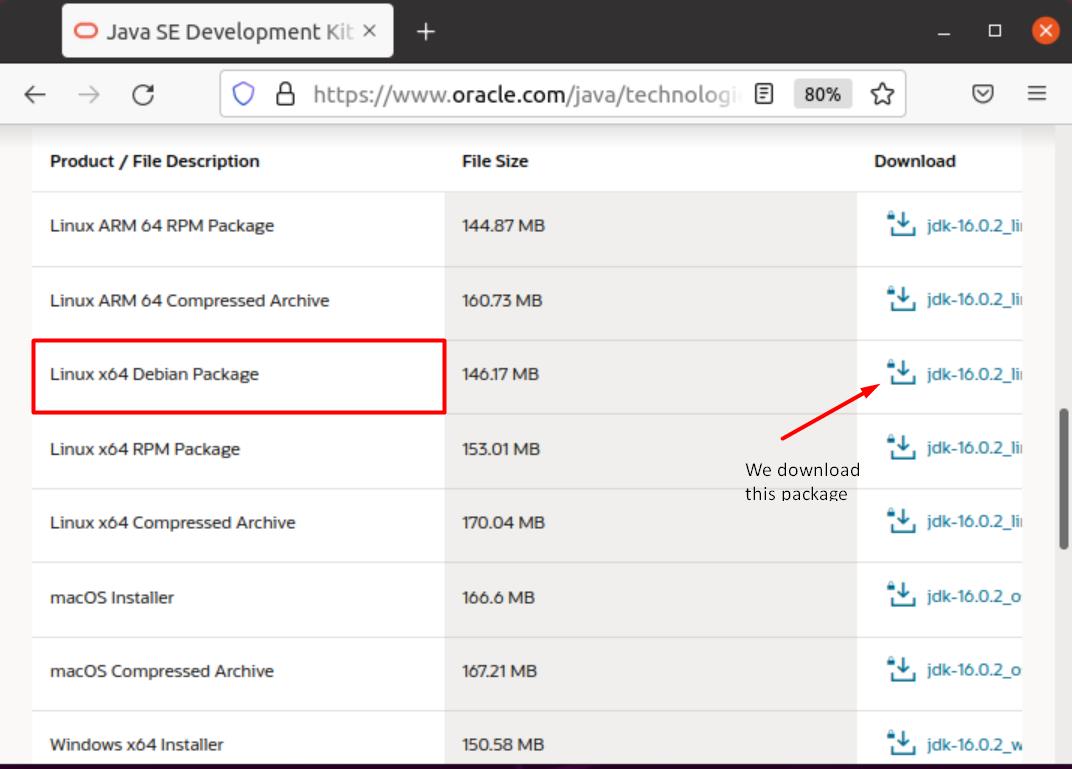
Scroll through the packages till you find the “Linux x64 Debian Package”. Download the file next to it. Ubuntu uses Debian packages to install programs, so you’ll see that the file has a .deb extension.
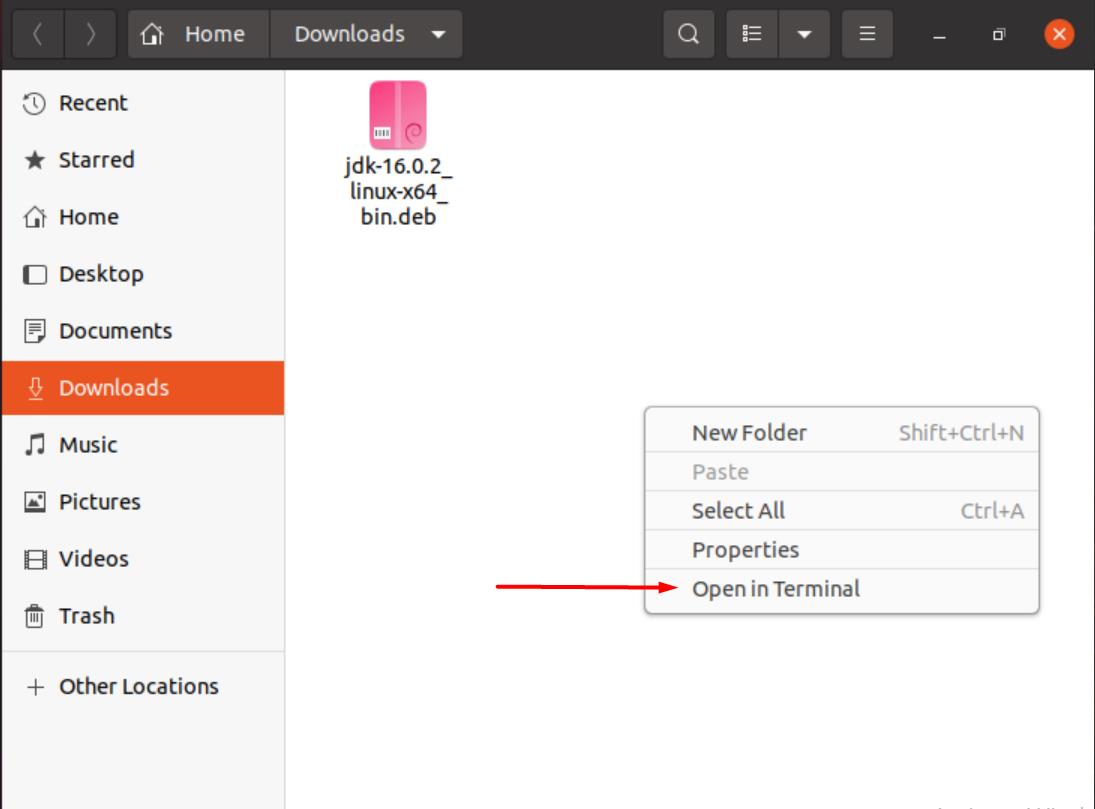
Once you are done with the download, open the folder where the downloaded package is located. Right-click anywhere in the window and select “Open in Terminal”.
Type the following command in the terminal to start unpacking the downloaded package.
You can replace the highlighted part of the command with the name of the package corresponding to the Java version you downloaded.
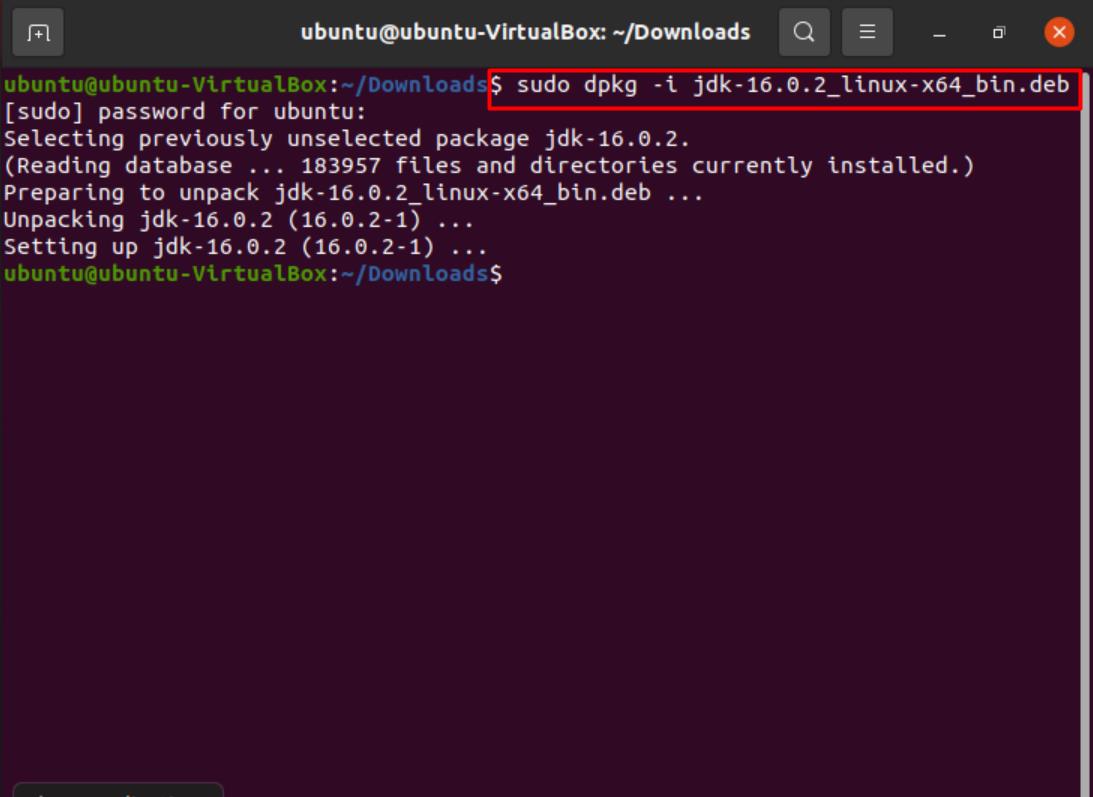
Having done that, you can type in the following command to confirm that Java is installed on your system.

With that out of the way, set your package as the alternative. To do that, use the following command:

Now, we can finally check and verify our version by typing the following:

To install the compiler, just use the same command as before, only this time replace “java” with “javac”.
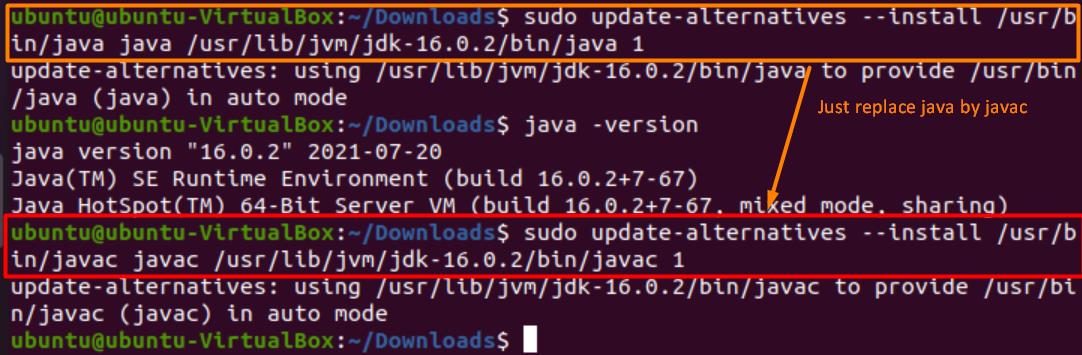
To check the Javac version, type the following command:
Additionally, to set the java_home path, enter the following:
$ sudo update-a;ternatives —config java
$ sudo gedit / etc / environment
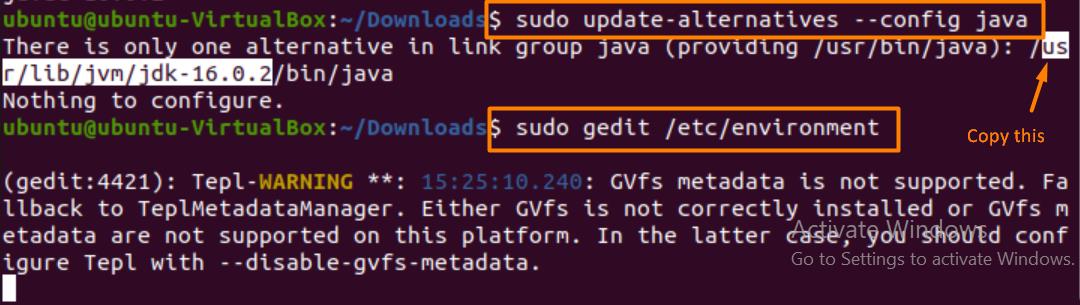
Once the text editor opens, paste the copied line and assign it to “JAVA_HOME” as demonstrated below.
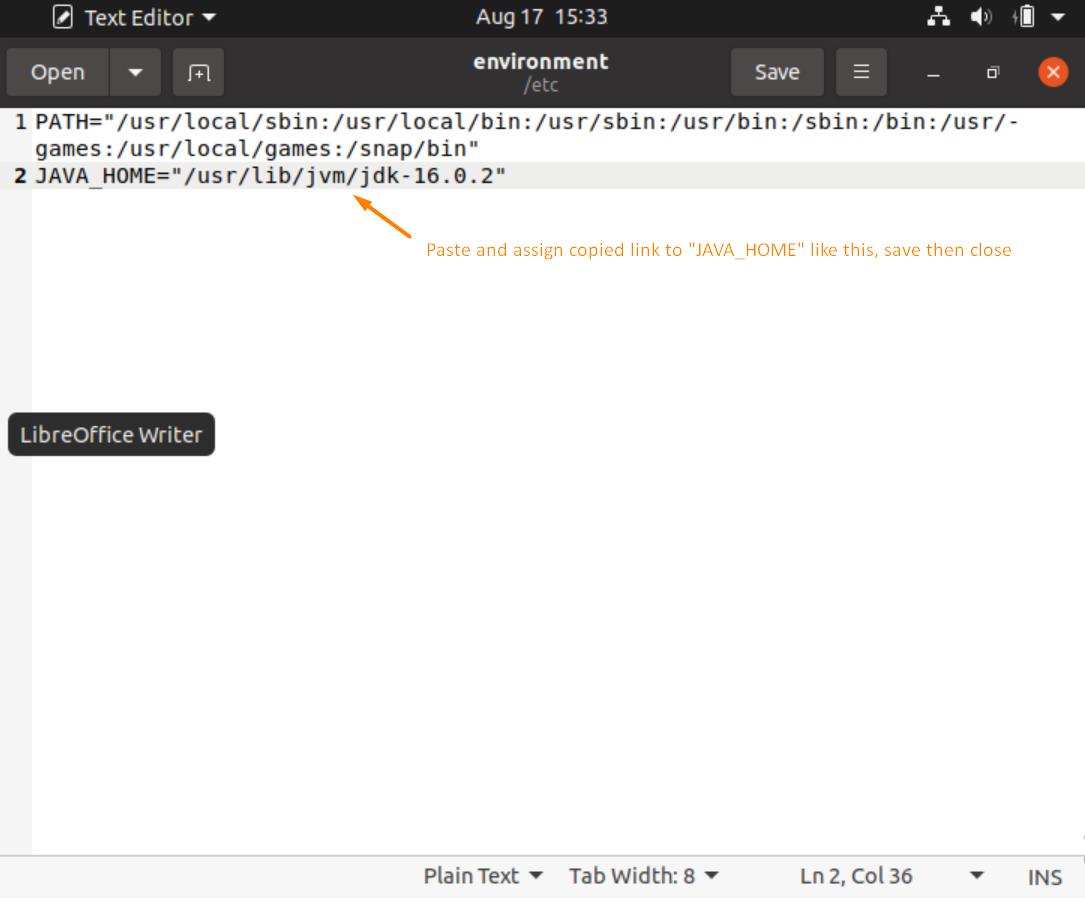
Once this is done, clear the screen and type in the following commands to complete the process of Java home path configuration.
$ source / etc / environment

Some Important Commands
Given below are certain commands you can use to check your version alongside other important things.
(This command shows all the Java versions installed on your system.)
(Shows Java version you are using.)
(Shows version of Java you are currently using.)
(Shows the version of Java compiler.)
(To find the location of Java.)
Remove Java Versions
To remove Java from your system, you can type in the following command:
To remove the package:
Press “Y” followed by “ENTER” and the package will be uninstalled.
Should You Use JRE or JDK?
To run Java programs, you’ll need JRE (Java runtime environment). It is compatible with Windows, Linux, Mac, Solaris, and many more.
JDK (Java Development Kit) is used to develop Java applications. It is usually where most programmers start from. It depends on what you want to do.
When to Use JDK
- You want to write Java programs. It comes with a compiler and Java application launcher.
- Has access to the main Java libraries for coding via Java application launcher which opens JRE.
When to Use JRE
- You have to use libraries and other files. It does not have compiler and error detection agents of its own.
- When you have to use utility packages like math or data related sets and instructions.
- To run applications running on Java.
Some Applications of Java
Java is mainly used in:
- Building Android applications.
- In developing web and cloud applications.
- Software tools like Eclipse and Netbeans.
- Chatbots.
- Games.
- Scientific and Enterprise applications
Conclusion
To stay up to date and get a hands-on experience of the latest packages and software, keeping our programs updated is a must. This check and balance can really help us a long way in keeping our system efficient, protected, and up to date.
About the author
Zeeman Memon
Hi there! I’m a Software Engineer who loves to write about tech. You can reach out to me on LinkedIn.
What Java Version Are You Running?

From time to time, you need to check which Java version is installed on your computer or server, for instance when starting on a new project or configuring an application to run on a server.
But did you know there are multiple ways you can do this and even get much more information than you might think, very quickly?
Reading the Java Version in the Terminal
Probably the easiest way to find the installed version is by using the java -version terminal command:
Checking Version Files in the Installation Directory
The above output results from info read by the java executable from a file inside its installation directory.
Let’s explore what we can find there.
On my machine, as I use SDKMAN to switch between different Java versions, all my versions are stored here:
And in each of these directories a release file can be found which also shows us the version information, including some extra information.
Getting More Information With showSettings
In 2010, an experimental flag (indicated with the X ) was added to OpenJDK to provide more configuration information: -XshowSettings .
This flag can be called with different arguments, each producing an other information output.
The cleanest way to call this flag, is by adding -version , otherwise you will get the long Java manual output as no application code was found to be executed.
Reading the System Properties
By using the -XshowSettings:properties flag, a long list of various properties is shown.
If you ever faced the problem of an unsupported Java version 59 (are similar), you’ll now also understand where this value is defined, it’s right here in this list as java.class.version .
It’s an internal number used by Java to define the version.
- Java release > Class version
- 8 > 52
- 9 > 53
- 10 > 54
- 11 > 55
- 12 > 56
- 13 > 57
- 14 > 58
- 15 > 59
- 16 > 60
- 17 > 61
- 18 > 62
- 19 > 63
Reading the Locale Information
In case you didn’t know yet, I live in Belgium and use English as my computer language, as you can see when using the -XshowSettings:locale flag:
Reading the VM Settings
With the -XshowSettings:vm flag, some info is shown about the Java Virtual Machine.
As you can see in the second example, the amount of maximum heap memory size can be defined with the -Xmx flag.
Reading all at Once
If you want all of the information above with one call, use the -XshowSettings:all flag.
Conclusion
Next to java -version , we can also use java -XshowSettings:all -version to get more info about our Java environment.