Исправлено: Adobe Media Encoder не установлен
Adobe Media Encoder помогает перекодировать, принимать, создавать прокси и выводить мультимедийные данные в любой форме. Это мощный инструмент, который обычно сопровождает другие основные программные компоненты Adobe, такие как Photoshop, Lightroom, After Effects и т. Д.
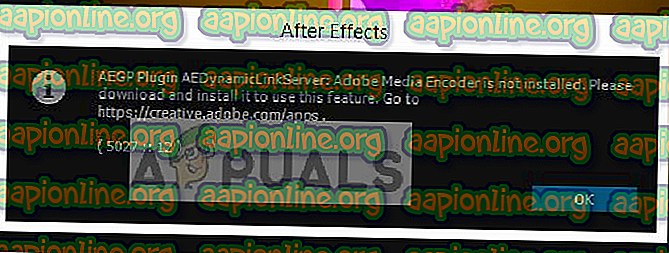
Adobe Media Encoder не установлен
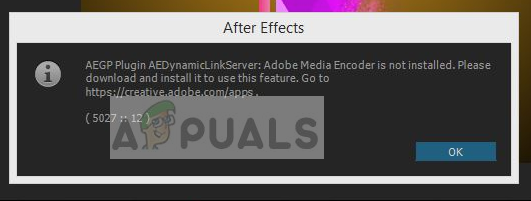
Пользователи, использующие последние приложения, могут получить сообщение об ошибке при использовании программного обеспечения «Adobe Media Encoder не установлен». Это сообщение об ошибке будет сопровождаться ссылкой, откуда скачать приложение, а также конкретным кодом ошибки. Теперь может быть два случая, когда вы можете столкнуться с этой проблемой; тот, где у вас уже есть медиа-кодер, и тот, где у вас нет. В этой статье мы рассмотрим как проблемы, так и способы их устранения.
Что вызывает сообщение об ошибке «Adobe Media Encoder не установлен» при использовании продуктов Adobe?
После наших обширных исследований и экспериментов мы пришли к выводу, что существует несколько причин, по которым вы можете столкнуться с этой проблемой компьютер на компьютер. Вот несколько из них:
- Медиа-кодер не установлен: это наиболее распространенный случай, когда действительно медиа-кодер не установлен на вашем компьютере. Вам нужно будет загрузить и установить его, прежде чем вы сможете начать использовать все функции программного обеспечения Adobe.
- Поврежденная установка: этот случай был замечен во многих различных сценариях. Установки могут быть повреждены, если они перемещаются с диска на диск или перемещаются.
- Расположение по умолчанию: Adobe Media Encoder должен присутствовать в расположении по умолчанию для правильного использования всеми продуктами Adobe.
- Старая версия. Если у вас установлена более старая версия любого из приложений, может появиться сообщение об ошибке. Убедитесь, что на вашем компьютере установлены последние сборки.
Прежде чем мы приступим к решению, убедитесь, что вы вошли в систему как администратор на вашем компьютере. Кроме того, у вас должно быть активное и открытое подключение к интернету. Мы предполагаем, что у вас есть правильная подписка на Adobe Creative Cloud, через которую вы используете приложения.
Решение 1. Установка Adobe Media Encoder
Сообщение об ошибке, которое вы видите, является допустимым, если вы действительно не установили Adobe Media Encoder на свой компьютер. В некоторых приложениях необходимо, чтобы кодер присутствовал на вашем компьютере для обеспечения полной функциональности. В этом решении мы перейдем на официальный сайт систем Adobe и установим приложение после его загрузки.
- Перейдите на официальный веб-сайт Adobe Media Encoder и загрузите исполняемый файл в доступное место.
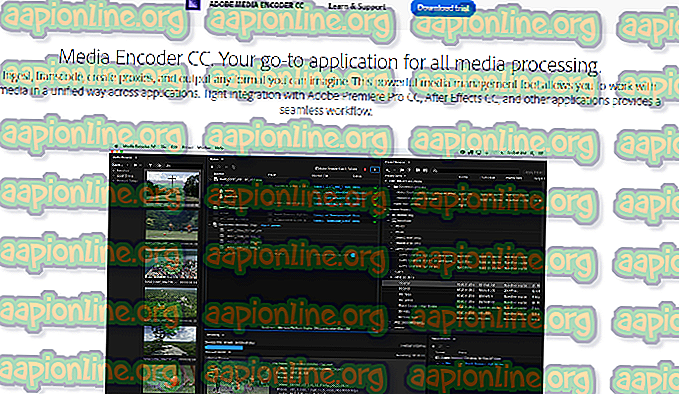
Загрузка Adobe Media Encoder
Вы также можете загрузить приложение непосредственно из приложения Adobe Creative Cloud. Вы можете искать продукты там и устанавливать соответственно.
- Щелкните правой кнопкой мыши исполняемый файл и выберите « Запуск от имени администратора» . После установки перезагрузите компьютер и проверьте, устранено ли сообщение об ошибке.
Решение 2. Изменение предпочтения места установки
Приложения Adobe не предназначены для правильной работы, если изменить их место установки вручную, скопировав их. Файлы реестра и настройки могут сломаться после того, как вы вручную переместите место установки. Из-за этого Adobe Media Encoder, в действительности, будет установлен на вашем компьютере, но из-за того, что вы изменили местоположение вручную, он не будет правильно зарегистрирован в системе. В этом решении мы постараемся исправить это и убедиться в правильности места установки.
- Сначала попробуйте вручную переместить приложения обратно в каталог по умолчанию:
Если после вставки установки обратно в каталог по умолчанию ошибка по-прежнему сохраняется, необходимо выполнить действия, указанные ниже.
- Откройте Adobe Creative Cloud и удалите все приложения, которые вы переместили вручную, в другое место.
- После установки снова установите приложения из Creative Cloud. Убедитесь, что вы правильно изменили предпочтение места установки, прежде чем продолжить.
Нажмите на значок шестеренки в правом верхнем углу приложения и выберите « Настройки» . В настройках проверьте расположение установки и снова выберите каталог по умолчанию. Убедитесь, что каталог правильный, прежде чем продолжить.
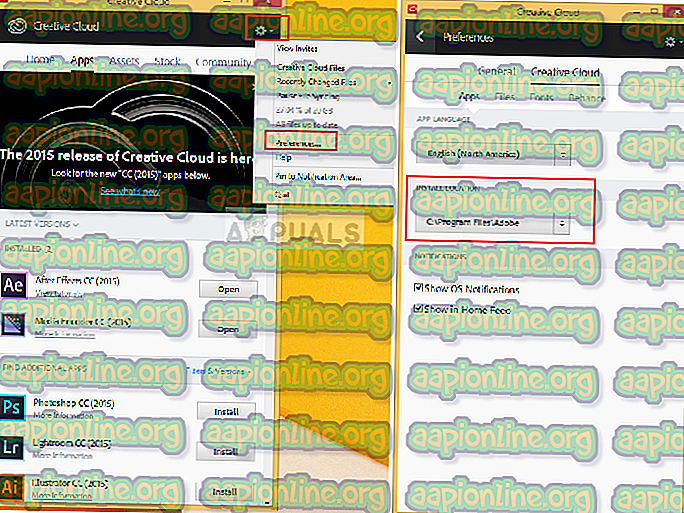
- Перезагрузите компьютер после переустановки / перемещения и проверьте, решена ли проблема.
Решение 3. Исправление каталога программ с помощью cmd
Как мы уже обсуждали, случай, когда программное обеспечение Adobe (например, After Effects) и кодировщик Adobe Media не установлены в одном каталоге; для этого случая есть другой обходной путь, когда мы вручную меняем каталог и исправляем неверную конфигурацию. Вы можете следовать этому решению, если ваш After Effects (например) находится на диске C, а Media Encoder — на другом.
- Во-первых, убедитесь, что версия компонента обоих модулей соответствует друг другу.
- Теперь нажмите Windows + S, введите «командная строка» в диалоговом окне, щелкните правой кнопкой мыши приложение и выберите « Запуск от имени администратора» .
- В командной строке с повышенными привилегиями выполните следующую команду:
В качестве примера:
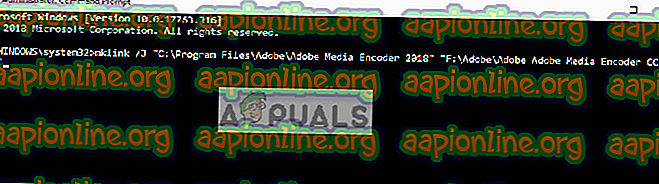
- После того, как вы выполните команду, вы получите подтверждение. Перезагрузите компьютер и попробуйте снова запустить программное обеспечение Adobe. Проверьте, решена ли проблема.
Решение 4. Удаление продуктов Adobe CC
Если все вышеперечисленные методы не работают (независимо от того, установлен ли у вас Adobe Media Encoder или нет), единственное логичное объяснение состоит в том, что ваши продукты CC повреждены или имеют неправильную структуру. В этом решении мы полностью удалим Продукты Adobe CC с вашего компьютера, а затем попробуем переустановить их снова. Убедитесь, что у вас есть учетные данные Adobe Creative Cloud, а также время для завершения загрузки.
- Перейдите на официальный веб-сайт Adobe CC Cleaner Tool.
- Теперь выберите правильную версию операционной системы. В данном случае Windows.
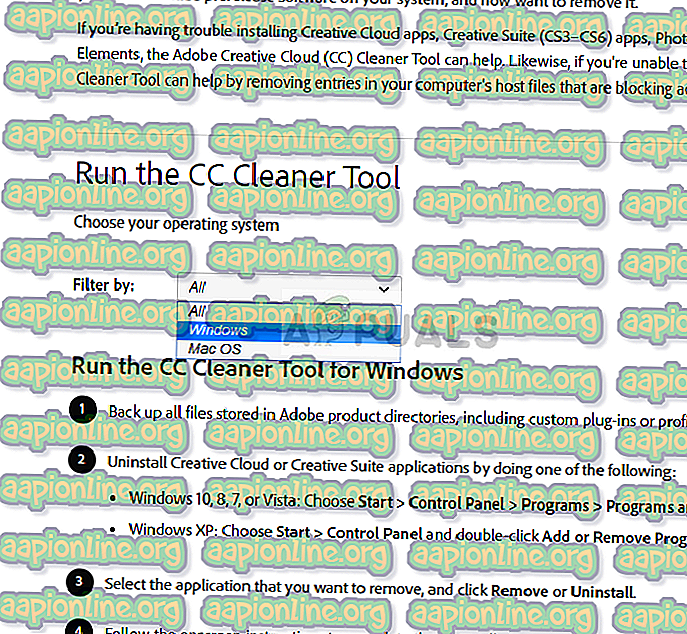
- После того, как вы выбрали ОС, следуйте инструкциям. Нажмите Windows + R, введите «appwiz.cpl» в диалоговом окне и нажмите Enter. Найдите Adobe CC и после щелчка правой кнопкой мыши выберите « Удалить» .
Теперь перейдите к 6-му шагу и загрузите исполняемый файл в доступное место.
Fix: Adobe Media Encoder is not Installed
Adobe Media Encoder helps transcode, ingest, create proxies, and output the media in any form. This is a powerful tool which usually accompanies other major Adobe software components such as Photoshop, Lightroom, After Effects etc.
 Adobe Media Encoder is not Installed
Users using the latter applications might get an error message when using the software that ‘Adobe Media Encoder is not installed’. This error message would be accompanied by the link from where to download the application along with the specific error code. Now there can be two cases where you can experience this problem; one where you have the media encoder already installed and one where you don’t. In this article, we will address both the issues and how to fix them.
What causes the error message ‘Adobe Media Encoder is not Installed’ when using Adobe Products?
After our extensive research and experimentations, we came to the conclusion that there were several reasons why you might experience this issue computer to computer. Here are a few of them:
- Media Encoder not Installed: This is the most common case where indeed the media encoder is not installed on your computer. You would have to download and install it before you can start using all the features of Adobe software.
- Corrupt installation: This case was seen in numerous different scenarios. Installations can potentially get corrupt if they are moved from drive to drive or relocated.
- Default location: Adobe Media Encoder should be present in the default location in order to be used properly by all the Adobe products.
- Older version: If you have an older version of any of the applications, you might experience the error message. Make sure that the latest builds are installed on your computer.
Before we proceed with the solution, make sure that you are logged in as an administrator on your computer. Furthermore, you should have an active and open internet connection. We are assuming that you have the correct subscription of Adobe Creative Cloud through which you use the applications.
Solution 1: Installing Adobe Media Encoder
The error message which you are experiencing is legit if you have indeed not installed Adobe Media Encoder on your computer. Some applications have made it necessary for the encoder to be present in your computer in order for full functionality. In this solution, we will navigate to the official website of Adobe systems and install the application after downloading it.
- Navigate to the official Adobe Media Encoder website and download the executable to an accessible location.
You can also download the application directly from the Adobe Creative Cloud application. You can search for products there and install accordingly.
- Right-click on the executable and select Run as administrator. After installing, restart your computer and check if the error message is resolved.
Solution 2: Changing the Preference of Install Location
Adobe applications are not designed to work properly if you change their install location manually by copy-pasting them. Registry files and preferences might break after you manually move the install location. Because of this, Adobe Media Encoder will, in reality, be installed on your computer but because of you changing the location manually, it will not be registered correctly in the system. In this solution, we will try to remedy this and make sure that the install location is correct.
- First, try manually moving the applications back into the default directory which is:
If after pasting the installation back to the default directory the error still persists, you have to follow the steps mentioned below.
- Open Adobe Creative Cloud and uninstall all the applications which you have moved manually to some other location.
- After installation, install the applications again from the Creative Cloud. Make sure that you change the preference of the install location correctly before proceeding.
Press the gear icon present at the top-right side of the application and select Preferences. Once in the preferences, check the Install location and select the default directory back again. Make sure that the directory is correct before proceeding.
- Restart your computer after reinstalling/moving and check if the issue is resolved.
Solution 3: Correcting Programs Directory using cmd
As we discussed the case where the Adobe software (like After Effects) and Adobe Media encoder are not installed in the same directory; there is another workaround for this case where we manually change the directory and correct the misconfiguration. You can follow this solution if your After Effects (for example) is on C drive while Media Encoder is in another one.
- First, check that the component version of both the modules is consistent with each other.
- Now press Windows + S, type “command prompt” in the dialogue box, right-click on the application and select Run as administrator.
- Once in elevated command prompt, execute the following command:
- After you execute the command, you will confirmation. Restart your computer and try running the Adobe software again. Check if the issue is resolved.
Solution 4: Uninstalling Adobe CC Products
If all the above methods don’t work (no matter whether you had Adobe Media Encoder installed or not), the only logical explanation is that your CC products are corrupt or have improper structure. In this solution, we will completely remove the Adobe CC Products from your computer and then try reinstalling them again. Make sure that you have your Adobe Creative Cloud credentials at hand and some time for the download to complete.
- Navigate to the Official Adobe CC Cleaner Tool website.
- Now select the correct version of the operating system. In this case, Windows.
- After you have selected the OS, follow the steps. Press Windows + R, type “appwiz.cpl” in the dialogue box and press Enter. Locate Adobe CC and after right-clicking, select Uninstall.
Now move to the 6 th step and download the executable to an accessible location.
Solve : Adobe Media Encoder Not Installed Premiere Pro | Export error Premiere pro

Guys, if you also have Adobe Media Encoder installed in your PC but still you are getting Adobe Media Encoder not Installed problem while creating Proxy or exporting Video Queue and it is disturbing your mind then this post It’s for you.
Solve this post today : Adobe Media Encoder Not Installed Premiere Pro | In Export error Premiere pro we will solve this problem step by step in Adobe Media Encoder is not Installed and with a sigh of relief, you will experience both peace and happiness, yes. So let’s read the Guys post.
Problem :-
First we look at the problem problem. As you know , we take the help of Proxy to do Smooth Editing in Premiere Pro . We create Proxy so that our PC does not lag and we can do Smoothly Editing .
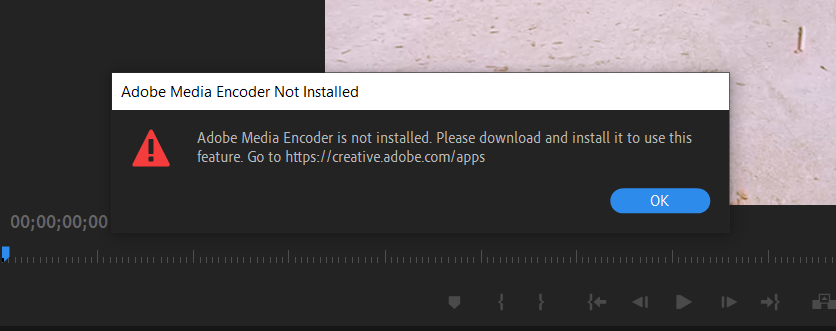
But as soon as we go to create Proxy for Guice editing, we get to see a Dialogue Box in which it is written that Adobe Media Encoder Not Installed . Adobe Media Encoder is not installed . Please download and install it to use this feature .
Adobe Media Encoder is installed in our PC, still we are getting this problem.
One place and we get to see this problem. When we export our project in Queue so that our project can be exported and at the same time we can also work on Premiere Pro, then we get to see the same problem.
Guys now let’s see the solution of this problem.
Solution :-
Guys First of all we have to open Adobe Creative Cloud .
Solved: Adobe Media Encoder not Installed in Premiere, After Effects
«I am using Premiere pro cc 2017 but when I try to make a queue or create a proxy with Media Encoder cc 2018 (installed in my mac), I get an error showing Media encoder not installed in my system. Please suggest the solution. «
«I am trying to export a sequence of first Pro CC 2014 to Media Encoder CC. After changing all the export parameters for what I want to in the first, I’m going to click on queue and the message «Adobe Media Encoder is not installed». Does anyone know the solution?»
 Adobe Media Encoder Not Installed Error
When trying to export a sequence in Adobe Premiere Pro or After Effects but frequently meet the «Adobe Media Encoder Not Installed» error? This error message would be accompanied by the link from where to download the application along with the specific error code. Now there can be two cases where you can experience this problem; one where you have the media encoder already installed and one where you don’t. In this article, we will address both the issues and how to fix them.
What causes the error message «Adobe Media Encoder is not Installed» when using Adobe Premiere Pro, Adobe After Effects, Photoshop and other Adobe products?
After our extensive research and experimentation, we came to the conclusion that there were several reasons why you might experience this issue computer to computer. Here are a few of them:
+ Media Encoder not Installed: This is the most common case where indeed the media encoder is not installed on your computer. You would have to download and install it before you can start using all the features of Adobe software.
+ Corrupt installation: This case was seen in numerous different scenarios. Installations can potentially get corrupt if they are moved from drive to drive or relocated.
+ Default location: Adobe Media Encoder should be present in the default location in order to be used properly by all the Adobe products.
+ Older version: If you have an older version of any of the applications, you might experience the error message. Make sure that the latest builds are installed on your computer.
Solutions to «Adobe Media Encoder Not Installed» Error in Premiere/AE
Before we proceed with the solution, make sure that you are logged in as an administrator on your computer. Furthermore, you should have an active and open internet connection. We are assuming that you have the correct subscription of Adobe Creative Cloud through which you use the applications.
Solution 1: Installing Adobe Media Encoder
The error message which you are experiencing is legit if you have indeed not installed Adobe Media Encoder on your computer. Some applications have made it necessary for the encoder to be present in your computer in order for full functionality. In this solution, we will navigate to the official website of Adobe systems and install the application after downloading it.
1. Navigate to the official Adobe Media Encoder website and download the executable to an accessible location.
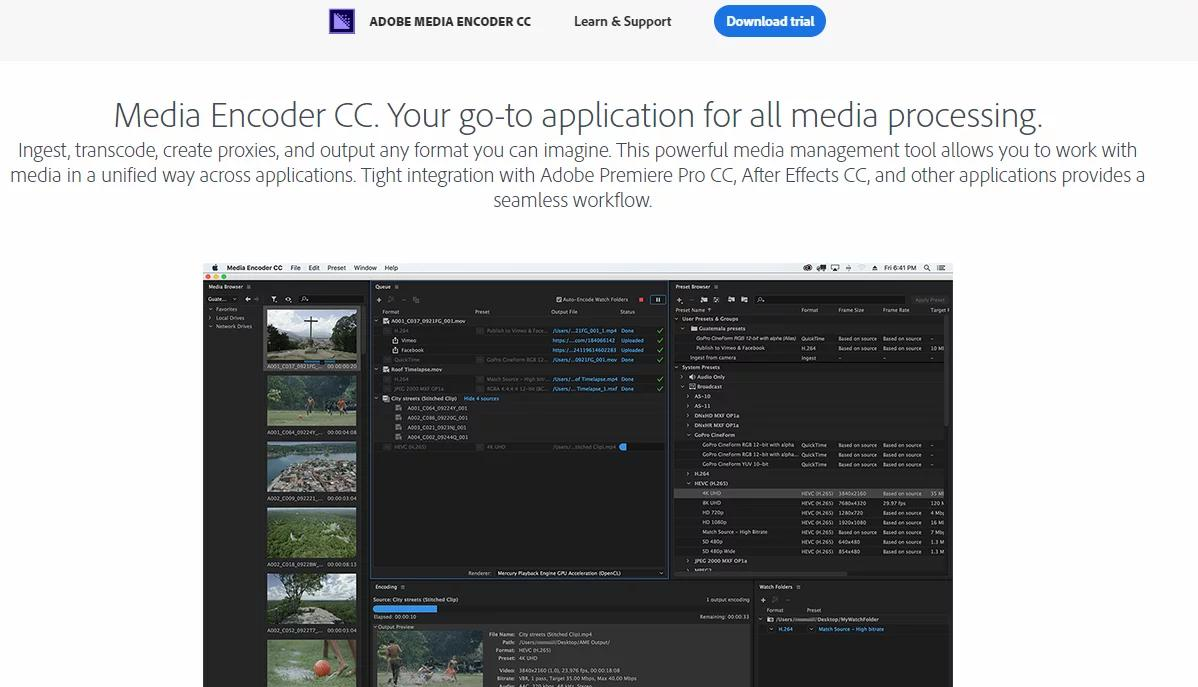 Download and Install Adobe Media Encoder
You can also download the application directly from the Adobe Creative Cloud application. You can search for products there and install accordingly.
2. Right-click on the executable and select Run as administrator. After installing, restart your computer and check if the error message is resolved.
Solution 2: Changing the Preference of Install Location
Adobe applications are not designed to work properly if you change their install location manually by copy-pasting them. Registry files and preferences might break after you manually move the install location. Because of this, Adobe Media Encoder will, in reality, be installed on your computer but because of you changing the location manually, it will not be registered correctly in the system. In this solution, we will try to remedy this and make sure that the install location is correct.
1. First, try manually moving the applications back into the default directory which is:
If after pasting the installation back to the default directory the error still persists, you have to follow the steps mentioned below.
2. Open Adobe Creative Cloud and uninstall all the applications which you have moved manually to some other location.
3. After installation, install the applications again from the Creative Cloud. Make sure that you change the preference of the install location correctly before proceeding.
Press the gear icon present at the top-right side of the application and select Preferences. Once in the preferences, check the Install location and select the default directory back again. Make sure that the directory is correct before proceeding.
4. Restart your computer after reinstalling/moving and check if the issue is resolved.
Solution 3: Update Adobe Media Encoder
You can update installed Adobe apps including Media Encoder automatically or manually. Here are the specific steps:
1. Keep Adobe Media Encoder updated automatically.
— Open the Creative Cloud desktop app. Select the Account icon and then select Preferences.
— Select the Apps tab and turn on the Auto-update for all apps of Adobe software. Or choose the specific app like Media Encoder and turn on the Auto-update.
— Click Done button when you’re finished.
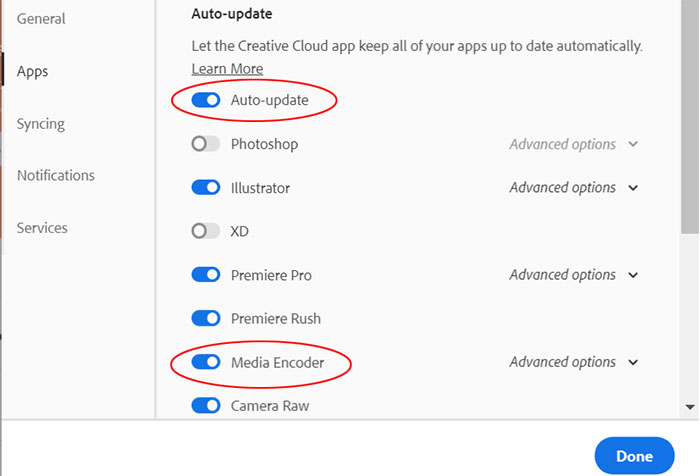 Auto update Adobe Media Encoder
2. Check the latest version of Media Encoder manually.
— Open the Creative Cloud desktop app as well.
— Select Updates in the left pane of the Apps tab.
— Select the . more icon, and then click on Check for updates.
— Find Media Encoder and click Update button to upgrade it to the latest version.
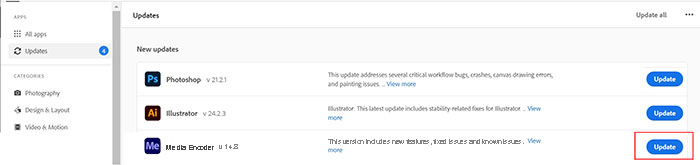 Update Adobe Media Encoder Manually
If you have upgraded Adobe Media Encoder to the latest version, Adobe Premiere Pro still won’t queue to Media Encoder. It might be an issue of the Premiere Pro. It requires the same version of both applications to queue the export. Thus you can update Premiere Pro to the latest version or install previous versions of Media Encoder.
Well, what If «Adobe Media Encoder Not Installed» Error Still Not Resolved?
If Adobe Media Encoder is still not working to queue to export after the above tips, you may need to consider another alternative to export your media. DumboFab Video Converter will be a good choice for transcoding and exporting video files.
• Transcode and export videos to MP4, H.264, H.265, AVI, WMV, MOV, MPEG-2 and 300+ profiles without quality loss.
• Change video parameters like codec, bitrate, frame rate, etc. to fit different apps and screens.
• Reduce & Compress 4K/HD Video Size Without Quality Loss.
• Edit 4K/Full HD Videos Efficiently. No Experience Required!
• 30X real time faster to convert videos with the with NVIDIA® CUDA™ Intel® Core™ and AMD® acceleration technology.
Download and install the video converter following the wizard steps.
★ For macOS 10.14 or lower, you’re recommended to download 32-bit installer here ↓
Step 1. Load the source
Launch DumboFab Video Converter, and then drag and drop the source video into the main UI for loading, or navigate it through the Add buttons on the main UI.
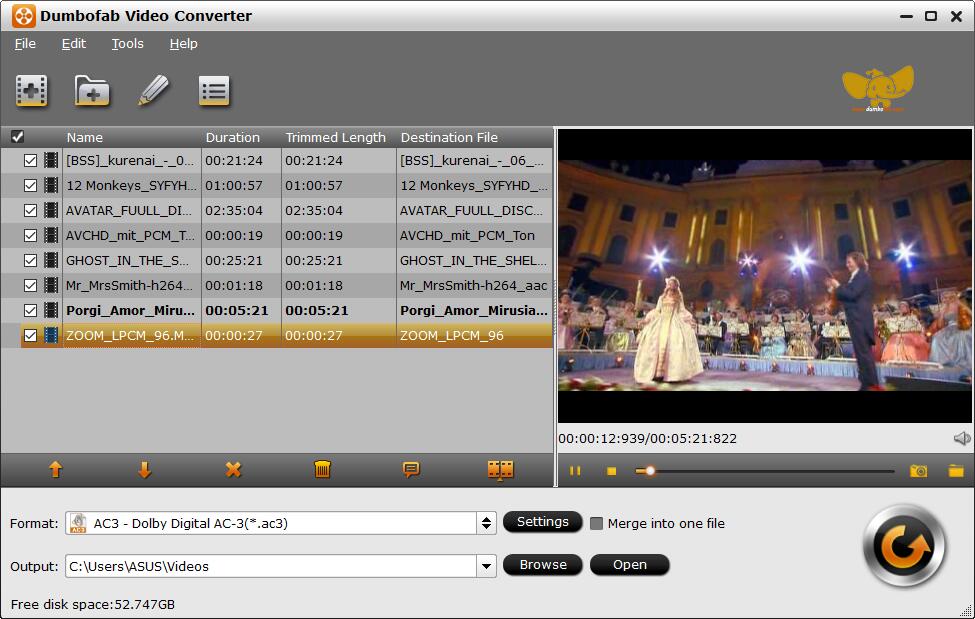 Add Video Files
Step 2. Choose one profile
Clicking the «Format» bar, you can choose one format or device profile from the format list. If you have higher requests regarding the output video, you can set all the video and audio parameters in «Profile Settings» window, and deeply customize the output video effect with the built-in video editor.
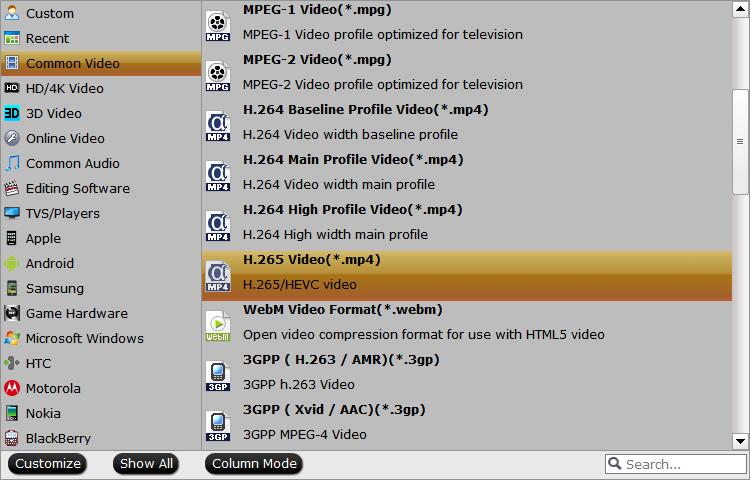 Choose Output Format
Step 3. Start to convert videos
Click the «Convert» button, DumboFab Video Converter will immediately begin converting video to the target profile you have chosen, and provide you with the detailed progress details during the process. You can cancel the task anytime you don’t want to continue during the process, and you can also set your PC to automatically shut down when the task is done.
Other Useful How-to Guides
[Fixed] Can’t Import or Edit 4K HEVC Videos in Adobe Premiere Pro
This article explains the possible reasons and solutions to help you fix 4K UHD videos not playing on playing on PC (Windows 10) or Mac.
How to Fix Premiere Pro MP4 File Import Failure
Get failure or error message when you try importing HEVC/H.265 videos from iPhone, DJI, GoPro, etc. to Adobe Premiere Pro? Here are 3 solutions to solve HEVC codec doesn’t work in Premiere Pro.
Can’t Import MKV File to Adobe Premiere Pro — Solved
MKV file import failure in Adobe Premiere Pro? The reason varies and the easiest method is to convert MKV to a more edit-friendly codec like MPEG-2, ProRes for Premiere Pro. Read on for details.
Fix iPhone HEVC Videos Not Working in Premiere Pro
Your Adobe Premiere Pro won’t import iPhone HEVC videos with variable frame rate or import with stuttering or distored video problem? Now your issue can be fixed by the solutions here.
ABOUT THE AUTHOR

Jason Eatock
Jason Eatock was an copywriter at DumboFab who has published hundreds of stories covering video transcoding, video editing, software review and how-tos. She is more like a «tech support» with adventurous soul, eagerly grabbing cutting-edge video technologies off in a professional yet easy-to-understand way.