How to Resize Canvas in Clip Studio Paint
Resizing the canvas allows you to change the dimensions of your artwork, whether you want to make it larger or smaller. It’s a handy feature that can help you adjust the size of your composition or create a new canvas with specific measurements.
Hi there, I’m Zoe! As an illustrator and graphic designer familiar with the ins and outs of Clip Studio Paint.
In this article, I’ll cover all the essentials of resizing your canvas in Clip Studio Paint starting by exploring the Change Image Resolution function. I’ll also share some valuable tips to ensure your artwork maintains its quality, even if you decide to change its dimensions later on.
Let’s get started!
Table of Contents
Key Takeaways
- Remember, it’s always better to start on a larger canvas and reduce its size, as it preserves the quality of your work.
- Resizing is different from cropping. While cropping trims your canvas to a smaller area, resizing involves scaling your artwork either up or down.
- Using vectors for your outlines from the start is a great habit to maintain. Vectors retain their quality when you resize them.
- You can undo the scaling using the keyboard shortcuts Ctrl + Z (Windows) or Command + Z (Mac), and start over until it looks its best.
Here’s the step-by-step guide to properly resizing your canvas in Clip Studio Paint.
Note: All screenshots from this tutorial are taken from the CSP Mac version.
How to Change Canvas Size in Clip Studio Paint
You can use the Change Image Resolution options to resize canvas in Clip Studio Paint. Here are the steps to get the perfect canvas size for your artwork.
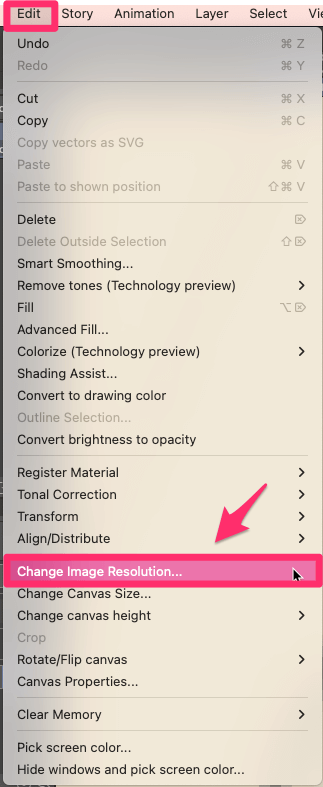
Step 1: Navigate to the top menu and click on Edit to reveal a dropdown menu. From the menu, select Change Image Resolution.
Step 2: In the Change Image Resolution dialog box, you’ll see different fields where you can input the new dimensions for your canvas. You have the option to adjust the width, height, resolution, and the measurement unit.
Click on the dropdown menu next to Unit and choose your preferred option, such as pixels, inches, centimeters, or millimeters.
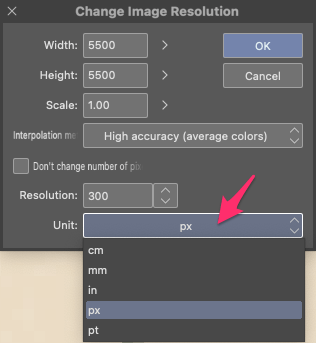
Enter the desired Width and Height values in the respective fields. Both values are linked, so changing one will automatically adjust the other.
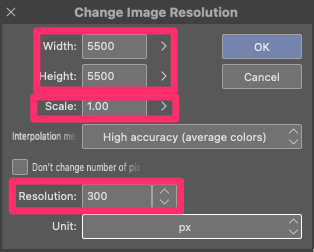
Alternatively, you can enter a Scale value to make your artwork bigger or smaller. For example, entering a value of 2 will double the size of your artwork. Changing the Scale value will automatically adjust the width and height accordingly, keeping everything in proportion.
Similarly, adjusting the Resolution will automatically change the canvas’ width and height. Opting for a higher resolution, such as 300 dpi, is a safe choice that works well for both digital art and printing, providing you with versatile options for your artwork.
Step 3: Choose an Interpolation Method that controls how edges and colors are adjusted during the resizing process. These methods determine the smoothness or sharpness of the final result.
If you’re simply resizing a blank canvas, you can skip this step.
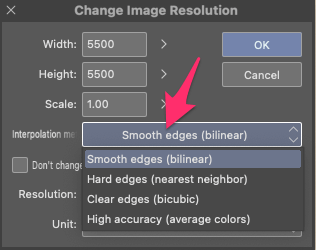
Here’s a quick overview of the Interpolation Methods:
- Smooth Edges (Bilinear): Blends nearby pixels for smooth transitions between colors, but may slightly blur the image.
- Hard Edges (Nearest Neighbor): Duplicates pixels without considering neighbors, maintaining sharp edges but potentially appearing slightly jagged.
- Clear Edges (Bicubic): Blends neighboring pixel colors for smooth outlines, providing more defined edges than bilinear interpolation. May introduce some white noise around outlines.
- High Accuracy (Average Colors): Calculates accurate average colors for each transformed pixel. Scaling up enhances sharpness, and scaling down produces smoother lines. This can result in some outline blurring and longer processing time.
Which method is best? It depends on your preference and the specific image. Bilinear is a popular choice for most scenarios, providing a good balance of smoothness and clarity. Experiment with different methods to find the one that suits your artwork best!
Step 4: Once you’ve set the desired dimensions and chosen the appropriate resampling method, click on the OK button to apply the changes. Clip Studio Paint will resize the canvas based on your specifications.
Your canvas is now resized! You can continue working on your artwork, adjusting the composition or adding new elements as needed.
Pro Tips on Upscaling and Downscaling Your Artwork
Now that you’ve learned how to rescale your canvas, let me share a few tips to enhance your workflow. By incorporating these tips into your creative process, you’ll always have the flexibility to ensure your illustrations look their best, regardless of their size.
- Start Big, Scale Down: If you’re unsure about the final size you want, it’s recommended to begin with a larger canvas and then scale it down later. This approach ensures that you maintain the quality and sharpness of your artwork during the resizing process.
- Downscaling: When you decrease the size of your artwork, there is no loss in quality. The software automatically adjusts the pixels to fit the new dimensions while preserving the sharpness of your artwork. This means you can confidently reduce the size without worrying about losing details or clarity.
- Upscaling and Vectors: If you find the need to increase the size of your artwork, vectors become incredibly useful. They preserve the definition of shapes when scaled up. In Clip Studio Paint, using vector layers is a smart approach to ensure clear outlines that can be easily scaled up whenever needed.
Remember, even if you didn’t apply these tips right now, it’s valuable to learn them in the future. Giving yourself flexibility and avoiding limitations in your artwork allows you to freely explore different directions without being constrained by initial decisions.
Final Thoughts
Resizing your canvas gives you the flexibility to explore layouts, adapt to different platforms, or prepare your artwork for printing. By following the steps and tips we’ve covered, you now have the knowledge and skills to confidently rescale your artwork.
I hope this guide has been helpful in understanding the process of resizing your canvas. If you have any feedback or tips, feel free to share them in the comments section below!
How to Resize in Clip Studio Paint
This post may contain affiliate links, which means I may earn a commission if you decide to purchase through my links.
It happens to all of us. We’re working on art in Clip Studio Paint and realize it’s the wrong size. Whomp whomp. That’s why this tutorial is all about resizing images, objects, and canvases in Clip Studio Paint.
To resize an object or image in Clip Studio Paint, use the transformation tool. To resize a canvas, use the change image resolution tool or change canvas size tool. With raster-based work, there’s a risk of quality loss when resizing, so it’s best to limit your resizing as much as possible.
Before we dive into the details of resizing in Clip Studio Paint, there’s an important note we need to cover.
Limit Resizing in Clip Studio Paint to Preserve Quality
Resizing raster-based work can result in quality loss because the pixels are stretching or shrinking to accommodate the new size. To limit quality loss, it’s important to carefully choose an interpolation setting and to limit the number of times you resize your work.
I have a full article on limiting quality loss when resizing your work in Clip Studio Paint that I highly suggest reading for further details on this.
In short, every time you resize, free transform, or adjust something, you risk quality loss to some degree. This is whether you resize a single object, larger parts of your art, or your entire canvas.
This is why I suggest resizing as infrequently as possible. Have a plan for each time you resize your work so that you’re cutting out any times you’re resizing for unnecessary reasons.
In general, it’s usually best to scale things down instead of up to avoid noticeable issues with quality. Not always, but usually.
Also, pay attention to your interpolation settings and consider using vectors, when possible. Again, read my post on limiting quality loss in CSP for more details!
Alright, so now that we’ve covered that, let’s dive into the details of resizing in CSP.
How to Resize Objects or Images in Clip Studio Paint
To resize objects or images in Clip Studio Paint, use the transformation tool. This can be found in the top toolbar with the square icon. Scale your object or image to your desired size and adjust any needed settings before confirming the change.
Here’s what you need to do, step-by-step:
1. Make sure your image or object is selected
If the image or object you need to resize is on the same layer, and there isn’t anything on the layer that you don’t want to resize, simply select that layer.
You can also select multiple layers and resize everything on them at the same time. You can do this by clicking on the checkmark next to each layer you want to select.
Or, hold down on the command button and click on each layer you want to select.
If you’re using an iPad, drag your finger out from the left side of your screen to access the keyboard.

If the image or object you need to resize is on the same layer, but there are other things on the layer that you don’t want to resize, use the selection tool to isolate the thing you want to resize.
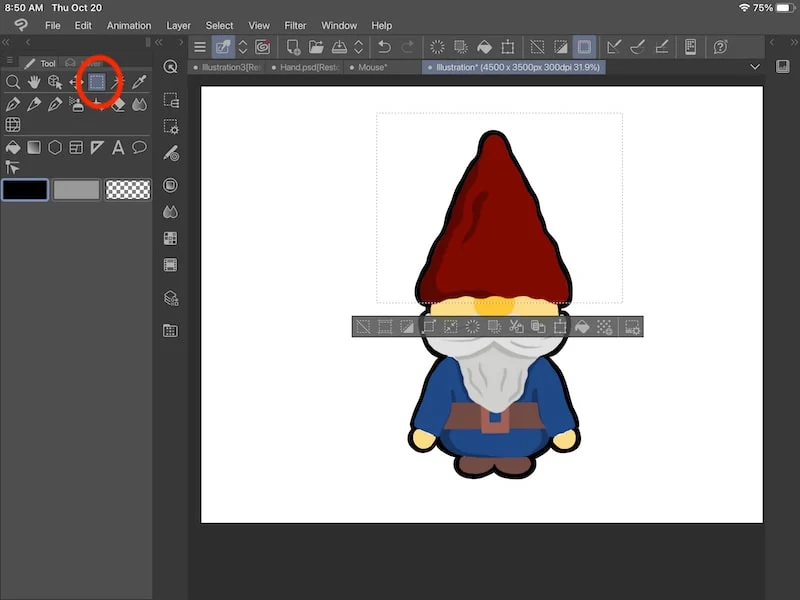
2. Click on the “Scale/Rotate” button in your top toolbar
The “Scale/Rotate” button can be found in the top toolbar with the square icon. You can also access it by going to the “Edit” menu, clicking on “Transform”, and choosing the “Scale/Rotate” button.
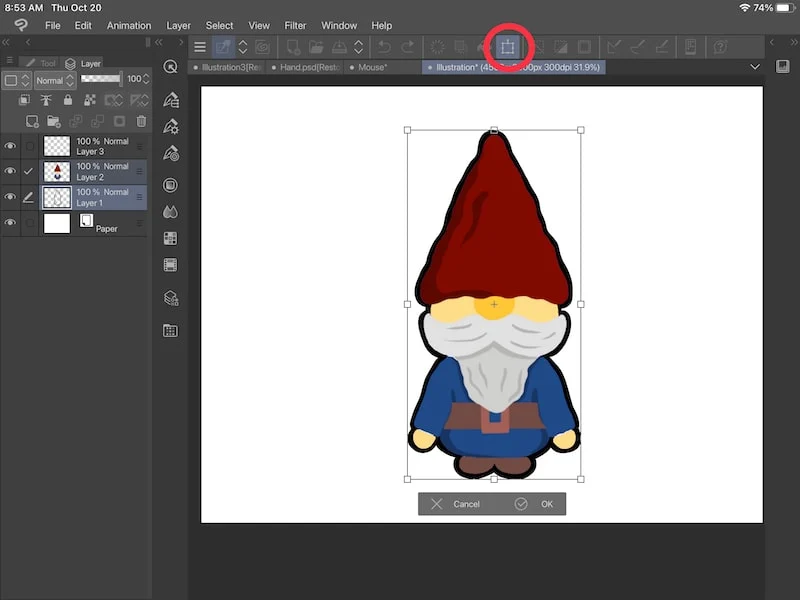
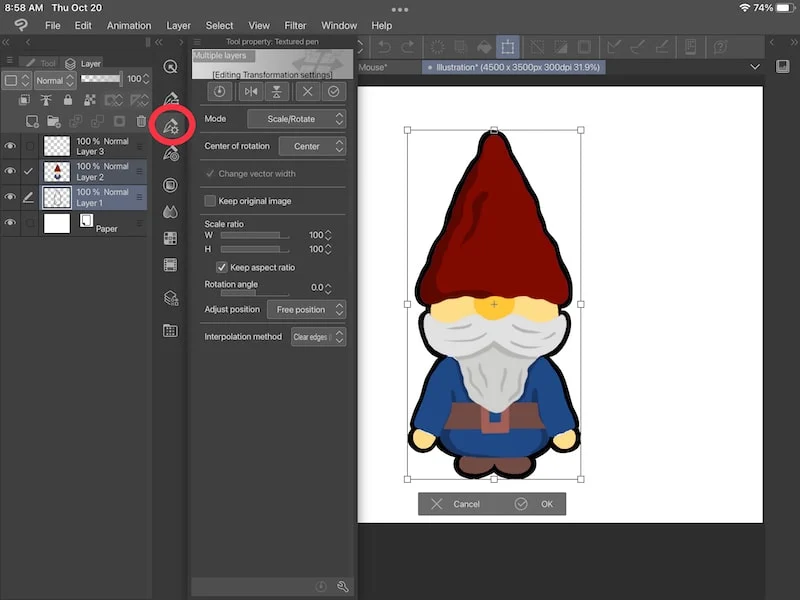
3. Adjust the transformation tool settings
Once you activate the transformation tool, the tool property menu will house your transformation tool settings.
You can find the tool property menu by clicking on the tool icon with the gear.
Within the transformation settings in the tool property menu, you can adjust things like the scale ratio, rotation angle, positioning, interpolation method, and more.
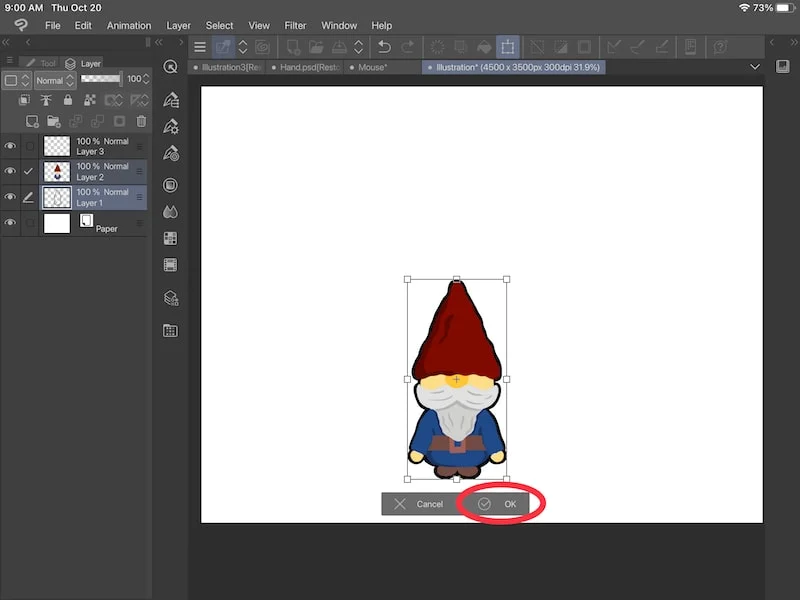
4. Resize your object or image, as needed
Once you’ve adjusted your transformation settings, go ahead and resize your object or image. Remember that we want to limit the amount of times we resize something, so be sure you have the right size before you confirm your change and click the “OK” button.
Now, let’s talk about how to resize your canvas in CSP.
How to Resize a Canvas in Clip Studio Paint
To resize a canvas in Clip Studio Paint, use the change image resolution option or change canvas size option. This can be found in the edit menu. Adjust the size of your canvas, plus any additional settings, as needed.
Here’s what you need to do, step-by step:
1. Choose the change image resolution option or the change canvas size option within the edit menu.
There are two ways to resize your canvas in CSP – the change image resolution option or the change canvas size option. Both of these can be found in the edit menu.
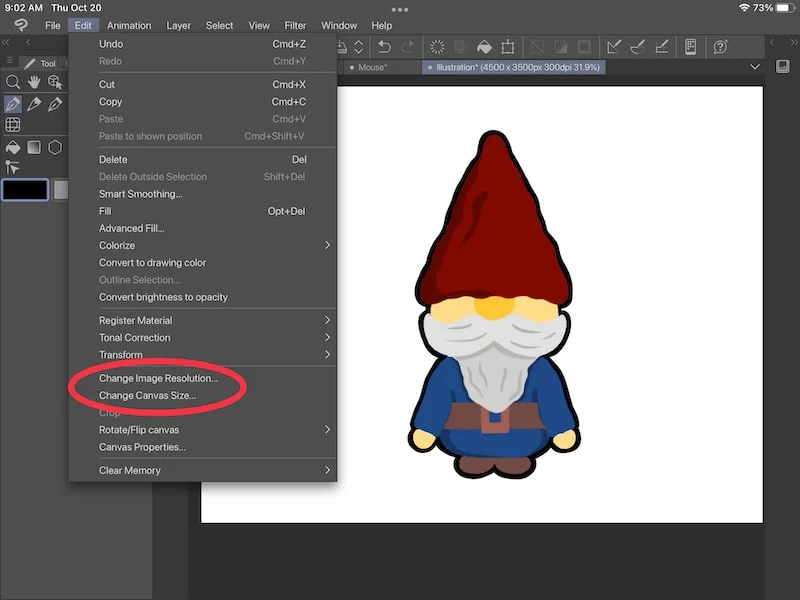
Personally, I prefer the change image resolution option. This is because there are more settings that I can change and adjust that will impact how my canvas is resized.
For example, within the change image resolution menu of options, I can verify my DPI and choose an interpolation method.
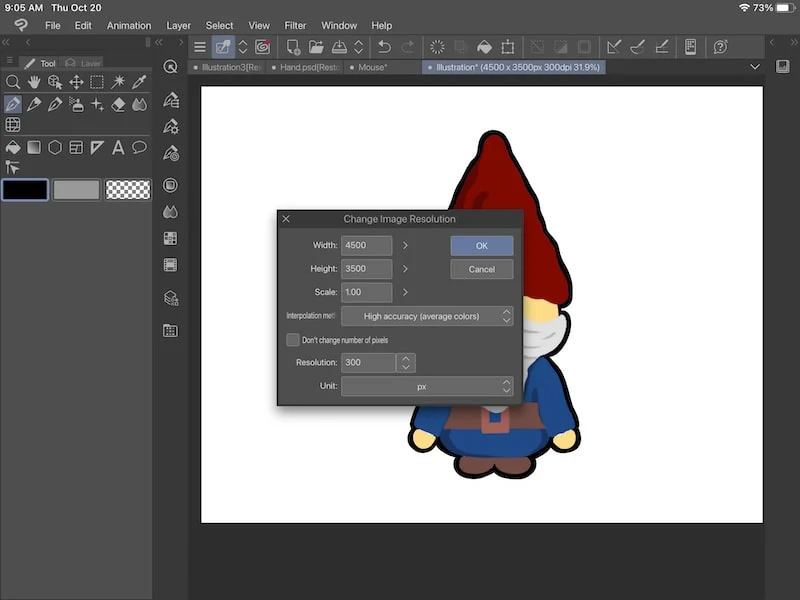
Given that we want to limit the number of times we resize our work, it’s great to verify these details and make sure everything is the way you want it to be.
2. Confirm your canvas changes
After you’ve adjusted all of your settings and you’re sure your canvas settings are what you want them to be, go ahead and click the “OK” button to adjust your canvas.
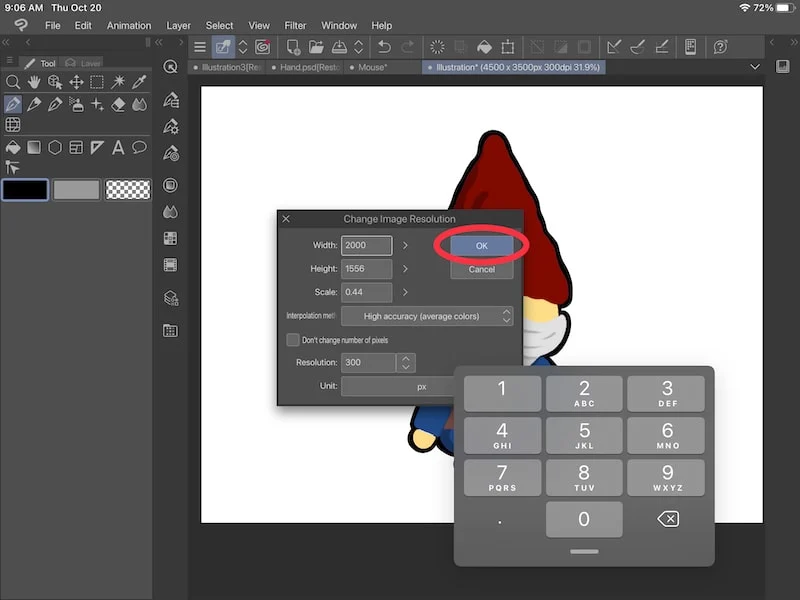
I know I’ve said it a lot, but it’s worth repeating over and over again. Limit the number of times you resize your canvas. That way, you’ll preserve as much of the quality of your art as possible.
With this amazing world of digital art, resizing your objects, images, or whole canvas only takes a few clicks. This is unbelievable to someone like me who used to stare at my piece of paper and wish it could magically become a different size.
While we want to resize sparingly, it’s a neat and powerful tool in the digital art world!
Diana has been an artist for over 26 years and has training in drawing, painting, digital drawing and graphic design. Diana’s latest obsession is digitally drawing with Procreate and creating t-shirt designs with Canva. Diana has experience selling her art across a number of platforms and loves helping other artists learn how to make money from their art as well.
How to Crop an Image in Clip Studio Paint
When you’re using a photo editing application, it’s easy to crop a picture.
But in a tool like Clip Studio Paint, how to crop an image may not seem so obvious.
You have to think of it in a slightly different way.
You’re not cropping your art. You’re cropping the canvas your art is drawn on. Cut off the canvas and you’ll cut off the area your drawing has to sit on..
There is an easy way to do it, and then there’s a harder way that I’ll walk you through because you might really like numbers.
The Easy Way
Go the Selection Tool –> Rectangle.
With any luck, the selection tool is on that stack of tools that, by default, line the left edge of your screen. This is the one that looks like a dashed line in the shape of a square.
Then, go to Edit -> Crop
That will crop your canvas to the rectangular area you chose.
The good news is, all of your drawing is still there, even though the window into it — or the canvas it’s layered on top of — has been cut down to this size. If you choose the Move Layer tool (which looks like four arrows pointing north, south, east, and west), you can move your layers around and still see all the art that’s effectively off the canvas now.
In theory, you could transform the entire layer and shrink it down to fit on the new canvas if you wanted.
But what if you want to expand your canvas? If your drawing has grown bigger than you thought and you need more room so nobody’s hand or foot gets cut off along the edges, how can you make it grow?
There’s a different way to do that. It looks more gnarly than it really is, but it’ll also work when you’re trying to shrink the canvas. Let me show you
The Hard Way (Numbers!)
This is the way to grow your canvas, but it’s also the best way to go when you know the specific size you want your canvas to be (larger or smaller), whether it’s in pixels or inches.
Unfortunately, it’s not so easy as drawing a rectangle over the portion of the canvas that you want to keep. You need to do it with numbers. It’ll take some rough guesswork and lots of corrections, but it is possible.
Go to Edit -> Change Canvas Size
This window pops up:
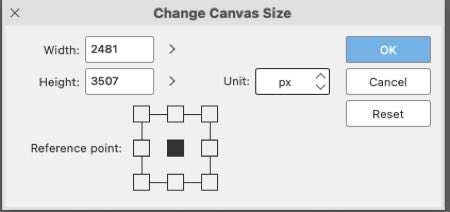
This might be a little confusing at first, but you’ll get the hang of it quickly.
That “Reference Point” Tic Tac Toe board is the most important part of this window, because that’s where Clip Studio Paint decides where to take away from or add to the canvas based on the new numbers you input in the Width and Height fields.
The reference point (some other applications might call this kind of thing an anchor point) is where the current canvas gets pinned down, whatever shape or layout it is. By default, that starts in the center. When you lower the number in the width field, half of the difference will be taken away from the left side on the image, and half on the right. When you lower the number in the height field, half of that difference will be removed from the top, and half from the bottom.
If you want the difference in numbers to be taken from only one side of the image, then you need to set the reference point to the opposite side of that tic tac toe board. So if you want to remove 100 pixels from the width on the left, then you need to choose the reference point on the right. That will anchor your image to the right and remove the pixels from the opposite side, away from the anchor.
If you change the number to be a larger one, the new pixels will also be added to the opposite side. If you pin the image to the right and increase the width by 100 pixels, CSP will add those 100 pixels to the left side of the image.
Tool Tips and Tricks
If you’ve tried this yourself by now, you’ve also seen one very helpful user interface trick that I haven’t mentioned yet. As you type in a new number in one of those fields, CSP starts to highlight the new canvas. As you continue to type the number in, it updates with every keystroke. You’re still guessing at what the proper number should be, but CSP is very helpful in showing you how close you are. You can adjust accordingly.
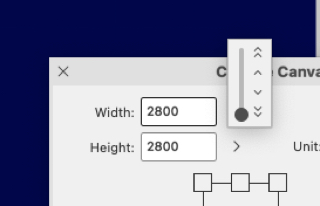
The chevrons to the right of the Height and Width field do bring up a slider you can use instead of typing in new numbers. It will change the highlighted portion of the canvas to match where the slider is at all times. I find this tool less useful, though, because the slider is very small. You can make huge changes to the canvas size with the slightest touch of the scrubber there. It maxes out at 50,000 pixels in either direction. My original image is not even a tenth of that number, which throws off the scale. I suppose if you work at a much larger size, this slider might make more sense. But if you’re trying to cut down a canvas from 2500 pixels to 2000 pixels, good luck.
Next to the slider, though, is another series of chevrons: two single chevrons pointing up and down, and two double sets pointing up and down. The single chevron adjust the canvas a pixel at a time. The double chevrons adjust it by 100 px with every click. That might be more useful. I tend to avoid it because it’s such a tiny button to have to try to press.
Around the Tic Tac Toe Board
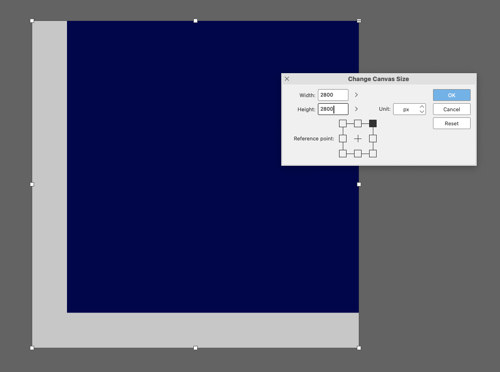
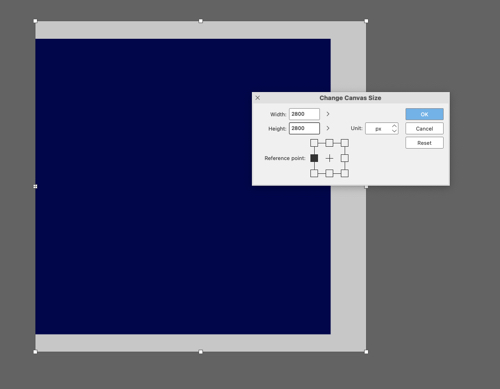
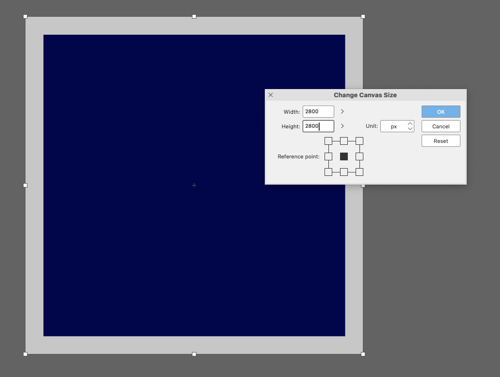
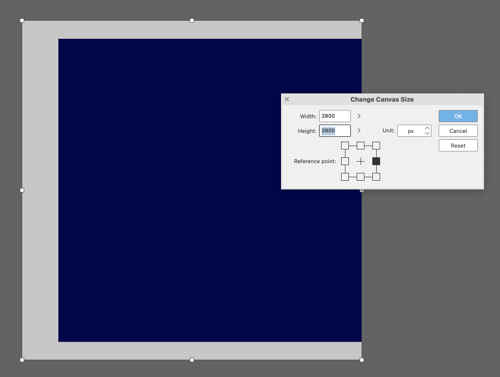
Logically, everything works from there. I’ll spell it out. I started here with a solid blue canvas at 2500 x 2500 pixels. In each of these examples, I extended the canvas out to 2800 x 2800, but with a different reference point each time.
If you’re on an iPad or a desktop display, things will be wide enough that these screen shots will format in a 3 x 3 grid. Each screenshot is placed where the reference point used in it is. If you’re on mobile, just look at the modal window in the screenshot to see where the reference point is.
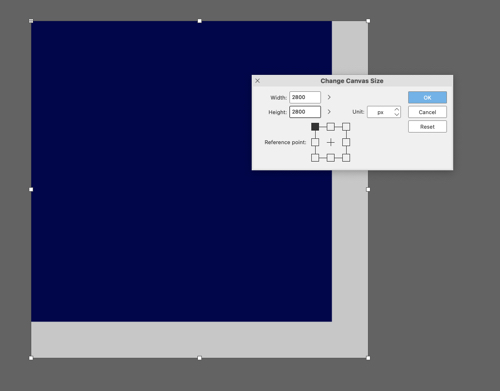
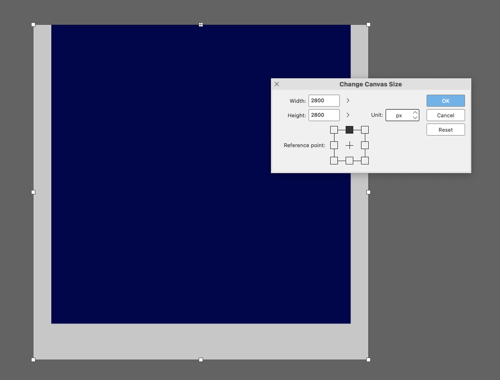
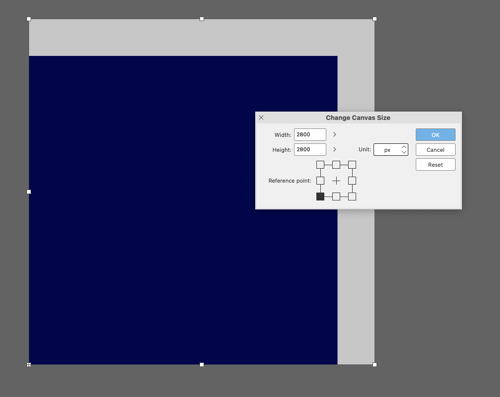
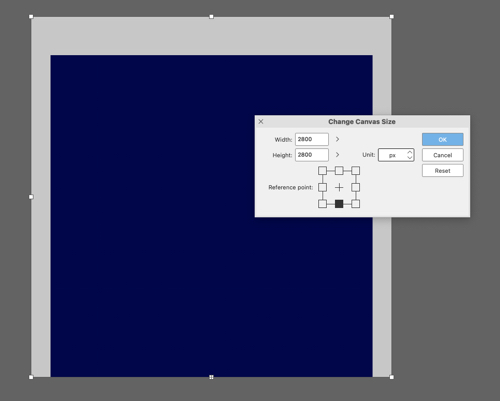
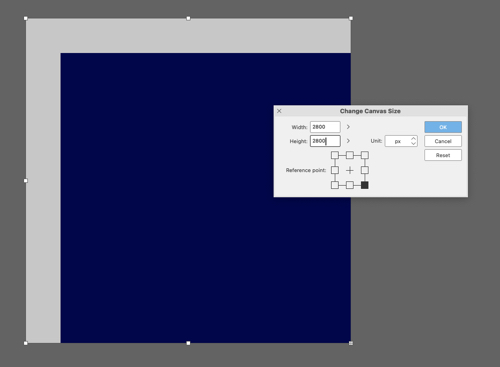
Or, to explain it in english:
The left anchor point changes the canvas width off to the right, while the height will change equally on both the top and bottom.
The right anchor point changes the canvas width off to the left, while the height will change equally on both the top and bottom.
The bottom anchor point impacts the top of the canvas in height, while the width changes equally on the left and right.
The top anchor point impacts the bottom for the canvas in height, while the width changes equally on the left and right.
The center anchor point always extends or shrinks evenly in both directions for height and width.
The top left corner changes the canvas width to the right and the height at the bottom.
The top right corner changes the canvas width to the left and the height at the bottom.
Как изменить размер холста в clip studio paint
Очень легко изменить размер холста в Clip Studio Paint. Вот пошаговая инструкция:
1. Откройте Clip Studio Paint и откройте документ, размер которого вы хотите изменить.
2. Перейдите к панели Листы и слои (Layer and Page panel) по умолчанию расположена справа от рабочего пространства.
3. Выделите слой, для которого вы хотите изменить размер холста. Если у вас есть несколько слоев, вы также можете выделить их все одновременно, удерживая клавишу Ctrl (Cmd на Mac) и щелкнув по нужным слоям.
4. В нижней части панели Листы и слои (Layer and Page panel), щелкните правой кнопкой мыши на значке Изменить размер (Change canvas size).
5. В открывшемся окне Изменение размера (Canvas size change), вы можете выбрать, как вы хотите изменить размер холста.
— Вы можете выбрать Процент (Percentage) и ввести процентное значение, на которое вы хотите изменить размер. Если, например, вы хотите увеличить размер в 50%, вам нужно ввести 150%. Если вы хотите уменьшить размер, введите значение меньше 100%.
— Вы можете выбрать Пиксели (Pixels) и ввести новые значения ширины и высоты холста в пикселях.
— Вы также можете выбрать Дюймы (Inches), См (Centimeters), Мм (Millimeters) или другие единицы измерения и указать новые значения в соответствующих полях.
6. Когда вы выбрали нужные значения, нажмите Применить (Apply), чтобы изменения вступили в силу.
После этого ваш холст будет изменен в соответствии с выбранными значениями. Будьте осторожны при изменении размеров холста, так как это может влиять на качество изображения и работу с ним. Учтите, что если увеличить холст, изображение может пикселизироваться, и если уменьшить, детали могут потеряться.