How to install Kali Linux persistence live on a USB?

Looking to run Kali Linux from a USB drive? In this guide, we’ll walk you through the steps to install Kali Linux persistence on a USB drive using Rufus, creating a portable operating system that you can use on any computer.
Follow these steps to get started:
1. Download Kali Linux
Head over to the official website kali.org and click on downloads. Scroll down to Live Boot and download the appropriate version of Kali Linux depending on your PC’s specifications (32-bit or 64-bit). The file size is approximately 3.88 GB.
2. Download Rufus
To create a bootable USB drive, download Rufus from rufus.ie/en. We are using the portable version.
3. Make a Bootable USB
Insert a USB drive and make sure to back up all the files on it as the USB will be formatted during the process. Open Rufus and select the USB drive under the “Device” section. Under “Boot Selection,” select the Kali Linux ISO image that you downloaded earlier. Click “Start” to begin the process, which may take some time.
4. Boot from the USB Drive
After making the bootable USB, restart your computer and go to the boot options. Press F10 or F12, depending on your PC, to access the boot options screen. Choose the USB drive to boot from.
5. Run Kali Linux from the USB Drive
Once your PC boots from the USB drive, choose “Live System with USB persistence” and press Enter. You’ll now have Kali Linux running from your PC. Connect to…
Installing Kali 2023
Today I have created a short blog post on how to install Kali Linux 2023.1, the latest version available from Offensive Security.
Firstly you will need to install some software to allow you to run the machine virtually on your Machine or alternatively to burn the .iso image file to a USB drive if you wish to install it on your system in a ‘dual boot’ configuration on an existing computer with a working Operating System or ‘bare metal’ where there is only the new OS (hello old laptop).
For the purposes of this guide I will walk you through setup via a software which is often called a ‘Hypervisor’.
Let’s get started
For this guide we are using the freely available Virtual Machine software Oracle — Virtual Box. There are other options available such as VMware (my preferred choice), The Windows HyperVisor Platform on Windows 10/11 Pro or if you are on Linux there’s QEMU, Virtual Machine Manager, VMware (again) even on MacOS with Paralells (and VMWare again) but this guide is for a primarily windows host environment and for as freely as possible.
Step 1: Download
Initially you will need to download the software from the link above for your machine (in this case from ‘Windows hosts’) as well as the Kali 2023.1 iso image from Offensive Security.
Be sure to pick the option for ‘Installer Images’ and you can pick the direct download (around 3,5Gb) or the torrent option which is completely legal and usually much faster, you just need a Bittorrent client on your machine.
Step 2: Verify the ISO image
Once you have downloaded the ISO from Offensive Security it would be a good idea to confirm the SHA256 hash of the ISO;
This ensures that the download has not been tampered with and that it is not damaged in some way — this is honestly a really good habit to get into when getting software off the internet.
I prefer using a software solution to do this check as I can never remember the Powershell for it:

cough the PowerShell is:
Once verified we can move onto the next step.
Step 3: Prepare a new Virtual Machine
To build a new machine in Virtual Box you will need to click on the new option from the top bar:

From here you can follow these steps highlighted in Red to get going as quickly as possible but for any in the audience to read along;
We select expert mode on the first screen we are presented with so that we are able to fine tune certain parts of the installation.

Here we have enter the name of the virtual machine (in this case Kali-2023.1), the location of the iso file we are installing from and also the type of Operating Sytem and Version of this also.

For Step 4 we configure the hardware side of this, now your machine will be different to mine, you may have less RAM and processor cores to play with (or you may have a great deal more) but this is how I configure the machine based on my needs and use case.

Next up you need to set the size of the Hard Disk the machine will be using, now this is not the same as when you install the Operating System directly as the ‘size’ is dynamically allocated and changes based on whats installed and saved on the virtual machine. In my case 80Gb is more than enough space to install and play with this Operating System.

Final checks here as we are back on the Virtual Machine Manager, check your RAM, CPUs, ‘Optical drive’ i.e. the iso file and Virtual Hard Disk are detected.
If all checks out, hit the green Start Button.

Step 4: Install your new Operating System
After clicking Start you will be presented with a popup window, that window is the ‘display’ of your new computer, in this case it will load to the boot menu from the Kali iso file.
Select the first option to begin the Graphical Installation process (difference between this and the ‘Install’ option is that it’s easier on the eyes and more easy to understand if you are new to this process);

From here select the language, location and keyoard layout, all UK for me.


After the selection of your locale and whatnot it will then grab some files from the Iso file or ‘installation media’;

Next up you select the hostname for your ‘computer’. Now technically yes you can set this to whatever you want, however, in the world of information security and OPSEC trying to ‘blend in’ with a target environment on an Red Team Engagement/Pentest is advantageous, you would be wise to name it something like “DESKTOP-C8C1H5T” if you are targeting a Windows Network as this is similar to how Windows generically names new computers.
Blending in can have it’s advantages in the ‘real world’ but in our case, plain and simple kali works fine;

Same for the Domain name if you know this, in our example leaving it blank is fine.

Now these next few steps with the above in mind (OPSEC) can be handy too, though in our case we are going with the name ‘pentester’ and the password of ‘123’ (I left these blank in the screenshots so you can make up your own, just don’t use 123 as a password, please).


Next up we are partitioning our Virtual Hard Disk, this is similar to the USB option, in our case we are using the entire Virtual Hard Disk;

Select the hard disk and hit next;

Here we are also going with the default option, all one big partition and all the file system together (just for simplicities sake).

We’re going to finish writing the changes to the Virtual Hard Disk;

Here we actually select the only option that isn’t default after the last few and pick ‘yes’ to actually erase the disk and make the changes to the partitioning of it.

It will take a moment to throw some files at the new disk.

Here it will then prompt to set up the desktop environment, now you can pick your preferred flavor of Linux Desktop Manager here if you wish, Kali has shipped with XFCE as the default for a while now and is what most people these days would be familiar with, it did used to ship with GNOME and looked gorgeous with that side bar… but lo I digress, as it’s Linux we can customize however and whenever but for now default it is, it will also default select all the tooling needed so hit next.

The begins more installation, probably the longer of the files being added, keen eyes may spot some familiar tools going on, look its MetaSploit!

Next up we have the GRUB boot loader, now on our system we as we only have one OS we don’t need to worry too much about about installing GRUB to the primary ‘drive’ if you were dual booting this would remove your current boot manager and replace it with grub, allowing you to pick whenever the computer is powered on which OS you would like to boot.

In our case we select /dev/sda the Virtualbox Hard Disk we just made.


And we are finally presented with the ‘Finish Installation’ screen, click continue to reboot.

Now we have the GRUB Bootloader showing out option of the default Kali GNU/Linux or Advanced Options (thats for other things like checking memory integrity), it will boot the default option in 5 seconds anyway so you can hit enter or just leave it going.

Et Voilla, we have our login screen and the bizarre Rorschach space goat looking wallpaper, lovely. Enter your details and get logged in!

Step 5 — Update
Now that we have Kali 2023.1 installed before we do anything, we need to update it and grab the latest versions of any apps.
From the main Desktop open the terminal;

This is the terminal, the ‘main way’ of interacting with Linux and something you need to get used to;

From here enter the following;

Now you may ask “Why have I entered all this?”, well let’s look at the command itself;

You are basically asking the computer to check for updates, install the updates and upgrade the system distribution if required and finally you are asking the computer to remove any old versions or applications that are no longer needed, the -y instructions basically mean that you won’t have to type in Y for yes on certain prompys like ‘hey I need an additional 300Mb of Hard Disk space to install these files, is that ok?

In an unattented install the installer would literally sit here waiting for the Y instruction, here it’ll just fly onward, now notice the Ampersand’s breaking up the three commands;

These are here for a reason, they are a failsafe for if there is an issue with the previous command it will stop the next command from being executed.

So, if our update fails, the rest of the command to upgrade and remove unnecessary files will not get run which saves the system spending time processing something it can’t change or processing a broken update and breaking loads more things;

As everything went through all ok we are presented with the downloads progress and lots of wizzing past text.

After that Kali is now fully up to date and ready to roll;

A ‘best practice’ here is to reboot the machine, let it come fully back online and create whats called a ‘Snapshot’ which is basically a softare backup of your machine in it’s current state.
Snapshots are incredibly helpful for people, especially those into Malware Analysis as they may want to ‘detonate’ the malware (like WannaCry for example) to see what happens with the machine and instead of rebuilding the machine, simply roll it back to the snapshot before detonation, like it never happened!
To do this simply click on ‘Machine’ from the top bar and then ‘Take Snapshot’.

You will then need to name the snapshot (to make your life easier) and also pop in a description i.e. ‘base install all apps’ or similar.

It will then generate the snapshot;

After that you are done, to roll it back simply head back to the Virtual Machine Manager, hit the options at the side of the Machine Name and select Snapshots;
As you can see above you can delete the snapshot if you wish or if you had multiple and want to ‘roll back’ select the appropriate snapshot and click restore.
Special Shoutout — The USB Option
If you wish to burn Kali to an USB you will first need a couple of things;
- The iso image from Offensive Security (Steps 1 and 2 from The Virtual Machine Option above)
- A USB thumb drive (8GB minimum is required).
- Software to burn the ISO image with.
Once you have assembled these it’s time to get started.
Step 1: Prepare the USB drive
It goes without saying that when your are burning software to USB or Disk, anything on the device will be removed so make sure you don’t have some important photos or documents on the USB drive.
Step 2: Burn the ISO image
For this step I am using the software Balena Etcher but you can use things like Rufus or others.
Select the ISO image, the USB drive (and check it’s the correct drive and not your spare hard disk or something) and click burn!
Step 3: Install your new Operating System
To boot from the USB drive you will need to check the hotkey your laptop or computer uses to enter the boot menu at startup, this can be Esc, F1, F11 or F12.
Once you have entered the boot menu you can select the USB drive and hit enter on the keyboard to boot.
For the rest of this step you can refer back to The Virtual Machine Option from the above as the ‘install’ steps are the same from this point forward, the only exception being if you are ‘dual booting’ Kali and your existing operating system, in which case the Graphical Install for Kali will guide you through this process and make the relevant changes to your installation and the GRUB bootmanager, you can also skip the snapshots as that won’t be an option on this setup.
That’s all there is to it, now you have a brand now Virtial Machine of Kali Linux version 2023.1 working your on your computer (or your spare computer). Now you can do with it as you will, take on the OSCP or Pwn some machines on TryHackMe or HackTheBox, even begin looking into malware or reverse engineering the sky is the limit.
I hope this guide helps you understand the basics of installing the new Kali Linux Distribution, this can also apply to any other Operating system that you want to try out/break in your spare time.
I don’t have any sponsors or anything but if you enjoy my work, or feel sympathy for my wife, then I have set up a Ko-Fi account as well as a BuyMeACoffee people can donate to.
Как запустить кали линукс с флешки
Our favourite way, and the fastest method, for getting up and running with Kali Linux is to run it “live” from a USB drive. This method has several advantages:
- It’s non-destructive — it makes no changes to the host system’s hard drive or installed OS, and to go back to normal operations, you simply remove the “Kali Live” USB drive and restart the system.
- It’s portable — you can carry Kali Linux in your pocket and have it running in minutes on an available system
- It’s customizable — you can roll your own custom Kali Linux ISO image and put it onto a USB drive using the same procedures
- It’s potentially persistent — with a bit of extra effort, you can configure your Kali Linux “live” USB drive to have persistent storage, so the data you collect is saved across reboots
In order to do this, we first need to create a bootable USB drive which has been set up from an ISO image of Kali Linux.
What You’ll Need
A verified copy of the appropriate ISO image of the latest Kali build image for the system you’ll be running it on: see the details on downloading official Kali Linux images.
If you’re running under Linux, you can use the dd command, which is pre-installed, or use Etcher.
A USB thumb drive, 4GB or larger. (Systems with a direct SD card slot can use an SD card with similar capacity. The procedure is identical.)
Kali Linux Live USB Install Procedure
The specifics of this procedure will vary depending on whether you’re doing it on a Windows, Linux, or macOS/OS X system.
Creating a Bootable Kali USB Drive on Linux (DD)
Creating a bootable Kali Linux USB drive in a Linux environment is easy. Once you’ve downloaded and verified your Kali ISO file, you can use the dd command to copy it over to your USB drive using the following procedure. Note that you’ll need to be running as root, or to execute the dd command with sudo. The following example assumes a Linux Mint 17.1 desktop — depending on the distro you’re using, a few specifics may vary slightly, but the general idea should be very similar. If you would prefer to use Etcher, then follow the same directions as a Windows user. Note that the USB drive will have a path similar to /dev/sdb.
WARNING: Although the process of imaging Kali Linux onto a USB drive is very easy, you can just as easily overwrite a disk drive you didn’t intend to with dd if you do not understand what you are doing, or if you specify an incorrect output path. Double-check what you’re doing before you do it, it’ll be too late afterwards.
Consider yourself warned.
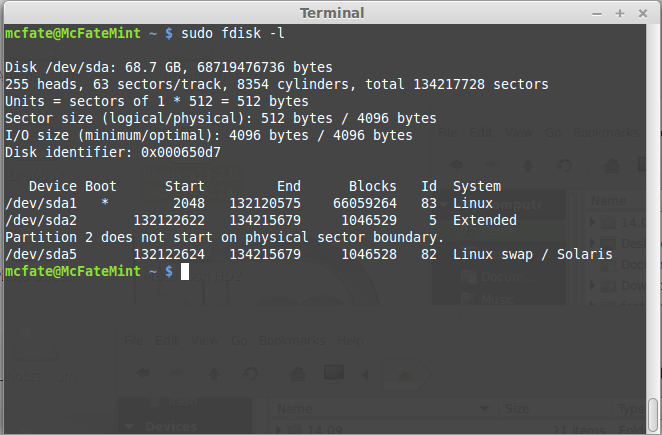
- First, you’ll need to identify the device path to use to write the image to your USB drive. Without the USB drive inserted into a port, execute the command sudo fdisk -l at a command prompt in a terminal window (if you don’t use elevated privileges with fdisk, you won’t get any output). You’ll get output that will look something (not exactly) like this, showing a single drive — “/dev/sda” — containing three partitions (/dev/sda1, /dev/sda2, and /dev/sda5):
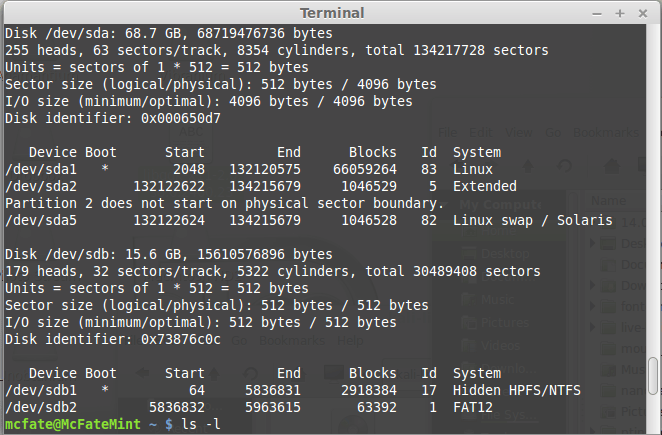
2. Now, plug your USB drive into an available USB port on your system, and run the same command, “sudo fdisk -l” a second time. Now, the output will look something (again, not exactly) like this, showing an additional device which wasn’t there previously, in this example “/dev/sdb”, a 16GB USB drive:
3. Proceed to (carefully!) image the Kali ISO file on the USB device. The example command below assumes that the ISO image you’re writing is named “kali-linux-2023.3-live-amd64.iso” and is in your current working directory. The blocksize parameter can be increased, and while it may speed up the operation of the dd command, it can occasionally produce unbootable USB drives, depending on your system and a lot of different factors. The recommended value, “bs=4M”, is conservative and reliable. Additionally, the parameter “conv=fsync” makes sure that the data is physically written to the USB drives before the commands returns:
Imaging the USB drive can take a good amount of time, over ten minutes or more is not unusual, as the sample output below shows. Be patient!
The dd command provides no feedback until it’s completed, but if your drive has an access indicator, you’ll probably see it flickering from time to time. The time to dd the image across will depend on the speed of the system used, USB drive itself, and USB port it’s inserted into. Once dd has finished imaging the drive, it will output something that looks like this:
That’s it, really!
Creating a Bootable Kali USB Drive on Linux (DD with status)
Alternatively there are a few other options available for imaging.
The first option is dd with a status indicator. This is only available on newer systems however. To do this, we simply add the status flag:
Another option is to use pv . We can also use the size flag here to get an approximate timer. Change the size depending on the image being used:
Creating a Bootable Kali USB Drive on Linux (Etcher)
Download and run Etcher.
Choose the Kali Linux ISO file to be imaged with “select image” and verify that the USB drive to be overwritten is the correct one. Click the “Flash!” button once ready.
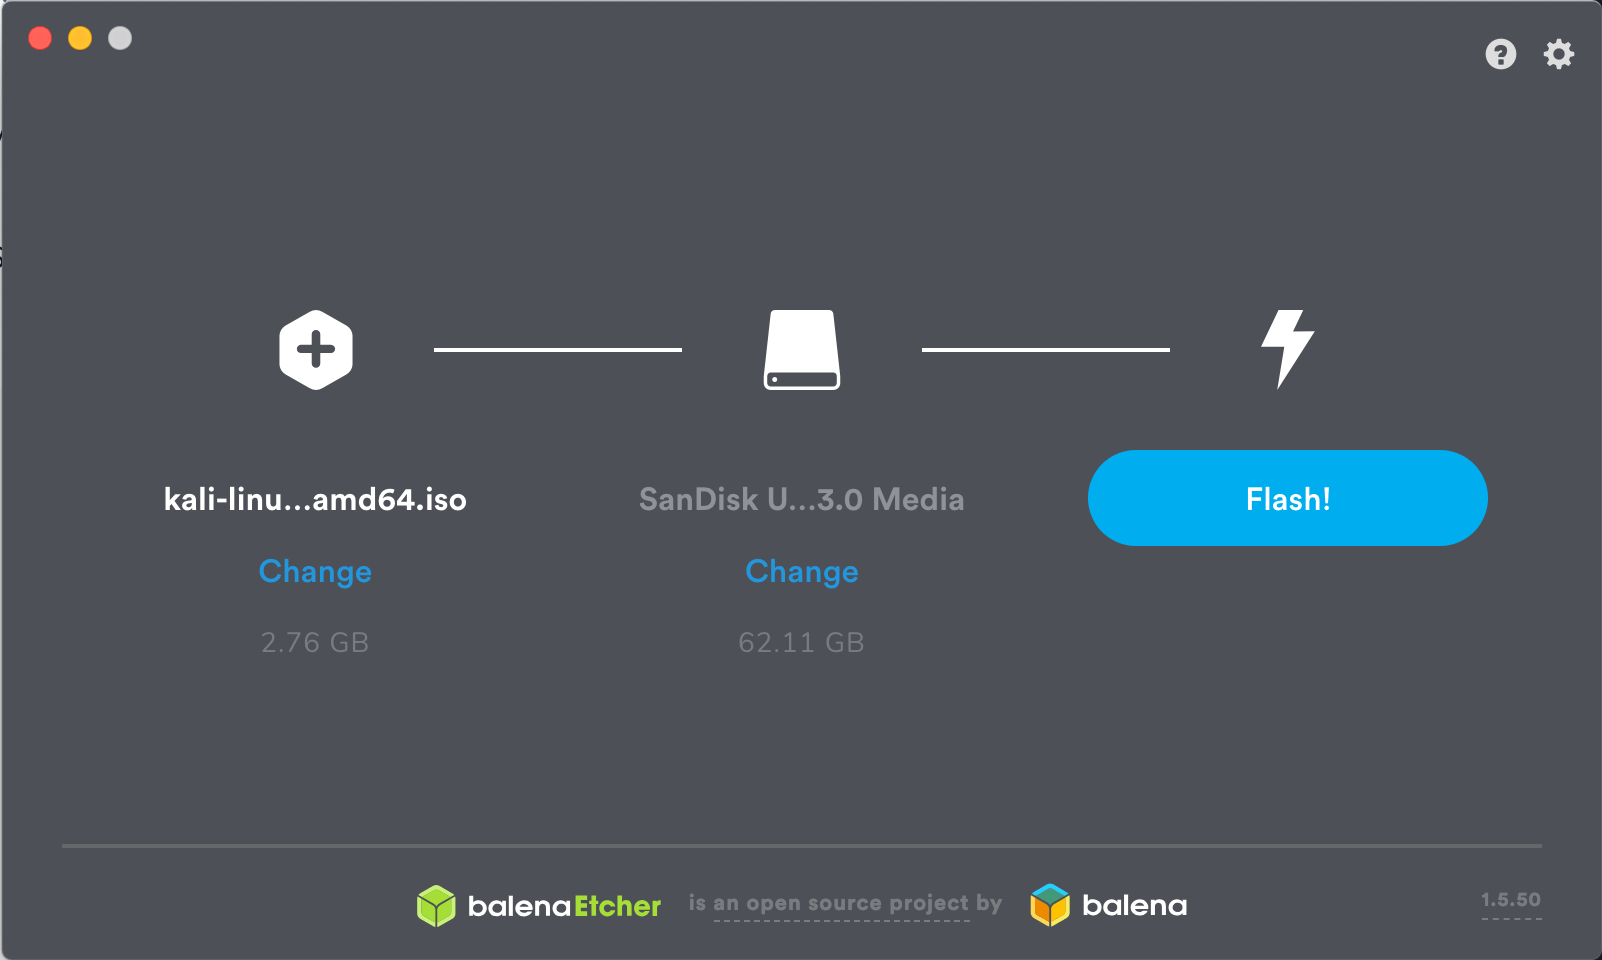
3. Once Etcher alerts you that the image has been flashed, you can safely remove the USB drive.
You can now boot into a Kali Live / Installer environment using the USB device.
Как запустить Kali Linux с флешки
Kali Linux — пожалуй один из самых популярных и востребованных дистрибутивов Linux в сфере информационной безопасности, который включает в себя сотни различных инструментов для тестирования компьютерных систем и сетей путем проведения различного рода «атак на проникновение».
Дистрибутив разрабатывается на базе Debian, первый официальный релиз Kali Linux состоялся 13 марта 2013 года. С тех пор разработчики внесли множество изменений в систему: был сделан упор на стабильность работы и функциональность дистрибутива, а также был «отфильтрован» и сам инструментарий. Дальше мы рассмотим как запустить kali linux с флешки.
Как запустить Kali Linux с флешки
Дистрибутив можно использовать как из виртуальной машины и жесткого диска, так и прямо с USB-флешки (LiveUSB). В данной статье будет рассмотрен процесс записи Kali Linux на USB в операционной системе Windows и в Linux, также будет рассмотрена возможность создания persistence раздела на USB флешке для последующего сохранения данных.
Как записать Kali Linux на флешку в Windows
Для записи образа Kali linux в Windows вам понадобится флешка на 8 Гб или более и программа под названием «Rufus», которая отлично справляется со своей задачей. Скачать Rufus вы можете с официального сайта разработчика.

Шаг 1. Установка Rufus
Скачайте и запустите программу:
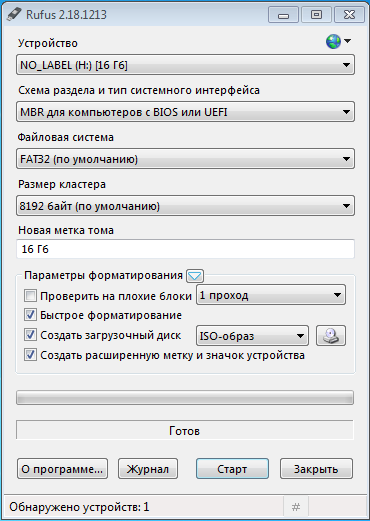
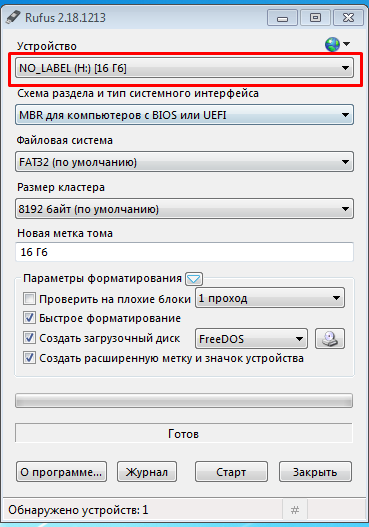
Шаг 2. Определяем USB
Подключите флешку к компьютеру и нажмите на кнопку Устройство и выберите нужную флешку для записи образа Kali:
Шаг 3. Определяем ISO — образ
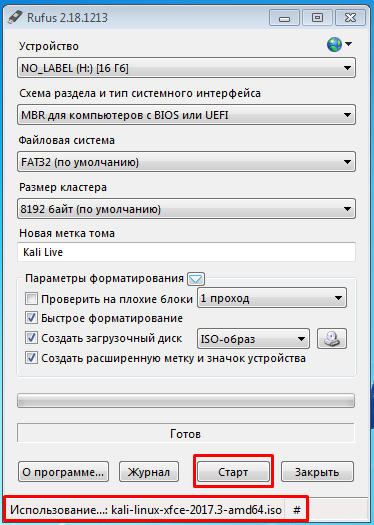
Затем нажмите на выделенную кнопку и выберите ваш образ с Kali Linux:

Шаг 4. Запись образа на USB
Программа успешно определила ISO — образ, нажмите кнопку Старт и дождитесь завершения записи образа:
После того как образ будет записан — вы получите полностью рабочий Kali Linux, который можно будет запускать прямо с флешки в режиме Live USB. Однако все изменения и все ваши данные будут потеряны после каждого выключения или перезагрузки вашей живой системы. И для того чтобы этого избежать, мы создадим persistence раздел, который позволит вам сохранять все ваши настройки и данные на флешке. Создание загрузочной флешки kali linux завершено.
Создание persistence раздела Kali Linux в Windows
Для того чтобы создать persistence раздел Kali Linux в Windows нам понадобится программа под названием MiniTool Partition Wizard Free Setup Wizard, которую вы можете скачать прямо с официального сайта.
Шаг 5. Установка программы
Скачайте, установите и запустите программу:

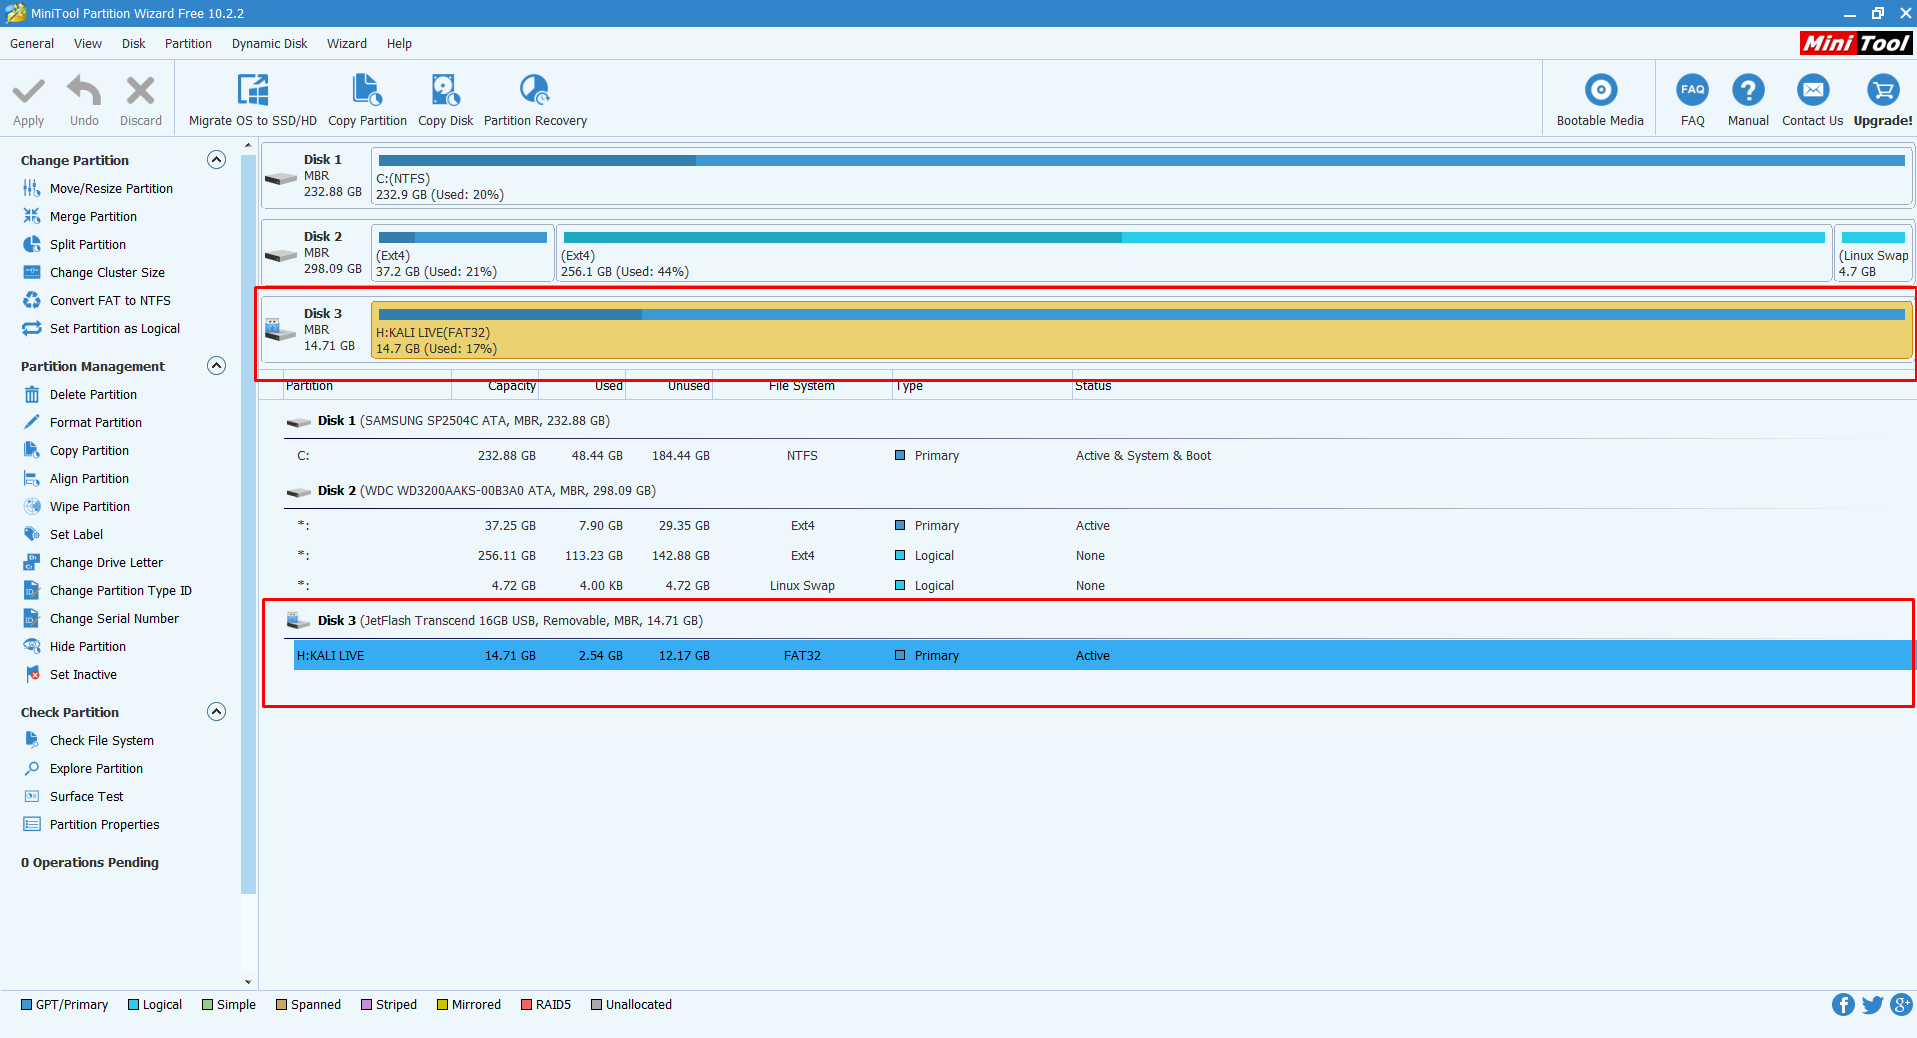
Шаг 6. Определяем USB
Теперь вам необходимо найти ваш вашу флешку. В моем случае это Disk 3:
Шаг 7. Разметка USB
На этом шаге нам необходимо сократить размер основного раздела Kali Linux и добавить туда persistence, который и будет отвечать за сохранение всех ваших системных настроек и данных. Для этого щелкните правой кнопкой мыши по разделу на вашем USB и выберете пункт Move/Resize (переместить/ изменить размер):
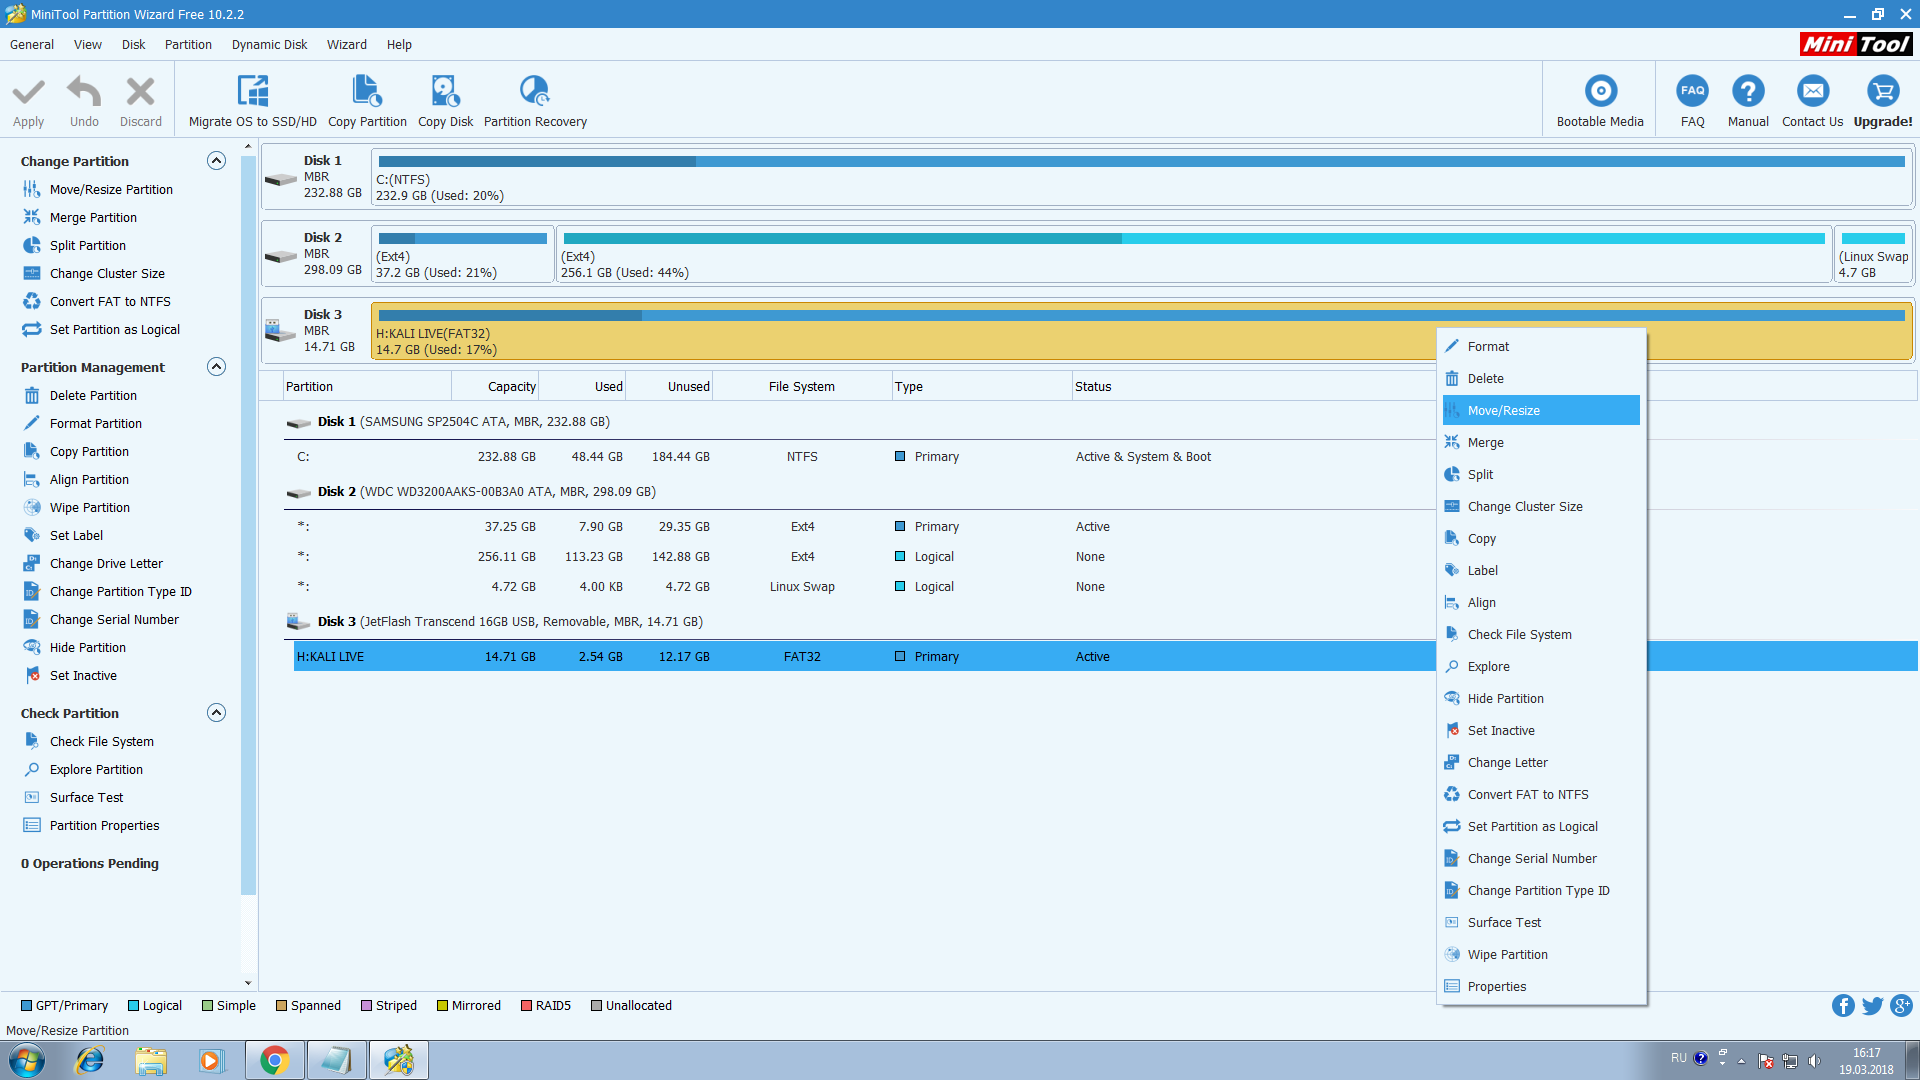
В открывшемся окне двигаем ползунок для регулировки размера основного раздела Kali Linux. Затем, определившись с размером, нажимаем кнопку Ок:
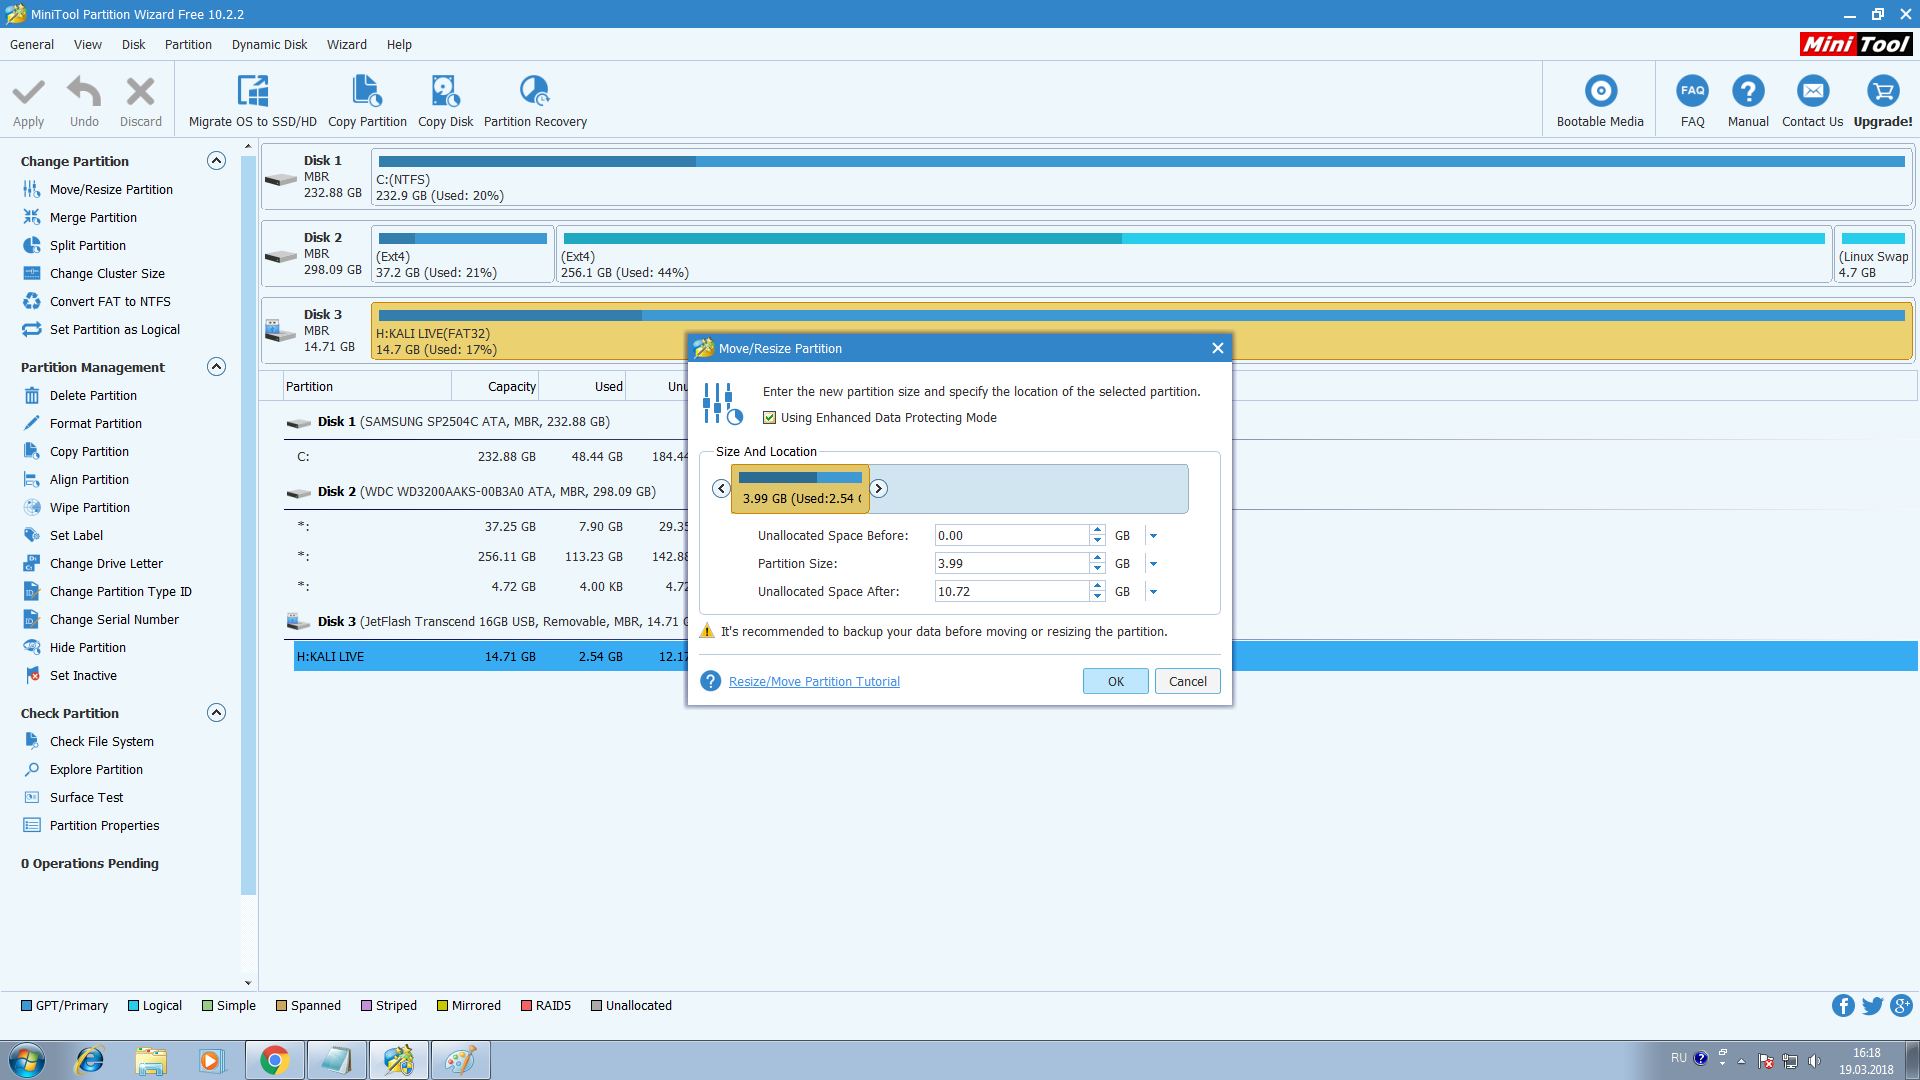
Как видно на фотографии ниже, у нас появился новый unallocated (нераспределенный) раздел флешки, который нам нужно будет разметить. Кликаем по нему правой кнопкой мыши и выбираем пункт Create:
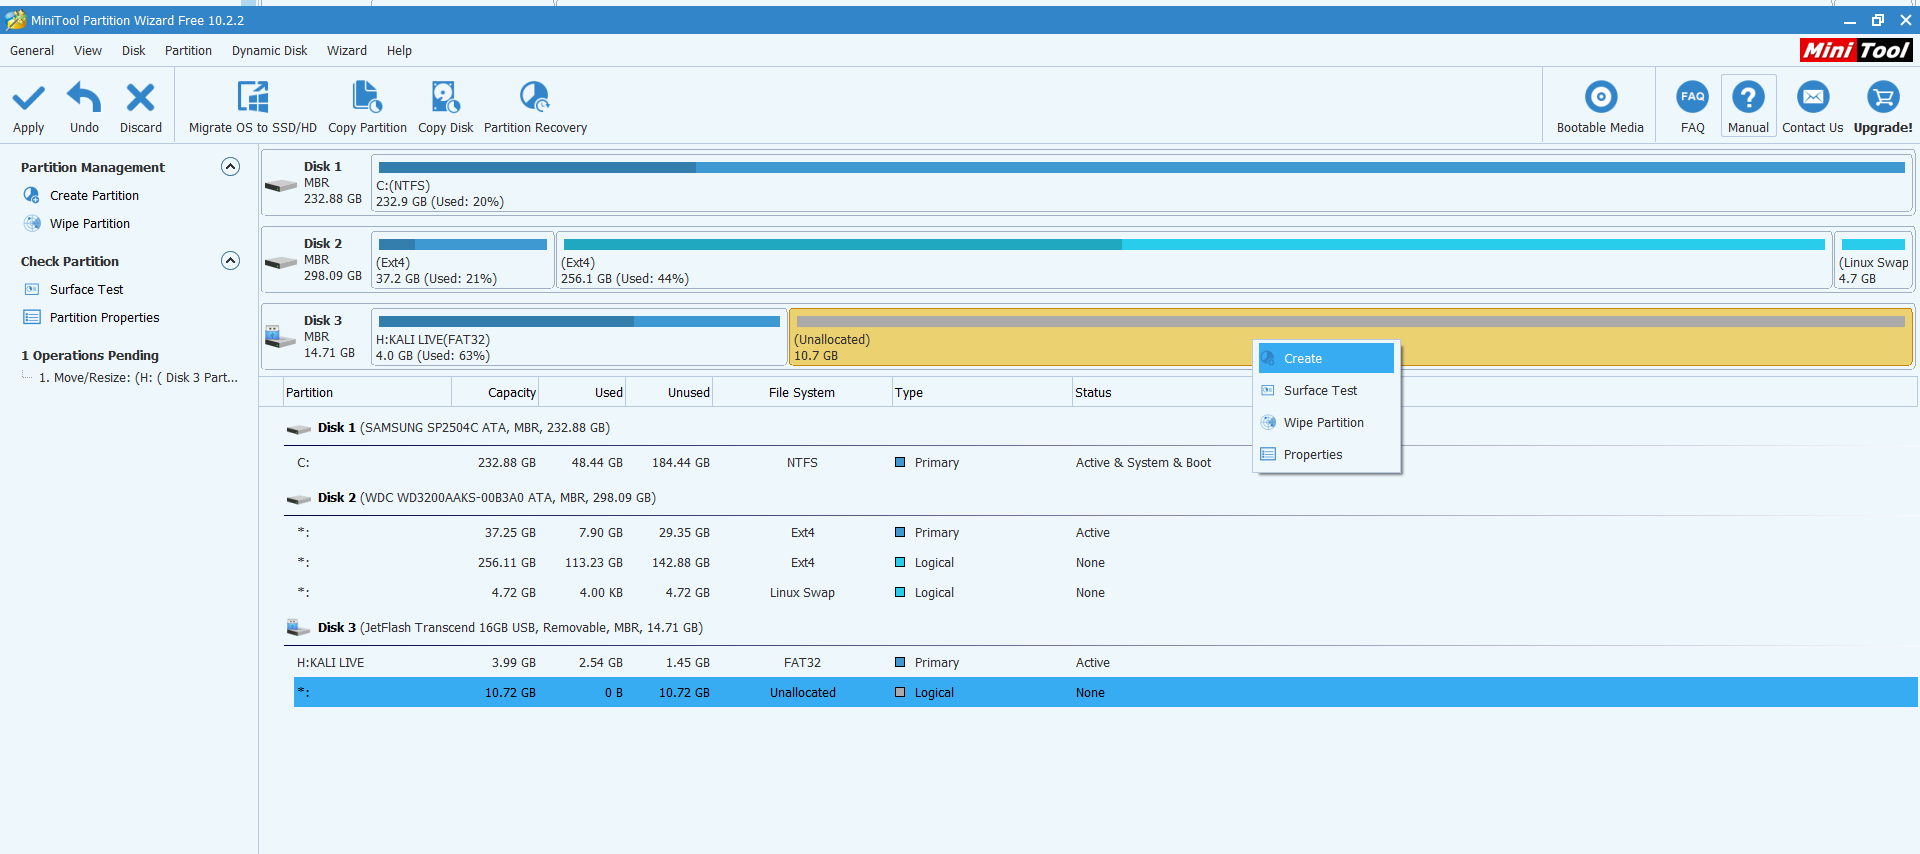
В открывшемся окне в поле Partition Label пишем название раздела persistence. В поле Create As выбираем Primary и файловую систему Ext4. Размер выбираем максимально допустимый. Нажимаем кнопку Ок:

Затем в правом верхнем углу нажимаем кнопку «Apply» и ждем завершения процесса. После того как менеджер разделов закончит свою работу, перезагрузите компьютер и загрузитесь с вашей флешки с Kali Linux и переходите к пункту статьи «Настройка persistence раздела Kali Linux» для того чтобы завершить настройку созданного persistence раздела. Теперь перейдем к тому как записать kali linux на флешку через ос Linux.
Как записать Kali Linux на флешку в Linux
Для того чтобы записать образ Kali Linux на флешку в Linux, достаточно использовать утилиту dd. Команда будет выглядеть вот так:
sudo dd bs=4M if=/путь/к/kali-linux.iso of=/dev/sd[буква_флешки] status=progress
sudo dd bs=4M if=
/Загрузки/kali-linux.iso of=/dev/sdb status=progress
Помимо этого, записать образ можно с помощью отличной опенсорсной программы Etcher. Скачать программу можно с сайта проекта. Запускаем программу, нажимаем Select Image и выбираем образ Kali Linux:
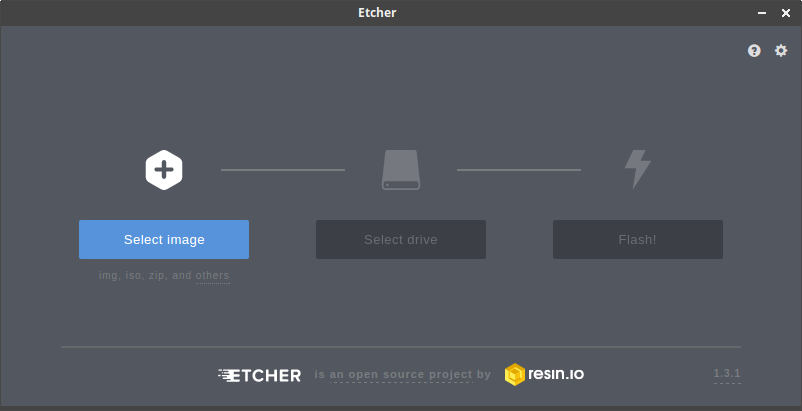
После этого программа сама определит и выберет подходящий подключенный к компьютеру USB:
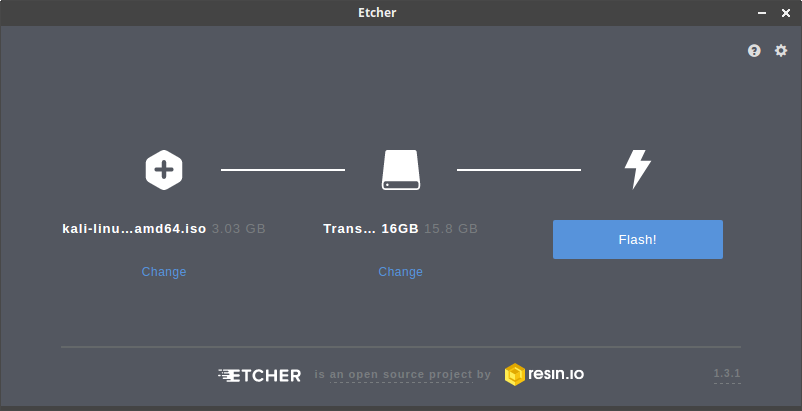
Затем нажимаем кнопку Flash, вводим пароль суперпользователя и ждем завршения процесса записи:
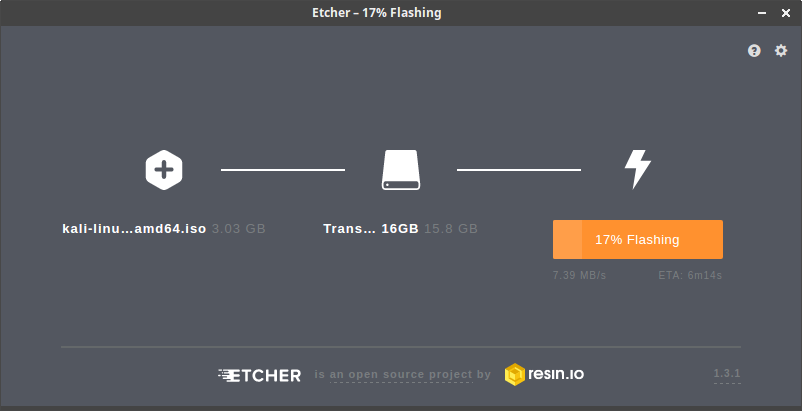
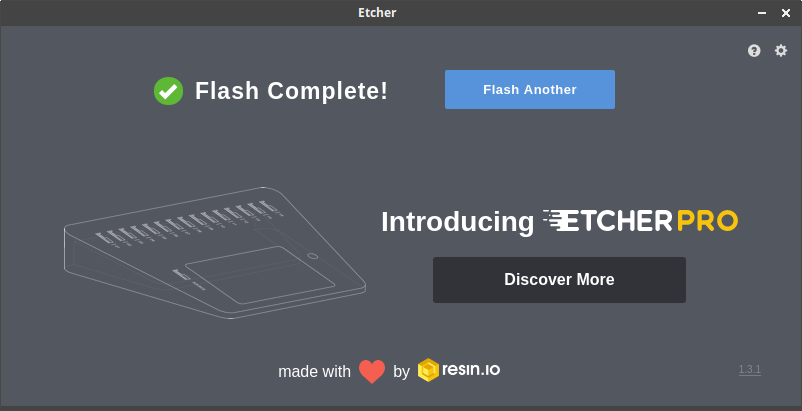
Программа уведомит вас по завершению записи на флешку:
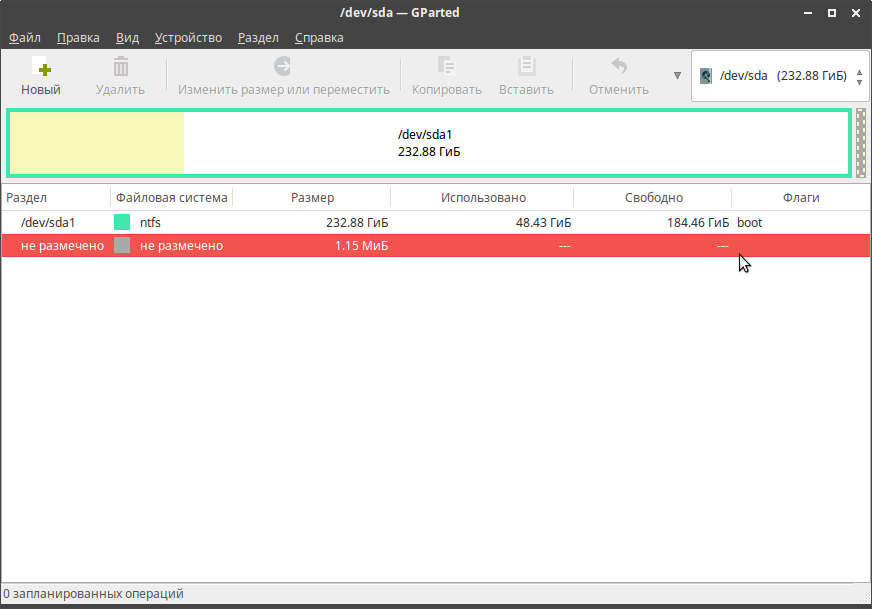
После того как мы закончили с записью флешки с Kali Linux, нам необходимо создать на USB- флешке persistence раздел. Для этого нам понадобится программа Gparted, скачать которую вы можете с официального сайта разработчика. Теперь запуск Gparted:
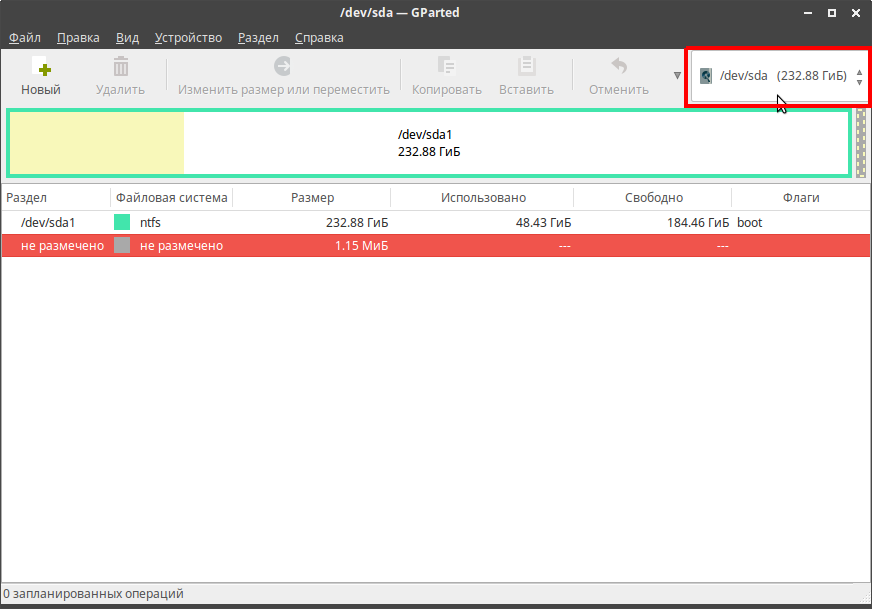
Нажимаем на выделенное окошко и ищем в выпадающем списке USB флешку и кликаем по нему. В моем случае это /dev/sdg:
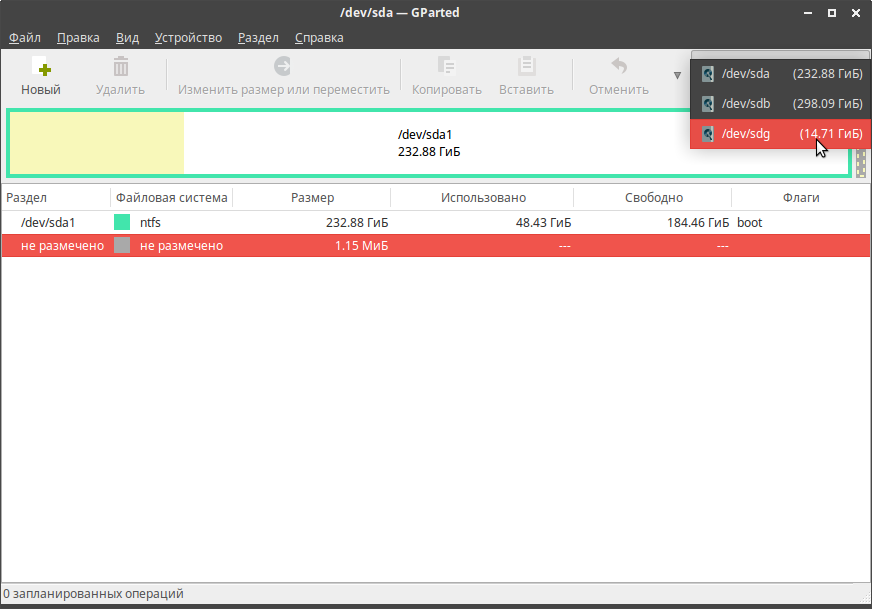
И при переходе к разделам на нашей USB флешке мы видим, что Etcher, с помощью которого мы записывали Kali Linux, разметил лишь необходимый объем памяти, а свободное место оставил неразмеченным:
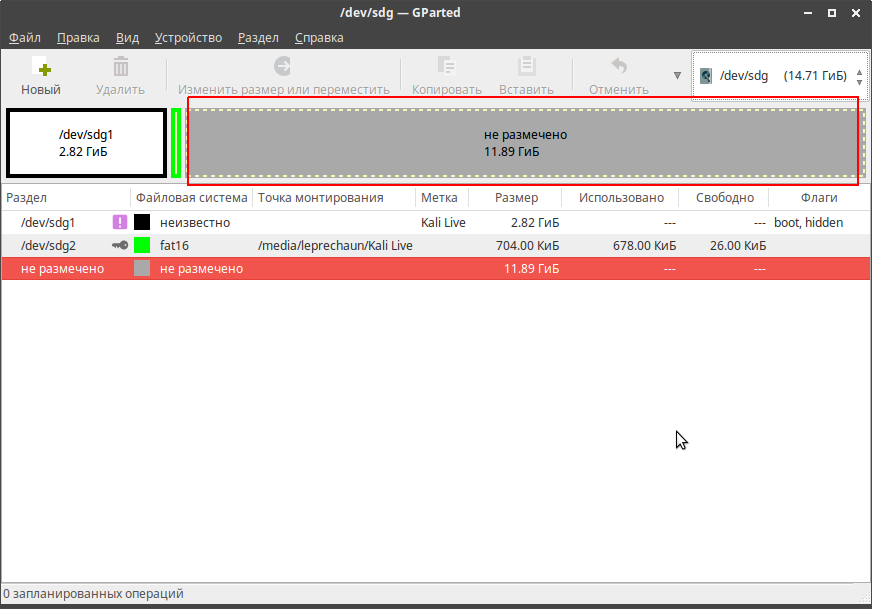
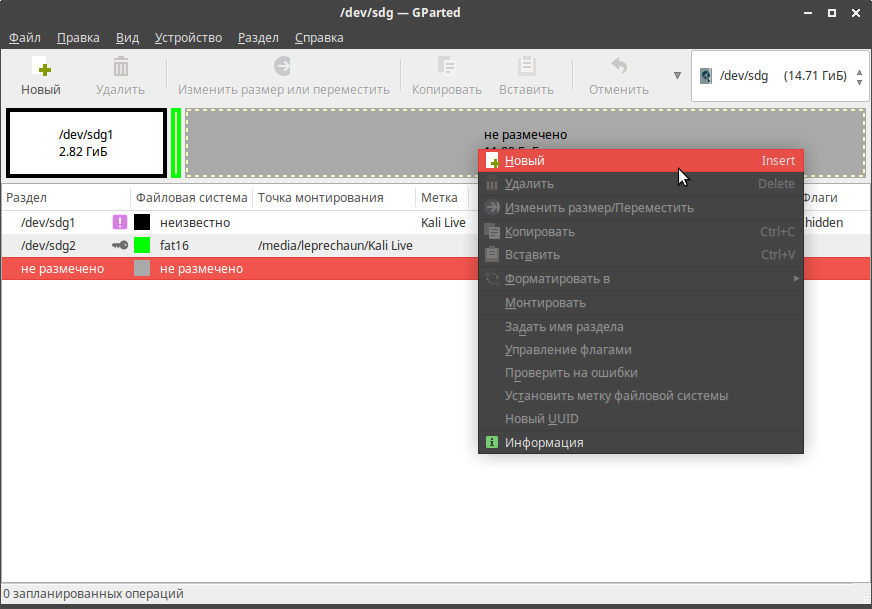
На этом неразмеченном пространстве мы и создадим наш persistence раздел. Правой кнопкой мыши кликаем по неразмеченной области и выбираем Новый:
В открывшемся окне выбираем максимально допустимый объем памяти для раздела, в пункте Создать как выбираем Основной раздел, файловую систему выбираем Ext4. В поле Метка прописываем persistence и затем нажимаем добавить:

После этого нажимаем Применить и Gparted начнет разметку USB диска:
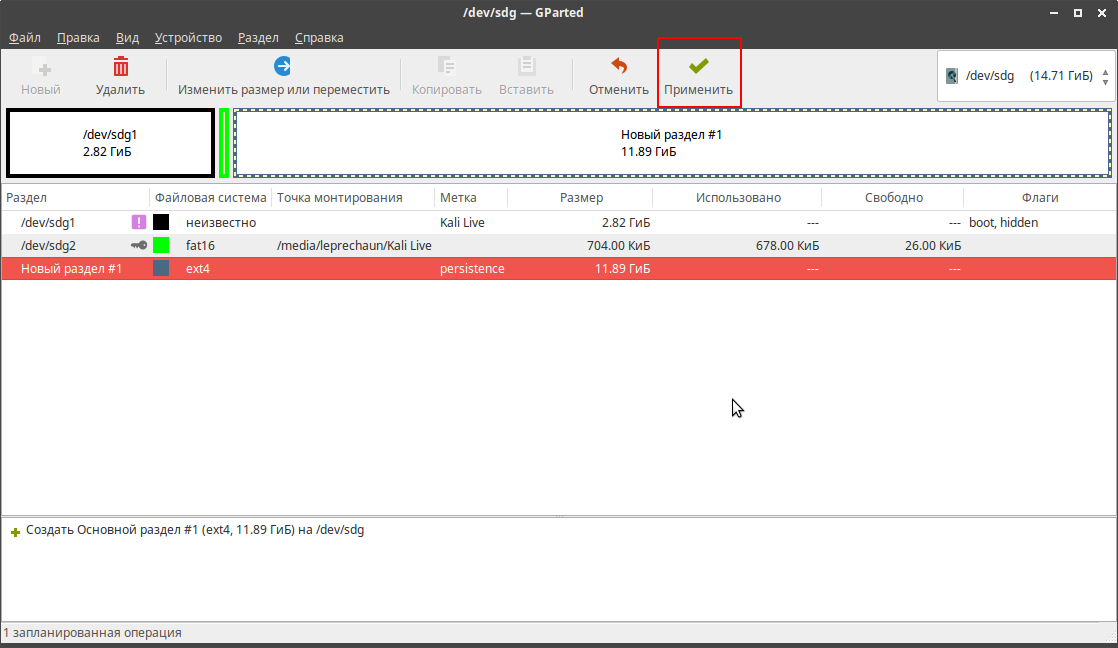
Вы уже можете выполнять запуск с флешки kali linux, но перейдем к настройке persistence раздела Kali Linux.
Настройка persistence раздела Kali Linux
Теперь перезагружаем компьютер, загружаемся с вашей флешки с Kali Linux и выбираем пункт Live USB Persistence и входим в систему со стандартными логином — root и паролем — toor:
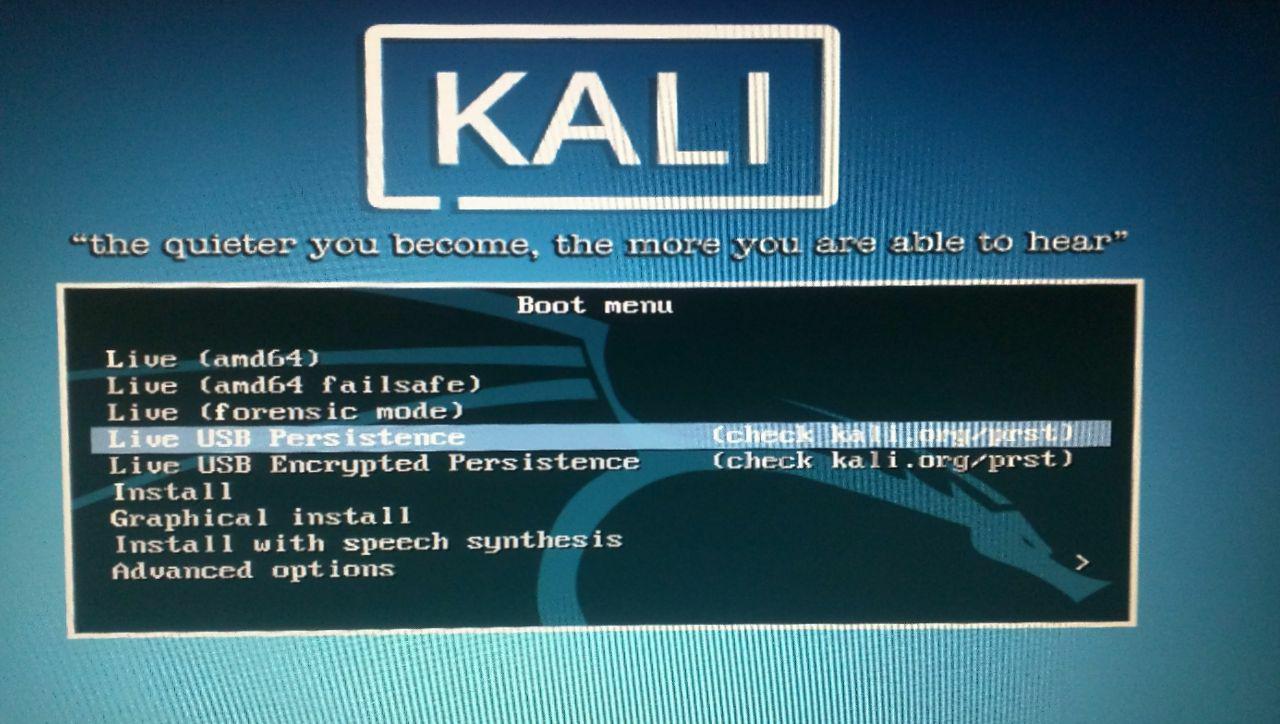
После того как вы войдете в систему на вашем рабочем столе должен появиться файл раздела для постоянного хранилища. Теперь нам необходимо найти его местонахождение. Открываем терминал и прописываем команду:
И ищем ваш постоянный раздел на флешке. В моем случае это /dev/sdg3:
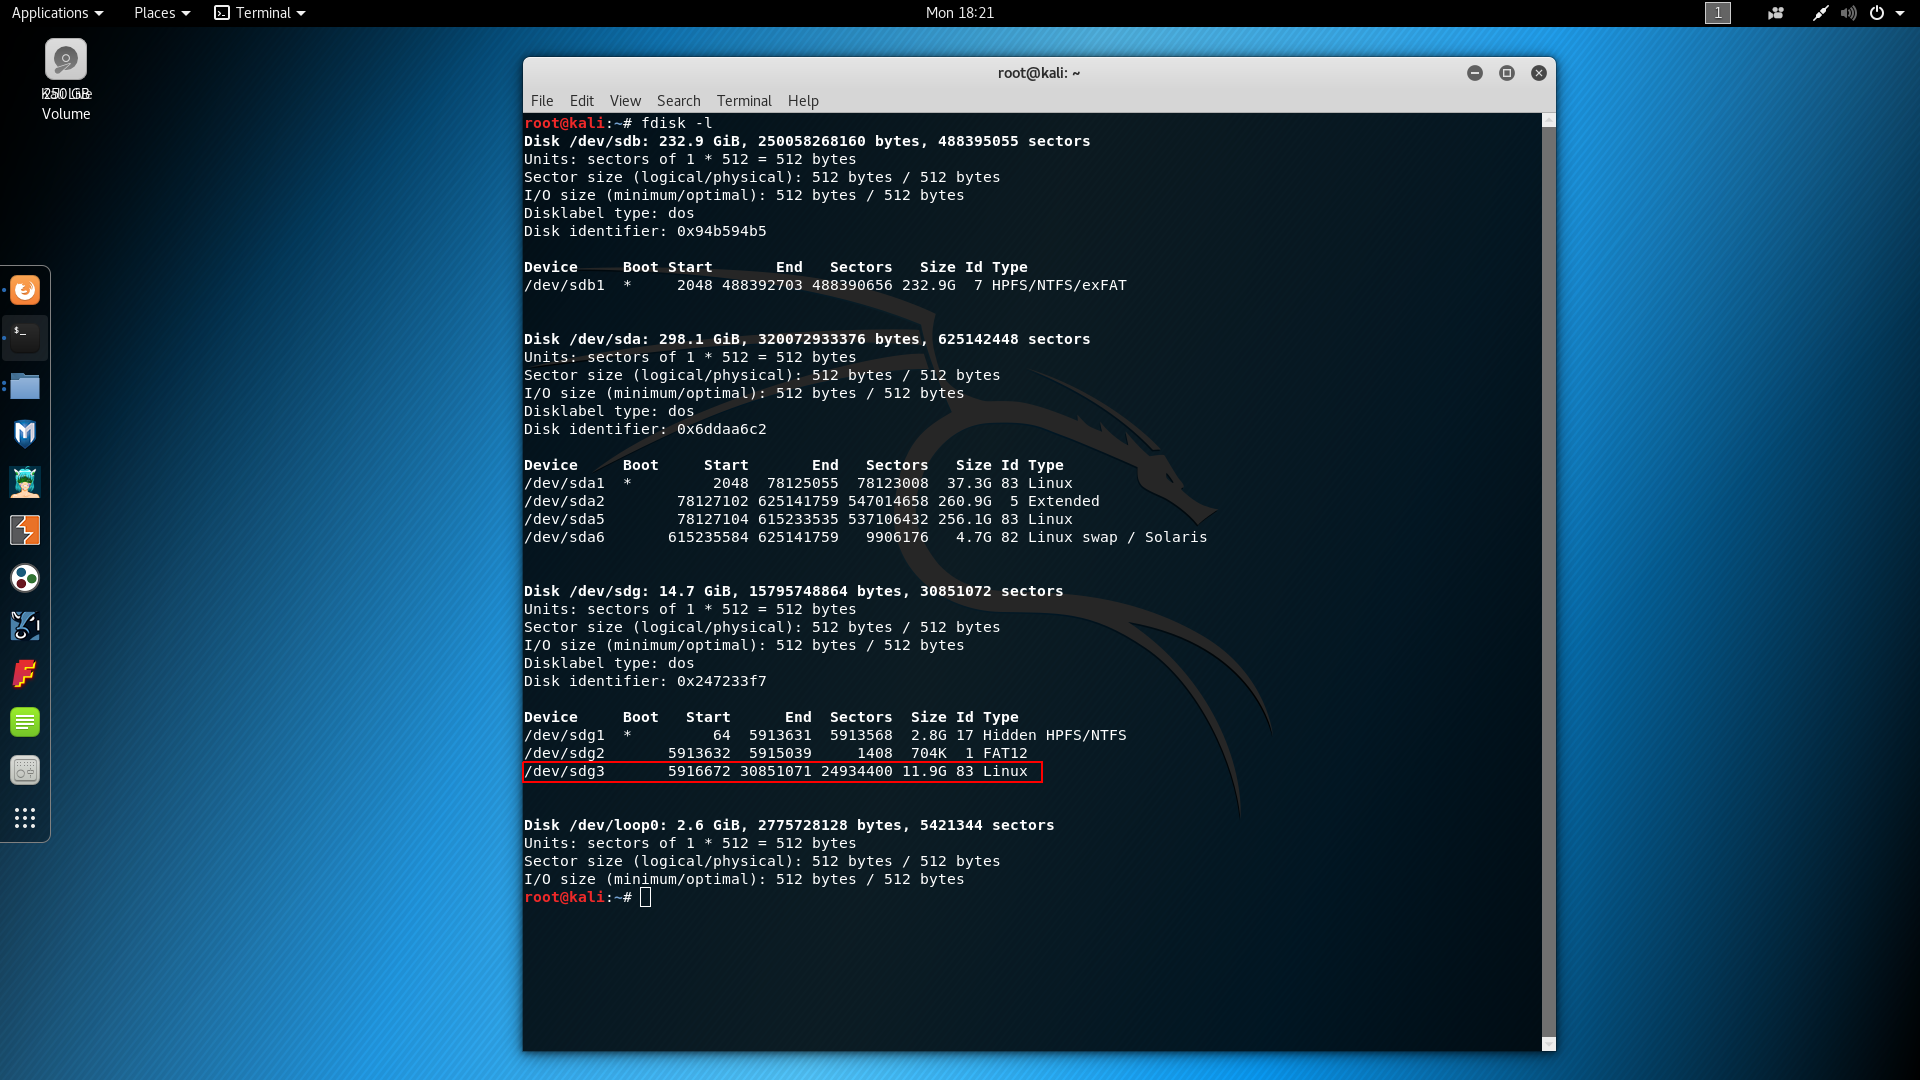
Затем прописываем в терминале следующие команды, где вместо sdg3 — ваше расположение раздела флешки:
mount /dev/sdg3 /mnt/USB
echo «/ union» >> /mnt/USB/persistence.conf
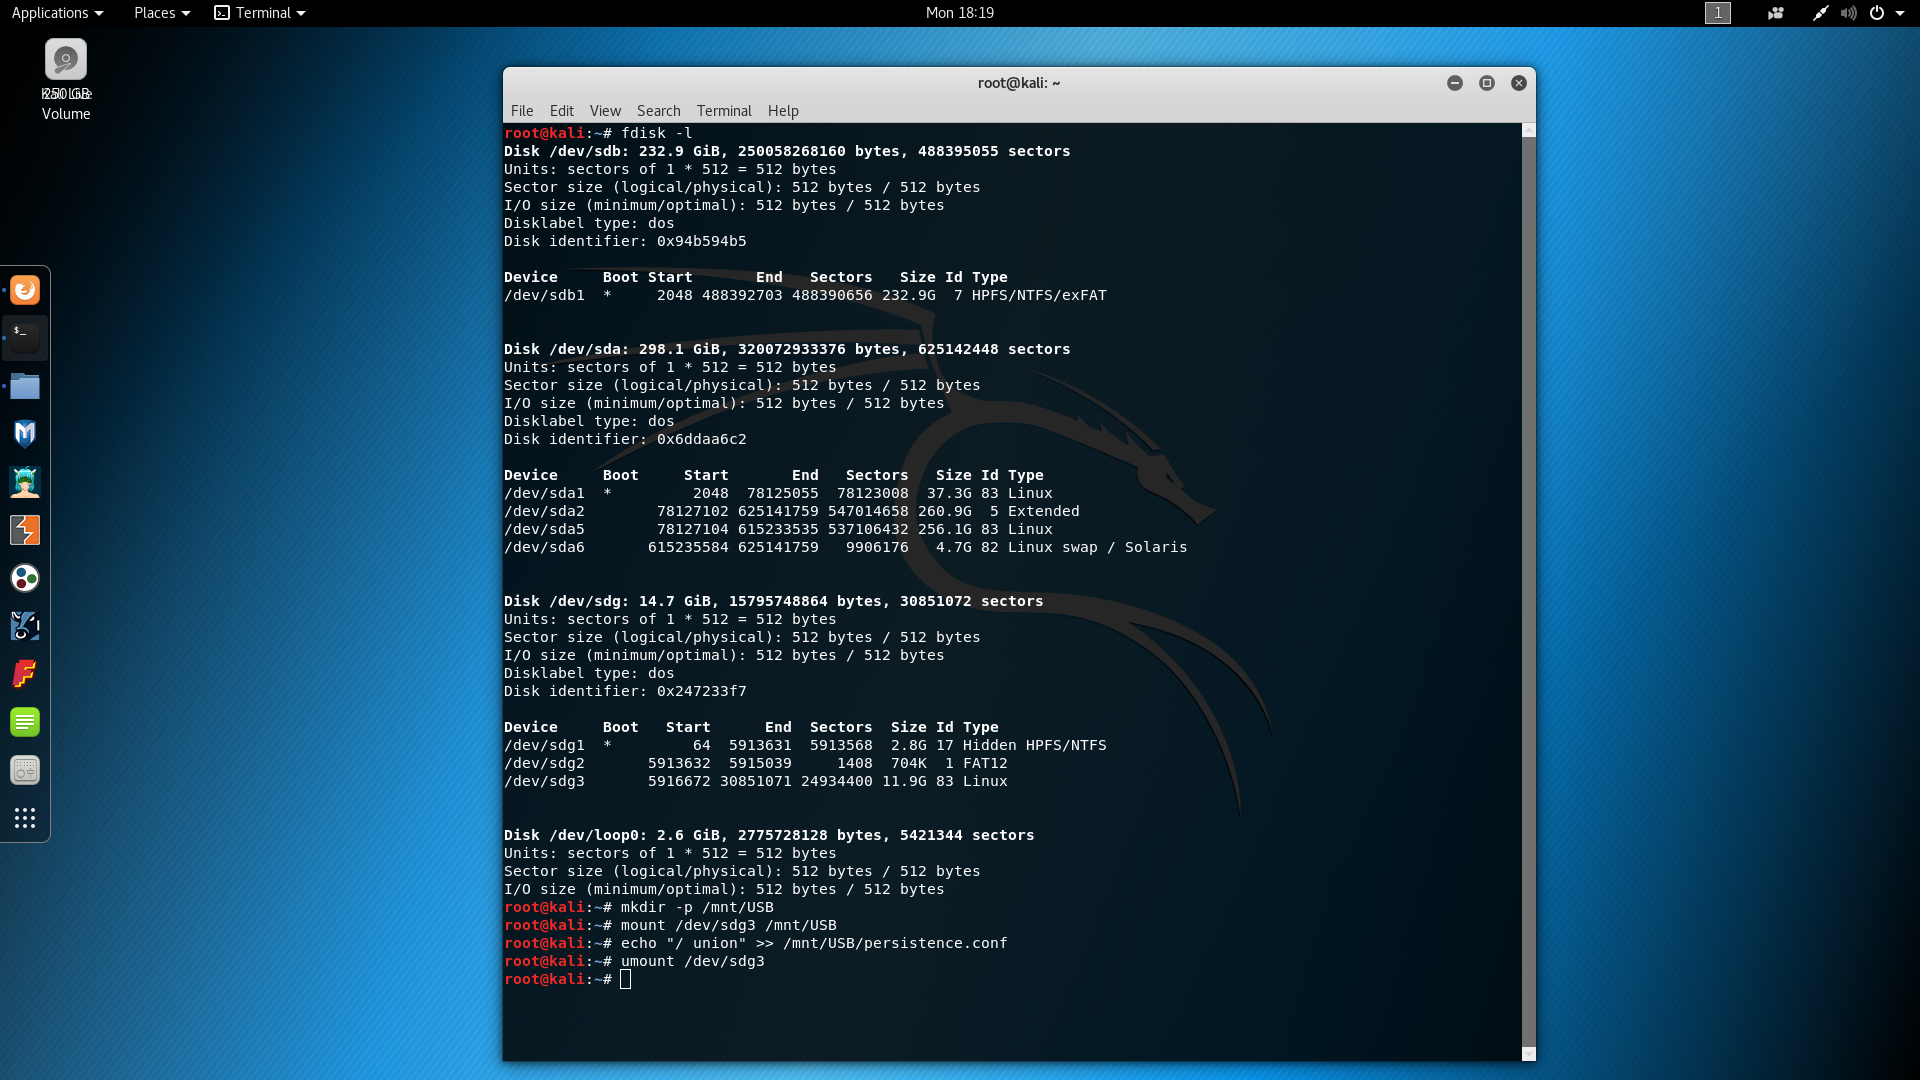
После этого можете выполнять запуск вашей системы и использовать вашу LiveUSB с Kali Linux с возможностью сохранять все системные настройки и данные.
Выводы
Таким образом мы рассмотрели как делается загрузочная флешка kali linux в Windows и Linux с возможностью сохранять все внесенные в систему изменения и данные.
Обнаружили ошибку в тексте? Сообщите мне об этом. Выделите текст с ошибкой и нажмите Ctrl+Enter.