What Is DMG File

DMG file is an Apple Disk Image file. It is also called a Mac OS X Disk Image file, which is a digital reconstruction of a physical disk. DMG is typically a file format used to store compressed software installers without having to use a physical disc. You will most likely only see them when downloading macOS software from the internet.
This macOS disk image format supports compression, file spanning, and encryption, so some DMG files may be password protected. DMG files also support 128-bit and 256-bit AES encryption, which means you can create password-protected compressed folders.
Why Do You Need DMG File?
The main reason macOS uses DMG files is to ensure that the files are downloaded correctly and have not been tampered with. DMG files contain something called a checksum, which basically verifies that the file is 100% intact.
This small window first goes through a stage of validating the file and then proceeds to unzip it once it is sure that the file is good. That’s the second reason macOS uses DMG files — they’re a compressed format that keep your downloads smaller.
How to Open DMG File on Windows/Mac
How to Open DMG File on Mac
You can open DMG files by double-clicking the file. Once the file is clicked, the DiskImageMounter utility bundled with macOS verifies the integrity of the disk image. After confirming the disk image, the utility mounts the virtual disk and places it on your desktop and in Apple Finder windows as if it were a CD or USB flash drive inserted into your computer.
You can double-click the program icon in a Finder window to run the application. Alternatively, you can drag the program icon to the Applications folder icon in the same window, move it to the Applications directory on your computer, and then double-click the application directly from the Applications directory to run it.
How to Open the DMG File on Windows
A DMG file not only stores compressed files such as images and videos but also contains a software program. You can use one of the programs mentioned below to extract/open a DMG file in Windows, but you can’t execute the program and use it like you can with other Windows applications. To use the same program in Windows, you need to download the Windows version, not the Mac DMG version.
However, assuming the DMG files only contain files such as images or videos (which may also be in a Windows-compatible format), or that you just want to view the contents of the DMG file, you should have no problem viewing them with 7-Zip.
How to Create the DMG File
How to create the OMG file on Mac? Here are the steps:
Open Disk Utility and choose File > New Image > Image from Folder. In the window, select the folder you want to encrypt and click the Choose button.
Then, you can configure some additional options, like where to save the file and whether to use encryption. When you encrypt the folder, your Mac will prompt you to enter your password twice.
Also, by default, the DMG file is read-only. If you want a read-write DMG, change the Image Format option from Compressed to Read/Write.
When you go to open your new DMG file, it will prompt you for the password you chose. After typing the password, the DMG file will mount like any other.
Tips for Using DMG File
The following are two tips for using the DMG file.
1. Use the Correct File
If you’re on a Windows computer, look for a similar file named ISO. Using this type of file avoids the need for extraction tools. You also don’t need to download the application files in macOS format. Look for files with this file extension, if possible.
2. Use DMG Files Like a Flash Drive
A DMG file acts as if a separate device were transmitting information to your computer. Think of this download as a way to avoid plugging another storage system into your computer. Downloading a DMG file may take less time than traditional information transfer from a flash drive or CD to your device.
Getting started with macOS Disk Utility: RAID, images, and repairs
 Chip Loder | May 14, 2023
Use Disk Utility to keep your Mac drives in line.
Disk Utility provides features for creating disk images, RAID, and repairing disks. In the second part of our deep dive, we’ll look at those options.
In part 1 of this series, we looked at the basics of Apple’s Disk Utility: what are devices and volumes, how to create and use volumes, and how files and folders are stored on volumes.
This time, we’ll look at using disk images, RAID, and repairing disks with Disk First Aid.
Getting started with disk images
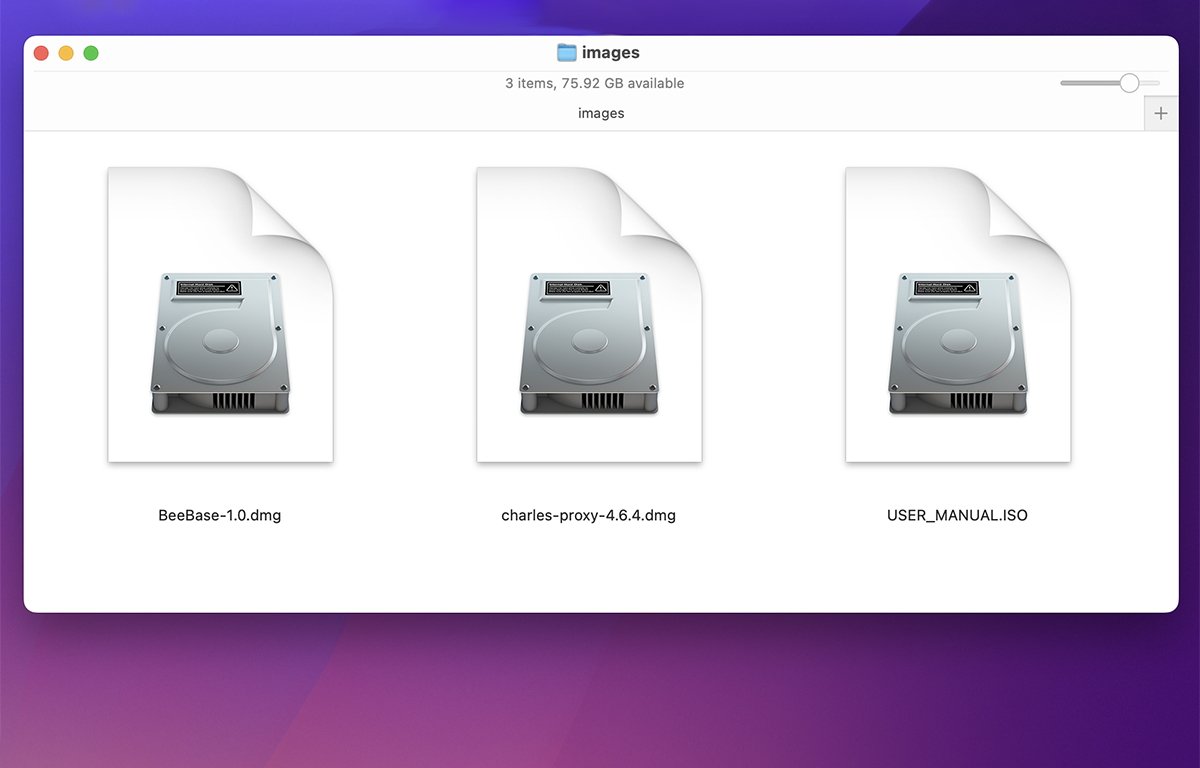
Disk Utility allows you to make exact copies of storage volumes and entire devices and store them as disk images. For Mac disks, these are usually stored as .dmg files using Apple’s APFS or HFS+ filesystems.
Disk Utility and the Mac Finder also know how to mount, copy, and format other disk image formats such as .iso, FAT16 and FAT32, and exFAT formats.
.iso images can only be mounted on the Finder’s Desktop if they were formatted with a filesystem the Mac Finder knows how to read. Additional image formats can be supported by installing third-party foreign file system plugins, which add additional filesystem support to macOS.
For optical formats such as CD-ROM (Yellow Book) and Compact Disc (Red Book), Disk Utility makes .cdr images, but .cdr is really just .iso with an optical standard format applied. The macOS Finder also knows how to natively read some extended CD-ROM formats such as CD-ROM\XA, better known as Photo CD.
In many cases you can convert a .cdr Disk Utility image to an .iso image merely by changing its file extension to .iso — and sometimes vice versa.
You can read and save any optical format to an image file using Disk Utility, provided it doesn’t contain a copy-protection scheme such as those used on commercial DVDs or Blu-Rays.
Beware, however, that in order to legally make disk image copies of copyrighted materials such as audio CDs, you must physically own the discs. You also must not share the copies with anyone without the written permission of the copyright holders.
Once you’ve made disk images of a volume or device, you can later restore the volume or device using Disk Utility’s Restore feature.
Creating disk images
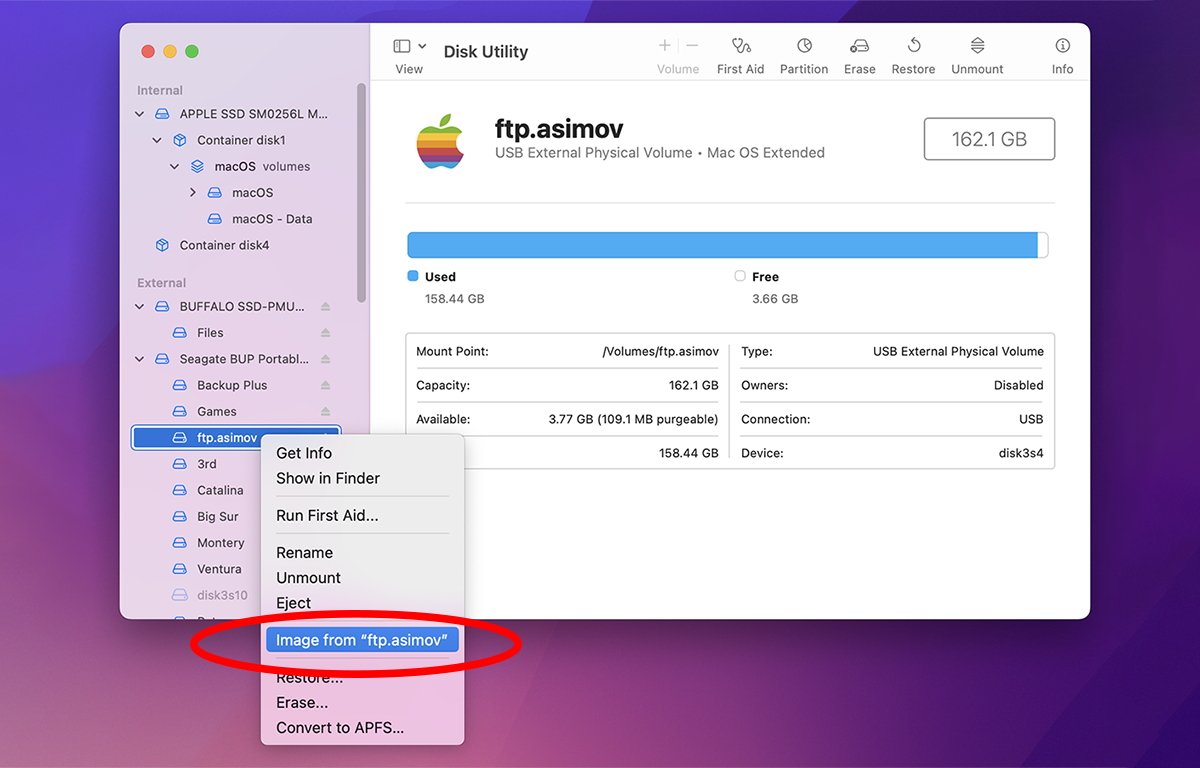
To make a disk image of a volume in Disk Utility, open the app in the Utilities folder on your Startup Disk, and select a volume from the volumes list in Disk Utility’s main window on the left side, then Control-click or right-click.
In the pop-up menu, «Select «Image from Volume Name», where «Volume Name» is the name of the volume you clicked on:
A standard file pane will appear, through which you can give the file a name. In the lower right corner is a Format menu, from which you can choose which kind of disk image to create:
- read-only
- compressed
- read-write
- DVD/CD master
Select a location in the dialog where you want to save the disk imag. Any storage location with enough space to hold the image will work.
Read-only images will mount on the Finder Desktop like real volumes, but you won’t be able to write any files to them or modify existing files on them.
Compressed images are like read-write images, but their data is compressed to make the disk image smaller.
Read-write images are the same as read-only except they are fully writable when mounted on the Desktop. You can write additional files to them, and modify existing files on them.
When you unmount the read-write volume, any changes get saved into the disk image.
DVD/CD master makes an exact bit-level copy of a CD-ROM, Compact Disc, or DVD disk. Again, be aware copying a DVD in this manner will likely result in an unreadable copy as the copy protection scheme won’t work on the copied data.
Unlike the Compact Disc audio standard, DVDs have built-in copy protection to prevent piracy.
The same legal restrictions apply to copyrighted DVDs as apply to copyrighted CDs.
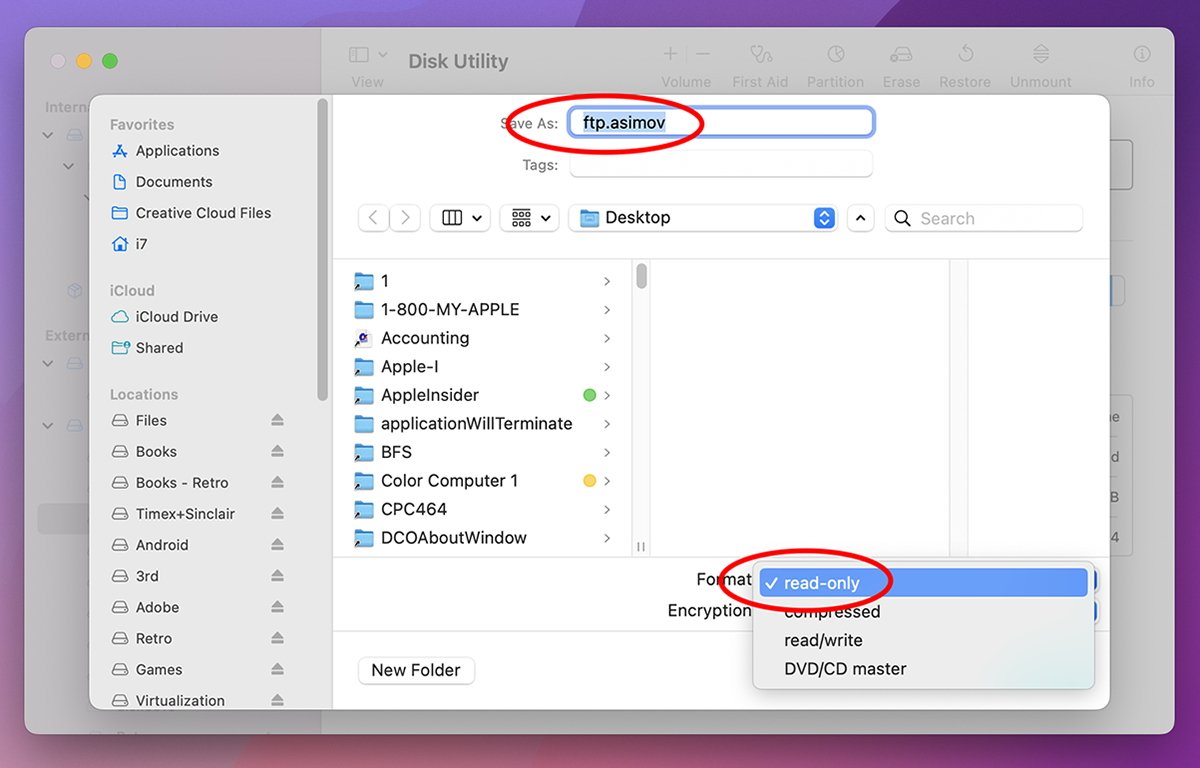
In the Encryption popup menu below the Format menu, you can optionally choose 128-bit or 256-bit AES encryption. If you choose an encryption option, all data on the volume will be encrypted when the image is created.
Click the «Save» button to begin creating the disk image. You’ll be prompted by the Disk Utility helper tool for a system admin password to begin creation.
As Disk Utility creates the disk image, a progress sheet will appear and, when completed, a success or error message will be displayed.
Note that in order for the copy to begin, Disk Utility has to unmount the volume — or in the case of a device, all volumes on the device. If there are any open files on a volume that need to be unmounted, the copy will probably fail and you’ll see an error message in the Disk Utility progress sheet.
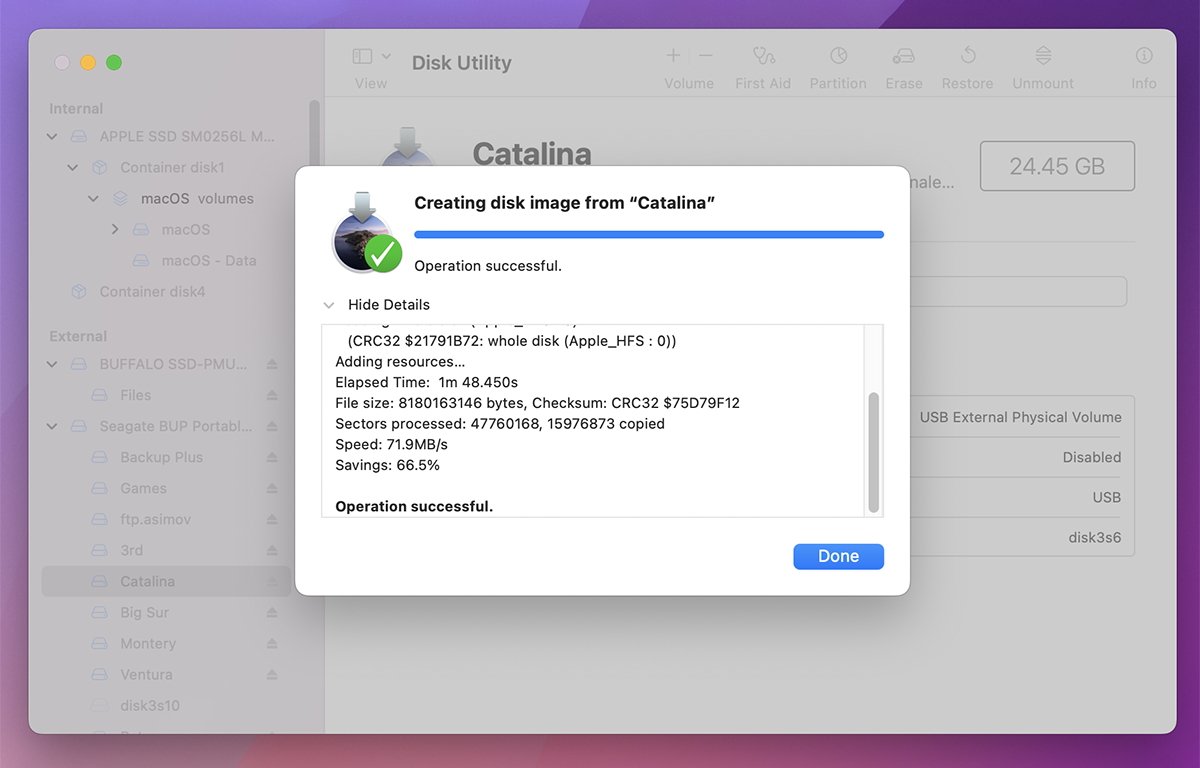
Note that you can also make disk images of entire storage devices by following the same procedure, but by first selecting «Show All Devices» in the View menu. You then Control-click on a device in the main list in the Disk Utility window and select «Image From».
Show All Devices causes Disk Utility to display not only volumes but all the physical devices containing those volumes. When you make a disk image of a device, you make a block-level image of that device — including all the volumes it contains.
After completion, you’ll have a new Disk Utility disk image which is fully transportable, copyable, and can be mounted and unmounted at will on any Mac by double-clicking the image file in the Finder.
To unmount a mounted disk image in Finder, drag its volume icon to the Trash in the Dock, or Control-click it in the Finder and select «Unmount» or «Eject» from the popup menu.
Volumes containing open files or apps can’t be unmounted until all open files on them are first closed.
When the Finder mounts a volume from a disk image, Disk Utility also makes note of it using file notification services built into macOS. Disk Utility will list all mounted disk image volumes at the bottom of the volumes list on the left-hand side of the window.
You can Control-click any disk image volume shown here and use the context popup menu just as you would on any volume on a real device.
In fact, Disk Utility also creates a virtual storage device above each mounted volume named «Apple Disk Image Media» so that you can use the context menu on it as if it were a real device:
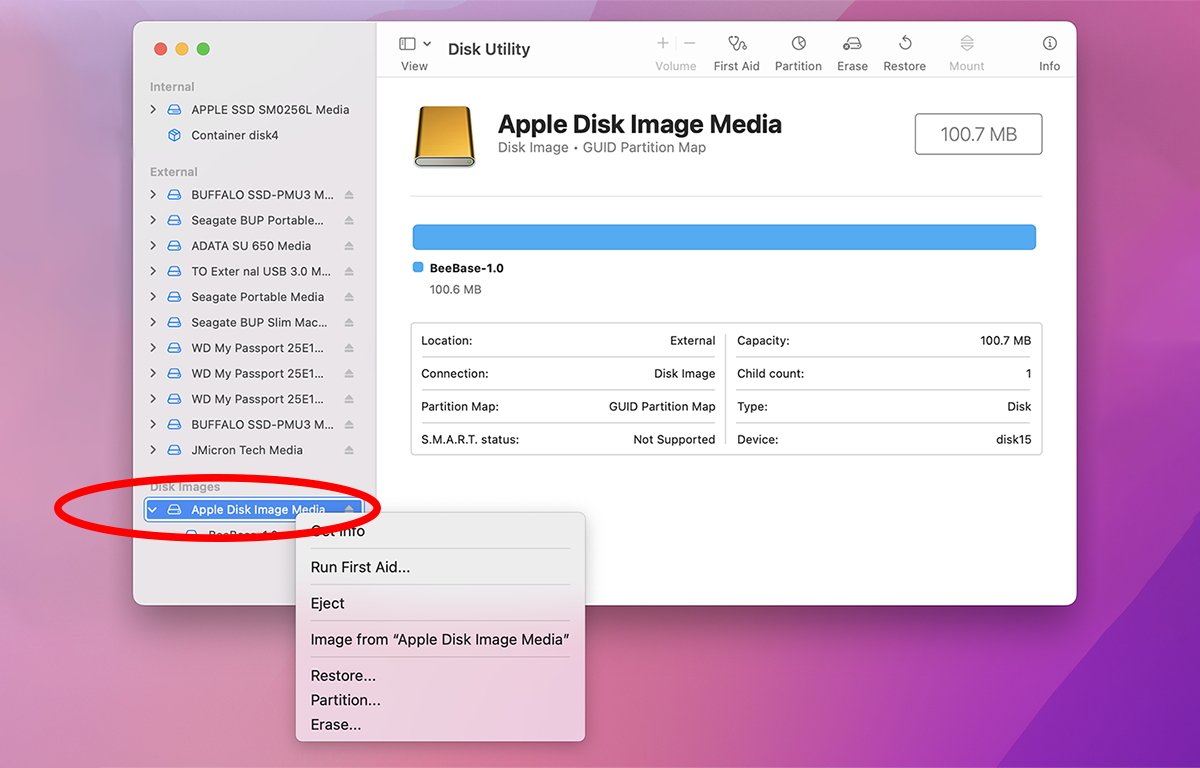
You can also unmount volumes from the volumes list by Control-clicking them and selecting «Unmount». To remove the virtual device containing the volume, Control-click it and select Eject.
Restoring from disk images
Once you have a disk image, you can restore it to a physical device fairly easily.
To do so, however, you must first scan the image to restore from via the «Images» menu in the main menubar. To do so select «Images->Scan Image for Restore», and when the standard file pane appears, select the disk image and click «Scan»:
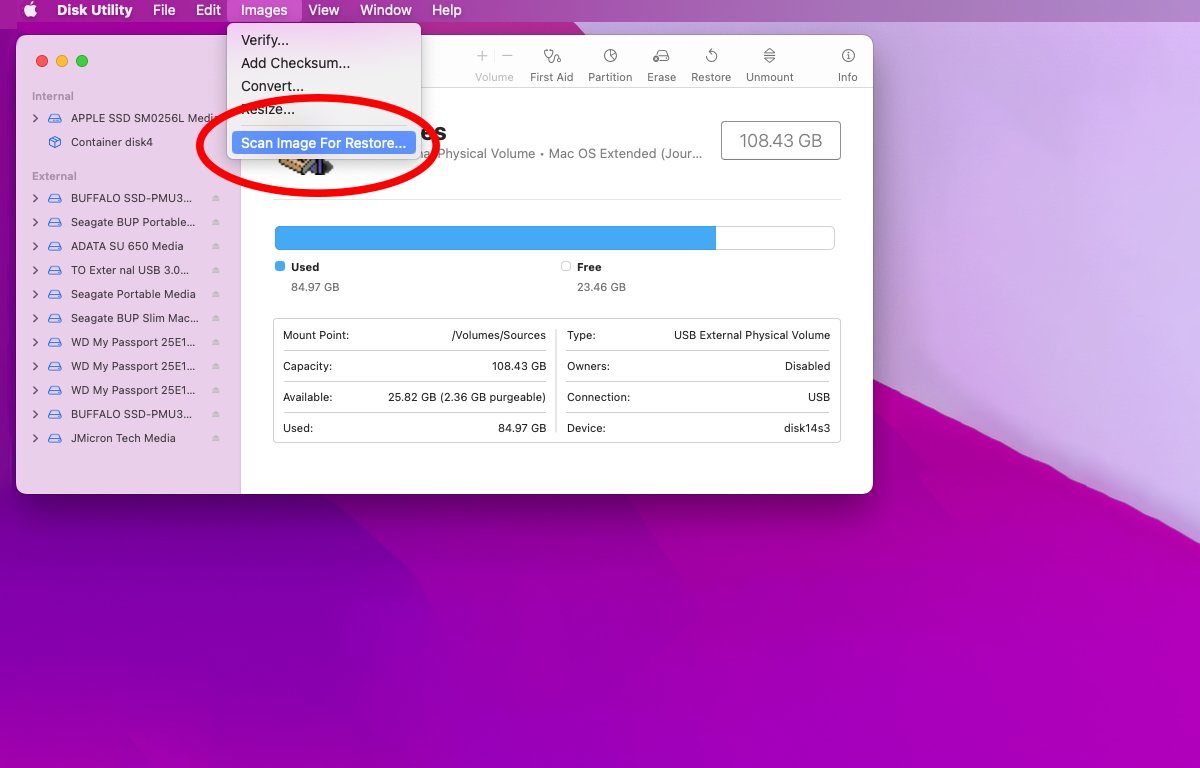
This allows Disk Utility to check the image and verify it can be restored to a device or volume.
Once the image has been successfully scanned, select a volume or device from the main list in the Disk Utility window and click the «Restore» button in the toolbar. This displays the Restore sheet:
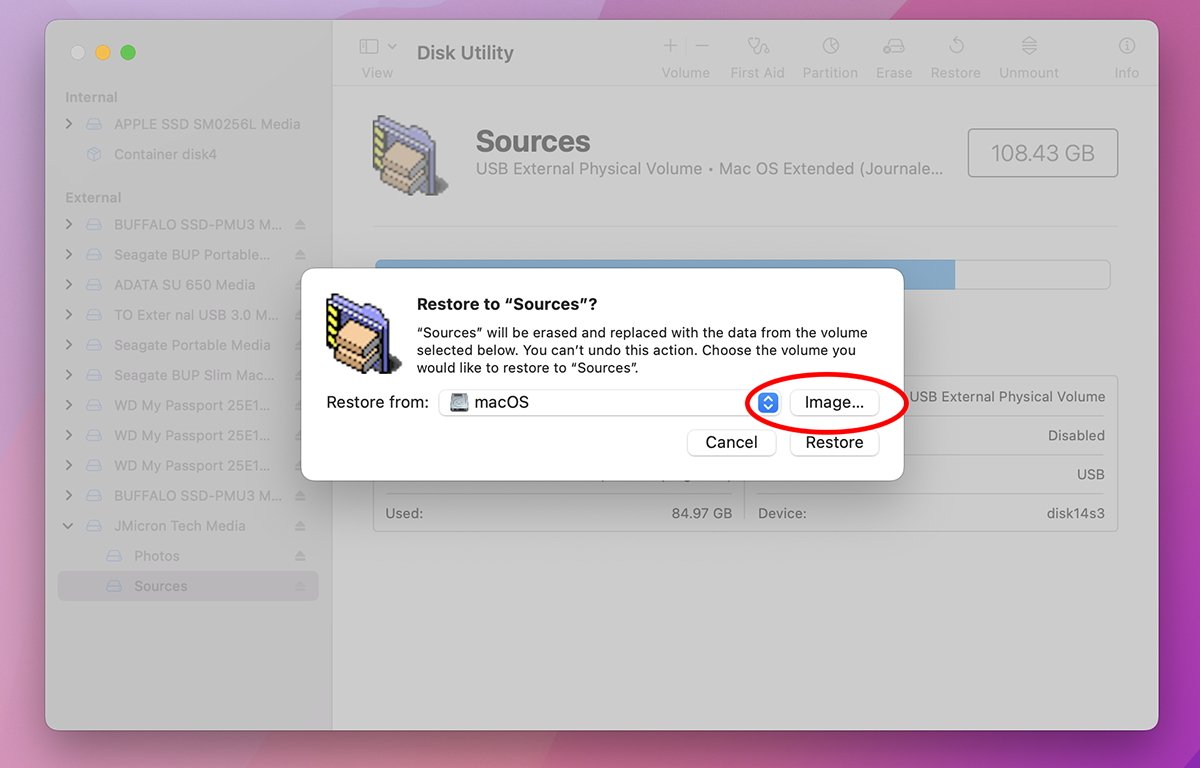
Note that this is a little counter-intuitive: instead of selecting the image you want to restore first, you select the device or volume you want to restore to first. Once the sheet appears, you can then restore from the scanned image by clicking the «Image. « button.
You can also restore to any device or volume on your Mac by clicking the volume popup button on the left of the «Image. « button and selecting any existing volume. This allows you to make an exact block-level copy of any volume to any other volume.
Use the Restore feature with care, since as soon as you click the Restore button in the lower-right corner of the sheet, all existing data on the target volume or device will be irrevocably destroyed.
Once the restore begins, Disk Utility will display a progress sheet, and when completed, whether the restore succeeded or failed. If it succeeded, Disk Utility will attempt to mount the restored volume on the desktop.
You can also restore by Control-clicking in the main list in the Disk Utility main window.
There are a few other options in the «Images» menu in the main menubar:
- Verify
- Add Checksum
- Convert
- Resize
«Verify» allows you to verify existing disk images, and «Convert» allows you to change an existing disk image into any one of the other four formats originally mentioned at the top of this article.
Disk First Aid
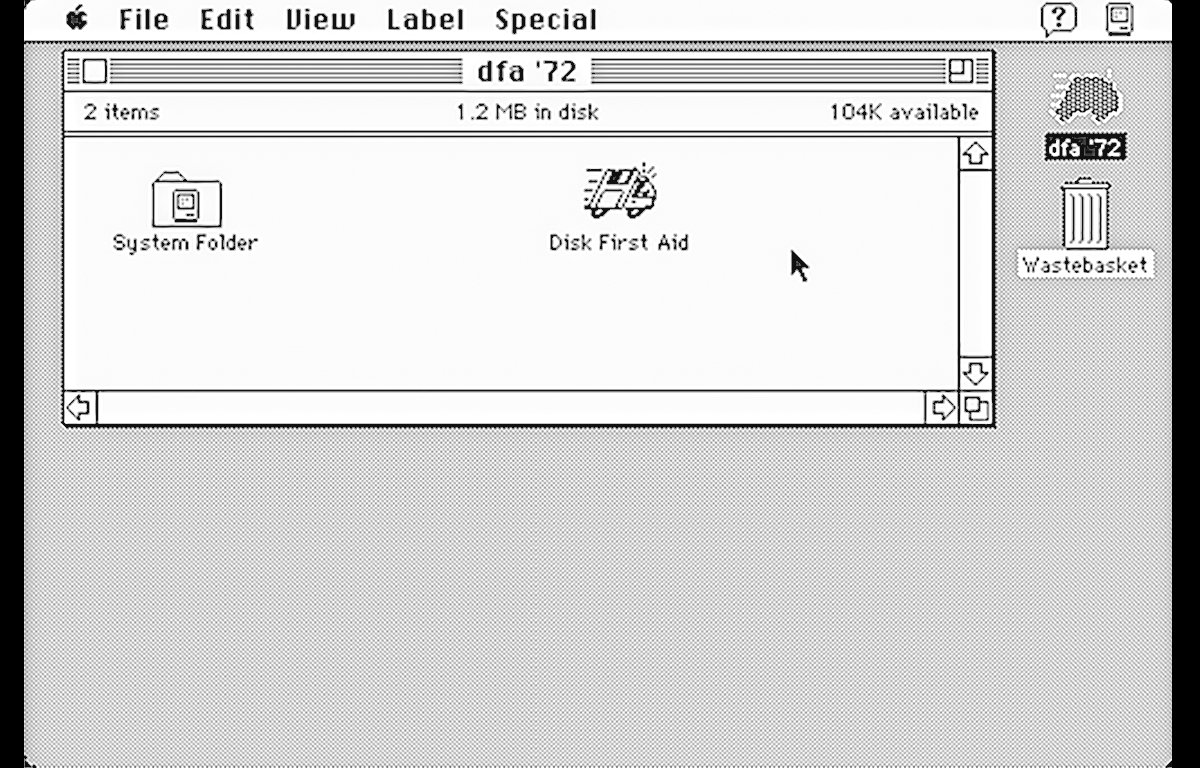
Disk First Aid, or DFA as it is better known, has been around on the Mac since System 6 in the late 1980’s. With Disk First Aid, you can scan a device or volume for problems and try to fix those problems if the tool can.
On modern Macs, this includes scanning a device’s partition map and comparing it against any found partitions on the device to make sure they match. There’s also the scanning of each volume’s volume header, catalog, and extents files to make sure there are no file or folder discrepancies.
On top of that, there’s the checking of UNIX permissions, owners, and groups to make sure the filesystem settings on system files are what they are expected to be.
If Disk First Aid finds any problems with a volume or any damaged volumes on a device, it tries to repair them in order to make them usable again.
Except in the case of repairing damaged volume structures that prevent a volume from mounting, Disk First Aid doesn’t usually recover any files on volumes directly. Apple also has a technote on how to attempt to repair a Mac disk using Disk Utility.
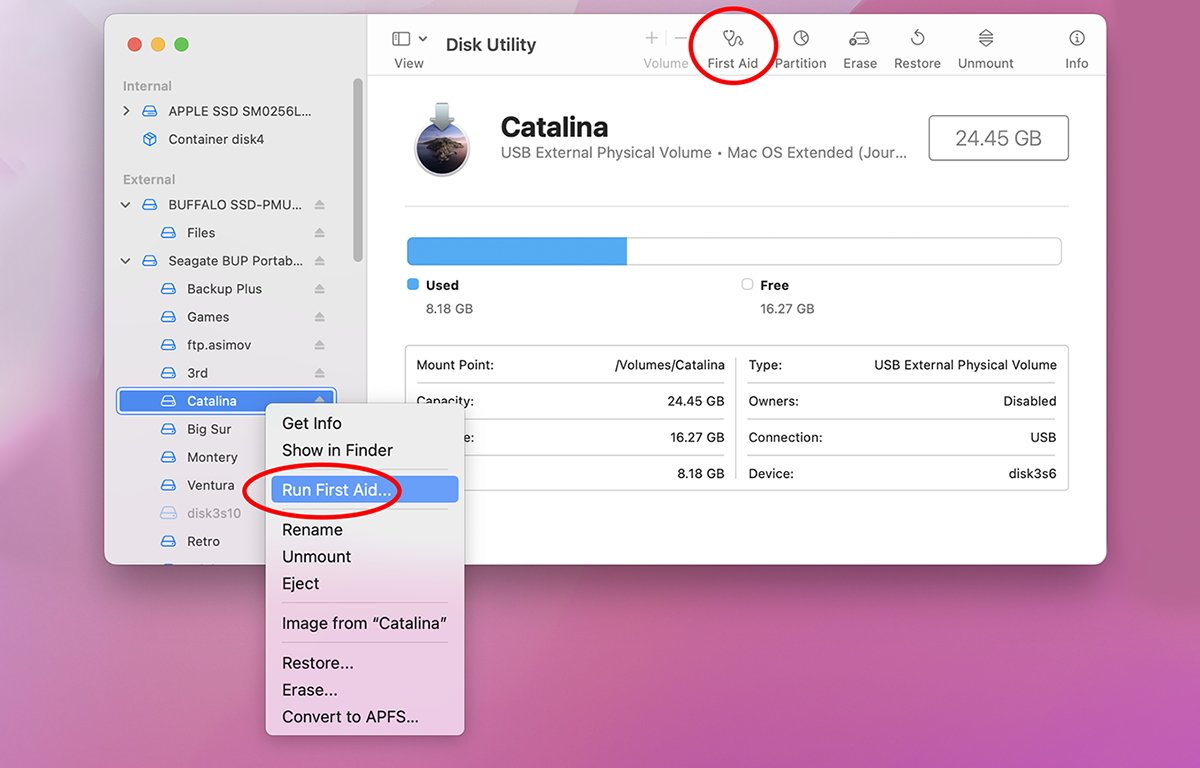
To repair a volume in Disk First Aid, select it from the main window’s sidebar, and click the «First Aid» toolbar button, or Control-click the volume in the main window, and choose «Run First Aid» from the popup menu.
Click the confirmation button in the alert, and Disk First Aid will begin checking the volume for errors. If it finds any, it will attempt to repair them.
When the repair is finished, Disk First Aid displays a sheet with a text summary of what it found and what it repaired, if anything.
You can also run First Aid on physical devices in addition to volumes.
If you’re repairing an APFS disk that contains multiple volumes, you want to run First Aid on them in reverse order: repair volumes first, then container volumes, then disks. For more information, see Apple’s technote on the topic.
Command line
Disk First Aid relies on several command line tools built into macOS: namely hdutil, diskutil, and dd. To get more info on any of these tools, run their corresponding man pages in Terminal. For example:
man diskutil and press Return.
A striped Redundant Array of Independent Disks (RAID) can allow huge performance improvements by marshaling drive data to and from multiple drive mechanisms simultaneously. The increased throughput spread across disks speeds up I/O and makes overall access faster while presenting the entire array to the computer as if it was one drive.
With drive prices fairly low today, it’s easy and inexpensive to set up your own RAID using several drives.
In general, you want to use the fastest external connection possible for RAID, such as Thunderbolt. USB will work too — you just won’t see as big a performance improvement over USB and you will with a Thunderbolt RAID.
Several third-party vendors sell RAID-enabled drive enclosures which are simple to set up and use.
We covered how to create your own inexpensive RAID array in a previous article.
Checking S.M.A.R.T status
Self-Monitoring, Analysis, and Reporting Technology (S.M.A.R.T.)is a storage standard for monitoring drive health on drives that support it. Most modern SSDs and hard drives have S.M.A.R.T. built into their firmware inside the drive.
Standard SATA commands are used to query the S.M.A.R.T. status of a drive. Disk Utility knows how to do this automatically so there’s nothing you need to do to check S.M.A.R.T. status.
Some external USB drives don’t report their S.M.A.R.T. status because the controller boards found in these drives don’t support translating S.M.A.R.T. commands from the SATA drive mechanism to USB.
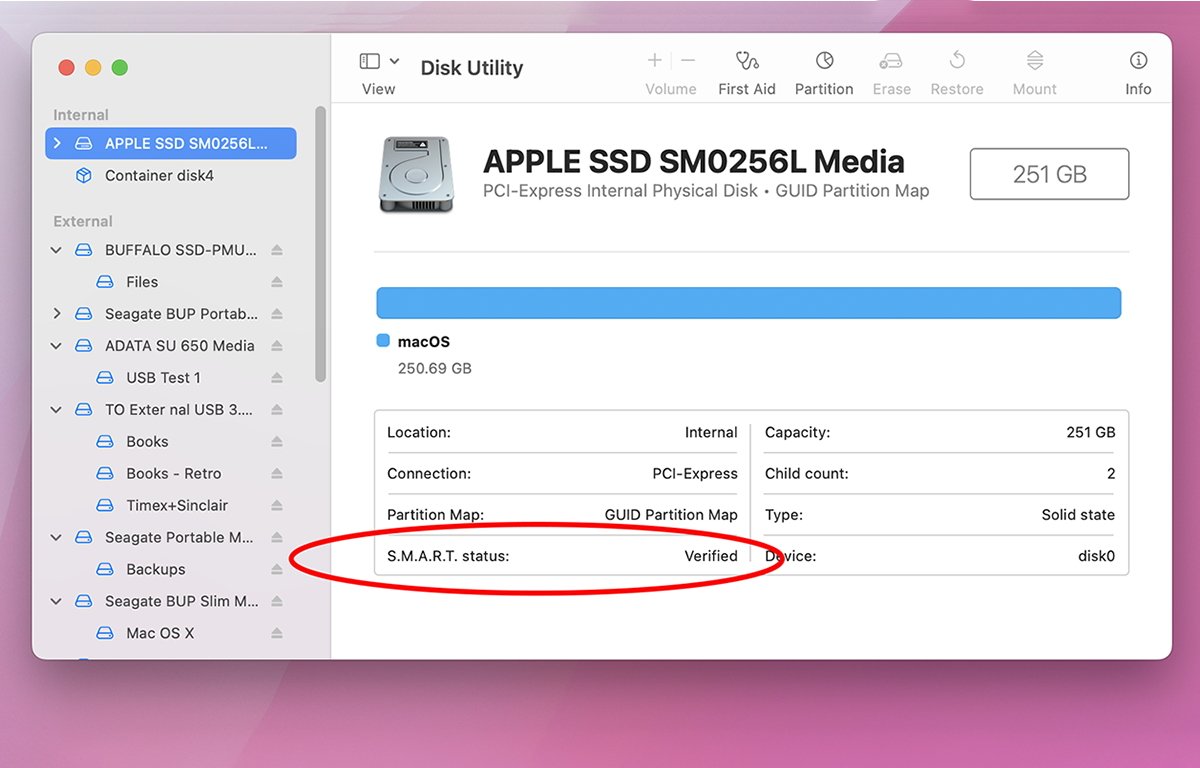
To read a supported drive’s current S.M.A.R.T. status, start by looking at drives and volumes in Disk Utility’s main list, then select any device in the list. Make sure to select a physical device and not just a volume.
If the drive supports S.M.A.R.T., Disk Utility will display its status in the text grid in the main window to the right of the device list, under the device’s name:
There are a few other options we didn’t cover in this article such as converting, adding, and removing existing APFS volumes, turning journaling on and off, and adding checksums. We’ll address these in part 3.
Chip is a 30-year Apple industry veteran, is author of 18 commercial Mac software products, and is a former Apple and Sony employee.
Related Articles

Apple fixes exploited security flaws with iPadOS & iOS 16.6.1, watchOS 9.6.2, macOS Ventura 13.5.2 updates
Less than a week until Apple's iPhone 15 event, Apple has released what is likely close to its last updates to iOS 16.6, macOS Ventura 13.5, and watchOS 9.6 to patch some actively exploited security problems.

UPDF's ChatGPT-powered PDF editor for MacOS users now 63% off
Versatile and capable PDF editing comes to Mac, iPad, iPhone, PC, and Android devices with UPDF, even with the latest iOS 17 updates. UPDF's all-in-one platform makes it easy for anyone to read, annotate, edit, sync, convert, encrypt, sign, and organize your PDF files, and it is now on sale for a limited time.

Game Mode isn't enough to bring gaming to macOS, and Apple needs to do more
Apple is bringing Game Mode and a porting toolkit to macOS Sonoma. It's a good start, but Apple needs to do far more to attract gamers and game makers to the Mac.
Как очистить apple disk image media
Узнайте, как использовать восстановление macOS до переустановки операционной системы Mac на встроенный накопитель или внешний диск.
Переустановить от восстановления в macOS
в macOS восстановления позволяет легко переустановить Mac операционной системы, даже если вы должны стереть загрузочный диск в первую очередь. Все, что вам нужно, это подключение к интернету. Если беспроводная сеть доступна, вы можете выбрать его из беспроводных меню в строке меню. Это меню также доступен на восстановление ОС macOS.
1. Начать с восстановления ОС macOS
Чтобы начать с восстановления ОС macOS, включите ваш Mac и сразу же нажмите и удерживайте одну из следующих комбинаций на клавиатуре. Команда-R обычно рекомендуется, особенно если вы никогда не устанавливали ОС macOS Сьерра-10.12.4 или поздно.
Команды (⌘)-Р
Установите последние версии macOS, которая была установлена на вашем Mac.
Вариант-⌘-Р
Обновление до последней версии macOS совместимо с Mac.
Сдвиг-Параметр-⌘-Р
Установить macOS, что пришел с вашего Mac или ближайшей версии по-прежнему доступны.
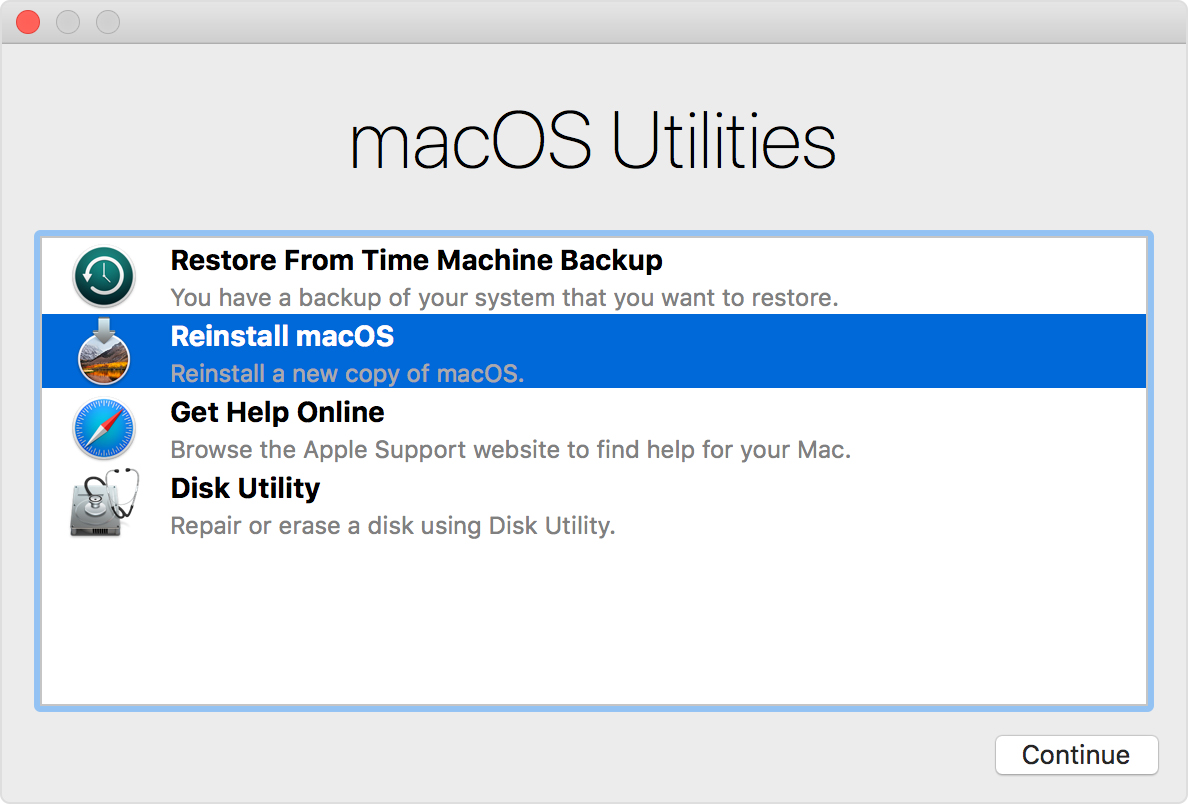
Отпустите клавиши, когда вы видите логотип Apple, вращающийся глобус, или запрос на прошивку пароль. Когда вы видите окно утилиты, вы начали с восстановления и macOS.
2. Решить, следует ли стереть (форматировать) диск
Если вам нужно стереть диск перед установкой macOS выберите пункт Дисковая утилита в окне утилиты нажмите Продолжить. Вы, наверное, не нужно стирать, если вы продаете или отдаете свой Mac или есть проблема, которая требует от вас, чтобы стереть. Узнать больше о том, когда и как стирать.
3. Установить macOS
После запуска из macOS восстановления, выполните следующие действия, чтобы установить macOS:
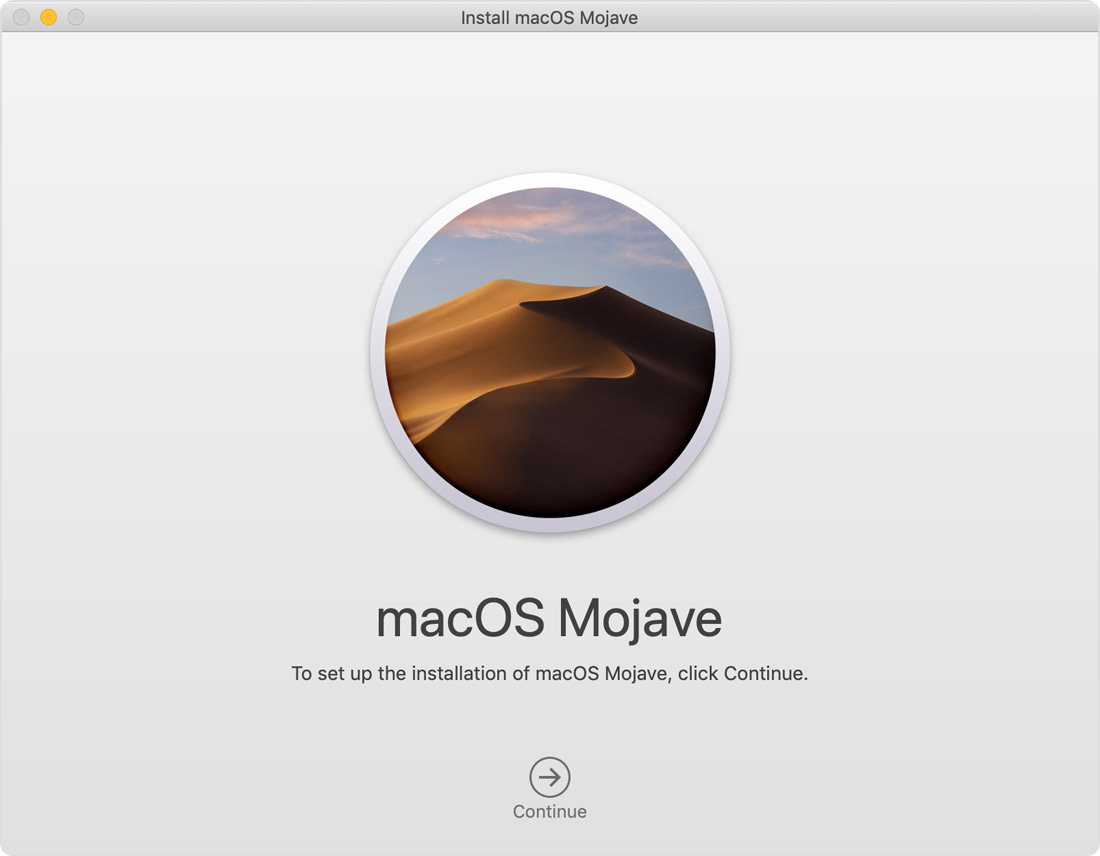
- Выбрать переустановить Макос (или переустановить OS X) в окно утилиты.
- Нажмите кнопку Продолжить, а затем следуйте инструкциям на экране, чтобы выбрать ваш диск и начать установку.
Если установщик просит разблокировать ваш диск, введите пароль, который вы используете для входа в ваш Mac. Если он не видит ваш диск, или на нем написано, что он не может установить на ваш компьютер или объему, вам может потребоваться стереть диск. - Пожалуйста, позвольте установки без применения компьютера Mac в режим сна или закрытия его крышкой. Во время установки, ваш Mac может перезагрузиться и показать прогресс-бар несколько раз, и экран может быть пустым в течение нескольких минут за один раз.
Если ваш компьютер Mac перезагружается в помощнике настройки, но ты продаешь или раздаешь его, нажмите клавиши Command-Q для выхода из помощник без установки. Затем нажмите кнопку Закрыть. Когда новый владелец запускает Mac, они могут использовать свои собственные данные для завершения установки.

Если вы никогда не устанавливали 10.12.4 и macOS Сьерра
Если в macOS Сьерра 10.12.4 или позже не был установлен на вашем Mac, macOS и восстановление работает по-другому:
How to Use Apple Disk Image File on Mac?

Summary: In this blog, you’ll learn about an Apple Disk Image (.DMG) file and how to use it on Mac. But before you proceed, download Stellar Data Recovery Professional for Mac software that can help you create a disk image of your Mac drive or volume and recover data using the image file in case of any data loss event.

Table of Contents
Apple disk image file is a particular file with the extension of .DMG that holds the structure and contents of a storage disk or volume. The image file can have multiple file system formats that exist on a storage medium. For instance, if you create disk image of a Mac drive with Boot Camp partition, the disk image file will have two file systems?APFS for macOS and NTFS for Windows.
To create a disk image file for an internal or external Mac device, you can use Disk Utility or a third-party data retrieval software. Also, when you open an image file, it mounts as a volume in Finder. Suppose you want to eject a mounted Apple disk image, then drag and drop the drive icon to Trash. To delete a disk image file, trash the file or use Command + Delete hotkey.
The Need for Apple Disk Image File
Apple disk image file is immensely helpful in creating a clone or backup of a Mac drive or volume. The image file is easy to store and quick to share through the Internet. Further, the image file can be encrypted for added security. So, Mac software products are distributed over the Internet in the .DMG file format. Besides, the Disk image file can help recover data if the source drive is corrupt, damaged, or dead.
 Image: Disk image file
You can create an Apple disk image file for your APFS or HFS storage drive or volume on a larger storage medium through the following methods.
Create DMG File Using Disk Utility
Disk Utility has an option to select a mounted storage drive, be it internal or external SSD or HDD, and create a disk image (.DMG) file to a location other than the source drive.
The steps to create a disk image of a drive using Disk Utility are as follows:
- Open DiskUtility and select the storage drive from the sidebar. Navigate to File > New Image > Image from ?DriveName.?
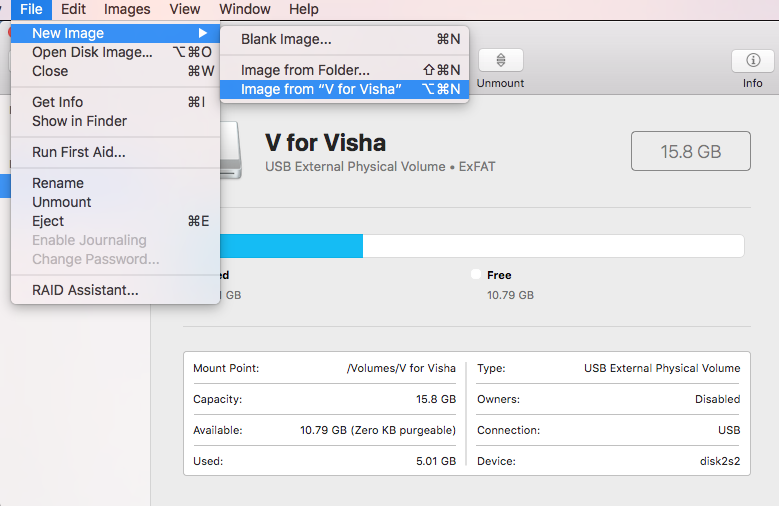 Image: Image from a drive
- Give a name to the Apple Disk Image file and provide a destination to save the file. Click Format, then choose the required option.
- If you want to limit this disk image file access, click Encryption to set a password for its access.
- Click Save to continue the imaging process. Finally, click Done once the imaging process is over.
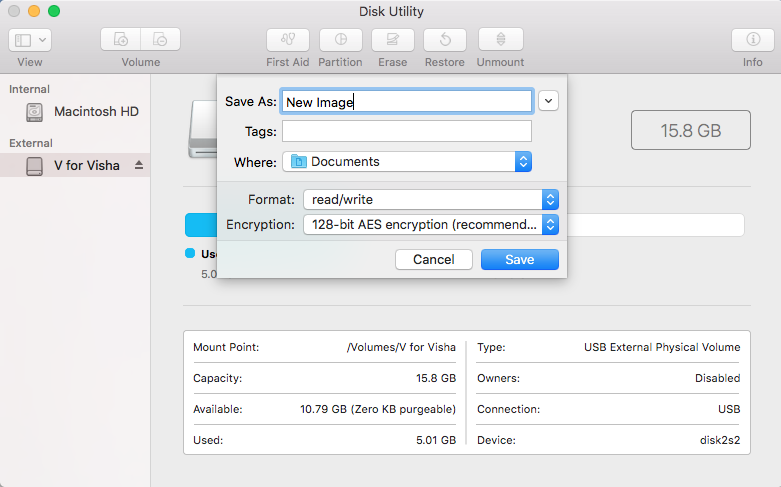 Image: Click Save to apply settings
Disk Utility mounts the image file on the sidebar of Finder and Desktop. You can access the stored content from the mounted disk image file.
Easily Create DMG File Using a Mac Data Recovery Software
You can create a disk image (.DMG) file of your built-in Mac storage drive/volume or an external storage device using a powerful Mac data recovery software. The tutorial video and sequential steps are as follows:
a) Install and launch Stellar Data Recovery Professional for Mac.
b) Click the icon present at the top of the home screen and select ?Create Image.?
c) From the ?Create Image? screen, select a drive or a volume to create an image file.
d) If you wish to create an image of the entire selected storage drive or volume, click Next.
e) Else, select the range to create an image, click the Advanced Settings.
- On the ?SelectRangetoCreateImage? screen, drag the sliders to define the image file’s starting and ending sectors.
- Click Close and then click Next.
f) In the ?Creating Media Image to Save? dialog box, locate the destination you wish to save the image file.
g) In the ?Save As? text box, type the disk image name, then click Save. Wait till the disk imaging process completes.
The DMG file created using the software can?t be mounted on macOS to access its data. But you can keep the file as a backup and use it to recover data at the time of data loss.
| *Stellar Data Recovery Professional for Mac has unlimited data recovery capability. Plus, you can create a bootable recovery drive to recover data from a crashed MacBook or iMac system. The professional version of the software is available for one year or a lifetime license. Also, you can avail a 30-day money-back guarantee for all the editions. |
Use an Image File on Mac
The .DMG file created using the professional Mac data recovery software helps recover data when the storage drive is severely corrupt, inaccessible, or damaged.
The steps to use the .DMG file for data recovery are as follows:
a) Launch the Stellar Data Recovery Professional for Mac software on your MacBook Pro, MacBook Air, Mac mini, or iMac.
b) Click the icon present at the top of the interface and select ?Load Image.?
c) From the ?Load Image? screen, select the .DMG file. Or else, click Add to add the image file.
d) Click Scan to start the recovery process using the image file.
e) Once the scan is over, preview and select the required files, then click Recover.
f) Specify the save location and click Save. Once the recovery is over, check the recovered data from the saved location.
What if the DMG File Itself is Deleted or Lost?
A DMG file is a file, so it can get deleted or turn corrupt. You can recover an Apple disk image file using Time Machine if you have a backup of your Mac. Or else, use the above data recovery software to recover even your deleted apple disk image file on your Mac.
Conclusion
We hope the blog helped you understand Apple’s disk image (.DMG) file and how to use it on macOS. By implementing Disk Utility, you can generate a disk image file and open the automatically mounted image file from the saved location. On the contrary, using the third-party Mac data recovery software allows you to create a disk image file and use it to scan and recover lost, deleted, or inaccessible files.
Unlike Disk Utility, the software allows you to select the specific region of the drive for image creation. This method helps recover files from a storage drive that is too big. For instance, if your storage drive has a data storage capacity of 8 TB, you need to recover data in portions. Plus, you can use the software to load the image, scan, and preview files.