How to create a music bot using Discord.js

In this tutorial, you will create a Discord music bot using Discord.js which will be able to play music, queue songs, skip songs and stop songs. You will also learn how to add the bot to your server and use him to play music.
The discord API provides you with an easy tool to create and use your own bots and tools. Today we are going to take a look at how we can create a basic music bot and add it to our server. The bot will be able to play, skip and stop the music and will also support queuing functionality.
Prerequisites
Before we get started creating the bot make sure that you have installed all the needed tools.
After the installation, we can continue by setting up our discord bot.
Setting up a discord bot
First, we need to create a new application on the discord development portal.
We can do so by visiting the portal and clicking on new application.

Creating a new application
After that, we need to give our application a name and click the create button.

Creating a discord bot
After that, we need to select the bot tab and click on add bot.

Discord bot information page
Now our bot is created and we can continue with inviting it to our server.
Adding the bot to your server
After creating our bot we can invite it using the OAuth2 URL Generator.
For that, we need to navigate to the OAuth2 page and select bot in the scope tap.

OAuth2 tab
After that, we need to select the needed permissions to play music and read messages.

Giving the discord bot the needed permissions
Then we can copy our generated URL and paste it into our browser.

Discord bot invite link
After pasting it, we add it to our server by selecting the server and clicking the authorize button.

Invite the bot to the server
Creating our project
Now we can start creating our project using our terminal.
First, we create a directory and move into it. We can do so by using these two commands.
After that, we can create our project modules using the npm init command. After entering the command you will be asked some questions just answer them and continue.
Then we just need to create the two files we will work in.
Now we just need to open our project in our text editor. I personally use VS Code and can open it with the following command.
Discord js basics
Before starting to code we need to populate our config.json file. Here we save the token of our bot and the prefix he should listen for.
To get your token you need to visit the discord developer portal again and copy it from the bot section.

Copy token
That are the only things we need to do in our config.json file. So let’s start writing our Javascript code. The article includes two versions, one for the new discord.js v13, which uses slash commands combined with the discord-player library to implement the music functionality and one for discord.js v12.5.3, which implements the functionality without a library. The older version is better for learning purposes and the newer version works with the current discord.js and is a lot easier to implement, so choose which you prefer.
Discord bot version 0.13
Now we just need to install some dependencies before we can get started.
After installing the dependencies, we can import them in our dependencies.
After that, we can create our client and log in using our token.
Now let’s add some basic listeners that console.log when they get executed.
After that, we can start our bot using the node command and he should be online on Discord and print “Ready!” in the console.
Creating discord player
Now that the client for the discord bot is created, we can continue by initializing our player, which will allow us to play and manage music in our Discord channel.
We can also add some error handlers that will be called if an error occurs.
The last thing we need to do is add listeners for the different player events like a song starting or being added.
In most cases, we just send a message into the Discord text channel using the send() function.
Adding slash commands
After the player has been set up successfully we can continue by adding our Slash commands to our client. This step is needed so Discord knows which commands the bot can execute.
We can do this by implementing a simple !deploy command that saves our commands in the guild.commands variable of a message. A slash command has a name, a description, and an optional options field that contains the command’s parameters. For example, the play command takes a song query as an argument.
After entering !deploy in your Discord text chat the slash commands will be added to your application. When typing / into the chat you should see something similar to this:

Implementing interactions
Once the interactions (slash commands) are defined, we can continue by implementing them. All slash commands trigger the interactionCreate event and can be implemented inside the async function below. Before executing any functionality, we run a few conditionals to check if the user is allowed to perform the given functionality.
After that we check which command is being executed by matching the commandName with the name of the commands we defined above.
The implementation can then be added inside of the if statement.
Playing songs
The play command requires us to search for the provided song and add the found result to the current queue of songs. Let’s start by retrieving the user-provided query using the options.get() function. After that we can use the player.search() function to search for the desired song.
Now that we have the song, we can create a queue for the songs (if there is already a queue the createQueue function will return the existing one). Once the queue is created, we can try joining the user’s voice channel. If that is successful, we add the song to the current queue using the addTracks function.
Lastly, if the queue isn’t already playing let’s start it using the play() function.
Skipping songs
Skipping is quite easy and can be done by calling the skip() function on the queue.
If the action is successful we can write a message to the Discord text channel using interaction.followUp() .
Stopping songs
The stop functionality will remove all the songs from the queue and the bot will leave the voice channel. This can be achieved by destroying the current queue which automatically makes the bot leave the voice channel (unless configured otherwise in the player configuration).
Complete source code for the index.js:
Here you can get the complete source code for our music bot:
Discord bot version 0.12
Now we just need to install some dependencies before we can get started.
After installing the dependencies, we can import them in our dependencies.
After that, we can create our client and login using our token.
Now let’s add some basic listeners that console.log when they get executed.
After that, we can start our bot using the node command and he should be online on discord and print “Ready!” in the console.
Reading messages
Now that our bot is on our server and able to go online, we can start reading chat messages and responding to them.
To read messages we only need to write one simple function.
Here we create a listener for the message event and get the message and save it into a message object if it is triggered.
Now we need to check if the message is from our own bot and ignore it if it is.
In this line, we check if the author of the message is our bot and return if it is.
After that, we check if the message starts with the prefix we defined earlier and return if it doesn’t.
After that, we can check which command we need to execute. We can do so using some simple if statements.
In this code block, we check which command to execute and call the command. If the input command isn’t valid we write an error message into the chat using the send() function.
Now that we know which command we need to execute we can start implementing these commands.
Adding songs
Let’s start by adding the play command. For that, we need a song and a guild (A guild represent an isolated collection of users and channels and is often referred to as a server). We also need the ytdl library we installed earlier.
First, we need to create a map with the name of the queue where we save all the songs we type in the chat.
After that, we create an async function called execute and check if the user is in a voice chat and if the bot has the right permission. If not we write an error message and return.
Now we can continue with getting the song info and saving it into a song object. For that, we use our ytdl library which gets the song information from the youtube link.
This will get the information of the song using the ytdl library we installed earlier. Then we save the information we need into a song object.
After saving the song info we just need to create a contract we can add to our queue. To do so we first need to check if our serverQueue is already defined which means that music is already playing. If so we just need to add the song to our existing serverQueue and send a success message. If not we need to create it and try to join the voice channel and start playing music.
Here we check if the serverQueue is empty and add the song to it if it’s not. Now we just need to create our contract if the serverQueue is null.
In this code block, we create a contract and add our song to the songs array. After that, we try to join the voice chat of the user and call our play() function we will implement after that.
Playing songs
Now that we can add our songs to our queue and create a contract if there isn’t one yet we can start implementing our play functionality.
First, we will create a function called play which takes two parameters (the guild and the song we want to play) and checks if the song is empty. If so we will just leave the voice channel and delete the queue.
After that, we will start playing our song using the play() function of the connection and passing the URL of our song.
Here we create a stream and pass it the URL of our song. We also add two listeners that handle the end and error event.
Note: This is a recursive function which means that it calls itself over and over again. We use recursion so it plays the next song when the song is finished.
Now we are ready to play a song by just typing !play URL in the chat.
Skipping songs
Now we can start implementing the skipping functionality. For that, we just need to end the dispatcher we created in our play() function so it starts the next song.
Here we check if the user that typed the command is in a voice channel and if there is a song to skip.
Stopping songs
The stop() function is almost the same as the skip() except that we clear the songs array which will make our bot delete the queue and leave the voice chat.
Complete source code for the index.js:
Here you can get the complete source code for our music bot:
Conclusion
You made it all the way until the end! Hope that this article helped you understand the Discord API and how you can use it to create a simple bot. If you want to see an example of a more advanced discord bot you can visit my Github repository.
If you have found this useful, please consider recommending and sharing it with other fellow developers.
If you have any questions or feedback, let me know in the comments down below.
Создание музыкального бота с помощью Discord.js

API discord предоставляет инструмент для создания и использования ботов. Рассмотрим пример создания базового музыкального бота и добавления его на сервер. Бот сможет проигрывать, пропускать и останавливать музыку, а также будет поддерживать функцию очереди воспроизведения.
Установка discord-бота
Создаем новое приложение на портале разработки discord.
Переходим на портал и нажимаем на “new application”.
Затем вводим название приложения и нажимаем на кнопку “create”.
Затем переходим на вкладку бот и нажимаем на “add bot”.
Бот создан! Теперь можно перейти к добавлению его на сервер.
Добавление бота на сервер
Добавляем созданный бот с помощью генератора OAuth2 URL.
Для этого переходим на страницу OAuth2 и выбираем бота в панели scope.
Затем выбираем необходимые разрешения для проигрывания музыки и чтения сообщений.
Теперь копируем сгенерированный URL и вставляем его в браузер.
Затем выбираем сервер, на который хотим добавить URL и нажимаем на кнопку “authorize”.
Создание проекта
Переходим к созданию проекта с использованием терминала.
Для начала создаем директорию и переходим в нее, используя две следующие команды:
Затем создаем модули проекта с помощью команды npm init. После введения команды будут заданы несколько вопросов. Ответьте на них и продолжайте.
Создаем два файла, в которых мы будем работать.
Теперь откройте проект в текстовом редакторе. Я использую VS Code и открываю его с помощью следующей команды:
Основы Discord js
Прежде чем начать, нужно установить несколько зависимостей.
После завершения установки продолжаем написание файла config.json. Сохраните для бота токен и префикс, который он должен слушать.
Для получения токена снова зайдите на портал разработки discord и скопируйте его из раздела bot.
Это все, что нужно выполнить в файле config.json. Приступим к написанию кода javascript.
Сначала импортируем все зависимости.
Затем с помощью токена создаем клиента и логин.
Добавляем несколько базовых listeners, выполняющих метод console.log при запуске.
Теперь можно начать работу с ботом с помощью команды node. Бот должен быть online в discord и в консоль выведется“Ready!”
Чтение сообщений
Бот находится на сервере и может выходить online. Теперь можно начать читать сообщения в чате и отвечать на них.
Для чтения сообщений нужно написать лишь одну простую функцию.
Создаем listener для события message, получаем сообщение и сохраняем его в объект message.
Проверяем: если сообщение пришло от бота, то игнорируем его.
В этой строке проверяется, является ли автором сообщения бот. Сообщение возвращается, если это так.
Затем проверяем, начинается ли сообщение с ранее определенного префикса. Сообщение возвращается, если нет.
После этого проверяем, какую команду нужно запустить. Это можно выполнить с помощью простых операторов if.
В этом блоке кода проверяется, какую команду нужно запустить, а также осуществляется вызов команды. Если полученная команда недопустима, то вводим сообщение об ошибке в чат с использованием функции send().
Узнав, какие команды нужно запустить, можно перейти к их реализации.
Добавление песен
Начнем с добавления команды play. Для этого понадобится песня и гильдия (гильдия представляет собой изолированную коллекцию пользователей и каналов и часто упоминается в качестве сервера). Также понадобится ранее установленная библиотека ytdl.
Для начала создаем map с названием очереди, в котором будут сохранены все песни, введенные в чат.
Затем создаем функцию async под названием execute и проверяем, находится ли пользователь в голосовом чате, и есть ли у бота соответствующее разрешение. Если нет, то пишем сообщение об ошибке и возвращаем.
Переходим к получению информации о песне и сохранении ее в объект song. Для этого используем библиотеку ytdl, которая получает информацию о песне по ссылке на youtube.
Необходимая информация сохраняется в объект song.
После сохранения информации нужно создать контракт для добавления в очередь. Для этого проверяем, определен ли serverQueue, что означает, что музыка уже играет. Если да, то добавляем песню в существующий serverQueue и отправляем сообщение об успешном выполнении. Если нет, то создаем его, подключаемся к голосовому каналу и начинаем проигрывать музыку.
В этом фрагменте мы проверяем, является ли serverQueue пустым. Если нет добавляем туда песню.
Если serverQueue имеет значение null, создаем контракт.
В этом блоке кода создается контракт, а песня добавляется в массив songs.
Затем присоединяемся к голосовому чату пользователя и вызываем функцию play(), которую затем реализуем.
Проигрывание песен
Поскольку теперь можно добавлять песни в очередь и создавать контракт при его отсутствии, можно приступить к реализации функцию проигрывания.
Сначала создаем функцию play, которая обладает двумя параметрами (гильдия и песня, которую нужно проиграть) и проверяет, является ли объект song пустым. Если да, то покидаем голосовой канал и удаляем очередь.
Затем начинаем проигрывать песню с помощью функции playStream() и URL-адреса песни.
В этом фрагменте мы создаем stream и передаем его URL-адресу песни. Также добавляем два listeners, которые обрабатывают события end и error.
Примечание: это рекурсивная функция, которая повторяет вызов самой себя. Рекурсия используется для проигрывания следующей песни, когда другая заканчивается.
Теперь можно проиграть песню, введя !play URL в чат.
Пропуск песен
Переходим к реализации функции пропуска. Для этого нужно выполнить завершения диспетчера, созданного в функции play() для начала проигрывания следующей песни.
В этом фрагменте мы проверяем, находится ли пользователь, который ввел команду, в голосовом канале, а также есть ли песни для пропуска.
Остановка песен
Функция stop() похожа на skip(), за исключением того, что массив songs очищается, из-за чего бот удаляет очередь и покидает голосовой чат.
Исходный код для index.js:
Полный исходный код для музыкального бота:
Заключение
У вас все получилось! Надеюсь, эта статья помогла вам разобраться в API Discord и создании с его помощью простого бота.
Как создать музыкального бота в Discord с использованием Python
В этой статье мы рассмотрим, как создать музыкального бота для Discord с использованием языка программирования Python и библиотеки discord.py .
Шаг 1: Установка необходимых библиотек
Установите библиотеку discord.py и youtube_dl с помощью следующих команд:
Шаг 2: Создание и настройка бота в Discord
- Перейдите на сайт Discord Developer Portal.
- Нажмите кнопку «New Application» и введите имя для вашего бота.
- Перейдите на вкладку «Bot» и нажмите кнопку «Add Bot».
- Скопируйте токен бота, он потребуется для авторизации в коде Python.
Шаг 3: Создание основного кода бота
Создайте новый файл Python и импортируйте необходимые библиотеки:
Затем создайте экземпляр бота:
Добавьте событие, которое будет вызываться при готовности бота:
Добавьте команду !join , чтобы бот присоединялся к голосовому каналу:
Добавьте команду !leave , чтобы бот выходил из голосового канала:
Добавьте команду !play для воспроизведения видео с YouTube:
Добавьте команду !pause для приостановки воспроизведения:
Добавьте команду !resume для продолжения воспроизведения:
Запустите бота, передав токен, скопированный на шаге 2:
Шаг 4: Запуск бота
Запустите файл Python, и ваш музыкальный бот для Discord будет работать. Теперь вы можете использовать команды !join , !leave , !play , !pause и !resume для управления воспроизведением музыки в голосовом канале.
Music Bot Tutorial
This tutorial is not yet migrated to Diataxis framework and might be out of date as it was updated for Discord4J v3.1.x.
Feel free to suggest changes to it in our Discord Server or through a GitHub issue if you encounter issues while following it.
Introduction#
One of the most common, and almost necessary, features for any Discord bot is the ability to playback music. This tutorial will provide an in-depth guide on how to create a music bot from scratch using Discord4J (and LavaPlayer).
Discord4J facilitates an environment where a Discord bot can be programmed in two different ways, reactively and/or imperatively. Reactive programming, while more efficient, is a paradigm shift from the traditional imperative Java programming model. This tutorial will provide both reactive and imperative approaches to designing a music bot for users who desire to implement either paradigm.
It is expected to complete this tutorial in under 15 minutes.
| Table of Contents |
|---|
| Introduction |
| Requirements |
| Setting Up IntelliJ |
| Creating a Bot |
| Adding Commands |
| Adding Music |
Requirements#
- You should already have your bot created and its token ready for use. If you do not, go to this link, create an application, obtain the bot token, and the Client ID.
- JDK 8 or above should already be downloaded and/or installed on your system.
- This tutorial assumes you are familiar with Java 8 or above concepts with a special emphasis in lambdas. If you are unfamiliar with lambdas, please visit our Lambda Tutorial.
- This tutorial uses IntelliJ to set up the programming environment and it is assumed to already be installed on your system. Eclipse, Netbeans, and other IDEs have similar, but slightly different, setup processes. Please consult the documentation for your specific IDE as it is necessary.
Setting Up IntelliJ#
Before coding, we need to create and setup a project with Discord4J installed. This section will cover what Maven is, how to create a Maven project using IntelliJ, and how to use Maven to install Discord4J.
Step 1#
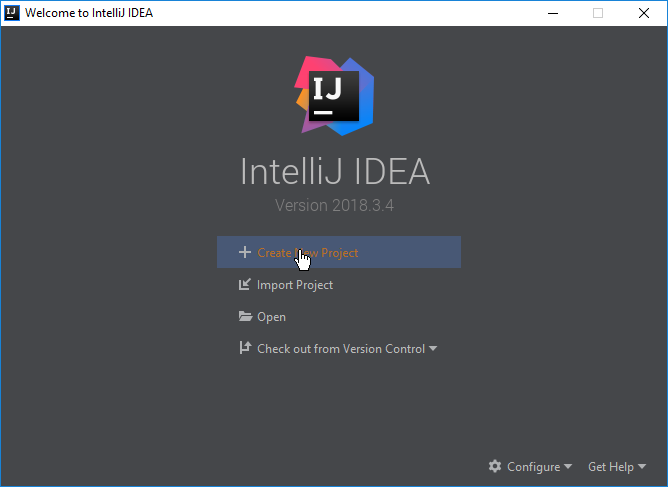
Open IntelliJ and select Create New Project.
Step 2#
Select Maven. Maven is a software project management and comprehension tool. Alongside its main competitor Gradle, Maven is practically required and essential for all Java development projects both personal and professional. It is what will enable us to install Discord4J and its dependencies along with any other dependencies and dependencies of those dependencies easily and with minimal effort.
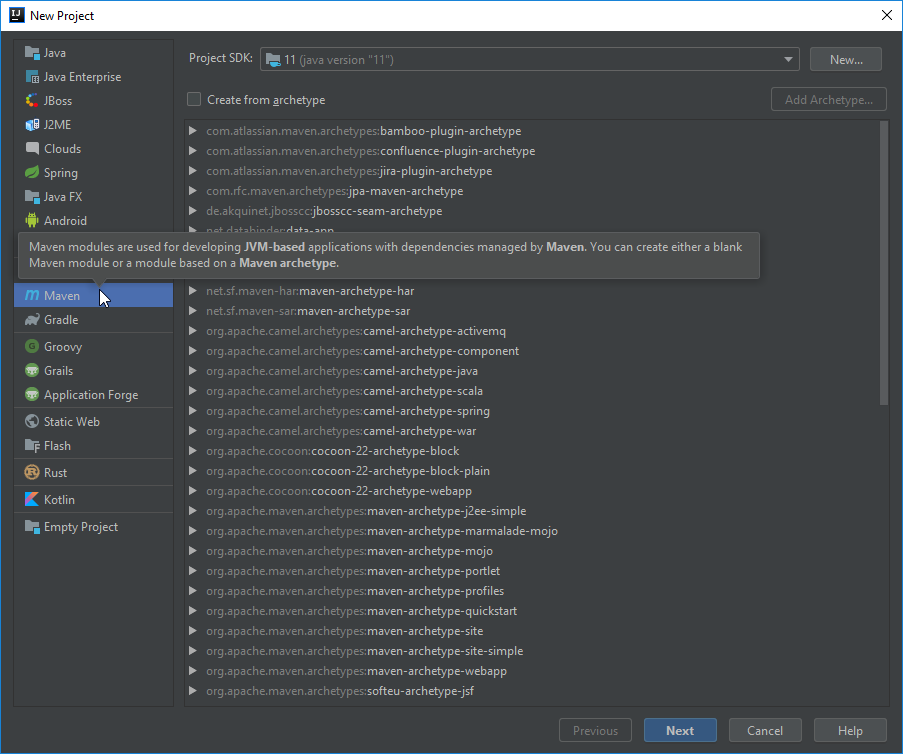
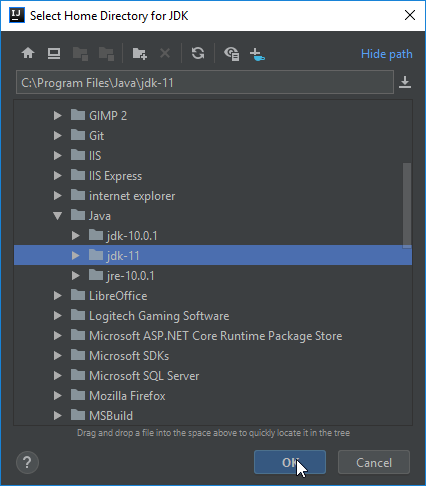
⚠️ If Project SDK is blank, click New and navigate to a directory where a JDK is present and click OK.

Step 3#
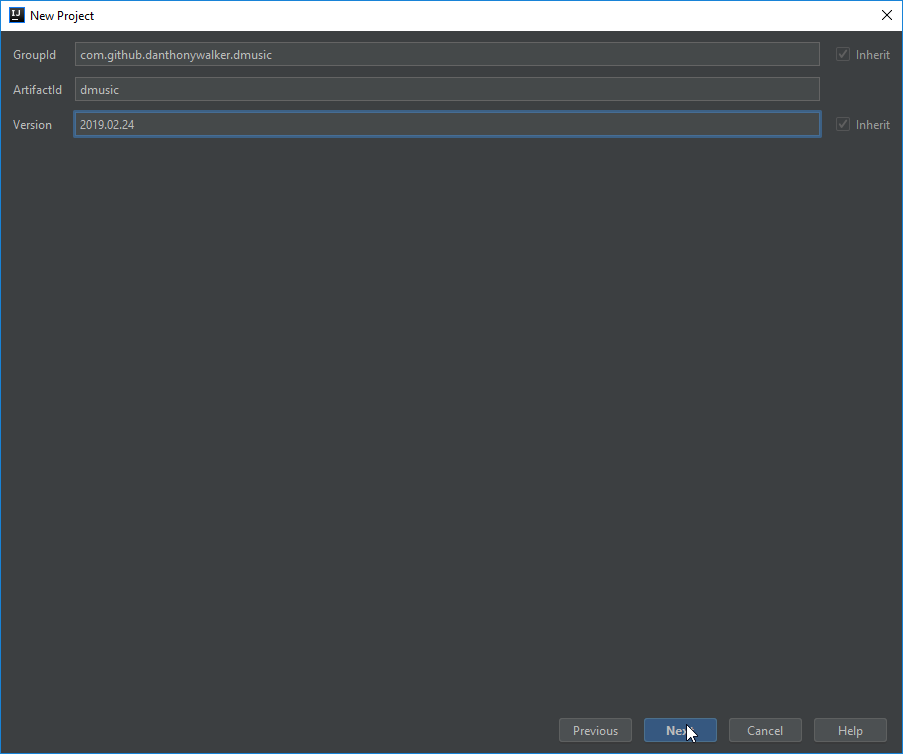
Click Next, and you'll be required to provide a GroupId, ArtifactId, and Version. Refer to this link for a detailed explanation of each of these attributes. After you are done providing your attributes, select Next.
I will be using the reverse domain name of GitHub as my GroupId with an addition of my username and the name of the project (DMusic, for Discord Music). The ArtifactId will be "dmusic" as I expect an outputted jar to be referred to as "dmusic.jar". Finally, as for the Version, since this is an application, not a library, I prefer using a date-based versioning scheme, particularly YEAR.MONTH.DAY .
Step 4#
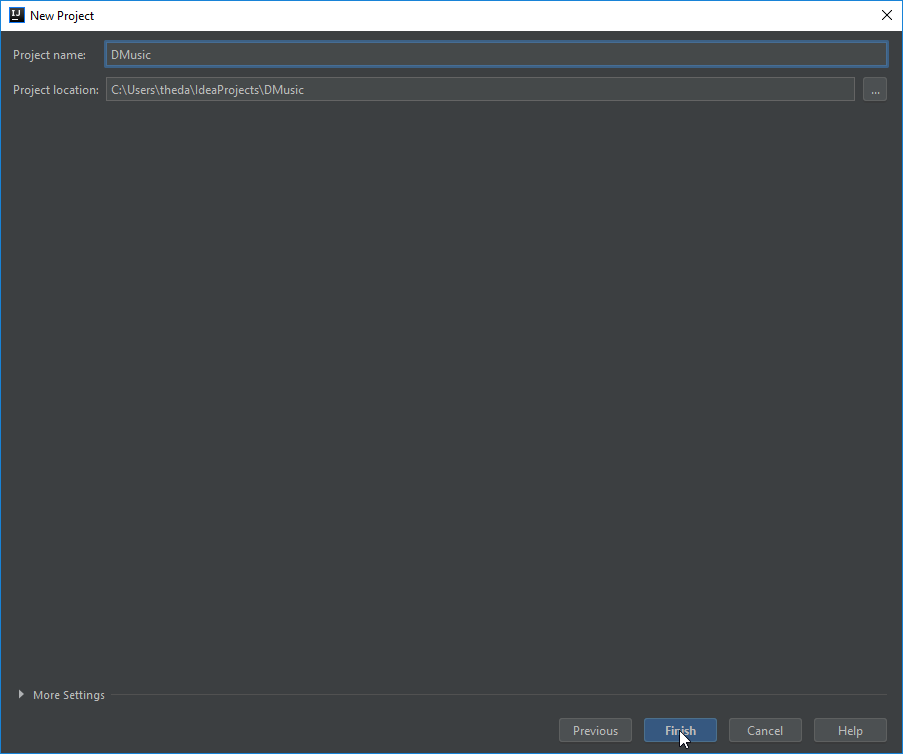
This page will ask for a Project Name. You may leave it as the default (it automatically takes from the ArtifactId), but I personally prefer having proper capitalization when working in IntelliJ. After you have chosen, select Finish.
Step 5#
Once IntelliJ has created the project, a dialog box will appear in the bottom-right corner. Select Enable Auto-Import. This will have IntelliJ automatically install dependencies like Discord4J after we request for them, rather than needing to manually refresh the project.

Step 6#
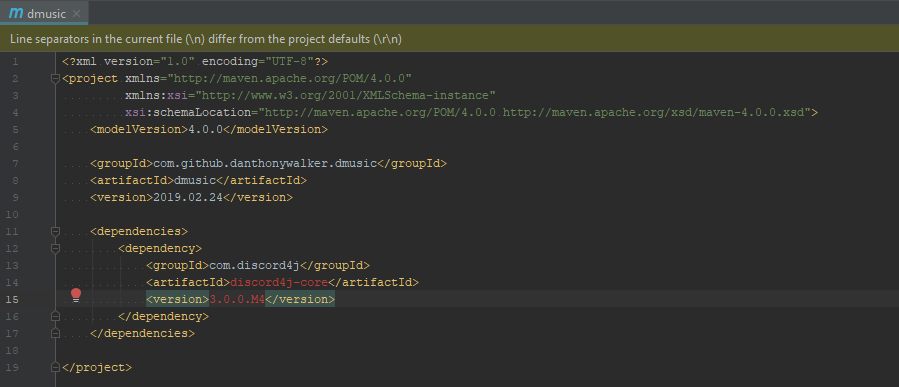
IntelliJ will automatically open the pom.xml after it has created the project. Maven uses the pom.xml to control the project's structure, and it's how we will be telling Maven to install Discord4J. As you can see here, Discord4J provides a set of "coordinates" that tells Maven how to find Discord4J. You may have noticed these coordinates contain a GroupId, ArtifactId, and Version; just like the attributes we have provided earlier! The coordinates are how Maven uniquely identifies a project, picks out a specific version, finds it, and eventually installs it for us.
Add the coordinates to the root of the pom.xml. If the text is red, that is OK! Give IntelliJ and Maven a few seconds or a minute to download and add Discord4J to our project. The text will eventually turn completely white.
Important: Version numbers shown in these images might be outdated. While following this tutorial, prefer using the latest version in the 3.1.x line:
Step 7#
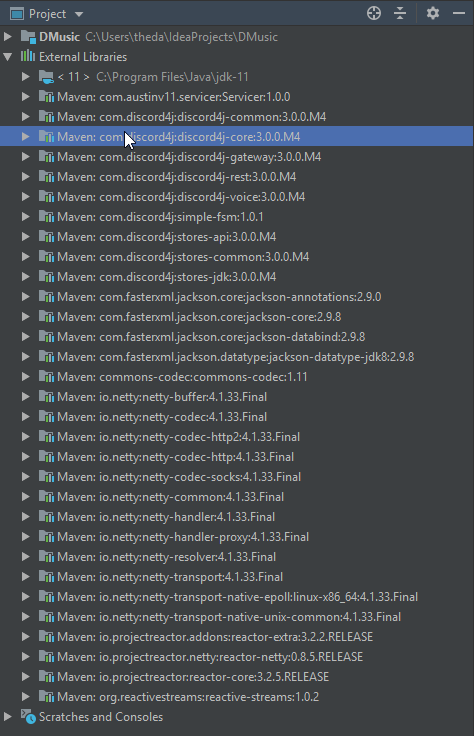
Under External Libraries on the navigation pane, discord4j-core should be present. This means Discord4J has been properly imported, and we are ready to utilize it in our project!
Creating a Bot#
Once IntelliJ is configured for Maven with Discord4J installed we can finally start coding! This section will cover how to make your bot appear online once you start the program.
Step 8#
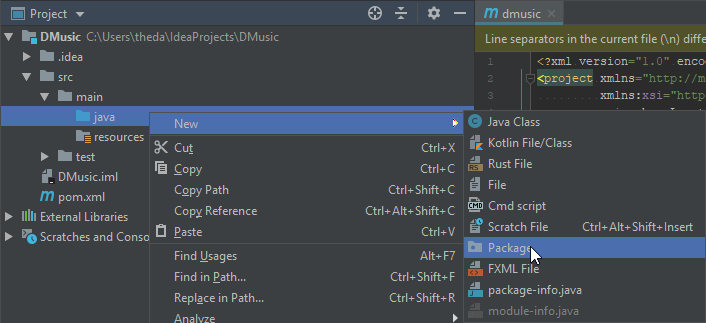
Right click on src/main/java in the Project View and select the New -> Package option. This will allow us to create a base package for us to work with and acts as a starting point to help organize our code.
Step 9#
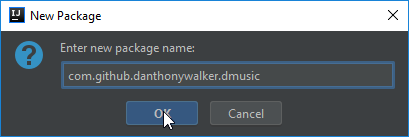
You should choose a package structure equal to the GroupId that you provided back in Step 3.
Step 10#
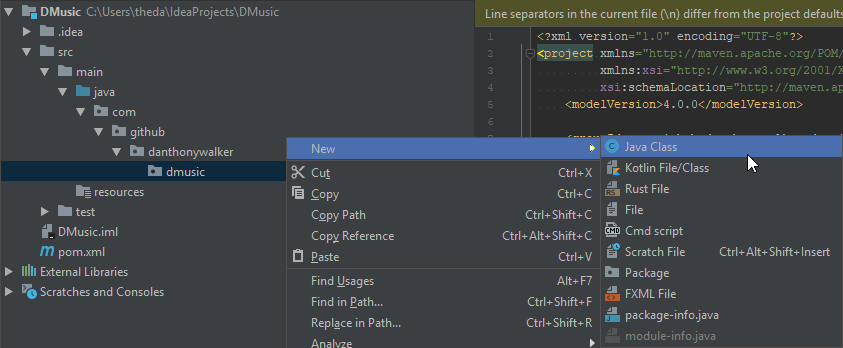
Right click on the last folder of your package structure and select the New -> Java Class option. We will now refer to this specific folder as the root package. For example, dmusic for my project is considered the root package.
Step 11#
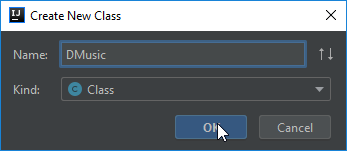
Choose a class name. It will contain our main method and as a personal preference I like having such classes equal the name of my application.
Step 12#
Create a main method and add the code below. Assume args refers to the String array that is standard on all main methods, i.e., String[] args .
Using Discord4J v3.0.x#
What is happening here? Well in order to make our bot appear online it has to login. The ability to login is only applicable to an instance of DiscordClient and the only way to obtain a DiscordClient instance is to build it using DiscordClientBuilder . We first build DiscordClientBuilder using args[0] which will take the first argument of our program which we will use to pass our bot token. Since we are not interested in any other options from DiscordClientBuilder we can just simply build a DiscordClient by calling build .
Once we have our DiscordClient instance we now call login . However, login returns a type called a Mono , which is an asynchronous and lazy data type. It doesn't do anything until we request it to do so and the ability to request an action can be accomplished in numerous ways. For now, we will call block which essentially means "request this action and wait (blocking the current thread) for it to finish".
v3.0 behavior: login will not "finish" until the bot is completely disconnected, i.e., calling logout at some point in the future.
Using Discord4J v3.1.x and above#
v3.1 behavior: login will not "finish" until the bot has connected to the Gateway and will return a GatewayDiscordClient object that can be used to operate on the Discord real-time websocket for bots.
Step 13#
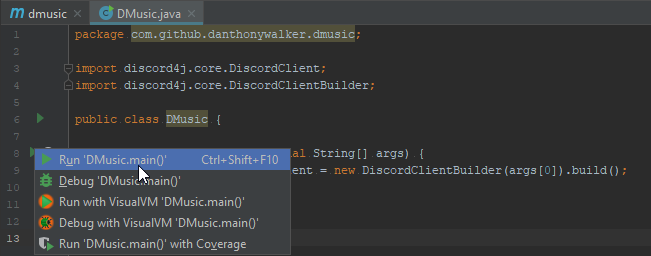
Click on the green arrow next to the main method and select the Run option.
Step 14#
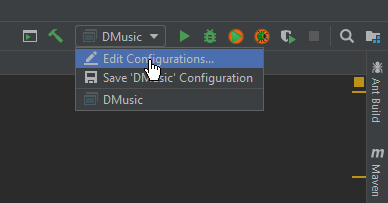
After IntelliJ compiles your program and starts, you'll immediately encounter an ArrayIndexOutOfBoundsException . This is because we haven't provided any arguments for our program yet so args[0] is invalid! So let's fix that. In the top right corner go into the Edit Configurations. menu.
Step 15#
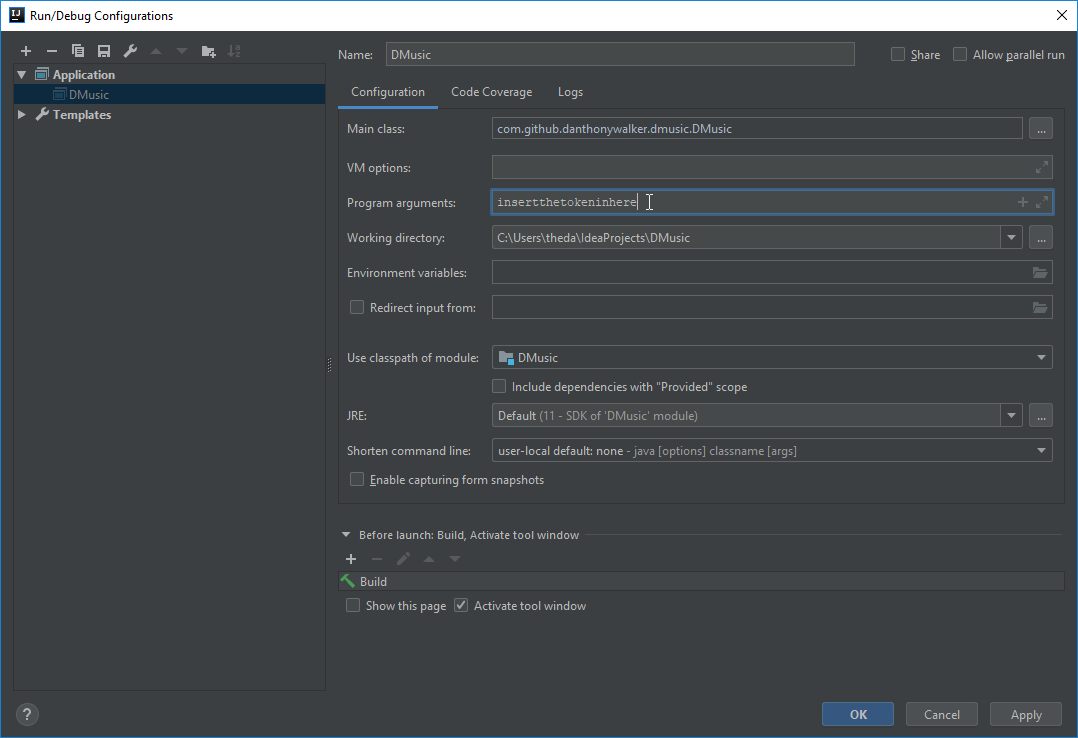
Add your bot token to Program arguments and click Apply then OK.
Step 16#
Rerun the program, you should now see a bunch of output to the console. Congratulations, your bot is now online! If you invite your bot using the link below, replacing CLIENTID with the Client ID, then you will see your bot green and ready. If you wish to disconnect your bot, click on the Exit button in the console.

Adding Commands#
Once the bot appears online we should allow it to respond to certain input from users. This section will cover one of the many ways to implement commands, or specifically structured user input, to allow responses from our bot.
Code Notice#
The next two sections will feature a lot more code than visual guidelines as seen from the previous sections. Each step will go in-depth about what the code does and why the code is written, but it will not step line-by-line to explain every minute detail.
As outlined by the introduction, this tutorial will focus on two paradigms of programming that Discord4J supports, reactively and imperatively. Do NOT implement both paradigms; only implement one. Both paradigms are provided by this tutorial to demonstrate how the two can be translated for easier understanding which is especially important when learning reactive programming.
Step 17#
There are many approaches to implementing a command system that have different trade-offs in abstraction, ease-of-use, ease-of-implementation, etc. In this tutorial we will be implementing a map-based, interface-bound command system. It is not the best solution, but you will have a functioning command system up and running very quickly, and it is very simple to understand.
First, create an interface named Command with a single method that accepts a MessageCreateEvent . As the name suggest, this event is fired whenever a message is created. We will be using this interface to represent any given "command", i.e., execute will only fire if we received the particular command that the implementation represents.
Imperative Approach#
Reactive Approach#
Step 18#
Next, we need a way to have all our commands in one place, so we can choose which one we want to fire for any given MessageCreateEvent , if any. The simplest way is to have a Map , where the keys represent the name of the command, with the values being Command instances.
Add the following inside your main class:
Step 19#
Let's populate this map with a simple "ping pong" command just as a demonstration that the system works. Add the following inside your main class:
Imperative Approach#
Reactive Approach#
All this code does is add a mapping to "ping" where the bot will create a new message in the same channel with the text "Pong!".
Step 20#
Finally, we need a way to hook up our command system to Discord4J's event system. All of Discord4J's events are dispatched through the EventDispatcher that is attached to the DiscordClient instance. EventDispatcher has a single method, on , which determines which type of event the dispatcher should provide us.
After having an event, we need to do some basic filtering to make sure we are executing the right commands for the right messages. To do this, we will simply iterate through all our commands, check if the contents of the message starts with a prefix plus the command we are checking against and, if it does, execute the command.
Discord4J v3.0.x: Add the following code after building the DiscordClient , but before login : Discord4J v3.1.x: Add the following code after building the GatewayDiscordClient , but before onDisconnect :
Discord4J 3.0.x — Imperative Approach#
Discord4J 3.0.x — Reactive Approach#
Discord4J 3.1.x — Imperative Approach#
Discord4J 3.1.x — Reactive Approach#
Step 21#
Rerun the bot and type "!ping" to any channel the bot can read, and it will promptly respond with "Pong!". Congratulations, you have successfully created your first command and expandable command system. If we need to add a new command, we just simply add another mapping to commands in the static block that we made in step 18.
Adding Music#
Once we know how to implement commands, let's add a few more with the added ability to playback music. This section will cover how to make our bot join a voice channel and how to playback audio from a YouTube link.
Step 22#
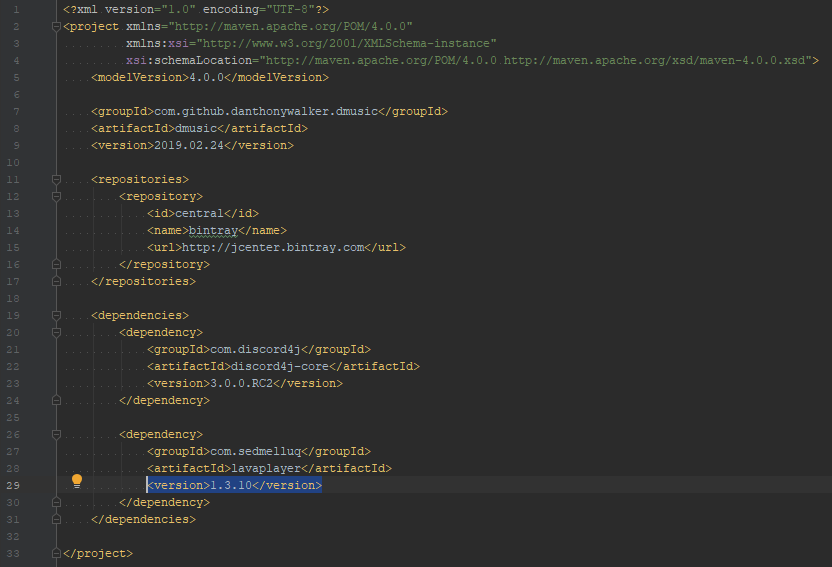
In order to playback audio from a YouTube link we need to be able to extract audio from a YouTube link in a format Discord will recognize. One of the easiest solutions for this is by utilizing LavaPlayer. So in your pom.xml, add the Maven coordinates that LavaPlayer's README specifies.
Important: Version numbers shown in these images might be outdated. While following this tutorial, prefer using the latest version in the 3.1.x line:
Step 23#
Add the following code at the start of your main class, before building the DiscordClient .
Step 24#
Create the following class:
Step 25#
Once Discord4J and LavaPlayer are linked together, we need to have our bot be able to join voice channels to playback music. As a very simple demonstration, we will be adding a "join" command where the bot will join the voice channel of the user who made the request.
Add the following code after creating the AudioProvider instance from step 23.
Imperative Approach#
Reactive Approach#
Step 26#
Finally, let's add a command that takes a YouTube link, extracts audio from it, and plays it back to the channel. First, we need to make a class taking processed AudioTrack instances and loads them into an AudioPlayer . The class this tutorial will make is the most basic implementation, but it is possible to design a "queue" system rather than an overriding system with a bit more requisite knowledge outside the scope of this tutorial.
Create the following class:
Step 27#
Now, let's add the command. We are going to add a "play" command, but with an additional technique to extract arguments from it. We will not be doing any sort of validation (i.e., check if the argument exists or if there are more than 1 arguments), but it would likely be a good idea to do so at a later date.
Add the following code right after your "join" command.
Imperative Approach#
Reactive Approach#
Step 28#
Rerun your bot and join a voice channel that the bot can also join. Type !join and then type !play https://www.youtube.com/watch?v=dQw4w9WgXcQ . Congratulations! You now have a bot that can parse commands, have an expandable command system, can join voice channels, and playback audio from YouTube (and other sources LavaPlayer supports).
That is the conclusion of this tutorial! If you have any questions or issues, you may ask in the Discord4J Discord server. Feedback is also welcomed, and thank you for your interest in learning Discord4J.