Why use the terminal?
"Under Linux there are GUIs (graphical user interfaces), where you can point and click and drag, and hopefully get work done without first reading lots of documentation. The traditional Unix environment is a CLI (command line interface), where you type commands to tell the computer what to do. That is faster and more powerful, but requires finding out what the commands are."
— from man intro(1)
This page gives an introduction to using the command-line interface terminal, from now on abbreviated to the terminal. There are many varieties of Linux, but almost all of them use similar commands that can be entered from the terminal.
There are also many graphical user interfaces (GUIs), but each of them works differently and there is little standardization between them. Experienced users who work with many different Linux distributions therefore find it easier to learn commands that can be used in all varieties of Ubuntu and, indeed, in other Linux distributions as well.
For the novice, commands can appear daunting:
However, it is important to note that even experienced users often cut and paste commands (from a guide or manual) into the terminal; they do not memorize them.
It is important, of course, to know how to use the terminal — and anyone who can manage typing, backspacing, and cutting and pasting will be able to use the terminal (it is not more difficult than that).
Starting a terminal
In Unity
Unity is the default desktop environment used as of 11.04. Where systems are not ready for Unity they revert to GNOME which is also used in previous releases such as Ubuntu 10.04 LTS (Lucid), see next sub-section.
The easiest way to open the terminal is to use the ‘search’ function on the dash. Or you can click on the ‘More Apps’ button, click on the ‘See more results’ by the installed section, and find it in that list of applications. A third way, available after you click on the ‘More Apps’ button, is to go to the search bar, and see that the far right end of it says ‘All Applications’. You then click on that, and you’ll see the full list. Then you can go to Accessories -> Terminal after that. So, the methods in Unity are:
Dash -> Search for Terminal
Dash -> More Apps -> ‘See More Results’ -> Terminal
Dash -> More Apps -> Accessories -> Terminal
Keyboard Shortcut: Ctrl + Alt + T
In GNOME
GNOME is the classic desktop environment for Ubuntu 11.04 (Natty) and is the default desktop environment in earlier releases, such as Ubuntu 10.04 LTS (Lucid).
Applications menu -> Accessories -> Terminal.
Keyboard Shortcut: Ctrl + Alt + T
In Xfce (Xubuntu)
Applications menu -> System -> Terminal.
Keyboard Shortcut: Super + T
Keyboard Shortcut: Ctrl + Alt + T
In KDE (Kubuntu)
KMenu -> System -> Terminal Program (Konsole).
In LXDE (Lubuntu)
Menu -> Accessories -> LXTerminal.
Keyboard Shortcut: Ctrl + Alt + T
Commands
sudo: Executing Commands with Administrative Privileges
The sudo command executes a command with administrative privileges (root-user administrative level), which is necessary, for example, when working with directories or files not owned by your user account. When using sudo you will be prompted for your password. Only users with administrative privileges are allowed to use sudo.
Be careful when executing commands with administrative privileges — you might damage your system! You should never use normal sudo to start graphical applications with administrative privileges. Please see RootSudo for more information on using sudo correctly.
File & Directory Commands
) symbol stands for your home directory. If you are user, then the tilde (
pwd: The pwd command will allow you to know in which directory you’re located (pwd stands for "print working directory"). Example: "pwd" in the Desktop directory will show "
ls: The ls command will show you (‘list’) the files in your current directory. Used with certain options, you can see sizes of files, when files were made, and permissions of files. Example: "ls
To navigate to your home directory, use "cd" or "cd
To navigate through multiple levels of directory at once, specify the full directory path that you want to go to. For example, use, "cd /var/www" to go directly to the /www subdirectory of /var/. As another example, "cd
mv: The mv command will move a file to a different location or will rename a file. Examples are as follows: "mv file foo" will rename the file "file" to "foo". "mv foo
-
To save on typing, you can substitute ‘
Note that if you are using mv with sudo you can use the
shortcut, because the terminal expands the
to your home directory. However, when you open a root shell with sudo -i or sudo -s,
Here is an example of when it would be necessary to execute a command with administrative privileges. Let’s suppose that another user has accidentally moved one of your documents from your Documents directory to the root directory. Normally, to move the document back, you would type mv /mydoc.odt
/Documents/mydoc.odt, but by default you are not allowed to modify files outside your home directory. To get around this, you would type sudo mv /mydoc.odt
/Documents/mydoc.odt. This will successfully move the document back to its correct location, provided that you have administrative privileges.
Running a File Within a Directory
So you’ve decided to run a file using the command-line? Well. there’s a command for that too!
./filename.extension
After navigating to the file’s directory, this command will enable any Ubuntu user to run files compiled via GCC or any other programming language. Although the example above indicates a file name extension, please notice that, differently from some other operating systems, Ubuntu (and other Linux-based systems) do not care about file extensions (they can be anything, or nothing). Keep in mind that the ‘extension’ will vary depending upon the language the source code is written in. Also, it is not possible, for compiled languages (like C and C++) to run the source code directly — the file must be compiled first, which means it will be translated from a human-readable programming language to something the computer can understand. Some possible extensions: ".c" for C source, ".cpp" for C++, ".rb" for Ruby, ".py" for Python, etc. Also, remember that (in the case of interpreted languages like Ruby & Python) you must have a version of that language installed on Ubuntu before trying to run files written with it.
Finally, the file will only be executed if the file permissions are correct — please see the FilePermissions help page for details.
System Information Commands
df: The df command displays filesystem disk space usage for all mounted partitions. "df -h" is probably the most useful — it uses megabytes (M) and gigabytes (G) instead of blocks to report. (-h means "human-readable")
du: The du command displays the disk usage for a directory. It can either display the space used for all subdirectories or the total for the directory you run it on. Example:
In the above example -s means "Summary" and -h means "Human Readable".
free: The free command displays the amount of free and used memory in the system. "free -m" will give the information using megabytes, which is probably most useful for current computers.
top: The top (‘table of processes’) command displays information on your Linux system, running processes and system resources, including CPU, RAM & swap usage and total number of tasks being run. To exit top, press "q".
uname -a: The uname command with the -a option prints all system information, including machine name, kernel name & version, and a few other details. Most useful for checking which kernel you’re using.
lsb_release -a: The lsb_release command with the -a option prints version information for the Linux release you’re running, for example:
ip addr reports on your system’s network interfaces.
Adding A New User
The "adduser newuser" command will create a new general user called "newuser" on your system, and to assign a password for the newuser account use "passwd newuser".
Options
The default behaviour for a command may usually be modified by adding a —option to the command. The ls command for example has an -s option so that "ls -s" will include file sizes in the listing. There is also a -h option to get those sizes in a "human readable" format.
Options can be grouped in clusters so "ls -sh" is exactly the same command as "ls -s -h". Most options have a long version, prefixed with two dashes instead of one, so even "ls —size —human-readable" is the same command.
"Man" and getting help
man command, info command and command —help are the most important tools at the command line.
Nearly every command and application in Linux will have a man (manual) file, so finding them is as simple as typing "man "command"" to bring up a longer manual entry for the specified command. For example, "man mv" will bring up the mv (move) manual.
Move up and down the man file with the arrow keys, and quit back to the command prompt with "q".
"man man" will bring up the manual entry for the man command, which is a good place to start!
"man intro" is especially useful — it displays the "Introduction to user commands" which is a well-written, fairly brief introduction to the Linux command line.
There are also info pages, which are generally more in-depth than man pages. Try "info info" for the introduction to info pages.
Some software developers prefer info to man (for instance, GNU developers), so if you find a very widely used command or app that doesn’t have a man page, it’s worth checking for an info page.
Virtually all commands understand the -h (or —help) option which will produce a short usage description of the command and it’s options, then exit back to the command prompt. Try "man -h" or "man —help" to see this in action.
Caveat: It’s possible (but rare) that a program doesn’t understand the -h option to mean help. For this reason, check for a man or info page first, and try the long option —help before -h.
Searching the manual pages
If you aren’t sure which command or application you need to use, you can try searching the manual pages. Each manual page has a name and a short description.
To search the names for <string> enter:
For example, whatis -r cpy will list manual pages whose names contain cpy. The output from whatis -r cpy will in part depend on your system — but might be as follows:
To search the names or descriptions for <string> enter:
For example, apropos -r "copy files" will list manual pages whose names or descriptions contain copy files. The output from apropos -r "copy files" will in part depend on your system — but might be as follows:
Other Useful Things
Prettier Manual Pages
Users who have Konqueror installed will be pleased to find they can read and search man pages in a web browser context, prettified with their chosen desktop fonts and a little colour, by visiting man:/command in Konqueror’s address bar. Some people might find this lightens the load if there’s lots of documentation to read/search.
Pasting in commands
Often, you will be referred to instructions that require commands to be pasted into the terminal. You might be wondering why the text you’ve copied from a web page using Ctrl + C won’t paste in with ctrl+V. Surely you don’t have to type in all those nasty commands and filenames? Relax. ctrl+shift+V pastes into a GNOME terminal; you can also do middle button click on your mouse (both buttons simultaneously on a two-button mouse) or right click and select Paste from the menu. However, if you want to avoid the mouse and yet paste it, use "Shift + Insert", to paste the command. If you have to copy it from another terminal / webpage, you can use "Ctrl + Insert" to copy.
Способы запуска «Терминала» в Linux
Консоль — основной инструмент дистрибутивов, основанных на ядре Linux. Через него пользователи выполняют множество полезных команд, которые позволяют взаимодействовать с операционной системой. Большинство юзеров придерживается одной методики запуска «Терминала», хотя на самом деле вариаций гораздо больше. Мы предлагаем ознакомиться со всеми доступными вариантами осуществления поставленной задачи, чтобы вы смогли найти оптимальный для себя или хотя бы узнали о наличии альтернативных способов, которые могут когда-то пригодиться.
Запускаем «Терминал» в Linux
Абсолютно каждый метод запуска «Терминала» в любом из дистрибутивов Linux не занимает много времени, а чаще всего выполняется буквально в несколько кликов. Сегодня в качестве примера мы рассмотрим Ubuntu. Если вы обладаете другой ОС, не беспокойтесь, поскольку почти нигде нет каких-либо различий, а если они и имеются, то самые минимальные, и о них мы обязательно расскажем в методах.
Способ 1: Стандартная комбинация клавиш
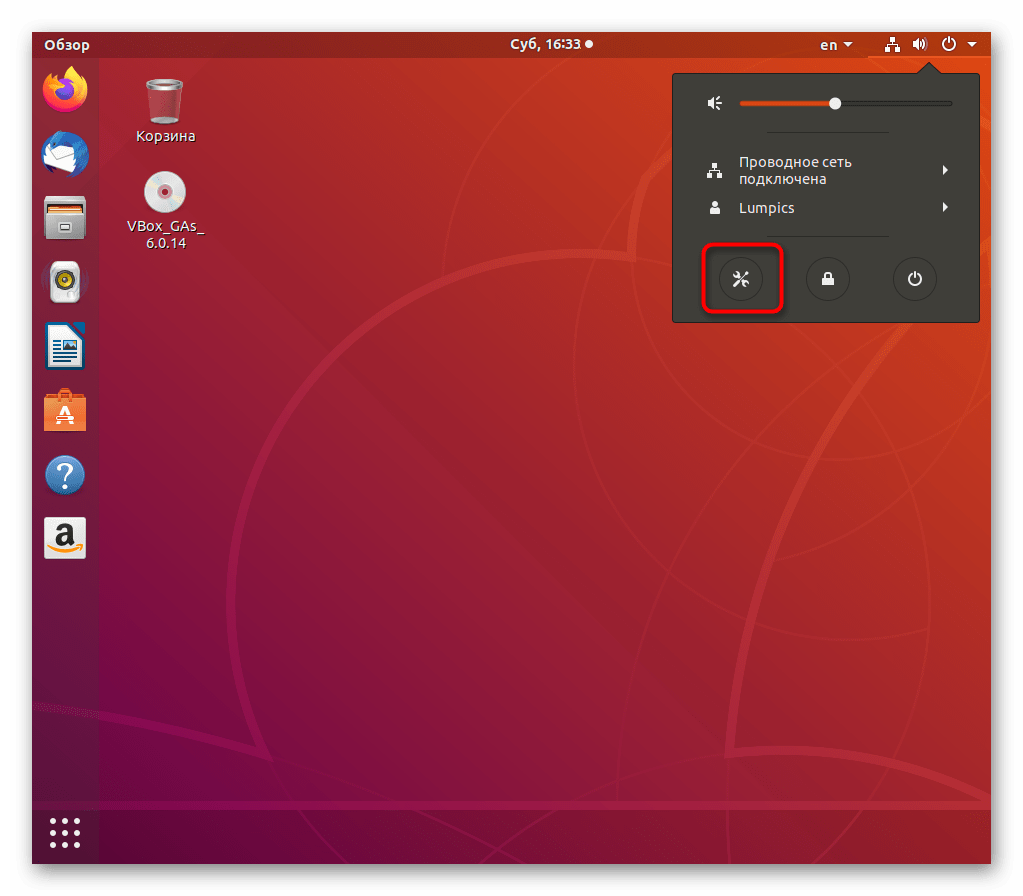
В Linux, как и во всех операционных системах, имеется ряд горячих клавиш, отвечающих за быстрый вызов определенных опций. Сюда входит и запуск установленной по умолчанию консоли. Однако некоторые пользователи могут столкнуться с тем, что стандартные комбинации по какой-то причине не работают или сбились. Тогда мы сначала советуем произвести следующие действия:
-
Откройте главное меню на панели задач и перейдите в раздел «Настройки».
Теперь вы знаете о том, как с помощью всего лишь одной комбинации запустить консоль. При этом будьте внимательны во время переназначения сочетаний, ведь некоторые сочетания уже заняты, о чем вы будете уведомлены. Таким способом вы можете открыть неограниченное количество новых окон классического «Терминала».
Способ 2: Утилита «Выполнить»
Способность применить этот метод зависит от установленного окружения. Практически во всех привычных графических оболочках он функционирует корректно, поэтому его обязательно следует попробовать. Принцип заключается в вызове утилиты «Выполнить», что производится зажатием комбинации Alt + F2.
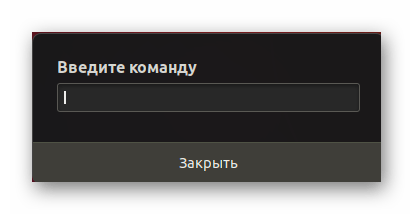
В появившейся строке достаточно будет вписать gnome-terminal или konsole, что зависит от типа используемой оболочки.
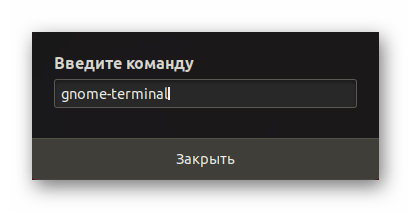
После этого вы увидите, как сразу же отобразится новое окно «Терминала».
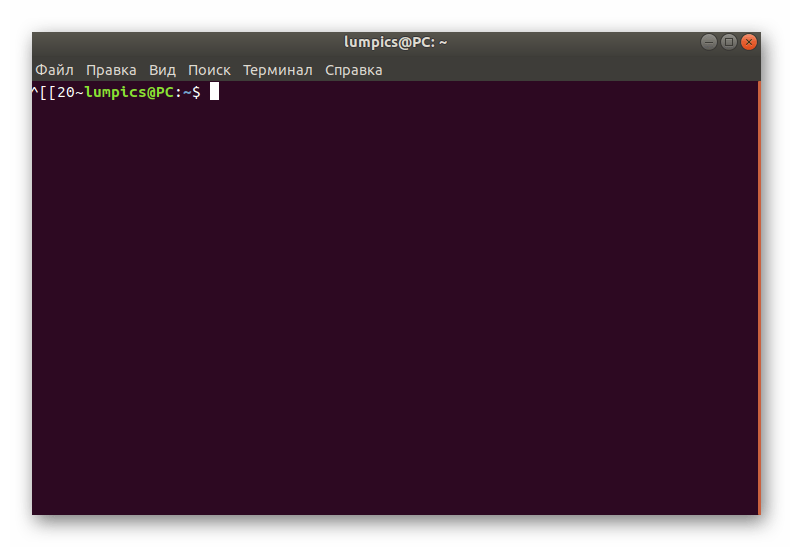
Недостаток этого метода заключается в том, что вам придется запоминать специальную команду или каждый раз копировать ее для вызова. Однако, как видите, ничего сложного в этом нет, поэтому уже буквально через пару вводов вы легко запомните необходимую фразу.
Способ 3: Контекстное меню директорий
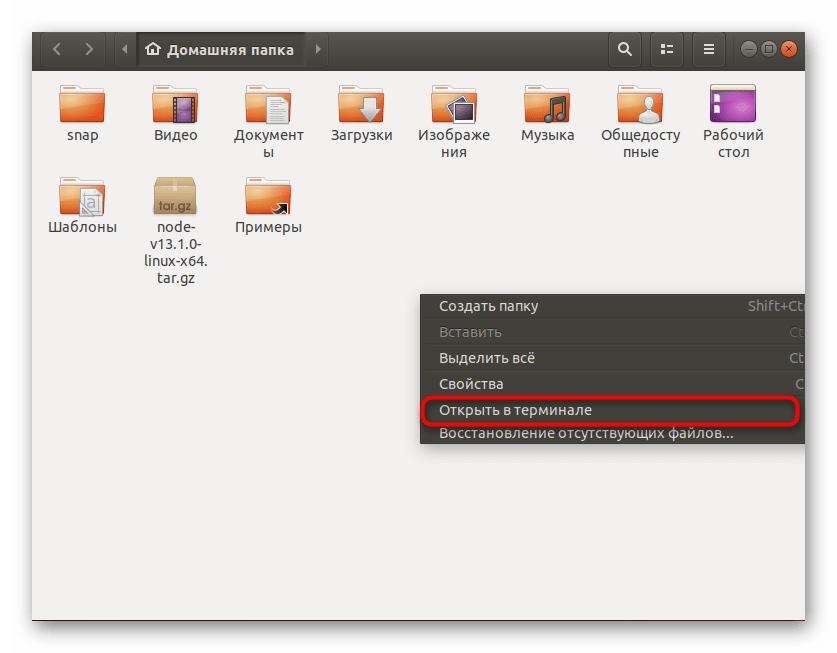
Большинство графических оболочек имеют контекстное меню, которое вызывается путем нажатия ПКМ по свободному месту в любой директории. Одним из пунктов называется «Открыть в терминале» или «Открыть терминал». Именно это мы и рекомендуем использовать в качестве отдельного способа запуска консоли. Особенно актуально это в тех случаях, когда вы хотите запустить новую консоль в необходимом расположении.
Способ 4: Главное меню ОС
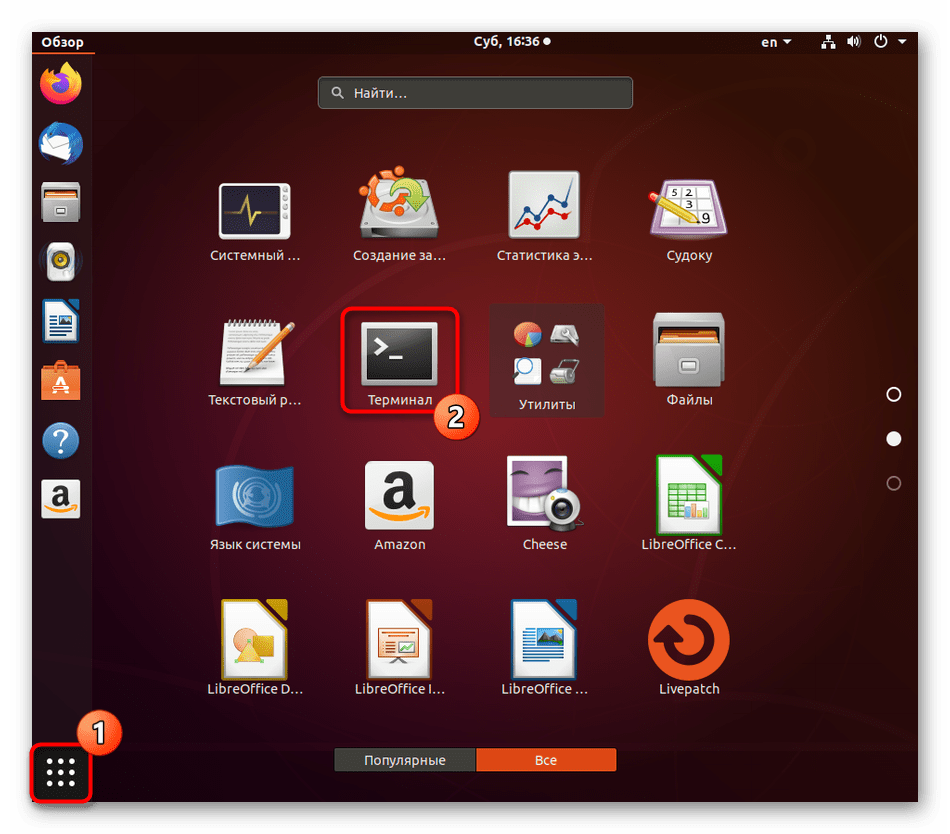
Строение практически всех окружений гарантирует наличие главного меню приложений, откуда можно запускать установленные и стандартные программы, включая консоль. Откройте главное меню удобным для вас образом и отыщите там «Терминал». Если просто найти его не получается, воспользуйтесь строкой поиска. Щелкните ЛКМ для запуска, и теперь вы можете смело приступать к вписыванию команд. Если потребуется создать новую сессию, вернитесь в главное меню и проделайте те же самые действия.
Способ 5: Виртуальная консоль
Этот вариант подойдет далеко не всем юзерам, поскольку он используется исключительно для перехода между виртуальными системными консолями. Дело в том, что при запуске операционной системы создается целых семь таких командных строк, последняя из них реализует графическую оболочку, поэтому пользователь видит только ее. При необходимости можно переключаться к другим терминалам, используя горячие клавиши Ctrl + Alt + F1/Ctrl + Alt + F6.
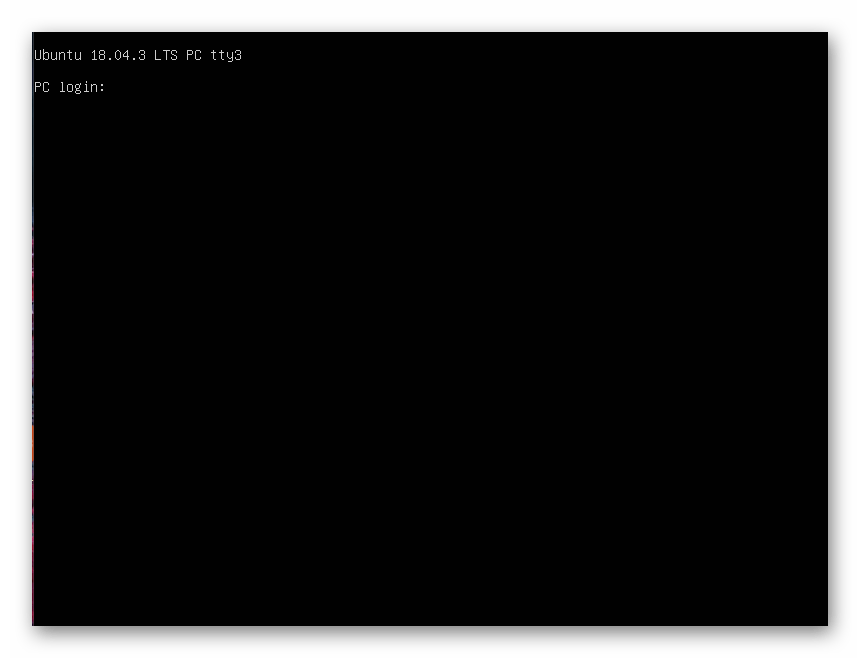
Для авторизации потребуется ввести сначала логин, а затем пароль. Учтите, что ключ суперпользователя не будет отображаться в целях безопасности, это уже вы должны знать, если хотя бы раз использовали команду sudo , которая запускает определенные действия от имени учетной записи с повышенными привилегиями.
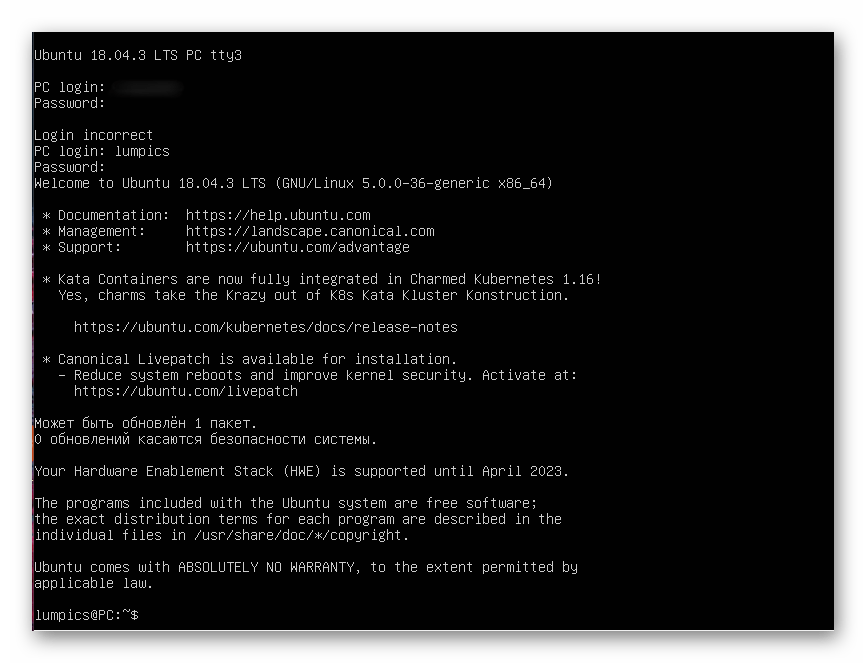
Вы будете уведомлены о том, что авторизация в Ubuntu произведена успешно. Отобразится несколько важных строк, где имеется общее описание и ссылки на официальную документацию и страницы поддержи. Теперь можете использовать команды для управления консолью. По завершении введите exit, чтобы выйти, а затем переключитесь на графическую оболочку через Ctrl + Alt + F7 .
Уточним, что существует огромное количество вспомогательных команд, а также определенных особенностей, которые следует знать о виртуальных консолях. Ознакомиться с этой всей информацией мы рекомендуем, прочитав официальную документацию Ubuntu, воспользовавшись указанной ниже ссылкой.
Способ 6: Строка «Избранное»
Пользователи Windows предпочитают закреплять важные приложения на панели задач, чтобы в необходимый момент быстро их запускать. В графических оболочках Linux эта функция тоже реализована, но сама строка называется «Избранное». Если «Терминал» изначально там отсутствует, предлагаем добавить его следующим образом:
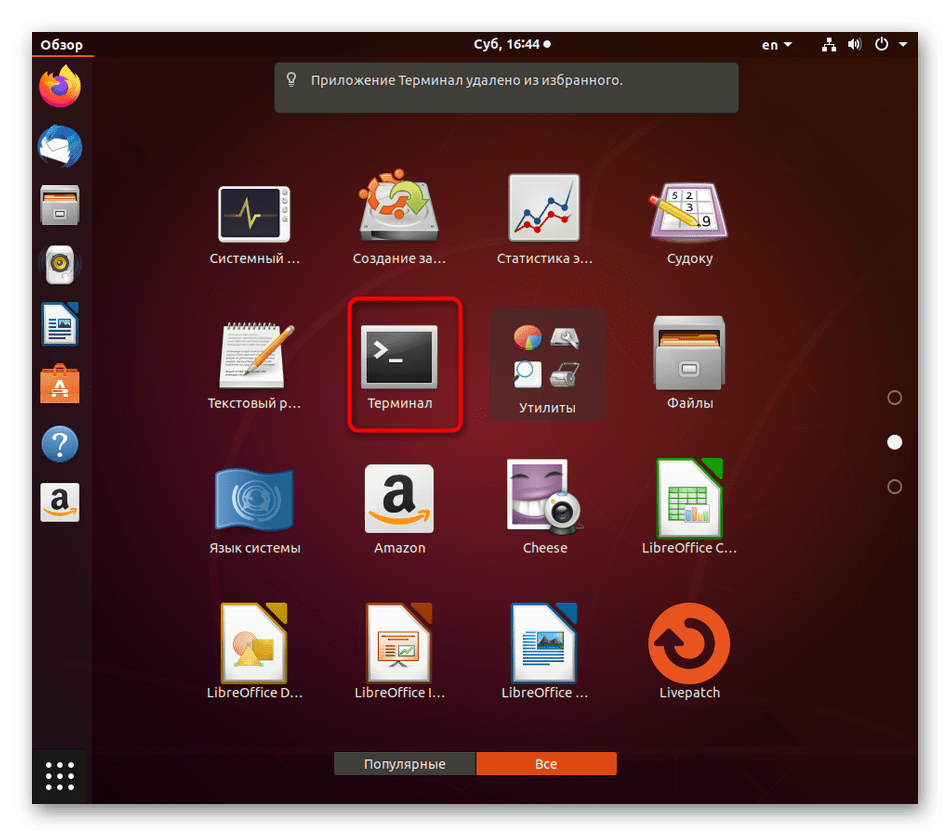
- Откройте главное меню и отыщите там консоль. Кликните по ней правой кнопкой мыши.
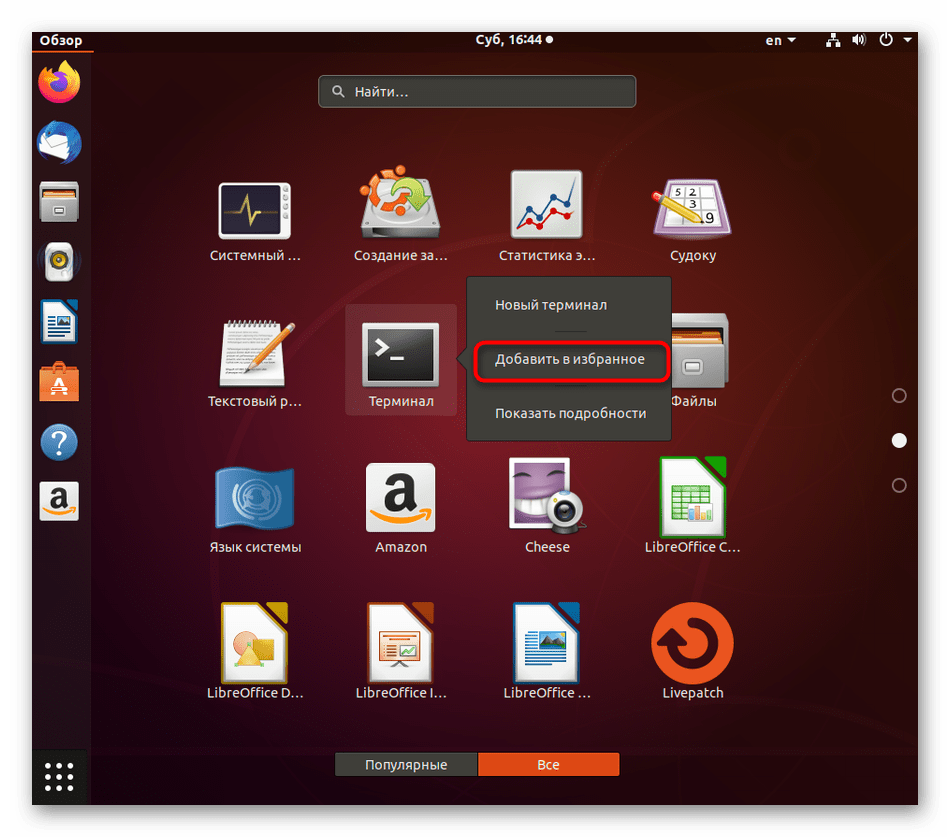
- В появившемся контекстном меню используйте строку «Добавить в избранное».
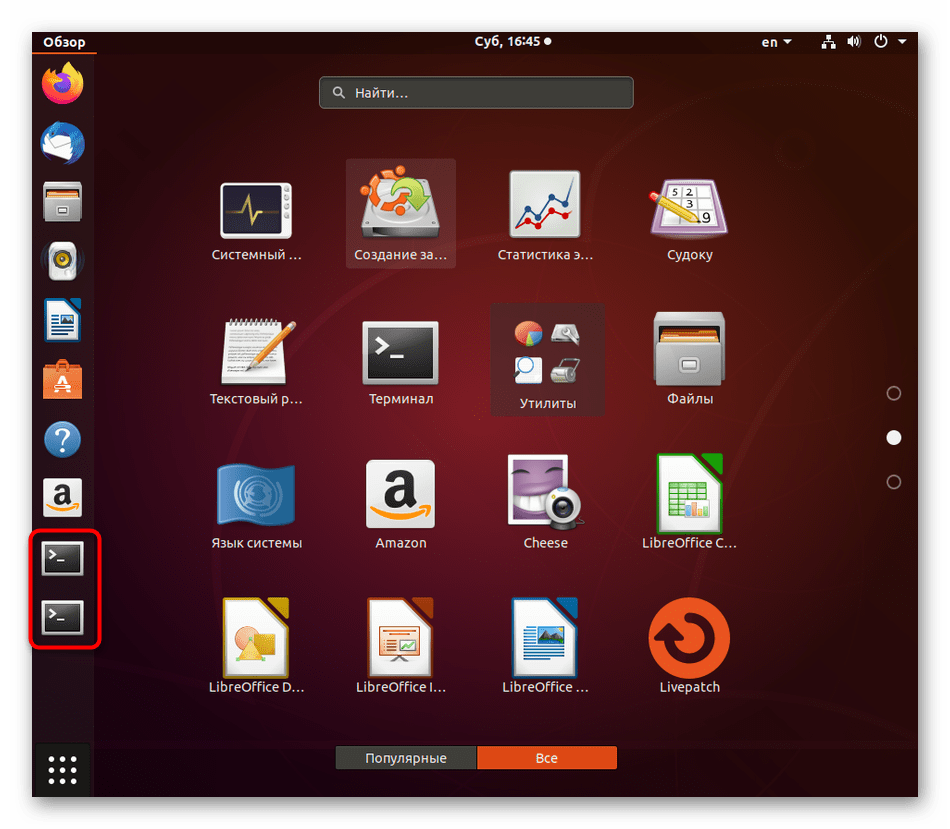
- После этого вы увидите, что консоль была добавлена на соответствующую панель. При необходимости можно поместить туда сразу несколько значков.
Это были все возможные методы запуска стандартной консоли в Linux. Ознакомьтесь с инструкциями, чтобы подобрать оптимальный для себя вариант. Учтите, что если вы задействуете пользовательский терминал, установленный отдельно, метод открытия может быть другим. Обязательно читайте эту информацию в официальной документации.
How to Open Terminal in Ubuntu 22.04?
A terminal is Command Line Interface (CLI) that allows the users to communicate with the system using commands to perform various tasks. We can provide text commands to the computer from the terminal to perform any task. The robust nature of Linux is due to its effective terminal support. It is a fact that GUI is the reflection of commands run through the terminal. In Linux, the most commonly used terminals are GNOME Terminal, Cool Retro Terminal, and Konsole.
This article will discuss the different ways to open the terminal in Ubuntu 22.04. The content of the post is:
- Using Shortcut Keys to Open Terminal
- Using GUI to Open Terminal
Let’s start with the first one:
Method 1: Using Shortcut Keys to Open Terminal
The easiest and most commonly used method to open the terminal in Ubuntu 22.04 is utilizing the shortcut keys. There are built-in shortcut keys for opening the terminal in Ubuntu 22.04 and an option to set your customized shortcut keys. Let’s discuss how to open a terminal using shortcut keys in Ubuntu 22.04.
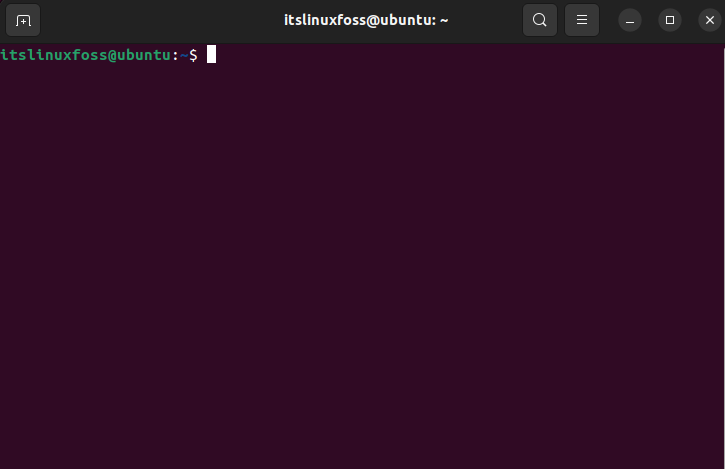
Using “CTRL+ALT+T”
The simplest way to open a terminal with built-in shortcut keys is by pressing the “CTRL + ALT + T” key from your keyboard. The terminal window will open up:
Using Run Prompt
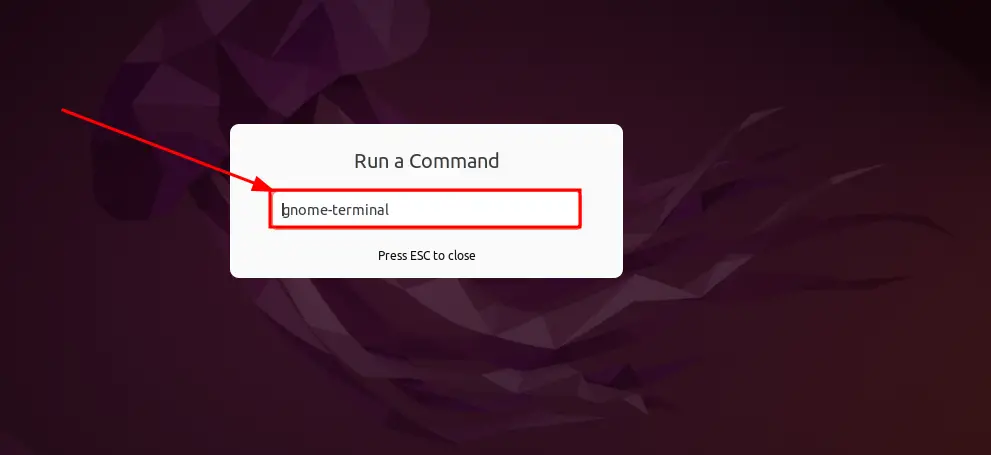
Another way to open the terminal in Ubuntu 22.04 is by using the “Run Prompt”. Press the “Alt + F2” keys to open the “Run Prompt”; it will show a search dialogue box as shown below. Type the “gnome-terminal” in the search bar and hit “Enter”:
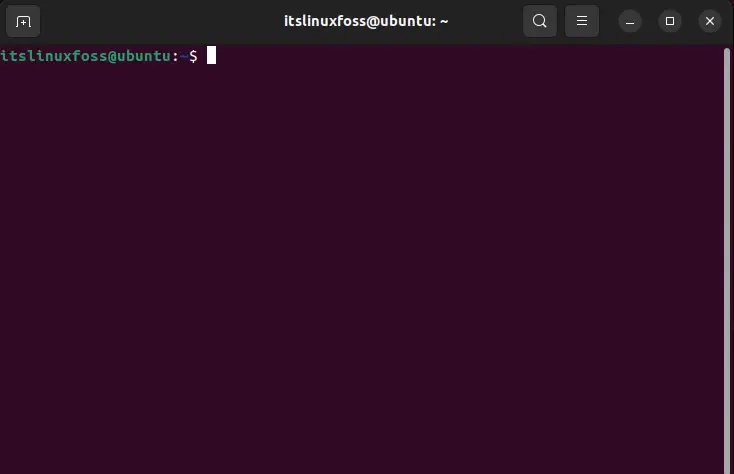
A new terminal has been launched:
These were the shortcuts to open Ubuntu’s terminal.
Method 2: Using GUI to Open a Terminal
This section will discuss how to open a terminal using the GUI in Ubuntu 22.04.
How to Open Terminal From Ubuntu Search?
You can open the terminal in Ubuntu 22.04 from the “Activities menu” by following the guideline provided below:
Click on “Show Applications”; a new window will open. Type “terminal” in the search bar and click on the “Terminal” application to open it:
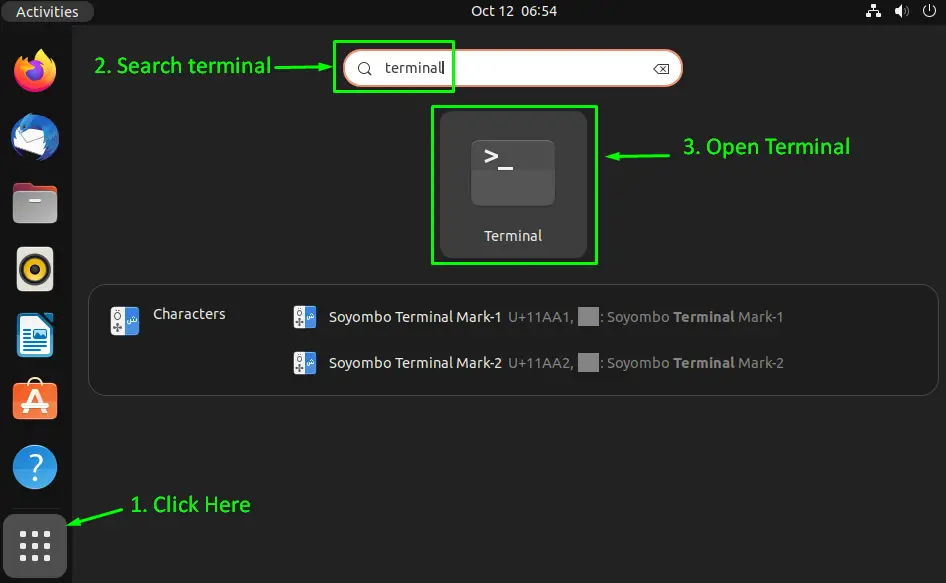
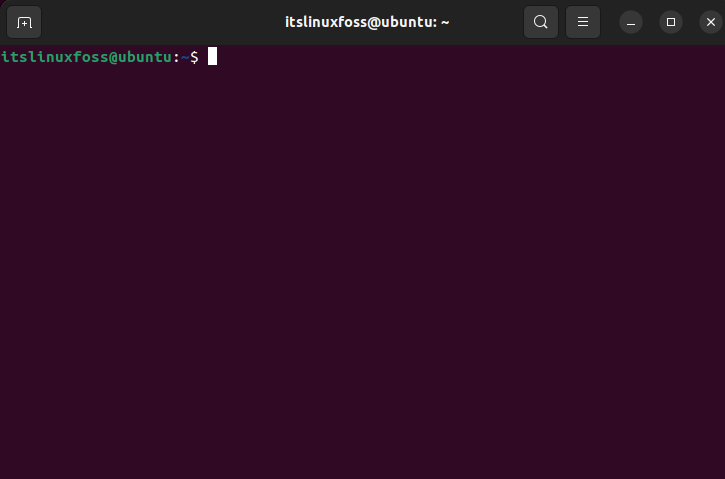
By Doing so, the terminal window will open up:
How to Open Terminal Directly From Desktop (or Inside a Directory)?
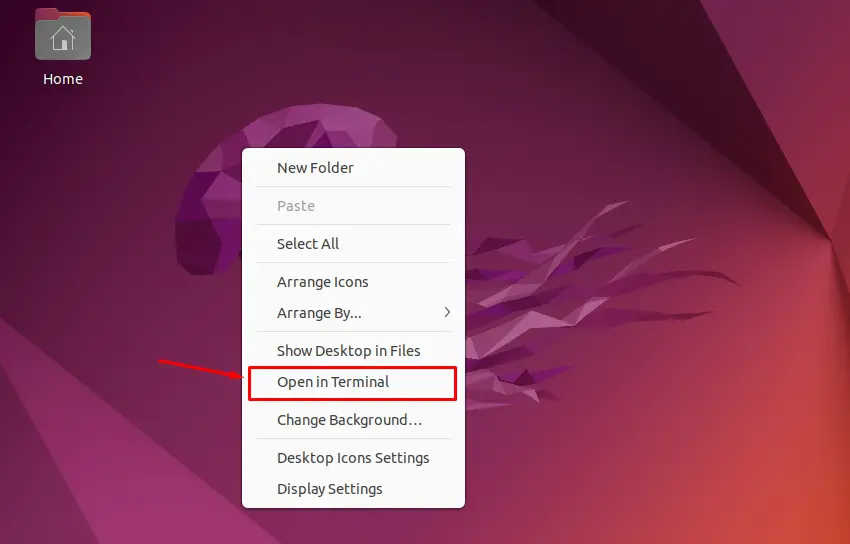
In Ubuntu 22.04, there is an option to open the terminal directly from “Desktop” or the specific “Directory”. The terminal can be started by right-clicking on the desktop and choosing the “Open in Terminal” option:
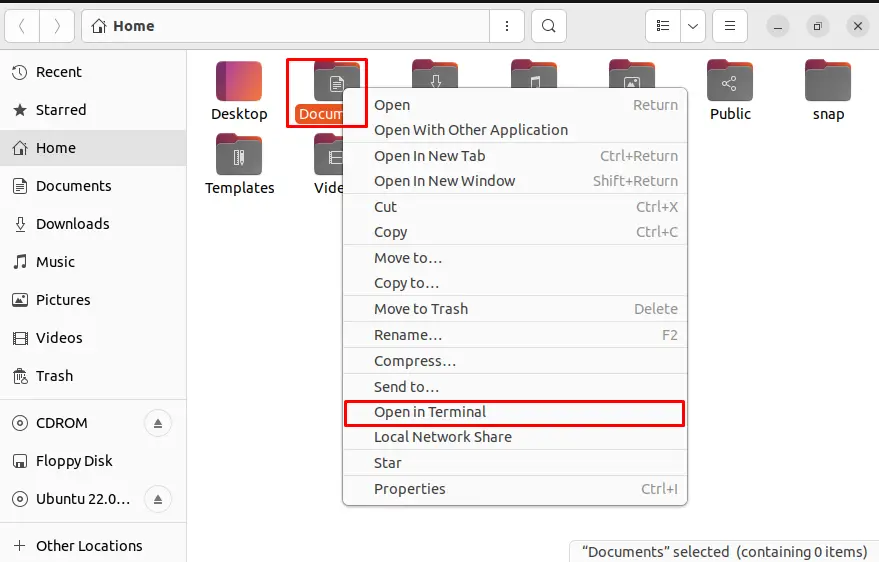
To directly open the folder/directory in the terminal, right-click inside that directory and choose the option “Open in Terminal”. It will navigate you directly to that folder in “Terminal”:
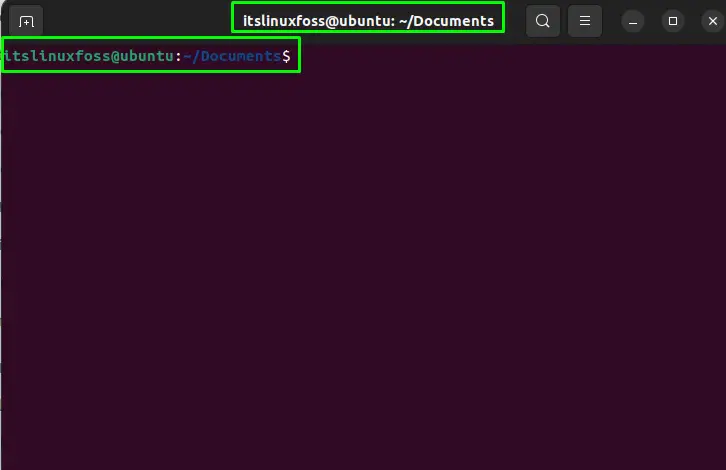
The output shows that the “Documents” folder/directory is opened in the terminal:
How to Open a New Terminal From an Opened Terminal?
When you have opened a “Terminal”, there is an easy way to open a new terminal by clicking on the “+” option (as indicated in the below picture):
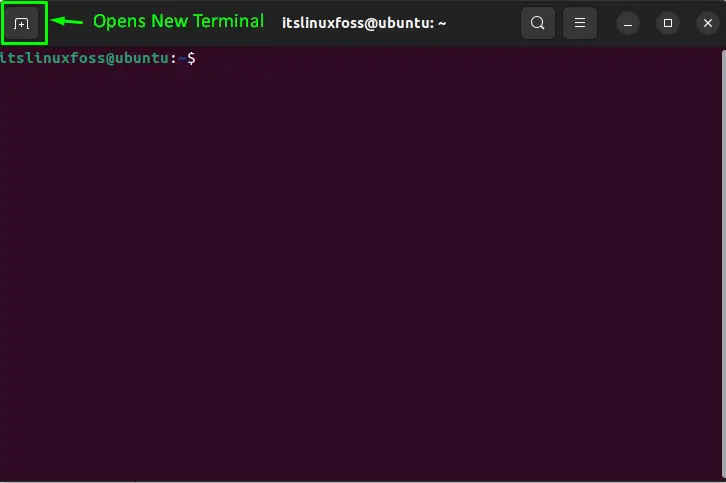
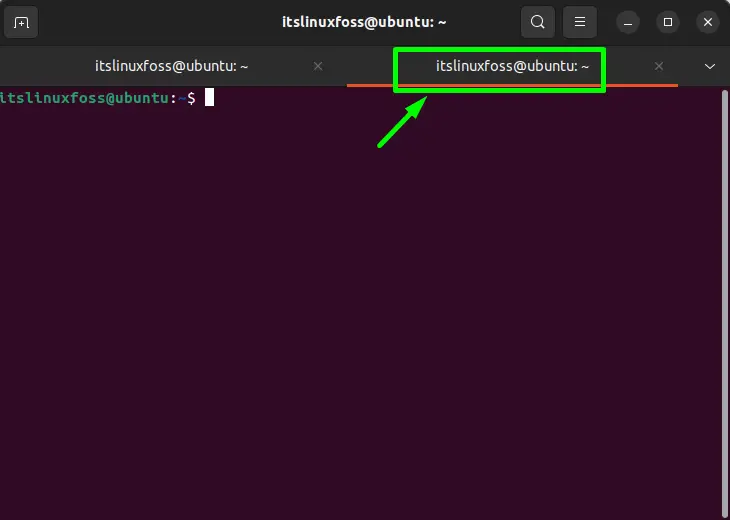
It will open a new terminal as shown:
That’s all from this guide!
Conclusion
To open a terminal in Ubuntu 22.04, we can use different ways using shortcut keys or GUI. The shortcut key “CTRL+ALT+T” will instantly open the terminal. Whereas the second shortcut key, “ALT+F2”, will open a run prompt and search “gnome-terminal” to open the terminal. While the GUI method can also be followed to open a terminal by searching it from Ubuntu search, or one can right-click anywhere to choose “Open in Terminal”. This guide has illustrated all the methods to open a terminal in Ubuntu.
5 способов открыть терминал в Linux: Ubuntu, Debian, Mint и др. (terminal ∼черное окно с командной строкой)
При работе в Linux нередко требуется вводить определенные команды в терминале (представляет он из себя что-то похожее на командную строку в Windows: то же черное окно с предложением ввести текстовую команду). Судя по комментариям, — не все начинающие пользователи могут с наскоку найти и открыть окно терминала, а потому решил кратко рассмотреть неск. способов его запуска. 👌
Зачем может понадобиться терминал:
- устанавливать, удалять приложения; копировать файлы, каталоги и пр.;
- обновлять систему, ядро и пр.;
- создавать пользователей;
- производить настройку сети, DNS, IP, и пр.;
- настраивать права доступа;
- запускать приложения, скрипты, настраивать расписание их запуска в авто-режиме;
- перезагружать и выкл. машину;
- и многое-многое другое.
Способы
Первый: ярлыки на раб. столе, в меню
Пожалуй один из наиболее простых и очевидных способов запустить терминал — это воспользоваться соотв. ярлыком в меню «ПУСК» («Приложения»), либо на рабочем столе, либо с нижней/верхней панельки (в зависимости от вашей версии Linux — ярлыки могут находиться в разных местах 😉).
Прим.: осмотрите вкладки «Система», «Администрирование», «Служебные» и пр. Как правило в них почти наверняка есть ярлык для запуска терминала.
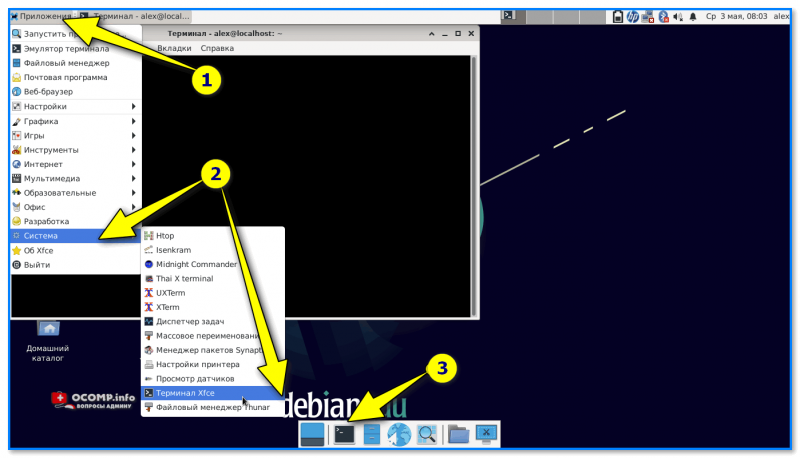
Меню ПУСК (приложения системные, администрирование)
Второй: горячие клавиши
Попробуйте воспользоваться «горячими клавишами». В Ubuntu, Debian это обычно:
- Ctrl+Alt+T
- Win+T
Посмотреть какие именно клавиши заданы можно в настройках клавиатуры (вкладка «Комбинации клавиш» ).
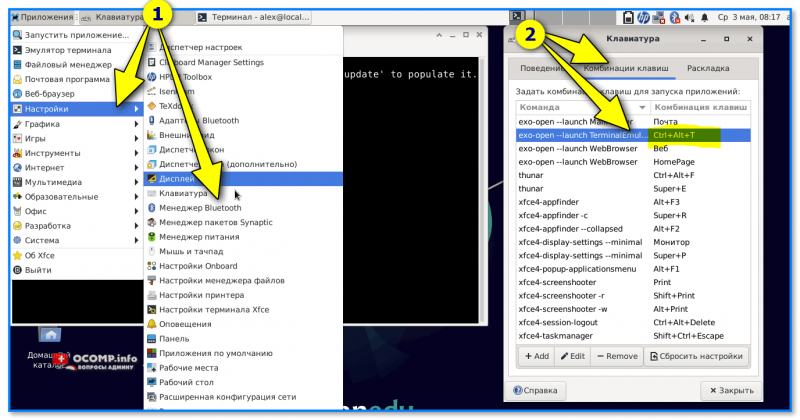
Ctrl+Alt+T — сочетание клавиш для вызова окна терминала
Третий: через обозреватель
Попробуйте открыть какой-нибудь каталог через стандартный обозреватель, а потом нажмите правой кнопкой мыши по свободному месту — должно появиться контекстное меню, в котором будет ссылка на терминал. См. пример ниже.👇
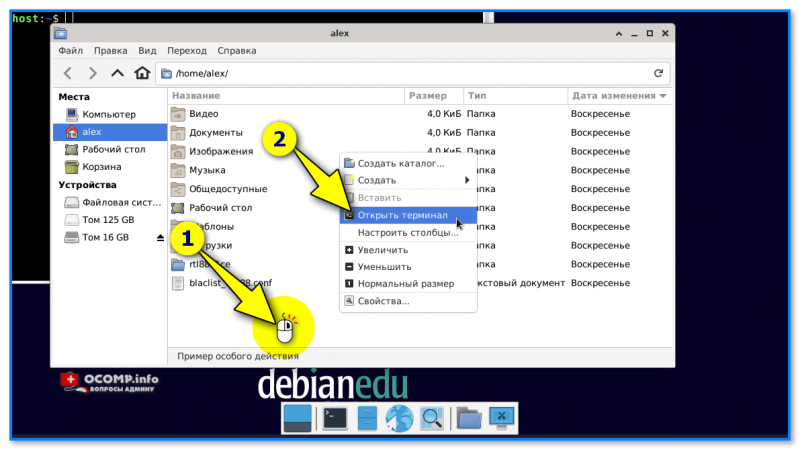
Щелчок правой кнопкой мыши в обозревателе
Четвертый: окно поиска
Во многих граф. средах (оболочках) Linux есть возможность воспользоваться строкой поиска: ее можно вызвать либо прямо мышкой через элемент интерфейса, либо нажав сочетание ALT+F2 .
В строке поиска можно попробовать набрать одно из нижеприведенного:
- gnome-terminal
- terminal
- xfce4-terminal
Как правило, система сама вам подскажет какой вариант ввести и предложит открыть терминал. Удобно?! 👌
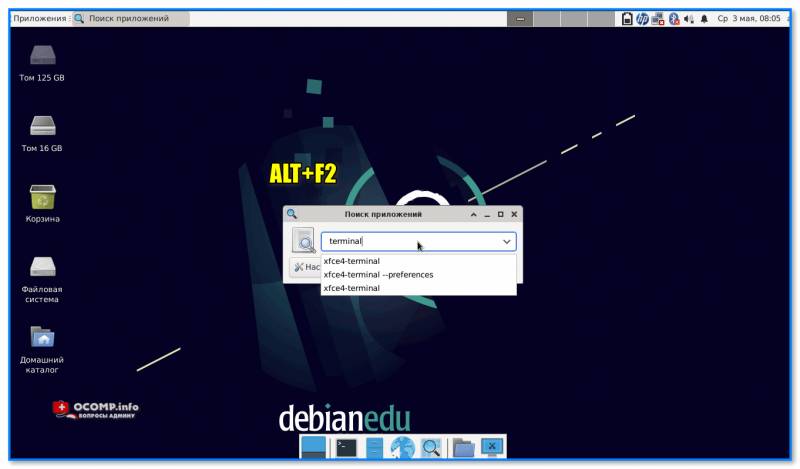
ALT+F2 — окно поиска
Пятый: виртуал. системная консоль
При запуске системы Linux создаются 7 вирт. консолей, последняя из них реализует графическую оболочку (shell), которую мы и видим (с рабочим столом, панельками и т.д.).
Разумеется, можно переключиться и на ту консоль, которая представляет собой «текстовый вариант» (терминал). Для этого достаточно нажать сочетание клавиш: Ctrl + Alt + F1, либо Ctrl + Alt + F2, либо Ctrl + Alt + F3 .
📌 Важно! На некоторых ноутбуках функциональные клавиши F1-F12 работают только при зажатой Fn!
Далее потребуется ввести свой логин и пароль — и можно работать! Для выхода из консоли введите команду Exit , а затем нажмите сочетание Ctrl + Alt + F7 .
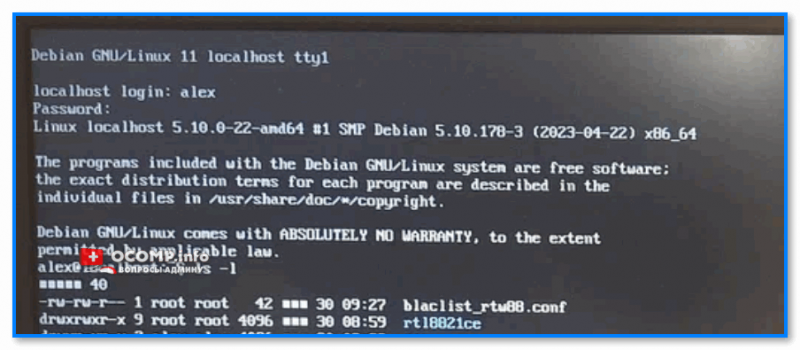
📌 Примечание: как получить права ROOT, как закрыть терминал
Для выполнения ряда команд требуются права ROOT (администратора машины). Чтобы их получить — достаточно в терминале воспользоваться одной из команд:
- набрать команду «sudo bash» и ввести пароль;
- набрать команду «su — root» .
- Разумеется, далее вам потребуется ввести пароль администратора, который вы задавали при установке системы!
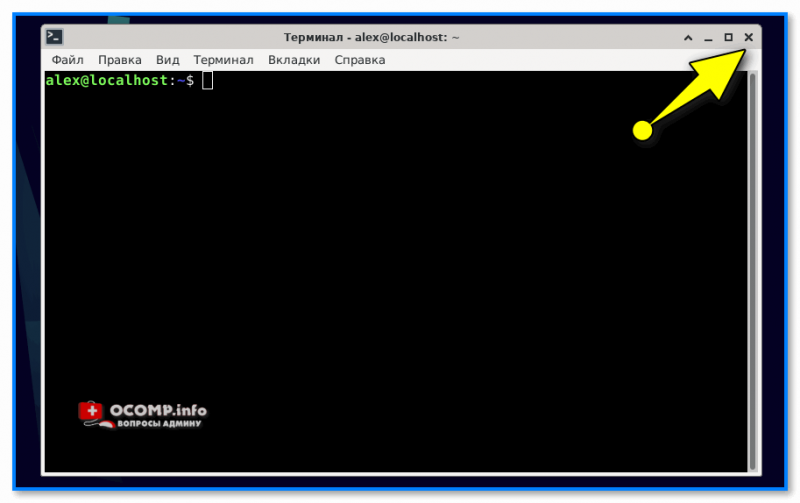
Для выхода из терминала:
-
в графическом окружении: достаточно нажать на крестик в углу окна (либо ввести команду «exit» и нажать Enter);
Дополнения по теме — приветствуются! Их можно оставить в комментариях ниже.