Masking and tracking
Use Premiere Pro’s masking tools to apply effects to a specific part of a frame in your video. Learn to apply a mask, and then track it as it moves across the frame.
Masking in Premiere Pro
Masks let you define a specific area in a clip that you want to blur, cover, highlight, apply effects, or color-correct. You can create and modify different shaped masks, like an Ellipse or a Rectangle. Or, you can draw free-form Bezier shapes using the Pen tool.
Create masks using shapes
You can use the Ellipse shape tool to create a circular or ellipse-shaped mask, or a Rectangle shape tool to create a four-sided polygon.


In the Timeline panel, select the clip you want to mask.
From the Effects panel, select the effect that you want to apply to the clip.
For example, if you want to apply the Mosaic effect, select Video Effects > Stylize > Mosaic .
Apply the selected effect to a clip by dragging the effect from the Effects panel to the clip in the Timeline panel. Alternatively, select the clip and double-click an effect in the Effects panel to apply it.
For more information on applying an effect, see Apply effects to clips.

Open the Effect Controls panel to see the effect properties. Click the drop-down arrow to reveal the controls.
You can create an ellipse or rectangle. Use the Pen tool to create free form shapes.
You can specify values to adjust a mask using the Effect Controls panel. The controls change depending on your choice. For more information, see Adjust mask settings.
Click the Ellipse shape tool to create an Ellipse-shaped mask or click the Rectangle shape tool to create a rectangle-shaped mask.
The shape mask appears in the clip displayed in the Program Monitor, and the effect is constrained within the masked area.

You can now customize the size and shape of the mask using the Effect Controls panel. For more information on editing your mask, see Adjust mask settings.
You can apply the same effect multiple times by using different settings each time.
Important notes
- Premiere Pro does not save masks as effects presets.
- Masking is disabled for the Warp Stabilizer effect. The mask shape controls do not appear for the Warp Stabilizer effect in the Effect Controls Panel.
Create free-form shapes
You can create free-form shapes using the Pen tool. The Pen Tool lets you freely draw complex mask shapes around objects.
Select the Pen tool from the Effect Controls panel. Draw directly on the clip in the Program Monitor.
You can create different shapes by drawing straight lines and curved segments. To draw smooth curves, you can draw Bezier path segments that provide you greater control over the shape of the mask.
Draw straight path segments with the Pen tool
The simplest path that you can draw with the Pen tool is a straight line with two vertex points. By continuing to click, you create a path made of straight-line segments connected by vertex points. This is a linear mask.
A linear mask is always a polygon with joined by hard angles. Linear control points are also known as corner points.

Select the Pen tool.
Position the Pen tool where you want the straight segment to begin, and click to define the first vertex point (do not drag).
The first segment you draw is not visible until you click a second vertex point.
Click again where you want the segment to end.
Continue clicking to set vertex points for additional straight segments.
To draw perfect 0°, 45°, or 90° angles, press Shift + click on the keyboard.
To close the path with a linear mask, Alt +click (Windows) or Option +click (macOS) over the first vertex point.
Draw curved Bezier path segments with the Pen tool
You create a curved path segment by dragging direction lines using the Pen tool. The length and direction of the direction lines determine the shape of the curve.
To create Bezier shapes, you convert a vertex point on a mask to a Bezier point by pressing the Alt key while placing the cursor over the vertex point. The cursor becomes an inverted "V" shape . Then, click and release the pointer.
Bezier handles provide two-directional controls that allow you to change the curve of the line segment between the handle and the next point on either side.

A. Two-directional Bezier handles to control the shape of the curve B. Bezier mask points
Place the Pen tool where you want the curve to begin, and hold the mouse button down. A vertex appears, and the Pen tool pointer changes to an arrowhead.
Drag to modify the length and direction of both direction lines for a vertex, and then release the mouse button.
A. Placing the Pen tool
B. Starting to drag (mouse button pressed)
C. Dragging to extend direction lines

Place the Pen tool where you want the curved segment to end, and do one of the following:
- To create a C-shaped curve, drag in the direction opposite from the direction that you dragged the previous direction line, and then release the mouse button.
A. Starting to drag
B. Dragging away from previous direction line, creating a C curve
C. Result after releasing mouse button

- To create an S-shaped curve, drag in the same direction as the previous direction line, and then release the mouse button.
A. Starting to drag
B. Dragging in same direction as previous direction line, creating an S curve
C. Result after releasing mouse button

Continue dragging the Pen tool from different locations to create a series of smooth curves.
Modifying and moving masks
The vertex points on a mask let you easily manage the shape, size, and rotation of a mask.
Modify the shape, size, and rotation of a mask

To change the shape of a mask, drag a mask handle.

To change the shape of an ellipse mask to a polygon, press Alt and click any of the vertices of the ellipse.

To resize a mask, place your cursor just outside a vertex and press Shift (cursor becomes a double-sided arrow ), then drag the cursor.

To rotate the mask, place your cursor just outside a vertex (cursor becomes a curved double-sided arrow ), and then drag.
Move, add, or remove a vertex

To move a vertex, drag the vertex with the Selection tool . Note that while dragging an ellipse-shaped mask, the ellipse shape is not maintained.

To add a vertex, place your cursor over a mask edge while pressing Ctrl (Windows) or Cmd (macOS). The cursor changes to a pen shape with a "+" sign .

To remove a vertex, place your cursor over the point while pressing Ctrl (Windows) or Cmd (macOS). The cursor changes to a pen shape with a minus sign .
Other important commands and keyboard shortcuts
- Use the arrow keys on your keyboard to nudge a selected control point by a distance of one unit.
- Press Shift and use the arrow keys to nudge a selected control point by a distance of five units.
- To deselect all the selected control points, click outside a currently active mask.
- To disable direct manipulation of a mask, click outside the mask. Or deselect the clip in the sequence.
- To delete a mask, select the mask in the Effect Controls Panel and press Delete on your keyboard.
Adjust mask settings
You can specify values to adjust a mask using the Effect Controls panel. You can feather the mask, expand the mask, change the opacity, or invert the mask to stylise your video.
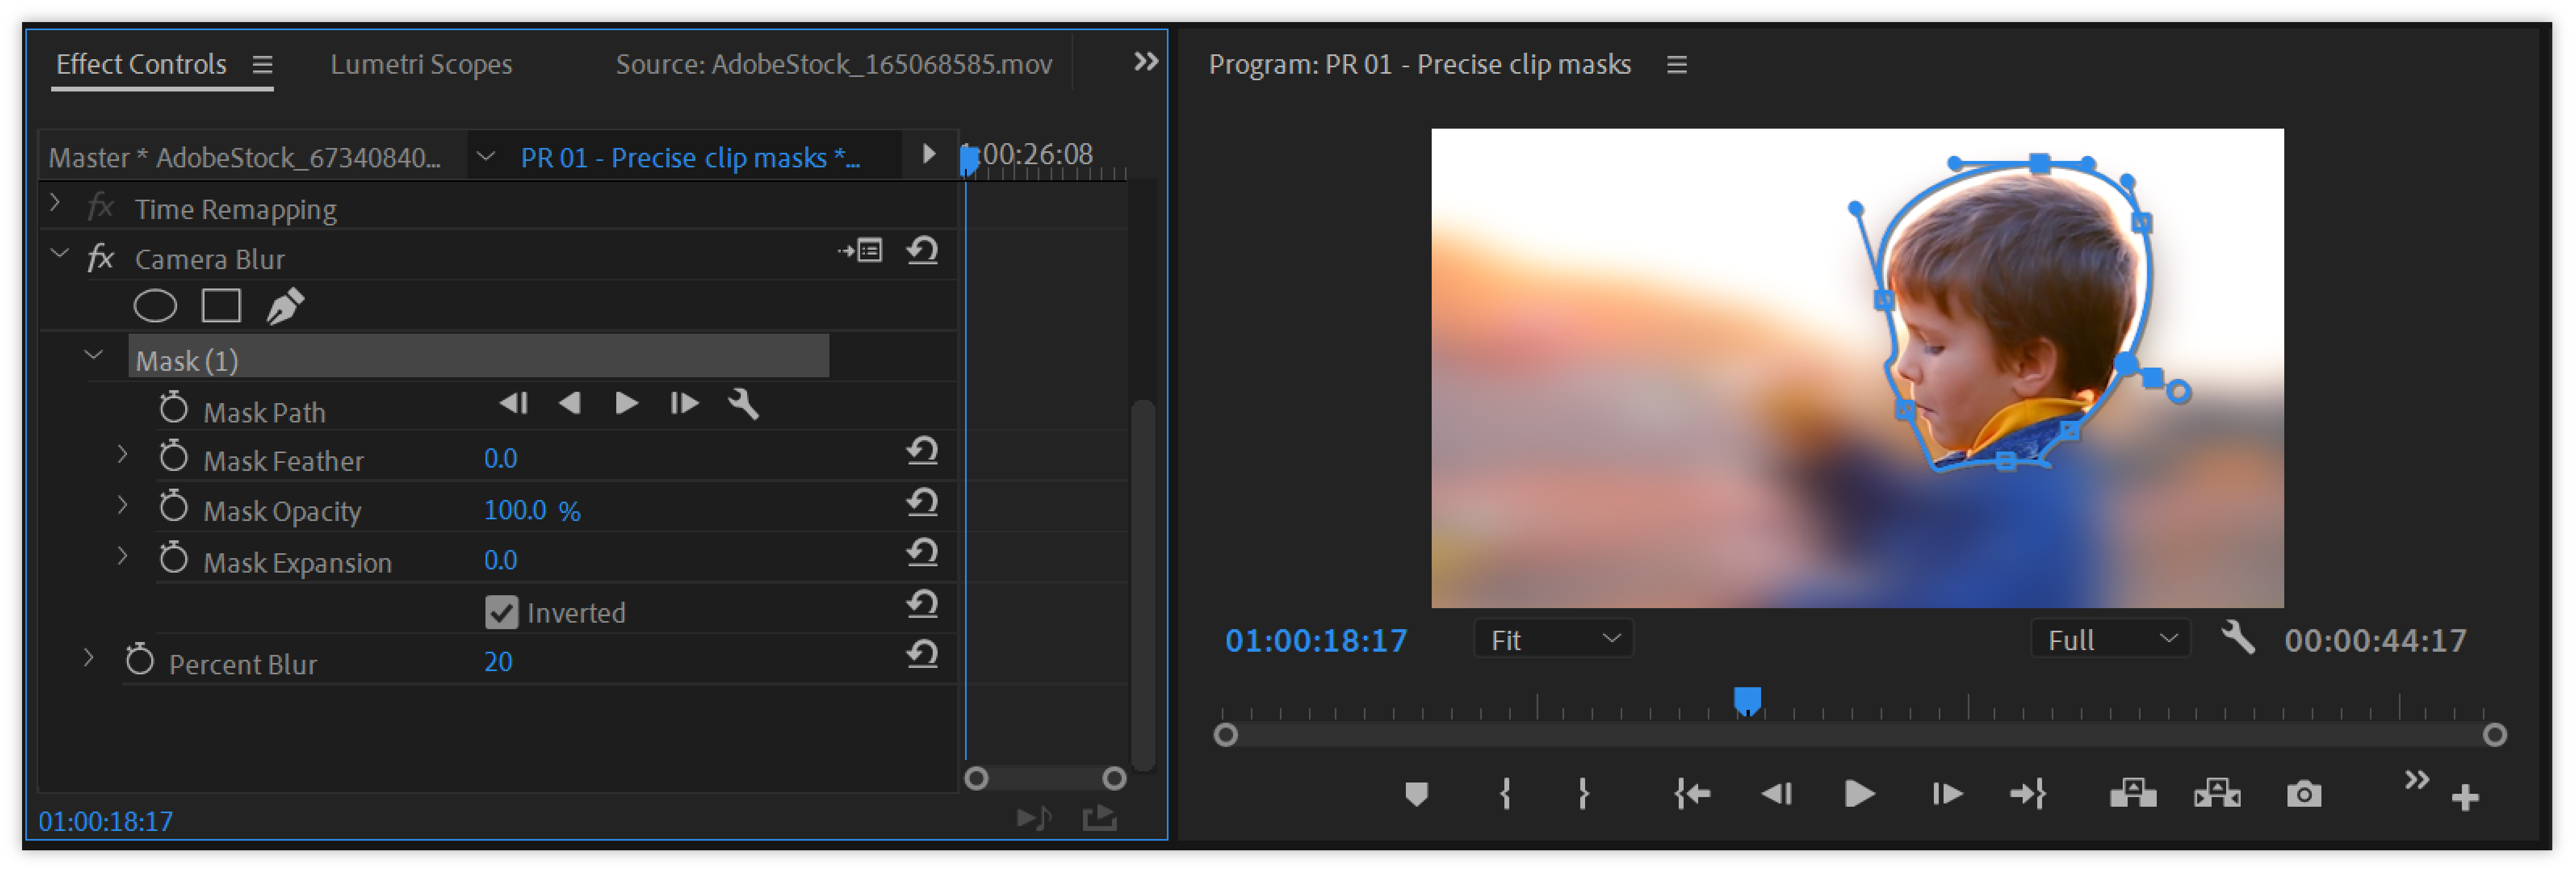
Apply mask feathering

To feather a mask, specify a Mask Feather value. The feathering guide appears around the mask as a dashed line. Drag the handle away from the feathering guide to increase the feathering, or toward the feathering guide to decrease the feathering.
The mask feather handle lets you control the amount of feathering directly on the mask outline in the Program Monitor.
Adjust mask opacity

When opacity is applied to a mask it will change the opacity of the footage you have cropped out.
To adjust the opacity of a mask, specify a Mask Opacity value. The slider controls the mask opacity. At a value of 100, the mask is opaque and blocks out any underlying area of the layer. As you lower the opacity, more of the area under the mask becomes visible.
Adjust mask expansion

To expand a mask, specify a Mask Expansion value. Positive values move the borders outward, and negative values move it inward. You can also drag the handle away from the expansion guide to expand the mask area, or toward the expansion guide to contract the mask area.
Invert mask selection

Select the Inverted check box to reverse the masked and unmasked areas.
You can protect areas that you want to leave as-is by masking it, and select the Inverted check box to apply effects to the unmasked areas.
Copy and paste masks
You can easily copy and paste masks between clips or between effects.
Copy and paste effects with masks between clips
When you copy and paste an effect containing masks, the pasted effect has the same masks applied.
- In the Timeline panel, select the clip containing the effect with masks.
- In the Effect Controls panel, select the effect to copy.
- Select Edit > Copy . Or use the keyboard shortcut Ctrl+C (Windows) or Cmd+C (Mac OS).
- Select another clip in the Timeline to which you want to paste the mask.
- Select Edit > Paste . Or use the keyboard shortcut Ctrl+V (Windows) or Cmd+V (Mac OS).
Copy and paste masks between effects
- In the Effect Controls panel, click the triangle to expand the effect to reveal the applied masks.
- Select the mask to copy.
- Select Edit > Copy . Or use the keyboard shortcut Ctrl+C (Windows) or Cmd+C (Mac OS).
- Select another effect in the Effect Controls panel to which you want to paste the mask.
- Choose Edit > Paste . Or use the keyboard shortcut Ctrl+V (Windows) or Cmd+V (Mac OS).
You can copy and paste only one mask at a time.
Mask tracking in Premiere Pro
When you apply a mask to an object, Premiere Pro can let the mask automatically follow the object as it moves from one frame to another. For example, after blurring a face using a shape mask, Premiere Pro can automatically track the movements of the masked face from frame to frame as the person moves.
When a mask is selected, the Effect Controls panel displays controls for tracking the mask forward or backward. You can choose to track the mask either one frame at a time or until the end of the sequence.
Click the wrench icon to modify how masks are tracked. You can select from a few choices to provide the most effective tracking:
Tracks just the mask position from frame to frame
Position And Rotation
Tracks the mask position while changing the rotation as required per frame
Position, Scale, And Rotation
Tracks the mask position while automatically scaling and rotating as the frame moves
You can find the option that works best for your clip by trial. Select one of these options, and if it doesn’t work well, undo, and try another one.
To use the more advanced tracking features available in After Effects, send your sequence to After Effects using the Dynamic Link feature. For more information, see Mask Tracking in After Effects.
Speed up mask tracking
Mask tracking in Premiere Pro is faster when Live Preview is disabled (the default option). If for some reason, Live Preview is enabled, you can disable it using the following procedure.
In the Timeline panel, select the clip containing the effect with masks.
To preview the changes in the track, click the mask wrench icon and select preview from the drop-down list.

To disable live preview, click the mask wrench icon and deselect preview from the drop-down list.

In addition, Premiere Pro has in-built features that optimize mask tracking:
For clips with a height greater than 1080, Premiere Pro scales the frame to 1080 before calculating the track. Also, Premiere Pro uses Low Quality renders to speed up the process of mask tracking.
Video tutorial

In this 5-min video tutorial, learn how to apply a feathered mask to protect a person’s identity and then track that mask as it moves across the frame in a scene.
The tutorial provides you sample files to try out the feature for yourself.
How to Do Motion Tracking in Premiere Pro?
Adobe After Effects isn’t the only software that lets you do motion tracking. In this tutorial, we are going to learn how to do motion tracking in Premiere Pro along with other effects such as auto motion tracking and zoom effects. Most of these features require the latest stable versions of Premiere Pro. We recommend making sure you have the most up to date version from the link below:

Does Premiere Pro have motion tracking?
Premiere Pro does have motion tracking! You can easily achieve the same motion tracking effects you get in After Effects. It supports manual tracking, auto-tracking and a combination of both.
There are various use cases for motion tracking. You could pan the screen following an object, create text tracking motions, and even apply blur effects on someone’s face and make the blur follow the face on the screen.
How do you motion-track an object in Premiere Pro?
Before getting started, we will need to activate helper tools and operators. Click on the plus (+) sign in your editor and activate the ruler and guides as shown in yellow in the following image. They aren’t necessary but allow us to create pixel-perfect motion tracking effects.
In this tutorial, we will apply motion blur tracking on our subject’s face.
- Open Premiere Pro and insert a dynamic clip into the timeline.
- Switch to the editing panel and find Gaussian Blur in the effects menu. It’s inside Blur effects > Blur & Sharpen. Or you could search for it from the search bar.
- Bring the timeline play head to the beginning, or where you want the effect to start and apply the effect.
- Gaussian Blur panel will show up inside the Effects Control panel. Since we will be tracking a face, we’ll select an ellipse mask. You could also select rectangle or draw your custom shape using the pen button.
- Once the ellipse shape is applied on your clip, drag and drop it onto your subject’s face. You may also need to adjust its shape and size a bit to fit.
- When ready, click on the Play button shown in the following image, and Premiere Pro will automatically start tracking and applying motion tracking.
Automated motion tracking works in most scenarios, but you may have to adjust a few settings here and there or create a custom manual motion tracking altogether. In that scenario, once you drop the mask on your subject, you’ll need to change its position using keyframes on the timeline.
Auto Motion Tracker For Objects
Auto Motion Tracker for Objects is a Premiere Pro paid plugin you can use to create custom automated motion tracking in Premiere Pro. It gives you greater control over objects and clips, allowing you to easily apply zoom, scale, and pan motion tracking effects. This is something that hasn’t been easy or possible to do before. You’d always have to launch your After Effect for that. But these extensions and plugins bring a lot of After Effects features into your Premiere Pro workspace.
How to Use Motion Tracking in Adobe Premiere Pro Easily

Motion Tracking is a technique where you can track an object in a video clip. Be it covering or blurring a face or moving a text around somebody in the video, motion tracking has become a trend these days.
It is being used in every other video. In fact, the most promising video editing tool i.e. Premiere Pro also allows you to use this function.
Through this article, we will make you understand what the need for this is and how you can use motion tracking in Premiere Pro.
Bonus Tip-The Most Recommended Motion Tracking Software
It is always important to select the best video editor or else say hello to wasted time and effort. T he simple yet powerful Filmora 11 is for beginners looking to use advanced features without going into detailed tutorials. I agree editing can be quite tiring. But, not with Filmora X. Especially the motion tracking feature. Filmora X makes motion tracking fairly easy. It is just a one-click process. Just select your tracking target and click Ok. As easy as that. What more could you want? Go on and try it out.


Part 1: Why You Need to Use Motion Tracking
1. Stabilization
When you happen to see an amazing shot and plan to record it, but you need to keep moving along with it, it might result in shaky footage. As a result, it will provide an unpleasant experience. However, when you know motion tracking, you can adjust this instability and remove it. By using motion tracking in Premiere Pro, you position the place in the frame, and as a result, the selected spot remains centered, and the entire frame moves around it. This merely corrects the shakiness and brings out a non-shaky video as a result.

2. Blur objects
The moments come where we need to create videos in public places. And a lot of times, people object to their faces being shown in the videos. At such times, motion tracking Premiere comes in handy. With the help of this, you can blur a person’s face to avoid any nuisance regarding any copyright issues. Also, it is useful when you have to make the well-known company logos unrecognizable when you do not have permission to do so.
Apart from this, when someone is photo-bombing your footage or anyone in the background becomes the cause of distraction, you can censor the face and use the motion tracking in Premiere while they are moving.

3. Make visual effects
Motion tracking can be helpful too when you require appealing visual effects. Whether you need to show animation effect like glowing moving ball or need to show the supernatural powers like shooting lasers from Superhero’s eyes, you can fulfill the need using the motion tracking in Premiere Pro. Along with this, the program offers you animated tilts, motions as well as transitions to help you bring out the work more marvelously.

Part 2: How to Use Motion Tracking in Adobe Premiere Pro
Now that you have a fair idea on what motion tracking is and what exactly can it be used for, we think it is the right time to introduce you with the step by step guide to implement this technology. Hence, without any further ado, let us know how you can use motion tracking in Adobe Premiere Pro.
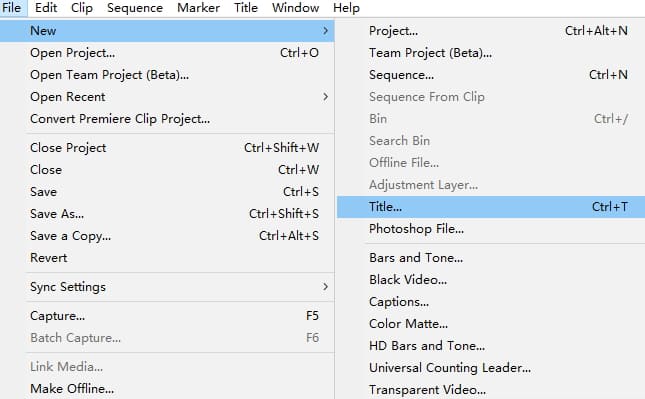
- To begin with, select your footage or clip and import it in the Premiere Pro. When you see it on the timeline, tap on the File menu at the top.
- Choose New from the menu and then select Title. Tap on OK from the pop-up that now comes.
- On the window that opens, choose reference point that you want and type a letter. Close the window now and drag the title on the timeline.
- Go to the Effects now, and under the Effects Controls tab, you need to choose the tiny stopwatch icon beside Position to set the keyframe.
- Now, move the footage a bit forward (say 5-10 frames) by holding down Shift key and hitting the Right Arrow.
- You’ll now notice that the reference point has been moved. You’re then required to drag the X and Y coordinates over the position keyframe panel to move and track the respective Title to the new reference point.
- Repeat steps 5 and 6 until your purpose is fulfilled. One done, double click on the Title and punch in the desired text you wish to make it appear there. That’s it.
- Для начала выберите отснятый материал или клип и импортируйте его в Premiere Pro. Когда вы увидите его на таймлайне, нажмите на меню Файл в верхней части.
- Выберите в меню пункт New (Новый) и затем выберите Title (Название). В появившемся всплывающем окне нажмите OK.
- В открывшемся окне выберите нужную вам точку отсчета и введите букву. Закройте окно и перетащите заголовок на таймлайн.
- Перейдите в раздел Эффекты и на вкладке Управление эффектами выберите крошечный значок секундомера рядом с Позицией, чтобы установить ключевой кадр.
- Теперь переместите кадры немного вперед (скажем, на 5-10 кадров), удерживая клавишу Shift и нажав стрелку вправо.
- Теперь вы заметите, что опорная точка была перемещена. Затем нужно перетащить координаты X и Y на панель ключевых кадров позиции, чтобы переместить и отследить соответствующий тайтл до новой опорной точки.
- Повторяйте шаги 5 и 6 до тех пор, пока ваша цель не будет достигнута. После этого дважды щелкните по заголовку и введите желаемый текст. Вот и все.

Conclusion
We brought you a very helpful piece of information on motion tracking in Premiere. Having this effect in your footage always makes it look better and professional. We hope that you have now learned how you can use motion tracking in Premiere Pro and got the results through this article. If you found this article helpful, you can go ahead sharing it on different platforms. Also, please leave a comment below to help us know your views. Thanks for reading!
Как легко использовать отслеживание движения (Track Motion) в Adobe Premiere Pro
Знаете ли вы, как использовать отслеживание движения в Premiere? В этой статье вы узнаете, как использовать отслеживание движения в Adobe Premiere.

Мария Матвеева
Время обновления: 23 Mar 2023 г.
Отслеживание движения — это функция, позволяющая отслеживать объект в видеоклипе. Будь то Будь то скрытие или размытие лица или перемещение текста вокруг кого-то на видео, отслеживание движения стало трендом в наши дни.
Он используется в каждом втором видео. Более того, самый перспективный видеоредакторPremiere Pro — также позволяет использовать эту функцию
В этой статье мы поможем вам понять, зачем это нужно и как можно использовать отслеживание движения в Premiere Pro.
Бонусный совет — наиболее рекомендуемое программное обеспечение для отслеживания движений
Очень важно подобрать оптимальный видеоредактор, иначе здравствуйте потраченные впустую время и усилия. Простая , но мощная Filmora 11 предназначена для новичков, которые хотят использовать расширенные функции, не вдаваясь в подробные руководства. Я согласен, что редактирование может быть довольно утомительным. Но только не с Filmora 11. Filmora делает отслеживание движений довольно простым, буквально в один клик. Просто выберите цель отслеживания и нажмите «Ok». Вот так просто. Чего еще можно желать? Давайте, попробуйте.
Часть 1: Почему необходимо использовать отслеживание движений
1. Стабилизация
Если вы случайно заметили удивительный кадр и планируете его записать, но вам нужно продолжать двигаться вместе с ним, это может привести к трясущимся кадрам. В результате это создаст не особо качественные кадры. Однако, если вы знаете, что такое отслеживание движения, вы можете скорректировать эту нестабильность и устранить ее. Используя отслеживание движения в Premiere Pro, вы позиционируете место в кадре, в результате чего выбранное место остается в центре, а весь кадр движется вокруг него.

2. Размытие объектов
Наступают моменты, когда нам нужно создать видео в общественных местах. И часто люди возражают против того, чтобы их лица были показаны в видео. В таких случаях на помощь приходит функция отслеживания движения Premiere. С его помощью можно размыть лицо человека, чтобы избежать неприятностей, связанных с авторскими правами. Также это полезно, когда нужно сделать неузнаваемыми логотипы известных компаний, если у вас нет на это разрешения.
Кроме того, когда кто-то фотографирует вас или кто-то на заднем плане становится причиной отвлечения внимания, вы можете отцензурировать лицо и использовать отслеживание движения в Premiere во время съемки.

3. Создание визуальных эффектов
Отслеживание движения может быть полезно и тогда, когда вам нужны красивые визуальные эффекты. Если вам нужно показать анимационный эффект, например, светящийся движущийся шар, или сверхъестественные способности, например, стрельбу лазерами из глаз, вы можете выполнить эту задачу с помощью функции отслеживания движения в Premiere Pro. Наряду с этим программа предлагает анимированные наклоны, движения, а также переходы, которые помогут вам сделать вашу работу более эффектной.

Часть 2: Как использовать отслеживание движения в Adobe Premiere Pro
Теперь, когда вы имеете представление о том, что такое отслеживание движения и для чего именно оно может быть использовано, мы считаем, что настало время познакомить вас с пошаговым руководством по применению этой технологии. Итак, без лишних слов, давайте узнаем, как можно использовать отслеживание движения в Adobe Premiere Pro.
Заключение
Мы представили вам очень полезную информацию об отслеживании движения в Premiere. Наличие этого эффекта в вашем видеоролике повышает его качество и профессионализм. Мы надеемся, что теперь вы узнали, как можно использовать отслеживание движения в Premiere Pro, и добились поставленных целей благодаря этой статье. Если эта статья оказалась полезной, вы можете поделиться ею на различных платформах. Также, пожалуйста, оставьте комментарий ниже, чтобы мы могли узнать ваше мнение. Спасибо за внимание!