Ubuntu Server 20.04 LTS VirtualBox Lab
This is a follow on from my old Centos 8 post, but this time I will be using Ubuntu LTS servers running on a Linux host with VirtualBox. The lab environment is designed to be used for any of the following:
- General Linux sysadmin
- Kubernetes cluster
- Ansible configuration management
- Terraform VirtualBox Provider
This post will cover of the following:
- Installing & configuring VirtualBox
- Installing & configuring the adminbox server
The adminbox server will have a bridged adapter to the host and will be used to SSH onto the other VMs via the VirtualBox NAT network. The whole solution will eventually consist of the following:
- network address: 10.0.2.0/24
- default gateway: 10.0.2.2
- 7 virtual machines
Install VirtualBox 6.1#
To install VirtualBox on an Ubuntu host, open the terminal and enter the following:
Configure VirtualBox#
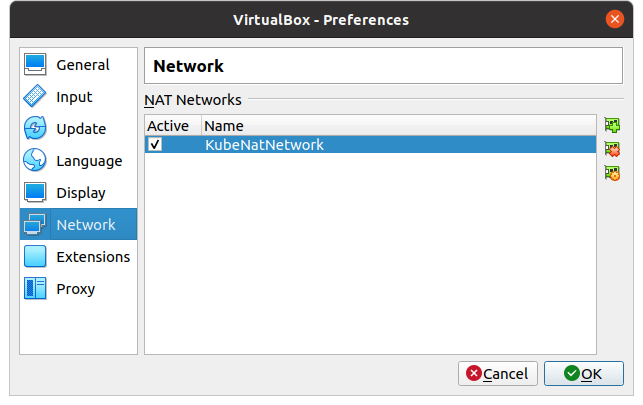
First I had to create a Nat Network by opening VirtualBox, selecting Tools > Preferences > Network. And then click the add new nat network button.
I named mine KubeNatNetwork as I plan to use it for a Kubernetes cluster.
Create a new Virtual Machine with the following:
- Name: adminbox
- Select the machine folder or leave as default
- Type: Linux
- Version: Ubuntu (64-bit)
- Memory size: 2048
- Hard disk file type: VDI
- Storage on Physical hard disk: Dynamically allocated
- Size: 20 GB
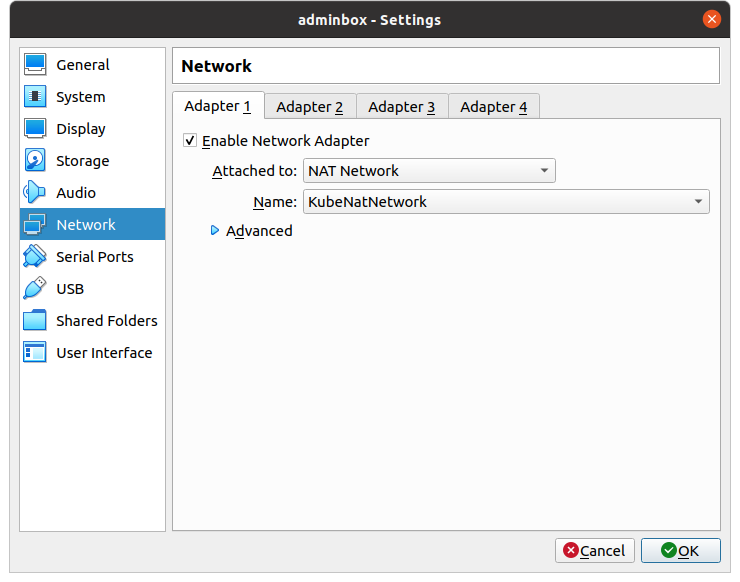
Once you have created adminbox, select it and click Settings > Network > Adapter 1
- Attached to: NAT Network
- Name: KubeNatNetwork
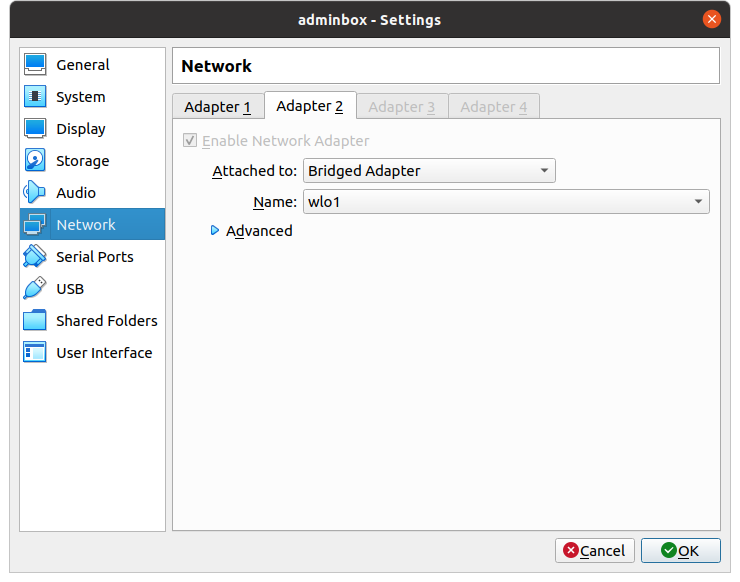
Settings > Network > Adapter 2
- Attached to: Bridged adapter
- Name: wlo1
Install Ubuntu#
Download the latest version of Ubuntu server from here, and then complete the following:
- Power on adminbox and when prompted, browse to the Ubuntu iso you just downloaded and click Start
- Select the language
- Choose whether to update to the new installer or not (I do)
- Select the keyboard layout
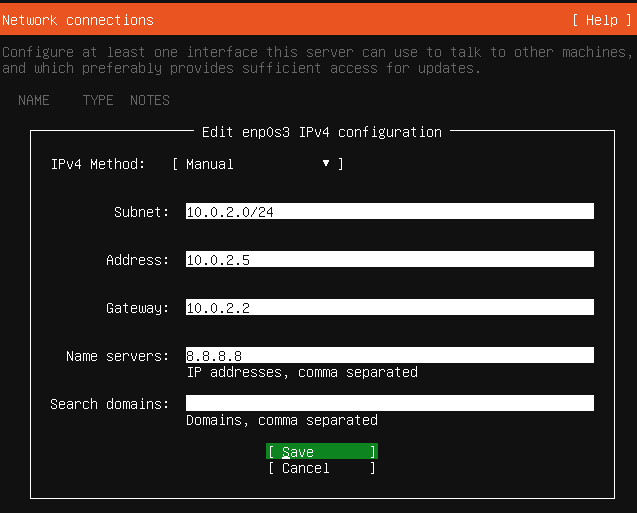
- The ethernet adapter enp0s3, we’ll want to set a static IP for. You can complete this now or later. To do now continue as follows
- Edit IPv4 > Manual
- Subnet: 10.0.2.0/24
- Address: 10.0.2.5
- Gateway: 10.0.2.2
- Name servers: 8.8.8.8
- Search Domains: Leave blank
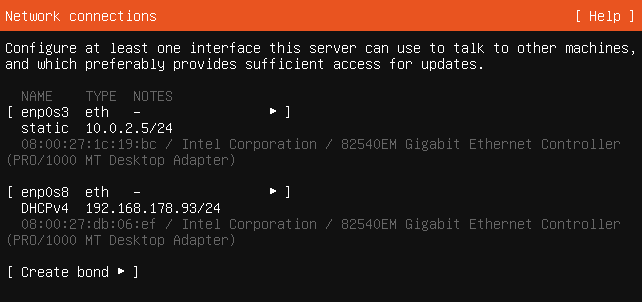
Note: You may want to shutdown the server upon first boot due to unmount /cdrom errors.
Update Ubuntu#
Once you have booted up and logged into Ubuntu for the first time, update it as follows:
Set Static IP#
If you skipped the part to configure the static IP in the setup, it can be done from within the Ubuntu terminal as follows:
This is what the yml file will show if it is set to dhcp. Adapter enp0s3 is the Nat adapter and enp0s8 is the adapter which is bridged to the host.
Change it with vi, vim, or nano
And fill in as follows (Be careful to use proper indentation):
Save and exit the text editor, then type the following to apply the changes:
Get the ip addresses by typing the following command:
Update the hosts File#
Updating the hosts files on your local machine allows for communication over hostname rather than IP address. Change the hosts file on your local machine as follows:
Add the ip address for your enp0s8 adapter which you can get from the ip addr show command:
Generate a SSH Key Pair#
To enable us to easily access the adminbox from the host OS for system administration, we can easily setup a SSH key-pair as follows:
From the host OS, create the ssh key-pair as follows:
Press Enter to accept the key to be saved in
/.ssh and do not specify a passphrase. Then use the following command to copy to adminbox:
Test by connecting to the machine via SSH:
Summary#
We’ve now successfully built the adminbox server in VirtualBox, have updated it and can SSH onto it. This will allow us access from the host machine, access to the internet, and access to future VMs created in the NAT network.
Как установить ubuntu server на virtualbox
1. Вступление
В рамках этой статьи рассмотрим подробную установку средства виртуализации Oracle VM VirtualBox (далее просто VirtualBox) и создания виртуальной машины под управлением Ubuntu 18.04 Server.Почему будем использовать именно VirtualBox?
Причин несколько:1) Он прост в установке на любую операционную систему (Windows, MacOS, Linux);
2) Имеет обширное комьюнити пользователей, а значит — можно найти ответ на любой вопрос;
3) Поддерживает создание множества виртуальных машин под разными ОС (Windows, FreeBSD, Ubuntu, CentOS, RedHat и др.);
4) Создание отдельных виртуальных сетей между виртуальными машинами;
5) Cоздание и восстановление снимков системы (снапшотов) и довольно обширную интеграцию с ОС хоста;
6) Бесплатный;Зачем это нужно?
1) Для обучения;
2) Для тестирования каких-то программ, сборки пакетов под определённую конфигурацию системы;
3) Для решения задач «домашнего сервера» при наличии мощной машины хоста;Версии ПО используемые для установки в данном руководстве:
— Windows 10, версии 1903;
— VirtualBox 6.1;
— Ubuntu 18.04 Server LTS;2. Подготовка
2.1 Скачивание, установка и настройка Oracle VM VirtualBox
Скачать VirtualBox можно с официального сайта — ссылка: https://www.virtualbox.org
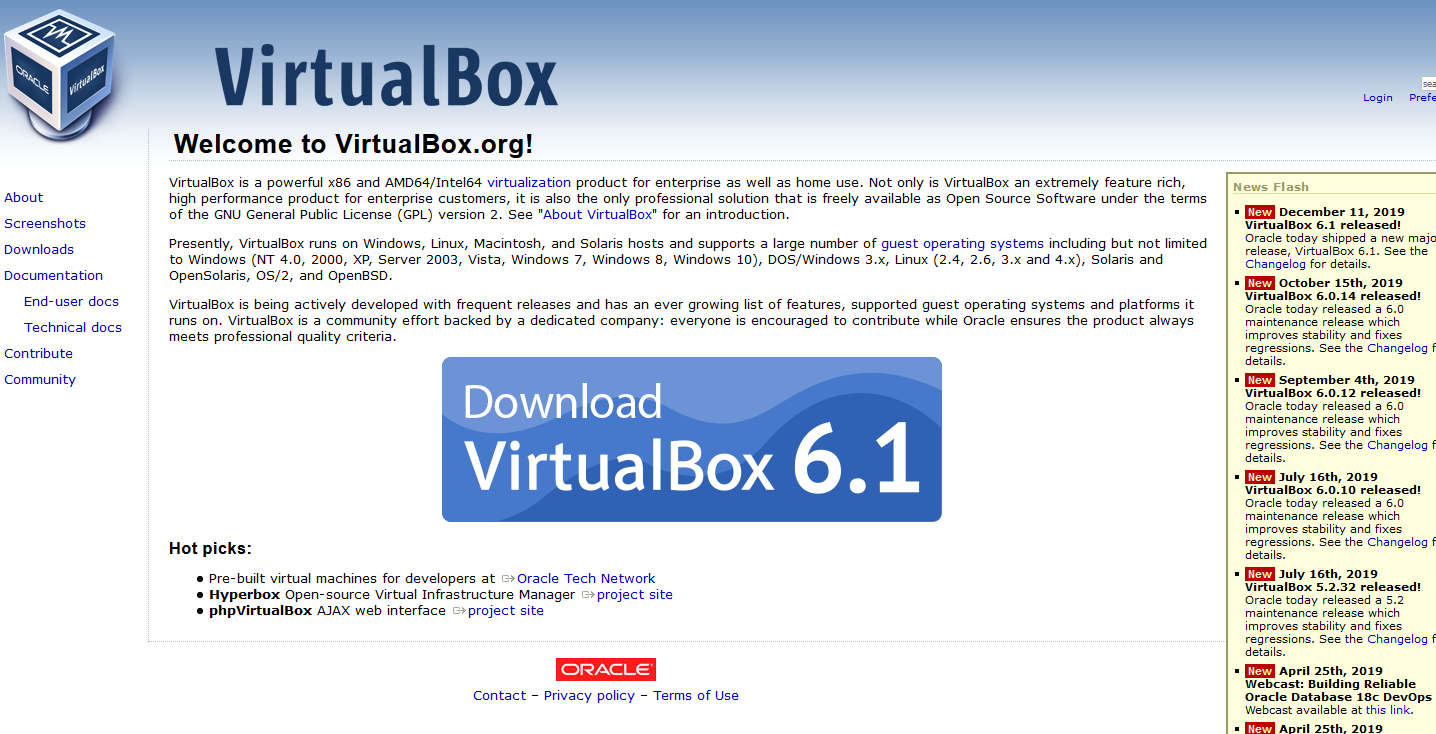
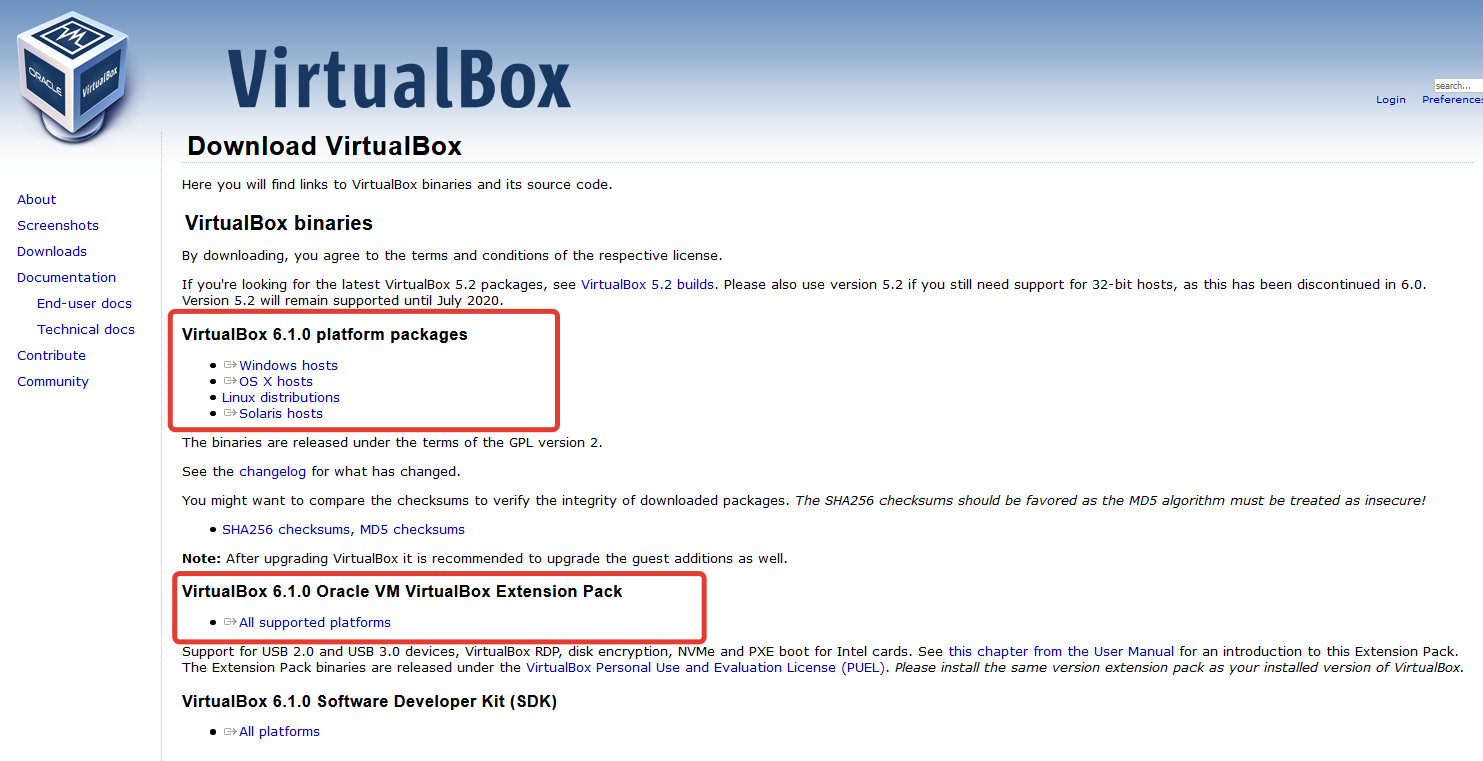
Нам необходимо скачать то,
что на скриншоте выделено
красными прямоугольниками,
а именно:
— Сам установочный файл
VirtualBox:
https://download.virtualbox.org/virtualbox/6.1.0/VirtualBox-6.1.0-135406-Win.exe
— И т.н Extension Pack —
пакет очень полезных
расширений
(общие папки, поддержка
USB выше 2.0 и др.)
для виртуальных машин:
https://download.virtualbox.org/virtualbox/6.1.0/Oracle_VM_VirtualBox_Extension_Pack-6.1.0.vbox-extpack2.2 Скачивание образа системы Ubuntu 18.04 Server
Пока скачивается одно, можно загрузить образ системы с официального сайта:
https://releases.ubuntu.com/18.04.4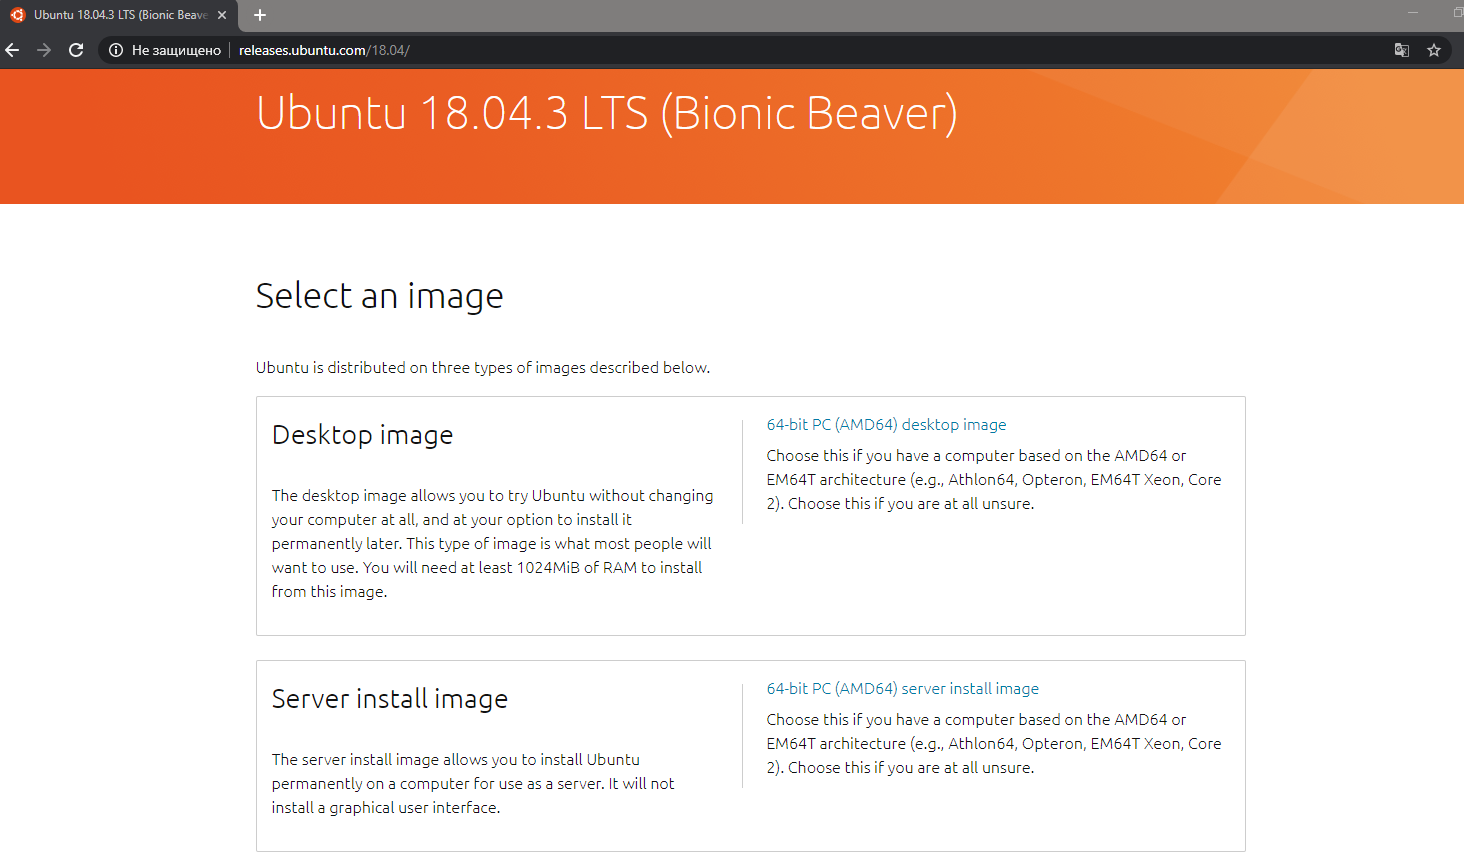
Выбираем тут Server install image
(Прямая ссылка:
http://releases.ubuntu.com/18.04/ubuntu-18.04.3-live-server-amd64.iso ),
выбираем путь для сохранения.
Готово.3. Установка VirtualBox
Установка самого VirtualBox
не сложна и заключается, в основном,
в «Далее-Далее-Принять-Готово»,
(кроме двух моментов о которых
расскажу далее),
подробно расписывать его
установку смысла не имеет,
но скриншоты процесса приложу ниже.Два «сложных» момента заключаются в следующем:
1) Необходимо включить в BIOS
ПК на который устанавливается
средство виртуализации,
настройку Virtualization Technology.
2) При установке кратковременно
пропадёт сеть на ПК, VirtualBox
об этом любезно предупредит.How to Install Ubuntu 20.04 Server on VirtualBox?
Virtualbox is one of the free, open-source hypervisors that you can run on pretty much all the operating systems out there. It doesn’t matter whether you have a windows machine, mac or Linux. The VirtualBox can run on all the devices irrespective of the operating system.
We have covered how you can install Ubuntu Desktop 20.04 on Virtualbox in the last blog, In this blog, we will install the Ubuntu server 20.04 on a VirtualBox hypervisor.
After the installation is complete, we will install VirtualBox guest additions to improve the ubuntu 20.04 server operating system performance.
Table of Contents
1. Create the Virtual machine.
Open VirtualBox and click on New to create a virtual machine in Virtualbox.
By default, you will be on the guided mode, for a simple virtual machine creation, that should be fine. However, if you want to have complete control of your virtual machine resources, you must choose the expert mode.
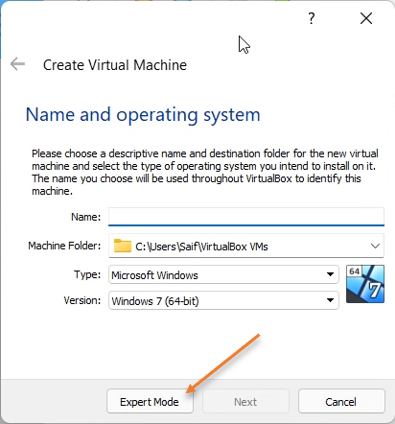
You will be taken to the Virtual machine creation wizard in Expert mode.
- Name : You will have to enter the name of your VM. For example ‘Ubuntu Server 20.04’.
- Machine folder: Location where you want to save the file.
- By default, when we typed the name, it picked up the Type as Linux and the version as Ubuntu.
- Configure the Memory- You could assign even 1 GB of memory. As I have close to 32GB of RAM and require good performance from the virtual machine, I am giving 4GB of RAM for the virtual machine. If you need more memory, you could add more as well.
- Hard disk – Choose create a virtual hard disk now option and click on Create.
2. Create virtual hard disk for Ubuntu server 20.04.
The virtual hard disk creation wizard will now open.
- Location – You will be able to see the location of your virtual hard disk on the top based on the configuration you made before.
- File Size – By default, the virtual machine has assing 10GB of storage for the Ubuntu server, which is not enough for most of the users. Hence I am assigning 20GB of storage. Again, you could assign more storage volume depending on your usage and hard disk storage capacity.
- Storage on Physical hard disk – Choose Dynamically allocated and click on Create.
3. Configure the CPU.
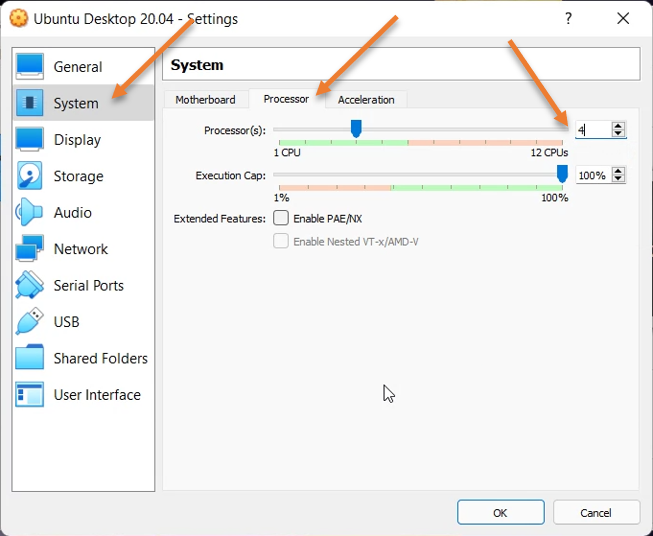
You will see the Ubuntu server VM created in the VirtualBox; by default, when we made the virtual machine, it picked up a single CPU. To get better performance, at least you should configure 2 CPUs. Since I have enough CPU on my machine, I assign about 4 CPUs.
So right-click on the VM and click on settings.
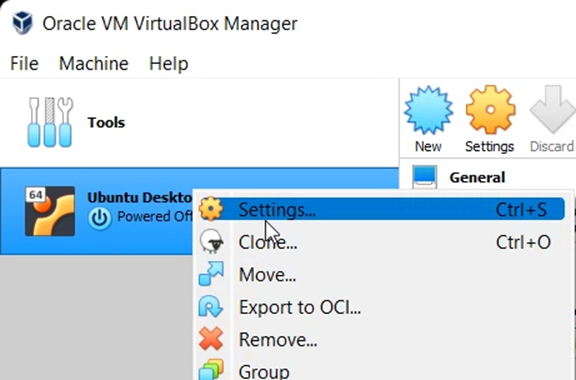
The virtual machine settings window would pop up, click on System àProcessor, Increase the CPU count as per your need.
4. Configure the Network.
You can keep the Ubuntu server 20.04 in a separate network depending on your need.
For the VM to get to the internet, there are two ways. One is through the bridged networking, and the other is through NAT.
Bridged networking – If you would like the Virtual machine to be part of the same local area network and wanted your LAN router to assign a DHCP address, you could use this option.
NAT – With the NAT, the VirtualBox will assign a NAT IP address to your Virtual machine, with which it can go out to the internet. However, the local area network devices will not talk to the Ubuntu virtual machine.
Other network options are also available for your VM to use, which I covered in detail here.
In my case, I would want my VM to be part of my local area network. Hence I am going to choose the Bridged network.
I won’t recommend this option at the office network unless you consult with your network admin. As it will get an IP address from your office DHCP server. Some companies won’t allow connecting other machines to the office network as per the policy. So, It is always better to consult with the networking team before using this option.
For office networks, you could use NAT network, as the local area network devices won’t see the virtual machine; instead, they will see the host machine IP for any traffic that is generated from the VM.
You can learn more about different types of networks in VirtualBox here.
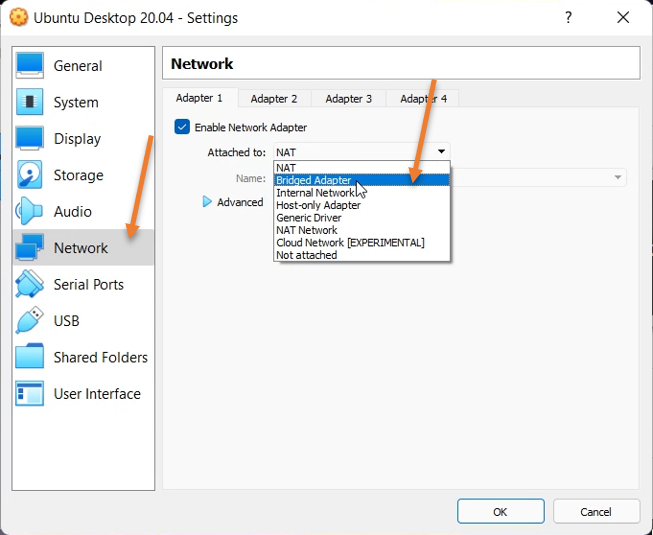
That’s it click on Ok, and you will be back to the VirtualBox window.
5. Initiate the Ubuntu Server installation.
Right-click on the Ubuntu server 20.04 and click on start.
As soon as the booting process starts, you will be prompted to choose the Ubuntu Server 20.04 ISO image from your machine and click on the folder icon to attach the file.
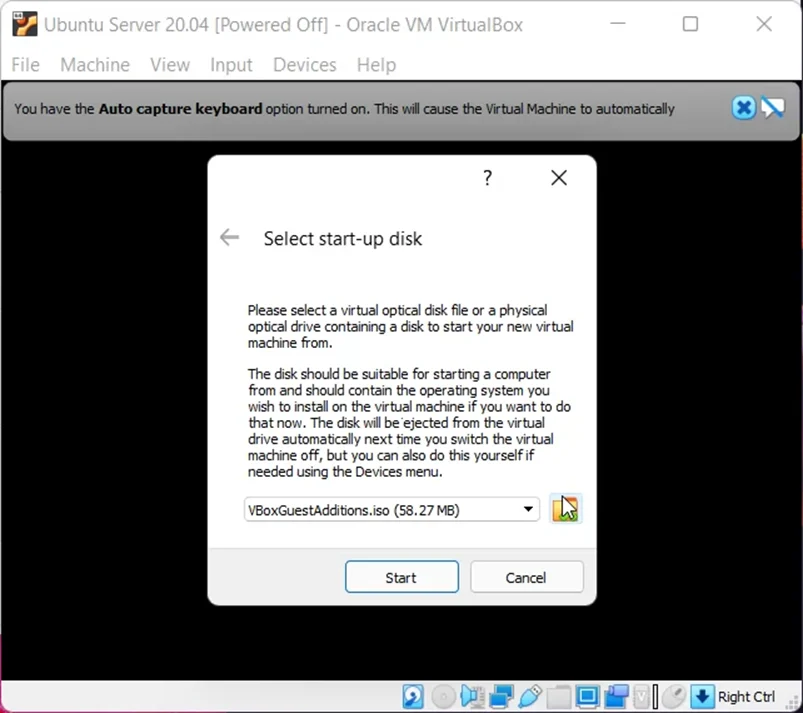
You will get a prompt again. In that, click on Add.
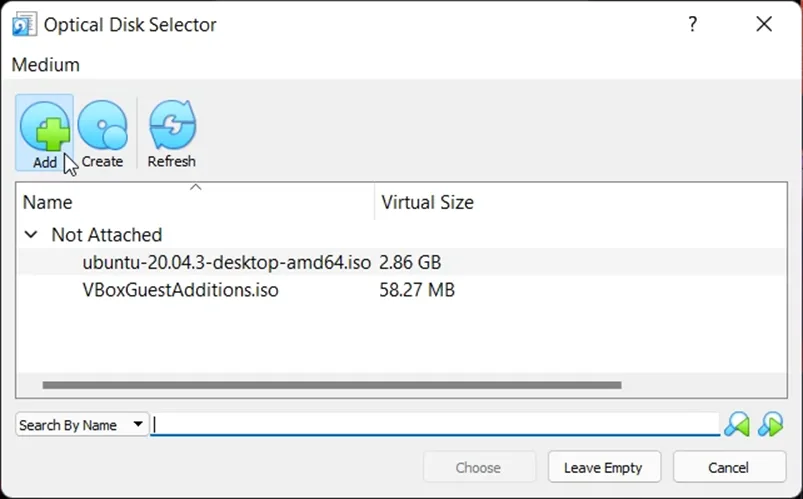
Browse for the file and attach it here, and click on start.
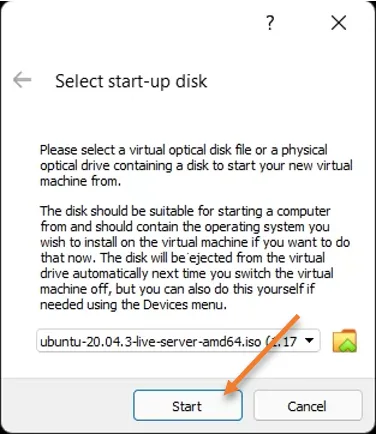
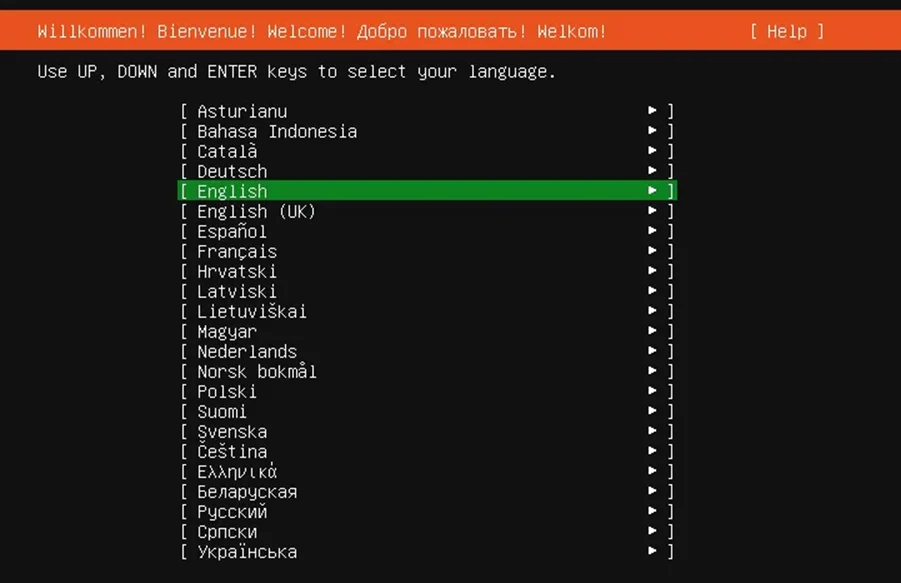
The Ubuntu Server installation will now begin. In the installation wizard, choose the language of your choice.
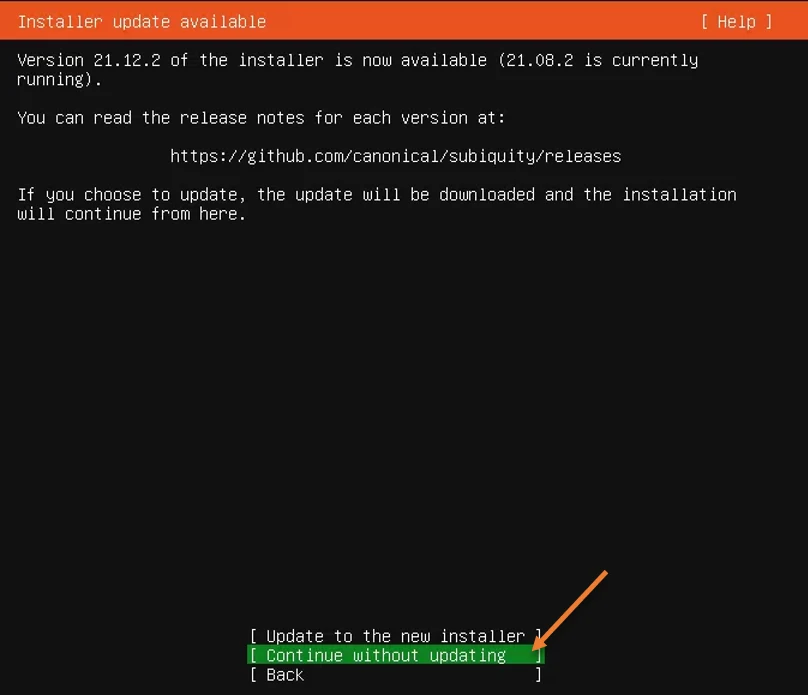
In my case, there was an installer update that was available. At this moment, I am not going to proceed with the installer update; hence I chose to continue without updating.
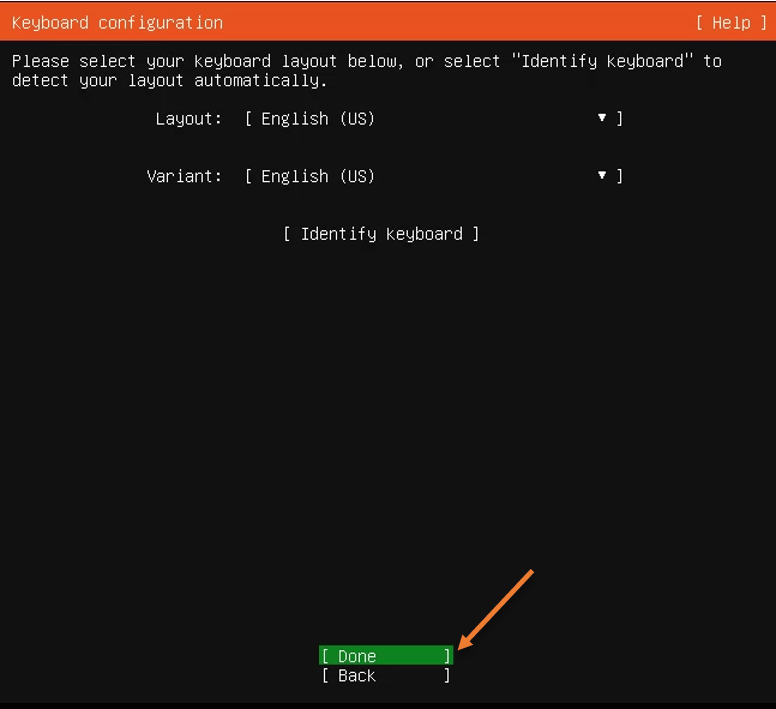
Configure the keyboard layout of your choice, and choose done.
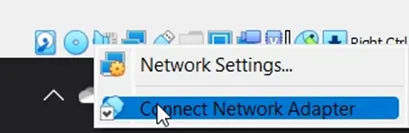
During this time, you may disconnect the virtual network adapter by right-clicking on the network icon and clicking on Connect Network Adapter. This will disconnect the VM from the network.
You can still avoid the Ubuntu update during the update, but this is the best and easiest option.
On the next screen, choose to continue without the network.
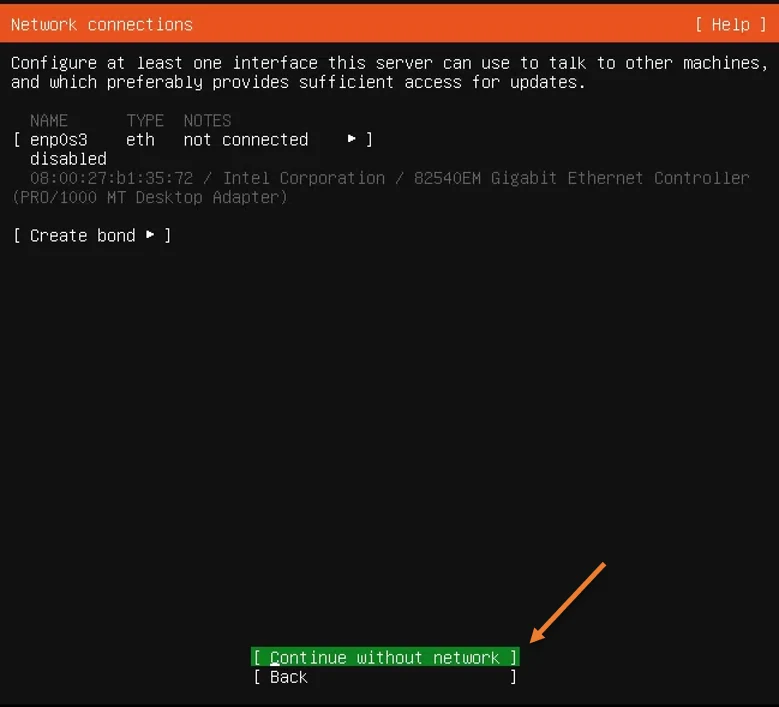
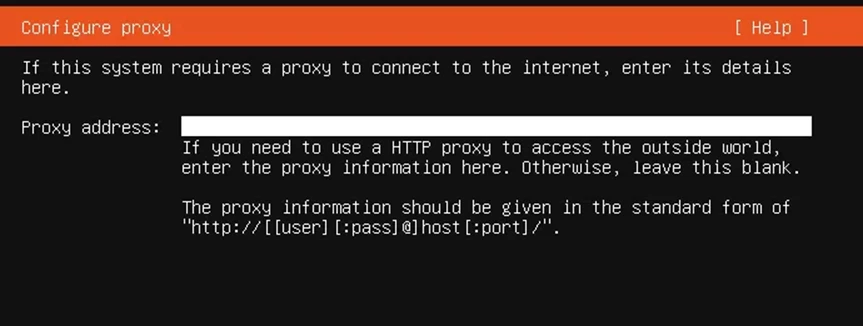
In case if you are using a proxy, you may enter them here and choose done.
If you don’t have a proxy that’s fine. You can leave it blank.
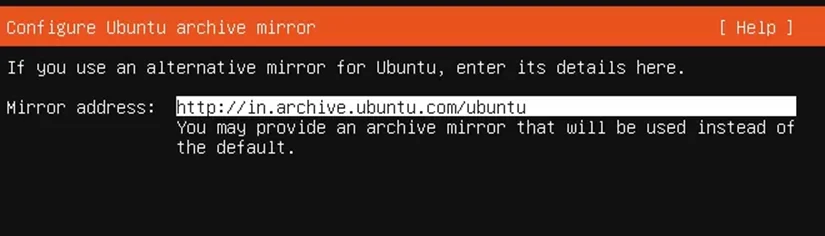
Configure the Ubuntu Archive mirror.
You can configure the Ubuntu mirror of your choice. I am just leaving the default and choosing done.
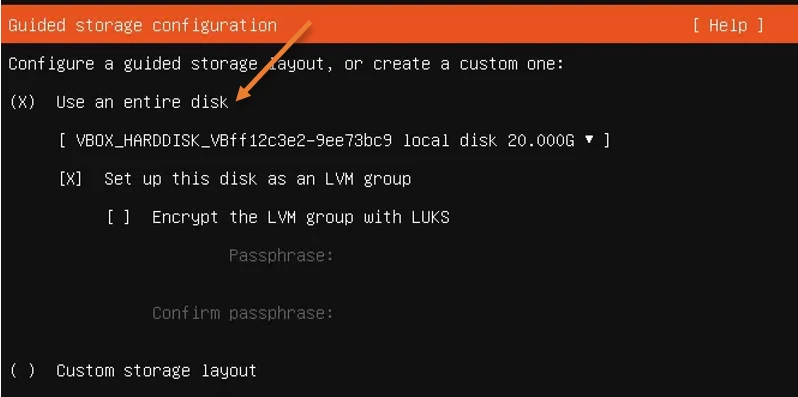
6. Storage selection.
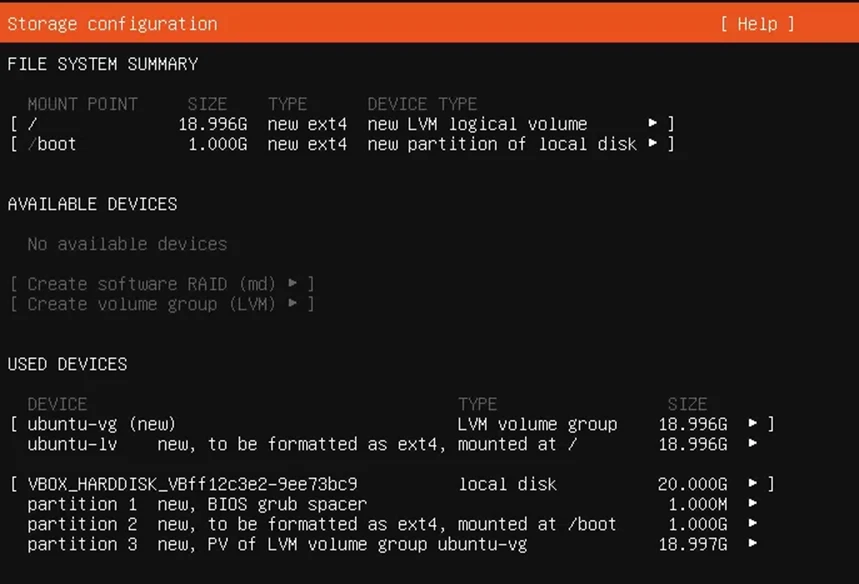
In the storage selection, I am choosing the option Use an entire disk. If I want to, I could use the tab button on the keyboard and select the custom storage layout.
You will get a summary of your storage here. If you needed you can go back and modify. Else, you may proceed with the Done.
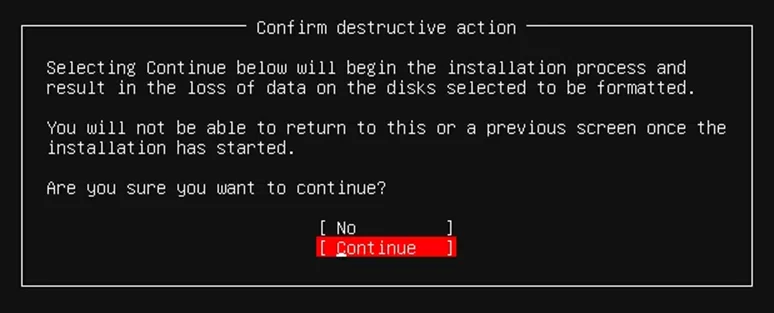
You will be prompted with a warning that says your storage will be formatted. Are you ok to continue? Choose continue here.
7. Ubuntu server profile setup.
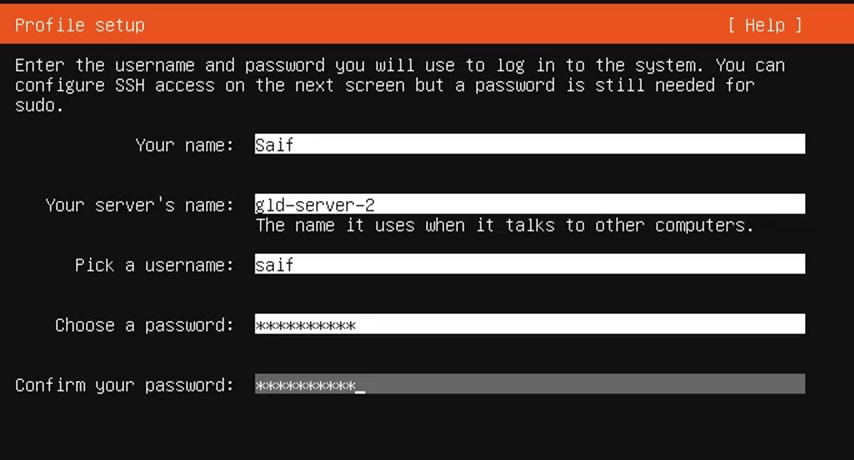
You can set up your user account here along with the server profile.
- Enter your name.
- Provide a name for your Server.
- Specify the username of your choice.
- And the password, and confirm password.
This account is needed in order for you to connect to the machine again vis SSH.
8. Ubuntu server ssh configuration.
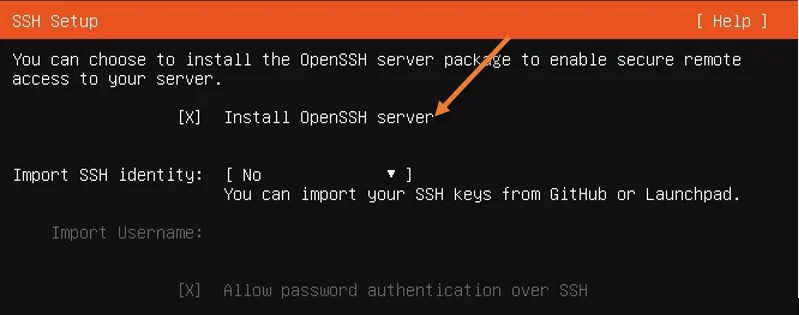
You will be asked whether you want to install OpenSSH server or not. In most scenarios, you would remote into the server using an SSH protocol; hence it is recommended to leave the ssh setting enabled.
Choose Install Openssh server and click on Done.
If you don’t require ssh access, you may unselect the option and choose done.
The installation will begin, and after sometime you will get an option that says the installation is now complete and the server is rebooting.
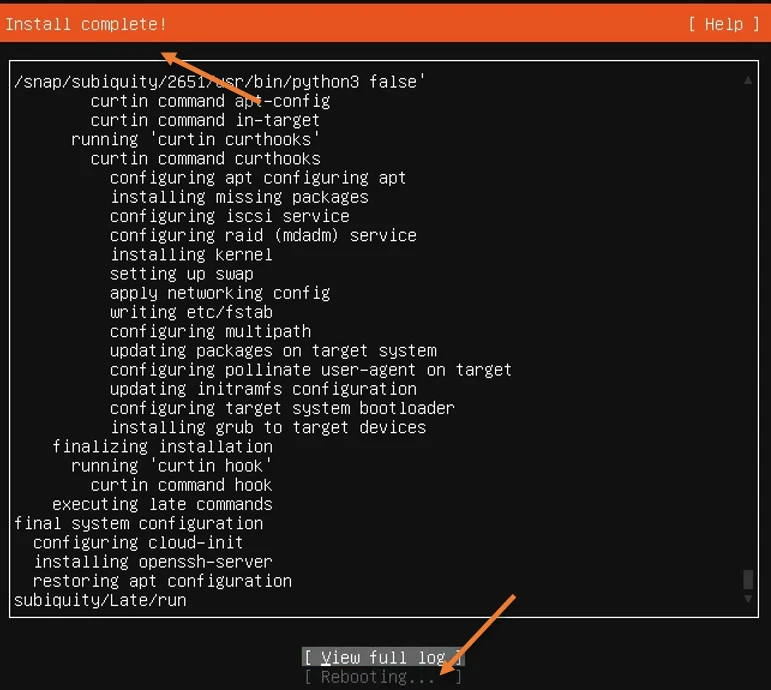
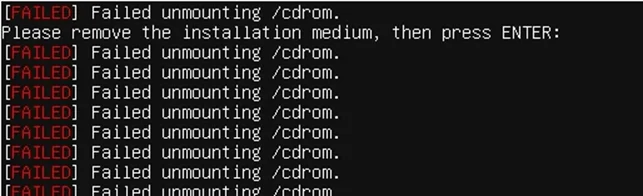
During the reboot, you will be asked to Remove the installation medium and then press ENTER, which is already done automatically, so you may hit Enter to proceed.
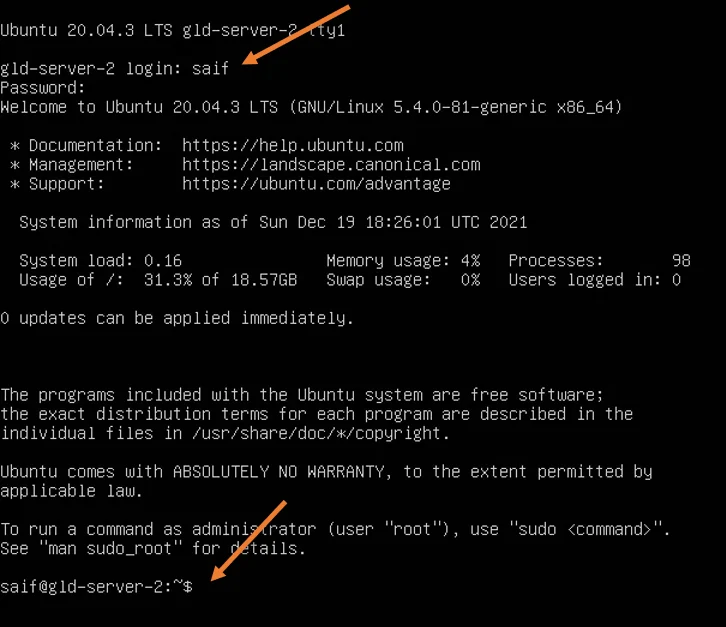
After the VM is rebooted, you will get a login screen to your virtual machine, enter the username that you set up during the installation, and the password. And you should be able to log in to the server just fine.
9. Connect the network back.
You now can connect back to the network back by right-clicking on the virtual adapter and clicking on Connect network adapter.
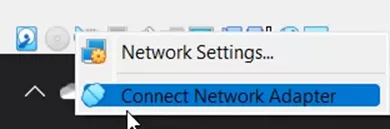
After you are connected to the network, you will get an IP address from your local area network, if you have chosen the bridged network, or NAtted IP if you have chosen the NAT network.
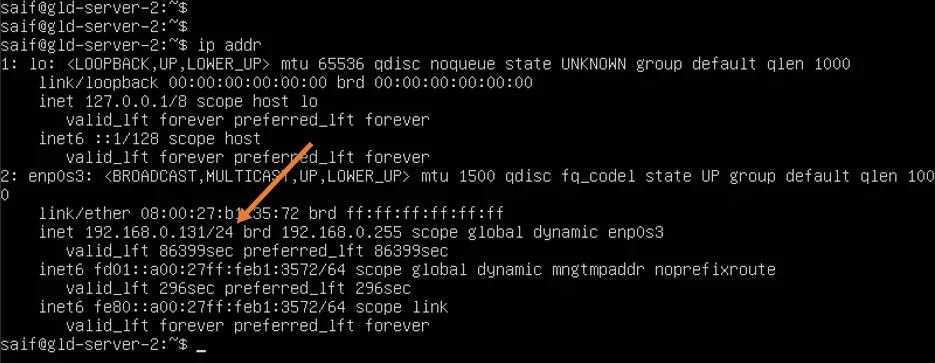
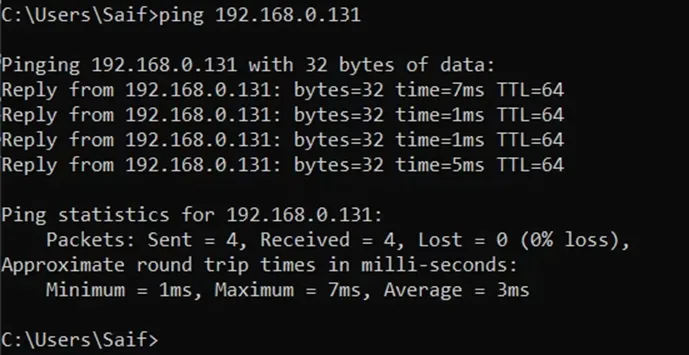
You can ping the virtual machine from your host and other devices on your local area network for Bridged network.
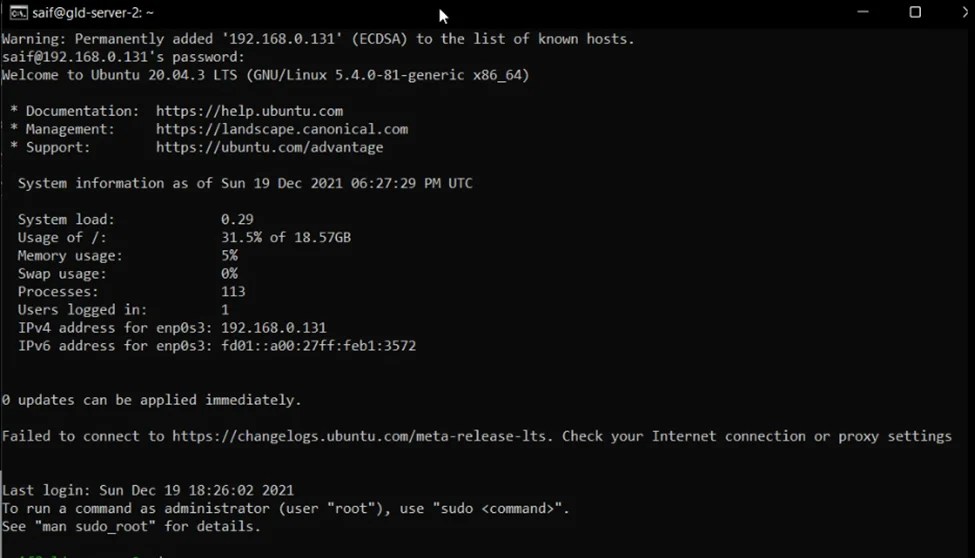
You can also SSH into the Ubuntu server just fine as well.
10. Virtual box guest addition installation on Ubuntu server 20.04.
Let’s go ahead and install the Virtual box guest addition on your machine.
On the Ubuntu Server terminal, enter the below commands to install the VirtualBox guest additions.
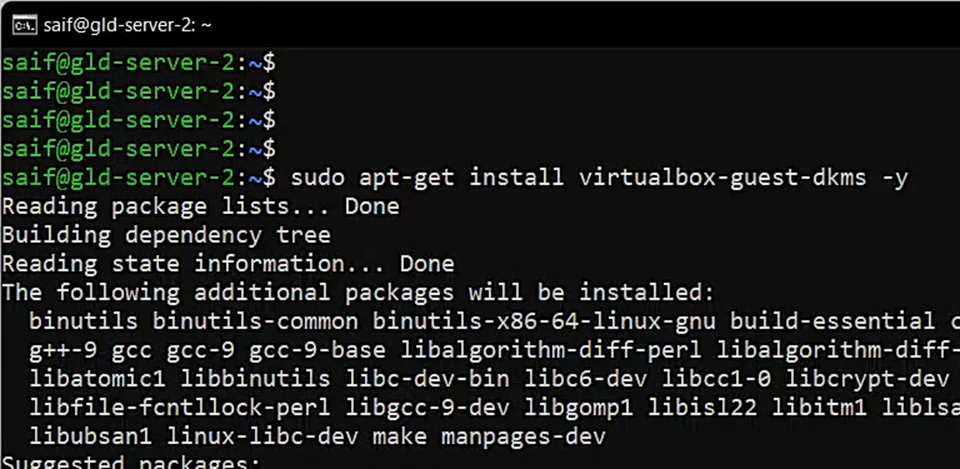
After a few seconds, the VirtualBox additions packages and all your dependencies will be installed on the ubuntu server 20.04 and you should be ready to start using the Ubuntu server.
Ubuntu Server installation in VirtualBox

VirtualBox is open-source software for virtualizing the x86 computing architecture. It acts as a hypervisor, creating a VM(virtual machine) where the user can run another OS (operating system).
To Download and Install VirtualBox in Official Website.
Download Ubuntu Server
Visit the Official Ubuntu Website. And click, Download and choose Ubuntu Server page. Download the Ubuntu server iso image.
The download should start. It may take a while to complete.
Finally the Ubuntu Server image was downloaded.
Create a New Virtual Machine
Lanuch VirtualBox and create a new virtual machine.
Click the New icon.
Name the Operating System name.choose Machine Folder, Type and Version.
Click Next.
Allocate the memory size for Operating System.If you find this is too slow, you can change it at any time while the Virtual Machine is shutdown.
Click Next.
Select Create a virtual hard drive now.
Click Create.
Select the VDI(VirtualBox Disk Image) as your hard drive file type.
Click Next.
Choose Dynamically allocated, so it can use space on your hard disk as it fills up.
Click Next.
Select File Location and Size.
Choose your Suitable file location and the size of the virtual hard disk.
Click Next.
Now new virtual machine has been successfully created.
Then, click Settings.
In Settings ,click Storage and then click empty to drop Optical Drive.
Choose your Ubuntu Server iso image file in your local system.And then select Ubuntu Server iso image file ,then click Open.
Now, Ubuntu Server iso image file was selected. And then click Ok.
Install Ubuntu Server in Virtual Machine
Now, let’s boot up our machine and Install Ubuntu Server.
Click Start.
The Ubuntu installation process will be started.
Press enter Try or install Ubuntu Server to continue the process.
Now, you should select your preferred language. I’m using English.
And press Enter.
Now, Select a keyboard layout .As I’m using a English keyboard, Ubuntu to detect my layout.
Press Done.
Now, Configure the Network Interface in Ubuntu Server.Just, Choose default Network Interface option.
Press Done.
In case, if you are using a proxy, you may enter them here and choose done.If you don’t have a proxy that’s fine. You can leave it blank.
In my case don’t have a proxy. So I can leave it blank.
Press Done.
Configure the Ubuntu Archive mirror.You can configure the Ubuntu mirror of your choice. In my case, just leaving the default .
Press Done.
In the storage selection, Use an entire disk option and Custom storage layout option there.you can choose any one of the option.
In my case, I choose Custom storage layout option.
Press Done.
Now you can see the Disk Space and Configure that.
Now, Press the Free space disk and press enter to Click Add GPT Partition.
First create Boot Partition. Add Boot Partition disk size, choose File Format and Finally, choose /boot as a mount.
In my case, I was add Boot Partition disk size 1GB and I was choose ext4 file format.Finally, I choose /boot as a mount.
Press Create.
Second create Root Partition. Add Root Partition disk size, choose File Format and Finally, choose /root as a mount.
In my case, I was add Root Partition disk size 6GB and I was choose ext4 file format.Finally, I choose /root as a mount.
Press Create.
Third create Swap Partition. Add Swap Partition disk size and Finally, choose swap Format.
In my case, I was add Swap Partition disk size 2GB and I was choose swap format.
Press Create.
Finally, Overview Storage configuration.
Press Done.
You will be prompted Confirm destructive action. That says your storage will be formatted.If you want to proceed to press Continue option. Otherwise, press No option.
Now, you can set up your user account here along with the server profile.
- Enter your name.
- Enter your servers name.
- Pick your username.
- Pick your password and confirm password.
Press Done.
In this case, You will be asked whether you want to install OpenSSH Server or not. In most scenarios, you would remote into the Server using an SSH protocol; hence it is recommended to leave the ssh setting enabled.
If you want OpenSSH Server, Choose that and You also have the opportunity to import your SSH keys from GitHub or Launchpad. Otherwise choose no option.
In my case. I was choose OpenSSH Server and intsall it.
Press Done.
Now, you can select from a list of popular snaps to install on your system. Snaps are self-contained software packages that work across a range of Linux distributions. I didn’t select any Server Snaps.
Press Done.
The Ubuntu Server installation process will begin and after sometime you will get an option that says the installation is now complete and the Server is rebooting.
Now, Ubuntu Server installation was complete.
Press Reboot Now.
During the reboot, you will be asked to remove the installation medium and then press ENTER, which is already done automatically, so you may hit Enter to proceed.
After the Virtual Machine is rebooted, you will get a login screen to your virtual machine, enter the username that you set up during the installation, and the password. And you should be able to log in to the Ubuntu Server.
Now, you should enter the Ubuntu Server username and Ubuntu Server password. And the proceed to logged in.
Check, Ubuntu Server version.
Use this command cat /etc/os-release.
Check, Ubuntu Server details using screenfetch command(Optional).
Final result of Ubuntu Server in VirtualBox.
Finally, You have Successfully installed Ubuntu Server in VirtualBox.
Conclusion:
In this blog , I Shown you to Install Ubuntu Server in VirtualBox.