Vector
Рассмотрим первый контейнер — альтернативу массиву — vector. Представленный в C++03, vector — это динамический массив, который может сам управлять выделенной для себе памятью. Это означает, что вы можете создавать массивы, длина которых задается во время выполнения. vector находится в заголовочном файле vector
Подобно массивам доступ к элементам может выполняться как через оператор [] (который не выполняет проверку диапазона), так и через функцию at(). Отличие метода at от обращения при помощи квадратных скобок в том, что при использовании метода at происходит проверка правильности индекса, и в случае выхода за границы вектора происходит ошибка исполнения. Это полезно при отладке программ.
Также vector позволяет верунть “первый” и “последний” эдемент с помощью функций front и back
Изменение размера вектора
Размер вектора можно узнать при помощи метода size() . Также есть метод empty() , возвращающий логическое значение (true, если вектор пустой).
Размер вектора можно изменить в любой момент, при помощи метода resize . У этого метода может быть один или два параметра. Вызов метода resize(n) изменяет размер вектора до n элементов (длина вектора может как уменьшится, так и увеличиться). Вызов метода resize(n, val) изменяет размер вектора до n элементов, и если при этом размер вектора увеличивается, то новые элементы получают значение, равное val.
Очень часто бывает полезно добавлять элементы в конец вектора по одному и удалять элементы из конца вектора по одному. Для добавления нового элемента, равного val, в конец вектора, используется метод push_back(val) . Для удаления последнего элемента вектора используется метод pop_back() — он не возвращает значения.
Добавление элемента в конец вектора осуществляется в среднем за O(1) (подробнее об O-нотации будет позже. Для нас счейчас можно отметить, что данная операция самая быстрая). Это реализовано за счет того, что память для хранения элементов вектора выделяется “с запасом”, то есть можно будет добавлять элементы по одному, пока не кончится запас памяти. Если запас памяти исчерпан, выделяется новая память, при этом “запас” размера вектора удваивается.
Очистить вектор можно при помощи метода clear() . Есить глобальная функиця swap , которая позволяем поменять местами содержимое двух векторов.
Вставка и удаление элементов в середину вектора
Метод erase позволяет удалять из середины вектора один или несколько элементов. Этот метод работает с итераторами. Подробнее
Метод insert позволяет вставлять в середину вектора новый элемент, или несколько равных элементов, или другой вектор, или фрагмент другого вектора. Подробнее
Поскольку вставка и удаление элементов требуют сдвига других элементов вектора, эти операции имеют линейную сложность, то есть выполняются за время, пропорциональное длине вектора.
Присваивание и сравнение векторов
Содержимое одного вектора можно целиком скопировать в другой вектор при помощи операции присваивания: A = B .
Также вектора можно сравнивать на равенство и неравенство ( A == B , A != B ), и сравнивать их содержимое в лексикографическом порядке ( A < B , A <= B , A > B , A >= B ).
Создание многомерных векторов
Элементами вектора могут быть и другие вектора. Например, можно сделать вектор, каждый элемент которого представляет собой вектор целых чисел:
Тем самым, a[i] будет вектором целых чисел, а обращаться к j-му элементу вектора a[i] можно через a[i][j].
Чтобы создать двумерный вектор размером n×m можно внешний вектор объявить размером n, а затем в цикле изменить размер каждого вложенного вектора:
Но можно сделать это и в одну строку, если передать вторым параметром для конструктора вектора конструктор, который создает вектор целых чисел длины m:
Урок 2: двумерный вектор
Так мы работали с обычным динамическим вектором из целых чисел:
Альтернативно можно сразу изменить размер вектора:
А что если мы хотим работать с картинками? Можно было бы представить себе картинку как таблицу, как матрицу, или как вектор в котором каждый элемент — это вектор хранящий числа из одной строчки:
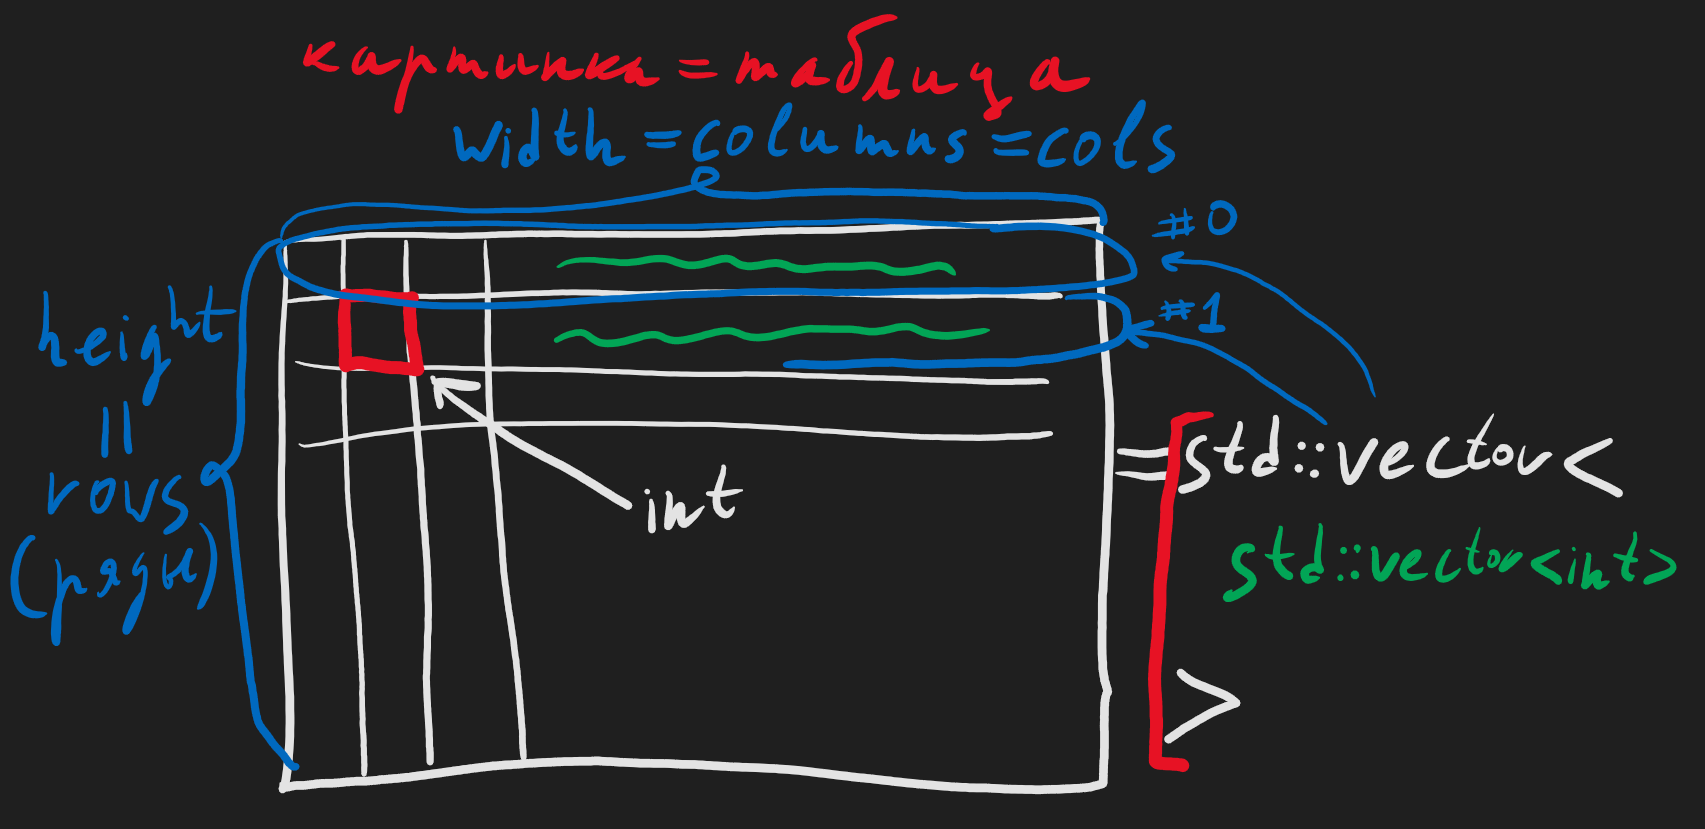
Поэтому хорошо бы научиться работать с вектором хранящим вектора каждый из которых хранит числа:
Чтобы получить новое задание — надо обновить вашу копию (клон который вы ответвили) репозитория с исходниками:
1) Откройте свой аккаунт на github.com и откройте список своих репозиториев (Repositories) найдите там CPPExercises2021
2) Откройте Pull requests -> New pull request
3) В строчке с четырьмы выпадающими списками в head repository укажите PML239CVCourse/CPPExercises2021
4) Теперь нажмите синее compare across forks -> убедитесь что head repository так же PML239CVCourse/CPPExercises2021
6) В выпадающем списке base repository укажите ваш репозиторий MyUserName/CPPExercises2021
6) Если появилось красное Can’t automatically merge. — не беспокойтесь, продолжайте.
7) Проверьте что снизу появилось что-то в т.ч. про lesson02 и lesson02vector
8) Нажмите зеленую кнопку Create pull request -> Create pull request -> Merge pull request -> Confirm merge
8) Если у вас было красное Can’t automaticall merge. — то жмите на Resolve conflicts и разрешите конфликт в желтых строчках (это код который поменяли вы когда делали домашнее задание, и так же параллельно поменял я, т.к. поправил опечатку, поэтому сейчас github не знает какая версия корректна, или может нужно их скомбинировать) — просто поправьте строки так чтобы они выглядели хорошо (и удалите все строки начинающиеся с <<<<<<< , ======= и >>>>>>> ) -> сверху справа Mark as resolved -> Commit merge -> I understand, continue updating main -> Merge pull request -> Confirm merge
9) Убедитесь что в вашем репозитории CPPExercises2021 появилась папка lesson02
10) Откройте CLion и нажмите там Git->Update Project. (или Ctrl+T) -> выберите Rebase . -> Ok
11) Убедитесь что у вас появилась папка lesson02
12) Внутри есть TODO — выполняйте их по возрастанию номеров (они разбиты на три группы)
13) Чтобы запустить новую программу вместо старой (вместо прошлого урока) — нажмите сверху справа на выпадающий список hello | Debug рядом с зеленым треугольником запуска и выберите там lesson02vector , затем нажмите на зеленый треугольник запуска
14) В конце урока и когда дома доделаете задание — не забудьте сделать Commit+Push — см. Сохраняйте в репозитории изменения из прошлой инструкции
Как задать размер двумерного вектора?

Т.е. pole — вектор из n векторов, каждый из которых — вектор из m строк.
Аналогично надо объявлять и pole2 .

Дизайн сайта / логотип © 2023 Stack Exchange Inc; пользовательские материалы лицензированы в соответствии с CC BY-SA . rev 2023.9.7.43618
Нажимая «Принять все файлы cookie» вы соглашаетесь, что Stack Exchange может хранить файлы cookie на вашем устройстве и раскрывать информацию в соответствии с нашей Политикой в отношении файлов cookie.
2D Vectors in C++ — A Practical Guide 2D Vectors

While we believe that this content benefits our community, we have not yet thoroughly reviewed it. If you have any suggestions for improvements, please let us know by clicking the “report an issue“ button at the bottom of the tutorial.
Also referred to as vector of vectors, 2D vectors in C++ form the basis of creating matrices, tables, or any other structures, dynamically. Before arriving on the topic of 2D vectors in C++, it is advised to go through the tutorial of using single-dimensional vectors in C++.
Including the Vector header file
It would be impossible for us to use vectors in C++, if not for the header files that are included at the beginning of the program. To make use of 2D vectors, we include:
Instead of including numerous kinds of Standard Template Libraries (STL) one by one, we can include all of them by:
Initializing 2D vectors in C++
Firstly, we will learn certain ways of initializing a 2-D vector. The following code snippet explains the initialization of a 2-D vector when all the elements are already known.
After running the above code, we get the following output:
The use of ‘vector<vector<>>’ symbolizes that we are working on a vector of vectors. Each value inside the first set of braces, like ‘<1, 0, 1>‘ and ‘<0, 1>‘ are vectors independently.
Note: To create 2D vectors in C++ of different data-type, we can place the data-type inside the innermost angle brackets like <char> .
Since we are working on a two-dimensional data structure, we require two loops for traversing the complete data structure, efficiently. The outer loop moves along the rows, whereas the inner loop traverses the columns.
Note: The ‘size()’ function provides the number of vectors inside the 2D vector, not the total number of elements inside each individual vectors.
Specifying the size for 2D Vector Initialization
2D vectors can be of large sizes. We can not expect the programmer to feed-in every single value. Therefore, we can initialize a 2-D vector on the basis of the number of rows and columns.
The output would be:
According to the standard initialization of a vector, ‘vector<int> v(10, 0)’ , the first argument denotes the size of the vector whereas the second denotes the default value every cell holds.
In the above code snippet, we follow two steps of standard initialization:
- ‘vector<int> row(num_col, 0)’ — In this statement, we create a single-dimensional vector called ‘row’ , which has length defined by ‘num_col’ and default values as ‘0’ . It basically forms each row of our two-dimensional vector.
- ‘vector<vector<int>> v(num_row, row) — In this statement, we create our complete two-dimensional vector, by defining every value of the 2-D vector as the ‘row’ created in the last statement.
After understanding the above procedure, we can improve our initialization of 2D vectors in C++ by:
The above code, will provide the similar output as before, since we are doing the exact same thing, but in a single line of code.
If we remember correctly, the standard initialization looks somewhat like the above one. Creating a two-dimensional vector requires us to set the default value for every element as a single-dimensional vector.
The last method involves creating a 2-D vector without the knowledge of rows or columns. It is done by:
The above declaration creates an empty container capable of storing elements in the form of vectors.
Iterators for 2D vectors
Instead of traversing a 2D vector using indices, C++ has a provision of iterators for every specific STL data structure.
Output:
The iterators come in handy when we use certain operations that require an argument for positioning. The two most used functions returning iterator values are:
- ‘v.begin()’ — It returns an iterator to the first vector in a 2-D vector.
- ‘v.end()’ — It returns an iterator to the end of the 2-D vector.
Let us look at some operations possible on a 2-D vector.
Adding elements to a 2-D vector
To add elements at the end of a two-dimensional vector, we use ‘push_back()’ function.
Output:
Since our container is a vector of vectors, it would only make sense to push complete vectors inside it. Therefore, the argument passed inside the ‘push_back()’ function must be a vector.
Note: ‘v[i]’ represents a single-dimensional vector. Therefore, if the programmer needs to add elements in a certain vector inside the 2-D vector, he may use ‘v[i].push_back(value)’ .
To add a complete vector at a specific location, we use the ‘insert()’ function.
Output:
The ‘insert()’ function requires a positional argument as an iterator not as an integral index. It is followed by a vector that is supposed to be inserted at the specified location.
Removing elements from 2D vectors in C++
Opposite to the ‘push_back()’ , C++ provides ‘pop_back()’ function with the duty of removing the last element from the given vector.
In the context of this article, ‘pop_back()’ function would be responsible for removing the last vector from a 2-D vector.
Output:
In addition to the ‘pop_back()’ function, we have an ‘erase()’ function using which we can remove elements from a specified index.
Output:
Similar to the ‘insert()’ function, it requires a positional argument as an iterator. To remove all the vectors from the 2-D vector, ‘clear()’ function can be used.
The above functions might be enough to get comfortable while using 2-D vectors in C++.
Conclusion
Two-dimensional vectors in C++ are very easy to use, provided that the programmer is aware of the syntax involved. This kind of vector comes in handy when we solve problems related to matrices, graphs, and other two-dimensional objects.
We hope that this tutorial enlightened the reader on the topic of using 2-D vectors. Feel free to comment below for any queries related to the topic.
Thanks for learning with the DigitalOcean Community. Check out our offerings for compute, storage, networking, and managed databases.