Introduction
This page explains how to use USB drives, like external hard disks and USB flash drives (aka USB sticks, thumb drives, pen drives, etc). The material here also applies to flash cards (like in your digital camera).
USB storage devices have the enormous advantage that for the most part they use a standard set of protocols. Thus, instead of needing individual drivers, as does much computer hardware, a standard driver permits access to the devices, making them very portable and able to easily work on many platforms.
For help with internal hard drives, see Fstab and MountingWindowsPartitions.
Automounting
Mounting
By default, storage devices that are plugged into the system mount automatically in the /media/<username> directory, open a file browser window for each volume and place an icon on your desktop. The rationale for this slight change of behavior can be found here. If you plug in a usb hard disk with many partitions, all of the partitions will automatically mount. This behaviour may not be what you want; you can configure it as shown below.
If the volumes have labels the icons will be named accordingly. Otherwise, they will be named "disk", "disk-1" and so on.
To change the volume label see RenameUSBDrive.
Configuring Automounting
To enable or disable automount open a terminal and type:
Browse to org.gnome.desktop.media-handling.
The automount key controls whether to automatically mount media. If set to true, Nautilus will automatically mount media such as user-visible hard disks and removable media on start-up and media insertion.
Another key, org.gnome.desktop.media-handling.automount-open, controls whether to automatically open a folder for automounted media.
If set to true, Nautilus will automatically open a folder when media is automounted. This only applies to media where no known x-content type was detected; for media where a known x-content type is detected, the user configurable action will be taken instead. This can be configured as shown below.
Configuring Program Autostart
To control which programs automatically start when you plug in a device, go to System-Settings — Details — Removable Media.
For more complex scenarios, see UsbDriveDoSomethingHowto.
Unmounting/Ejecting
- Right-click the desktop icon and select "Unmount" (or in some cases, "Eject").
- In the file manager window, click on the "eject" button next to the name of the mounted volume.
- Right-click the icon in the launcher and select "Unmount".
Auto-mounting (Ubuntu Server)
By default, disk drives do not auto-mount in Ubuntu Server Edition. If you are looking for a lightweight solution that does not depend on HAL/DBUS, you can install "usbmount".
Manually Mounting
Using Disks
Disks (the GNOME disk utility) is an application for visually managing disk drives and media. When you run it, you will see a list of your drives, including USB drives. If you click a drive on the list, you can view its details, and you can click the triangle-shaped button (Play button) to mount the drive. (This method works even when the drive does not auto-mount.)
Using mount
Get the Information
Sometimes, devices don’t automount, in which case you should try to manually mount them. First, you must know what device you are dealing with and what filesystem it is formatted with. Most flash drives are FAT16 or FAT32 and most external hard disks are NTFS. Type the following:
Find your device in the list. It is probably something like /dev/sdb1. For more information about filesystems, see LinuxFilesystemsExplained.
Create the Mount Point
Now we need to create a mount point for the device. Let’s say we want to call it "external". You can call it whatever you want, but if you use spaces in the name it gets a little more complicated. Instead, use an underscore to separate words (like "my_external"). Create the mount point:
Mount the Drive
We can now mount the drive. Let’s say the device is /dev/sdb1, the filesystem is FAT16 or FAT32 (like it is for most USB flash drives), and we want to mount it at /media/external (having already created the mount point):
The options following the "-o" give you ownership of the drive, and the masks allow for extra security for file system permissions. If you don’t use those extra options you may not be able to read and write the drive with your regular username.
Otherwise, if the device is formatted with NTFS, run:
Note: You must have the ntfs-3g driver installed. See MountingWindowsPartitions for more information.
Unmounting the Drive
When you are finished with the device, don’t forget to unmount the drive before disconnecting it. Assuming /dev/sdb1 is mounted at /media/external, you can either unmount using the device or the mount point:
You cannot unmount from the desktop by right-clicking the icon if the drive was manually mounted.
Using pmount
There is a program called pmount available in the repositories which allows unprivileged users to mount drives as if they were using sudo, even without an entry in /etc/fstab. This is perfect for computers that have users without RootSudo access, like public terminals or thin clients.
pmount can be used with the same syntax as mount (but without sudo), or quite simply as follows:
- This will mount the device /dev/sdb1 at /media/flash_drive.
If you leave off the label option, it will mount by default at /media/device.
To unmount the device, use pumount, like so:
For more help, see the man pages for pmount and pumount.
The Importance of Unmounting
Before disconnecting devices, you must unmount them first. This is similar to "Safely Remove" in Windows in that the device won’t unmount until data is finished being written to the device, or until other programs are finished using it. This applies to all types of storage devices, including flash drives, flash cards, external hard drives, ipods and other media players, and even remote storage like Samba or NFS shares.
Failure to unmount before disconnecting the device can result in loss of data and/or a corrupted file system. There are no exceptions to this rule. Be safe — unmount your drives before disconnecting them!
Other Useful Commands
To see a list of your USB devices (the vendor and device ID’s), run:
To see all attached storage devices and their partitions, run:
To see information about currently mounted systems, simply run:
Troubleshooting
Presented here are some common problems users encounter.
Interfering services
Two services/programs responsible for automounting might interfere and thereby prevent a successful automount and permission setting.
Example: Activating the Automount function of Nautilus while using pmount will result in read-only permissions for normal users. Either disable Nautilus’ Automount function or deinstall pmount.
Unclean LogFile
If you are mounting drives formatted with NTFS (like most external USB hard disks are), you must first have the ntfs-3g driver installed. This is done automatically in newer versions of Ubuntu. You should also install ntfs-config and enable mounting, which is not done automatically. For ntfs-3g and ntfs-config, see MountingWindowsPartitions.
When a drive is not Safely Removed from a Windows machine (or a forced shutdown occurs from Windows), you may get an error like this when you plug in your drive:
The best option is Choice 1, but you can force the mount by running Choice 2 with sudo. You must then manually unmount it from the terminal (you can’t right click the desktop icon):
After that the drive should automount normally again.
User Privileges
If your usb device doesn’t appear on your desktop, you should check that your user has the correct privileges. Go to System->Administration->User and Groups, choose the user, click on "Properties", then go to the "User Privileges" tab. You should have the "Access external storage devices automatically" option checked.
Preferences
NOTE: This does not seem to apply to Hardy Heron.
USB 2 Issues
old kernels workaround
If you encounter problems using your USB device with USB 2 (i.e. ‘high speed’ mode), you can revert to the ‘full speed’ mode (slower) by unloading ehci_hcd. To do that, type in a terminal:
before plugging in your device.
recent kernels workaround, from Karmic
- Determine your device id using
- Find which bus it is connected to. The bus id can be found as a folder in /sys/bus/pci/drivers/ehci_hcd. The following script explores buses and connected devices: The information is also usually available in /var/log/kern.log
- Unbind the bus (and all devices) from the ehci_hcd driver. Insert the bus id in the following command, using the format 0000:00:xx.x
Buffer I/O Errors
If you see errors related to Buffer I/O when attaching a USB storage device, there are two ways to work around it. First, try using varying max_sectors settings, as such:
Try values of 120, 64 and 32.
If this does not resolve the issue, then you may need an unusual_dev entry for your device. It would look something like this:
The vendor and device IDs can be obtained from the output of "lsusb". The entry would be placed in drivers/usb/storage/unusual_devs.h. If you cannot compile your own kernel, please file a bug report, and we’ll attempt to compile a test module for you.
Device suddenly becomes read-only
If your device changes suddenly to read-only mode, and you see this kind of error:
This might be the sign of an unclean device. You should check your device. Try TestingStorageMedia to do so. Or use "Disk Utility" (under System, Administration), find your device, unmount it, check the file system, then mount it again.
USB-Device is or becomes read-only without errors
If you see "Write Protect is off" and no errors in your logfiles, than you should set filesystem type specific mount options (FS_MOUNTOPTIONS) in /etc/usbmount/usbmount.conf. Wrong gid causes mounting read only.
General tip
When you encounter problems with USB devices, the first thing to do is to check the latest debug information generated from the kernel just after you plug in your device and/or just after you encounter the problem.
To do that, open a terminal and type :
Check the latest messages; they should be related to your problem.
Seeking Further Help
The best place to get help with almost any Ubuntu problem is on the Ubuntu Forums. The Absolute Beginner Talk section is best for beginners.
List USB partition

Here, I want to use sda1 for example.
Create mount point
Before you are able to use mount command to mount the USB partition, you need to create a mount point. It can be a new or a existing directory within your host filesystem.
I create new directory to be the mount point to mount my USB device by using mkdir command:
Mount USB Drive
Use mount command to mount /dev/sda1 into UsbStick mount point:
You’ll see a response similar to:
sda1 is mounted to /home/root/UsbStick from /run/media/sda1
To check whether the USB drive has been mounted correctly execute mount command again without any arguments and use grep to search for USB block device name:
You’ll see a response similar to:
Accessing USB Data
You can access the USB data simply by navigating to the previously created mount point /UsbStick :
Unmount
Make sure that no process is using or accessing the mount point directory.
Execute the following command to unmount your USB drive:
Permanent Mount
If you want to mount the USB drive permanently, you can use vi command to modify the config file:
You’ll see a response similar to:
Add the following line into fstab config file:
If fail, you can use partition UUID instead of the device name. Now, locate a UUID of your USB drive:
You’ll see a response similar to:
The UUID of device sda1 is FDFA-40E0 thus our /etc/fstab mount line will be:
Sorry, you have been blocked
This website is using a security service to protect itself from online attacks. The action you just performed triggered the security solution. There are several actions that could trigger this block including submitting a certain word or phrase, a SQL command or malformed data.
What can I do to resolve this?
You can email the site owner to let them know you were blocked. Please include what you were doing when this page came up and the Cloudflare Ray ID found at the bottom of this page.
Cloudflare Ray ID: 80350d739edf0557 • Your IP: Click to reveal 178.175.133.149 • Performance & security by Cloudflare
Как вручную монтировать/размонтировать USB-устройство в Ubuntu
Когда вы подключаете USB-накопитель к нашей системе, он обычно монтируется автоматически, и в папке носителя создается каталог с вашим именем пользователя. Вы также можете получить к нему доступ через файловый менеджер вашей системы. К сожалению, это не всегда так; иногда для доступа к USB-накопителю необходимо вручную смонтировать его в системе.
В этом руководстве мы расскажем, как вручную монтировать и размонтировать USB-накопитель в системе. Команды и шаги, описанные в этой статье, будут работать на любой последней версии Ubuntu, включая Ubuntu 22.04.
Как подключить USB-накопитель в Ubuntu
Давайте выполним следующие шаги, чтобы подключить USB-накопитель вручную к вашей системе:
Шаг 1: Подключите USB-накопитель к свободному порту.
Шаг2: Выполните следующую команду от имени sudo в приложении Terminal, чтобы проверить доступные устройства хранения данных в вашей системе и файловую систему, которую они используют:

Ваше USB-устройство обычно будет перечислено в конце вывода в основном как sdb-(номер). В нашем случае оно указано как sdb1, работающее с файловой системой FAT32.
Шаг 3: Создайте точку монтирования для вашего USB-устройства с помощью следующей команды:
Имя точки монтирования не должно содержать пробелов; вы можете разделять слова знаком подчеркивания ‘_’.
Теперь точка монтирования будет создана.
Шаг 4: Теперь мы смонтируем USB-накопитель в созданную точку монтирования. Мы будем использовать следующую команду для монтирования устройства FAT32:
Опция security является обязательной и позволяет вам предоставить/получить доступ к USB, указав одно из следующих значений для разрешения;
В этом примере я предоставляю контроль доступа пользователю (текущему пользователю), указывая идентификатор пользователя:
Для NTFS используйте следующую команду:
Шаг 5: Теперь ваш USB смонтирован. Вы можете получить доступ к нему через папку media.
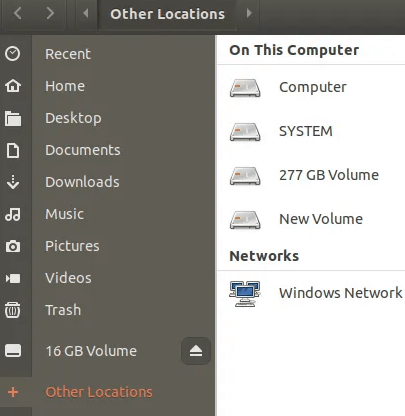
Вы также можете получить доступ к USB через файловый менеджер. На следующем изображении том 16 ГБ, указанный прямо над «Другими местами», является моим смонтированным USB-накопителем.
Как размонтировать USB-накопитель в Ubuntu
Если вы смонтировали USB-накопитель вручную, то лучше всего даже размонтировать его вручную.
Шаг 1: Используйте следующую команду, чтобы размонтировать USB:
В приведенной выше команде укажите точку монтирования, если она отличается от точки монтирования ‘USB’, которую я использовал.
Шаг 2: Вам нужно будет вручную удалить каталог точки монтирования USB, если вы не планируете использовать его в будущем:
Шаг3: Отключите USB от вашей системы.
После выполнения шагов, описанных в этой статье, вы сможете успешно монтировать и размонтировать USB-накопитель в систему и из системы. Это поможет вам, если ваша система не сможет автоматически сделать USB доступным для доступа и использования.