How to Download a Google Slides Presentation as a Powerpoint File
The Google Slides app that is available to individuals with Google Accounts provides a lot of ways for you to customize a slide, create a template, apply themes, and edit your presentations in a variety of ways. But you may wonder how to download a Google Slides file in the Powerpoint format if you would like to edit the slideshow in Powerpoint, or use it to create other files or templates. You can also read this guide if you want to download a slide as a picture.
Google applications like Docs, Sheets, and Slides have been gaining a lot of popularity as an alternative to comparable Microsoft Office products. They are easy to work with, the file management is simple, and the advanced features make it a powerful tool for a wide range of users.
But you might still occasionally encounter situations where colleagues or school associates are unable to work with or view your Google Slides presentation, and would prefer to work in Microsoft Powerpoint. Luckily this won’t require you to completely re-create the file in Powerpoint, as you are able to download a copy of the presentation in the Powerpoint format directly from Google Slides.
How to Use the Google Slides Download Tool to Create a Powerpoint File
- Open your Google Slides file.
- Click File.
- Choose Download, then Microsoft Powerpoint.
Our guide continues below with additional information on downloading Google Slides presentations as Powerpoint files, including pictures of these steps.
How to Save for Powerpoint from Google Slides (Guide with Pictures)
The steps in this article were performed in the Google Chrome Web browser, but will also work for other desktop and laptop Web browsers. Completing this tutorial will result in the creation of a Powerpoint file that is a copy of your Google Slides presentation. The original Google Slides file will still exist in your Google Drive. Any changes that you make to the downloaded copy of the Powerpoint file will not be reflected in the original Google Slides presentation.
Step 1: Go to your Google Drive at https://drive.google.com/drive/my-drive and open the Google Slides file that you wish to save as a Powerpoint file.
Step 2: Click the File tab at the top of the window.
Step 3: Choose the Download as option, then click Microsoft Powerpoint.
The Powerpoint version of the presentation will then download to your browser’s download folder, where you will be able to open and share it in the same manner as you would any other Powerpoint file.
If you are using Chrome and aren’t sure where your downloads folder is, then you can learn how to see your recent Chrome downloads.
Would you like to be able to upload Powerpoint files to Google Drive and work on them in that application, rather than just view them? Learn how to enable the conversion of uploaded documents for Google Drive and use it to work on any compatible file type.
Tips on Creating Powerpoint Files from Google Drive Presentations
- Downloading Powerpoint presentations won’t affect your Google Slides files. You will still have the original file in your Google Drive.
- You can only download .pptx files from the Google Slides app. This means that you can’t automatically create templates from slideshows in your Google Drive. However, you can always save the presentation file as a template from within Powerpoint.
- Most slide options and formatting will be compatible with the Powerpoint format. However, it’s always best to open the Powerpoint file after you create it to ensure that there aren’t any glaring problems with the file.
Additional Sources
Matthew Burleigh has been writing tech tutorials since 2008. His writing has appeared on dozens of different websites and been read over 50 million times.
After receiving his Bachelor’s and Master’s degrees in Computer Science he spent several years working in IT management for small businesses. However, he now works full time writing content online and creating websites.
His main writing topics include iPhones, Microsoft Office, Google Apps, Android, and Photoshop, but he has also written about many other tech topics as well.
How to Download Google Slides Presentation [Complete Guide!]

If you are a Google Slides user, you probably already know that Google Slides works on cloud storage. Meaning that your presentation files are stored online and can be accessed using just a browser. You no longer need to carry the physical file on a thumb drive. But, what if you intentionally need to save a Google Slides presentation? In that case, how do you download a Google Slides presentation?
To download a Google Slides presentation, simply open the presentation file in your browser. Then, click on the “File” menu and select the “Download” option. Choose the format (such as .pptx, .pdf, etc) in which you need to download the file, and save the presentation on your computer.
While that’s just a quick explanation, if you need a detailed step-by-step pictorial description, continue reading as I will be sharing the same below in the article. Plus, I will also share with ninja tips that will allow you to download just the audio or even a protected presentation to your computer!
So, let’s get started!
A Quick Note Before We Begin – if you want to make jaw-dropping presentations, I would recommend using one of these Presentation Designs. The best part is – it is only $16.5 a month, but you get to download and use as many presentation designs as you like! I personally use it from time-to-time, and it makes my task of making beautiful presentations really quick and easy!
1. How to Download a Google Slides Presentation?
Downloading a google slide presentation is very simple and absolutely free for Windows, Mac and other operating systems. There are a few ways you can download a google slides presentation on your computer which you can choose from, according to your preference.
In this section, I will show you step-by-step, the 3 ways you can download Google Slides presentation on your device.
1a. Save Google Slides as a PowerPoint File
The fastest way to save a Google Slides file as a Power Point file is to use the “Download” option in the “File” tab that you can find on the upper left corner of the ribbon. Here is a detailed step-by-step guide of the whole process:
Step-1: Click on File Tab and Select Download
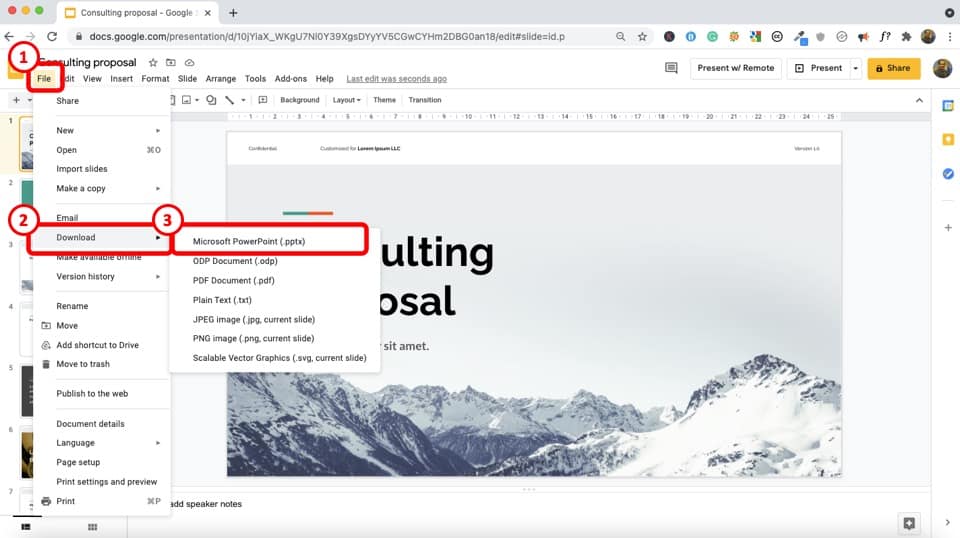
When the Google Slides document is open, you can find the “File” tab on the top left corner of your screen. Select that tab and you will find the “Download” option.
Step-2: Select the “Microsoft PowerPoint (.pptx)” Option
After selecting the “Download” option, there you will find a series of convertible formats to download to your computer. Select the “Microsoft PowerPoint (.pptx)” option.
Step-3: Open the Downloaded file.
After you select the “Microsoft PowerPoint (.pptx)” option the download will begin automatically and the preview of the downloaded file will be displayed on the bottom left corner of your screen (if you are using Google Chrome as your browser) which will lead you to the downloaded PowerPoint file.
1b. Download Google Slides as a PDF
The process of Downloading a Google Slides presentation file as a PDF file is very simple and the steps of doing it is very much similar to downloading it as a Microsoft PowerPoint file. Here is a step-by-step guide to the entire process.
Step-1: Click on the “Download” Option from the “File” tab
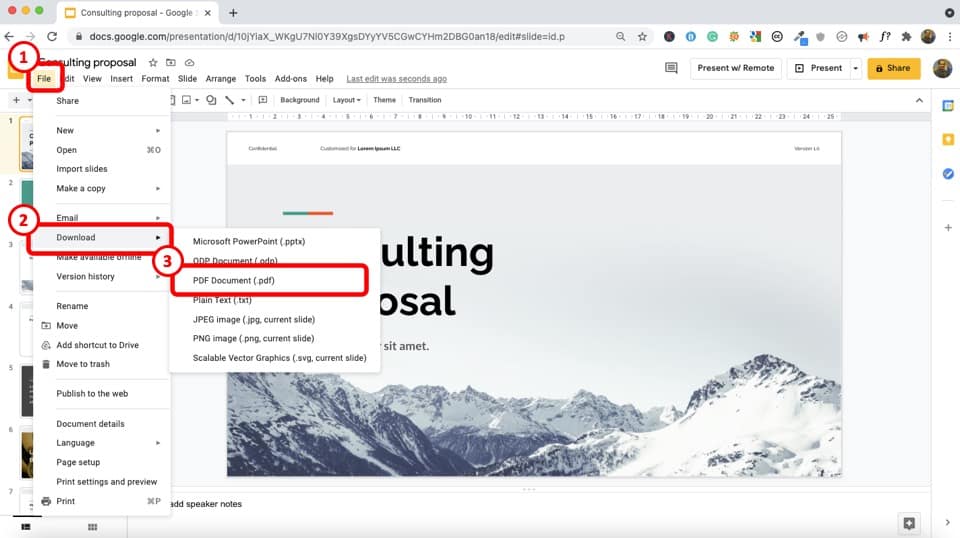
As we’ve learned from the previous section, the “Download” option in the “File” Tab is the first step to begin the process.
Step-2: Select the “PDF Document (.pdf)” option
Inside the “Download” option there is a range of convertible formats to choose from. Click on the “PDF Document (.pdf)” option.
Step-3: Open the downloaded PDF document
Right after clicking on the “PDF Document (.pdf)” option, the downloading process will being and the file will be downloaded in a few seconds.
A preview of the file will be found on the bottom left corner of the screen and the file will be found in the “Download” folder of your computer.
1c. Save Google Slides as Images
It is a bit tricky to download all the google slides into images since there is no ready option to do so. In any case, I will show you how to do it step-by-step below;
Step-1: Open the “Download” option from the “File” tab
When the Google Slides window is open on your computer screen, you can find the “File” tab in the top left corner of your screen. Open the “Download” option.
Step-2: Download the file as a Microsoft PowerPoint (.pptx)
To download the google slides as images, you have to first download it as a PowerPoint .pptx format.
Step-3: Open the Downloaded Presentation file on Microsoft PowerPoint.
After downloading the Googles slides presentation on your computer, open the file with Microsoft PowerPoint.
Step-4: Click on the “Export” option in the “File” tab
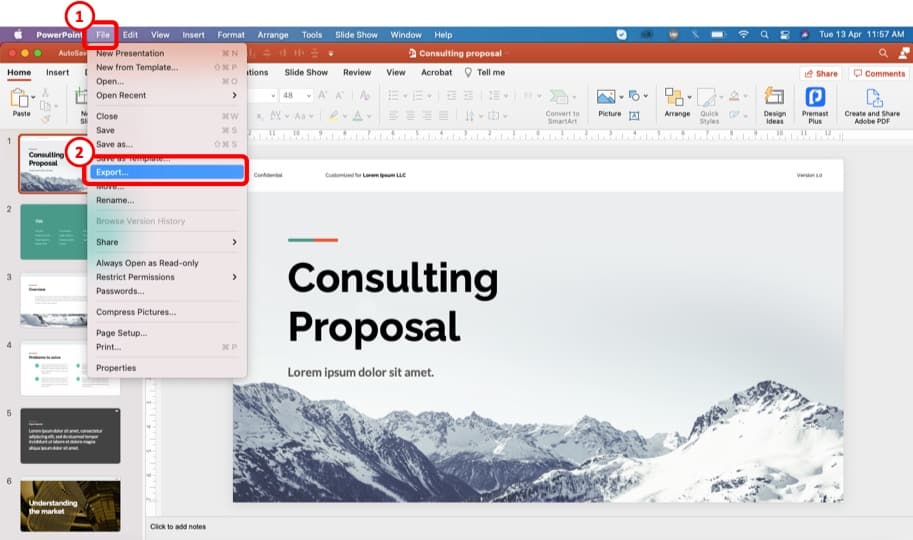
At the top left corner of the screen you can find the “File” tab which will take you to the “Export” option.
Step-5: Select the “JPEG File Interchange Format” button in the “Change File Type” option
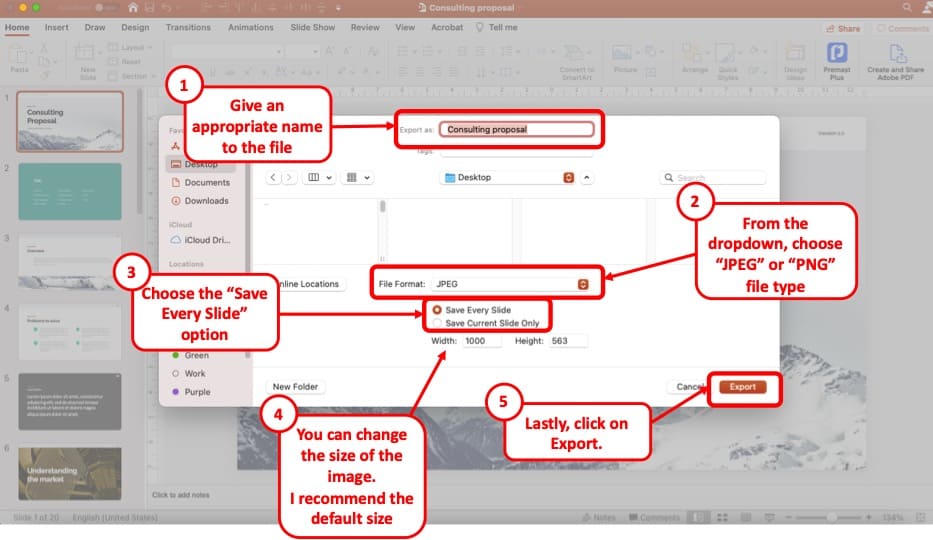
At the bottom of the “Export” option you will find the “Change File Type” option which will allow you to select “JPEG File Interchange Format”
Step-6: Select the “Save As” or “Export” button
After selecting the “Save As” button in a pop-up will show you the file name destination and file type. For Mac users, you can directly click on the “Export” button (as shown in the image above).
After selecting the “Save” button each slide will be converted into a JPEG image and saved in a folder together.
2. How to Download Google Slides Presentation with Audio?
Downloading Google Slides Presentations with audio can be a little trouble because after downloading it as a Power Point presentation, the file open in a different window instead of the presentation background. Here is a step-by-step to solve that problem.
Step-1: Download the Audio by right clicking the mouse on the audio bar
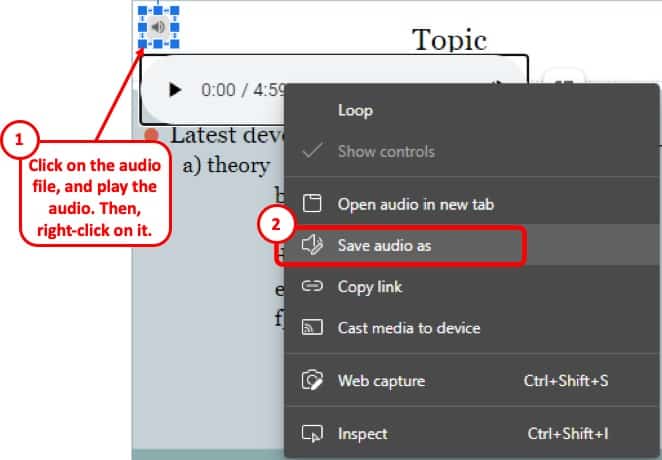
By selecting the speaker icon on the slide, you can turn on the audio in the presentation. Upon turning it on, right click on the audio bar and select “Save audio as”.
Step-2: Save the audio on your computer

By selecting the “Save audio as” option, a pop up will appear the screen. Select the “Save” button
Step-3: Download the Google Slides Presentation as a PowerPoint File
Download the presentation as a PowerPoint presentation on your computer as explained in the previous section of this article.
Step-4: Insert the Audio in Your PPT File
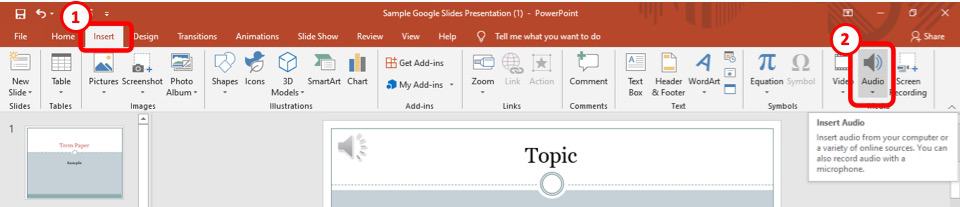
Open the slide where the audio was embedded on the google slide presentation. When the slide is open, go to the “Insert” tab on the upper part of the Power Point file.
By going to the “insert” tab, there is the “Audio” option in the top right part of the screen as shown in the figure
By clicking on the “Audio” option in your presentation, a pop-up window will appear. Select the audio downloaded for the presentation and hit “Insert”
Step-5: Re-arrange the position of the speaker icon
By inserting the audio into your presentation, an audio icon will appear at the center of the screen. Reposition the icon and you’re all set. This is just an optional step.
3. How to Download a Protected Google Slides Presentation?
There are no easy ways to download protected google slides presentations to your computer. There is no available direct links or download buttons. But there is a simple way of generating a direct download link from shared or protected files. Each step of the process is described below:
Step-1: Click on the Protected Google Slides presentation URL
https://docs.google.com/presentation/d/FILE_ID/edit?usp=sharing
There is a link in the URL box located at the upper part of your browser. The link should look something like the link above
Step-2: Select the “edit?usp=sharing” part of the URL
In the link select the part of the URL from “edit” until the end. (check the section of the link that has been written in bold formatting
Step-3: Write “export/pptx” on the selected part
Your link should look something like this – https://docs.google.com/presentation/d/FILE_ID/export/pptx
Upon selecting the colored part of the URL, write “export/pptx” in its place. The URL should look like how it has been written above.
Step-4: Press “Enter” to Open the New Link
The new link that you’ve created is a direct download link and so upon opening it, your presentation file should start downloading automatically.
4. How to Download Embedded Google Slides Presentation from a Website?
Unfortunately, there is no easy way to download an embedded google slides presentation from a website. However, there is a quick and simple way to download the presentation by simply making two bookmarks on your internet browser. The process is described below;
Step-1: Create a bookmark named “Open Google Sides”
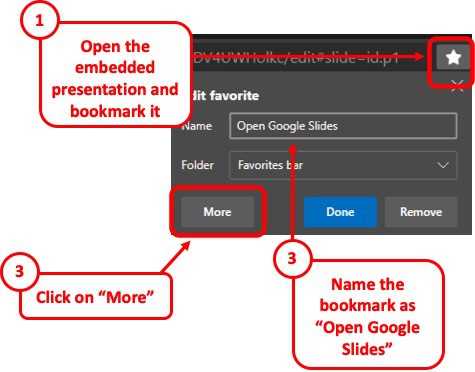
The first step is to create a bookmark named “Open Google Slides” on your preferred browser. Simply click the star mark on the right corner of your url box (for Google Chrome) and change the name of the bookmark to ‘Open Google Slides’.
Step-2: Paste the JavaScript code in the url section.
With a click on the “More” option, there will be a pop-up box for you to paste a url. Paste the following code into the url box.
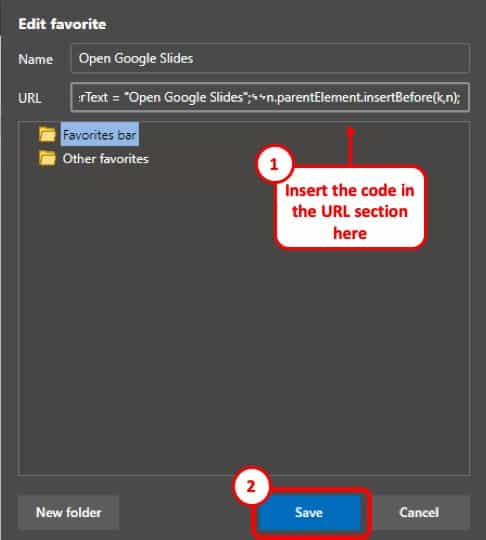
Copy and Paste the code mentioned below –
javascript:
var n = document.querySelectorAll(‘iframe[src*=docs\\.google]’)[0],
k = document.createElement(“a”);
k.setAttribute(“href”,n.getAttribute(“src”));
k.setAttribute(“target”,”_blank”);
k.setAttribute(“style”,”display:block”);
k.innerText = “Open Google Slides”;
n.parentElement.insertBefore(k,n);
Step-3: Make a similar bookmark with the name “Extract Slides”
Simillar to the last step, another bookmark make another bookmark, but name it ‘Extract Slides’ and instead of the previous code, paste the following code on the url box:
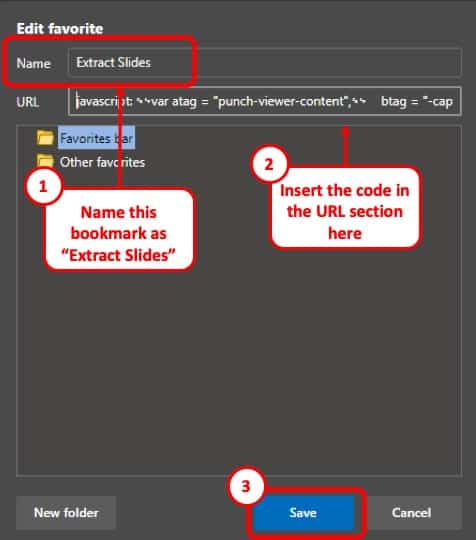
Copy and Paste the below-mentioned code –
javascript:
var atag = “punch-viewer-content”,
btag = “-caption”,
ctag = “aria-setsize”,
dtag = “aria-posinset”,
msvg = document.getElementsByTagName(“svg”),
node = document.querySelectorAll(‘[class$=”‘ + btag + ‘”]’)[0],
view = document.getElementsByClassName(atag)[0],
size = node.getAttribute(ctag),
data = “”,
func = () => <
data += msvg[0].outerHTML;
if((i = node.getAttribute(dtag))==size) document.write(data);
else view.click(), setTimeout(func,10)
>;
func()
Step-4: Download the embedded file
Once the bookmarks are in place, simply go to the website with the embedded presentation and click on the “Open Google Slides” bookmark. It should open a link on top of the embedded presentation to be downloaded.
5. How to Download a Google Slides Presentation Published to the Web
When there is no direct link to downloading a google slides presentation in a website, it can be frustrating to find complex ways to download it. But I will show you a simple way of creating a direct download link. The process is described below.
Step-1: Scroll to the last character of the shared protected google slide presentation URL
There is a link in the URL box located at the upper part of your browser. The link should look something like the link below:
https://docs.google.com/presentation/d/FILE_ID/edit?usp=sharing
Step-2: Select the “edit?usp=sharing” part of the URL
In the link select the part of the URL that I intentionally made bold, to explain the process.
Step-3: Write “export/pptx” on the selected part
Your link should look something like this – https://docs.google.com/presentation/d/FILE_ID/export/pptx
Upon selecting the bold part of the URL, write “export/pptx” in its place. The URL should look like the link showcased above.
Step-4: Open the new link
The new link that you’ve created is a direct download link and so upon opening it, your presentation file should start downloading automatically.
How to download Embedded Google Slide Presentations (published to the web)

Quickly to the point, I searched & failed to find a nifty way to save an embedded Google Slide Presentation last night. The only way that reportedly seems to work, didn’t work either.
So if you are in a hurry, all this involves is creating a couple of bookmarks.
Create a bookmark & name it ‘Open Google Slides’ & in the URL part, copy :
Similarly, Create another one & name it ‘Extract Slides’ with the URL part as:
Done. Now open the page with the embedded google slide & click the first bookmark. It should create a link “Open Google Slides” above the slides.
Clicking it should open the embedded presentation in a new tab. Now click the second bookmark. This should expand the page which you can simply save & use offline.
No plugins or apps. The next time you need to save an embedded presentation, simply use the two bookmarks.
The code snippets above are simple. The first one creates a link to the presentation & the second one expands the slides on the page, manually triggering the click on each slide.
Как конвертировать Google Slides в PowerPoint?
Интересуетесь, как конвертировать Google Slides в PowerPoint? Эта статья предлагает вам три надежных метода конвертирования Google Slides в PowerPoint.
Статьи по теме

Василий Лебедев
2023-03-23 16:03:52 • Отправлено: Для Презентации • Проверенные решения
Google Slides — это вполне достойная облачная альтернатива Microsoft PowerPoint, но если вам нужно поделиться ею с кем-то в виде вложения в электронное письмо, вы, возможно, хотите узнать, как конвертировать Google Slides в PowerPoint, чтобы не отправлять ее в виде ссылки. Отправка в виде вложения лучше, например, когда у получателя нет стабильного подключения к интернету. В этой статье показано, как легко конвертировать Google Slides в PowerPoint, чтобы можно было хранить и просматривать их в автономном режиме.
3 способа конвертирования Google Slides в PowerPoint на Google Диске.
Google Slides — это облачная программа, позволяющая создавать презентации онлайн и обмениваться ими с коллегами. Оно также имеет встроенный модуль конвертирования файлов, позволяющий загружать файлы в различных форматах. Преимущество Google Slides в том, что оно предоставляется бесплатно вместе с аккаунтом Gmail или G Suite Google, а также регулярно обновляется без необходимости что-либо скачивать. Этот инструмент также отлично подходит для создания презентаций непосредственно из онлайн-источника. Однако он предлагает несколько вариантов конвертирования при загрузке файла на локальную память. Давайте посмотрим, как это делается:
Способ 1: Экспорт Google Slides в PowerPoint из меню «Файл».
- Откройте презентацию в Google Диске.
- Нажмите «Файл» → «Загрузить как» и выберите опцию «Презентация PowerPoint».
- При необходимости переименуйте выходной файл и нажмите «Сохранить».
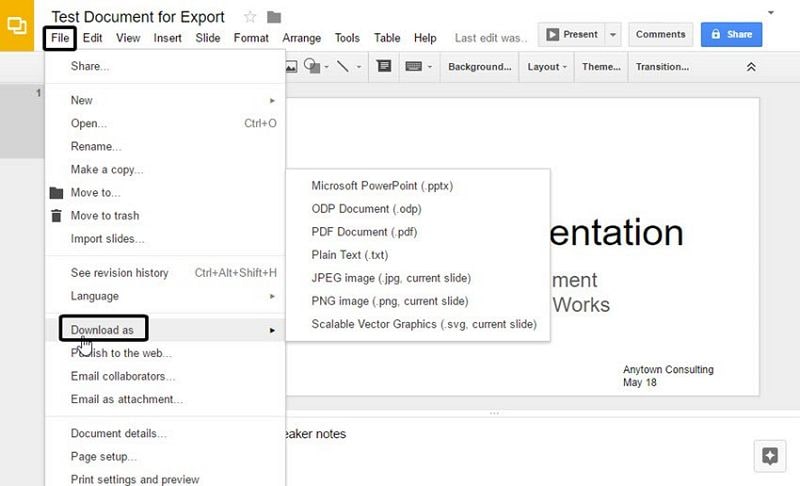
Теперь файл можно открыть с помощью MS PowerPoint. В дополнение к этому методу вы также можете загрузить файл непосредственно из его местоположения на диске без открытия. Для этого выполните следующие действия:
Способ 2: Конвертирование Google Slides в PowerPoint из папки диска.
- Перейдите в папку диска, где находится ваш файл.
- Щелкните файл правой кнопкой мыши и выберите опцию «Загрузить».
- При необходимости переименуйте документ и нажмите «Сохранить».
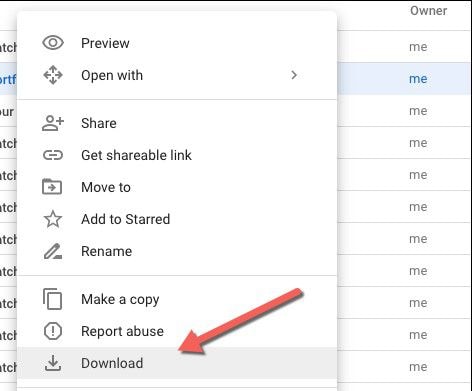
Если эти два метода позволяют загружать по одному файлу за раз, то следующий метод покажет вам, как конвертировать несколько файлов за один раз и загрузить их в zip-файл, который гораздо проще передать по электронной почте.
Способ 3: Конвертирование и загрузка нескольких файлов в виде архива.
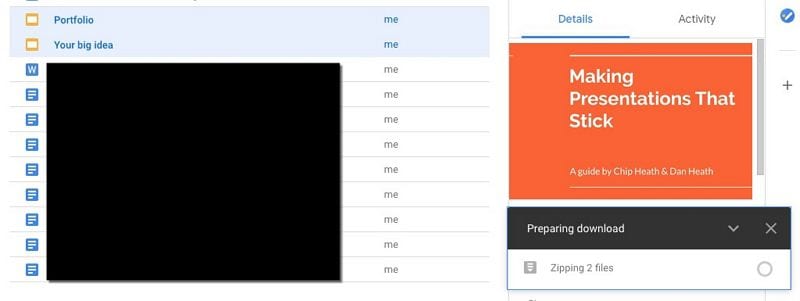
- Выберите несколько файлов в Google Диске с помощью клавиш Shift или Ctrl и мыши.
- Щелкните правой кнопкой мыши по любому из выбранных файлов.
- Вы увидите процесс конвертирования ваших файлов и их архивирования в один файл.
- После завершения процесса вы можете выбрать место сохранения и нажать кнопку «Сохранить».
Лучшая альтернатива Adobe Acrobat для редактирования PDF-файлов.
Вы также можете конвертировать эти PPT-файлы в PDF для более удобного архивирования и обмена, но вы можете заметить, что файлы со сложными макетами не будут точно отображаться в конечной версии PDF, если вы не используете подходящий инструмент для этой работы. В этом случае идеальным инструментом будет Wondershare PDFelement — Редактор PDF-файлов универсальный, полнофункциональный и доступный редактор PDF с широкими функциями для редактирования, конвертирования, заполнения форм, защиты, электронной подписи, OCR и многого другого.
Adobe Acrobat, без сомнения, является приоритетным выбором для многих крупных корпораций, имеющих большие бюджеты на программное обеспечение для своих сотрудников. Однако, если вы являетесь представителем малого бизнеса или профессионалом, у которого нет таких денег, PDFelement — это лучший выбор для вас. Он не только гораздо доступнее продукта Adobe, но и обладает большинством тех же функций, что и Acrobat. Более того, пользовательский интерфейс гораздо более интуитивно понятен, а также он быстрее и точнее конвертирует отсканированные PDF-файлы в редактируемые, индексируемые и доступные для поиска.
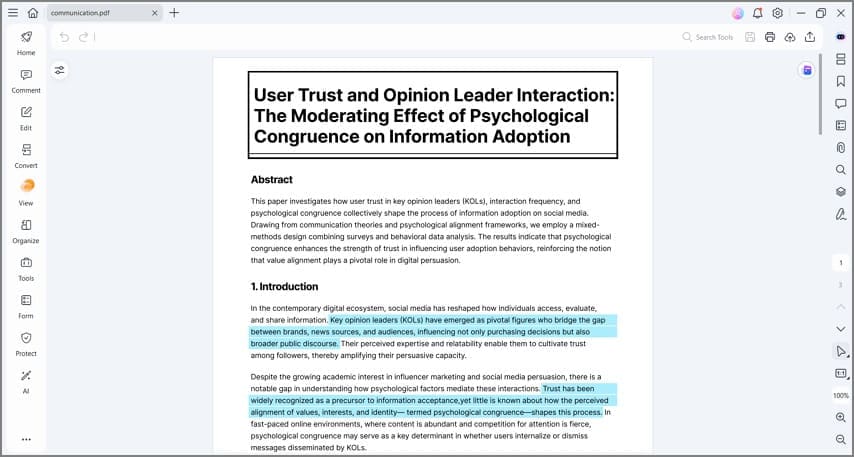
- Полный набор инструментов для редактирования: программа предлагает полный набор инструментов для редактирования изображений, текста, URL, мультимедиа и других объектов в PDF-документе. Инструменты редактирования очень удобные, а пользовательский интерфейс очень прост по сравнению с некоторыми другими редакторами PDF.
- Широкие возможности конвертирования: если вы конвертируете другие типы файлов в PDF или PDF-файлы в другие выходные форматы, результат вас впечатлит. Более того, точность конвертирования и скорость не имеют себе равных.
- Надежные функции безопасности и конфиденциальности: с помощью этого инструмента можно без труда ограничить содержимое, добавить штампы или водяные знаки, а также применить надежное шифрование для ограничения доступа к открытию и изменению файлов.
- Эффективные средства разметки и комментирования: одним из наиболее распространенных действий в PDF является просмотр и создание комментариев и заметок для сотрудников. Программа облегчает эту задачу, предоставляя вам длинный список элементов аннотации, таких как текстовые поля, стикеры, штампы, фигуры, стрелки и так далее.
- Расширенная обработка форм и OCR: создание интерактивных форм или преобразование нередактируемого содержимого в редактируемое — это простое дело, поскольку преобразование происходит гораздо быстрее, чем в большинстве других PDF-приложений. Более того, вы можете положиться на высокоточный механизм преобразования, который поддерживает множество языков.
- Пакетная обработка: многие действия можно выполнять для нескольких файлов. Это более быстрый способ выполнения работы, который сделает вас намного продуктивнее с самого первого дня.
Как конвертировать другие форматы в PowerPoint?
Конвертирование практически любого формата документа в PowerPoint буквально так же просто, как перетаскивание файла в интерфейс. Механизм конвертирования мгновенно включается, когда обнаруживает другой формат файла, и конвертирует его в PDF, а затем вы можете преобразовать его в PowerPoint. Независимо от того, насколько сложным было расположение содержимого в исходном файле, оно будет точно сохранено и отображено в полученном PDF. Чтобы сделать процесс еще более понятным, мы описали шаги ниже:
Шаг 1. Откройте файл.
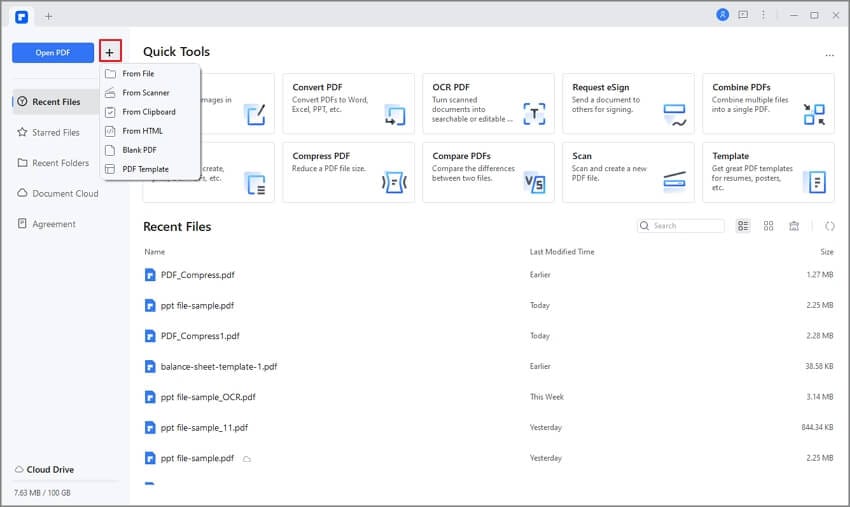
Если программа не открыта, вы можете перетащить исходный файл на иконку PDFelement, что приведет к запуску программы и конвертированию файла в PDF.
Если у вас открыт PDFelement, вы можете перейти в модуль «Создать PDF» и выбрать файл для импорта в формате PDF.
Шаг 2. Конвертируйте PDF в PowerPoint.
Перейдите в меню «Конвертировать» на верхней панели инструментов, а затем выберите кнопку «В PPT». Откроется новое окно «Сохранить как». В этом окне вы можете выбрать выходную папку и, в завершение, нажать кнопку «Сохранить».