Chinese Annotator for Microsoft Word
A Microsoft Word add-in for adding tone graphs, pinyin or zhuyin to Hanzi(汉字).
This project is maintained by twighk
Chinese Annotator for Microsoft Word
A Microsoft Word add-in for adding tone graphs, pinyin or zhuyin to Hanzi(汉字).

The tones are automatically placed above the chinese characters, by the computer using a dictionary (CC-CEDICT) for the longest word it can find. If it is unsure of the tones, it will place multiple tones above the character (here 好, as 大家好 is not in the dictionary as one word).
To annotate tones for LaTeX, see hanzi2tghz.
This project is hosted on GitHub.


Installation
- Download and run the installer.
- Open Word and the hanzi2tghz ribbon should be there.
- If any of the previous steps failed, please write about them on the issues page or issues page or Documentation
Before use, please remember to make a backup of your document, just in case.
Contents
Tones, Pinyin or Zhuyin Fuhao

Adding
To add tones or pinyin to text select some, or all the text ( Ctrl+a ), and press either the Add Tones , Add Pinyin or Add Zhuyin Button. When the dictionary finds multiple pronunciations for tones it puts multiple tones. For Pinyin or Zhuyin, it duplicates the words with the various pronuciations. To reduce duplicates use the Dictionary Correction utilities.
When tones or pinyin are added, all the font information about the text before is lost, so the size, colour, font, etc. are reset to the default.
Removing
When removing tones or pinyin, it is preferable to use the undo button, to undo the previous action of adding them. For tones, the Remove Tones/Pinyin button can be used, but it can be problematic for pinyin, as it does not remove the duplicated characters caused by converting to pinyin.
Editing
To edit tones or pinyin, click on or select some text, then press the Edit Tones or Pinyin button and the incorrectly named Edit Text or Pinyin window should appear.

Here 大家好 has tones, and 欢迎来到我的网站 has pinyin. For tones, put the number of the tone or tones, in the text box on the right. For pinyin put the pinyin followed by the tone number.
Resizing Text
When the text is resized the tone/pinyin do not scale with the text size. The solution is to use one of the resize buttons.

Pinyin or Zhuyin Fuhao
To resize pinyin or zhuyin fuhao, use the Pinyin Resize: button. The number next to it ( 0.5 is the default) is the relative size of the text compared to the characters, i.e. 0.5 is half the size, 1.0 is the same size.
Tones
For Tones there are two issues the size of the tones and the height of the tones above the characters. For the size of the tones use the Tone Resize: button and change the relative size if you wish. For the height of the tones, change the number next to the Tone Height: button ( 12 is the default, make it larger for larger text), then click the Tone Height: button.
Dictionary Correction
Enabling Dictionary Correction
To enable dictionary correction press the Enable button in the Dictionary Corrections Section of the toolbar/Ribbon. By default there are no corrections, you can see the avaliable corrections, by pressing the Edit Dictionary in the Dictionary Corrections section. To import a tone corrections dictionary, or make yourown, see below.
Editing the Corrections Dictionary
To open the Dictionary Corrections window press the Edit Dictionary button.

Press the Done button to close the window saving changes.
Adding Words
To add a correction, type the chinese characters in the box containing 汉字 and the pinyin, separated by character by spaces, postfixed with the tone graph number, in the han4 zi4 box. Then press the Add button and it should be copied into the list. See the above window for examples.
For multiple pronuciations add the same chinese characters twice, with different pronunciations.
Deleting Words
To delete words, select the large grey box to the left of the row you wish to delete, and press the delete key. There is no button in the window to do this.
Editing Words
The words in the dictionary cannot be edited, to preven errors in the program. To edit one delete it, and add the corrected version.
Enabling/Disabling Words
Words can be enabled or disabled individually, buy having the tickbox checked or unchecked, respectively.
Importing and Exporting
Edits to the dictionary can be imported or exported, to enable sharing, by selecting an option in the File Menu.

Currently there is no undo mechanism for this. The tone corrections file is a hidden file called tghzToneCorrections.txt in your personal user or home folder. The file can be backed up by exporting it (see below) or making a duplicate. Deleting this file should cause a new empty file.
Importing
To import a tone corrections file, press the Edit Dictionary button, and then File -> Import Dictionary Corrections File from the menu bar in the Dictionary Corrections window. A file dialog box will appear allowing you to choose the file to import. Please be careful to select the correct file.
Here is my Tone Corrections File. To download it, right-click the hyperlink and choose Save Link As. , or similar.
Exporting
To export a tone corrections file, press the Edit Dictionary button, and then File -> Export Dictionary Corrections File from the menu bar in the Dictionary Corrections window. A file dialog box will appear allowing you to choose where to export the file to.
Colouring Tones
Tones/pinyin and/or characters can be coloured using the colour button. Tick the box(es) before adding tones or pinyin for the output to also be coloured.

Converting Traditional/Simplified Characters
To convert from traditional or simplified to simplified or traditional, select the text and press the To Simplified or To Traditional buttons, respectively.

Troubleshooting
If you have any problems, please feel free to Certificate Error
While running the setup file there may be a certificate error:

, because it is installing from an untrusted location.
To fix this, https://raw.githubusercontent.com needs to be added to the list of trusted sites:

Open Internet Explorer, and click the Gear Icon (top right corner) and then choose Internet Options . In the Internet Options window select Security , then Trusted Sites , then click the button that says Sites . In the Trusted sites window copy and paste:
and Add it. It should now be possible to install the program. But beware, this will make your computer trust any content from github, not just this add-in. To be safe it should be removed after installation, but the program will not automatically update.
Visual Studio Tools for Office Solution Installer Error
While running the setup file, there may be an error message with the Visual Studio Tools for Office Solution Installer .

To fix this, please run the setup program as an administrator.
(This problem was seen on Windows 8.1)
Other Problems
If there are any other problems with using or installing the software, please submit an issue.
Add phonetic guides to East Asian text
Some of the content in this topic may not be applicable to some languages.
Important: To complete this procedure, you must first turn on Chinese or Japanese language features.
Do any of the following:
Add phonetic guides to Chinese text
Select the text that you want to add phonetic guides to.
On the Home tab, under Font, click Phonetic Guide or .
On the Home tab, under Font, click Phonetic Guide .
On the Home tab, under Font, click Phonetic Guide .
In the Ruby Text box, enter the phonetic guides that you want to apply to the selected text.
Under Alignment, on the pop-up menu, click the distribution option that you want, and check the preview pane to see how the alignment will look in your document.
Note: Character formatting that is applied to text does not affect phonetic guides. For example, if you apply bold formatting to text that has phonetic guides, the bold formatting is applied only to the text, not to the phonetic guides.
Add phonetic guides to Japanese text
Select the text that you want to add phonetic guides to.
On the Home tab, under Font, click Phonetic Guide .
In the Ruby Text box, enter the phonetic guides that you want to apply to the selected text.
Under Apply To, click the option that you want the phonetic guide to apply to.
Under Alignment, on the pop-up menu, click the distribution option that you want, and check the preview pane to see how the alignment will look in your document.
Note: Character formatting that is applied to text does not affect phonetic guides. For example, if you apply bold formatting to text that has phonetic guides, the bold formatting is applied only to the text, not to the phonetic guides.
Что делать, если вместо текста иероглифы (в Word, браузере или текстовом документе)
Наверное, каждый пользователь ПК сталкивался с подобной проблемой: открываешь интернет-страничку или документ Microsoft Word — а вместо текста видишь иероглифы (различные «крякозабры», незнакомые буквы, цифры и т.д. (как на картинке слева…)).
Хорошо, если вам этот документ (с иероглифами) не особо важен, а если нужно обязательно его прочитать?! Довольно часто подобные вопросы и просьбы помочь с открытием подобных текстов задают и мне. В этой небольшой статье я хочу рассмотреть самые популярные причины появления иероглифов (разумеется, и устранить их).
Иероглифы в текстовых файлах (.txt)
Самая популярная проблема. Дело в том, что текстовый файл (обычно в формате txt, но так же ими являются форматы: php, css, info и т.д.) может быть сохранен в различных кодировках .
Кодировка — это набор символов, необходимый для того, чтобы полностью обеспечить написание текста на определенном алфавите (в том числе цифры и специальные знаки). Более подробно об этом здесь: https://ru.wikipedia.org/wiki/Набор_символов
Чаще всего происходит одна вещь: документ открывается просто не в той кодировке из-за чего происходит путаница, и вместо кода одних символов, будут вызваны другие. На экране появляются различные непонятные символы (см. рис. 1)…
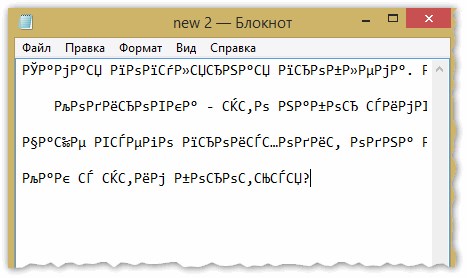
Рис. 1. Блокнот — проблема с кодировкой
Как с этим бороться?
На мой взгляд лучший вариант — это установить продвинутый блокнот, например Notepad++ или Bred 3. Рассмотрим более подробно каждую из них.
Notepad++
Один из лучших блокнотов как для начинающих пользователей, так и для профессионалов. Плюсы: бесплатная программа, поддерживает русский язык, работает очень быстро, подсветка кода, открытие всех распространенных форматов файлов, огромное количество опций позволяют подстроить ее под себя.
В плане кодировок здесь вообще полный порядок: есть отдельный раздел «Кодировки» (см. рис. 2). Просто попробуйте сменить ANSI на UTF-8 (например).
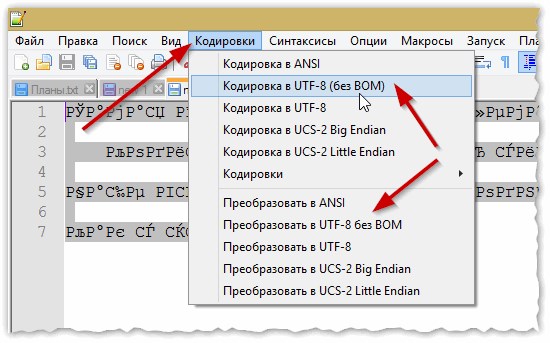
Рис. 2. Смена кодировки в Notepad++
После смены кодировки мой текстовый документ стал нормальным и читаемым — иероглифы пропали (см. рис. 3)!

Рис. 3. Текст стал читаемый… Notepad++
Bred 3
Еще одна замечательная программа, призванная полностью заменить стандартный блокнот в Windows. Она так же «легко» работает со множеством кодировок, легко их меняет, поддерживает огромное число форматов файлов, поддерживает новые ОС Windows (8, 10).
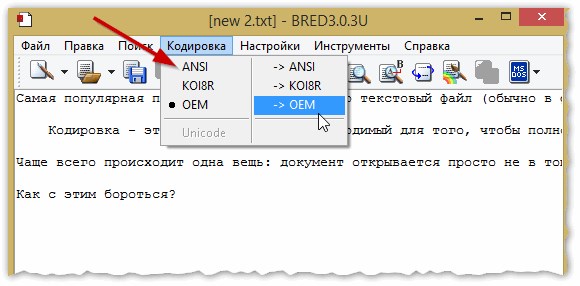
Кстати, Bred 3 очень помогает при работе со «старыми» файлами, сохраненных в MS DOS форматах. Когда другие программы показывают только иероглифы — Bred 3 легко их открывает и позволяет спокойно работать с ними (см. рис. 4).
Если вместо текста иероглифы в Microsoft Word
Самое первое, на что нужно обратить внимание — это на формат файла. Дело в том, что начиная с Word 2007 появился новый формат — « docx » (раньше был просто « doc «). Обычно, в «старом» Word нельзя открыть новые форматы файлов, но случается иногда так, что эти «новые» файлы открываются в старой программе.
Просто откройте свойства файла, а затем посмотрите вкладку « Подробно » (как на рис. 5). Так вы узнаете формат файла (на рис. 5 — формат файла «txt»).
Если формат файла docx — а у вас старый Word (ниже 2007 версии) — то просто обновите Word до 2007 или выше (2010, 2013, 2016).
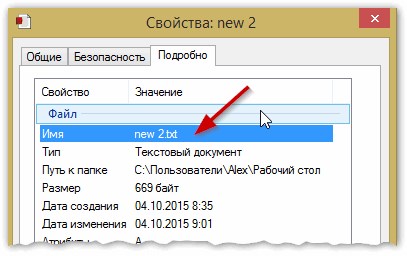
Рис. 5. Свойства файла
Далее при открытии файла обратите внимание (по умолчанию данная опция всегда включена, если у вас, конечно, не «не пойми какая сборка») — Word вас переспросит: в какой кодировке открыть файл (это сообщение появляется при любом «намеке» на проблемы при открытии файла, см. рис. 5).
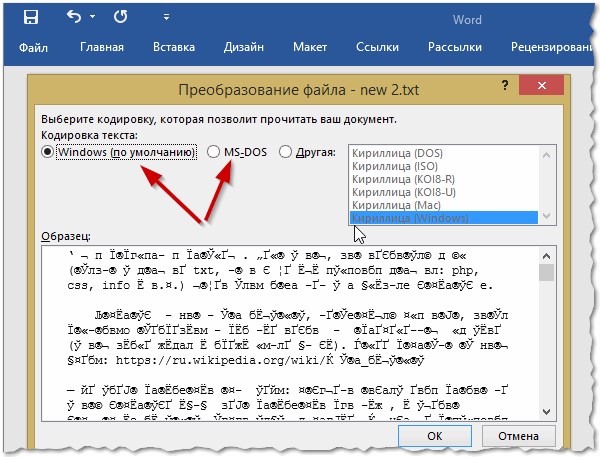
Рис. 6. Word — преобразование файла
Чаще всего Word определяет сам автоматически нужную кодировку, но не всегда текст получается читаемым. Вам нужно установить ползунок на нужную кодировку, когда текст станет читаемым. Иногда, приходится буквально угадывать, в как был сохранен файл, чтобы его прочитать.
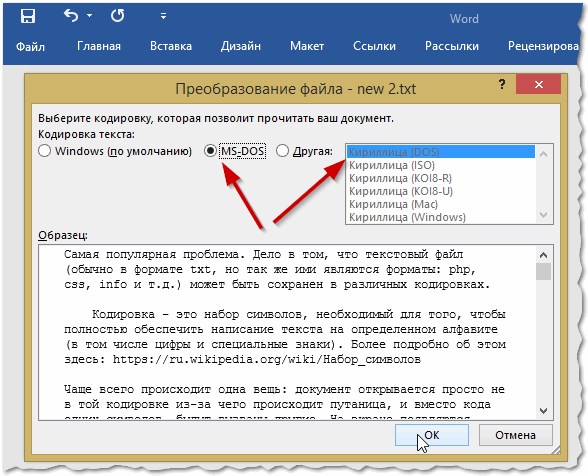
Рис. 7. Word — файл в норме (кодировка выбрана верно)!
Смена кодировки в браузере
Когда браузер ошибочно определяет кодировку интернет-странички — вы увидите точно такие же иероглифы (см. рис 8).
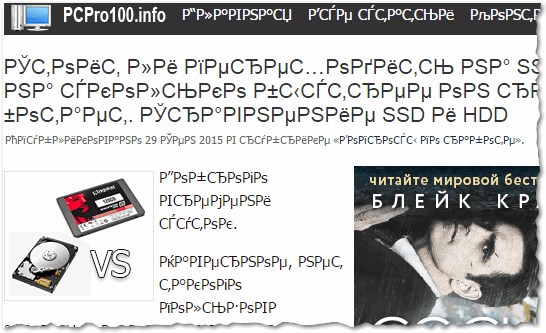
Рис. 8. браузер определил неверно кодировку
Чтобы исправить отображение сайта: измените кодировку. Делается это в настройках браузера:
- Google chrome: параметры (значок в правом верхнем углу)/дополнительные параметры/кодировка/Windows-1251 (или UTF-8);
- Firefox: левая кнопка ALT (если у вас выключена верхняя панелька), затем вид/кодировка страницы/выбрать нужную (чаще всего Windows-1251 или UTF-8) ;
- Opera: Opera (красный значок в верхнем левом углу)/страница/кодировка/выбрать нужное.
PS
Таким образом в этой статье были разобраны самые частые случаи появления иероглифов, связанных с неправильно определенной кодировкой. При помощи выше приведенных способов — можно решить все основные проблемы с неверной кодировкой.
Как писать китайскими иероглифами в Microsoft Word (за 6 шагов)
Microsoft Office Word 2003 поддерживает запись на нескольких языках. Вы можете настроить Word, чтобы вы могли писать на языках, использующих идеографические символы, например японском, а также на языках, которые пишутся справа налево, например тайском. Word позволяет вам выбирать между несколькими версиями языка, такими как упрощенный и традиционный китайский. Вы должны сначала настроить Windows, если хотите писать китайскими иероглифами в Microsoft Word.
Шаг 1
Настройте Windows XP для поддержки китайских символов. Щелкните Пуск> Панель управления> Дата, время и язык. Откроется окно «Дата, время, язык и региональные стандарты».
Шаг 2
Щелкните ссылку «Добавить другие языки». Откроется окно «Язык и региональные стандарты».
Шаг 3
Щелкните вкладку «Языки», затем установите флажок «Установить файлы для языков Восточной Азии». Microsoft включает упрощенный китайский, традиционный китайский, японский и корейский языки в языковой пакет для Восточной Азии. Windows откроет диалоговое окно с просьбой подтвердить установку. Нажмите "ОК" в диалоговом окне.
Шаг 4
Нажмите кнопку «Применить» в окне «Язык и региональные стандарты». Windows установит необходимые файлы. Если будет предложено, вставьте установочный диск Windows XP в привод компакт-дисков вашего компьютера. По завершении процесса нажмите кнопку «ОК».
Шаг 5
Установите Microsoft Word. Нажмите Пуск> Microsoft Office> Инструменты Microsoft Office> Языковые настройки Microsoft Office 2003. Это запустит процесс установки для окна языковых настроек.
Шаг 6
Убедитесь, что китайский язык находится в списке «Доступные языки». Нажмите кнопку «ОК», чтобы закрыть окно и завершить процесс.