How to Disable/Enable SMB v 1.0 in Windows 10/Server 2016?
In Windows Server 2016/2019 and Windows 10 (starting with build 1709), the Server Message Block 1.0 (SMBv1) network protocol used to access shared folders is disabled by default. In most cases, this protocol is required to access shared folders hosted on legacy systems, such as no longer supported Windows XP, Windows Server 2003 and older OSs. In this article, we’ll look on how to enable or disable SMBv1 client and server support on Windows 10 and Windows Server 2016/2019.
In one of the previous articles, we showed the table of client- and server-side SMB version compatibility. According to the table, old client versions (XP, Server 2003 and some *nix clients) can access network shared folders only using SMB v1.0 protocol. If there are no such clients in the network, you can completely disable SMB 1.0 on the side of file servers (including AD domain controllers) and client desktops.
In Windows 10 and Windows Server 2016, the SMBv1 protocol is split into two separate components – SMB client and SMB server, which can be enabled/disabled independently.
Auditing Shared Folder Access via SMB v1.0
Before disabling or completely removing SMB 1.0 driver on the side of the SMB file server, it’s worth making sure that there are no legacy clients that use it in your network. To do this, enable the audit of file server access over SMB v1.0 using the following PowerShell command:
Set-SmbServerConfiguration –AuditSmb1Access $true
After a couple of days, open the Event Viewer on the server, check the log Applications and Services -> Microsoft -> Windows -> SMBServer -> Audit and see if any clients accessed the file server over SMB1.
In our example, an event with EventID 3000 from the SMBServer source was found in the log. The event indicates that the client 192.168.1.10 is trying to access the server using the SMB1 protocol.
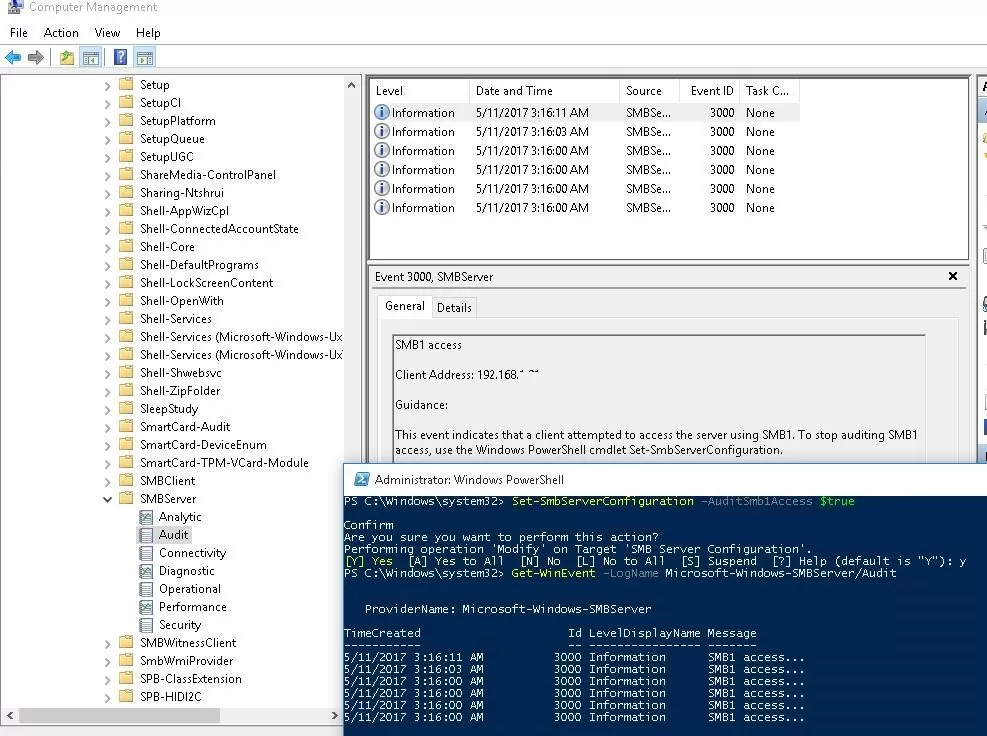
You need to find this computer or device on the network and update the OS or firmware to a version that supports newer SMB protocol versions: SMBv2 or SMBv3.
In our case we’ll ignore this information, but you should bear in mind that later this client won’t be able to access shared folders on this SMB server.
Enable/Disable SMB 1.0 on Windows Server 2016/2019
In Windows Server 2016 starting with build 1709 and Windows Server 2019, SMBv1 is disabled by default. To enable support for the SMBv1 client protocol in newer versions of Windows Server, you need to install the separate SMB 1.0/CIFS File Sharing Support feature.
You can install the SMBv1 feature using Server Manager, or through PowerShell.
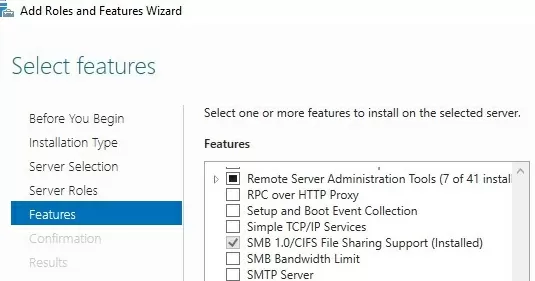
You can check that SMBv1 is enabled with the PowerShell command:
To install the FS-SMB1 feature, run:
To uninstall the SMBv1 client feature (requires a reboot), run the command:
Uninstall-WindowsFeature –Name FS-SMB1 –Remove
Disable-WindowsOptionalFeature -Online -FeatureName SMB1Protocol -Remove
In order for your server to handle SMBv1.0 client access, you need to enable SMBv1 support at the SMB file server level in addition to the FS-SMB1 component. To check if SMBv1 access is enabled for network shares on your server, run:
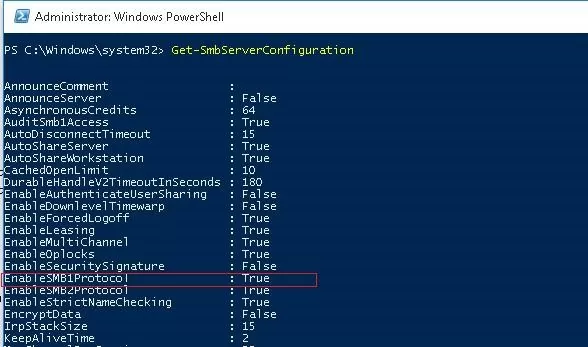
The line “ EnableSMB1Protocol: True ” means that you are allowed to access shared folders on this server using the SMBv1 protocol. To disable SMBv1 server support in Windows Server, run the PowerShell command:
Set-SmbServerConfiguration -EnableSMB1Protocol $false -Force
Now use the Get-SmbServerConfiguration cmdlet to make sure SMB1 server is disabled.
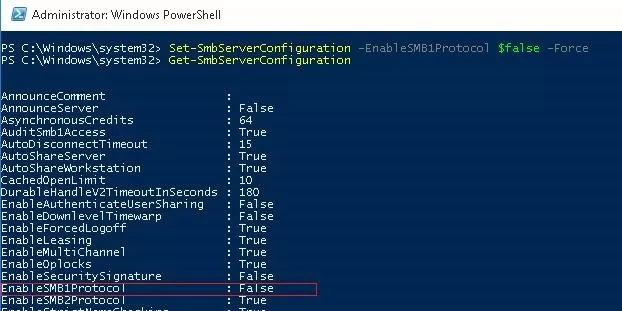
To enable SMBv1 support on the server, run the command:
sc.exe config lanmanworkstation depend= bowser/mrxsmb20/nsi
sc.exe config mrxsmb10 start= disabled

How to Enable/Disable SMBv1 on Windows 10?
As we already said, in all new builds of Windows10 (starting from 1709) support for the SMB1 protocol is disabled (guest access via the SMBv2 protocol is also disabled).
In Windows 10, you can check the status of the SMBv1 protocol components with the DISM command:
Dism /online /Get-Features /format:table | find «SMB1Protocol»

In our example, you can see that all SMBv1 features are disabled:
In Windows 10, you can also manage SMB 1 features from the Control Panel ( optionalfeatures.exe ). Expand the SMB 1.0 /CIFS File Sharing Support option. As you can see, 3 SMBv1 components are also available here:
- SMB 1.0/CIFS Automatic Removal
- SMB 1.0/CIFS Client
- SMB 1.0/CIFS Server
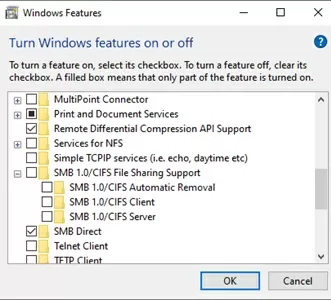
You can enable SMBv1 client and server on Windows 10 from the feature management window or using the commands:
Dism /online /Enable-Feature /FeatureName:»SMB1Protocol»
Dism /online /Enable-Feature /FeatureName:»SMB1Protocol-Client»
Dism /online /Enable-Feature /FeatureName:»SMB1Protocol-Server»
Enable-WindowsOptionalFeature -Online -FeatureName SMB1Protocol-Server
Enable-WindowsOptionalFeature -Online -FeatureName SMB1Protocol-Client
If after enabling SMBv1 client, it is not used for more than 15 days, it is automatically disabled.
To disable SMB1 client and server support in Windows 10, run the following DISM commands:
Dism /online /Disable-Feature /FeatureName:»SMB1Protocol»
Dism /online /Disable-Feature /FeatureName:»SMB1Protocol-Client»
Dism /online /Disable-Feature /FeatureName:»SMB1Protocol-Server»
If you disabled the SMBv1 client in Windows 10, then when you access a snared folder on a file server that only supports SMBv1 (the SMBv2 and v3 protocols are disabled or not supported), you may receive the following errors:
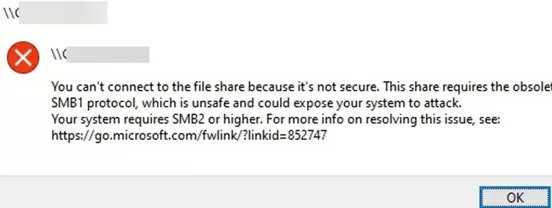
Additionally, if you disable the SMBv1 client, the Computer Browser service, which is used by the legacy NetBIOS protocol to discover devices on the network, stops working on the computer. To correctly display neighboring computers on the Windows 10 network, you must configure the Feature Discovery Provider Host service (check this article).
Disabling SMBv1 Client and Server via Group Policy
In an Active Directory domain environment, you can disable SMBv1 on all servers and computers using Group Policies (GPOs). Since there is no separate SMB configuration policy in the standard Windows Group Policies, you will have to disable it through the registry policy.
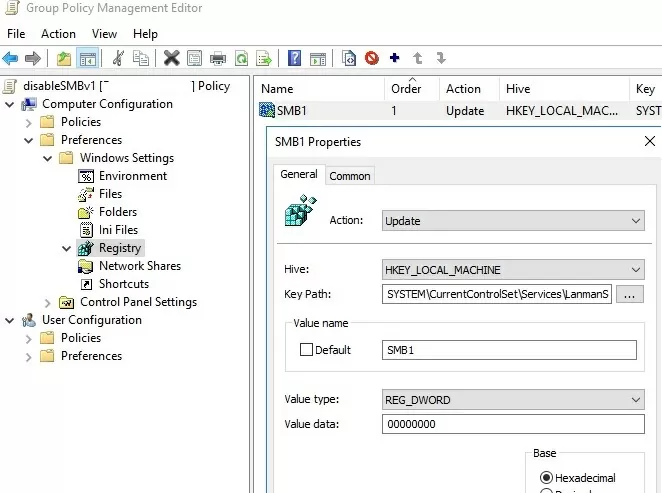
- Open the Group Policy Management console ( gpmc.msc ), create a new GPO (disableSMBv1) and link it to the OU containing the computers on which you want to disable SMB1;
- Switch to the policy editing mode. Expand the GPO section Computer Configuration -> Preferences -> Windows Settings -> Registry;
- Create a new Registry Item with the following setting:
Action: Update
Hive: HKEY_LOCAL_MACHINE
Key Path: SYSTEM\CurrentControlSet\Services\LanmanServer\Parameters
Value name: SMB1
Value type: REG_DWORD
Value data: 0This policy will disable support for the SMBv1 server component through the registry on all computers.
If you want to disable the SMB client on domain computers via GPO, create two additional registry parameters:
- The Start parameter (REG_DWORD type) with value 4 in the registry key HKLM\SYSTEM\CurrentControlSet\services\mrxsmb10;
- The DependOnService parameter (REG_MULTI_SZ type) with the value Bowser, MRxSmb20, NSI (each value on a new line) in the reg key HKLM\SYSTEM\CurrentControlSet\Services\LanmanWorkstation.
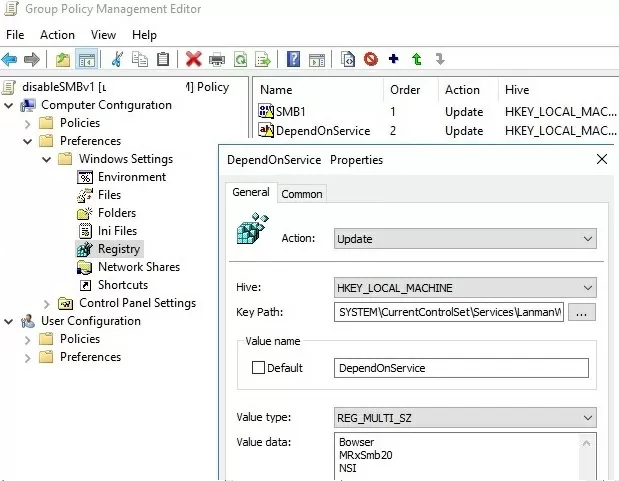
It remains to update the Group Policy settings on the clients ( gpupdate /force ) after the reboot make sure that the SMBv1 components are completely disabled.
Как отключить или включить протокол SMBv1 в Windows 10/Server 2016?
 16.11.2022
 itpro
 Windows 10, Windows Server 2016, Windows Server 2019, Групповые политики
 комментариев 29
По-умолчанию в Windows Server 2016/2019 и Windows 10 (начиная с билда 1709) отключена поддержка сетевого протокола для общего доступа к файлам в сетевых папках Server Message Block 1.0 (SMBv1). Этот протокол в большинстве случаев нужно только для обеспечения работы устаревших систем, например снятых с поддержки Windows XP, Windows Server 2003 и т.д. В этой статье мы рассмотрим, как включить или корректно отключить поддержку клиента и сервера SMBv1 в Windows 10 и Windows Server 2016/2019.
В одной из предыдущих статей мы приводили таблицу совместимости версий протокола SMB на стороне клиента и сервера. Согласно этой таблице, старые версии клиентов (XP, Server 2003 и некоторые устаревшие *nix клиенты) могут использовать для доступа к файловым ресурсам только протокол SMB 1.0. Если таких клиентов в сети не осталось, можно полностью отключить SMB 1.0 на стороне файловых серверов (в том числе контролерах домена AD) и клиентских станциях.
В Windows 10 и Windows Server 2016 протокол SMBv1 разделен на два отдельных компонента – SMB клиент и SMB сервер, которые можно включать/отключать отдельно.
Аудит доступа к файловому серверу по SMB v1.0
Перед отключением и полным удалением драйвера SMB 1.0 на стороне файлового SMB сервера желательно убедится, что в сети не осталось устаревших клиентов, которые используют для подключения протокол SMB v1.0. Для этого, нужно включить аудит доступа к файловому серверу по SMB1 протоколу с помощью команды PowerShell:
Set-SmbServerConfiguration –AuditSmb1Access $true
Через пару дней откройте на сервере журнал событий Applications and Services -> Microsoft -> Windows -> SMBServer -> Audit и проверьте, были ли зафиксированы попытки доступа к ресурсам сервера по протоколу SMB1.
Get-WinEvent -LogName Microsoft-Windows-SMBServer/Audit
В нашем примере в журнале обнаружено событие с EventID 3000 от источника SMBServer, в котором указано что клиент 192.168.1.10 пытается обратиться к сервереу по протоколу SMB1.
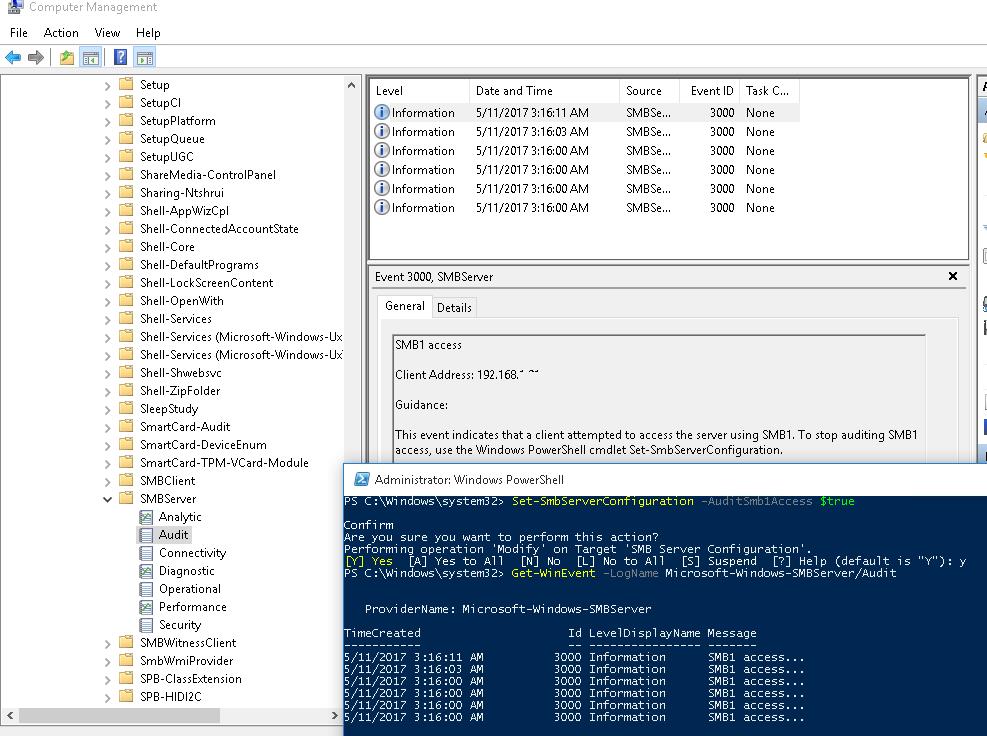
Вам нужно найти в сети этот компьютер или устройство, при необходимости обновить ОС или прошивку, до версии поддерживающий, более новые протоколы SMB: SMBv2 или SMBv3.
В данном случае, мы проигнорируем эту информацию, но нужно учитывать тот факт, что в дальнейшем данный клиент не сможет получить SMB доступ к общим папкам на этом сервере.
Включение/отключение SMB 1.0 в Windows Server 2016/2019
В Windows Server 2016, начиная с билда 1709, и Windows Server 2019 по умолчанию отключен протокол SMBv1. Чтобы включить поддержку клиентского протокола SMBv1в новых версиях Windows Server, нужно установить отдельный компонент SMB 1.0/CIFS File Sharing Support.
Вы можете установить компонент поддержки клиента SMBv1 с помощью Server Manager, или через PowerShell.
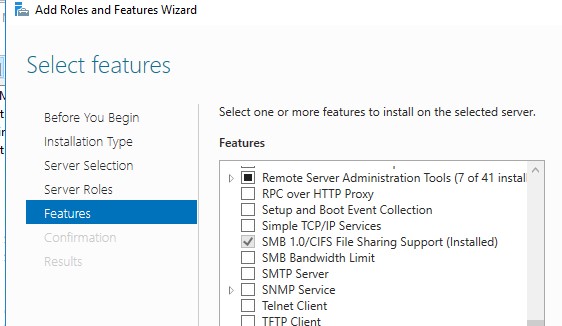
Проверить, что SMBv1 включен можно командой PowerShell:

Чтобы установить компонент FS-SMB1, выполните:
Для удаления SMBv1 клиента (понадобится перезагрузка), выполните:
Uninstall-WindowsFeature –Name FS-SMB1 –Remove
Disable-WindowsOptionalFeature -Online -FeatureName SMB1Protocol -Remove
Чтобы ваш сервер мог обрабатывать доступ клиентов по протоколу SMBv1, кроме компонента FS-SMB1 нужно, чтобы поддержка протокола SMBv1 была включена на уровне файлового сервера SMB. Чтобы проверить, что на вашем сервере включен доступ по SMBv1 к сетевым папкам, выполните:
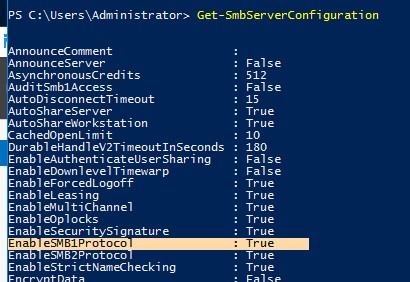
Строка “ EnableSMB1Protocol: True ” говорит о том, что у вас разрешен доступ по протоколу SMBv1 к сетевым папкам на сервере. Чтобы отключить поддержку сервера SMBv1 в Windows Server, выполните команду:
Set-SmbServerConfiguration -EnableSMB1Protocol $false -Force
Теперь с помощью командлета Get-SmbServerConfiguration убедитесь, что протокол SMB1 отключен.
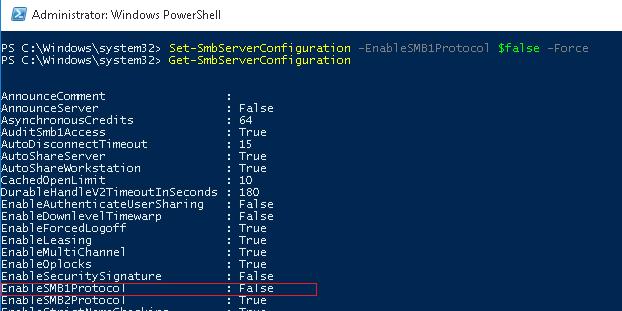
Чтобы включить поддержку протокола SMBv1 на сервере, выполните команду:
Set-SmbServerConfiguration -EnableSMB1Protocol $True -Force
sc.exe config lanmanworkstation depend= bowser/mrxsmb20/nsi
sc.exe config mrxsmb10 start= disabled

Включить/отключить SMB 1.0 в Windows 10
Как мы уже говорили, начиная с Windows 10 1709, во всех новых билдах поддержка протокола SMB1 отключена (также отключен гостевой доступ по протоколу SMBv2).
В Windows 10 вы можете проверить статус компонентов SMBv1 протокола командой DISM:
Dism /online /Get-Features /format:table | find «SMB1Protocol»
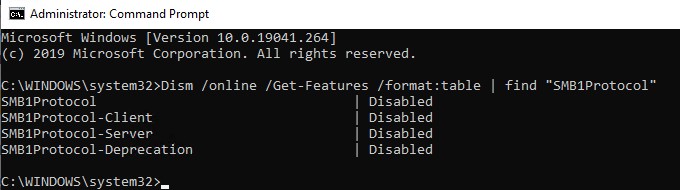
В нашем примере видно, что все компоненты SMBv1 отключены:
В Windows 10 также можно управлять компонентами SMB 1 из панели управления компонентами ( optionalfeatures.exe ). Разверните ветку Поддержка общего доступа к файлам SMB 1.0 /CIFS. Как вы видите здесь также доступны 3 компонента:
- Клиент SMB0/CIFS
- Сервер SMB0/CIFS
- Автоматическое удаление протокола SMB0/CIFS
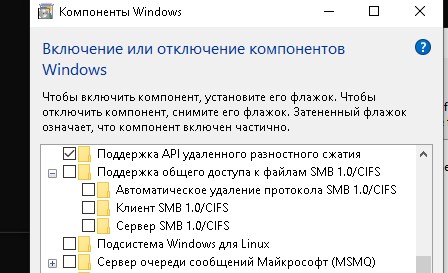
Вы можете включить клиент и сервер SMBv1 в Windows 10 из окна управления компонентами или командой:
Dism /online /Enable-Feature /FeatureName:»SMB1Protocol»
Dism /online /Enable-Feature /FeatureName:»SMB1Protocol-Client»
Dism /online /Enable-Feature /FeatureName:»SMB1Protocol-Server»
Enable-WindowsOptionalFeature -Online -FeatureName SMB1Protocol-Server
Enable-WindowsOptionalFeature -Online -FeatureName SMB1Protocol-Client
Если после включения SMBv1 клиента, он не используется более 15 дней, он автоматически отключается.
Чтобы отключить поддержку клиента и сервера SMB1 в Windows 10, выполните следующие команды DISM:
Dism /online /Disable-Feature /FeatureName:»SMB1Protocol»
Dism /online /Disable-Feature /FeatureName:»SMB1Protocol-Client»
Dism /online /Disable-Feature /FeatureName:»SMB1Protocol-Server»
Если вы отключили поддержку SMBv1 клиента в Windows 10, то при доступе к сетевой папке на файловом сервере, который поддерживает только SMBv1 (протоколы SMBv2 и v3 отключены или не поддерживаются), появятся ошибки вида:
Также при отключении клиента SMBv1 на компьютере перестает работать служба Computer Browser (Обозреватель компьютеров), которая используется устаревшим протоколом NetBIOS для обнаружения устройств в сети. Для корректгого отобрражения соседних компьютеров в сети Windows 10 нужно настроить службу Function Discovery Provider Host (см. статью).
Отключение SMBv1 с помощью групповых политик
В доменной среде Active Directory вы можете отключить протокол SMBv1 на всех серверах и компьютеров с помощью групповой политики. Т.к. в стандартных политиках Windows нет политики настройки компонентов SMB, придется отключать его через политику реестра.
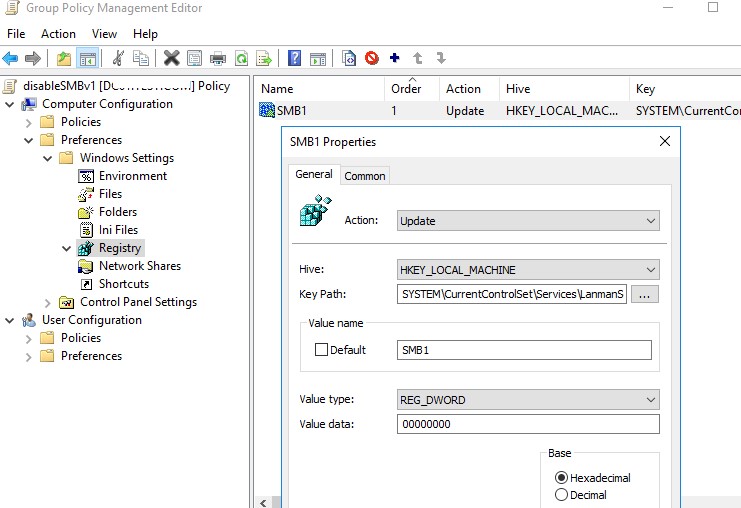
- Откройте консоль управления Group Policy Management (gpmc.msc), создайте новый объект GPO (disableSMBv1) и назначьте его на OU с компьютерами, на которых нужно отключить SMB1;
- Перейдите в режим редактирования политики. Выберите Computer Configuration -> Preferences -> Windows Settings -> Registry;
- Создайте новый параметр реестра (Registry Item) со следующими настройками:
Action: Update
Hive: HKEY_LOCAL_MACHINE
Key Path: SYSTEM\CurrentControlSet\Services\LanmanServer\Parameters
Value name: SMB1
Value type: REG_DWORD
Value data: 0
Данная политика отключит через реестр поддержку компонента сервер SMBv1 на всех компьютерах.
Если вы хотите через GPO отключить на компьютерах SMB клиент, создайте дополнительно два параметра реестра:
- Параметр Start (типа REG_DWORD) со значением 4 в ветке реестра HKLM\SYSTEM\CurrentControlSet\services\mrxsmb10;
- Параметр DependOnService (типа REG_MULTI_SZ) со значением Bowser, MRxSmb20, NSI (каждое значение с новой строки) в ветке реестра HKLM\SYSTEM\CurrentControlSet\Services\LanmanWorkstation.
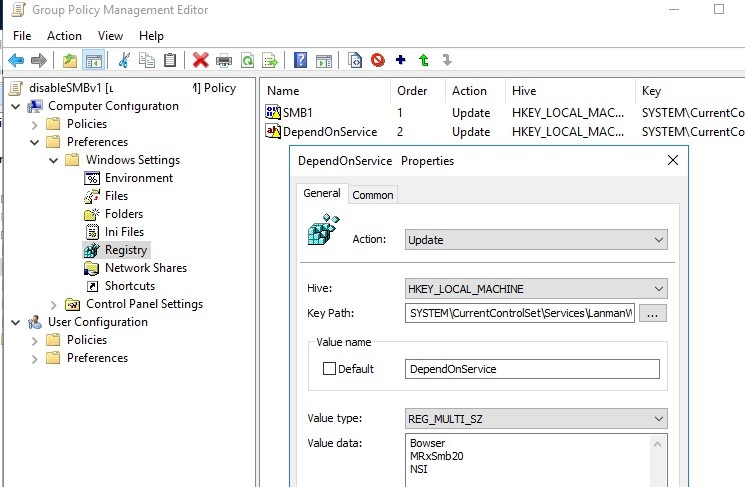
Осталось обновить настройки групповых политик на клиентах и после перезагрузки проверить, что компоненты SMBv1 полностью отключены.
How to Enable/Disable SMB v 1.0 in Windows
As part of our Server Management Services, we help our customers with software installations regularly.
Today, let’s see how our Support Engineers Enable/Disable SMB v 1.0 in Windows.
Why is Server Message Block 1.0 (SMBv1) network protocol disabled by default?
The Server Message Block 1.0 (SMBv1) network protocol is disabled by default in Windows Server 2016/2019 and Windows 10.
- If there are no SMB 1.x clients left, we completely disable SMBv1 on all Windows devices.
- By disabling SMB 1.0, we protect Windows computers from a wide range of vulnerabilities in this legacy protocol.
- As a result, the devices will use new, more efficient, secure and functional versions of the SMB protocol when accessing network shares.
On the other hand, old client versions can access network shared folders only by using SMB v1.0 protocol. If there are no such clients in the network, we can completely disable SMB 1.0 on the side of file servers and client desktops.
Enable/Disable SMB v 1.0 in Windows
Before enabling or disabling the SMB 1.0 driver, we make sure that there are no legacy clients that uses it in the network.
Auditing Shared Folder Access via SMB v1.0
To do this, we enable the audit of file server access over SMB v1.0 using the following PowerShell command:
Also, after a couple of days, we open the Event Viewer on the server and check the log in Applications and Services -> Microsoft -> Windows -> SMBServer -> Audit. Check if any clients has access to the file server over SMB1.
To display the list of events from this event log we use the command:
Here, an event with EventID 3000 from the SMBServer source is seen in the log. The event indicates that the client 192.168.1.10 is trying to access the server using the SMB1 protocol
We have to find this computer or device on the network and update the OS or firmware to a version that supports newer SMB protocol versions.
Enable/Disable SMB v 1.0 in Windows Server 2016/2019
To enable support for the SMBv1 client protocol in newer versions of Windows Server, we install separate SMB 1.0/CIFS File Sharing Support feature.
It is possible either by using Server Manager or through PowerShell.
Check if SMBv1 is enabled using the PowerShell command:
To install the FS-SMB1 feature, run:
Similarly, to uninstall the SMBv1 client feature (requires a reboot), run:
Another PowerShell command that removes the SMB1Protocol feature is:
For the server to handle SMBv1.0 client access, enable SMBv1 support at the SMB file server level in addition to the FS-SMB1 component.
Furthermore, to check, run:
“EnableSMB1Protocol: True” means we have access to shared folders on this server using the SMBv1 protocol.
To disable SMBv1 server support in Windows Server, we run the PowerShell command:
We make sure using,
In the same way, to enable SMBv1 support on the server, we run the command:
On Windows 7/8 and Windows Server 2008 R2/2012, in order to disable the SMB 1.0 client, we need to disable the service and the SMBv1 access driver with the commands:
Disabling SMBv1 Client and Server via Group Policy
In an Active Directory domain environment, we can disable SMBv1 on all servers and computers using Group Policies (GPOs).
Since there is no separate SMB configuration policy in the standard Windows Group Policies, we have to disable it through the registry policy.
- Open the Group Policy Management console (gpmc.msc), create a new GPO (disableSMBv1) and link it to the OU containing the computers on which we want to disable SMB1
- Switch to the policy editing mode. Expand the GPO section Computer Configuration -> Preferences -> Windows Settings -> Registry
- Create a new Registry Item with the following setting:
Also, to disable the SMB client on domain computers via GPO, create two additional registry parameters:
- The Start parameter (REG_DWORD type) with value 4 in the registry key HKLM\SYSTEM\CurrentControlSet\services\mrxsmb10
- The DependOnService parameter (REG_MULTI_SZ type) with the value Bowser, MRxSmb20, NSI (each value on a new line) in the reg key HKLM\SYSTEM\CurrentControlSet\Services\LanmanWorkstation.
It remains to update the Group Policy settings on the clients ( gpupdate /force ). After the reboot make sure that the SMBv1 components are completely disabled.
The Security Baseline GPOs from the Microsoft Security Compliance Toolkit have a separate administrative template MS Security Guide ( SecGuide.adml and SecGuide.admx files ) that have separate options for disabling the SMB server and client:
- Configure SMB v1 server
- Configure SMB v1 client driver
[Get our 24/7 support. Our server specialists will keep your servers fast and secure.]
Conclusion
In short, webmasters can easily enable or disable SMB using powershell. Today, we’ve seen by example how Bobcares Support Techs go about to Enable/Disable SMB v 1.0 in Windows.
PREVENT YOUR SERVER FROM CRASHING!
Never again lose customers to poor server speed! Let us help you.
Our server experts will monitor & maintain your server 24/7 so that it remains lightning fast and secure.
Server 2019 smb1 как включить
Hello- How do you enable SMB1 Protocol on Windows Server 2019? When adding the role we get an error, "The source files could not be found." We have run several PowerShell commands but still no joy. Powershell output below. What are we missing?
Systems Manager Screenshot
PS C:\Users\localadmin> Set-SmbServerConfiguration -EnableSMB1Protocol $true
Are you sure you want to perform this action?
Performing operation 'Modify' on Target 'SMB Server Configuration'.
[Y] Yes [A] Yes to All [N] No [L] No to All [S] Suspend [?] Help (default is "Y"): A
Set-SmbServerConfiguration : The specified service does not exist.
+ Set-SmbServerConfiguration -EnableSMB1Protocol $true
+ CategoryInfo : NotSpecified: (MSFT_SmbServerConfiguration:ROOT/Microsoft/. erConfiguration) [Set-SmbSe
+ FullyQualifiedErrorId : Windows System Error 1243,Set-SmbServerConfiguration
PS C:\Users\localadmin> Enable-WindowsOptionalFeature -Online -FeatureName smb1protocol
Enable-WindowsOptionalFeature : The source files could not be found.
Use the "Source" option to specify the location of the files that are required to restore the feature. For more
+ Enable-WindowsOptionalFeature -Online -FeatureName smb1protocol
+ CategoryInfo : NotSpecified: (:) [Enable-WindowsOptionalFeature], COMException
PS C:\Users\localadmin> Set-SmbServerConfiguration -EnableSMB1Protocol $true
Are you sure you want to perform this action?
Performing operation 'Modify' on Target 'SMB Server Configuration'.
[Y] Yes [A] Yes to All [N] No [L] No to All [S] Suspend [?] Help (default is "Y"): y
Set-SmbServerConfiguration : The specified service does not exist.
+ Set-SmbServerConfiguration -EnableSMB1Protocol $true
+ CategoryInfo : NotSpecified: (MSFT_SmbServerConfiguration:ROOT/Microsoft/. erConfiguration) [Set-SmbSe
+ FullyQualifiedErrorId : Windows System Error 1243,Set-SmbServerConfiguration
PS C:\Users\localadmin> Get-WindowsOptionalFeature -Online -FeatureName "SMB1Protocol"
DisplayName : SMB 1.0/CIFS File Sharing Support
Description : Support for the SMB 1.0/CIFS file sharing protocol, and the Computer Browser protocol.
ServerComponent\Description : Support for the SMB 1.0/CIFS file sharing protocol, and the Computer
ServerComponent\DisplayName : SMB 1.0/CIFS File Sharing Support
PS C:\Users\localadmin> Enable-WindowsOptionalFeature -Online -FeatureName "SMB1Protocol" -All
Enable-WindowsOptionalFeature : The source files could not be found.
Use the "Source" option to specify the location of the files that are required to restore the feature. For more
+ Enable-WindowsOptionalFeature -Online -FeatureName "SMB1Protocol" -Al .
+ CategoryInfo : NotSpecified: (:) [Enable-WindowsOptionalFeature], COMException
PS C:\Users\localadmin> Enable-WindowsOptionalFeature -Online -FeatureName smb1protocol
Enable-WindowsOptionalFeature : The source files could not be found.
Use the "Source" option to specify the location of the files that are required to restore the feature. For more
+ Enable-WindowsOptionalFeature -Online -FeatureName smb1protocol
+ CategoryInfo : NotSpecified: (:) [Enable-WindowsOptionalFeature], COMException
PS C:\Users\localadmin> Get-WindowsFeature FS-SMB1
Display Name Name Install State
[ ] SMB 1.0/CIFS File Sharing Support FS-SMB1 Removed
PS C:\Users\localadmin> Enable-WindowsOptionalFeature -Online -FeatureName smb1protocol
Enable-WindowsOptionalFeature : The source files could not be found.
Use the "Source" option to specify the location of the files that are required to restore the feature. For more
+ Enable-WindowsOptionalFeature -Online -FeatureName smb1protocol
+ CategoryInfo : NotSpecified: (:) [Enable-WindowsOptionalFeature], COMException
PS C:\Users\localadmin> Get-SmbServerConfiguration | Select EnableSMB1Protocol
PS C:\Users\localadmin> Set-SmbServerConfiguration -EnableSMB1Protocol $true
Are you sure you want to perform this action?
Performing operation 'Modify' on Target 'SMB Server Configuration'.
[Y] Yes [A] Yes to All [N] No [L] No to All [S] Suspend [?] Help (default is "Y"): A
Set-SmbServerConfiguration : The specified service does not exist.
+ Set-SmbServerConfiguration -EnableSMB1Protocol $true
+ CategoryInfo : NotSpecified: (MSFT_SmbServerConfiguration:ROOT/Microsoft/. erConfiguration) [Set-SmbSe
+ FullyQualifiedErrorId : Windows System Error 1243,Set-SmbServerConfiguration
PS C:\Users\localadmin> Set-SMBServerConfiguration
Are you sure you want to perform this action?
Performing operation 'Modify' on Target 'SMB Server Configuration'.
[Y] Yes [A] Yes to All [N] No [L] No to All [S] Suspend [?] Help (default is "Y"): A
PS C:\Users\localadmin> Set-SmbServerConfiguration -EnableSMB1Protocol $true
Are you sure you want to perform this action?
Performing operation 'Modify' on Target 'SMB Server Configuration'.
[Y] Yes [A] Yes to All [N] No [L] No to All [S] Suspend [?] Help (default is "Y"): A
Set-SmbServerConfiguration : The specified service does not exist.
+ Set-SmbServerConfiguration -EnableSMB1Protocol $true
+ CategoryInfo : NotSpecified: (MSFT_SmbServerConfiguration:ROOT/Microsoft/. erConfiguration) [Set-SmbSe
+ FullyQualifiedErrorId : Windows System Error 1243,Set-SmbServerConfiguration