Blender Dynamic topology: What, where, how and problem solving
When I was first testing dynamic topology, I was confused. I had learned that topology was so important to get right, and here was a tool that completely neglected all of that while sculpting in Blender.
Dynamic topology, or Dyntopo is a tool that automatically subdivide your mesh while sculpting so that more detail can be had without having to deal with the topology itself. To use dynamic topology, in sculpt mode, find the Dyntopo on the right side in the header of the 3D viewport and check the checkbox.
Now, there is a lot more to dynamic topology than merely enabling it. Let’s dive into the settings, features and how we can approach this tool in Blender.
What is dynamic topology?
Dynamic topology is a sculpt mode tool in Blender. It automatically subdivides the mesh so that we can have more detail without thinking about the topology as we sculpt.
Traditionally when we 3D model, we deal with the shape and topology at the same time during the modeling process. Dyntopo separate the shaping of an object and management of topology into two separate tasks.
This makes sense during sculpting since it is a much more organic form of modeling with focus on the shape to a much higher degree than traditional 3D modeling.
The topology management is pushed forward to a later stage in the 3D modeling pipeline, and we call this stage retopology. In some cases when the quality of the mesh isn’t important, this can also be done automatically through remeshing or just by simply leaving the topology as it is. But this makes it much harder to texture and almost impossible to animate. So, there is a tradeoff.
Dynamic topology has a handful of settings dictating how the mesh is subdivided or un-subdivided as you make brush strokes.
We can also fill the entire mesh with a certain mesh density all at the same time.
Dyntopo settings in Blender and what they do
Here is a breakdown of the various settings. You find these settings by going to sculpt mode, and in the header find the dyntopo menu on the right side.
The same settings are also available both in the active tools tab in the properties panel or in the right-side toolbar in the 3D viewport during sculpt mode. It does not matter where you change the settings, change it in one location and it will change in all locations. There is only one set of settings.
Personally, I most often use these settings:
- Resolution, depends on the level of detail I am currently sculpting
- Refine method, subdivide
- Detailing, constant detail.
With these settings I can set the detail level manually and sculpt, knowing what level of detail I will be at. As I work through the sculpt, I increase the resolution to match the level I want to sculpt at.
I also know that if I touch an area with higher detail with a lower resolution, in case I need to go back up to a lower resolution I won’t ruin the sculpt.
But let’s now cover the settings.
Let’s start from the top.
Dynamic topology — Detail size — Resolution
This can be called detail percentage or resolution as well depending on the detailing method that we cover below.
In essence, it dictates the length of edges. This in turn translates to the level of detail that is possible to achieve. The shorter the edges, the more edges and more detail.
Dynamic topology — Refine Method
First, we have the option of subdividing edges which instructs Blender to subdivide an edge if the size of our brush is greater than the detail size. Blender will subdivide the edge to achieve the finer detail that we want.
Second, we can select collapse edges which will instruct Blender to collapse/join short edges to form one single edge. Blender uses the detail size to determine whether an edge is too short or not. This helps us in evening out the topology of our mesh it also removes any fine details we may already create.
Third, we have subdivide-collapse option which is the default option for Blender’s Dyntopo tool. As the name suggests, the subdivide-collapse option first subdivides our edges and collapses them as we sculpt. This means that whatever we touch with the sculpt brush will end up at the topology size set by our detail size or resolution option.
Dynamic topology — Detailing
the third option is slightly more tricky. But essentially it is the perspective from which the detail size should be set.
Relative detail is set as the Default in Blender. Using this option, your screen pixels are used to define the detail size you can affect. So, if you zoom out, the edges in your mesh become smaller. If you zoom in, the edges become relatively large, and this allows to subdivide them and sculpt in finer details.
Second, we have the constant detail option in which the detail size remains the same whether you zoom in or out. To achieve this, Blender sets the detail size as a percentage of the base unit which is set in the unit section in the scene tab accessed from the properties panel.
In selecting constant detail, Blender also gives you an eyedropper which allows you to set the edge lengths of your current region to match that of another region within your mesh.
Third, the brush detail option allows you to add detail depending on the percentage you have set for your brush cursor. You are able to increase the edge length by increasing the radius of your brush cursor. So, if you want to add finer details to your mesh you should reduce the radius of your brush.
Lastly, we have the manual detail option in which the edge length in your mesh is fixed based on the resolution value you selected in the detail size. The level of detail here is fixed and is not dependent on the size of your brush cursor or the zoom preferences you want.
Dynamic topology is not working, what could cause it?
As you work with and get familiar using dynamic topology you may run into some problems at times.
One of them is being unable to see any differences in your mesh as you sculpt. This is usually because not all your sculpting brushes in Dyntopo will dynamically add fine details as you sculpt. So, you should change the sculpt brush you are using or select the “Detail Flood Fill” option in Constant Detail.
You might also get a vertex data warning as you turn on the Dyntopo tool. The image below shows this:
This warning informs you that the dyntopo tool will permanently change the topology of your mesh. So, any vertex colors, UVs or vertex groups that your mesh previously had will be permanently altered. You can click OK if you want to continue with Dyntopo.
Multiresolution modifier, an alternative to dynamic topology
The Dynamic topology tool is not the only tool that allows you to sculpt finer details in Blender, there is also the Multiresolution (multires) modifier.
The multiresolution modifier is a modifier you add to the modifier stack.
It allows you to subdivide the mesh evenly and multiple times. At each stage you can add detail and sculpt your object before subdividing again and move to even more detail. You can then access the mesh at any sculpting level.
Final thoughts
At first, dynamic topology can be a bit tricky to understand. I suggest that you test the options and play with it in sculpt mode to get a feel for how the different settings work.
We covered how to enable dynamic topology, it’s settings such as detail size, resolution, and detailing method.
Topology

Topology in Blender refers to the structure and organization of the polygons that make up a 3D model. It is an important aspect of 3D modeling as it determines how the model will look and how it will deform during animation.
In Blender, topology is created using a combination of tools such as the Extrude, Loop Cut and Slide, and the Subdivide and Smooth tools. These tools allow the user to create a clean and efficient topology by adjusting the number of polygons and their distribution on the model.
A good topology should have a consistent polygon density and flow, and should avoid areas of high curvature with too many edges. This helps to ensure that the model will deform smoothly during animation and will not have any visible artifacts or “stretching” when the model is deformed.
Another important aspect of topology in Blender is the use of edge loops. Edge loops are groups of edges that run in a circular pattern around the model and are used to define the shape and form of the model. They are important for creating a proper topology as they help to define the areas of the model where the most detail is needed and where the least detail is needed.
In addition to the basic tools for creating topology, Blender also includes advanced tools such as the sculpting tools that allow users to sculpt and shape their models in a more intuitive and natural way. These tools can be used to make adjustments to the topology and refine the shape of the model in a more organic and free-form way.
Overall, topology in Blender is an essential aspect of 3D modeling that plays a crucial role in the final look and feel of a model. With the right tools and techniques, you can create a clean and efficient topology that will ensure that your models look great and deform smoothly.
The ideal topology of non-game models
The ideal topology of non-game models in Blender will vary depending on the intended use and desired final look of the model. However, in general, a good topology should have a consistent polygon density and flow, and should avoid areas of high curvature with too many edges. This helps to ensure that the model will deform smoothly and will not have any visible artifacts or “stretching” when the model is deformed.
For non-game models, it is important to have a high polygon count to achieve high level of details and realism. This is achieved by using tools such as the Extrude, Loop Cut and Slide, and the Subdivide and Smooth tools. These tools allow the user to create a clean and efficient topology by adjusting the number of polygons and their distribution on the model.
Another important aspect of topology in Blender is the use of edge loops. Edge loops are groups of edges that run in a circular pattern around the model and are used to define the shape and form of the model. They are important for creating a proper topology as they help to define the areas of the model where the most detail is needed and where the least detail is needed.
Additionally, it is important to take into account the animation aspect of the non-game models. A good topology should be able to deform smoothly during animation and should have enough edge loops and polygons to support complex animations without stretching or deforming the model.
In addition to the basic tools for creating topology, Blender also includes advanced tools such as the sculpting tools that allow users to sculpt and shape their models in a more intuitive and natural way. These tools can be used to make adjustments to the topology and refine the shape of the model in a more organic and free-form way.
Overall, the ideal topology of non-game models in Blender should be a balance between achieving high level of details, efficient deformation during animation, and good performance. With the right tools and techniques, you can create a clean and efficient topology that will ensure that your models look great and deform smoothly.
The ideal topology of game ready models
One way to achieve this is by using a consistent polygon density throughout the model. This means that the number of polygons used should be as low as possible while still maintaining the desired level of detail. It also means that the distribution of polygons should be balanced and not concentrated in certain areas of the model.
Another important aspect of topology for game ready models is the use of edge loops. Edge loops are groups of edges that run in a circular pattern around the model and are used to define the shape and form of the model. They are important for creating a proper topology as they help to define the areas of the model where the most detail is needed and where the least detail is needed. By using edge loops, the modeler can control the polygon flow and make sure that the model deforms smoothly during animation.
It’s also important to consider the UV mapping aspect of the game ready models. A good topology should have a clean UV layout and minimal stretching to ensure that the textures will be applied correctly and look good.
In addition to the basic tools for creating topology, Blender also includes advanced tools such as the sculpting tools that allow users to sculpt and shape their models in a more intuitive and natural way. These tools can be used to make adjustments to the topology and refine the shape of the model in a more organic and free-form way. However, it’s important to keep in mind that the sculpted details should be converted into a low polygon count model to be used in game engines.
Overall, the ideal topology of game ready models in Blender should be a balance between achieving a high level of detail, efficient deformation during animation, minimal stretching in UV mapping, and good performance. With the right tools and techniques, you can create a clean and efficient topology that will ensure that your models look great and perform well in real-time rendering.
Tips and Tricks for Clean Topology
Clean topology is important when creating meshes in Blender. In this tutorial, I will teach you how to create meshes with clean topologies that won't cause problems later on.
Manjil Thapa
Good topology is important when creating models in Blender, especially if you plan on doing subdivision surface modelling or animating the mesh. This is because bad topology can lead to unwanted artefacts and cause problems in animation, rigging, unwrapping, etc.
In this article, I will give some tips and tricks on how we can model in Blender with better topology and solve some common problems.
Problems with Non-Quad Topology
Let’s model a simple mesh with bad topology and deform it. Then add a subdivision surface modifier to the mesh.
 Bad Topology Example
As you can see, weird artefacts are seen with topologies containing Ngons, triangles, and poles. These artefacts increase with the angle between faces.
In the case of Ngons and poles, the more vertexes your model has, the more artefacts it will generate.
Solutions
In some cases, models with non-quad topology may be unavoidable. A quick solution can be moving non-quad topology to a flat surface of your mesh or hiding them in places not easily seen. This method is recommended when making low poly art or optimized modelling assets for games.
Another solution can be subdividing the mesh until the artefacts are gone. But this can result in a dense mesh, which is harder to work with when rigging, animating, texturing, rendering, etc. This method is impractical in most cases.
The proper solution for these problems is simply modelling everything in quads. That is because quads deform and subdivide much nicely.
Quad Modelling
When modelling, there may come a time when you need to go from a higher number of quads to lower and vice versa. This is one of the main reasons for the formation of non-quad faces. Here are some methods to transition between different numbers of quads without adding non-quad faces.
 Subdivision Modeling Guide
The figure above shows that redirecting edge loops or adding supporting edges between the mesh lines can help maintain quads in our mesh.
Here you can see the same mesh I used in the first example, but with all quads in its topology. It doesn’t have any artefacts, and the topology is clean.
 Good Topology Example
Problems with Unevenly Spaced Edges
Another common problem occurs when your model contains unevenly spaced edges with a lack of support loops.
The left mesh has unevenly spaced edge loops in the example below, resulting in a bad subdivision. This is solved on the right mesh by adding support loops. So, adding support loops will help with cases that deal with unevenly spaced edges.
 Support Loop Advantage
Conclusion
When modelling, you may find it technical or tedious to think about clean topology and edge loops, as we think of modelling as an artistic process. However, these tips are important to keep in mind, as bad topology will cause problems when animating, rendering, etc.
To avoid these problems, one needs to start with a clean topology fr m the beginning. Clean topology also helps make the job of your teammates much easier. So, always aim for good topology when modelling.
8 Tips for Clean Topology in Blender (Updated for 2021)
The process you use to put together your 3D model determines a lot — how easy it is to edit later, how good it looks when lighting and shaders are applied, how easy it is to deform while animating, and much more. A good model is crucial for all of the other parts of the CG pipeline to work well.
Messy topology, on the other hand, can make the rest of the process a disaster.
What can you do to keep that from happening? Here are 8 tips you can use right away.
Contents of this article:
8 Tips For Great Blender Topology
1. Understand Common Mesh Tools
This is an obvious tip, but one that everyone venturing into 3d modeling in Blender needs to become proficient in.
When modeling, understanding how to properly add/remove/modify the mesh s the most important aspect. After all, 3d modeling is all about conforming faces/edges/vertices to form a visually pleasing shape.
So let’s take a look at some of the most common types of tools you’ll use when modeling. (Note that most of these tools can only be accessed when in edit mode in Blender .)
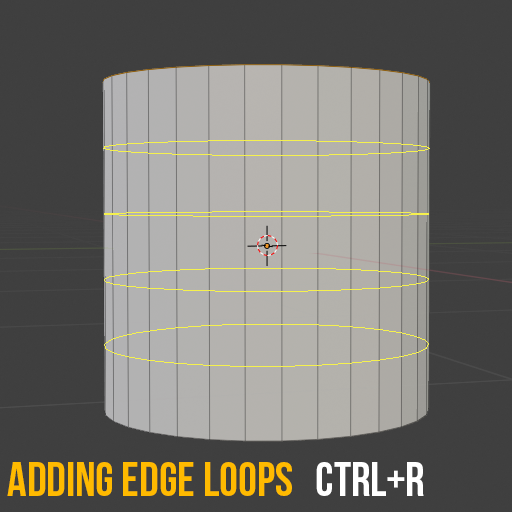
Adding Edge Loops
Adding edge loops is something you’d typically do to support the edges of a mesh to create a crisp-looking edge, or just to provide additional geometry very quickly.
The shortcut for this is Ctrl + R.
When this is enabled, you need to hover over the mesh itself which will then reveal a yellow line to project where this edge loop will be placed. To increase the number of edge loops, use your mouse scroll wheel or type in the number of loops you want using the numeric keypad.
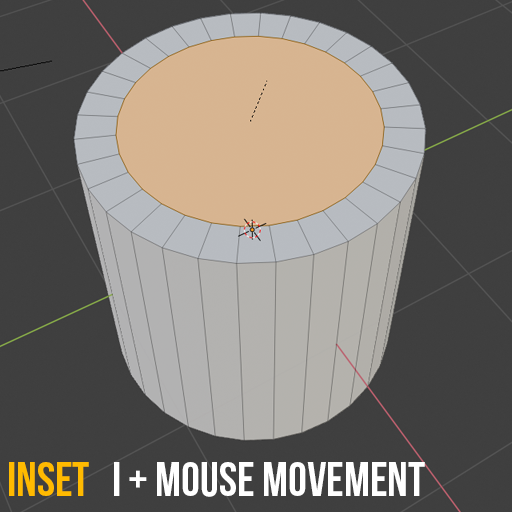
Inset
Inset allows you to create things like a window. If I click a face and press I (as in Inset) with a face selected, I can then move my mouse to create a smaller version of that face within. This is incredibly useful for creating something like a frame or an edge around a specific part of the mesh. Note that this creates the face on the same surface as the face selected and does not change it’s shape.
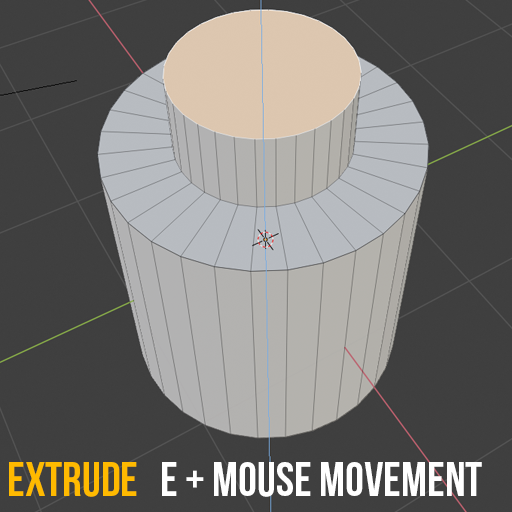
Extrude
Similar to Inset, Extrude also creates additional geometry but unlike Inset, it allows you to change the shape of it by allowing you to take that extra geometry and move it around.
To extrude a face press E (as in Extrude) then move your mouse in the direction you want to extrude to. Typically, this will default to the axis this face is pointing in, but you may also see that you can move the extrusion in any direction you want. Left click again in order to stop moving.
Along with the basic extrude you also have a number of different wants to extrude. To access more extruding options press the shortcut keys Alt + E which will open up the extrude menu. If you have vertex selection mode enabled you’ll see all the options available to you to extrude.
Often times you’ll need to realign vertices to conform to a proper shape and while you can try to push and pull verts this can lead to a frustrating process of trying to get vertices in line properly. Vertex Slide allows you to move vertices in line with the edge(s) they are connected to. Think of it as being connected to a rail and the rail is an edge. In order to enable this you can press G twice with a vertex selected. If you accidentally slide a vertex, you can right click to cancel the movement.
The same can be done with edges to speed up the process. If you need to slide an edge into place while keeping it along the same surface use the same shortcut key.
 Recommended: Mesh Modeling in Blender
Learning modeling in Blender? This course will take you through mesh modeling workflows and useful tools. Included is a mini-project for practice, plus a modeling exercise. Watch the trailer.
Knife Tool
As the name implies, the Blender knife tool allows you to cut into your mesh. You start by pressing K which enables the tool to appear followed by a knife icon for the cursor. You select an edge to add a vertex point to start off with, then connect it to another edge. Once you’re done making your cut, hit enter to save your changes.
By pressing C you can constrain your cut to 45-degree increments. This is useful for getting those perfectly straight cuts in your mesh. Lastly, if you need to make multiple cuts (that are not connected) you can press E to start a new cut. You’ll still need to save your changes by pressing enter.
Connect
Connecting vertices is a common way to easily create an edge between two selected vertices. Select at least 2 vertices and press J to connect them. This is similar to cutting through faces with the knife tool but much quicker.
Fill
Similar to Connect, you can also fill in faces. Select the vertex points you want to connect with a face, then press F. You can create an n-gon, triangle or quad with this method and you can also use this to create an edge between two vertices.
Subdivide and Smooth Shading
These can be found under the same Right-Click Menu but are context-specific.
If you are in Object Mode, right clicking will reveal smooth shading, which will smooth out the mesh and remove the faceted look. This is typically something you’d enable after applying some subdivisions to the mesh. This is similar to adding a subdivision surface modifier with simple enabled. Subdividing quickly adds in more geometry and evenly distributes this new geometry throughout your mesh.
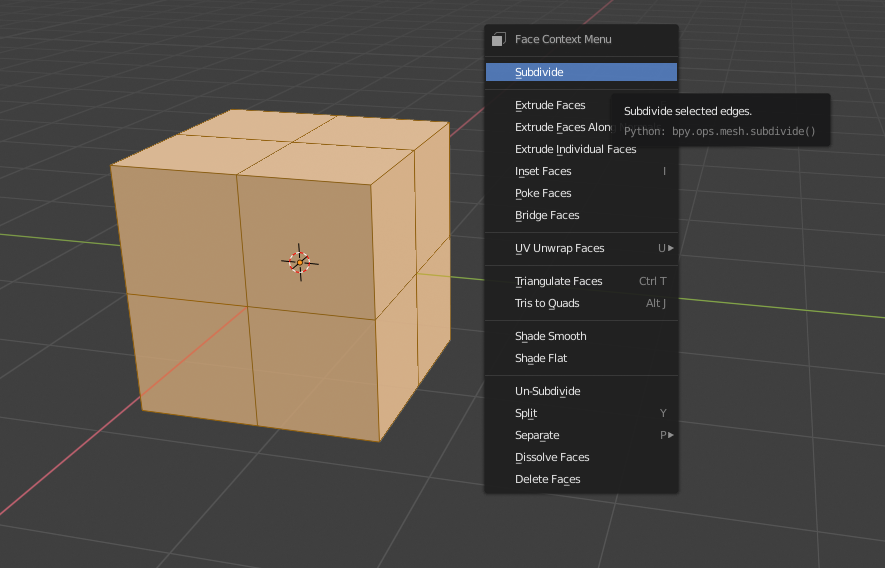 Right click to Subdivide in edit mode
 Right click to shade smooth in object mode
These are just a handful of the most common tools. Being familiar with how these are accessed and when to use them will improve your topology workflow.
2. Know When to use N-gons, Triangles, and Quads
N-gons are polygons that contain 5 or more sides. For example, a pentagon is considered an N-gon. Because of their odd shape N-gons can be difficult to subdivide and you may see odd shading artifacts. This becomes an even bigger issue when animating an object; if you try to bend a face in half you’ll get unexpected results.
But N-gons are not always going to be avoided, so you might as well get familiar with them.
 Top face of a cylinder is an N-gon
Jonathan Lampel, CG Cookie’s Blender trainer, says:
N-gons are good for complex, flat shapes that won’t be animated or have subdiv. It’s pretty niche, but that’s where they can beat quads because they’re faster to work with. Just be careful to convert them to tris or quads before UV unwrapping.
Triangles aka three connected vertices are the simplest way to create a face. Because of their simplicity, you’ll find that games utilize meshes as triangles. If you imported a model made entirely of Quads into Unity, you’ll see it gets converted into triangles. Triangles introduce poles for just about every vertex. (Poles are 3, 5 or more edges connected to a vertex and these produce their own problems which we’ll discuss later.)
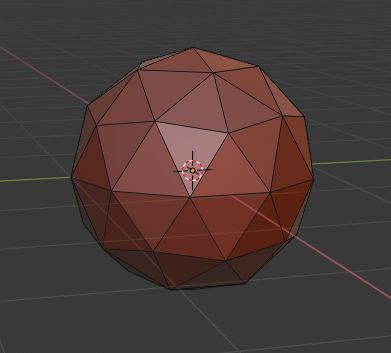 Icosphere is made entirely of Triangles
Lastly, we have Quads. Quads have 4 edges and 4 vertices making it easy to subdivide. This also makes them great for things like sculpting or utilizing them within a game engine which will eventually convert these quads into triangles.
Along with using quads, ensure that these are properly scaled. Elongated faces will result in stretched textures and can deform your mesh topology. Quads not only make for clean topology — they also help display the proper shape and «flow» of your mesh.
 UV Sphere is made mostly of Quads
3. Understand Edge Flow
We talked about N-gons before along with triangles and these could introduce something known as a Pole. As I mentioned above, Poles exist when we have a vertex with 3, 5 or more edges connected to it.
Why is this important? Because poles essentially control the direction of your topology. Understanding how to control the «flow» of your topology is vital to getting specific details in place. Moving and placing poles down to control the flow yourself is highly dependent on the model you’re working on.
If you’re interested in learning more about how to control poles and edge flow, I’d highly recommend watching this lesson on Edge Loops in Blender by Jonathan Lampel from his Mesh Modeling Bootcamp.
In that course, Jonathan also discusses All Quad Junctions which includes this graphic to better understand how poles could affect your topology:
 Credit to Don Newman
4. Use MatCaps
MatCap (short for Material Capture) is a complete material that allows for proper lighting and reflections. MatCaps help us see how light and reflections react to your mesh topology. It’s a very easy and quick way to determine if your mesh is distorted due to bad topology.
Below, we have a scene with traditional shading. While we do have some lighting and shadows, it may be difficult to see distortions in something like a reflection. Instead of creating a reflective material and shader in Blender we can quickly change the viewport shading to using a MatCap.

I’ve applied a MatCap that includes a very glossy and reflective surface. Now I can quickly tell if any distortion appears within the smooth curved surfaces of this object.

To add a MatCap you’ll need to access the viewport shading menu:
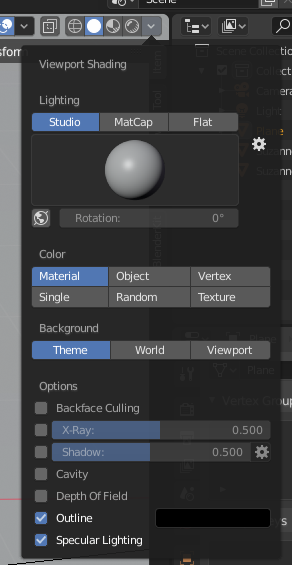
Ensure you have Solid as the display method (the solid white circle) and when you open this up you should immediately see an option to switch between Studio, MatCap and Flat for the lighting. With MatCap selected I can also change out the type by clicking on the preview of the material:

5. When to use Creases versus Holding Edges
There will come a time when you add a subdivision surface modifier to a mesh with flat surface and you’ll see those edges start to droop or lose their crisp edge.
There are a few ways you can keep the smoothness of the modifier while still keeping those edges crisp. The first method: using a crease.
Creases are applied directly to an edge and you can make these sharp by increasing their crease value, sometimes also known as their weight (which is a value between 0 and 1). Select the edge in edit mode, then use the keyboard shortcut CTRL + E (same as the edge menu) then move your mouse in or out to adjust the crease weight.
As you may have guessed, creases can only be applied to specific edges. If you have a very smooth mesh but want specific parts of it extra sharp (such as the body lines on a vehicle), using creases might be just the thing you need. Here’s an example of a basic cube with a subdivision modifier applied and the top 4 edges have Edge Crease enabled with a value of 1.

Holding edges are typically recommended due to the amount of influence you can have on the mesh in general.
Similar to a tent, the more support poles you provide, the more distinct the shape will be. Holding edges, also known as support loops, allow you to create extra geometry around edges to ensure they don’t droop. More geometry in one area leaves less room to «blend» between edges. The downside to this is that added geometry can cause issues with the rest of the mesh topology.
Take a look at a similar example, a cube with a subdivision modifier — but this time, we have holding edges supporting each corner:

Here is another example of both, but with the cube on the left containing nothing but creases. This means less geometry which may be useful if you’re really tight on how much geometry you can include in a scene or object but has it’s downsides as you can see:

6. Keep It Simple, Stupid (KISS)
This is largely dependent on your mesh, but often you can break it up to ensure that detailed pieces don’t make the rest of your mesh denser than it needs to be.
Think about a car door handle. The car door itself can be relatively simple geometry-wise, but a door handle has a key hole, handle and frame around that handle.
The handle will be more intricate. But why should the entire door provide supporting loops and geometry for a smaller piece? It makes sense to create the car door and the handle separately. You can get as detailed as you want with the door handle, while the door keeps it’s low polygon count.
Along with that, determine the bare minimum of edge loops needed to form the shape you’re looking for. It may be tempting to add in a ton of loops early on to make something look better, but the more geometry you add, the harder it becomes to work with. Limit your loops early on to create what is needed, then add more where necessary.
7. Beware of Duplicates
When you start using tools like Inset and Extrude you may forget to move the added geometry which leaves duplicates in the exact same place. Depending on what was duplicated it may be difficult to really see the changes made, but will become apparent when you try to manipulate the mesh in those areas. Take a look at the image below: can you spot the duplicate vertices?

Here, I extruded the top face by pressing E but then hit enter. Sometimes you may accidentally hit enter or think you canceled the operation when all you really did was leave it in place. I can select the top face and move it up:

If you suspect you may have duplicate vertices, you can select the entire mesh and use shortcut key Alt + M to pull up the Merge menu. You’ll be provided options to merge vertices (assuming you have more than one selected) based off the center point, 3d cursor, or to collapse them into one. The last option is By Distance which was previously known as «doubles». If vertices are close enough, they will be merged together. 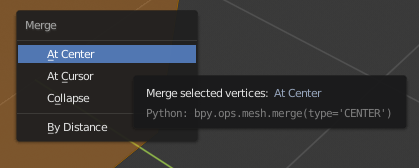
8. Always Check Your Normals
Similar to duplicate geometry, you may notice that your mesh appears darker than normal.
Normals refer to the direction of the faces. Here you can see blue lines indicating the direction each face is pointing in:
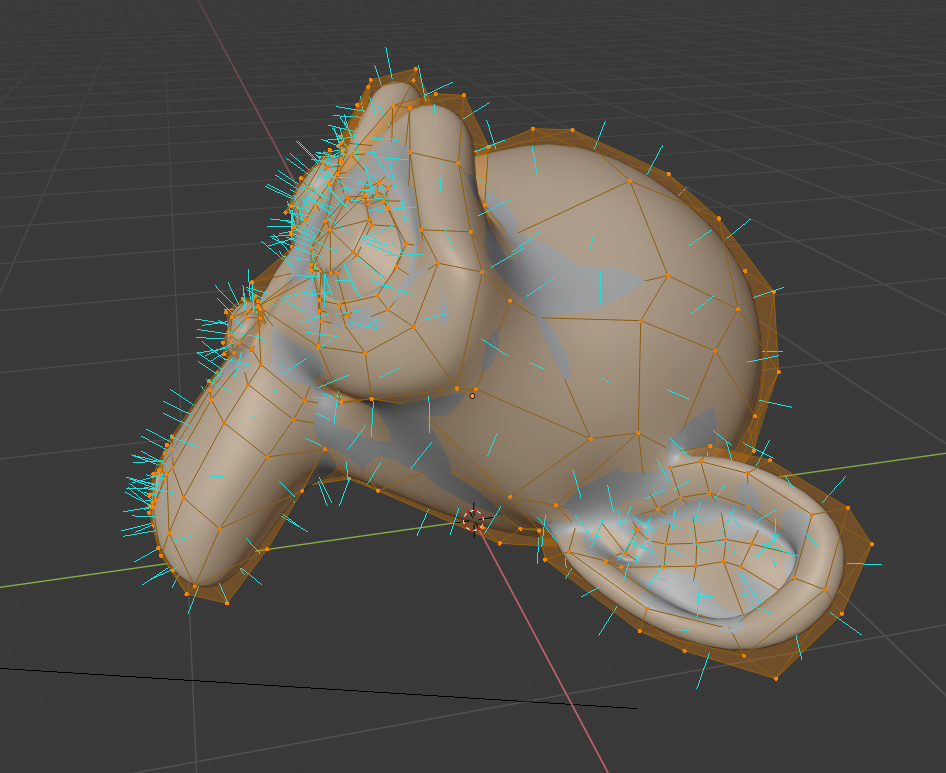 If you want to enable this yourself you can find this setting under overlays at the bottom where it says Normals. You can select Vertex, Split or Face normals along with a size for the length of the blue line:

From time to time you may be working on a mesh and end up in a situation where your normals are flipped in the opposite direction. While this mostly affects the rendering of your object, it may confuse you into trying to fix the issue by adding more edge loops or modifying the mesh.
Below is an example of a couple faces of our mesh flipped. The faces still exist but because they’re pointing in the opposite direction they result in weird shading. In rare instances you may also have issues creating edge loops through these areas. By enabling the normals display you can see which faces have issues.
In general, flipping normals is done all at once. To open up the normals menu use shortcut Alt+N. Next, you can recalculate outside to have the normals pointing outward.

In rare cases, you may be building a model where the inside is rendered in which case you’d want to recalculate the inside. This is also important when working with games. You may export a model and notice that mesh looks transparent and only the inner portions are rendered:

This is due to the normals being flipped. Typically you only render one side of a mesh as there’s no point in rendering parts of a mesh you won’t actually see (which also helps with performance). If you experience this when importing into a game engine you’d have to recalculate the normals to the outside in Blender and reimport that once again. Make sure to check out my article on Maximizing Your Unity Game Performance as well.
Retopology Tools
Once you get to a point where you are working with higher density mesh models on a regular basis you will want to speed up your retopology workflow.
Retopology is the process of turning dense topology into simpler, lower poly topology. This is especially useful when working with game assets or animations, where sculpted objects will be too costly to utilize or provide improper deformations.
RetopoFlow
RetopoFlow is retopology suite created in house by Jonathan Williamson and Jonathan Denning and can be found on the Blender Market. You can watch a free course on how to use RetopoFlow addon — prepare to have your mind blown!
DynRemesh/AutoFlow

DynRemesh 2.5 is a quad-based remesher for Blender 2.8, assisting in retopology for your dyntopo sculpts & 3dscans containing too many triangles.
Tesselator
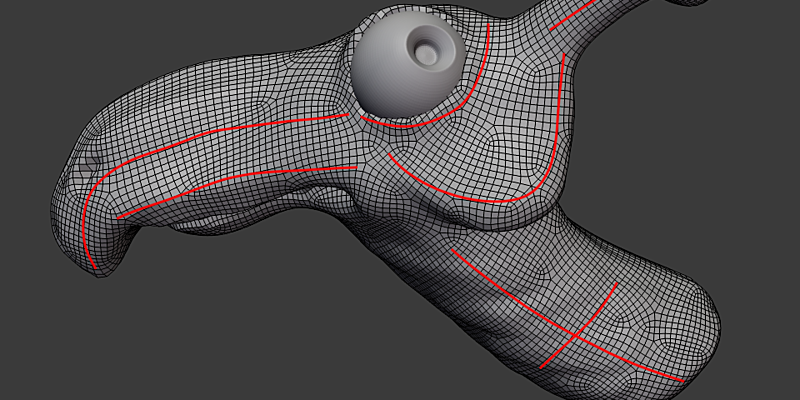
Tesselator is a remeshing addon that helps you create regular quad and triangle meshes easily out of sculpts.
Where to go Next
For more in-depth tips on proper topology and tools within Blender, check out some of our most popular Blender tutorial series:
Recommended: Mesh Modeling in Blender
Learning modeling in Blender? This course will take you through mesh modeling workflows and useful tools. Included is a mini-project for practice, plus a modeling exercise. Watch the trailer.
- Modeling with Good Topology(Live Stream) by Jonathan Lampel
- Mesh Modeling Bootcamp(tutorial series) by Jonathan Lampel
- Introduction to Retopology(tutorial series) by Jonathan Willamson
Those are just a few of the courses we offer that can speed up your topology work flow. Have questions about your specific model? Feel free to post questions and comments on our community forum.
Have any great topology tips and tricks you’d like to share? Let us know in the comments!