Fushicai VIDEO DVR
How to uninstall Fushicai VIDEO DVR from your computer
This web page is about Fushicai VIDEO DVR for Windows. Here you can find details on how to remove it from your PC. It is developed by Fushicai . Open here where you can find out more on Fushicai. More information about Fushicai VIDEO DVR can be seen at http://www.Fushicai.com. Usually the Fushicai VIDEO DVR application is placed in the C:\Program Files (x86)\Fushicai VIDEO DVR directory, depending on the user’s option during setup. The full command line for uninstalling Fushicai VIDEO DVR is C:\Program Files (x86)\InstallShield Installation Information\<989BAFE8-E777-43D7-9749-9810E0E9FF48>\setup.exe -runfromtemp -l0x0009 -removeonly. Keep in mind that if you will type this command in Start / Run Note you may get a notification for administrator rights. The application’s main executable file has a size of 449.46 KB (460248 bytes) on disk and is called setup.exe.
Fushicai VIDEO DVR is composed of the following executables which occupy 635.46 KB ( 650712 bytes) on disk:
- setup.exe (449.46 KB)
- vmdrv.exe (106.00 KB)
- vmdrv.exe (80.00 KB)
This page is about Fushicai VIDEO DVR version 2013.5.6 alone. Several files, folders and Windows registry data will not be removed when you want to remove Fushicai VIDEO DVR from your PC.
- C:\Program Files (x86)\Fushicai VIDEO DVR
- C:\Program Files (x86)\Fushicai VIDEO DVR\App\_setup.dll
- C:\Program Files (x86)\Fushicai VIDEO DVR\App\data1.cab
- C:\Program Files (x86)\Fushicai VIDEO DVR\App\data1.hdr
- C:\Program Files (x86)\Fushicai VIDEO DVR\App\data2.cab
- C:\Program Files (x86)\Fushicai VIDEO DVR\App\ISSetup.dll
- C:\Program Files (x86)\Fushicai VIDEO DVR\App\layout.bin
- C:\Program Files (x86)\Fushicai VIDEO DVR\App\setup.exe
- C:\Program Files (x86)\Fushicai VIDEO DVR\App\setup.ini
- C:\Program Files (x86)\Fushicai VIDEO DVR\App\setup.inx
- C:\Program Files (x86)\Fushicai VIDEO DVR\App\setup.isn
- C:\Program Files (x86)\Fushicai VIDEO DVR\Drivers\AV600_WHQL\AV600_Vista_32\HuayaBDAx86.lib
- C:\Program Files (x86)\Fushicai VIDEO DVR\Drivers\AV600_WHQL\AV600_Vista_32\oemdrv.cat
- C:\Program Files (x86)\Fushicai VIDEO DVR\Drivers\AV600_WHQL\AV600_Vista_32\OEMDrv.inf
- C:\Program Files (x86)\Fushicai VIDEO DVR\Drivers\AV600_WHQL\AV600_Vista_32\OEMDrv.sys
- C:\Program Files (x86)\Fushicai VIDEO DVR\Drivers\AV600_WHQL\AV600_Vista_64\HuayaBDAx64.lib
- C:\Program Files (x86)\Fushicai VIDEO DVR\Drivers\AV600_WHQL\AV600_Vista_64\oemdrv.cat
- C:\Program Files (x86)\Fushicai VIDEO DVR\Drivers\AV600_WHQL\AV600_Vista_64\OEMDrv.inf
- C:\Program Files (x86)\Fushicai VIDEO DVR\Drivers\AV600_WHQL\AV600_Vista_64\OEMDrv.sys
- C:\Program Files (x86)\Fushicai VIDEO DVR\Drivers\AV600_WHQL\AV600_Win7_32\HuayaBDAx86.lib
- C:\Program Files (x86)\Fushicai VIDEO DVR\Drivers\AV600_WHQL\AV600_Win7_32\oemdrv.cat
- C:\Program Files (x86)\Fushicai VIDEO DVR\Drivers\AV600_WHQL\AV600_Win7_32\OEMDrv.inf
- C:\Program Files (x86)\Fushicai VIDEO DVR\Drivers\AV600_WHQL\AV600_Win7_32\OEMDrv.sys
- C:\Program Files (x86)\Fushicai VIDEO DVR\Drivers\AV600_WHQL\AV600_Win7_64\HuayaBDAx64.lib
- C:\Program Files (x86)\Fushicai VIDEO DVR\Drivers\AV600_WHQL\AV600_Win7_64\oemdrv.cat
- C:\Program Files (x86)\Fushicai VIDEO DVR\Drivers\AV600_WHQL\AV600_Win7_64\OEMDrv.inf
- C:\Program Files (x86)\Fushicai VIDEO DVR\Drivers\AV600_WHQL\AV600_Win7_64\OEMDrv.sys
- C:\Program Files (x86)\Fushicai VIDEO DVR\tools\x64\DIFxAPI.dll
- C:\Program Files (x86)\Fushicai VIDEO DVR\tools\x64\vmcoinst.dll
- C:\Program Files (x86)\Fushicai VIDEO DVR\tools\x64\vmdrv.exe
- C:\Program Files (x86)\Fushicai VIDEO DVR\tools\x86\DIFxAPI.dll
- C:\Program Files (x86)\Fushicai VIDEO DVR\tools\x86\vmcoinst.dll
- C:\Program Files (x86)\Fushicai VIDEO DVR\tools\x86\vmdrv.exe
- HKEY_LOCAL_MACHINE\Software\Fushicai\Fushicai VIDEO DVR
- HKEY_LOCAL_MACHINE\Software\Microsoft\Windows\CurrentVersion\Uninstall\
How to delete Fushicai VIDEO DVR from your PC using Advanced Uninstaller PRO
Fushicai VIDEO DVR is a program released by the software company Fushicai. Sometimes, people choose to uninstall it. This can be easier said than done because removing this manually requires some know-how related to PCs. One of the best QUICK action to uninstall Fushicai VIDEO DVR is to use Advanced Uninstaller PRO. Here is how to do this:
1. If you don’t have Advanced Uninstaller PRO on your PC, install it. This is a good step because Advanced Uninstaller PRO is a very useful uninstaller and general tool to optimize your PC.
- navigate to Download Link
- download the program by clicking on the green DOWNLOAD NOW button
- set up Advanced Uninstaller PRO
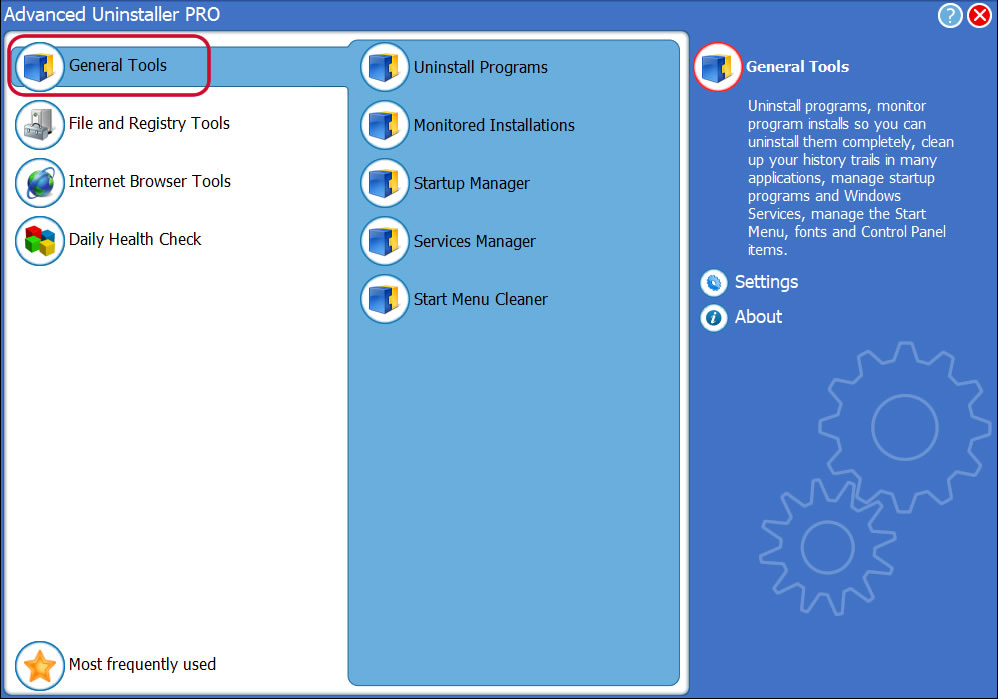
3. Press the General Tools button
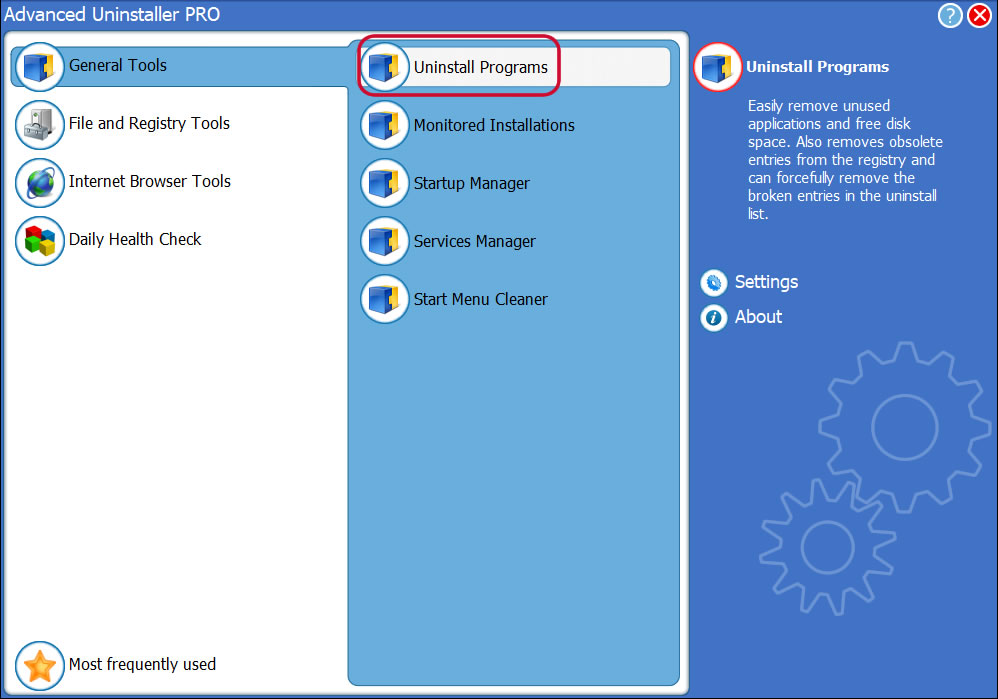
4. Press the Uninstall Programs tool
5. A list of the programs installed on the PC will be made available to you
6. Scroll the list of programs until you find Fushicai VIDEO DVR or simply click the Search field and type in «Fushicai VIDEO DVR». The Fushicai VIDEO DVR program will be found very quickly. After you select Fushicai VIDEO DVR in the list , some data regarding the program is made available to you:
- Star rating (in the lower left corner). The star rating tells you the opinion other users have regarding Fushicai VIDEO DVR, from «Highly recommended» to «Very dangerous».
- Opinions by other users — Press the Read reviews button.
- Technical information regarding the application you are about to remove, by clicking on the Properties button.
- The publisher is: http://www.Fushicai.com
- The uninstall string is: C:\Program Files (x86)\InstallShield Installation Information\<989BAFE8-E777-43D7-9749-9810E0E9FF48>\setup.exe -runfromtemp -l0x0009 -removeonly
8. After removing Fushicai VIDEO DVR, Advanced Uninstaller PRO will offer to run a cleanup. Click Next to proceed with the cleanup. All the items that belong Fushicai VIDEO DVR that have been left behind will be detected and you will be asked if you want to delete them. By removing Fushicai VIDEO DVR using Advanced Uninstaller PRO, you are assured that no registry items, files or directories are left behind on your disk.
Your system will remain clean, speedy and ready to take on new tasks.
Geographical user distribution
| United States | 16.35% | |
| United Kingdom | 14.42% | |
| Islamic Republic of Iran | 5.77% | |
| New Zealand | 5.77% | |
| Italy | 4.81% | |
| Spain | 3.85% | |
| Portugal | 3.85% | |
| Belgium | 2.88% | |
| Serbia | 2.88% | |
| Brazil | 2.88% |
- Windows 7 (6.1)
- Windows Vista (6.0)
- Windows 8 (6.2)
- Windows 8.1 (6.3)
- 10.0
- Windows XP (5.1)
Disclaimer
The text above is not a piece of advice to remove Fushicai VIDEO DVR by Fushicai from your computer, we are not saying that Fushicai VIDEO DVR by Fushicai is not a good application for your computer. This page simply contains detailed instructions on how to remove Fushicai VIDEO DVR supposing you decide this is what you want to do. The information above contains registry and disk entries that other software left behind and Advanced Uninstaller PRO discovered and classified as «leftovers» on other users’ computers.
FUSHICAI VIDEO DVR
FUSHICAI VIDEO DVR is developed by Fushicai and is used by 75 users of Software Informer. This particular product is not fit to be reviewed by our informers.
You can check Argus Surveillance DVR, DVR-MS Converter, GoLife Player and other related programs like DVR-MS to AVI at the «download» section.
Comments
Recent downloads
- Business Card Designing Software
- Employee Payroll Software
- Cydia Cloud Free Installer 2.0.0
- AuDimix: Split music stems like a pro
- FoneLab iOS Unlocker
- AnyRec Phone Mirror
- RTOPO Hydrology
Latest updates
- PHOTOfunSTUDIO 8.3
- aSc TimeTables 1.0
- Inpaint 10.0
- XnView 2.5
- Charter Security Suite 2.2
- ENUFF PC 8.0
- Outlook Address Extractor 2007 1.8
- Microsoft Office Visio 16.0
- PowerProducer 6.0
Fushicai video dvr что это за программа
Ответ от Андрей[гуру]
Формат файла .dvr-ms это Видеозапись Microsoft (Microsoft Digital Video Recording)
Открывается.
* Microsoft Windows Media Player (необходим Windows XP SP1 или более новый)
* Roxio Easy Media Creator
Есть и ещё несколько плееров типа DVRPlayer
А вот чем можно конвертировать:
ссылка
- Список и загрузка драйверов для разных устройств видео захвата USB EasyCap 2.0
(DC60, DC60++, EzCap128 и выше, EasyCap 001 и тп); - Драйвер для устройства EasyCap 2.0 на STK 1160 и UTV 007;
- Программа видеозахвата для STK 1160 VideoView;
- Программа для снятия видео USB Easy Cap ULEAD Video Studio 11;
- Программа захвата видео для USB платы EayCap 2.0 Honest Video VHS to DVD;
- Программа Virtual Dub: virtualdub.ru и http://www.softportal.com/software-1828-virtualdub.html.
Что такое Easycap USB 2.0.
Под названиями EasyCap DC plus, Easier Cap, Video Cap и тому подобными, может скрываться один из двенадцати различных чипсетов от разных производителей. Давайте подробно рассмотрим работу по установке и эксплуатации платы видеозахвата EasyCap 2.0. Это устройство позволяет произвести оцифровку с различных аналоговых видеоустройств, таких как VHS-магнитофоны и камеры.
Установка и использование.
Итак, разберемся, с чем можно столкнуться на начальном этапе использования Easycap USB 2.0 — это процесс установки Easy Cap, поиск и инсталляция драйверов, установка программ по видеозахвату с Easy Cap и типовые проблемы, а также методы их устранения.
Для нашей работы нам понадобится все, что есть в поставляемом комплекте:

- USB — плата;
- Диск с драйвером и программой для видеозахвата;
- Инструкция на английском;
- USB — удлинитель.
Далее нам нужен источник сигнала для видеозахвата, например, старый видеомагнитофон. Для соединения потребуется AV-кабель и, наконец, компьютер, на котором мы получим конечную цифровую видеозапись.
Определение чипсета платы.
Для начала необходимо понять, с каким именно чипсетом мы имеем дело. Аккуратно, но уверенно, нажав на боковые грани пластика платы с одной стороны, отсоединяем защелки и смотрим название чипсета. Это может быть один чип или два (один для видео, второй для аудио), в любом случае, выпишите название всего того, что вы видите выгравированным на чипах, это может очень пригодится в дальнейшем. В нашем случае мы используем Easy Cap на основе чипсета, отличающегося своей стабильностью в работе в тридцати двух и шестидесяти четырех битных системах, поддерживающий работу в Windows, XP, Vista, Windows 7, 8 и 10, а также потенциально способного работать с UNIX-совместимыми системами. Закроем плату простым нажатием до звука щелчка и приступим к инсталляции.
Установка устройства в USB — порт.
Обычное подключение к свободному порту USB платы видеозахвата уже таит в себе возможные проблемы. Чтобы не столкнуться с ними, не рекомендуется использовать USB-удлинитель из комплекта поставки Easy Cap, т.к. могут быть проблемы с определением и работой устройства. Стоит учитывать, что внутри компьютера один USB-порт может иметь индивидуальный выход на материнскую плату, а может быть подключен к внутреннему концентратору, и тогда на один вход на материнской плате может приходится до четырех USB-портов. Для нормальной работы с таким высокотребовательным к питанию и пропускной способности устройством как USB — видеозахват, потребуется выделенный USB-порт. Поэтому если вы столкнулись с проблемой установки драйверов или захватом видео, попробуйте переставить EasyCap в другой USB-порт компьютера.
Установка драйверов.
После включение платы в USB-порт в диспетчере устройств появится неизвестное устройство. Зайти в диспетчер устройств можно через "Пуск", далее клик правой кнопкой мыши на "Мой компьютер" или просто "Компьютер", затем "Свойства" и "Диспетчер устройств". Самым простым способом установки драйверов является запуск диска из комплекта к плате захвата. Запустив диск, выберите "install driver", при необходимости, перезагрузите компьютер после установки. Также, вы можете установить необходимые драйвера для своего чипсета из списка, приведенного в данной инструкции.
После успешной установки, в диспетчере устройств появится название нашего устройства. Если установка драйверов не увенчалась успехом, попробуйте переключить устройство в другой USB-порт и/или скачать драйвера по ссылке.
Подключение платы к носителю видеосигнала.
Для трансляции сигнала на устройство подключим магнитофон к плате видеозахвата Easycap USB 2.0 через стандартный male-male AV-Кабель. Белый колокольчик к белому тюльпану, желтый — к желтому. В нашем случае, к красному. Теперь подключаем кабель к видеомагнитофону — белый тюльпан к аудиовыходу (надпись Audio-OUT), желтый (в нашем случае, красный) к видеовыходу (надпись Video-OUT). Включаем сам магнитофон, вставляем кассету для теста и нажимаем "Play".
Установка программы видеозахвата.
После того, как драйвер для устройства установлен, а сигнал из магнитофона транслируется, осталось дело за малым: выбрать, скачать и установить программу для видеозахвата роликов. Однако, если ваше устройство на другом чипсете, рекомендуется проверить каждый из перечисленных программных продуктов, возможно, именно он окажется оптимальным для вашего USB EasyCap. Почти все программы требуют наличие девятого и выше Direct X от Microsoft.
Установка программы с диска из комплекта.
В нашем комплекте поставки идет программное обеспечение HonesTech VHS to DVD. После установки программы, вводим код активации с ярлыка конверта, в который запечатан диск. Далее запускаем программу. Картинка выдается черно-белая. Данная проблема решается переключением в настройках видео с NTSC на PAL и/или изменением цветовой схемы в настройках. Настройка аудиозаписи производится в соответствующем пункте меню. Сперва необходимо выбрать устройство для записи аудио. И далее включить запись в настройках. После этих шагов проблема будет решена, а видео и аудио будут стандартными. Если звук не воспроизводится, попробуйте поставить частоту 8Mhz, Stereo, 8bit.
Установка прочих программ видеозахвата.
Еще одна распространенная программа, которую стоит попробовать: Ulead Video 11. Одна из самых популярных программ, имеет множество возможностей по настройке и редактированию видео. В нашем случае, снова неудача, при подключении платы видеозахвата выдается ошибка считывания устройства.
А программа Virtual Dub является самым популярным продуктом по захвату видео, она имеет множество тонких настроек по формату видеоданных, фильтрам, аудиоканалам и многому другому. Рассмотрим это приложение чуть подробнее. Выбираем пункт захвата видео в меню. Видим снова черно-белую картинку. Меняем источник видеоданных на PAL. Теперь картинка приобрела нормальный цвет. Для включения аудиозахвата нужны обычные настройки. К сожалению, для нашего устройства адекватно запись звука производится не стала. Картинка начала сильно тормозить, не смотря на 16 гигабайт оперативной памяти. Варианты решения — подключения звука из магнитофона ко внешнему источнику (вход микрофона компьютера, к примеру) или дальнейший поиск рабочего канала для экспорта аудио.
Надеемся, данное руководство пользователя позволит разобраться с таким интересным устройством, как Easycap USB 2.0. Если вы столкнулись с непреодолимыми сложностями, рекомендуем обратиться к тематическим форумам. Служба поддержки не оказывает консультаций по установке и настройке устройства. Желаем вам успешных кадров!
Минимальные системные требования:
- Intel Pentium III 800 МГц или выше;
- Microsoft Windows 2000, XP / Vista;
- 256 Мб оперативной памяти (512 Мб или выше для редактирования);
- 600 Мб свободного пространства на жестком диске для установки программы;
- 4 Гб + на жестком диске для видео захвата и редактирования;
- Windows-совместимый дисплей с разрешением не менее 1024×768;
- ОС Windows с совместимой звуковой картой;
- CD-ROM, CD-R/RW или DVD-R/RW.
Рекомендуемые системные требования:
- Pentium 4, 2,0 GHz процессор;
- 512 Мб оперативной памяти;
- 7200 оборотов в минуту для жесткого диска.
Типовые проблемы и методы их решения:
1. Проблема — не определяется устройство. Решение — переключение в другой разъем USB или, в качестве крайней меры, другой компьютер.
2. Проблема — программа видеозахвата не определяет устройство или не показывает картинку вообще. Решение — выбрать устройство видеозахвата в списке источников данных и/или попробовать установить другой драйвер.
3. Проблема — черно-белая картинка видео. Решение — сменить источник видеосигнала на PAL и/или другую цветовую схему в настройках видеоизображения.
4. Проблема — нет звука. Решение — для разных программ решается по-разному, как правило, сменой аудиоформата на более низкой частоте. Также попробуйте разные настройки захвата аудиоданных.
5. Проблема — большой объем видеоролика, есть шумы и артефакты в аудио. Решение — воспользоваться другой программой захвата или программой для нелинейного монтажа для пост обработки видео, которая позволит тонко настроить аудиоканал и оптимизировать размер. Например, программой Аdobe premiere pro.
6. Проблема — не вижу код для активации регистрации. Решение — серийный номер находится на диске, который входит в комплект. И на самом диске в документе SN.
* Примечание: Ссылки даны для ознакомительных целей. Автор не имеет отношения к приведенным по ссылкам данным и не несет ответственности за размещаемый на них контент. Ответственность за использование не лицензированного программного обеспечения, а также обеспечение безопасности своего компьютера от установки потенциально вредоносного программного обеспечения лежит на пользователе.
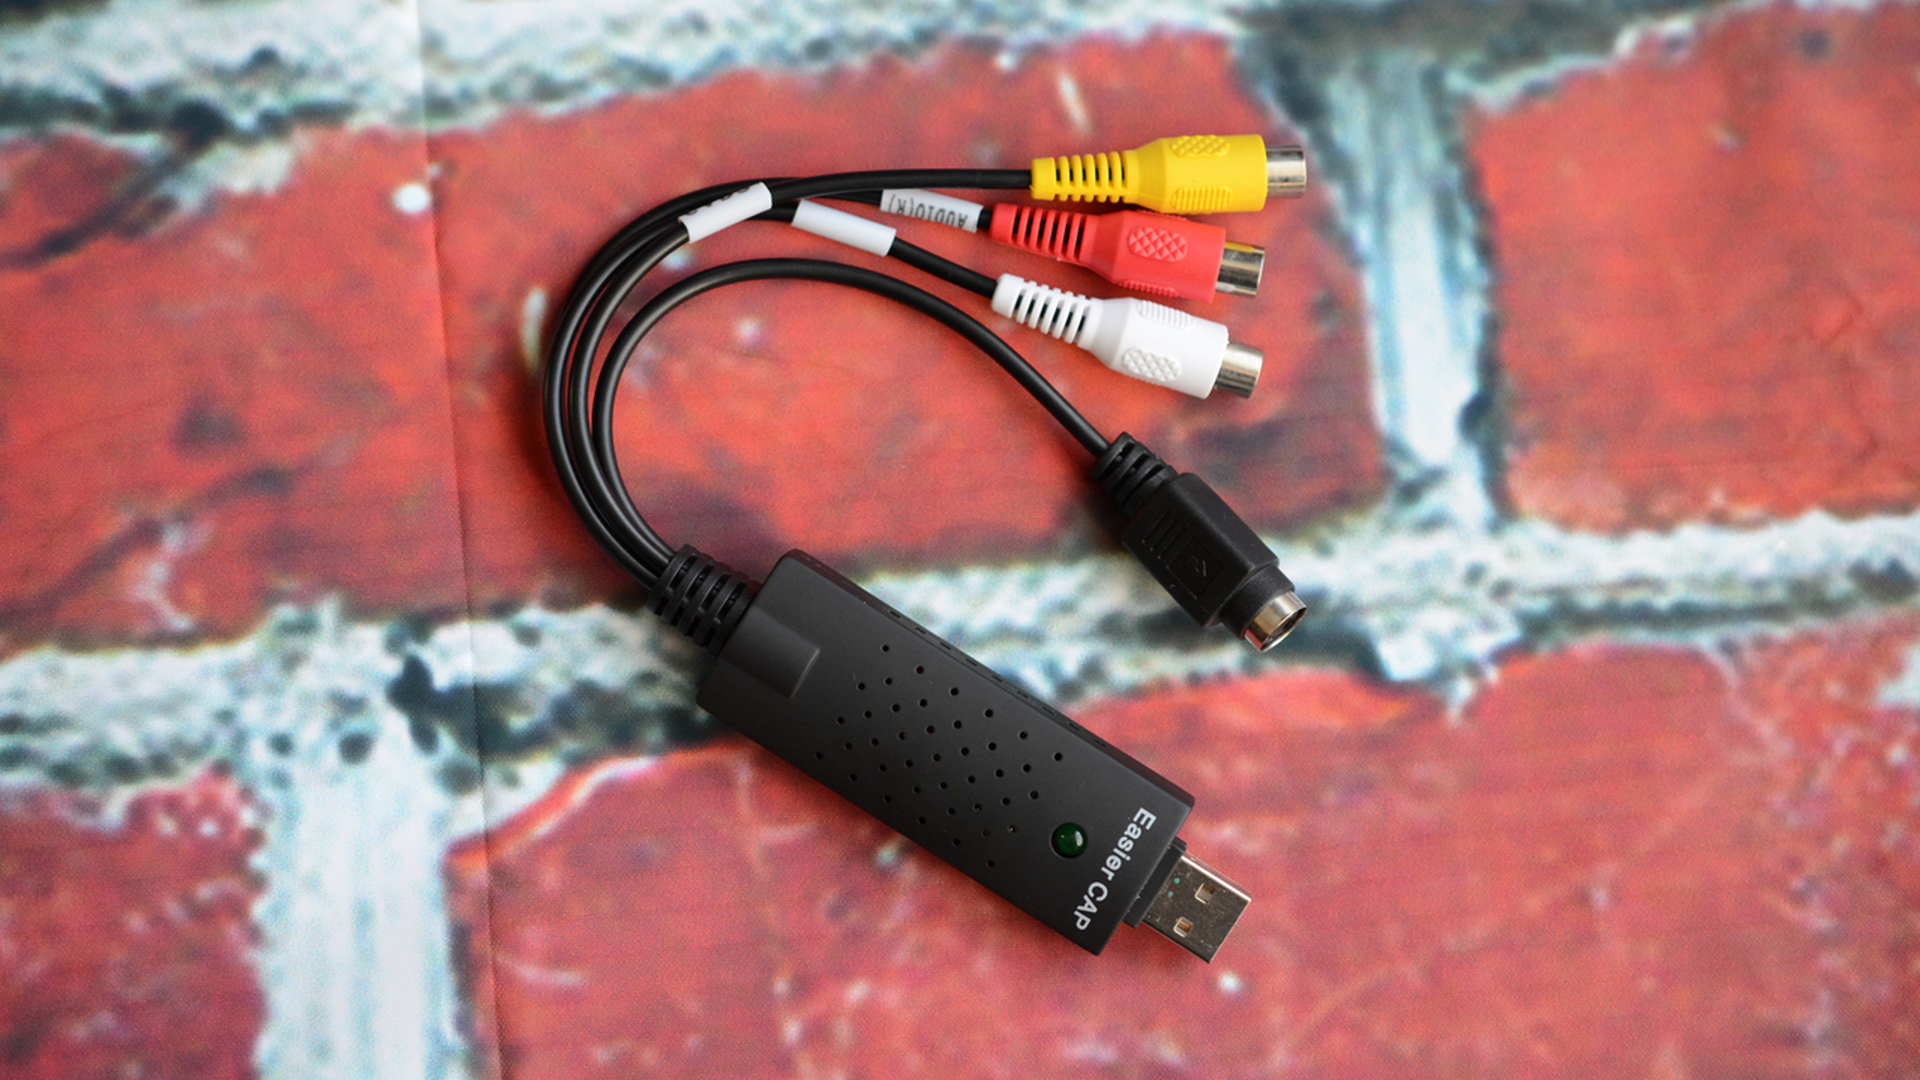
Этот девайс преобразует аналоговый сигнал, например, от видеомагнитофона, камеры наблюдения, ТВ-тюнера, камкордера и т.п., в цифровой вид. Созданные затем специальной программой файлы удобно обрабатывать, просматривать на любом компьютере, включая мобильные устройства, записывать на диски, делиться в Сети, а также загружать в "облачные" хранилища. Вести.Hi-tech поделились своим опытом работы с EasyCap USB 2.0
С проблемой оцифровки сталкиваются, например, те, у кого в домашнем архиве сохранились записи туристических поездок, семейных праздников, дней рождений, а также прочих торжеств и событий, которые зафиксированы на VHS-кассетах. Воспроизведение их содержимого на видеомагнитофоне (или соответствующей приставке) не всегда удобно, к тому же, такая техника практически исчезла из домашнего обихода. Судя по опубликованным в Сети предложениям, услуги по оцифровке оцениваются, как минимум, в 200-300 рублей за 60 минут записи. Следовательно, преобразование контента наиболее популярной 3-часовой "вэхаэски" (E-180) обойдется почти в тысячу рублей. Примерно за такие же деньги (800-1200 рублей) можно, например, приобрести устройство видеозахвата EasyCap USB 2.0 (Video Grabber). При этом, подобное же изделие прямо от китайских товарищей с торговой площадки AliExpress (минуя жадных отечественных посредников) обходится обычно раза в два дешевле.
Таким образом, если VHS-кассет в домашней медиатеке не одна, а несколько, то выгода просто очевидна. Напомним также, что EasyCap USB 2.0 позволит преобразовывать сигналы и от других источников, сохранившихся в хозяйстве, в том числе, например, от аналоговых видеокамер и камкордеров (VHS-C, Video8 и т.п.).
Вообще говоря, EasyCap не является названием какой-либо компании или торговой маркой. Китайские производители используют это обозначение для устройств видеозахвата, использующих разную аппаратную начинку, в том числе, от Syntek (STK1160/1150), Empia (EM2860/61), Somagic (SMI-2021), Fushicai (UTV007) и т.д.
Обзор EasyCap USB 2.0: технические характеристики
- Входной сигнал: S-Video, композитное видео
- Выходной интерфейс: USB 2.0
- Стандарты кодирования цвета: NTSC, PAL
- Выходные параметры: 720×480@30fps (NTSC), 720×576@25fps (PAL)
- Поддержка форматов: DV, MPEG-1, MPEG-2, MPEG-4 (с DivX-кодеком), SVCD/VCD, DVD, AVI, WMV
- Совместимость с ОС: Windows 2000/XP/Vista/7/8/8.1/10, 32/64 разряда
- Максимальная потребляемая мощность: 1 250 мВт (5 Вт, 250 мА)
- Дополнительное питание: не требуется
- Габаритные размеры: 89х28х14 мм (без кабелей)
Обзор EasyCap USB 2.0: комплект поставки
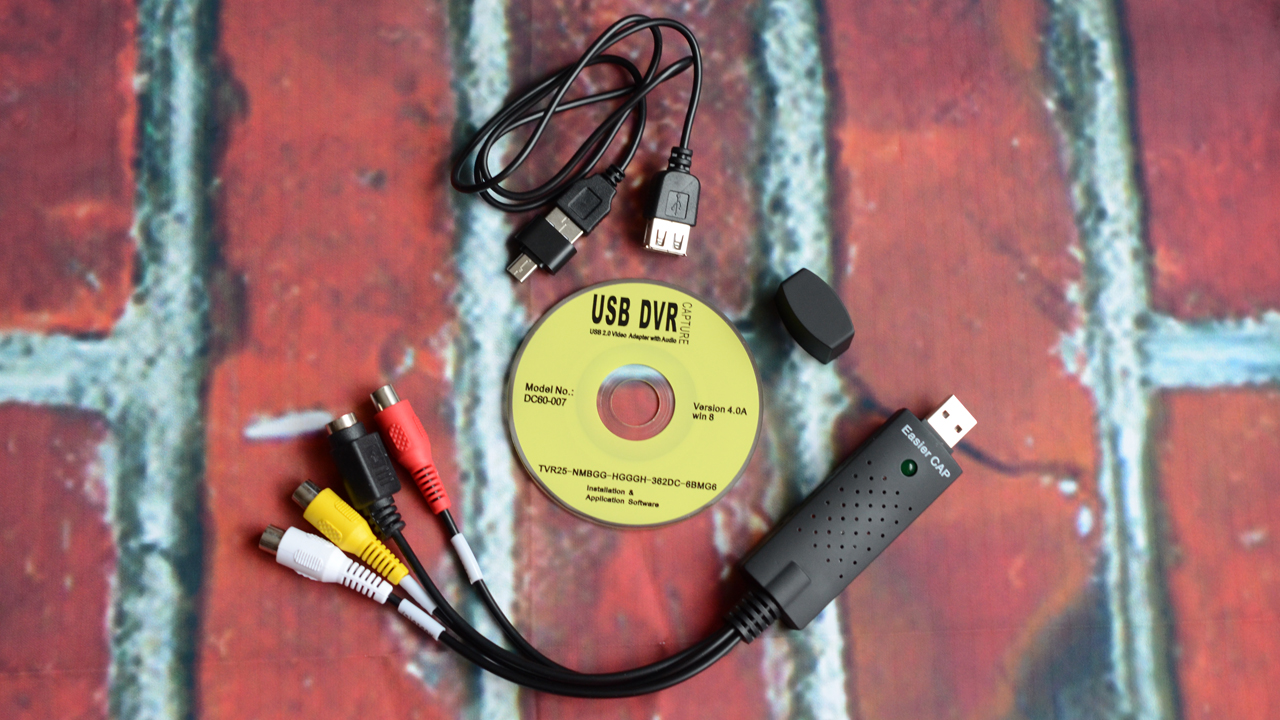
Собственно в комплект входит само устройство видеозахвата, удлинительный USB-кабель, а также компакт-диск с документацией и программным обеспечением (может меняться от продавца к продавцу). Опционально присутствует OTG-переходник (USB-microUSB). Заказав EasyCap USB 2.0 в одном из магазинов площадки AliExpress, в лучшем случае можно рассчитывать на жесткую пластиковую упаковку. Однако, учитывая цену, не следует особо удивляться, если содержимое посылки окажется в простом полиэтиленовом пакете.
Обзор EasyCap USB 2.0: внешний вид
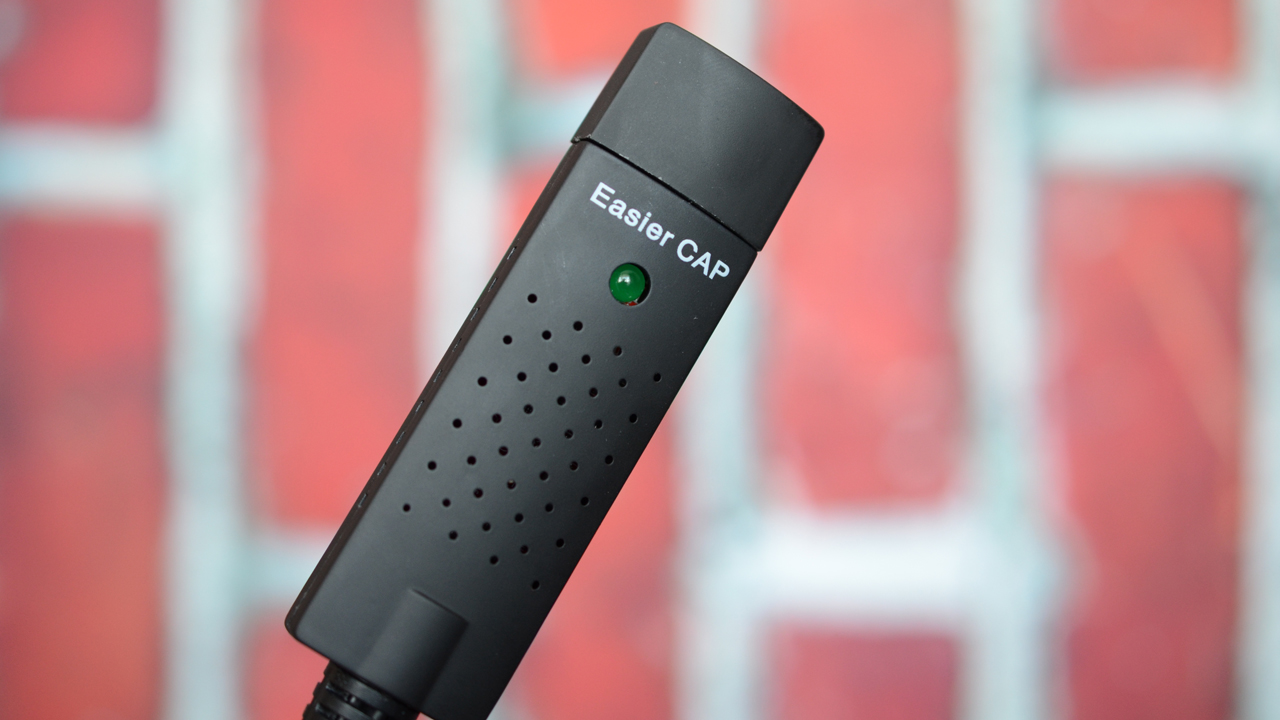
Само устройство EasyCap, при габаритных размерах 89х28х14 мм, похоже на большую флешку или старый 3G-модем для USB-порта. На корпусе из темного софт-тач пластика обычно указывается название, в котором изготовитель старается хоть как-то проявить свою индивидуальность (так, тестируемое нами изделие шло под наименованием Easier CAP).
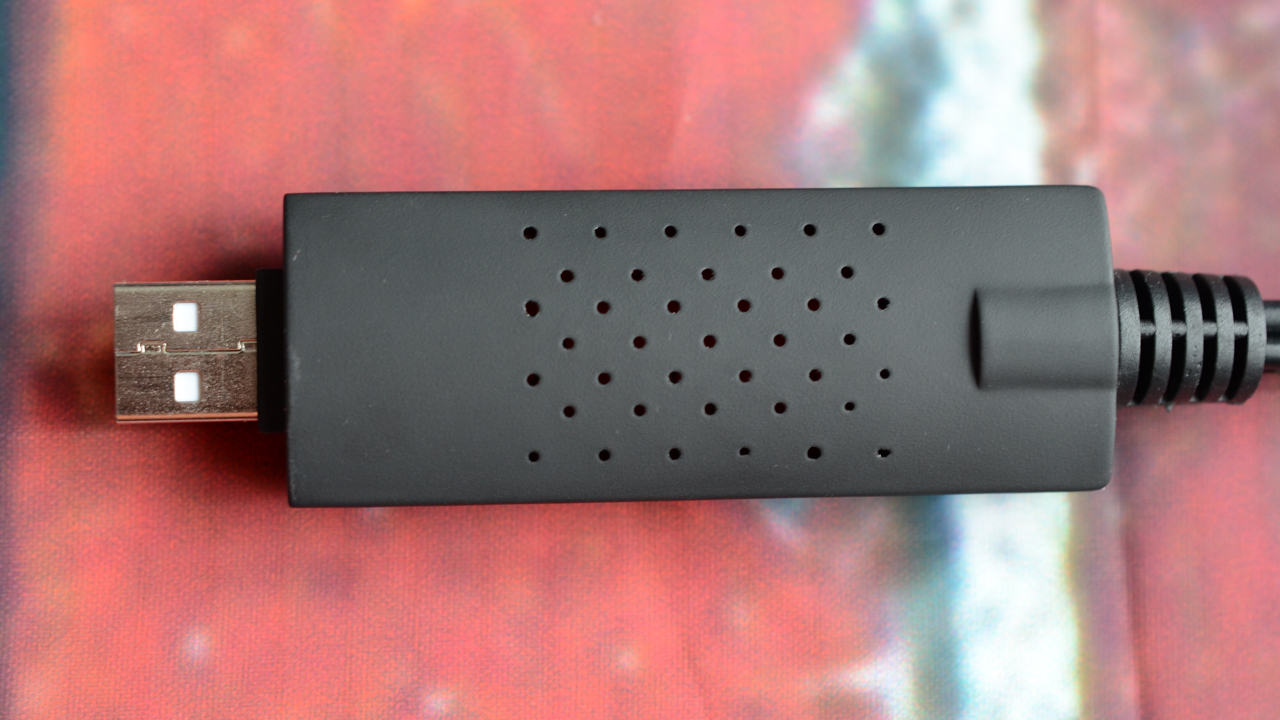
Поверхность корпуса со всех сторон обильно покрыта вентиляционными отверстиями,
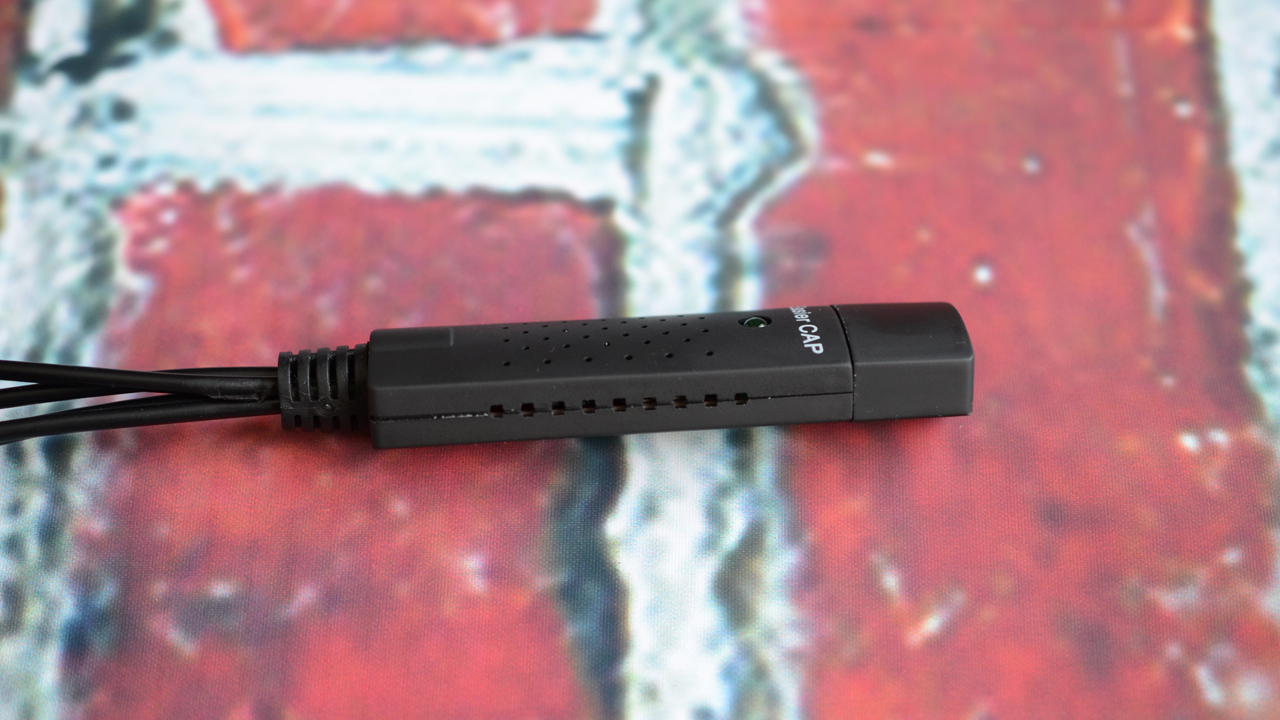
включая даже боковые ребра. Напомним, что максимальная потребляемая мощность устройства составляет ватт с четвертью.
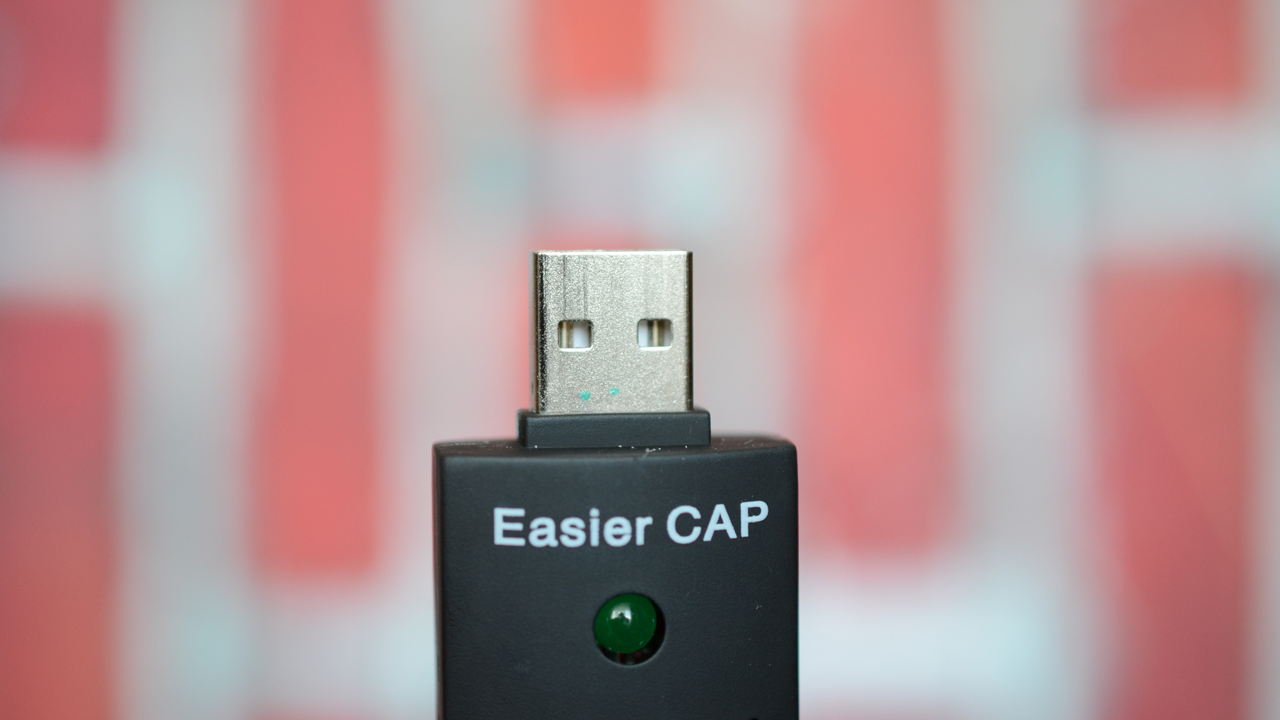
В качестве индикатора питания используется крупный светодиод зеленого цвета.
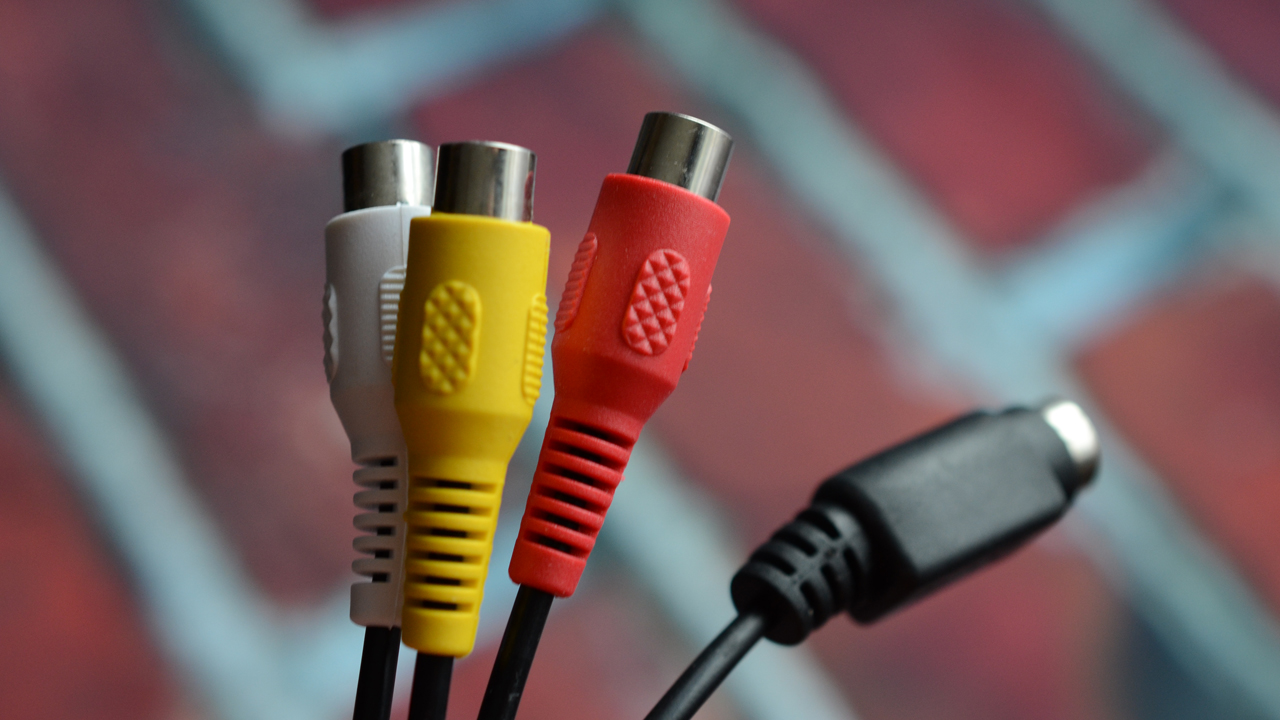
На одном торце корпуса выведены четыре коротких кабеля (примерно 12-13 см), которые заканчиваются разъемом S-Video и тремя разноцветными "тюльпанами" (RCA-коннекторы).
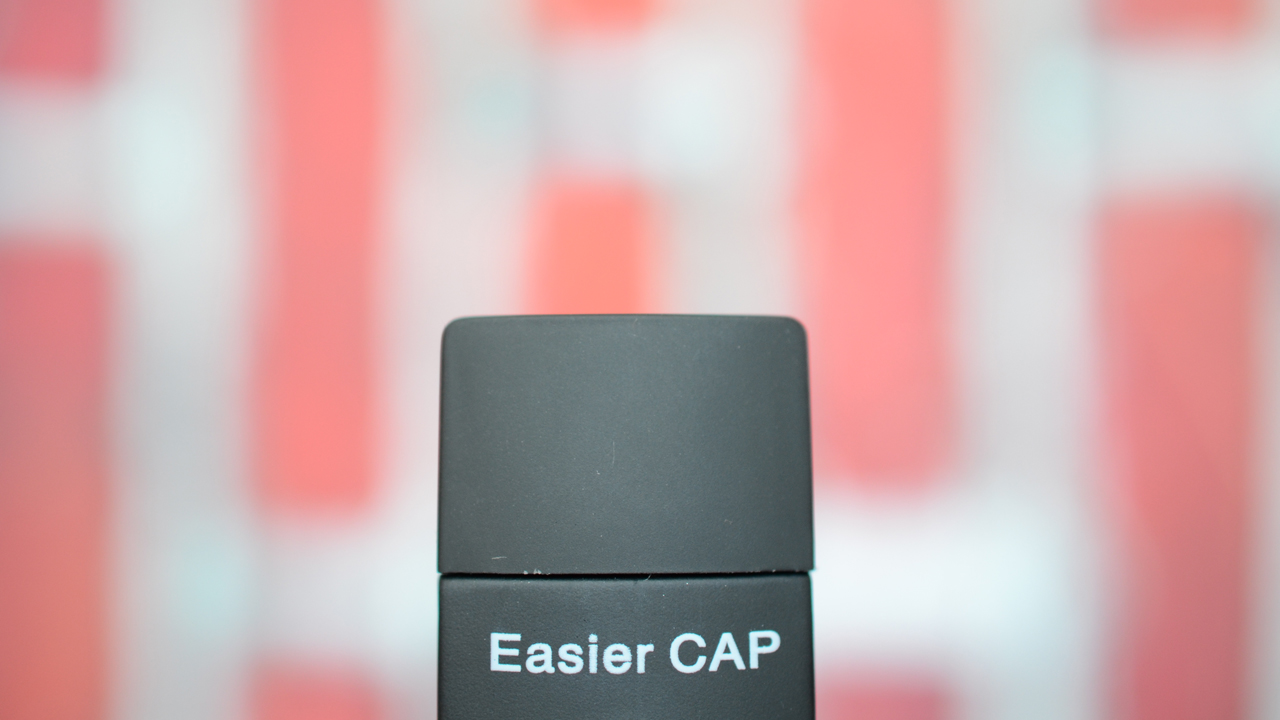
На другом торце находится USB-разъем, закрываемый колпачком.
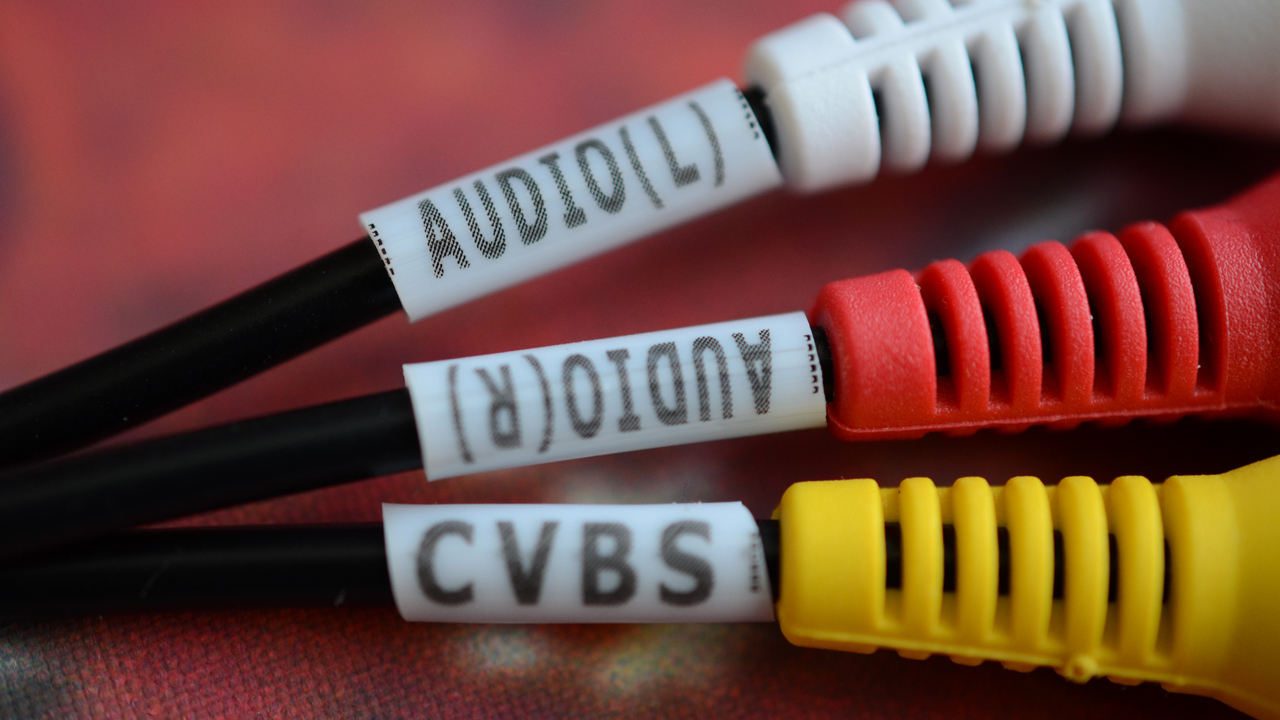
На каждом кабеле нанесены соответствующие обозначения: на желтом — для композитного сигнала CVBS (Сolor, Video, Blanking, Sync), на красном — для правого звукового канала Audio (R), на белом — для левого Audio (L).
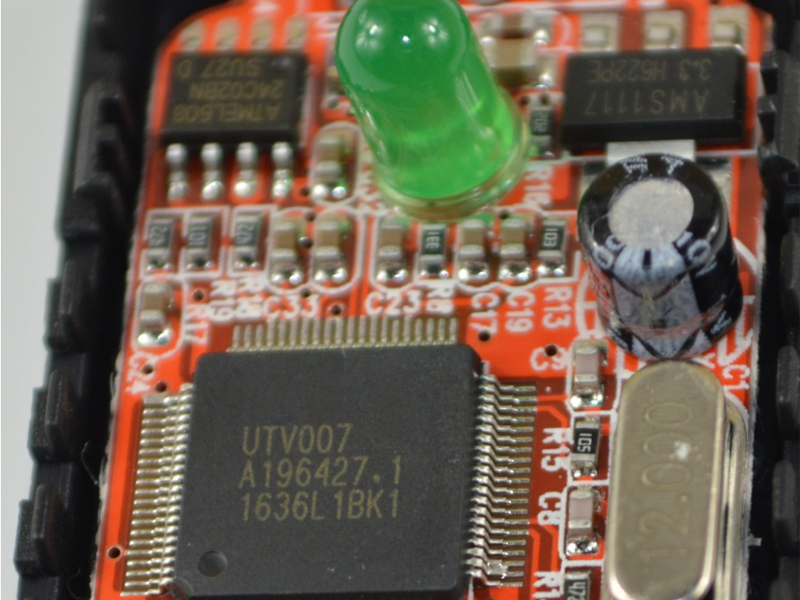
"Мотором" EasyCap USB 2.0 в данном случае является микросхема UTV007.
Обзор EasyCap USB 2.0: как это работает
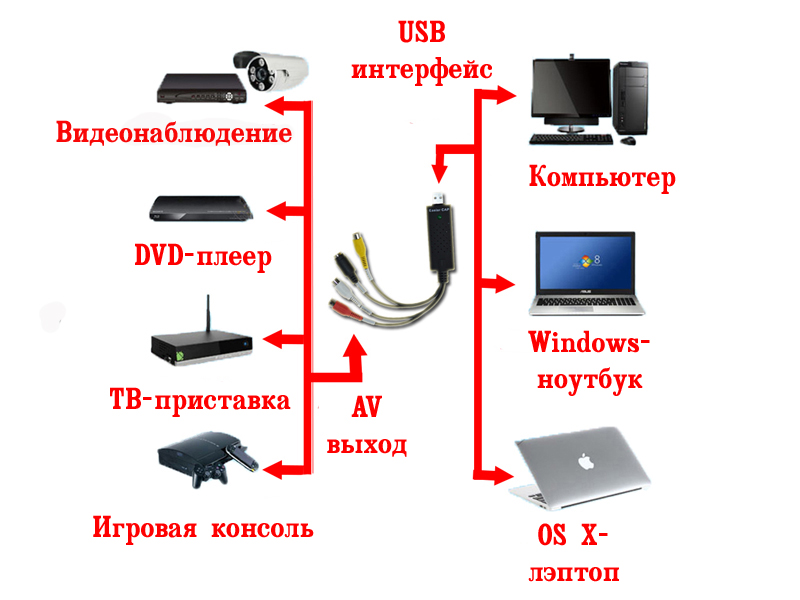
Процесс подключения EasyCap USB 2.0 между компьютером и источниками аналогового сигнала поэтапно иллюстрирован в документации.
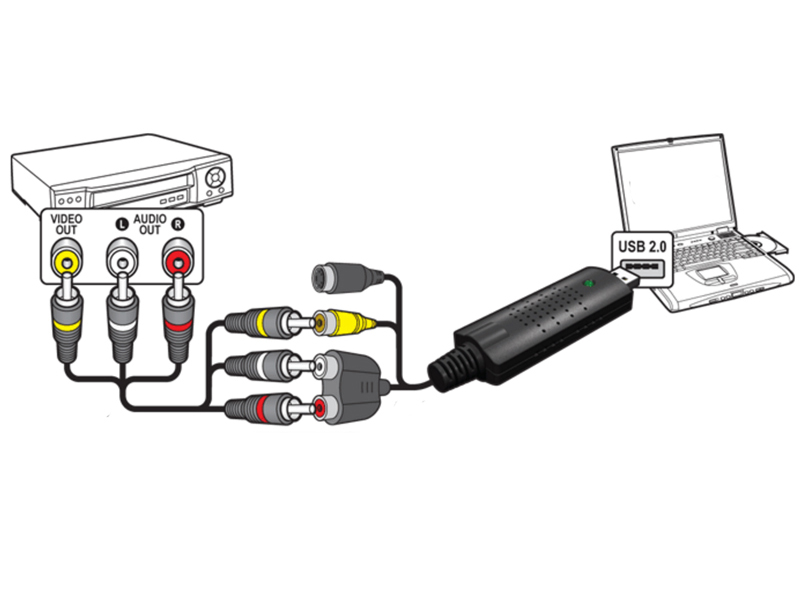
Соединить RCA-разъемы с такими же по цвету ответными "тюльпанами" сможет и ребенок. Удлинительный USB-кабель понадобится для размещения источника аналогового сигнала на некотором удалении от ПК. Для этой же цели удобно использовать удлинительные кабели RCA (в комплект не входят).
Вообще говоря, к ПК или ноутбуку предъявляются вполне определенные, хотя и довольно простые, требования. Первым делом, конечно, необходим свободный USB-порт. Причем при подключении к ПК подойдет не любой из них, а обычно только тот, что связан с USB-контроллером напрямую, а не через концентратор. Выяснить это, скорее всего, придется методом "тыка" (перебирая варианты).
Среди других требований к компьютеру (Pentium 4 или выше, 512 МБ или больше оперативной памяти, свободный гигабайт на диске для работы программы и более 4 ГБ под захват видео, дисплей на 1024х768 точек, звуковая карта) значится и совместимость с операционной системой (ОС). Для Windows 2000/XP/Vista/7/8 драйверы обычно входят в комплект (или скачиваются по ссылке продавца). Говорят, что наименее проблемными оказываются девайсы на базе микросхемы UTV007. Действительно, во время тестирования каждая из четырех ОС Microsoft справилась с поиском и подбором драйверов для EasyCap USB 2.0 самостоятельно.
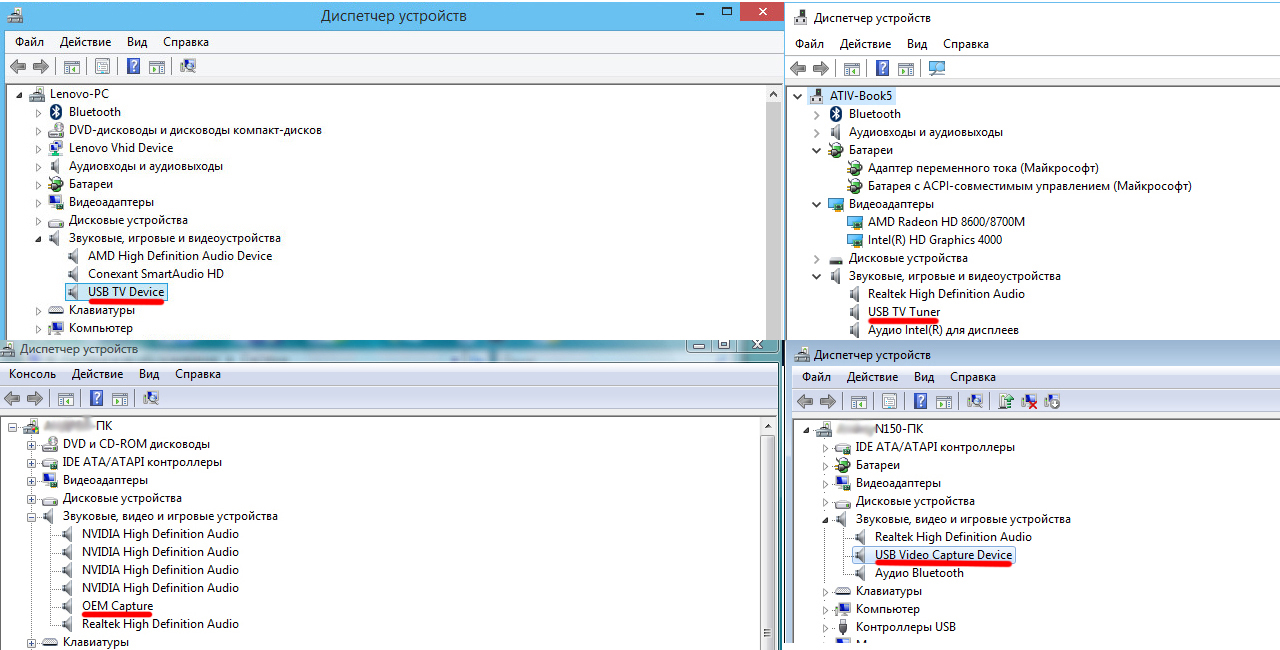
Так, Windows Vista назвала девайс — OEM Capture, Windows 7 – USB Video Capture Device, Windows 8.1 – USB TV Device, даже Windows 10, не дождавшись танца с бубном, нарекла устройство — USB TV Tuner. Напомним, что вся эта информация отображается в разделе звуковых, видео и игровых устройств соответствующего диспетчера.
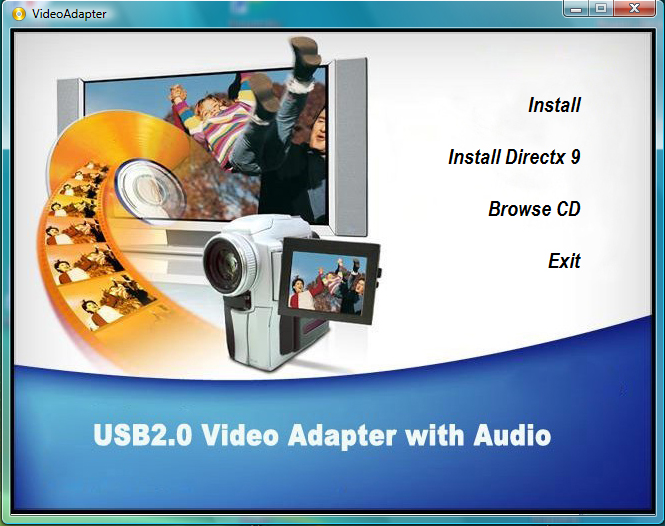
Для работы с софтом из комплекта EasyCap USB 2.0 остановились на ПК с Windows Vista. После автоматической загрузки компакт-диска открывается стартовое меню. Программа видеозахвата требует наличия (или установки) DirectX, как минимум 9 версии.
Для видеозахвата продавец предложил воспользоваться коммерческой утилитой TVR 2.5 от компании Honestech. На компакт-диске даже нанесен серийный номер продукта, который требуется ввести перед первым запуском этой программы.
После включения воспроизведения на видеомагнитофоне на экране программы TVR появляется "живое" видео. Если изображение черно-белое, то в настройках кодека надо сменить NTSC на PAL. Интерфейс программы совсем простенький. Щелчок мышкой по соответствующей пиктограмме на панели управления активирует запись в файл. Предварительно следует выбрать один из предлагаемых форматов (AVI, MPG, MP4 и т.д.).
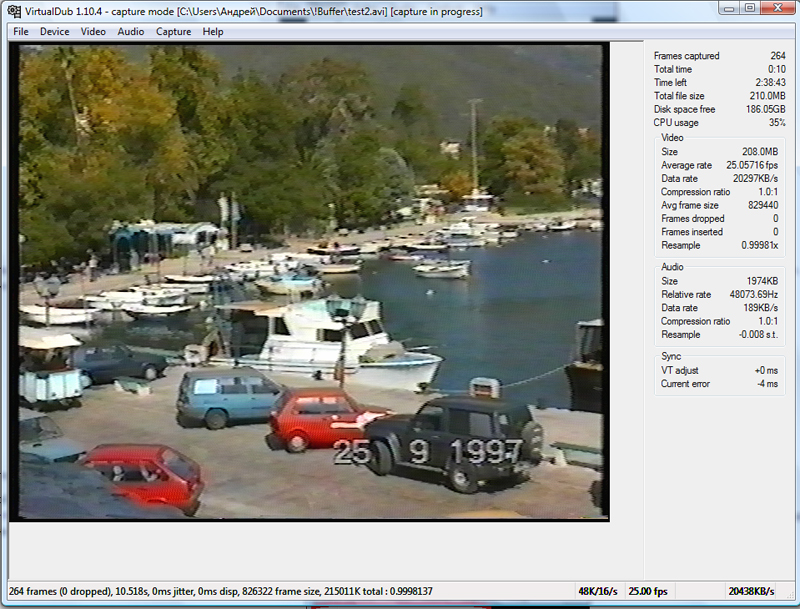
При проверке работы EasyCap USB 2.0 под Windows 7 обошлись бесплатной утилитой VirtualDub, которая исправно служит не только для захвата, но также монтажа и редактирования видеопотока.
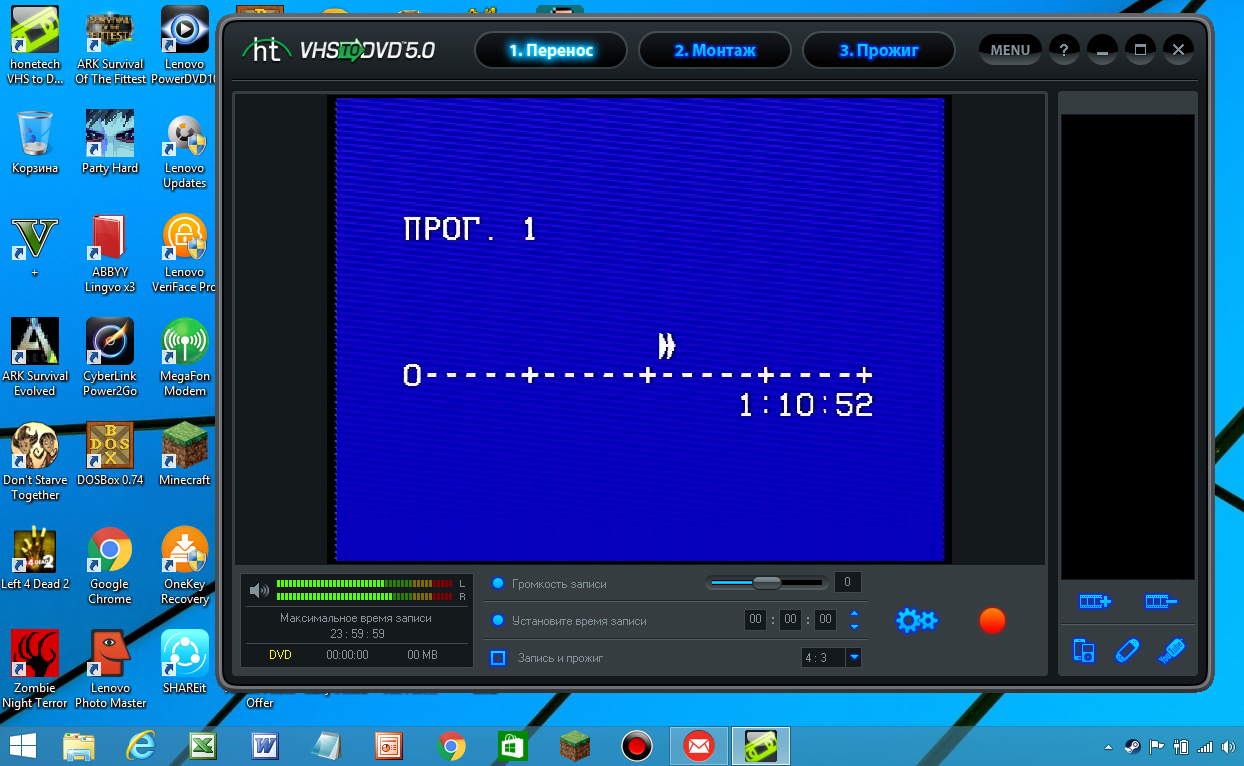
А вот на ноутбуках с Windows 8.1
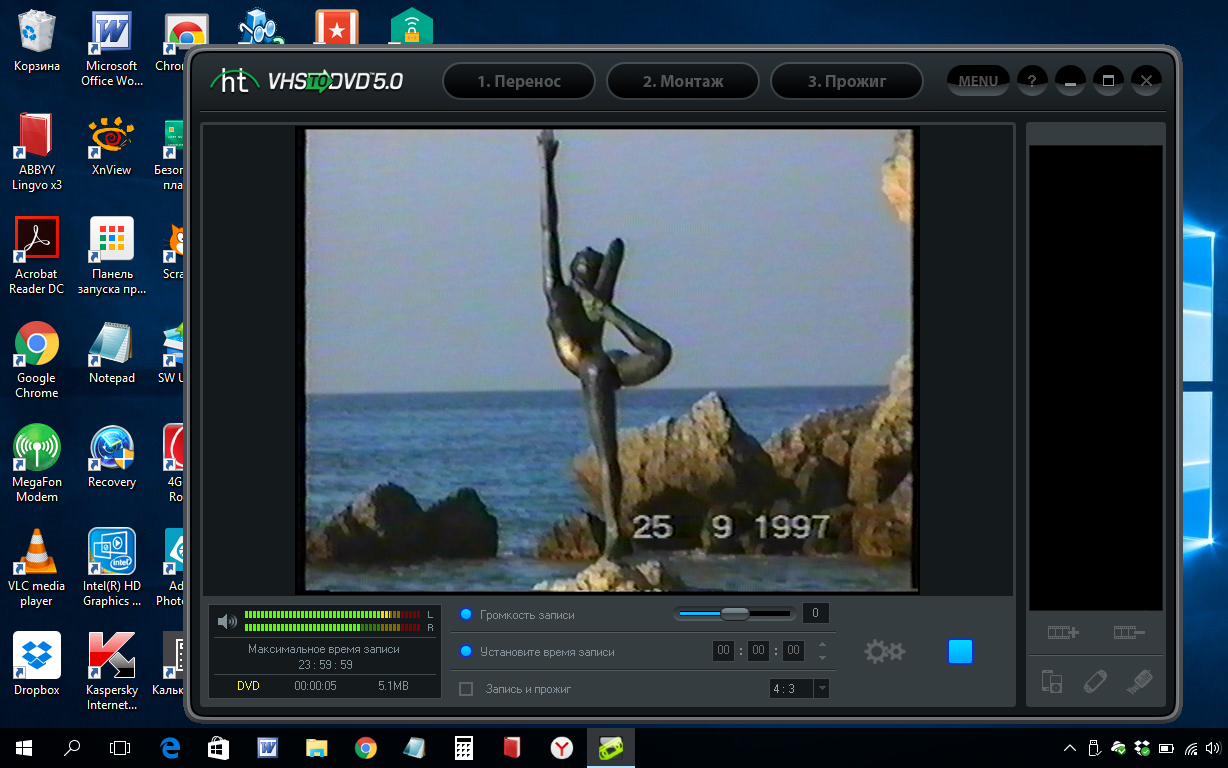
и Windows 10 попробовали более современное (увы, не бесплатное) приложение Honestech VHStoDVD 5.0. Кстати, компания Honestech включает устройства видеозахвата в комплект с люксовыми версиями своих программ.
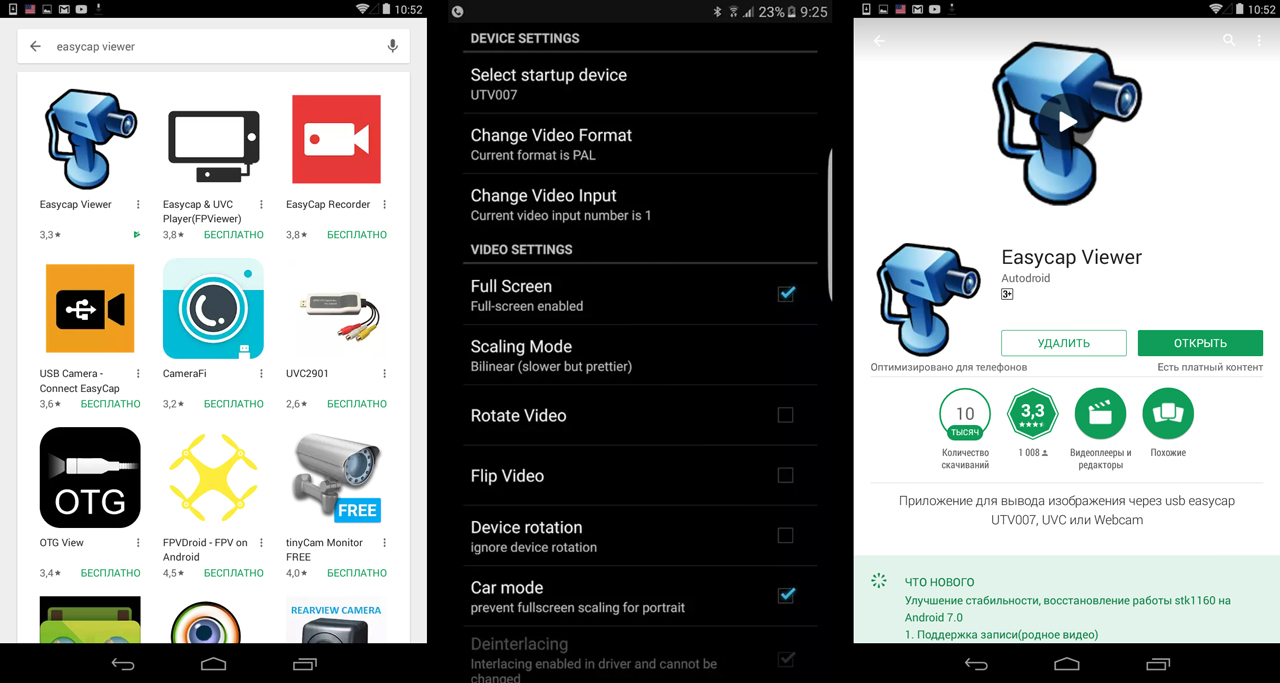
В магазине Google Play для EasyCap USB 2.0 предлагаются мобильные приложения, в том числе, например, и платная программа EasyCap Viewer, которая заточена под визуализацию сигнала с аналогового выхода видеокамер. Работает она на смартфонах и планшетах с ОС Android 4.0 (или более поздней версией, включая "семерку" — Nougat).
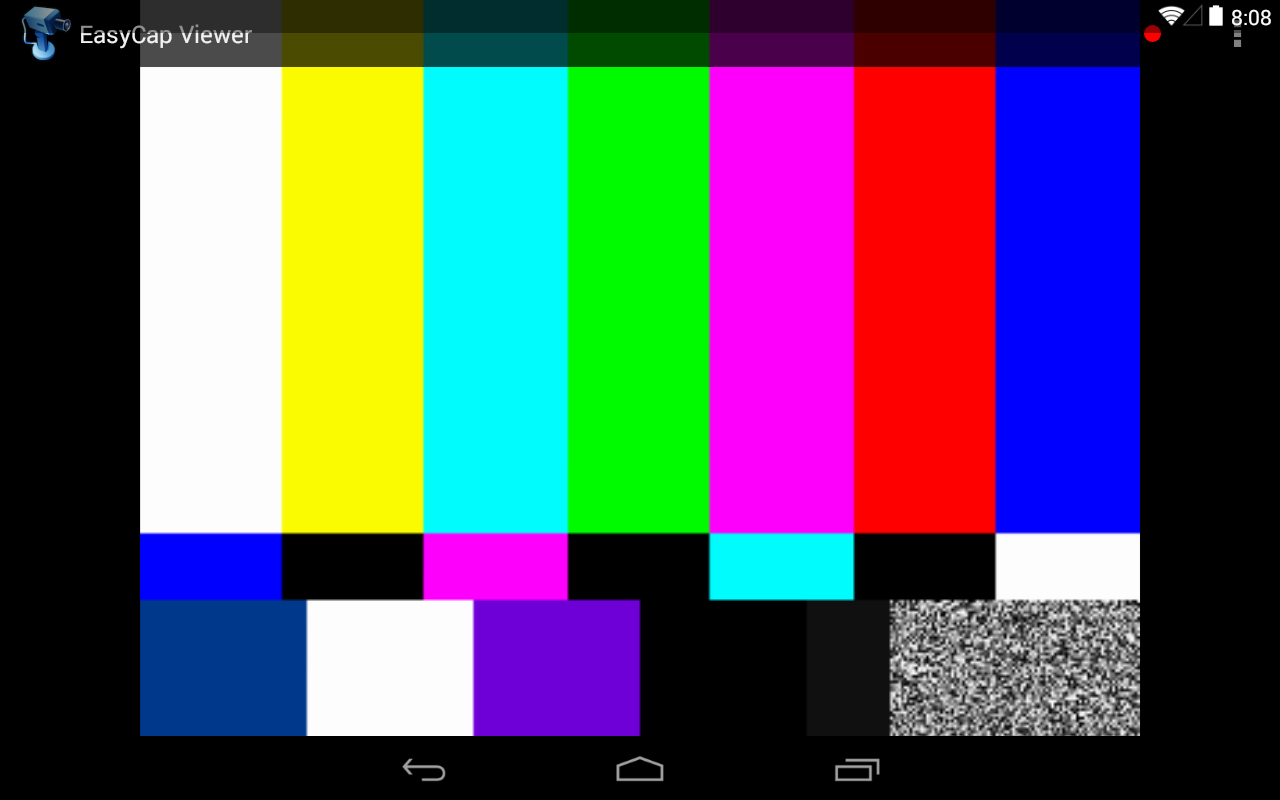
Вот тут-то и пригодился OTG-переходник для подключения к Nexus 7, который выступил в качестве 7-дюймового устройства отображения.
Обзор EasyCap USB 2.0: покупка, выводы
Резюмируя вышеизложенное, отметим, что EasyCap USB 2.0 оказывается весьма полезным девайсом. Со штатным софтом под Windows Vista, Windows 7 и Windows 8.1 это устройство распознается и подключается довольно просто. Вопреки ожиданиям, никаких заморочек с Windows 10 в нашем случае также не наблюдалось (хотя продавец предупреждал о возможных проблемах). Что же касается программы видеозахвата, то входящая в комплект обычно удовлетворяет всем запросам лишь на первое время. К счастью, ей легко подобрать как коммерческую, так и бесплатную альтернативу. Качество сохраняемого контента с VHS-кассет ни чем не хуже оригинала. Таким образом, при наличии EasyCap USB 2.0 перевод "аналогового наследства" в цифровой вид – только вопрос времени. К тому же, дополнительные возможности для этого девайса открываются при использовании мобильного приложения.
Место покупки однозначно рекомендовать довольно сложно. Сэкономить удастся, выбрав, например, один из магазинов на площадке AliExpress, где можно рассчитывать на цену 5-8 долларов. Правда, для уточнения деталей у китайских продавцов, понадобится минимальное знание английского. Да и посылку придется подождать. Быстрее, но обычно дороже, окажется приобретение EasyCap USB 2.0 в России. Впрочем, этот девайс в любом случае окупится.
Fushicai Video Dvr Driver For Mac
This article aspires to become a even more updated and very clear instructional on how to set up the Easycap video capture device in Ubuntu ánd it’s alternatives. Provided the cost of these capture devices and there relatively great video high quality they are usually fairly well-known gadgets, at an typical price of $10-$15 how can you not really pick one up to at minimum check it out. Until not really to lately there wasn’t a excellent deal of assistance for the devices and what assistance and drivers there were weren’t usually the very best for all óf the Easycap variations and equipment. The old driver acquired poor video high quality and compatibility for all hardware types is pretty low and finicky. Additionally you had to make use of their capture software program piped through Mplayer to catch video unless you installed the slightly more finicky kernel spot. And that is definitely what I will be helping you through right now is installing the current steady kernel module you will require to correctly set up and make use of your Easycap device in ubuntu. Explanation Linux kernel component driver for thé Somagic Easycap capture gadget.
Audio is currently not supported on the last Linux kernel. Audio is working with the Windows driver (tested on Windows 2000 with the XP driver not on a virtualized computer with a playstation PSX for the video and audio inputs with the software ‘honestech HD DVR 2.5’). The Windows driver shipped with the device was for another model.
EasyCAP Design DC60, with CVBS, S-VIDEO, AUDIO(M), and Sound(L) advices. The uninitialized gadget exhibits in lsusb ás “1c88:0007 Somagic, Inc.”. Once initialized, it shows as “1c88:003c Somagic, Inc”. EzCAP USB 2.0, with unlabeled CVBS, S-VIDEO, AUDIO(L), and AUDIO(R) inputs. The device is usually initialized automatically and shows in lsusb ás “1c88:003d Somagic, Inc”. EasyCAP Model 002 (or EasyCAP002), with 1, 2, 3, 4, and unlabeled mike advices.
The uninitialized gadget shows in lsusb ás “1c88:0007 Somagic, Inc.”. Once initialized, it displays as either “1c88:003e Somagic, Inc” or “1c88:003f Somagic, Inc”. Recognition Indentify the gadget before purchasing It is certainly tough to determine the chipset óf any EasyCAP gadget before buying because most onlineshops (ebay, amazon . com) do not méntion in the providéd technical data thé chipset of thé device. Identify device using installation instructions for Home windows. If the chipset can be not stated in gadget specifications on the internet site, one way to determine out the chipsét inside the EáysCAP is usually to study through the installation directions for Windows (if offered for download). Scréenshots of the windowsinstaIler frequently disclose the dévicename.
STK1160 EasyCAP is certainly in Windows: (Syntek) STK1160 or STK1150. Empia EasyCAP will be in Windows: USB 2861 Device or EMP. Somagic EasyCAP can be in Windows: SM-USB 007 or SMI Grabber Device. UTV007 centered EasyCAP will be in Home windows: USBTV007e Known Easycap gadgets STK1160 EasyCAP It is presumed that the stk1160 structured “EasyCAP DC60” ist the “originally” EasyCAP gadget.
This gadget is sold in different varieties (versions) and actually under different names like: EzCap, LógiLink, Mumbi, Weltbild, ánd some more. Parts Used. Synték STK1160 (USB video link).
Silan SC8113 or GM7113 (Philips SAA7113 compatible video decoder). Air conditioning unit’97 sound processor chip (In the 4 inputs design this chip is lacking. Audio capturing is completed by the STK1160 chips buiIt-in ADC for móno mike audio saving.) Indentification # lsusb Tour bus 001 Device 003: ID 05e1:0408 Syntek Semiconductor Co., Ltd STK1160 Movie Capture Gadget Producing it work STK1160 centered devices are backed (video and audió) undér Linux by the éasycap kernel component (kernel 2.6.38 and later on) and more on by thé stk1160 kernel module (kernel 3.7). More details on this wiki: Sound support Even more details ón this wiki: Empia EásyCAP The Empia EásyCAP is definitely centered on the EM2860 chip from Empia.
Elements Used. Empia EM2860 (Na2861?) (USB video bridge). Silan SC8113 (Philips SAA7113 compatible video decoder). Air conditioners’97 audio processor chip Indentification # lsusb Coach XXX Device XXX: Identity eb1a:2861 eMPIA Technology, Inc.
Producing it function Na2860 (EM2861) based devices are supported in Linux by the em28xx kernle module. More info on this wiki: Audio help The na28xx kernel module should produce a Na28xx Sound ALSA soundcard which can become used for sound capturing. Somagic EásyCAP The Somagic EásyCAP can be centered on the SMI-2021 chip from Somagic. It requires a firmware for procedure.
Parts Used. Somagic SMI-2021CEnd up being (USB video bridge). SAA7113 compatible video decoder. Cirrus Logic 5340-CZZ sound processor chip Indentification # lsusb Bus XXX Device XXX: Identification 1c88:0007 Somagic, Inc. And after loading the firmware # lsusb Bus XXX Gadget XXX: Identification 1c88:003c Somagic, Inc.
Or Coach XXX Gadget XXX: Identity 1c88:003f Somagic, Inc. Making it work For SMI-2021 centered devices is available a beginning Linux-driver task: which this guide clarifies the installation procedure for Ubuntu. Continué to the part of this instructional More details on this wiki: Audio support Audio support will be supplied by the éasycap-somagic-linux drivér at an unidentified stage. USBTV007 EasyCAP This EasyCAP is certainly structured on a single UTV007 tagged chip. Sudo apt-gét build-dep Iinux-image-$(uname -ur) Then you will need to download possibly or and or depending on your architecture from the unique drivers web site because we will require the firmware éxtractor for the Sómagic-EasyCap hardware to work. Extracting firmware. Make sure you do not inquire for or provide hyperlinks to the copyrightéd firmware.
If yóu wear’t have your driver Compact disc, you might end up being capable to find the firmware onIine via a web search. Using wine, operate “Drivers/Setup.exe” (or occasionally “Driver/Setup.exe”), ón the EasyCAP installation CD. For the EasyCAP DC60, this should produce a document called “Program Documents/Common Documents/Somagic/SmiUsbGrabbér3C/xp/SmiUsbGrabbér3C.sys”. Fór EasyCAP002 this should produce a file named either “Program Files/Common Files/Somagic/SmiUsbGrabbér3E/xp/SmiUsbGrabbér3E.sys” ór “Plan Data files/Common Files/Somagic/SmiUsbGrabbér3F/xp/SmiUsbGrabbér3F.sys”. Operate “. Run as origin “somagic-extract-firmwaré SmiUsbGrabber.sys”, tó create “/lib/firmware/somagicfirmware.trash can”. Depending on whether the set up created SmiUsbGrabber3M.sys or SmiUsbGrabber3G.sysSmiUsbGrabber3At the.sys or SmiUsbGrabber3n.sys you will copy /lib/firmware/somagicfirmware.trash can to /lib/firmware/smi20213f.rubbish bin Examining The EasyCap Device This check can be to make certain the gadget is working correctly before moving forward to set up the kernel module.
Put in the EasyCAP device. Work “ somagic-init” tó initialize the EásyCAP device, which changes its USB identification. This step is not essential for thé EzCAP USB 2.0, which is usually immediately initialized. If there is no output, initialization was successful.
However, to personally confirm whether initialization had been prosperous, re-run “ sómagic-init” or check “ lsusb” for the brand-new id “ 1c88:003c Somagic, Inc” (EasyCAP DC60), “ 1c88:003e Somagic, Inc” (EasyCAP002), or “ 1c88:003f Somagic, Inc” (EasyCAP002). You can also operate “ somagic-capture -tést-only” and check for a return code of 0 with “ echo $?“. For EzCAP USB 2.0 just, run “ modprobe -r usbhid“.
Activate your video resource and ensure video can be linked, either via CVBS/composite (any device), or S-VIDE0 (EasyCAP DC60 or EzCAP USB 2.0). For the EasyCAP002 the proper plug may differ. First attempt “2”, then “3”. Choose and run a use example based on your input type Have fun with PAL video from CVBS/amalgamated input somagic-capture mpIayer -vf yadif,scréenshot -demuxer rawvideo -rawvidéo “mate:format=uyvy:fps=25” -factor 4:3 — Play NTSC video fróm S-VIDEO insight somagic-capture -n mplayer -vf yadif,screenshot -demuxer rawvideo -rawvideo “ntsc:structure=uyvy:fps=” -aspect 4:3 — Installing Somagic Easycap Kernel Module Only Include supporting segments The smi2021 driver is usually depending on the saa7115 module. Some adjustments had to become made to that component to make the driver function. We will possess to download ánd install 3 or 6 even more spots before we can construct the kernel Component. From here we will change to our kernel headers listing to download the updated saa7115 component and sections cd /usr/src/linux-héaders-$(uname -r) (or where ever you possess downloaded your kerneIs headers and supply) Down load the repair with thé smi2021 driver module sudo wget -no-check-certificate -U smi2021v3.patch git checkout -b smi2021v3 git feel smi2021v3.patch If your kernel-tree is old than 3.11, you will first require these three areas.
Sudo wget -nó-check-certificate -U saa7115-0001.patch sudo wget -no-check-certificate -O saa7115-0002.patch sudo wget -no-check-certificate -U saa7115-0003.patch If your kernel-tree is usually older than 3.12 — and you didn’t down load the media-master forest — you will need these three pads. Sudo wget -nó-check-certificate -U saa7115-0004.patch sudo wget -no-check-certificate -O saa7115-0005.patch sudo wget -no-check-certificate -U saa7115-0006.patch. When you possess downloaded the required bits we require to use them. This will rely the patch documents in the saa7115 patch documents and use them all.
git was saa7115-000. Compile smi2021 module only This is definitely how you simply compile the module, without getting to compile the whole kernel. If your kernel is definitely old than 3.11 carry on to the “l” section. This will just work if the kerneI source-tree is the exact same version as the kernel you are currently working First you will require to spot your kernel forest with thé smi2021v3.patch, and the three or six saa7115 pads as explained above. Then you will possess to develop both the saa7115 component and the smi2021 component. These commands are entered when you are usually in the main of the kernel-source tree.
Make Michael=drivers/media/i2c segments make Meters=drivers/media/usb/smi2021 quests After that we set up the modules. Sudo /sbin/insmod drivers/média/i2c/saa7115.ko sudo /sbin/insmod drivers/média/usb/smi2021/smi2021.ko If you get mistakes about missing emblems when attempting to insmod the saa7115 component, this is definitely probably because the saa7115 component requires some various other segments that aren’testosterone levels loaded yet.
We can power them to be loaded if do this before thé insmod saa7115 command: sudo /sbin/modprobé saa7115 sudo /sbin/rmmod saa7115 You should today be able to insert your EasyCap, ánd you will find this collection in your kernel sign: smi2021 2-1.1:1.0: Somagic Easy-Cap Movie Grabber Putting together A New Kernel And Segments change listing to the main of where yóur kernel headers are usually located First, we duplicate the construction of your current kernel. Sudo cp /boot/.config$(title -ur). >.config Then we check that we can compile the smi2021 module Modifying the configuration This step can end up being overlooked if no configuration changes are usually wished. The build procedure will use a construction that is put together from different sub-config data files. The simplest method to modify anything here can be to run: chmod a+a debian/scripts/. chmod a+x débian/scripts/misc/.
Video Dvr Driver
fakeroot débian/rules clean fakeroot debian/guidelines editconfigs This will take the present construction for each architecture/flavour supported and calls menuconfig for thát. The chmod will be required because the way the supply package will be created manages to lose the executable bits on the scripts. Device motorists ->Media support ->Mass media USB Adapters ->Discover the access called “ Somagic SMI2021 USB video/audio capture support“. Check out that it’s i9000 ski slopes with, if not, press michael to mark it as a component or con to compile it into the kernel. Check out the config for additional choices you would like, departure and conserve the config. Creating the kernel Developing the kernel is definitely quite easy. Shift your functioning index to the basic of the kernel source forest and then sort the following instructions:.
fakeroot debian/rules clear fakeroot debian/rules binary-headers binary-generic Now, just wait around, and wish you’ve accomplished everything correct (ánd that l didn’t forget about anything). If the build is effective, a set of three.deb binary package deal data files will be created in the index above the build root directory website. For illustration after developing a kernel with edition “2.6.38-7.37” on an amd64 program, these three.n deals would end up being created: compact disc. Ls.deb linux-headers-2.6.38-72.6.38-7.37all.deb linux-headers-2.6.38-7-common2.6.38-7.37amd64.deb linux-image-2.6.38-7-generic2.6.38-7.37amd64.deb When the compile finishes, and there are usually no mistakes, we set up the segments. Sudo make modulesinstall This should full in a several minutes, and then we are usually prepared to set up the kernel. Install all packages that had been created except the tools-generic package deal as this occasionally doesn’t have the dependency to properly install. Once that can be carried out you can restart your pc and when it loads up you should observe another video gadget in /dev most likely video1 Screening the driver Put your gadget, and kind this: vlc v4l2:///dev/videoX:v4l2-standard=:input-slave=alsa://plughw:X,0 In /dev/videoX, the Back button is definitely the quantity of the gadget, on my personal computer it’s 1, because my webcam is usually 0, but it might be any number.
The QS704 USB 2.0 Movie Grabber, it can catch Top quality video and sound file immediate by USB 2.0 interface without good card. Nevertheless, the installation is very easy and the external power is definitely unnecessary. Alternative for notebook, we have got encased the professional video editing software then provide greatest editing functionality for you. ShowBiz Dvd movie is usually video-editing software that can make editing your movies as fun as shooting them. It assists novice customers finish stylish films in only three methods.
Battlefield 3 download mac os x. Share completed tasks on Dvd and blu-ray, cassette, the Web, and mobile devices. High-speed rendering and current performance imply less period waiting around and even more time developing. By the way, you can produce many particular impact and cut video files.etc.
Functions:. Include Professional and simple to understand utilized video publisher software. Popular USB 2.0 user interface and not really need other. Capture Movie though USB 2.0 interface. Support Lighting, Contrast, Color, and Vividness handle. The dimension suitable that can be simple to bring. High plug play.
Assistance For All Formats: record in Dvd movie+/-R/RW, Dvd movie+/-VR, and DVD-Video. Applying to internet meeting / world wide web conference Specifications:. Complies With General Serial Shuttle bus Standards Rev. 2.0. Works with NTSC, PAL Video structure. Video insight: One RCA composite, One S-Video. Sound input: Stereo audio (RCA).
Fushicai Video Dvr Driver For Mac
Aspect: (T)96 back button (W)23 x (L)16. USB coach power. Supports high quality video resolution: NTSC: 720 a 480 @ 30fps System Specifications:. P4 1.7GHz CPU or above. 256MN Memory. VGA credit card with 32MN storage. One obtainable USB 2.0 port.
Suitable Windows-sound card. Microsoft windows XP/Vista/Win7/Win8/Win10 Package deal Articles:.
QS704 USB video grabber. Quick Installation Guideline.
Software CD (Includes drivers, video editing and converting software, and guide).
Contents. Overview/Features. All the EasyCAP devices and clones require a USB 2.0 link (USB 1.1 is usually too sluggish).
They are tunerless but can capture analogue vidéo up to 720×576 px (Pet) or 720×480 px (NTSC) and. stereosound up to 48000 Hz sampling price (or only 8000 Hz mono on some versions where the Air conditioner’97 chip is lacking). Most of them have input cables labelled CVBS, S-VIDEO, AUDIO(D), AUDIO(R). Some versions do have 4 yellowish input wires (CVBS) branded 1, 2, 3, 4 and one white unlabelled audio wire. Capturing can be probable from only one insight at a period! Components Used The elements of the various EasyCAP labeled devices are usually mentioned in the area below. Additional Pictures.
If the chipset is definitely not described in device specs on the web site, one way to number out the chipsét inside the EáysCAP is certainly to learn through the installation guidelines for Home windows (if offered for download). Scréenshots of the windowsinstaIler often uncover the dévicename. STK1160 EasyCAP is certainly in Home windows: (Syntek) STK1160 or STK1150. Empia EasyCAP will be in Windows: USB 2861 Gadget or EMP. Somagic EasyCAP is usually in Home windows: SM-USB 007 or SMI Grabber Gadget.
UTV007 based EasyCAP is in Windows: USBTV007 Known Easycap products STK1160 EasyCAP It can be suspected that the stk1160 based ‘EasyCAP DC60’ ist the ‘initially’ EasyCAP gadget. This gadget is offered in different types (versions) and even under different names like: EzCap, LógiLink, Mumbi, Weltbild, ánd some more. Elements Used. Synték STK1160 (USB video link).
Silan SC8113 or GM7113 (Philips SAA7113 compatible video decoder). Air conditioners’97 sound processor (In the 4 inputs model this nick is lacking.
Audio capturing can be performed by the STK1160 potato chips buiIt-in ADC for móno mike audio saving.) Indentification # lsusb Bus 001 Gadget 003: ID 05e1:0408 Syntek Semiconductor Co., Ltd STK1160 Video clip Capture Device Producing it work STK1160 structured devices are supported (video and audió) undér Linux by the éasycap kernel component (kernel 2.6.38 and afterwards) and further on by thé stk1160 kernel component (kernel 3.7). More details on this wiki: Sound support More information ón this wiki: Empia EásyCAP The Empia EásyCAP is certainly based on the Na2860 nick from Empia. Components Used. Empia EM2860 (EM2861?) (USB video link). Silan SC8113 (Philips SAA7113 suitable video decoder). Air conditioning’97 audio processor Indentification # lsusb Bus XXX Gadget XXX: Identification eb1a:2861 eMPIA Technology, Inc. Producing it work EM2860 (EM2861) based devices are usually backed in Linux by the em28xx kernle module.
More details on this wiki: Sound help The em28xx kernel component should develop a Em28xx Sound ALSA soundcard which can end up being used for good capturing. Somagic EásyCAP The Somagic EásyCAP is certainly centered on the SMI-2021 chip from Somagic. It needs a firmware for procedure. Elements Used. Somagic SMI-2021CEnd up being (USB video bridge).
SAA7113 compatible video decoder. Cirrus Logic 5340-CZZ audio processor chip Indentification # lsusb Bus XXX Device XXX: ID 1c88:0007 Somagic, Inc. And after loading the firmware # lsusb Tour bus XXX Device XXX: Identification 1c88:003c Somagic, Inc. Or Coach XXX Gadget XXX: ID 1c88:003f Somagic, Inc. Making it work For SMI-2021 based devices is present a proceeding Linux-driver task: More information on this wiki: Sound support Audio support can be offered by the éasycap-somagic-linux drivér at an unfamiliar phase. USBTV007 EasyCAP This EasyCAP is certainly centered on a single UTV007 labeled chip. This gadget is offered as ‘USB video capture QS702’ from SHENZHEN FUSHICAI ELECTRONIC CO.,LTD lsusb reviews.
Manufacturer: Fushicai. Item: usbtv007 Components Used. Single nick: UTV007 A new614231.1 1136L1BT. Inscriptions on the table: FSC VIDEO DVR Indentification # lsusb Coach XXX Device XXX: Identification 1b71:3002 Making it function Audio assistance As of kernel version 3.19-rc1, the usbtv kernel component should create a USB Sound ALSA soundcard which can become utilized for sound capturing. Kernel segments Kernel 3.19-rc1 and over now consist of the usbtv kernel component that supports both video and audio. Patch ID:.
Audio is usually 48Khz, 2ch, 16bit. Kernels between version 3.13-rc5 and 3.19 support video just. If you are usually below kernel version 3.19 and need audio assistance, you can construct the component yourself. Git:. EnabIe CONFIGVIDEOUSBTV Userspace motorists. Data analysis toolpak mac download.
Git:. Quite experimental. Presently doesn’t perform anything beyond whát kernel driver does but is resource starving. Written using Python libusb1 and v4l2 bindings (you will need their deals from pypi.pythón.org). Requires sixth is v4l2loopback:.
Could end up being useful for easy protocol testing, prototyping Work needed. Tests and fixing of final bugs can be very delightful!. Audio is currently not really backed on the final Linux kernel. Sound is operating with the Home windows driver (tested on Windows 2000 with the XP driver not really on a virtualized pc with a pIaystation PSX for thé video and audio inputs with the software program ‘honéstech HD DVR 2.5’).
The Home windows driver delivered with the gadget was for another design. Right here’s the appropriate one: Slides from chat describing set up for reverse-engineering what does the equipment do are available: Exterior Links Consumer info about the four various EasyCAPs with equipment photos (Western site translated with Search engines) Site of a chinese EasyCAP manufacturer/ store where at some Easycap items the chipset will be announced and at some it is certainly not declared.