Creating Scenes
In SketchUp, making a scene doesn’t bother anybody. In fact, scenes help you save different model views and properties and then present those views to other people. Each scene you create appears as a tab at the top of the modeling window and you can manage your scenes using the Scenes panel, as shown in the figure below.
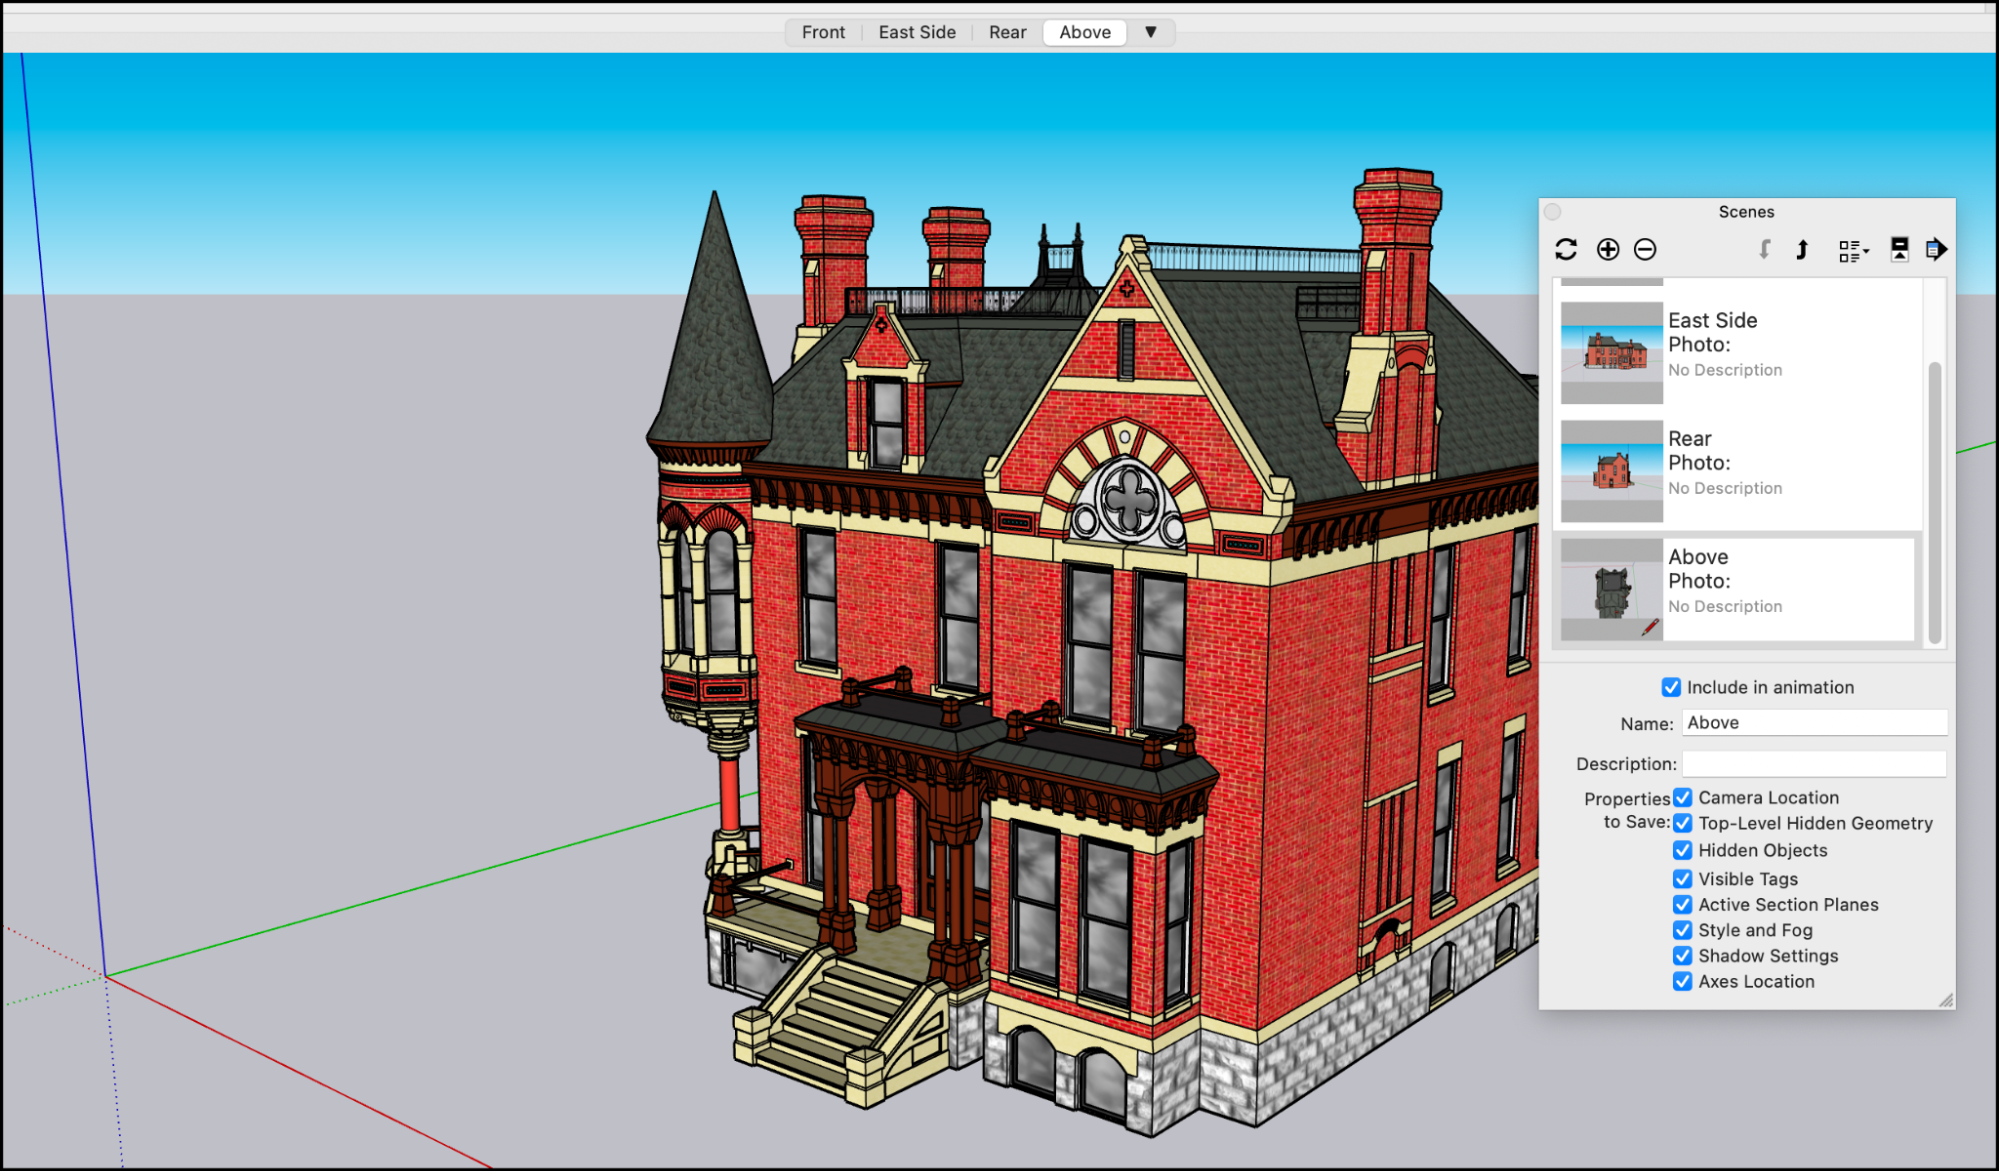
Here are a few ways you might use scenes:
- As you’re creating a 3D model, creating scenes helps you quickly change to a different view of your model. You might save views from different angles, like the front, back, and side of your model, or rendering styles, such as wireframe, monochrome, or textured.
- Saved scenes can help you present your model. Selecting a scene tab is much easier than pausing a presentation to orbit, pan, or zoom while your audience watches and waits.
- Save scenes with a model that you share via the 3D Warehouse.
- Animate a sequence of scenes to show off a model. Learn how to animate scenes in Animating Sections and Scenes.
Table of Contents
Adding a scene
Before you create a scene, set the view and apply any styles, fog, shadows, or section cuts that you want to the scene to display. Also, hide any geometry or deselect any layers that you don’t want the view to display. All these properties are saved with your scene, although you can update or manage these properties later, as explained in the next two sections of this article.
To add a scene, follow these steps:
- Select Window > Scenes to open the Scenes window.
- Select the Add Scene icon (
 ). The scene appears in the Scenes window with the default name of Scene 1.
 - If you want to change the name of your scene or add a description, select the Show Details icon (
 ) in the upper right of the Scenes window. Use the options provided to rename the scene, add a description, and select which properties are saved with the scene. Descriptions add detail to the Thumbnail view in the Scenes panel and are also available as an Auto-Text property in LayOut.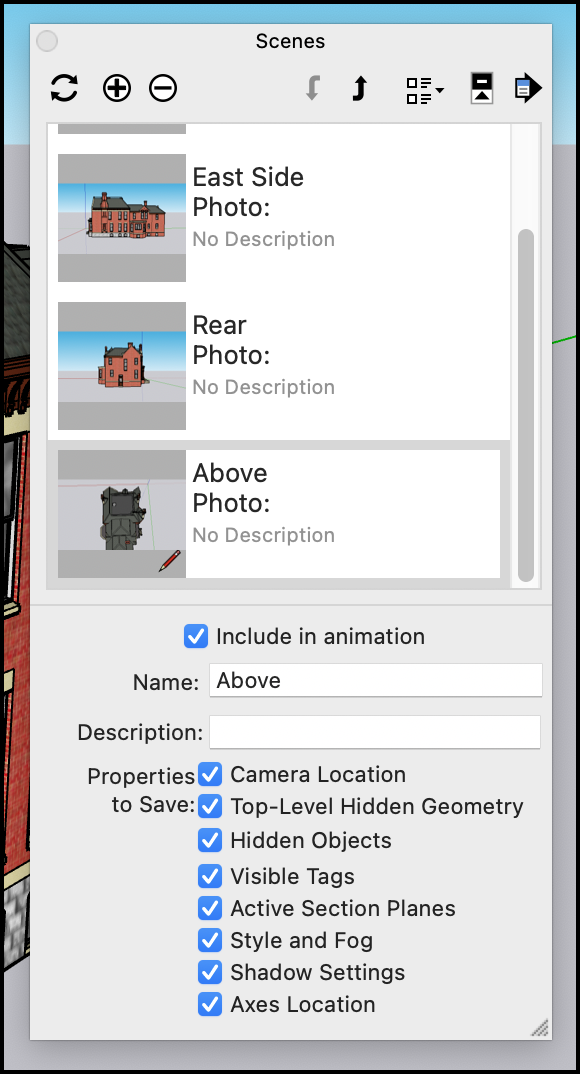
If you’re creating a new model of a building and you have a photo of that building, you can create a scene and start a Match Photo operation at the same time. In the Scenes dialog, click the Details arrow ( ) and select Add Scene with Matched Photo. You’re prompted to select the photo file you want to use, and then SketchUp switches to Match Photo mode. See Matching a Photo to a Model (or a Model to a Photo) for details about working with the Match Photo feature.
Managing properties saved with a scene
By default, when you add a scene, SketchUp saves several properties that affect the view of your model. In the Scenes dialog, the following checkboxes enable you to control which of these properties are saved. Here’s brief introduction to the checkboxes and the properties they control:
- Camera Location: Remember that SketchUp uses a camera as a metaphor for the way you view your model. The camera properties saved with a scene include the point of view, including the zoom distance and field of view.
- Hidden Geometry: If your scene has hidden geometry, this geometry remains hidden every time you load that particular scene.
- Visible Layers: This property applies if you use layers to control visibility.
- Active Section Planes: Your model can contain several section planes, which slice your model at a certain point to display a view of the inside, usually from the top or the side.Tip: You can use different section cuts in successive scenes to create exciting animations of your model.
- Style and Fog: This checkbox determines whether the scene saves style settings, such as edge rendering and fog.
- Shadows Settings: This checkbox tells SketchUp whether to store all shadow-related information, including type, time, date, and so on, with the scene.
- Axes Location: This setting affects whether the axes display and the axes position in the scene.
By default, all these checkboxes are selected, so all the properties are saved with your scene. If you don’t want to save one of these properties, select the scene in the Scenes dialog, click the Show Details icon () to display the checkboxes, and deselect the checkbox for each set of properties that you don’t want to save.
Note that you can’t save updates to a property with a scene if that property isn’t saved with the scene. See the next section for details about making sure you include all the properties you want to save in an update.
Updating a scene
Updating a scene saves any changes that you make to a scene after you create it. To update a scene, follow these steps:
- Select Window > Scenes to open the Scenes dialog.
- In the Scenes dialog, select the scene you want to update.
- Click the Show Details icon () and make sure all the properties you want to save with the scene are selected.
- Click the Update Scene icon (
 ) in the upper left of the Scenes dialog.
 - In the Scene Update dialog box that appears, you can deselect any properties you don’t want to save with the update. Remember that if an item wasn’t selected in Step 3, that property doesn’t save, even if you select it in the Scene Update dialog box. After you’re done selecting or deselecting properties, click Update.
Tip: If you don’t like keeping the Scenes dialog open, you may prefer to update a scene by context-clicking a scene’s tab and selecting Update. In the Scenes dialog, you can also click the Details arrow () and select Update Scene.
Managing Scenes
Some models have a lot of scenes making finding the right scene when you need it a bit tough. SketchUp offers the tools you need to help you manage how your scenes are listed or find a specific scene on the fly.
SketchUp lists scene tabs in the Scenes window based on the order in which they were created by default. You can change how your scenes are listed in one of two ways:
- Context-click the tab you want to move and select Move Left or Move Right. Repeat the command if you want to move that tab multiple times.
- In the scenes window select the scene from the list and click the Move Scene Down icon (
 ) or the Move Scene Up icon (
 ) in the upper right. The tab order updates to reflect the order in the Scenes dialog.
You can also search for a specific scene using the drop-down menu seen next to your scene tabs. You’ll see your scenes listed in this menu along with a text search box. Simply start typing and you will see a list of scenes matching your text. Click a scene from this list and the modeling window will update. The scene will also be selected in the Scenes panel.
Deleting a scene
If you no longer need a scene, you can delete the scene in the following ways:
- Select the scene in the Scenes dialog and click the Remove Scene icon (
 ) in the upper left.
 - Select the scene in the Scenes dialog, click the Details arrow (), and select Delete Scene from the menu that appears.
- Context-click the scene tab and select Delete from the menu that appears.
Customizing thumbnails the Scenes dialog
In the Scenes dialog, you can customize how the scene thumbnails and the list of scenes appear.
The following options enable you to control how the scene thumbnails appear:
- If you don’t want to see the thumbnail images, click the Details arrow() and deselect Use Scene Thumbnails.
- If you update a scene and want the thumbnail to reflect the update, click the Details arrow and select Update Scene Thumbnail.
Click the View Options ( ) menu in the upper right of the Scenes dialog, and you can select from the following options, which control how your lists of scenes appears:
- Small Thumbnails: You see only thumbnails, not the scene names, and more than ten thumbnails are visible in the list at once, before you need to scroll in order to see more scenes. However, as the option name indicates, the thumbnail images are quite small.
- Large Thumbnails: See only large thumbnail images of a scene, not the scene name. With this option selected, you can see about six thumbnail images at a time.
- Details: This is the default option, which shows medium-sized thumbnails, the scene name, the photo if your scene has one, and the scene description. You see more information but fewer scenes in this view.
- List: See only the scene names in a list. The text is a bit larger in this view than in the Details view.
Viewing scenes in models imported from the 3D Warehouse
If you download a model from the 3D Warehouse into SketchUp, your download is inserted into your model as a component. However, components don’t have scenes.
To open a 3D Warehouse download as a model, click No when a message asks, «Load this directly into your SketchUp model?» You then see another message that asks, «Do you want to open or save this file?» Click Open and you can see and use any scenes saved with the model.
For details about saving, sharing, or downloading models via the 3D Warehouse, see the 3D Warehouse section of the Help Center.
SketchUp Guide: How to Export an Optimized Image From SketchUp
Michael LaValley is an N.Y.-state registered architect, career strategist and the blogging entrepreneur behind Evolving Architect. Michael is launching a new SketchUp Training course for aspiring architects. click here for more information on how to sign up.
SketchUp is one of the most versatile programs out there for 3D modeling. This post is part of an ongoing series that will provide you with a closer look into its inner workings and teach you a few new tricks along the way so that you can maximize your efficiency and enjoy working in SketchUp.
As creatives, we look for the best ways to convey our ideas to the world. Half the battle is the presentation of what we develop so that our idea isn’t lost in the process. When it comes to rendering in SketchUp, you have to work within its parameters in order to present your ideas well. Let’s go through the basic steps of how to export your images from SketchUp.
Setting Up Scenes
The first thing you need to understand are the views or what SketchUp calls ‘Scenes.’ Because SketchUp is inherently a one-window experience where you do everything from modeling to editing within a single viewport, Scenes allows you to save your position as well as other attributes so that you can return the camera to a fixed moment.
Go to the Windows menu at the top of the program and select the Scenes tray. From here, you can set views using the “+” sign. The “–” sign will allow you to delete Scenes. The rotational arrow symbol will allow you to update Scenes if you make any changes you wish to keep.
The best way to think of these Scenes are as cameras you’ve placed within the model space that will ultimately take the pictures of the model you’re creating. It’s important to set these up as early as possible in your process so that you can check back to them often and adjust the design to meet your intended affect.
Using the Camera Tools
In order to develop a captivating scene, you need to use the camera tools that are at your disposal. Most views you’ll see in renderings are taken from the first-person vantage point at eye level.
Position Camera: As such, we can start by using the “Position Camera” tool. Use this by clicking the tool icon that looks like a little man standing over a pair of crosshairs. Next, click to a ground surface in your model where you anticipate the ‘feet’ of the person to go. SketchUp will fill in the blanks and automatically position the camera at that location, 5 feet 6 inches above the floor.
Walk: Next, you can move the camera around while maintaining that same eye level by using the Walk tool. Click the tool icon that looks like two feet. From there, click in the center of your view and drag the mouse around. You’ll notice that the camera is moving forward along the path that you drag the cursor. The difference between this and a simple zoom is that the Walk tool keeps the camera’s vertical position at the same height it started at. This is the closest way to experience your model from a person’s vantage point.
Look Around: To further refine your view, you can use the Look Around tool. To activate it, click the icon that looks like an eye. To move the camera’s view but maintain its position, click and drag the eye with the mouse. The camera will remain in a fixed location, simulating someone standing still but moving their head around to see.
Refining the Image
Now that you understand the concept of Scenes and how to use the various camera tools, you can set a Scene that you like and begin to populate the image with other information.
After you’ve set your Scene, go to the Shadow Settings tray to add shadows to your view. Click the cube icon that has a shadow on it to toggle the shadows in your model on and off. You can use the tray’s options to determine the exact day and time of year that you want the shadows to represent.
After you’ve established a setting that you’re happy with, just go back to the Scenes tray and use the update toggle to make your settings permanently part of your view. Note: This will overwrite what you had before. If you don’t want to overwrite the previous view, simply click the “+” again in order to set up a second view.
It’s not atypical for a model to have a default view where all of the extra settings are turned off and a primary view where all presentation settings remain on. Working without a lot of the extra settings will help maintain a steady workflow and keep from overburdening your computer.
Exporting the Image
Now that everything is ready to go, let’s export the final image.
To start, go to File > Export > 2D Graphic. You’ll see a typical save window popup. Choose the desired format and then click on the Options button next to the format toggle.
By default, SketchUp will want to export your actual screen as is. What I would recommend instead is to use about a 4,000-pixel width while leaving the aspect ratio intact. In other words, only change the width and not the height so that the overall image doesn’t stretch in unexpected ways. This way, you’ll know that you’re getting the same image that you settled on.
After that, set the resolution to 300 pixels/inch, always leave the Anti-alias box checked and make the quality toggle go as high as it will let you.
Note that a few of these options may be different from one image format to the next. The main idea here, though, is to keep the aspect ratio the same while increasing the image quality so that your overall image maintains the qualities you desired while yielding the best product possible.
The process is fairly straightforward from there. Click “OK,” then choose a name for the exported image and a location for where you want to save it to.
Present Your Work
Now that you have an exported image, you could further explore your image options in postproduction with Adobe Photoshop, or you could present the image as it was exported from SketchUp.
If you weren’t happy with the final export from SketchUp, you can go back and adjust some settings on the fly and export it again. Sharing what you’ve created with the world in a quick and efficient way — that’s the simple beauty of SketchUp.
Check out the first two articles in our “SketchUp Guide” series here:
Architizer is building tech tools to help power your practice: Click here to sign up now. Are you a manufacturer looking to connect with architects? Click here.
Как экспортировать виды из SketchUp?
Выберите «Файл» > «Экспорт» > «2D-графика». Появится диалоговое окно экспорта. Перейдите к месту, где вы хотите сохранить изображение. (Необязательно) В поле «Сохранить как» введите имя файла изображения.
Как экспортировать несколько видов в SketchUp?
SketchUp: экспорт нескольких изображений сцен одновременно
- Перейдите в «Окно» -> «Информация о модели» -> «Анимация» -> снимите флажок «Scence Transitions».
- Перейдите в меню «Файл» -> «Экспорт» -> «Анимация», установите тип файла «JPEG».
- Используйте кнопку «Параметры», чтобы настроить размер изображений.
- Экспорт анимации.
Можно ли экспортировать из SketchUp бесплатно?
Бесплатная версия не будет экспортировать ни один из перечисленных вами типов файлов.. SketchUp действительно очень мощный и способен на многое. Бесплатная веб-версия значительно упрощена по сравнению с настольными версиями, особенно Pro. Бесплатная версия не будет экспортировать ни один из перечисленных вами типов файлов.
Как сохранить видео SketchUp в формате PDF?
Чтобы экспортировать документ в формате PDF, выполните следующие действия в зависимости от выбранной операционной системы:
- В строке меню выберите «Файл» > «Экспорт» > «PDF». …
- Перейдите к месту, где вы хотите сохранить PDF.
- В поле Имя файла введите имя файла.
- Нажмите кнопку «Сохранить».
Как экспортировать одну сцену в SketchUp?
Чтобы экспортировать анимацию в Windows, выполните следующие действия:
- Выберите «Файл» > «Экспорт» > «Анимация» > «Видео». …
- Перейдите к месту, где вы хотите сохранить видеофайл.
- Введите имя файла в текстовом поле Имя файла.
- Выберите формат файла из раскрывающегося списка «Сохранить как тип».
Как экспортировать из 2020 в SketchUp?
Как импортировать элементы из SketchUp в 2020 Design
- Перейдите на вкладку «Элементы», а затем щелкните значок SketchUp на ленте ЭЛЕМЕНТЫ.
- В браузере SketchUp 2020 введите в поиск имя объекта или модель.
- Щелкните. …
- В окне загрузки нажмите «Загрузить», а затем выберите нужный файл SketchUp.
Какие типы файлов можно экспортировать из SketchUp?
Какие типы файлов можно импортировать/экспортировать с помощью SketchUp Pro…
- Ваша подписка на SketchUp Pro обеспечивает совместимость на профессиональном уровне. …
- Экспорт SketchUp: SKP, 3DS, DAE, DWG, DXF, FBX, IFC, OBJ, KMZ, STL, WRL, XSI, JPG, PNG, TIF, PDF (только для Mac), EPS.
Какие форматы файлов можно экспортировать из SketchUp?
Экспортируйте свою модель SketchUp в формат файла, который работает с другой программой.
Использование данных SketchUp с другими программами или инструментами моделирования.
Как преобразовать проекты SketchUp в 2D-чертежи (за 6 шагов)
Чтобы преобразовать трехмерный дизайн SketchUp в двухмерный набор листов, вы должны отобразить проект на виде сверху и, по крайней мере, на виде фасада. Вам также следует добавить размер к дизайну, чтобы вы могли видеть размер каждого компонента. Меню «Камера» программы содержит команды, которые перемещают точку обзора на ту, которая необходима для двухмерного снимка. Команда «Размер» на панели «Инструменты» помечает края их размером, чтобы создатели вашего проекта знали точный размер, в котором нужно вырезать или собрать деталь. Чтобы изменить числовые единицы меток, которые добавляет инструмент «Размер», измените элемент «Формат» в строке «Единицы» в диалоговом окне «Информация о модели» в меню «Окно».
Шаг 1
Щелкните меню «Файл», а затем команду «Открыть». Используйте элементы управления в диалоговом окне «Открыть», чтобы перейти к файлу сцены Sketchup, а затем щелкните его, чтобы выбрать и отредактировать. Щелкните команду «Открыть», чтобы загрузить сцену в Sketchup. Если у вас нет существующего макета, щелкните значок в форме прямоугольника на панели «Инструменты», а затем перетащите его на пол, чтобы создать прямоугольник. Щелкните значок на панели «Инструменты», имеющий форму блока со стрелкой, расположенной на нем, а затем перетащите прямоугольник вверх, чтобы превратить его в коробку.
Шаг 2
Щелкните меню «Камера», а затем подменю «Стандартный вид», в котором перечислены виды, обычно используемые в двухмерных чертежах. Нажмите на элемент «Сверху», чтобы отобразить ваш дизайн с высоты птичьего полета. Архитекторы и другие дизайнеры также называют это «Вид в плане», потому что он необходим для всех дизайнерских планов.
Шаг 3
Щелкните значок панели «Инструменты» с меткой «3», чтобы запустить инструмент «Измерение». Щелкните одну из конечных точек одного края вашего дизайна, чтобы закрепить один конец инструмента, а затем перетащите мышь к противоположному концу этого края. Щелкните мышью еще раз, чтобы окончательно определить длину измерения берега. Метка размера показывает длину кромки в единицах измерения по умолчанию для вашей модели. Например, если вы живете в Соединенных Штатах, единицы измерения, вероятно, будут в дюймах, если вы не измените их специально.
Шаг 4
Перетащите мышь от края, к которому вы применили инструмент «Размер», чтобы вы могли четко видеть метку размера. Щелкните мышью еще раз, чтобы окончательно определить размер этого берега.
Шаг 5
Используйте инструмент «Размер», чтобы обозначить оставшиеся края трехмерного дизайна, которые видны в виде «Сверху». Щелкните команду «Печать» в меню «Файл», а затем нажмите «ОК», чтобы напечатать вид сверху с метками размеров.
Шаг 6
Щелкните подменю «Стандартный вид» в меню «Камера», а затем щелкните элемент «Слева», чтобы отобразить вид слева вашего трехмерного дизайна. Как и в случае с видом сверху, используйте инструмент «Размер», чтобы добавить метки размеров к каждому краю, который виден в «левом» виде. Щелкните команду «Печать» в меню «Файл», чтобы распечатать «Левый» вид.