Automatically Cc (carbon copy) someone on every email you send
In Microsoft Outlook, you can specify that for all messages that you send, an automatic carbon copy (Cc) is sent to other people or distribution lists.
One scenario in which this rule is useful is when all members of a team are responsible for responding to incoming email messages, such as a support center. When one team member replies to a message, the rest of the team automatically receives a copy of the reply, keeping everyone informed of outgoing communications.
You will first need to create a rule to automatically send a carbon copy (Cc) of all email messages that you send.
This particular rule is called a client-side rule. A client-side rule runs only on the computer on which it is created, and only runs if Outlook is running. If you were to send an email message by using your email account on a different computer, the rule would not run from that computer until it was created on that computer. You must create this same rule on each computer from which you intend to use it.
Create the rule
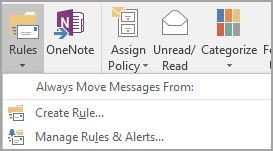
In Mail, on the Home tab, in the Move group, click Rules > Manage Rules & Alerts.
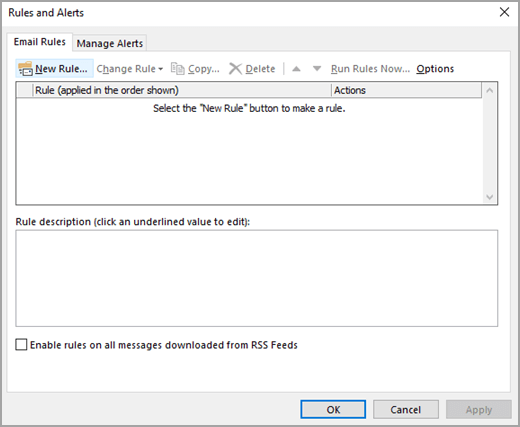
The Rules and Alerts dialog box appears.
On the E-mail Rules tab, click New Rule.
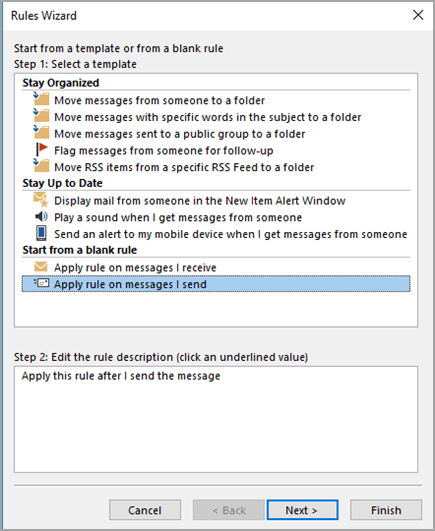
In the Rules Wizard, under Start from a blank rule, click Apply rule on messages I send.
Click Next, and then click Next again.
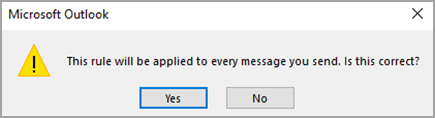
A confirmation message will appear, notifying you that this rule will apply to every message that you send. Click Yes.
Under Step 1: Select action(s), select the Cc the message to people or public group check box.
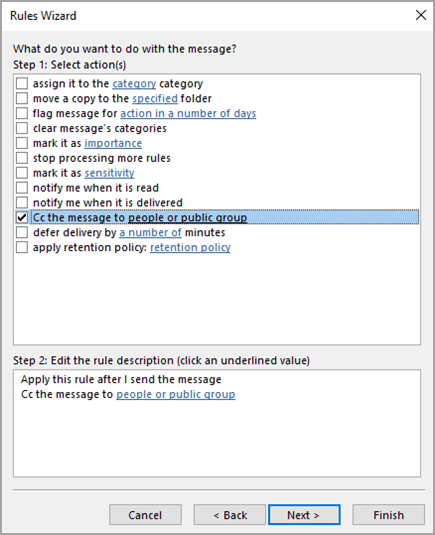
Under Step 2: Edit the rule description (click an underlined value), click people or public group.
In the Rule Address dialog box, click a name or group, and then click To. Repeat this step until all names or groups that you want to add are included in the To box.
In the Rules Wizard, click Next and then click Next again.
Under Step 1: Specify a name for this rule, enter a name that you will recognize for this rule.
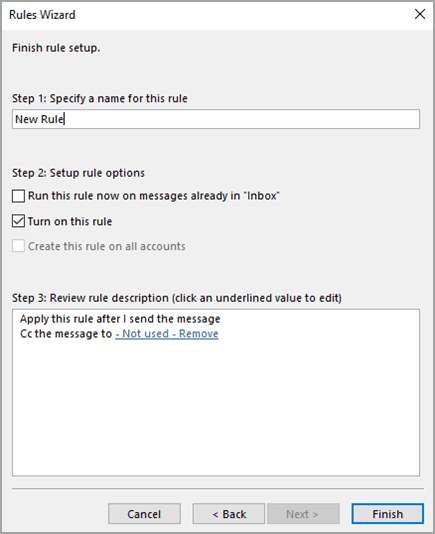
In Step 2: Set up rule options, select the Turn on this rule check box.
Click Finish.
You will see a message stating that the rule will run only when you check your email in Outlook. Click OK.
Now every time that you send a message, whether it is a new message, a reply, or a message that you are forwarding, the people or groups that you specified in the rule will automatically be added as Cc recipients. You will not see the names of the people or groups on the Cc line as you compose the message, but any recipient of the message will see these names.
Turn off the rule
To avoid automatically sending a carbon copy, you must first turn off the rule.
In Mail, on the Home tab, click Rules > Manage Rules & Alerts.
On the E-mail Rules tab, under Rule, clear the check box for the rule that you created earlier.
You can now send a message without the automatic Cc rule sending a copy to other people or distribution lists. The rule will remain off until you return to the Rules and Alerts dialog box and enable the rule again.
Tip: For a fast way to turn off this rule on a per-message basis, see the next section, «Use a category to turn off the automatic Cc on a per-message basis.»
Use a category to turn off the automatic Cc on a per-message basis
If you want the flexibility to turn your new automatic Cc rule off on a single-message basis without going to the Rules and Alerts dialog box, you can use the category feature in Outlook, together with the rule.
Edit the rule you created earlier so that if you add a specified category to the message, the Cc rule does not send a copy to anyone automatically.
In Mail, on the Home tab, click Rules > Manage Rules & Alerts.
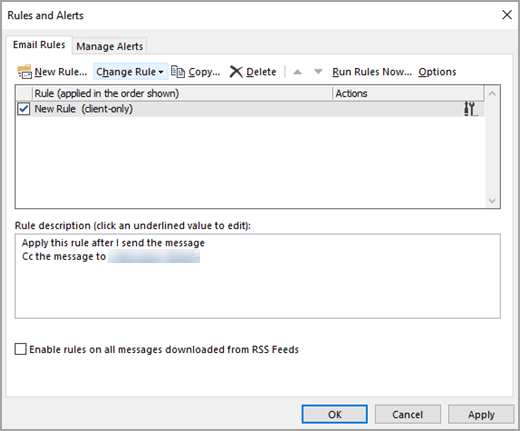
On the E-mail Rules tab, click the rule that you created earlier, and then click Change Rule.
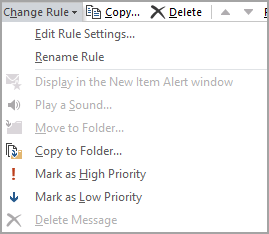
Click Edit Rule Settings.
Click Next on the first two steps of the Rules Wizard until you see Are there any exceptions?
Under Step 1: Select exception(s) (if necessary), select the except if assigned to category category check box.
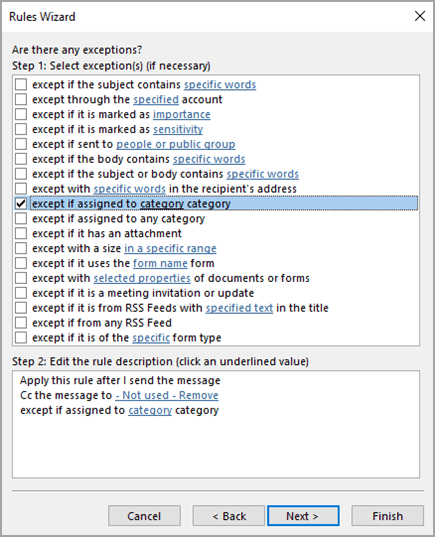
Under Step 2: Edit the rule description (click an underlined value), click category.
In the Color Categories dialog box, click New.
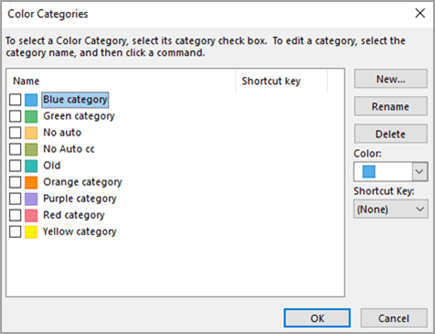
In the Add New Category dialog box, in the Name box, type No Auto Cc.
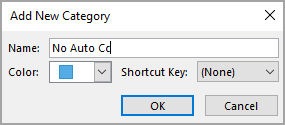
You can also assign a keyboard shortcut that can be used to quickly apply this category to a message. To do this, click an option in the Shortcut Key list.
Click OK to close the Add New Category and Color Categories dialog boxes.
Click Finish.
You will see a message stating that the rule is a client-only rule. Click OK.
When you want to send a message and turn off the automatic Cc rule for that one message, apply the category to the message.
When composing a new message, or replying to or forwarding a message, on the Options tab, click More Options.
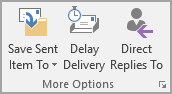
In the Properties dialog box, click Categories, and then click No Auto Cc.
Tip: Use the category keyboard shortcut if you specified one when you created the special category.
When you send the message, the Auto Cc rule will not automatically send a copy to anyone.
You will first need to create a rule to automatically send a carbon copy (Cc) of all email messages that you send.
This particular rule is called a client-side rule. A client-side rule runs only on the computer on which it is created, and only runs if Outlook is running. If you were to send an email message by using your email account on a different computer, the rule would not run from that computer until it was created on that computer. You must create this same rule on each computer from which you intend to use it.
Create the rule
In Mail, on the Tools menu, click Rules and Alerts.
On the E-mail Rules tab, click New Rule.
In the Rules Wizard dialog box, under Start from a blank rule, click Check messages after sending, and then click Next.
Click Next.
A confirmation will appear, notifying you that this rule will apply to every message that you send. Click Yes.
Under Step 1: Select action(s), select the Cc the message to people or distribution list check box.
Under Step 2: Edit the rule description (click an underlined value), click people or distribution list.
In the Rule Address dialog box, click a name or distribution list, and then click To. Repeat this step until all names or distribution lists you want to add are included in the To box.
In the Rules Wizard dialog box, click Next.
Click Next.
Under Step 1: Specify a name for this rule, enter a name that you will recognize for this rule.
Click Finish.
Now every time that you send a message, whether it is a new message, a reply, or a message that you are forwarding, the people or distribution lists that you specified in the rule will automatically be added as Cc recipients. You will not see the names of the people or distribution lists on the Cc line as you compose the message, but any recipient of the message will see these names.
Turn off the rule
To avoid automatically sending a carbon copy, you must first turn off the rule.
In Mail, on the Tools menu, click Rules and Alerts.
On the E-mail Rules tab, under Rule, clear the check box for the rule that you created earlier.
You can now send a message without the automatic Cc rule sending a copy to other people or distribution lists. The rule will remain off until you return to the Rules and Alerts dialog box and enable the rule again.
Tip: For a fast way to turn off this rule on a per-message basis, see the next section, «Use a category to turn off the automatic Cc on a per-message basis.»
Use a category to turn off the automatic Cc on a per-message basis
If you want the flexibility to turn your new automatic Cc rule off on a single-message basis without going to the Rules and Alerts dialog box, you can use the category feature in Office Outlook 2007 together with the rule.
Edit the rule you created earlier so that if you add a specified category to the message, the Cc rule does not send a copy to anyone automatically.
In Mail, on the Tools menu, click Rules and Alerts.
On the E-mail Rules tab, click the rule you created earlier, click Change Rule, and then click Edit Rule Settings.
Click Next on the first two steps of the Rules Wizard until you see Are there any exceptions?
Under Step 1: Select exception(s) (if necessary), select the except if assigned to category category check box.
Under Step 2: Edit the rule description (click an underlined value), click category.
In the Color Categories dialog box, click New.
In the Add New Category dialog box, in the Name box, type No Auto Cc.
You can also assign a keyboard shortcut that can be used to quickly apply this category to a message. To do this, click an option in the Shortcut Key list.
Click OK to close the Add New Category and Color Categories dialog boxes.
Click Finish.
When you want to send a message and turn off the automatic Cc rule for that one message, apply the category to the message.
When composing a new message, or replying to or forwarding a message, on the Message tab, in the Options group, click the Message Options Dialog Box Launcher .
In the Message Options dialog box, click Categories, and then click No Auto Cc.
Tip: Use the category keyboard shortcut if you specified one when you created the special category.
When you send the message, the Auto Cc rule will not automatically send a copy to anyone.
Sorry, you have been blocked
This website is using a security service to protect itself from online attacks. The action you just performed triggered the security solution. There are several actions that could trigger this block including submitting a certain word or phrase, a SQL command or malformed data.
What can I do to resolve this?
You can email the site owner to let them know you were blocked. Please include what you were doing when this page came up and the Cloudflare Ray ID found at the bottom of this page.
Cloudflare Ray ID: 803a65673e60b9e1 • Your IP: Click to reveal 178.175.133.149 • Performance & security by Cloudflare
Tech Tip 004 — Outlook CC Rule

When you’re CC:’d on an email, it’s most likely for your information instead of an immediate need to respond. Why not read your CC: emails later, at a time of your choosing, instead of dealing with it now and incurring one more distraction to your work?
Create a folder in your Outlook email called “CC:” then create a rule that moves any new emails with you in the CC: field into your CC: folder:
Gmail users, substitute labels for folders, and filters for rules. Same principle applies:
Что такое Cc и Bcc, и как их использовать при поддержке клиентов?
Если вы активно используете почту при общении с клиентами и коллегами, редкий день обходится без копий. Они являются неотъемлемой частью рабочей переписки. Поэтому многие клиенты, перебираясь на Омнидеск со старой доброй почты, часто спрашивали о поддержке Cc и Bcc. До появления этой функциональности мы получили 47 (!) просьб добавить её. Цифра внушительная, ведь о своих потребностях и вопросах в лучшем случае пишут 5-7% желающих.
Перед тем, как перейти к подробностям нашей реализации копий, давайте разберёмся, что они собой представляют.
Типы получателей письма
To: (кому) — основной получатель письма.
Cc: (копия, carbon copy) — вторичные получатели письма, которым направляется копия. Они видят и знают о наличии друг друга.
Bcc: (скрытая копия, blind carbon copy) — скрытые получатели письма, чьи адреса не показываются другим получателям.
Примеры использования копий
а. Пользователь обратился за помощью и попросил отправлять ответы как на рабочую, так и личную почту. Вы указываете его личный адрес в копии (Cc), чтобы он смог отвечать с любого адреса и в каждом из них видеть всю переписку.
б. Клиент оплатил консалтинг/поддержку/разработку, и вы регулярно общаетесь с его сотрудниками. Вы добавляете его в копию (Cc), чтобы он получал все ваши ответы, мог в любой момент вклиниться в переписку и оценить качество предоставляемых вами услуг.
в. Руководитель хочет следить за общением поддержки с VIP-клиентами. В обращениях от этих клиентов руководитель добавляется в скрытую копию (Bcc), чтобы он всегда получал ваши ответы (с историей переписки).
Прелесть в том, что клиент не знает о «слежке», а руководитель может ответить лично вам и, к примеру, сделать замечание 🙂
г. Клиент обращается к вам, чтобы обсудить получение скидки и способы оплаты. Он сразу добавляет своего бухгалтера в копию (Cc), чтобы тот мог следить за ходом общения и принять эстафету в нужный момент.
Как мы реализовали поддержку копий?
Приведённые выше примеры описывают лишь некоторые сценарии, которые клиенты «продавали» нам, аргументируя необходимость поддержки копий на сервисе. Мы реализовали все стандартные моменты, но не забыли добавить и несколько полезных фишек. Рассмотрим всё по порядку.
Базовая функциональность
1) Справа от названия поля «Получатель» мы разместили две ссылки для добавления копий — «Сс» и «Bcc».
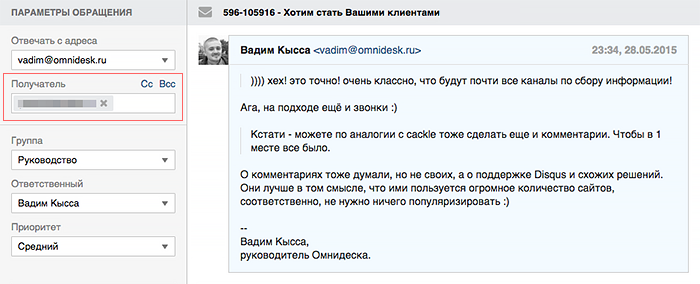
2) При нажатии на «Cc» появляется поле «Копия», и пропадает ссылка «Cc».
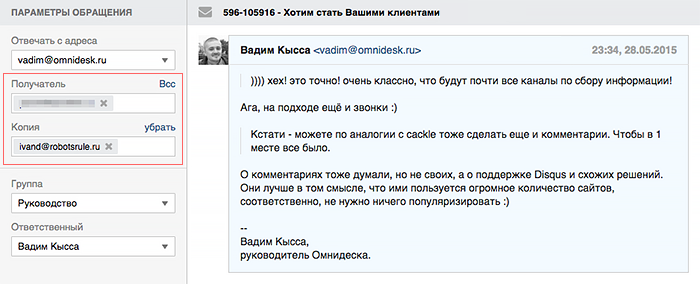
3) При нажатии на «Bcc» появляется поле «Скрытая копия», и пропадает ссылка «Bcc».

4) Если нажать на ссылку «убрать», то поле пропадает, а ссылка «Сс»/«Всс» возвращается на своё место (справа от названия поля «Получатель»).
5) Когда сотрудник добавляет адрес в обычную копию (Cc), его ответ отправляется на основной адрес из поля «Получатель» и на адрес из поля «Копия». В этом случае оба пользователя видят, что письмо было доставлено на два адреса. Каждый из них может ответить как сотруднику, так и сотруднику + другому пользователю.
6) Когда сотрудник добавляет адрес в скрытую копию (Bcc), его ответ отправляется на основной адрес из поля «Получатель» и на адрес из поля «Скрытая копия». В этом случае основной пользователь видит, что письмо пришло только ему, поэтому его ответ может быть отправлен только сотруднику.
При этом пользователь из скрытой копии видит, кто был основным получателем, и может отправить письмо как сотруднику, так и сотруднику + основному получателю.
7) Поддержка копий работает и в обратном направлении. Если пользователь отправляет запрос (или новый ответ в текущую переписку) и добавляет другой адрес в Cc, мы автоматически прописываем этот адрес в поле «Копия», чтобы при ответе сотрудника письмо отправлялось на оба адреса.
Полезные фишки
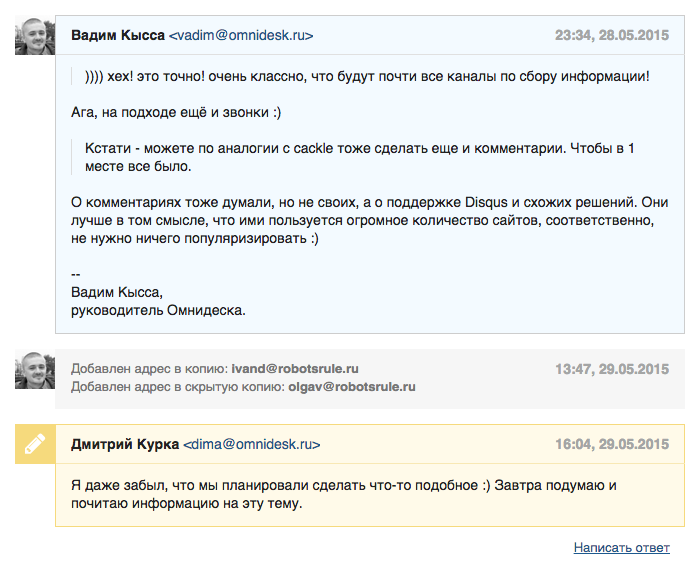
8) Все изменения в полях «Получатель», «Копия» и «Скрытая копия» фиксируются в истории действий.
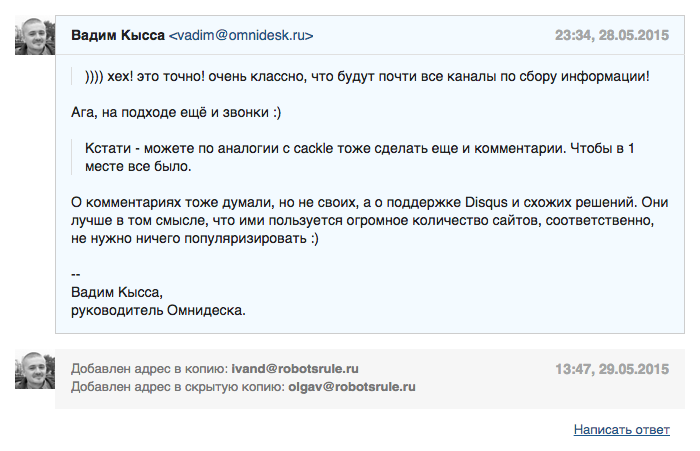
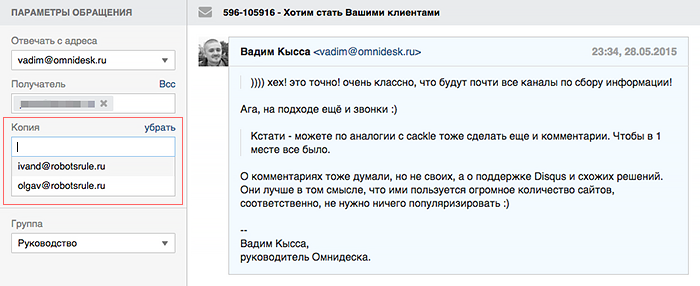
9) Для каждого обращения мы запоминаем все адреса, которые указывались в полях «Получатель», «Копия» и «Скрытая копия». Поэтому после удаления адреса из поля его можно легко вернуть. Достаточно кликнуть в нужном поле, и мы предложим выбрать адрес из выпадающего списка.
10) Когда пользователь из скрытой копии отвечает сотруднику и основному пользователю, его письмо добавляется в обращение в виде обычного ответа. Если же он отвечает только сотруднику, тогда его письмо добавляется в обращение в качестве заметки, которая не видна основному пользователю (при просмотре переписки по обращению в своём аккаунте).
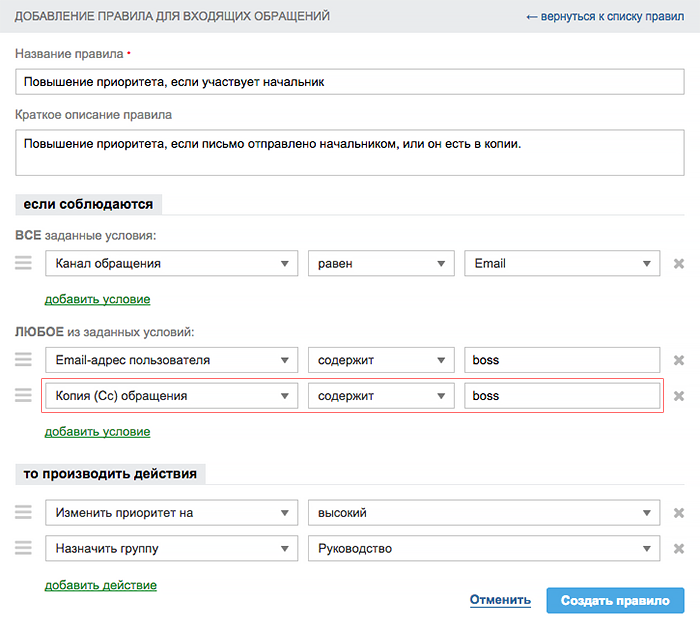
11) В правилах для входящих обращений мы добавили условие «Копия (Cc) обращения», чтобы можно было отслеживать наличие определённого адреса (или домена) в копии и автоматически выполнять нужные действия.
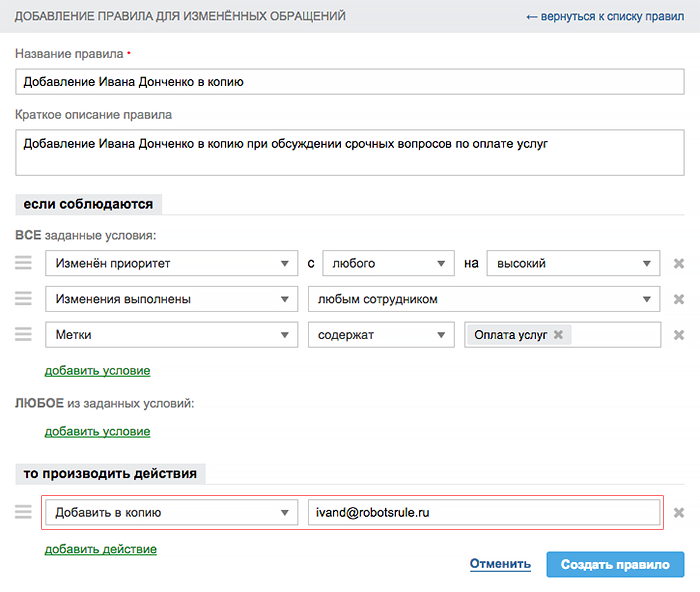
12) Во всех типах правил появились два новых действия — «Добавить в копию» и «Добавить в скрытую копию» на случай, если требуется добавить адреса в копии, когда обращение соответствует условиям правила.
Вот такие полезные копии. Если вы раньше не использовали их, теперь обязательно начнёте 🙂