How to configure python kivy for pycharm on windows?
Kivy is an open-source Python library used for creating multi-platform graphical user interfaces. PyCharm is a popular integrated development environment (IDE) for Python programming. The combination of Kivy and PyCharm can provide a powerful tool for GUI development in Python. However, setting up Kivy to work with PyCharm can be a challenge for new users, especially on Windows.
Method 1: Installing Kivy in a Virtual Environment
- Install Python 3.7 or higher on your Windows machine.
- Open the command prompt and install virtualenv by typing pip install virtualenv .
- Create a new virtual environment by typing virtualenv kivyenv .
- Activate the virtual environment by typing kivyenv\Scripts\activate .
- Install the dependencies required for Kivy by typing pip install docutils pygments pypiwin32 kivy.deps.sdl2 kivy.deps.glew .
- Install Kivy by typing pip install kivy .
- Open PyCharm and create a new project.
- In the project interpreter settings, select the option to use a virtual environment.
- Select the virtual environment you just created.
- In the terminal window, activate the virtual environment by typing kivyenv\Scripts\activate .
- Run your Kivy application and enjoy!
This code imports Kivy and creates a simple "Hello World" label. When you run this code, it should display the label on the screen.
By following these steps, you should now be able to configure Python Kivy for PyCharm on Windows using a virtual environment.
Method 2: Adding Kivy to the PyCharm Interpreter
This tutorial will guide you on how to configure Python Kivy for PyCharm on Windows by adding Kivy to the PyCharm Interpreter.
Step 1: Install Python
First, you need to install Python on your Windows machine. You can download the latest version of Python from the official website https://www.python.org/downloads/.
Step 2: Install PyCharm
Next, you need to install PyCharm, the popular Python IDE. You can download the latest version of PyCharm from the official website https://www.jetbrains.com/pycharm/download/.
Step 3: Install Kivy
Now, you need to install Kivy, the Python library for creating user interfaces. You can install Kivy using the following command:
Step 4: Add Kivy to the PyCharm Interpreter
To add Kivy to the PyCharm Interpreter, follow these steps:
Open PyCharm and create a new project.
Go to File > Settings > Project: <project_name> > Project Interpreter.
Click on the "+" button to add a new interpreter.
Select "Existing environment" and click on the ". " button to browse for the Python executable.
Navigate to the Python installation directory and select the "python.exe" file.
Click on the "OK" button to add the interpreter.
Once the interpreter is added, click on the "+" button again to install Kivy.
Type "kivy" in the search box and select the "kivy" package.
Click on the "Install Package" button to install Kivy.
Once Kivy is installed, you can import it in your Python code using the following statement:
Method 3: Configuring the Kivy Path in PyCharm
If you want to use Kivy in PyCharm, you need to configure the Kivy path first. Here's how you can do it:
First, download and install Kivy. You can download the latest version of Kivy from the official website: https://kivy.org/#download
After installing Kivy, open PyCharm and create a new project.
Go to File -> Settings -> Project -> Project Interpreter.
Click on the gear icon and select "Add".
In the "Add Python Interpreter" dialog, select "System Interpreter" and click on "OK".
In the "Project Interpreter" window, click on the gear icon and select "Show All".
Select the interpreter that you just added and click on the "Paths" tab.
Click on the "+" icon and add the path to the Kivy installation directory. For example, if you installed Kivy in "C:\Kivy", add "C:\Kivy\kivy" to the list.
Click on "OK" to save the changes.
Now you can start using Kivy in your PyCharm project. For example, you can create a new Python file and add the following code:
This code will create a simple Kivy application that displays a label with the text "Hello, Kivy!".
That's it! You have successfully configured the Kivy path in PyCharm and created a simple Kivy application.
AlexKorablev.ru
Александр Кораблев о разработке ПО, ИТ-индустрии и Python.
Проект на Kivy. Часть 1. Настройка окружения
Опубликовано 16 May 2016 в Python
Kivy — интересный проект, который позволяет делать кроссплатформенные GUI приложения, включая мобильные. По слухам. Я решил выяснить можно ли использовать его для создания маленьких приложений на питоне. В этой серии статей я попробую поисследовать Kivy на примере клона "конструктора слов" — одного из упражнений для LingvoLeo.
Эта серия — не учебник, а исследовательский лог моих попыток. В результате я планирую получить собранные приложения для трех платформ минимум: Windows, Mac, Android. Будет здорово, если я соберу еще и iOS версию. В качестве основной платформы для разработки я использую Mac. Так что, все инструкции по установке и настройке окружения будут для этой операционной системы.
Установка
Под мак есть два способа поставить Kivy: скачать бандл или установить зависимости из homebrew, а kivy поставить с помощью pip.
Первый способ (быстрый):
Скачать с http://kivy.org/#download Kivy2.7z (использует системный питон 2.7) или Kivy3.7z (включает в себя Python 3.5)
Копируем в приложения
Минус этого способа установки в том, что создается только одно виртуальное окружение на все Kivy проекты. Для маленьких проектов такой способ подойдет, для больших — сомневаюсь. Так что лучше сразу ставить фремворк в свое окружение.
Второй способ (правильный):
Подразумеваю, что вы пользуетесь pyenv и pyenv-virtualenv.
Первым делом ставим зависимости.
Ставим свежий питончик.
Иногда установка падает:
В этом случае поможет:
Как только свежий питон стоит, создаем виртуальное окружение для нашего проекта.
Активируем созданное окружение
Проверим, что все работает. Создадим файлик main.py в папке с проектом с таким содержимым:
Если открылось окно с заголовком WordConstructor, все установилось и работает как надо.
PyCharm
Теперь настроим проект в пайчарме.
В Preferences выбираем Project interpreter соответствующий нашему виртуальному окружению.
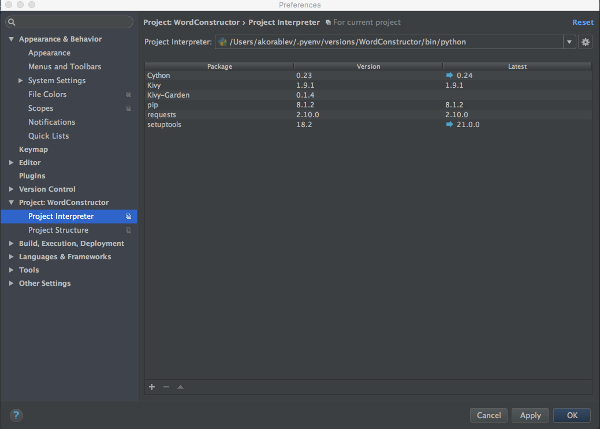
Для описания интерфейсов в Kivy используется свой язык Kv Design Language. Неплохо бы добавить для него подсветку синтаксиса и автокомплит.
Installing Kivy in PyCharm

Well, I am a starter on Python so this may not be everyone’s story. All I wanted to do today was to install Kivy in PyCharm and run a simple hello world program — this shouldn’t have taken a couple of hours!
The official Kivy installation guide for Windows looks a bit cluttered in my opinion and didn’t really help me. I ended up with many errors all over the place in PyCharm.
Python including Pip
When you get this ERROR: Did not get any data blocks invoke:
See which one will allow download. Youmay end up with a .3gp file.
PyTube
For PyTube, to install the latest source directly from github using pip, type this in your command line:
PyCharm and Kivy Install
To explore: in Ubuntu 12.04, one user solved it this way:
-
Install CYTHON – Do this First!
-
Install the Python header files: sudo apt-get install python-dev
-
Install KIVY: [sudo apt-get install Python-Kivy] or [sudo apt-get install python3-kivy]
-
Install the kivy-examples: sudo apt-get install kivy-examples
An important link for Python 2x was included. The user went on to say that “the code builds and runs, but does not display in Python. I will edit this answer if I fix that, but this should at least get you started.”
Note: PyCharm turned out to be a too-hard-basket editor to get working properly with Kivy, so I went with Brackets instead.