How to enable and disable the built-in camera on a Mac?

Having spent some years coding applications for macOS, we’ve created a tool that everybody can use. The all-round problem fixer for Mac.

So here’s a tip for you: Download CleanMyMac to quickly solve some of the issues mentioned in this article. But to help you do it all by yourself, we’ve gathered our best ideas and solutions below.
Features described in this article refer to the MacPaw site version of CleanMyMac X.
Privacy fears have more people than ever wanting to disable the camera on a Mac. Almost every Mac model has a built-in camera connected to the mic, giving you audio and video whenever needed for FaceTime, Skype, or other calls using your Mac.
However, Mac cameras can also be used to snoop on people with illegal software. Such as spyware or even key-logger viruses. Cameras can be used to bribe and blackmail people and make everyone feel a little uneasy using our Macs, knowing someone else could be watching.
So to prevent this, you need to know how to disable the Mac camera. At the same time, you should also know how to enable it when needed again. In this article, we have a few solutions for both and cover some useful troubleshooting topics around this.
How to disable the webcam on a Mac?
Firstly, let’s start with a simple, non-technical solution that anyone can do. Cover it using tape.
Security and intelligence chiefs and even Facebook CEO Mark Zuckerberg are known for covering built-in cameras with thick masking tape or scotch tape. You can even use the sticky part of Post It notes. Don’t use clear tape; that won’t work.
Using tape is simple, effective, and cheap. It could, however, leave marks or scratches on your Mac or potentially damage the lens, so it maybe isn’t a long-term solution. Let’s take a look at other options:
- Go to System Preferences.
- Open Security & Privacy.
- Select Camera from the menu on the left.
- Now uncheck all apps on the list to disable camera access.

If you want to check your microphone access, you can do that in Security & Privacy as well. Just select Microphone from the list and uncheck the apps that have permission to use your microphone.
Disable Mac camera in Screen Time
The newer macOS versions make parents feel safer, giving them more ways to block content and functionality. This includes a camera as well. Many users don’t know it, but the Screen Time window does way more than limit internet time.
In Screen Time, there is a tab titled Content & Privacy.
Open System Preferences > Screen Time.

How to disable the Mac camera within popular web browsers
Safari, the built-in Mac web browser, has advanced security and privacy settings that make this easier. To access these, open Safari, and now click on Safari Menu > Preferences.

Within Safari settings, you can click Ask to switch to Deny to disable the camera and audio inputs. Of course, with all of these changes, if you want to use it again, you will need to reverse these steps.
Other browsers, including Firefox, have equally robust and user-friendly security settings. You can easily switch off the audio and video access for every web browser you use, making it much more difficult for malicious software to hijack access and keep an unwanted watchful eye.
We hope the tips above were helpful. But what about reconnecting the camera when it is needed?
Simply go back to the settings within whichever web browser you disabled it, or back to System Preferences, and if the tape was used, take it carefully off the camera.

What if you can’t reconnect with the camera?
Start with deleting system junk.
Over time, a Mac can get full of everything from out-of-date files, duplicate images and videos, games, and apps you don’t need or use anymore. In particular, old cache files can interfere with the camera.
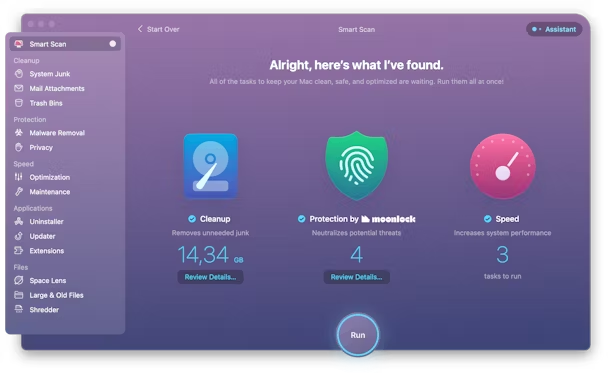
Use CleanMyMac X, a powerful Mac performance improvement app, to clear hard-to-find system junk, clutter, and caches, to get your Mac camera working as good as new again. Here is how you do that:
-
(a link to download a free version).
- Use the Smart Scan to quickly and easily identify system junk.
- It will also spot any third-party apps interfering with the camera; these can be removed via the Uninstaller.
Now your Mac camera and audio should be working normally again. Just remember to disable access via System Preferences or web browsers when it isn’t needed to keep your Mac secure.
Another issue CleanMyMac X can help with:
Staying in control of your camera permissions
Use another tool that’s supplied with CleanMyMac X, it’s called Application Permissions. With its help, you can check what apps are allowed to use your camera and adjust those permissions in a few clicks.

Therefore, if you ever have a creeping feeling that someone is watching you, you can easily check it within Privacy and block access to your camera at once.
Mac cameras are one of the many system features that are taken for granted. So much so that we forget they are there. The problem is, because of this, they’ve become a natural security weakness that is being exploited. Taking care to prevent unwanted intrusion is a necessity. We hope this article helps you do that.
Как отключить веб-камеру на MacBook?
Некоторые довольно любопытные глаза могут использовать вашу вебку на MacBook для слежки за вами. В этой статье мы вам покажем, как обезопасить веб-камеру на MacBook, используя только клейкую ленту, пару-тройку настроек и бесплатное программное обеспечение.
Вебкамеры действительно хороши для видео-разговоров по FaceTime, Skype или даже некоторых селфи в Photo Booth. Но правда в том, что все эти вещи может просматривать и кто-то посторонний, а не только вы.
Хакеры уже давно научились использовать вебкамеры для слежения за ничего не подозревающими жертвами, собирая материал, с помощью которого они могут шантажировать или угрожать, или же…ну…использовать его для более личных и развращенных целей.
Но не нагоняйте на себя тревожные мысли, так как существуют простые способы, которое помогут вам защититься от вторжения в личное пространство и спокойно продолжать сидеть за своим ноутбуком без опасений.
Так что давайте разберемся в том, как отключить веб-камеру на Мак и не опасаться всяких злоумышленников.
Как отключить веб-камеру на Мак?
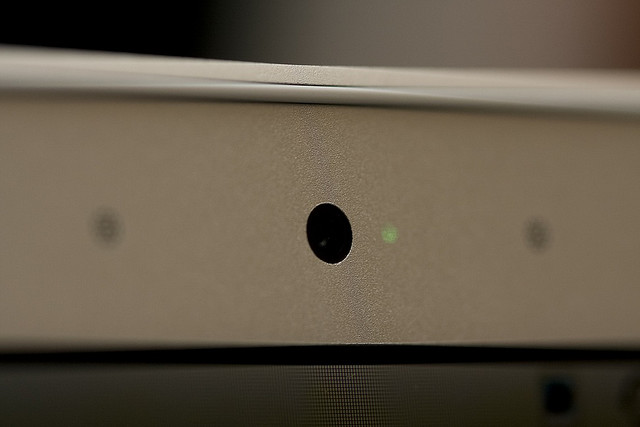
Прикрыть объектив
Пожалуй наиболее быстрым и самым простым способом ограничить хакеров от снятия различных видео и фото с вами — это закрыть им обзор. Это высокотехнологичное решение включает в себя такую утонченную технику, как «прилепить клейкую ленту на объектив вебки».
Может и звучит довольно забавно или даже глупо, но это бесспорно эффективно. Этим же методом пользуются такие люди, как Марк Цукерберг, генеральный директор Facebook, и Джеймс Коми, директор ФБР. Поэтому, если уж такие личности прибегаю к «липучке», то почему бы по крайней мере не попробовать.
Естественно, что прозрачная клейкая лента не подойдет, но вот скотч или кусочек тонкой изоленты прекрасно подойдет. Если же вы не хотите приклеивать к линзе объектива вебкамеры, то можете вырезать что-то из бумаги, чтобы закрыть вебку, а затем уже приклеить бумагу к корпусу MacBook.
Собственно, вот и все. Потратите вы на это приблизительно минут пять, а поэтому можно считать этот метод самым простым, быстрым и дешевым.
Прикрыть микрофоны
Естественно, что при активной камере работает не только видео, но и аудио. Хотя видео уже является довольно хорошим компроматом на вас, но порой какое-то аудио будет лучше любого видео. Например, вы вели довольно личный разговор с кем-то, камеру вы прикрыли, но вот микрофоны то нет, и прощай личная информация.
Так же как в случае в клейкой лентой для, динамики тоже можно прикрыть, да хотя бы той же лентой. Попросту вырежьте из скотча или прозрачной клейкой ленты(так как это уже звук, а не видео) и аккуратно заклейте каждый микрофон так, чтобы лента не мешалась вам при использовании MacBook.
Как только вы это проделайте, то у вас уже будет хотя бы базовый уровень защиты против хакеров. Мы рекомендуем использовать материал потолще, на вроде изоленты, так как тот будет пропускать меньше звука.
Если вы хотите проверить непроницаемость микрофонов, то можете попросить позвонить вашего друга вам или попытайтесь записать что-либо на диктофон.
Настройка уровня входящего звука
Еще один метод по отводу недоброжелателей — это попросту заглушить принимаемый звук вашему встроенному микрофону. Для того чтобы это сделать, откройте Системные настройки — Звук — Вход. Перед вами будет находиться слайдер «Чувствительность на входе», который, собственно, вам и нужно вытянуть влево до самого упора для приглушения принимаемого звука.
Вам придется снова лезть в настройки, если вы захотите использовать микрофон, но такой вот способ должен на порядок усложнить жизнь различным хакерам. Хотя это и не является гарантией того, что какая-нибудь вредоносная утилита не сможет изменить настройки Входящего звука для вашего микрофона.
Всегда будет присутствовать определенный уровень риска, только если вы не полностью отключите вебкамеру, что требует знания определенных командных строк, или же полностью удалите этот юнит из устройства, т.е. Macbook’a.
Так что когда будете в следующий раз делиться какой-то важной информацией со своими друзьями, которые, так случилось, сидят рядом с вашим MacBook, то лучше всего применять вышеуказанные самодельные меры защиты.
Наблюдение за активностью вебкамеры
Последнее к чему вы можете прибегнуть, так это задействование сторонней утилиты, которая будет отслеживать активность вашей веб-камеры и микрофона. Довольно популярным решением среди пользователей является программа Oversight. Она доступна совершенно бесплатно на сайте Objective-See.
Oversight — это довольно простая утилита по отслеживанию программ, которые получают доступ к веб-камере или микрофону. После обнаружения оных, Oversight пошлет пользователю сообщение об обнаружении вредителя на компьютере.
Программа, например, может обнаружить утилиты, которые пытаются подключить себя к таким сервисам, как Skype, Google Hangouts, и FaceTime без разрешения пользователя.
Как уже говорилось, Oversight полностью бесплатна и она показала себя достойным оружием против цифровых «смотрил» на сегодняшний день.
Как отключить камеру FaceTime (iSight) на iMac и MacBook: 2 способа (не скотч)
В одной из серий 3-го сезона «Черного зеркала» рассказывается жуткая история о злоключениях паренька, на которого собрали компромат через веб-камеру его ноутбука. Слежки через «вебку» в реальной жизни опасаются и люди, которые в IT разбираются не понаслышке – создатель Facebook Марк Цукерберг, например, заклеивает её скотчем.

Лучший способ защитить себя – полностью отключать камеру и включать только при необходимости.
Предлагаемая ниже инструкция по отключению веб-камеры предназначена как для «продвинутых» пользователей, так и для новичков. Следуя инструкции вы полностью отключите «вебку» на программном уровне, и к ней не сможет подключиться ни одно приложение, в том числе «хакерское».
Важно. Если при выполнении нижеуказанных действий на Mac было запущено приложение, использующее камеру, то для применения настроек его необходимо перезапустить. Например, если перед выключением камеры на компьютере был запущен Skype, то камера продолжит работать в рамках данной сессии. Для применения настроек необходимо просто закрыть (перезапустить) приложение.
Как отключить веб-камеру на iMac и MacBook при помощи скрипта isightdisabler
Воспользовавшись специальным AppleScript’ом под названием isightdisabler. После активации он временно меняет разрешения для драйверов файлов, которые дают приложениям доступ к камере.
1. Скачайте и распакуйте скрипт.
2. Откройте скрипт в программе Редактор скриптов (просто кликните дважды по загруженному файлу), в меню программы выберите Файл, затем Экспортировать и Программа в меню Формат файла.

На рабочем столе появится иконка созданного приложения isightdisabler.

3. Запустите приложение isightdisabler. В появившемся окне выберите вариант Disable iSight. Введите пароль администратора.


Готово – теперь FaceTime камера (iSight) на вашем Mac отключена. Готово – камера Мас отключена. Теперь при запуске FaceTime, Skype, Photo Booth, QuickTime, iMovie и тому подобных программ отобразится сообщение о том, что подключенной камеры нет. Что и требовалось доказать! В нашем случае программа отображает надпись: «Камера не подключена» или «Нет доступных камер»:

Чтобы включить iSight, просто запустите ваше AppleScript-приложение ещё раз и выберите пункт Enable iSight. После введения пароля от вашей учетной записи камера будет работать как ни в чем не бывало.
Как отключить веб-камеру на iMac и MacBook при помощи Терминала
1. Сделайте резервную копию Mac. Если что-то пойдет не так, вы легко вернете систему к её предыдущему состоянию.
2. Выключите защиту SIP (System Integrity Protection). Для этого перезагрузите Mac и сразу же после начала загрузки (вместе со звуком приветствия) зажмите и удерживайте две клавиши — ⌘Cmd и R! Компьютер загрузится в режиме восстановления (не пугайтесь, все данные и настройки на Mac останутся нетронутыми). Через некоторое время появится меню выбора языка.
Выберите язык и нажмите на стрелку Далее.

На следующем экране появится меню с Утилитами macOS. Но нам оно не нужно. В верхнем меню нажмите на вкладку Утилиты и выберите Терминал.

Вставьте в командную строку команду:
csrutil disable; reboot
и нажмите Enter (Return)

Мас перезагрузится. После возвращения на рабочий стол можно действовать дальше.
3. Откройте Терминал и введите следующие команды.
Важно: выполняйте не все сразу, а одну за другой:
4. Все, камера отключена. Выйдите из Терминала и при необходимости верните защиту SIP. Для этого введите команду csrutil enable, повторив пункт 2.
Как включить выключенную камеру на Mac при помощи Терминала
Если приступ паранойи у вас прошел, или вам просто захотелось поговорить с кем-то по видеосвязи… почему бы не включить «вебку» снова? Для этого отключите защиту SIP (если вы ее снова включили), как написано выше, откройте Терминал и поочередно введите следующие команды:
Готово – теперь камера снова в строю!
Если вы считаете, что программных мер защиты недостаточно – попробуйте самостоятельно или с помощью квалифицированного мастера отключить веб-камеру физически.
Конечно, даже программное отключение камеры требуется, мягко говоря, далеко не всем пользователям Мас. Но если вы опасаетесь, что за вашей личной жизнью следят через веб-камеру, просто заклейте её изолентой, как советуют глава ФБР Джеймс Коми и Эдвард Сноуден. Так вам точно станет спокойнее.
How to Turn off or Disable Camera on MacBook Pro

Turning off or disabling your MacBook Pro’s camera can come in really handy. Especially when you want to conserve battery life and save storage space.
Regardless of how you want to use your camera, you need to know how to turn it on and off. We’ve already talked about how to turn your Mac camera on in another post. So for this one, we will look at how to turn the camera off.
How to Turn Off or Disable Camera on MacBook Pro [Quick Answer]
To turn off or disable the camera on your MacBook Pro, close the applications that use the camera. When you open these apps, a green light may appear beside the camera lens, indicating that the camera is in use. By closing the app, the camera will turn off, and the green light will disappear.
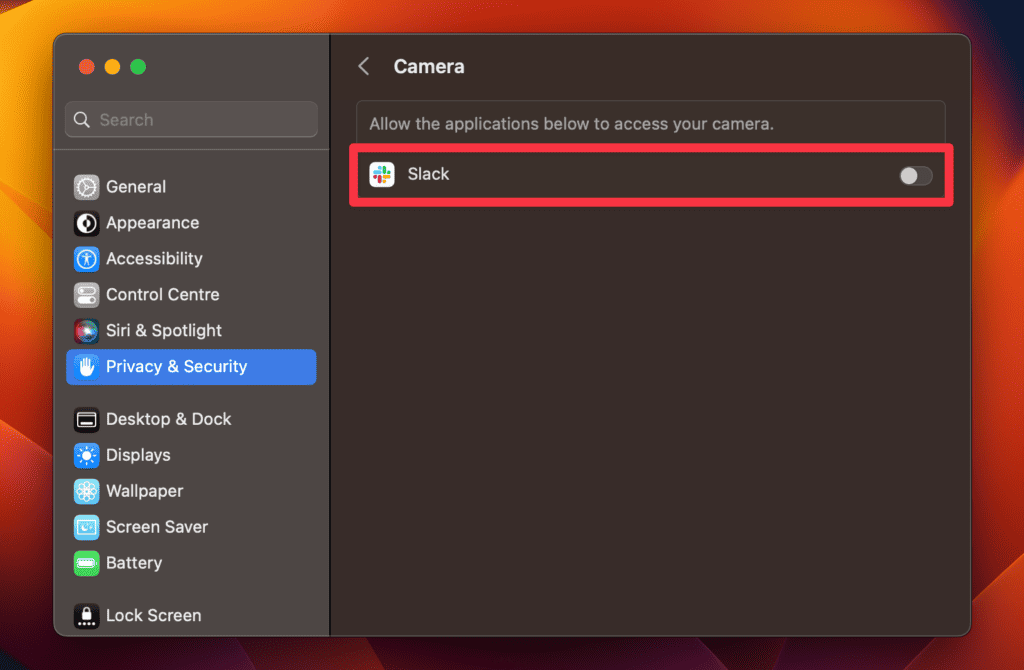
Alternatively, you can access the System Settings on your MacBook Pro, select Privacy & Security, and click the Camera tab. Toggle off the apps you don’t want accessing your camera. Following these steps, you can quickly and easily turn off or disable the camera on your MacBook Pro.
Why Turn Your Mac’s Camera Off
While your Mac’s camera serves essential purposes like enabling video conferencing, face recognition, and more, it can also be a potential gateway for privacy intrusion if misused.
In some instances, hackers and malicious software have been known to gain unauthorized access to these cameras, creating a significant breach of personal privacy. So, learning how to turn off your camera when not in use can be an important step in maintaining your digital privacy.
Below, we’ve shared some reasons why you should turn off your Mac’s camera when not in use:
1. Privacy
Privacy is a critical concern in today’s technology-driven world. The convenience of having vast information available at our fingertips is undeniably remarkable, but it also exposes us to potential privacy risks.
The thought of someone surreptitiously accessing our cameras without our knowledge is truly alarming and something everyone wants to avoid. While it may be unlikely, the possibility of such an intrusion should not be dismissed.
Hackers can potentially access your Mac’s camera and spy on you if it’s not turned off or disabled. Additionally, if you accidentally leave your camera on, anyone you’re conversing with may see what you don’t want. Both these instances violate privacy and you can easily fix them by turning off your camera.
2. Save Battery
The camera feature on your MacBook Pro is undoubtedly impressive, but it consumes more power compared to other functions of your computer.
The display on your MacBook is one of the most power-intensive components, and when you use the camera, it requires constant use of the display. Engaging in activities like video calls or live-streaming can significantly drain your battery if you’re not connected to a power source.
To conserve battery power, you should keep your Mac’s camera off when you’re not using it. Doing so helps you avoid unnecessary power consumption.
3. Save Space
Turning off your camera also helps in saving storage space, which is another compelling reason to do so. If you unintentionally leave your camera on, it may start capturing pictures or videos without your knowledge, which can quickly eat up lots of space on your hard drive.
Images and videos occupy substantial memory and storage resources, so it’s reassuring to ensure that you are not unknowingly accumulating extra files. While unwanted files can be easily deleted, it’s even more convenient and efficient to prevent their creation in the first place.
How to Turn Off Camera on Mac
The easiest way to turn off your Mac’s camera is to simply close the app you’re using that uses the camera. When you open up one of these apps, a green light may appear to the right of the camera lens, indicating the camera is in use.
When you close the app, the green light should disappear indicating the camera is now turned off. However, sometimes you may need to hit Command + Q instead of just closing the tab to fully quit an application.
Besides this quick method, you can try the following solutions to turn off the camera on your Mac.
1. Turning Off Camera on Mac: The Standard Method
If you want to safeguard your privacy while using your Mac, you can disable the camera temporarily. The standard method for turning off the camera is quick and easy. By understanding how to turn off the camera on a Mac using the standard method, you can confidently manage your camera settings and control your device’s visual capabilities.
Here’s how you can turn off the camera on MacBook Pro using the standard method:
1. Click the Apple logo on the top left corner and select System Settings.
2. Select Privacy & Security in the left sidebar.
3. In the right pane, select Camera.
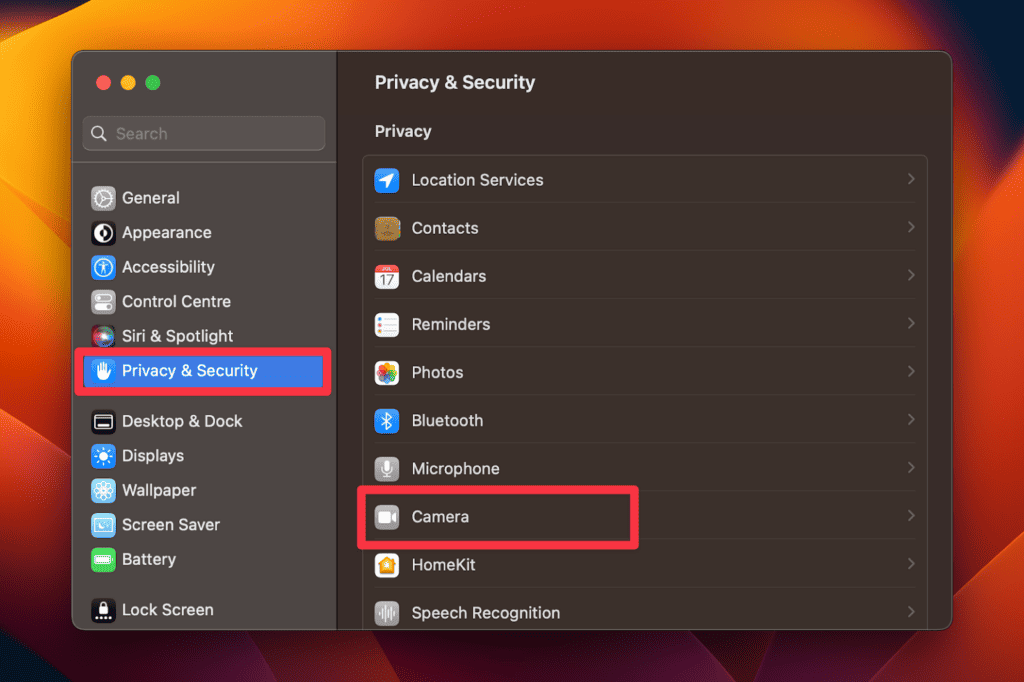
4. Toggle off the apps you don’t want to access your camera.
2. Turning Off Camera on Mac: The Browser Method
With the ever-increasing importance of online communication and video conferencing, the ability to manage camera access on our devices has become crucial. You can use the browser method to turn off your Mac’s camera for specific websites. By leveraging the power of web browsers, you can easily control camera permissions on a per-website basis.
To turn off the camera on a Mac using the browser method, you can follow these steps:
1. Open the web browser of your choice (Safari, Chrome, or Firefox) on your Mac. We’re using Safari.
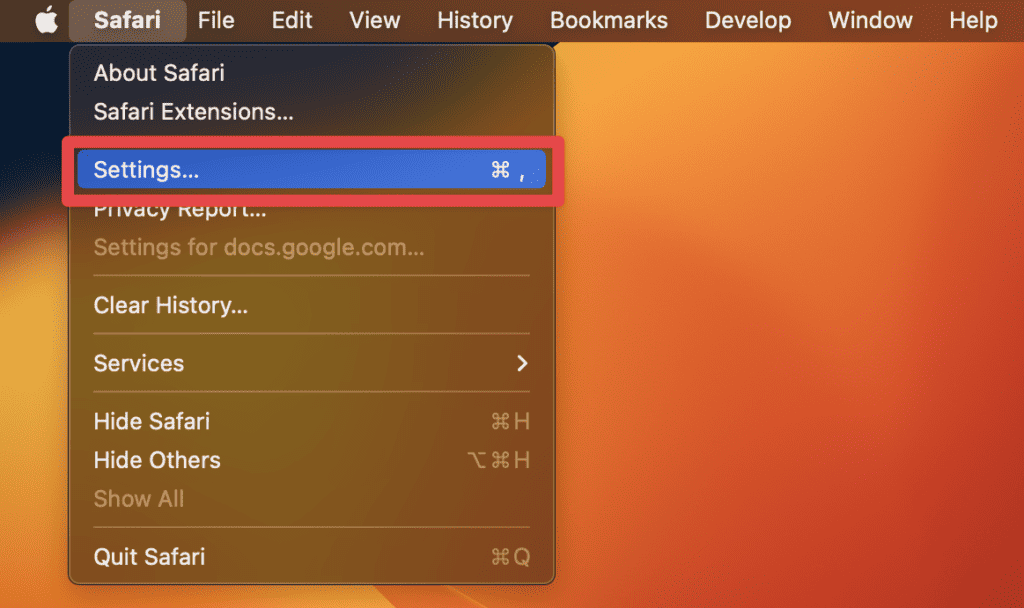
2. After opening Safari, click Safari in the menu bar and select Settings.
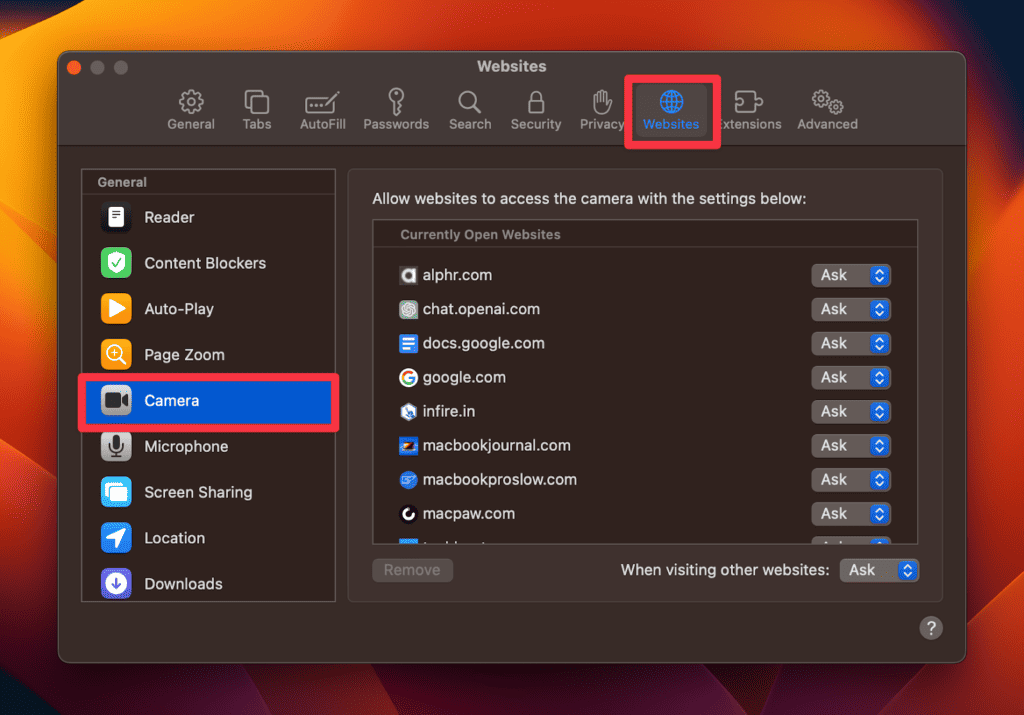
3. Click the Websites tab in the next window and select Camera in the left pane.
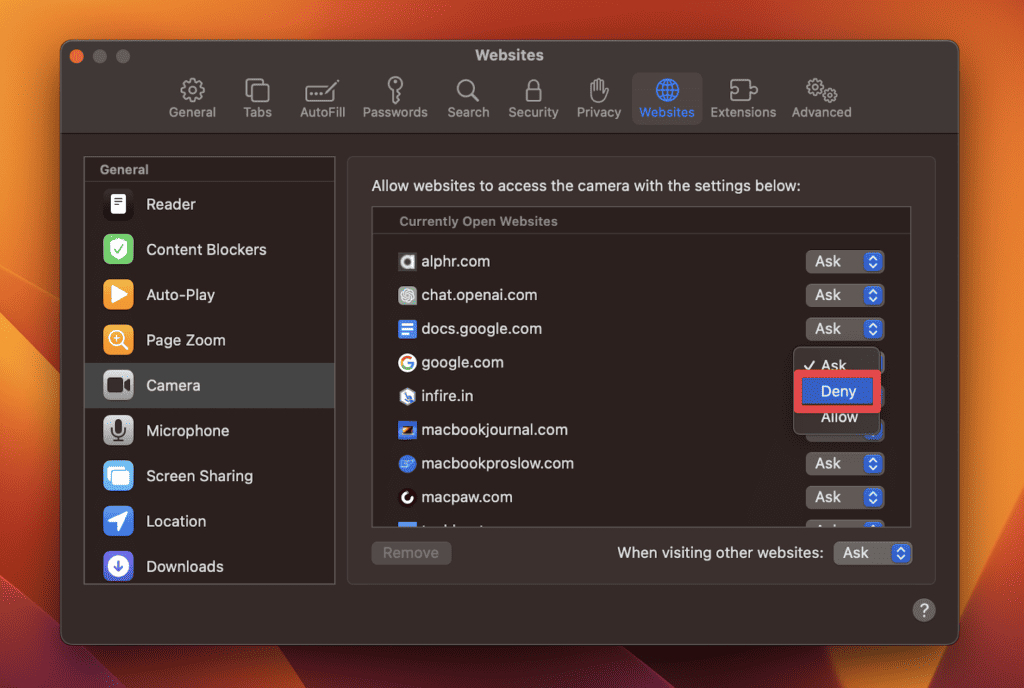
4. In the right pane, click the drop-down icon next to the open apps and select Deny.
5. You can also choose the Deny option next to When visiting other websites at the bottom.
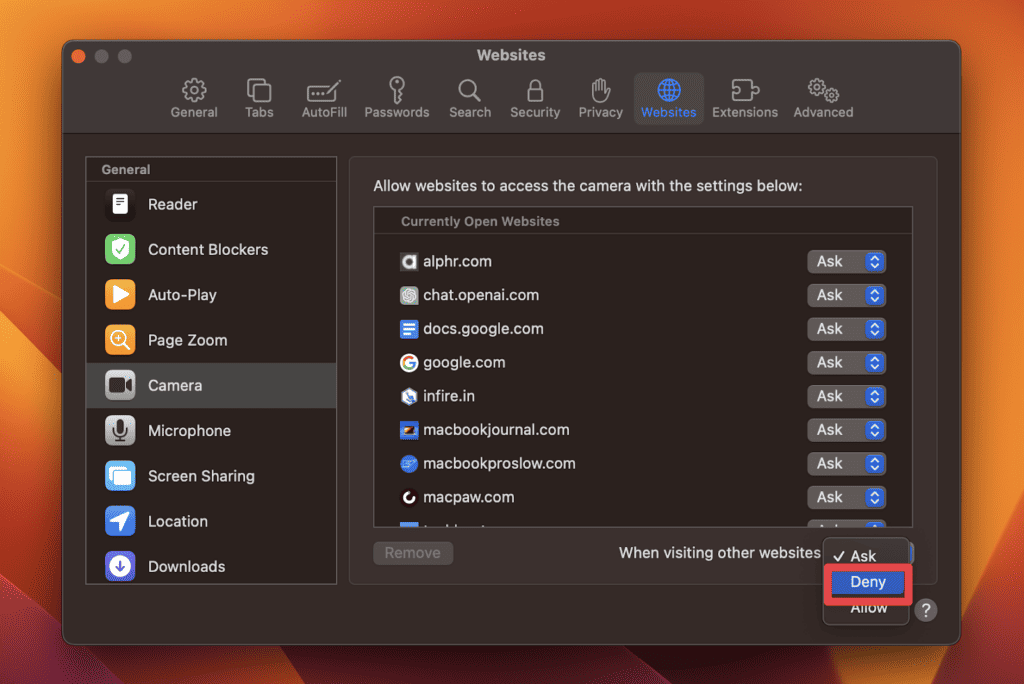
6. If you want to let the websites use your camera with your permission, select Ask instead of Deny.
Please note that this method only disables camera access for websites and web applications. Other applications installed on your Mac, such as video conferencing software, may have their own camera settings that you need to adjust separately.
3. Turning Off Camera on Mac: The Screen Time Method
The next method to turn off the camera on Mac is using the Screen Time feature. Originally designed to manage app usage and screen time limits, this powerful tool also provides the ability to disable the camera on a Mac. By using the Screen Time method, you can exercise granular control over camera permissions, making it an ideal solution for those who value productivity and privacy.
To turn off the camera on a Mac using the Screen Time method, you can follow these steps:
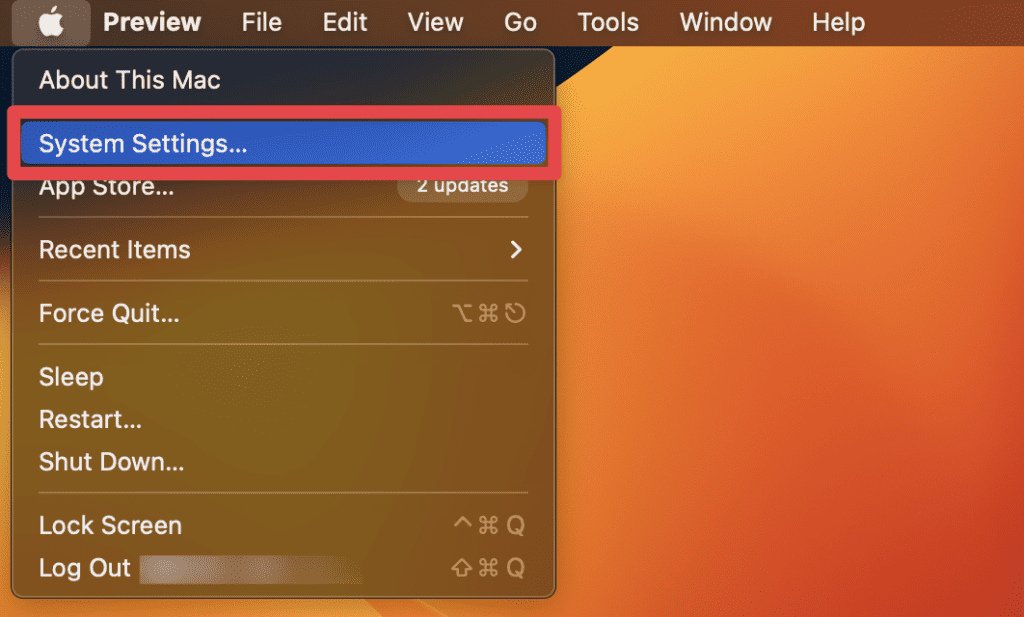
1. Click the Apple menu located in the top-left corner of your screen and select System Settings from the drop-down menu.
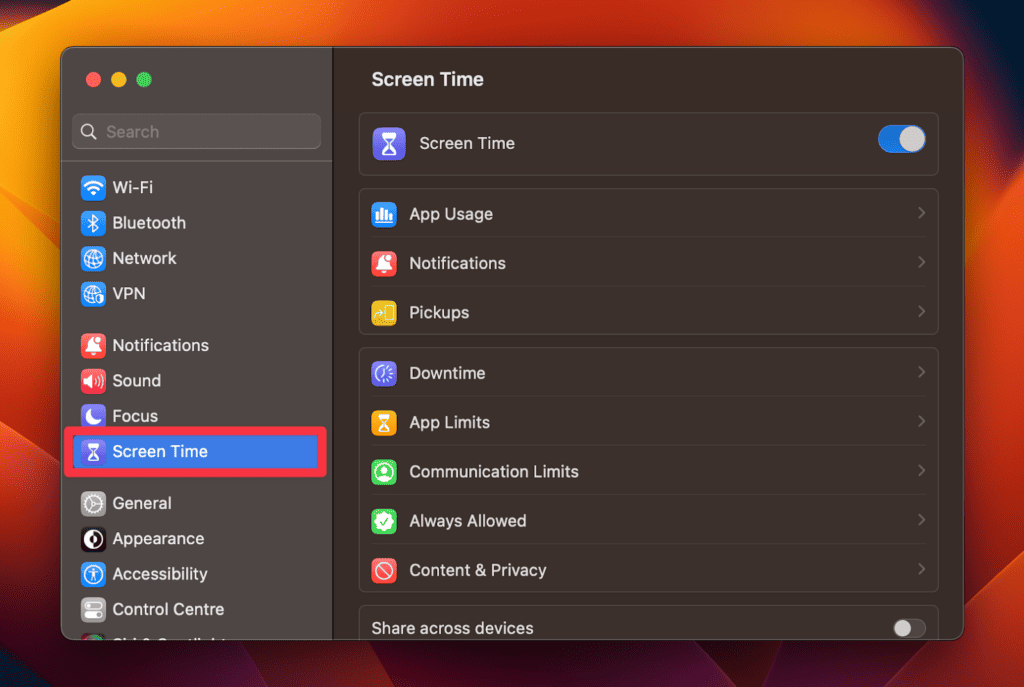
2. In the System Settings window, click Screen Time in the left sidebar.
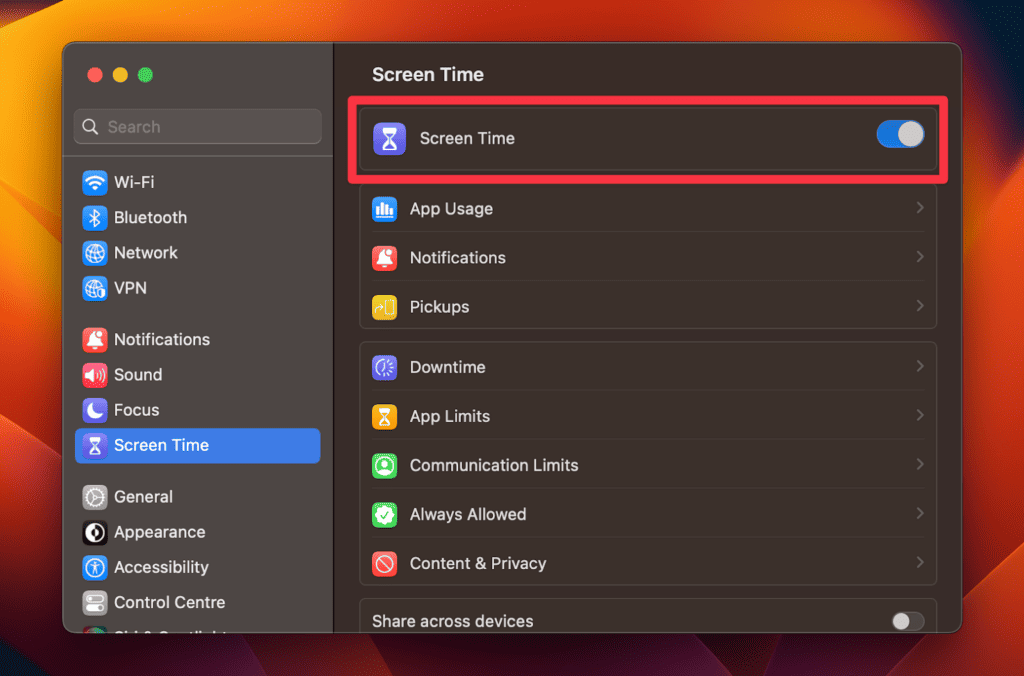
3. If you haven’t set up Screen Time before, toggle on the Screen Time option at the top and follow the prompts to set it up. If you have already set it up, proceed to the next step.
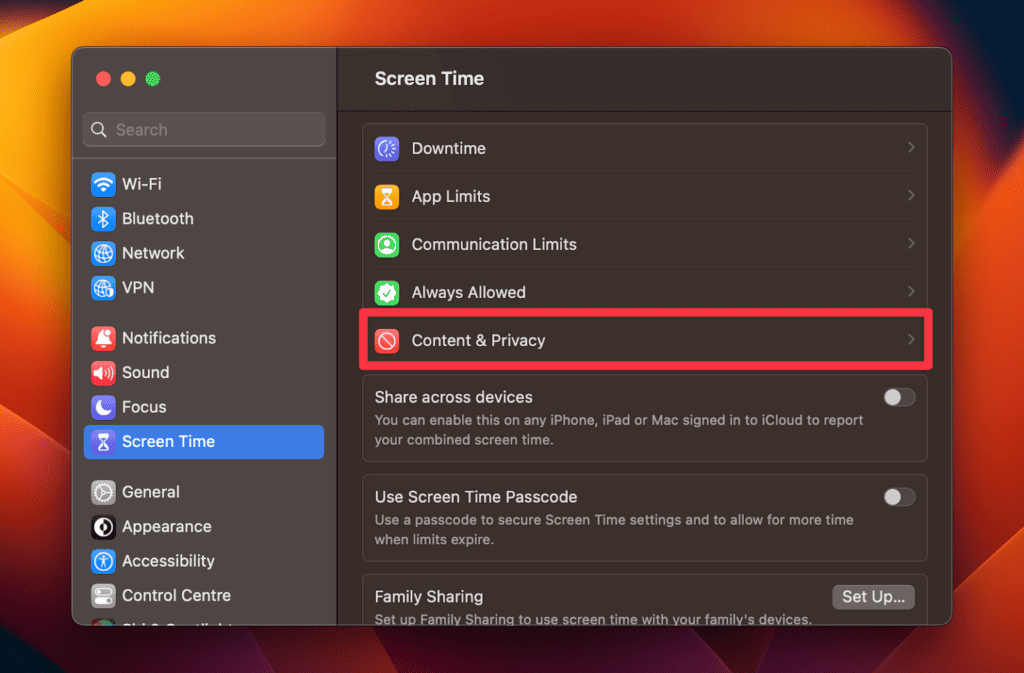
4. In the right pane of the Screen Time window, click Content & Privacy.
5. In the Content & Privacy section, click the App Restrictions tab.
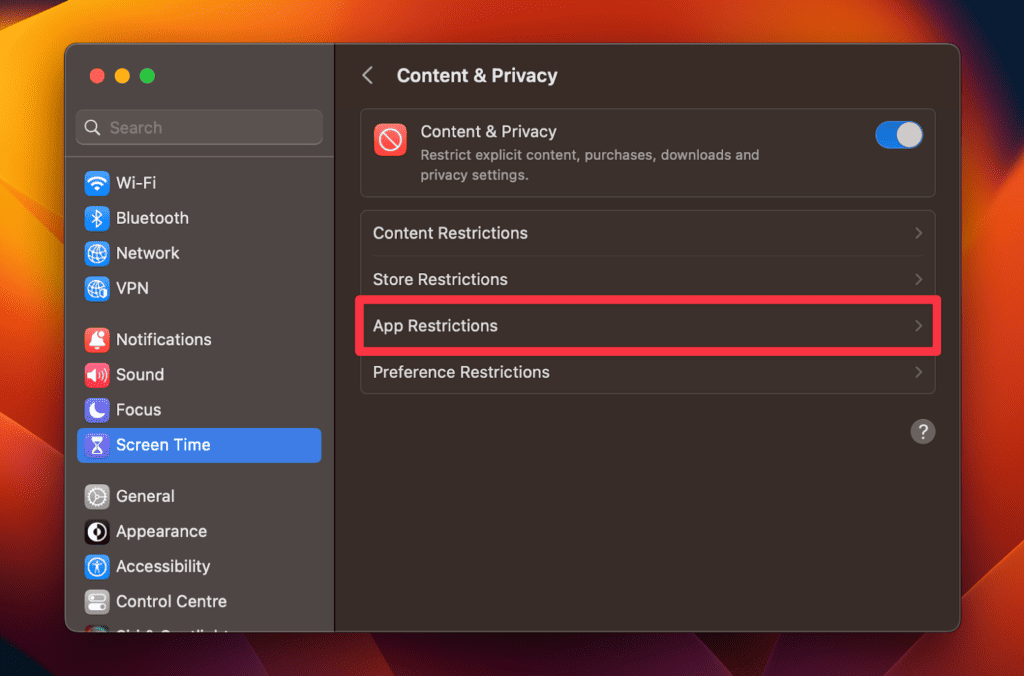
6. Here, toggle off the Allow Camera option and click Done.
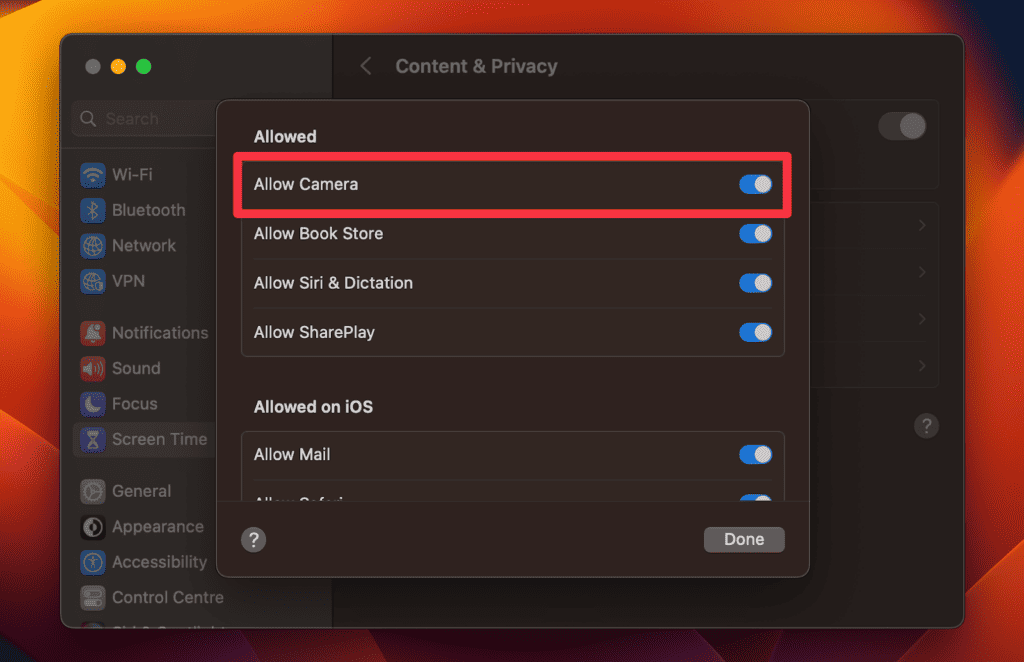
By following these steps, you can successfully turn off the camera on your Mac. Keep in mind this method disables camera access for all apps and processes, so you won’t be able to use the camera until you re-enable it in the Screen Time settings.
4. Turning Off Camera on Mac: The Physical Prevention Method
If you’re really concerned about privacy, you may want to take further steps to prevent your camera from turning on without you knowing. One of the easiest ways to do this is to simply cover your camera lens with a piece of dark sticker or tape.
This may sound weird but if anyone tries to access your camera, even if they succeed, they won’t see anything if the camera lens is covered.
Another option is to use a dedicated webcam privacy cover (like this one below). You can slide it on and off very easily. However, a potential issue we can’t ignore is the risk of scratching your display, and the trackpad (if you’re using the 2017 model or later, the trackpad area is much larger).
Apple also warns users not to close MacBook, MacBook Air, or MacBook Pro with a cover over the camera, by saying:
Covering the built-in camera might also interfere with the ambient light sensor and prevent features like automatic brightness and True Tone from working.
Anyway, the choice is yours. We’ll let you decide which method works better.
5. Turning Off Camera on Mac: The Third-Party Method
You can install a third-party application called OverSight developed by Objective-See to turn off your Mac’s camera. This application monitors your Mac’s microphone and webcam, and alerts you when the microphone or FaceTime camera is activated. It also displays the process accessing the hardware.
Here’s how to use OverSight on Mac:
1. Download the zip archive containing the application and unzip it.
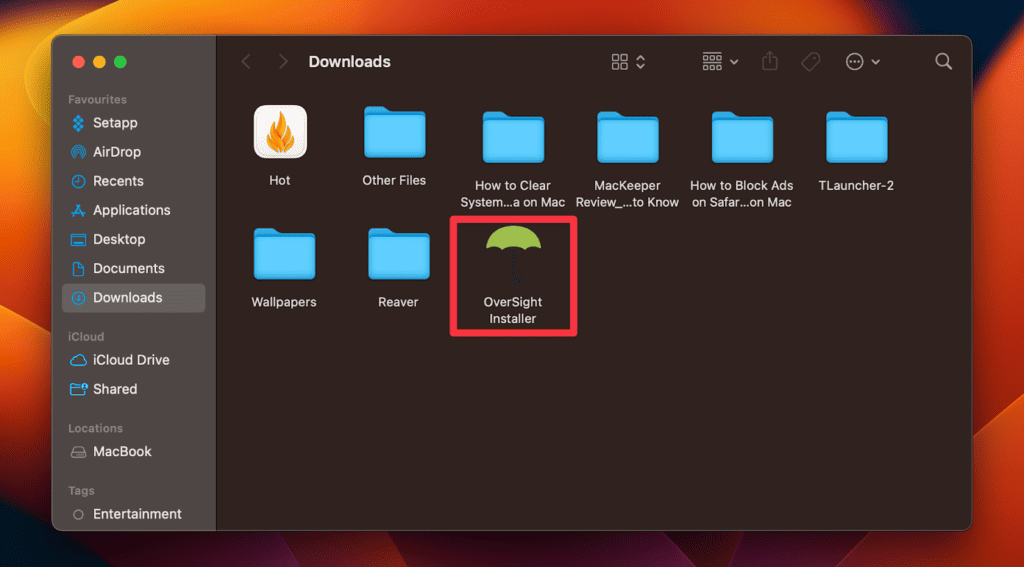
2. Double-click the OverSight Installer in your Downloads.
3. Click Install to install the tool.
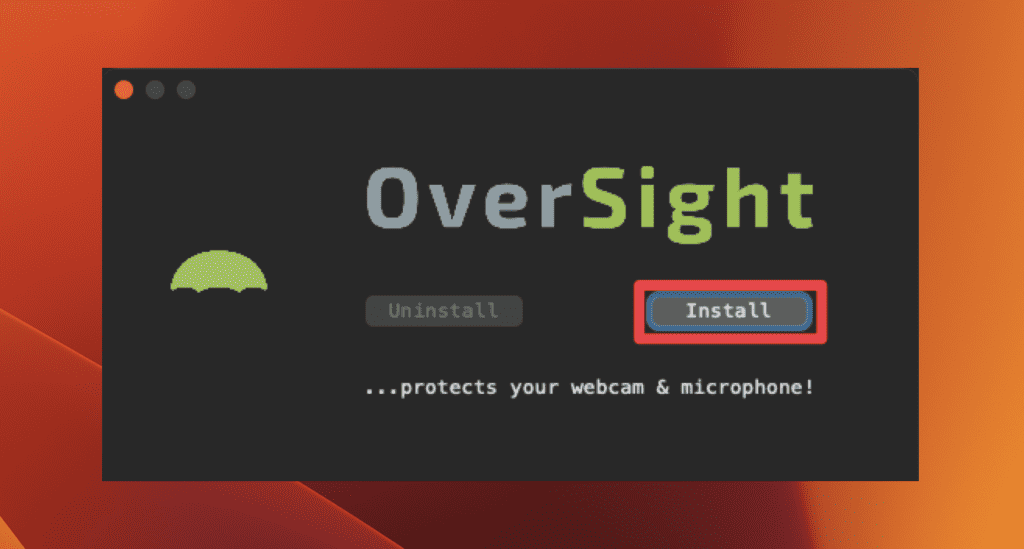
4. During the installation process, you’ll be prompted to allow OverSight to show notifications and alerts.
5. Click the Options button to open the app settings to allow this. It will notify you whenever something accesses the microphone or webcam.
6. When the System Settings window opens, toggle on the Allow notifications options.
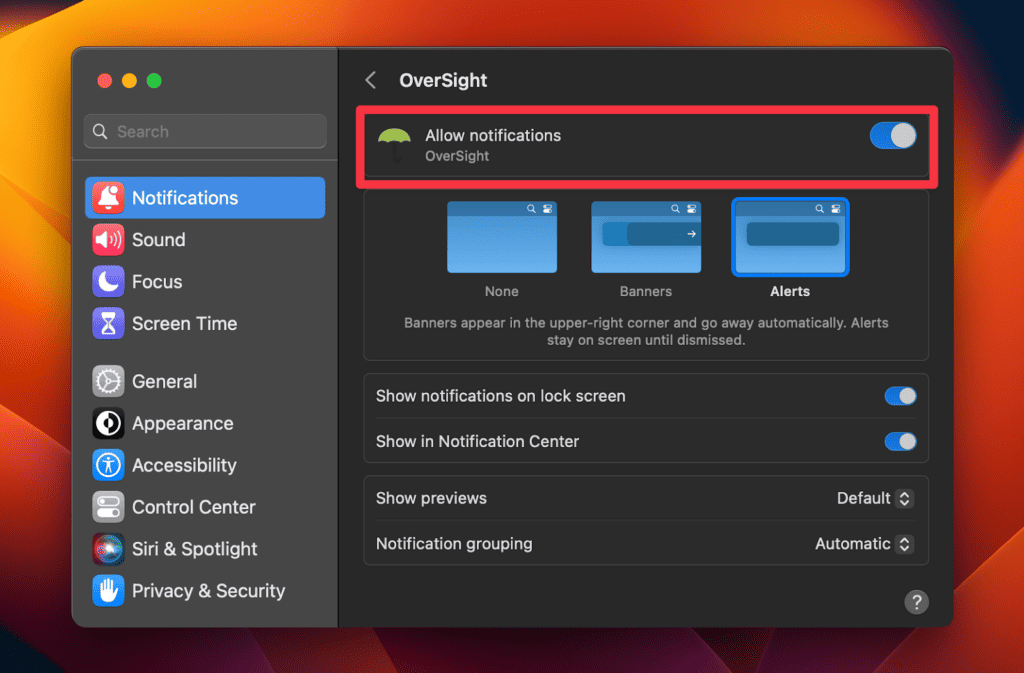
7. Once OverSight is installed, it is set to automatically start each time you log in. Anytime the internal microphone is activated, or a process accesses the built-in webcam, OverSight will alert you.
8. The alert will contain the name of the device (mic or camera) that triggered the event, as well as the name and process identifier of the process responsible for the alert. You can allow the process once, allow it always, or terminate it via the Block option.
OverSight is 100% free and open-source, and provides the means to allow or block a process accessing the mic/webcam. It also allows you to approve a process, allowing access to the mic or webcam without any subsequent alerts.
Frequently Asked Questions
1. What are the privacy risks associated with leaving your Mac’s camera on?
There are several privacy risks associated with leaving your Mac’s camera on. It can make you vulnerable to potential hackers who might access your camera without your knowledge.
It can also inadvertently expose you to others if you accidentally leave the camera on during video calls or live-streaming.
2. How does leaving the Mac camera on drain the battery?
Leaving the Mac camera on drains the battery as it consumes a significant amount of power, particularly when using the display for video calls or streaming. To conserve battery life, it’s advisable to turn off the camera when not in use.
3. Can leaving the camera on consume storage space on my Mac’s hard drive?
Yes, leaving the camera on can consume storage space on your Mac’s hard drive. If the camera is accidentally left on and captures pictures or videos without your knowledge, it can consume storage space on your hard drive. Unwanted files can quickly accumulate and take up valuable memory.
4. Can hackers access the camera even if the green light doesn’t turn on?
Yes, hackers can access the camera even if the green light doesn’t turn on. A skilled hacker can access your camera without triggering the green light indicator. Taking precautions like physically covering the camera or using third-party apps can provide an additional layer of protection against such scenarios.
5. Can covering the camera lens interfere with other features like automatic brightness and True Tone?
Yes, covering the camera lens may interfere with other features like automatic brightness and True Tone. Apple advises against closing the MacBook with a cover over the camera.
Final Thoughts
It is crucial to know how to turn off or disable the camera on your MacBook Pro. Doing so helps protect your privacy, conserve battery life, and save storage space. Unwanted camera access can lead to privacy breaches, while leaving the camera on drains the battery and consumes storage.
By using various methods such as standard settings, browser preferences, or physical prevention, you can easily turn off the camera and enhance your overall security and device performance.
So, do you put tape or cover over your MacBook’s camera?
Leave a Reply Cancel Reply
So what if the green light does not go off?
I’m trying to figure out where the camera is! I want to tape it but I can’t find it!
I’ve used regular scotch tape. Works fine.
always have had a cardboard slider over it
but annoyed now by tiny green dot in upper left corner of my screen
Search
Related Posts
 How to Delete Adobe from Mac: A Step-by-Step Guide
  Easy Steps to Uninstall Zoom from Mac | Complete Guide
  How to Uninstall Office from Mac Properly | Quick & Easy Guide
  How to Uninstall Xcode from Mac: A Comprehensive Step-by-Step Process!
  Civilization V for Mac: Explore the World of Gaming on macOS
  CS:GO on M1 Mac: Your Ultimate Guide to Playing Counter-Strike
  Top War Games for Macs: Unleash the Action on macOS!
  World of Warcraft on Mac: How to Download & Play
Table of Contents Toggle Table of Content Toggle
Tips and guides for MacBook Pro users. As an Amazon Associate, I earn from qualifying purchases.