Как сделать и поставить рамку для веб камеры для OBS?
Рамка для веб камеры для OBS украшает стрим, создает нужное настроение, позволяет персонализировать и выделить канал. Если вы хотите научиться оформлять трансляции – читайте наш обзор! Бонусом расскажем, где взять самые крутые эффекты и оверлеи.
Где скачать
Сделать рамку для камеры в OBS вы можете самостоятельно, если обладаете навыками работы в Adobe Photoshop и Adobe After Effects (для анимации). Если подобными знаниями не обладаете – в сети есть масса сайтов с готовыми вариантами.
Подбирайте понравившийся вариант в каталоге и скачивайте на компьютер совершенно бесплатно. Обратите внимание, в большинстве случаев вы сможете персонализировать обрамление – можно добавить свое имя или ввести дополнительные символы, выбрать понравившийся цвет до загрузки.
Рамки для вебки OBS можно бесплатно скачать здесь, здесь или здесь. Поищите другие каталоги, чтобы иметь действительно широкий выбор!
Альфа-маска
Если вам не нравится стандартное прямоугольное решение оформления, можно воспользоваться маскированием. С помощью специально созданных картинок вы измените оформление окна – сделаете не стандартным прямоугольным, а круглым или квадратным.
Расскажем, как вставить вебку в рамку в ОБС! Первый шаг – смена размера. Это необходимо сделать, чтобы окно не перекрывало игру – по умолчанию оно открывается в полноразмерном виде.
- Найдите нужное устройство захвата видео в разделе «Источники» (если его нет, необходимо предварительно добавить);
- Начните тянуть красные маркеры так, чтобы уменьшить пропорции и соотношение сторон;
- Передвиньте окошко в нужную часть экрана.
Готово, размер подогнали! Теперь поговорим о том, как добавить рамку для вебки в ОБС. Предварительно мы сделали в Фотошопе или скачали окно нужной формы – круглое, фигурное или другое.
- Нажмите на название устройства захвата (в «Источниках» ) правой кнопкой мыши;
- Выберите пункт «Фильтры» из выпадающего меню;

- Нажмите на иконку в виде плюсика;

- Кликните по строке «Маска изображения/ смешивание» ;

- Дайте название эффекту (при желании);

- В разделе «Тип» оставьте значение «Альфа-маска» ;
- В разделе «Путь» жмите на кнопку «Обзор» , переходите в директорию, где хранится заранее загруженный файл и открывайте его.

Если этого решения недостаточно, вы хотите узнать, как сделать рамку для вебки в ОБС с анимацией или цветными эффектами – читайте следующую часть нашего обзора!
Оверлей
Думаем, вы уже догадались – сначала нужно загрузить подходящий эффект на компьютер. Теперь возвращаемся к программе:
- В поле «Источники» нажимаем на плюс, выбираем «Добавить» и и кликаем на пункт меню «Изображение» ;

- Отмечаем строку «Создать новый» , добавляем название при необходимости (или оставляем вариант по умолчанию);

- В строке «Файл изображения» есть кнопка «Обзор» ;

- Жмем на нее и выбираем документ, сохраненный на компьютер;
- Переместите добавленный оверлей так, чтобы он наложился на камеру;
- Теперь надо подогнать вебку под рамку в ОБС – тяните красные маркеры, чтбы размеры полностью совпадали;
- Для удобства использования выделите кнопкой мыши строку «Изображение» в источниках, зажмите клавишу Сtrl и выделите свою вебкамеру;
- Нажмите правой кнопкой мышки и выберите иконку «Сгруппировать» . Это простое действие поможет перетаскивать оба окна вместе, а не двигать отдельно изображение, отдельно эффект.
Вы получили исчерпывающий ответ на вопрос, как поставить рамку на вебку в ОБС – теперь приступайте к работе! Пора персонализировать стрим и украсить камеру уникальным эффектом.
How To Make A Webcam Border in OBS Studio
Webcams and other cameras have become a mainstay on most modern-day streaming channels. They bring a sense of personalization and relatability to a stream and allow viewers to see a streamer’s body language and visual reactions to certain events.
When they’re first plugged in, webcams produce a rectangular source that rarely looks great on top of other content. The best way to help them fit in with your overall theme is to frame them in a border.
There are a few options for you to consider if you need to make a webcam border in OBS studio. Some of them require external software or plugins, but few of them can be done with only OBS Studio available.
- Color Source Border – Create a basic single color border for your webcam from inside OBS Studio.
- Gradient Source Border Plugin – Create a multi-color border for your webcam from inside OBS Studio with the help of a plugin.
- Photoshop Custom Border – Create a webcam border from a predetermined image or pattern.
- After Effects Animated Border – Create a simple, fully animated webcam border in transparent WEBM format.
How to Create Custom Webcam Borders for OBS
Method 1: Color Source Border
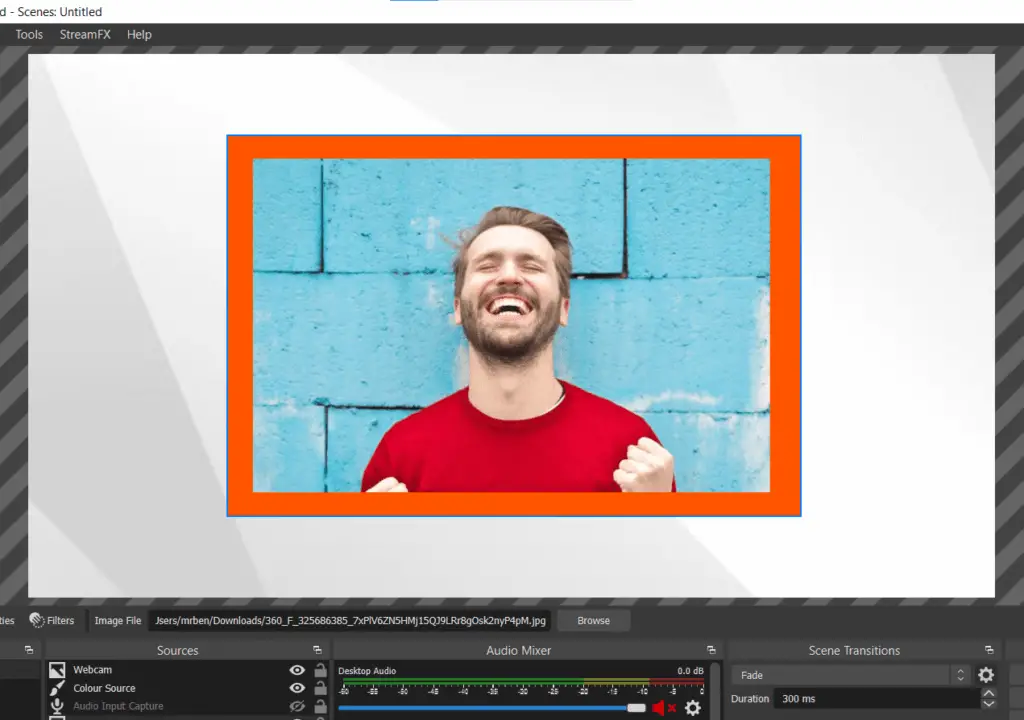
A color source border can be created with the default OBS studio installation. It creates a very simple but effective single-color frame around the edges of your webcam.
- Add your video capture device source to your scene.
- Go to your source list and add a new color source to your scene.
- Select your border color, leave the width and height as it is and click okay.
- Drag the color source underneath your video capture source in the source list.
- Select both your video capture source and your new color source and click CTRL+D to center both sources.
- Select your color source and drag the edges of the source in so that all sides are equidistant from the webcam source. You can drag the bounds in or out depending on how thick or thin you want the border.
- Finally, group your webcam source and color source together in a folder. This will ensure you cannot move them individually and the border will be fixed to the webcam source.
Method 2: Gradient Source Border Plugin
- Download the Windows installer for the gradient source plugin here.
- Run the EXE file inside the zip folder and restart OBS studio.
- Add your video capture device source to your scene.
- Go to your source list and add a new gradient source to your scene.
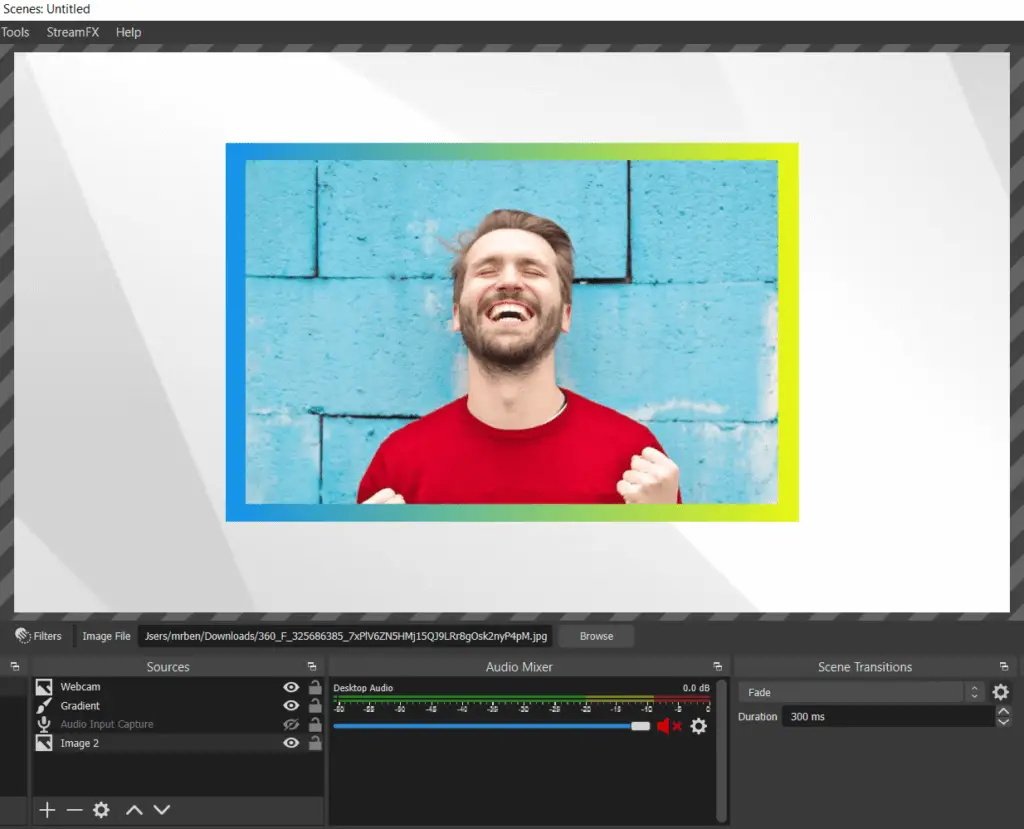
- Inside the gradient source settings menu, you can change the number of colors, direction, and size of the gradient. You can see what your chosen settings will look like in the settings preview area. Choose two or more individual colors and click ok.
- Drag the gradient source underneath your video capture source in the source list.
- Select both your video capture source and your new gradient source and click CTRL+D to center both sources.
- Select your gradient source and drag the edges of the source in so that all sides are equidistant from the webcam source. You can drag the bounds in or out depending on how thick or thin you want the border.
- Finally, group your webcam source and gradient source together in a folder. This will ensure you cannot move them individually and the border will be fixed to the webcam source.
Method 3: Photoshop Custom Border
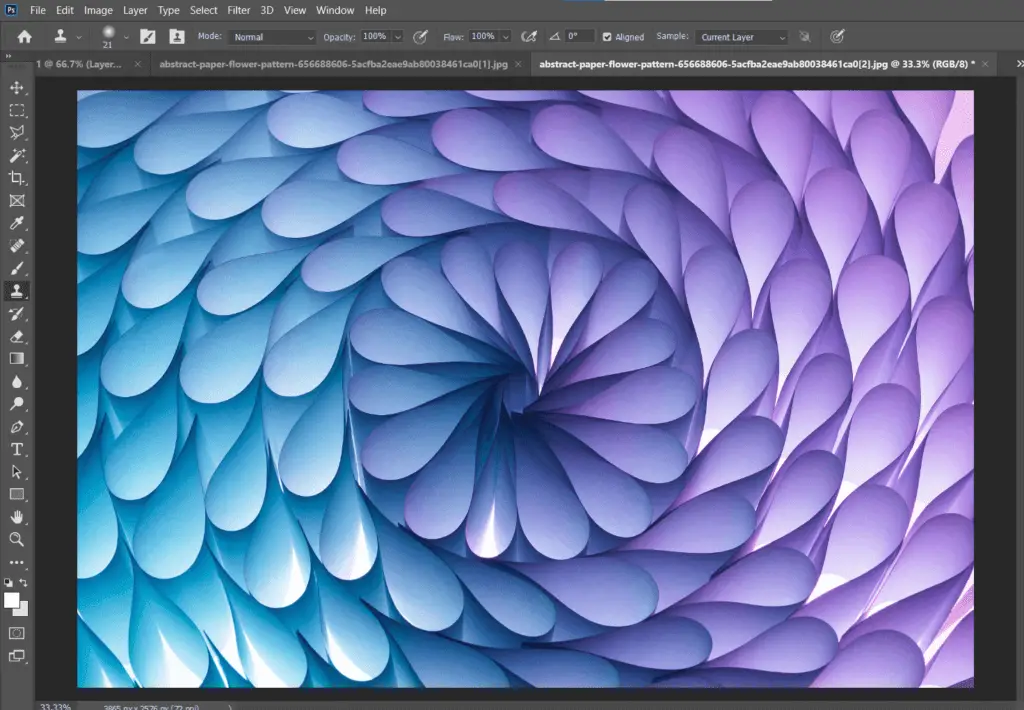
1. Download or prepare a rectangular image that you would like to use as your webcam border/frame.
2. Open the image in photoshop.
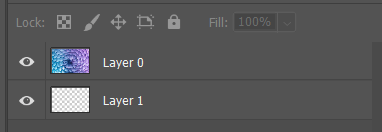
3. Create a new transparent layer below the image layer.
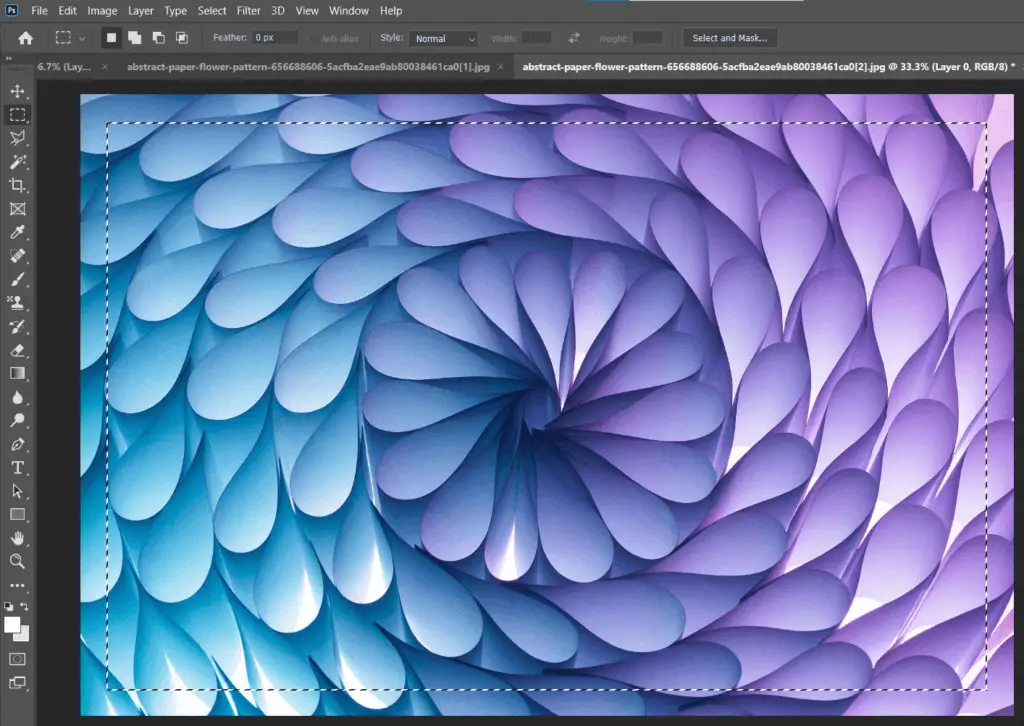
4. Select your image layer.
5. Choose the rectangle select tool.

6. Draw a rectangle inside your image bounds and leave an even gap from your selection box to each side of the original image.
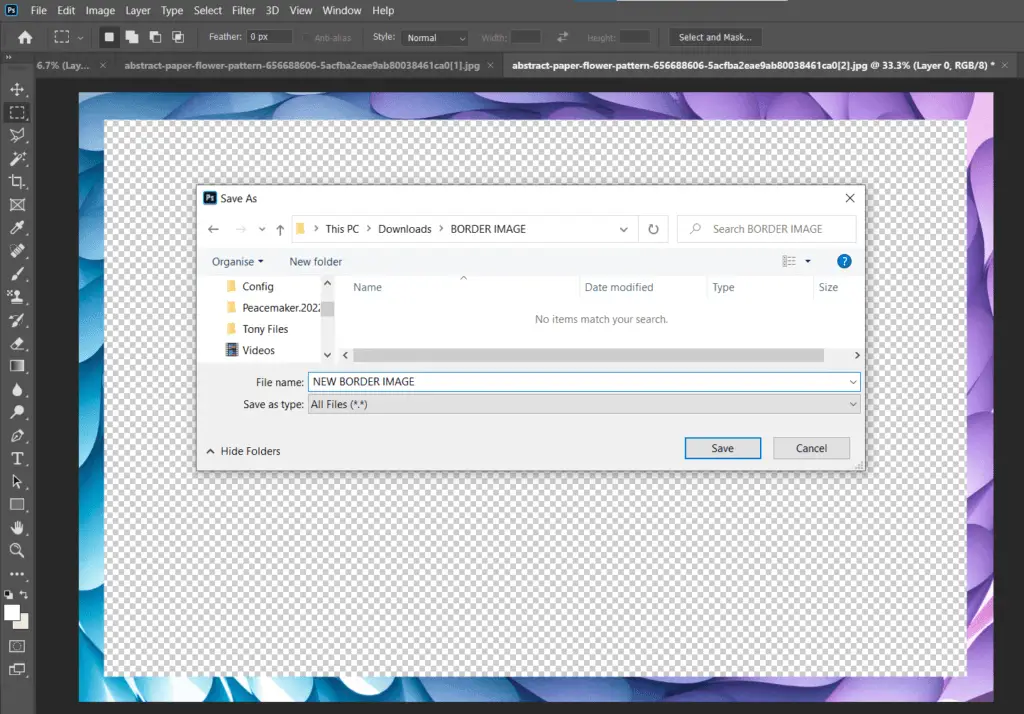
7. Click DEL on your keyboard.
8. Export the resulting image as a PNG file.
9. Add an image source in OBS studio and select your new PNG image file.
10. Place the new PNG image file on top of your webcam source.
11. If necessary, use CTRL+ALT to drag the bounds of your webcam source in to fit underneath your new frame.
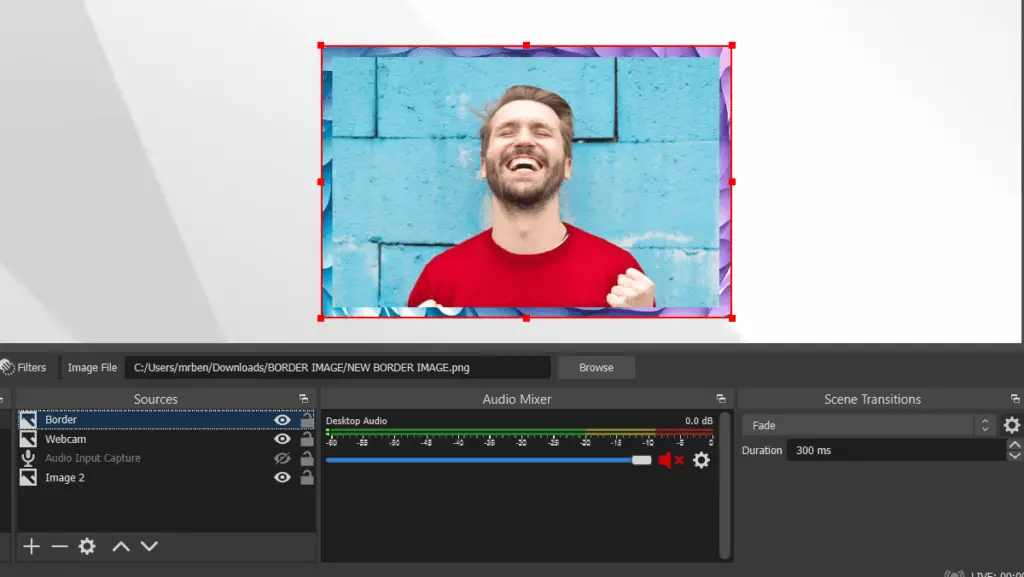
Method 4: After Effects Animated Border
1. Open After Effects and select new project.
2. Select new composition and input the composition settings shown below.
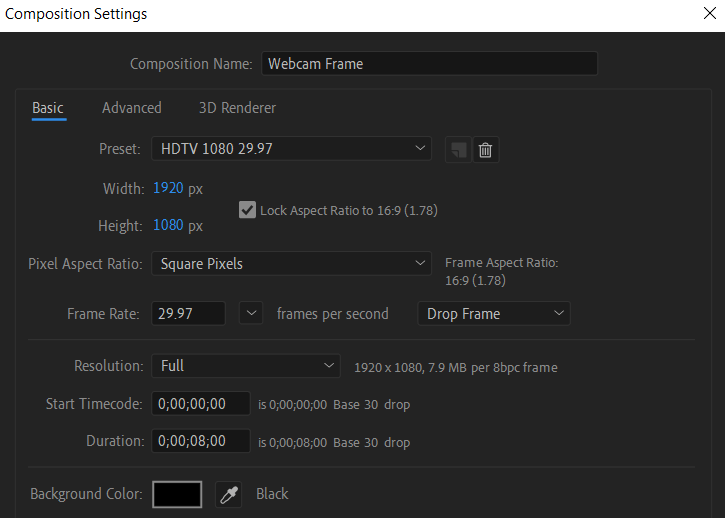
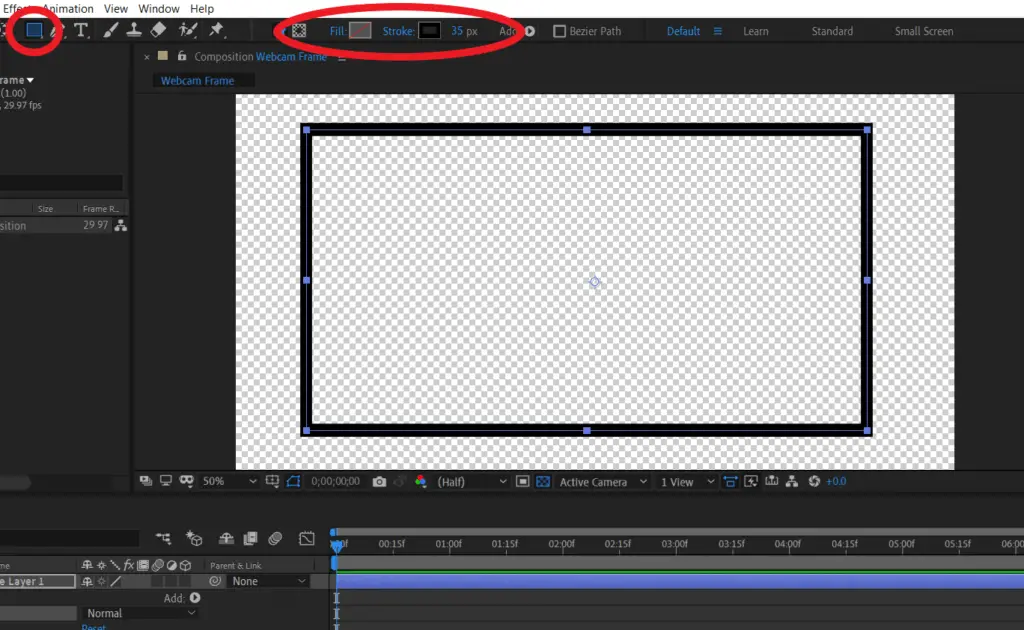
3. Select the rectangle tool and drag a new rectangle shape into your preview area. Make sure the fill is set to no fill and stroke size set to 35 pixels.
4. With your rectangle shape layer selected, go to the layer tab, then layer styles, and then gradient overlay.
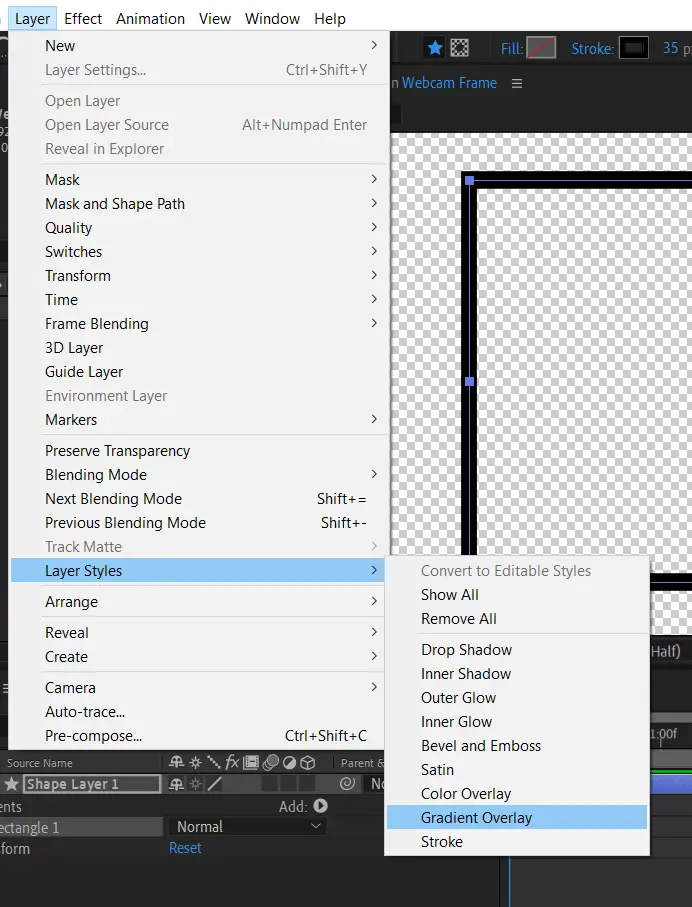
5. Go to the source list dock in the bottom left-hand corner and select the gradient overlay layer style.
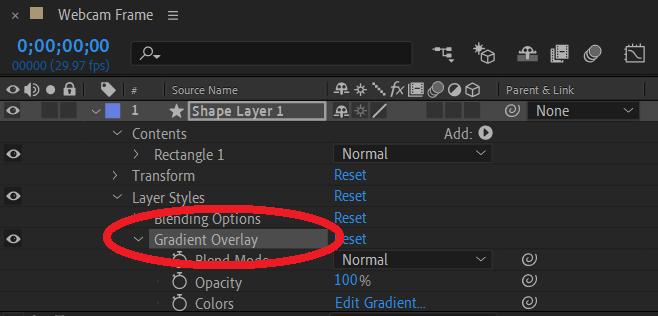
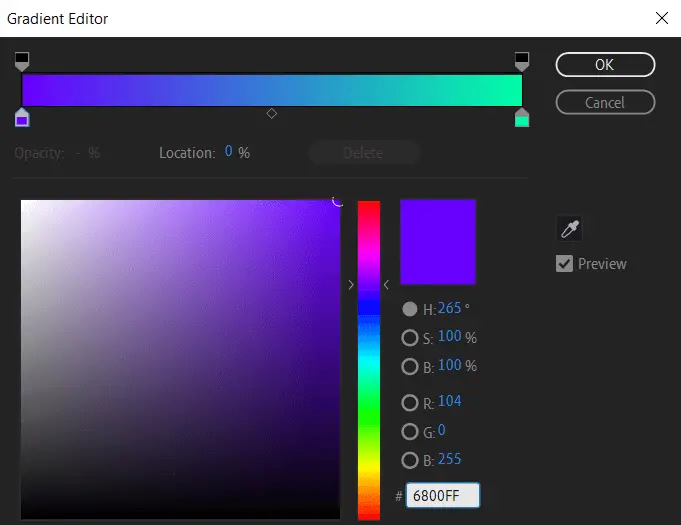
6. Click edit gradient and select the two colors you want to rotate around your border.
7. Find the angle line of the gradient overlay settings and click the stopwatch, so it turns blue.
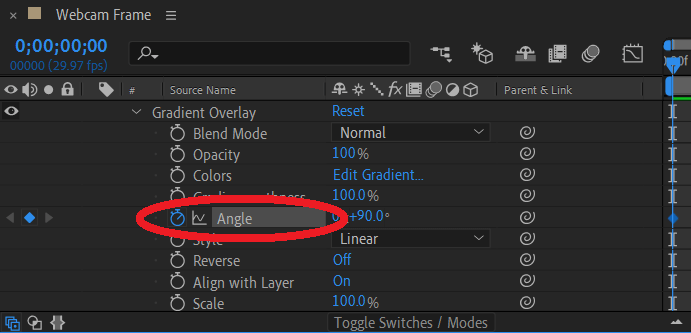
8. Drag the time indicator to the end of your timeline and change the first angle value to 1.

9. Press the spacebar and watch your animated border go!
10. Export as a transparent WEBM via Media Encoder.
11. Add the border to OBS studio as a media source and place it on top of your video capture webcam source.
12. If necessary, use CTRL+ALT to drag the bounds of your webcam source in to fit underneath your new frame.
Pre Made Webcam Borders
Creating image and video files can be daunting to some. The software is quite tricky to use and often very confusing but fear not; there are pre-made webcam borders out there that are available for streamers to download and use. Some of the most popular sites to download transparent borders from include:
- PNGTree – A huge directory of still image files. Use this search query to find hundreds of pre-made webcam borders.
- StreamDPS – An incredibly underrated site where users can create and edit their own browser-based widgets including webcam frames. To find the frames on the site, click here. Each widget needs to be added to OBS Studio as a browser source.
- Nerd Or Die – A site offering hundreds of overlays, alerts, and stream designs. Some of the higher-end designs are behind a paywall but they do have a large section of downloadable freebies.
- OWN3D – One of the main competitors of Nerd Or Die, OWN3D provides a similar service but with products focussed mostly on compatibility with Twitch. Regardless, webcam frames work with all platforms! There are fewer free options here but everything behind the paywall is extremely well made.
File Types and Sources
Certain file types need to be added as particular sources in OBS Studio to function properly. Generally, if your border is animated, it will need to be added as a media source. If it is a still image, it needs to be added as an image source:
FLV, MP4, WEBM, MOV, H264, MKV, WMV, AVI, GIF- Add as a media source
JPEG, PNG, BMP, TIFF – Add as an image source
Online browser-based widget – Add as a browser source using the widget’s URL
In Conclusion
If you are looking for a simple yet effective webcam border for your stream, the in-built OBS studio sources can handle it. Still, for more effective and better-looking borders, including those with animation, you’ll need to look into external software!
Purchasing Photoshop and After Effects only for creating webcam borders might seem a big commitment, but they’re also an excellent tool for creating stream logos, overlays, and alerts. Pre-made overlays exist online and can be a great timesaving alternative, but there’s nothing quite like making everything on your stream by hand!
To keep building your streaming setup, we recommend our tutorials on how to add alerts, chat, and more within OBS.
Как использовать хромакей в ОБС (OBS Studio) + туториал по рамке вебки
✅Понравилось? Нажимай и подписывайся: ��bit.ly/2xseMK5 ✅Boosty: ��boosty.to/vizoone ✅Платный вопрос (не просьба настроить, а именно вопрос) : ����donationalerts.com/askme/vizoone ��Игровой ПК�� CPU: AMD Ryzen 7 5800x3d ��ya.cc/m/wJjzleP GPU: EVGA GeForce RTX 3080 ��ya.cc/m/iiX6zbG Motherboard: ASUS TUF B450M-PRO GAMING ��ya.cc/m/hCIHWwP RAM: Kingston FURY Beast Black 32 Gb ��ya.cc/m/ItNVRzf Monitor: LG 32GK650F-B ��ya.cc/m/ZL5RnA7 ��Строим ПК�� CPU: AMD Ryzen 9 3900X ��ya.cc/m/PC4G5KX GPU: GIGABYTE NVIDIA GeForce RTX 2070SUPER ��ya.cc/m/PLAWsyI Motherboard: ASUS PRIME X370-PRO ��ya.cc/m/6IECEoW RAM: G.Skill AEGIS 16 Gb ��ya.cc/m/8keCIdU Capture card: Elgato Game Capture 4K60 Pro MK.2 ��ya.cc/m/UpQenwH ��Дивайсы⌨ Mouse: Logitech g305 ��ya.cc/m/fIyLgpV Keyboard: ZET GAMING Blade Kailh Red ��ya.cc/m/sD3IkMW Mousepad: ZET GAMING GM-XXL Beast 4 (2XL) ��ya.cc/m/KnZSuPE Headphones: HyperX Cloud MIX ��ya.cc/m/QqHKhwu Saund card: Steinberg UR-12 ��ya.cc/m/9BLNxOl Mic booster: KLARK TEKNIK MIC BOOSTER CM-2 ��ya.cc/m/ExcJZrn Microphone: RODE PodMic ��ya.cc/m/quxQQLm OBS — самая популярная программа для стриминга. Если вы хотите транслировать на Twitch, на YouTube, на Facebook или где-либо еще, вся настройка одинакова. ��Обязательно посмотри эти видео: �� Как настроить OBS для записи игр ��youtu.be/8xqTTpIwPgc �� Быстрая настройка OBS для стрима ��youtu.be/cfalVUx9doE �� Бесплатная музыка для YouTube ��youtu.be/nKv-ETwVG5s �� Как разделить звук игры, Discord и системы ��youtu.be/rcUCVu4b6I4 �� Настройка веб-камеры ��youtu.be/vFX70qPYb-s ��Как сделать рамку для вебки ��youtu.be/66pL1Zh-jME �� Как сделать стингер переход ��youtu.be/fDKuebYPQfg �� Настройка микрофона для стрима ��youtu.be/S7C_JLfFW2M �� Создаем оповещение о подписке ��youtu.be/nzPwUA07Rnw �� Настройка OBS Подробно ��youtu.be/Fd-54KGdyhY Как удалить зеленый фон экрана с помощью OBS или Streamlabs OBS, чтобы вы могли быть поверх своей игры! Сегодня расскажу как использовать хромакей в ОБС (OBS Studio) и как просто и быстро нарисовать рамку для веб камеры что бы использовать ее «зенекой»


А почему у меня зади зеленый фон выставляю фильтре храмокей то картинка как была так и осталось(( ок посмотрю настройки вэб камеры
скинул бы файлик с фотошопа)
Расскажи про недорогие карты захвата, которые ты упомянул в видео! Спасибо
VIDEOMiN .NET
02:27 
07:56 
03:20 
03:22 
04:56 
04:04 
02:29 