Как скрывать треки в Spotify
Вы знали, что в Spotify можно скрывать песни в альбомах и плейлистах, чтобы их не слушать? При прослушивании скрытые треки будут автоматически пропускаться. Скрыть песню на время лучше, чем её удалить, ведь спустя какое-то время вы можете передумать. Ниже мы расскажем, как скрывать треки в Spotify.

Возможность скрывать треки в приложении Spotify появилась 16 апреля 2020 года. Доступна она только при наличии подписки Spotify Premium.
В версии Spotify для компьютера такой функции пока что нет.

Когда вы скроете ненужные песни, то вам не придётся каждый раз пропускать их вручную. Это будет происходить автоматически.
Как скрывать песни в Spotify
- Откройте приложение Spotify на своём устройстве с iOS.
- Выберите нужный плейлист или альбом, треки из которого хотите скрыть.
- Нажмите значок в виде трёх точек рядом с песней, которую хотите скрыть.
- В меню выберите HideSong(Скрыть песню).

Скрытые треки не исчезнут из альбома или плейлиста полностью. Они просто станут серыми, и рядом с ними появится красный значок.

Spotify будет автоматически пропускать скрытые треки при прослушивании плейлиста или альбома. Если вы передумаете, скрытые песни можно вернуть.
Как вернуть скрытые песни в Spotify
- Откройте приложение Spotify на своём устройстве.
- Выберите плейлист или альбом со скрытыми песнями.
- Нажмите значок в виде трёх точек рядом со скрытым треком.
- Выберите опцию Hidden(Скрыто) в меню.
Песня сразу же вернётся в плейлист или альбом.

Функция позволяет лишь на время скрывать песни, которые вам не нравятся, а не удалять их полностью. Это очень удобно, поскольку часто треки надоедают на время, а потом их снова хочется слушать. Жаль, что в Apple Music нет такой же функции.
Напомним, что для доступа к функции нужна платная подписка Spotify Premium.
Раньше в Spotify можно было ставить дизлайки песням, которые вам не нравились. Это было очень удобно, и многие ждут возвращения функции. А до тех пор вы можете лишь скрывать треки.
Доступ к плейлистам
По умолчанию все созданные плейлисты открыты. Если вы закроете их, другие пользователи не смогут получить к ним доступ даже по ссылке или через поиск по названию.
Как отключить видимость плейлиста:
- Нажмите на значок или в верхней части плейлиста.
- Выберите Закрыть доступ.
Совет. Чтобы плейлист снова могли слушать все пользователи, нажмите «Открыть доступ» (мобильная версия) или «Сделать открытым» (версия для ПК).
Делитесь плейлистами с близкими
Вы можете предоставлять доступ к закрытым плейлистам семье и друзьям. Вот что для этого нужно:
- Создайте в приложении ссылку для просмотра и отправьте ее пользователям. Изображения их профилей появятся в верхней части плейлиста рядом с вашим изображением. Затем вы сможете настроить уровни доступа.
Примечание. Ссылки действительны в течение 7 дней. - Сделайте плейлист общим. Подробнее…
Настраивайте плейлисты, опубликованные в профиле Spotify
В вашем профиле показываются открытые, а также по умолчанию все новые плейлисты.
Изменить эту настройку можно в приложении для компьютера:
- Нажмите на изображение профиля в верхней части экрана и выберите Настройки.
- В разделе Приватность включите или отключите параметр Публиковать новые плейлисты в своем профиле.
Примечание. Если вы закроете плейлисты, опубликованные в вашем профиле, они не будут видны другим пользователям. Чтобы узнать больше о публикации плейлистов, прочитайте эту статью.
7 Steps To Make Your Playlist Private On Spotify

This is a guide to making your Spotify playlist private. It’ll walk you through what settings you should change in order to keep your music from showing up on other people’s playlists. You’ll also learn how to make your account so that only you can see the songs inside of it.
Here’s How To Make A Playlist Private
If you’re someone who likes to keep their taste in music to themselves, you may be wondering how to make a playlist private on Spotify. Luckily, it’s easy to do! Here’s a step-by-step guide:
1. Open the Spotify app and sign in to your account.
2. Click on the «Your Library» tab in the bottom right corner of the screen.
3. Select «Playlists» from the menu that appears.
4. Click the playlist that you want to make private
5. Click on the three dots near the big green play button. Looks like «. «
5. On the menu that appears, find the option that says «Make Private» or if you’re on mobile, «Make Secret.»
That’s all there is to it! Now your playlist is private and only visible to you when you’re logged in to your Spotify account.
How to Share Playlists with Friends
Spotify is a great way to share music with friends. You can create playlists and share them with anyone you want. Here’s how to do it:
1. Go to your playlist and click the share button.
2. Copy the link that appears.
3. Paste the link into an email or chat window. Your friend will be able to see the playlist and listen to it if they have Spotify.
How to Change Privacy Settings
If you’re someone who loves music and uses Spotify to listen to your favorite tunes, you may want to keep your playlists private. After all, not everyone wants to share their musical taste with the world. Luckily, Spotify makes it easy to change the privacy settings on your playlists so that only you can see them. Here’s how:
1. Log in to your Spotify account and click on the «Profile» tab in the upper-right corner.
2. Click on the «Edit Profile» button and scroll down to the «Privacy» section.
3. Under «Who can see your playlists?», select «Only Me».
4. Scroll down and click on the «Save» button to save your changes.
Now, only you will be able to see your Spotify playlists when you log in to your account. If you ever want to change this setting back or allow other people to see your playlists, simply follow these steps again and select the appropriate option under «Who can see your playlists?»
Other Ways to Keep Your Playlists Private
In addition to the steps outlined in the article, there are a few other ways you can keep your Spotify playlists private.
One way is to create a playlist and then set it to «Private» in the settings. To do this, go to the playlist page, click on the three dots next to the playlist name, and select «Edit» from the drop-down menu. From here, you can toggle the «Public» switch to «Private.»
Another way to keep your Spotify playlists private is to make use of Spotify’s Family Plan feature. With this feature, you can create a separate account for each family member and set different privacy settings for each account. For example, you could make your own account public while keeping your kids’ accounts private.
Finally, you can also use third-party apps to keep your Spotify playlists private. Apps like Playlist Converter and Exportify let you export your Spotify playlists as text files, which you can then save or share however you want. These apps also let you import playlists from other sources (like iTunes), so they’re a good way to keep all your music in one place.
How to make your Spotify private: A guide to Spotify privacy settings
Learn how to make a Spotify playlist private—and more.
Creating Spotify playlists at work has become part of my routine. I need the right music to get into the right zone, so I've been building up my playlist collection quite a bit.
At the risk of sounding my age, I only recently noticed that all of my Spotify playlists were public. I mean, I get it: Spotify's marketing model relies heavily on music sharing. The more playlists and listening data Spotify can gather, the smarter the algorithm gets. So by default, all playlists and listening activity are public.
But still, I felt kind of exposed. My work playlists are generally pretty tame, but do I really want the world seeing my more embarrassing choices? So I set out to discover how to make Spotify playlists private.
The 3 levels of Spotify playlist privacy
Before we dive in, it's worth pointing out that Spotify playlists have three different potential levels of privacy:
Public playlists that are available on your profile and searchable
Public playlists that aren't on your profile but are still searchable
Private playlists that aren't on your profile and aren't searchable
When you're thinking about how to make your Spotify playlist private, you're going to want to choose between options 2 and 3, depending on how much privacy you're looking for.
How to remove a playlist from your Spotify profile
As with all actions you perform on Spotify, there are two ways to remove playlists from your profile: one for mobile and one for desktop. Here's how to remove a playlist from your Spotify profile:
On mobile: Open the playlist, and click the three dots (. ) at the top. Select Remove from profile.
On desktop: Click the three dots (. ) at the top of the playlist (or right-click the playlist), and select Remove from profile.

Remember: even if you remove a playlist from your Spotify profile, people will still be able to find it in Spotify search. That means anyone can listen to your playlist and share it with others. (Your playlists are that good.)
How to hide all new playlists from your Spotify profile
When you first create a Spotify playlist, the default is that it will be public and display on your profile. For example, I made a playlist for February 2023 (I like to do monthly playlists, so I can go back and revisit music from different periods—I'm a nostalgic one). You can see from this image that the playlist is already labeled a "Public playlist" and it appeared immediately on my profile, even though I hadn't added any songs to it yet.
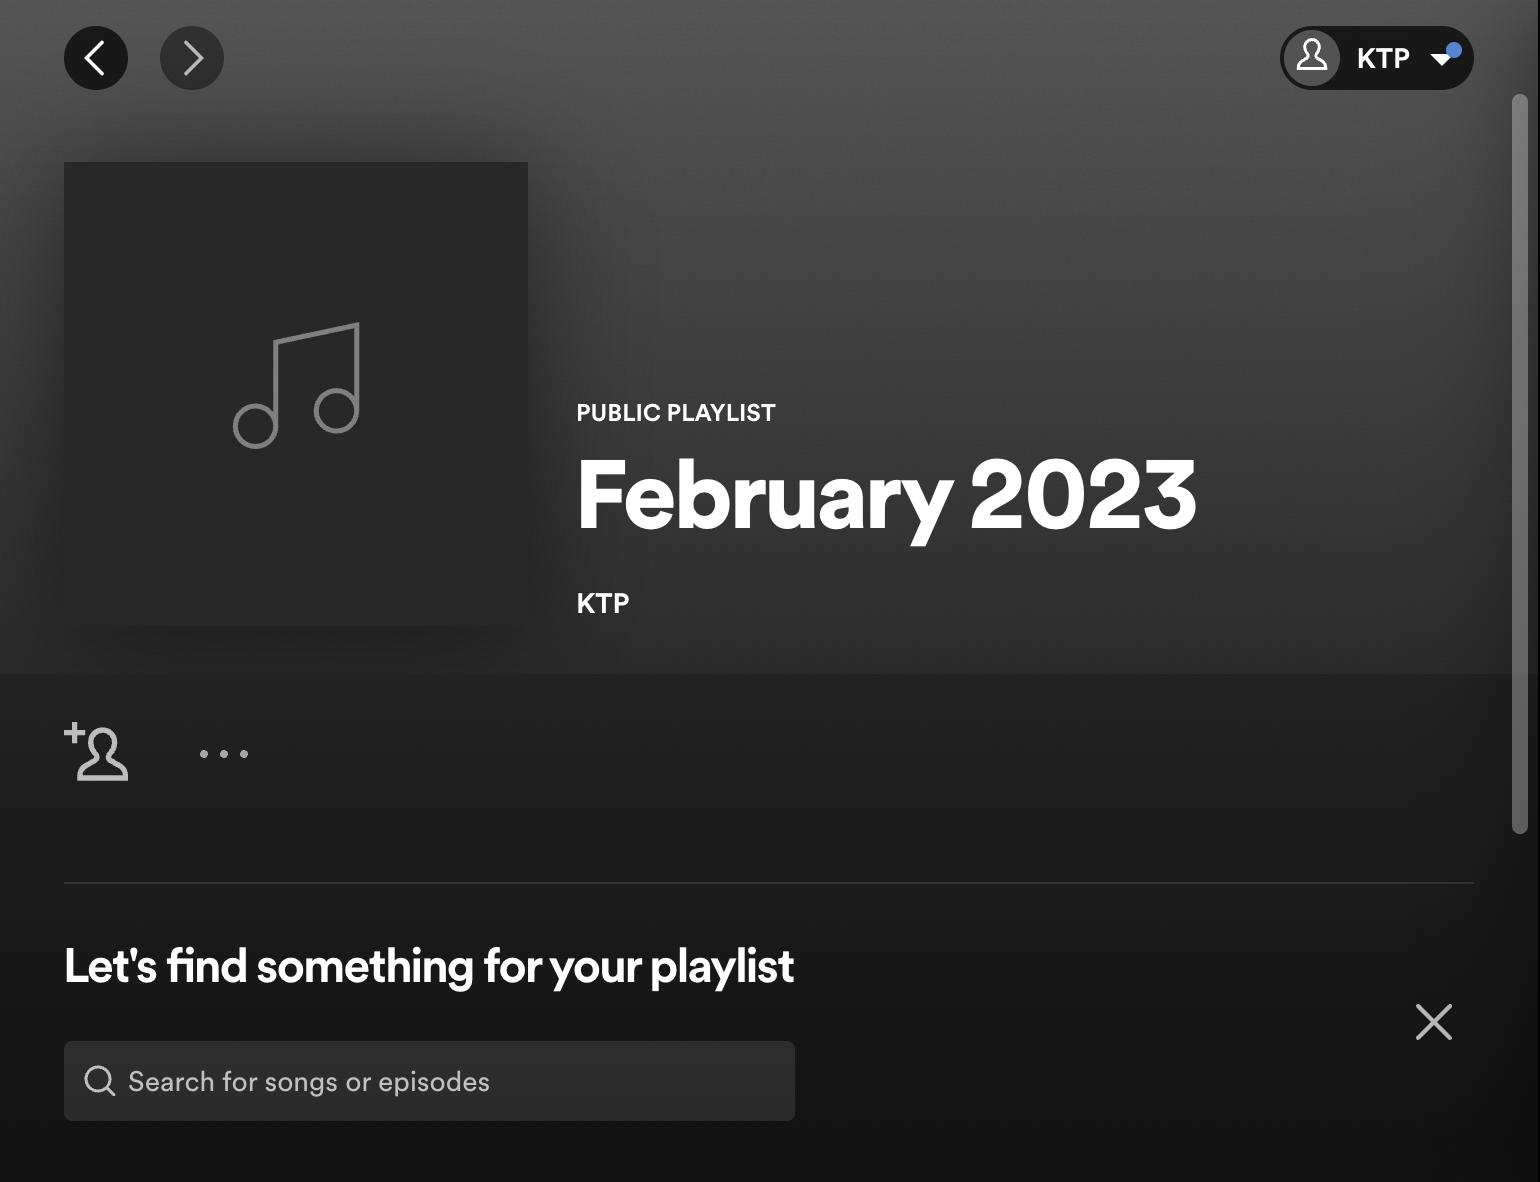
To stop Spotify from automatically displaying your playlists on your profile, there's a setting you can change through the desktop app (note: you can't do this on mobile).
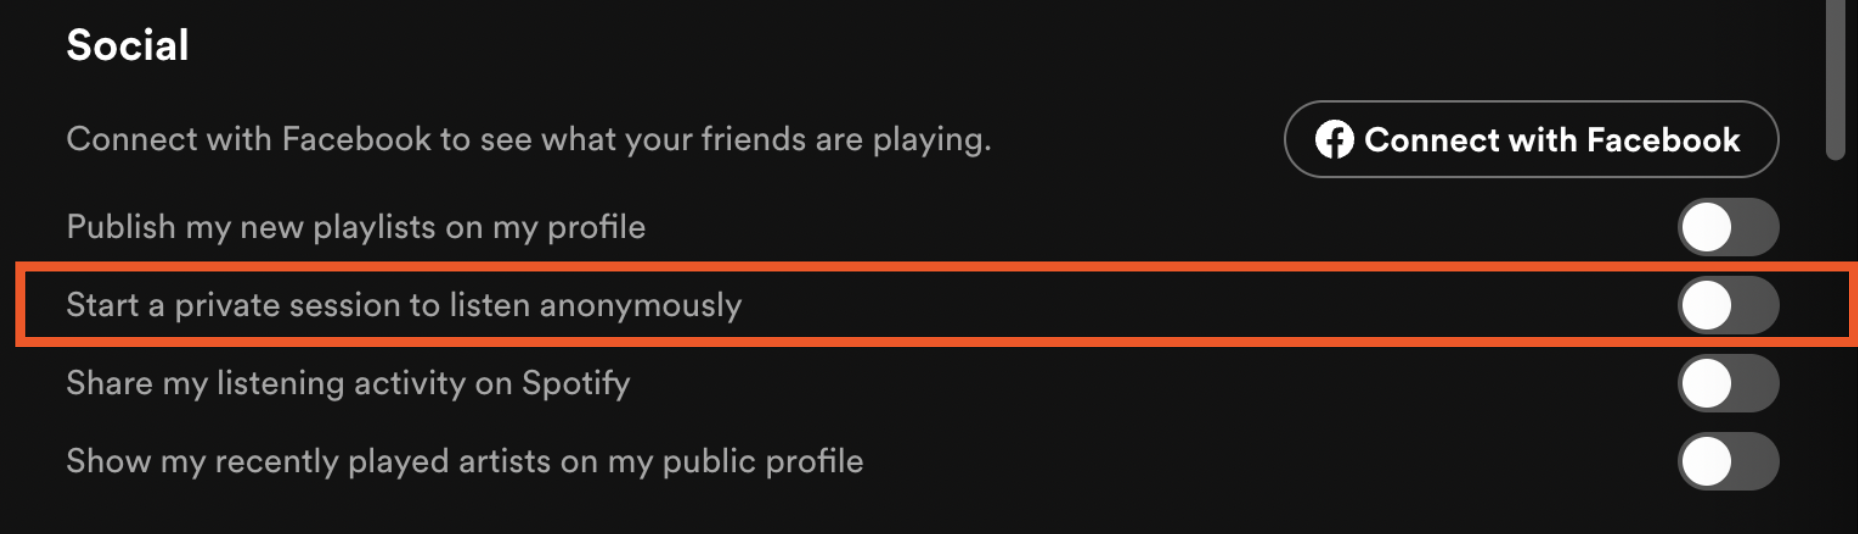
Click the arrow next to your username, and select Settings > Social.
Under the Social header, you'll see the option to Publish my new playlists on my profile.
Switch this option off, and any new playlists you create won't appear on your profile.
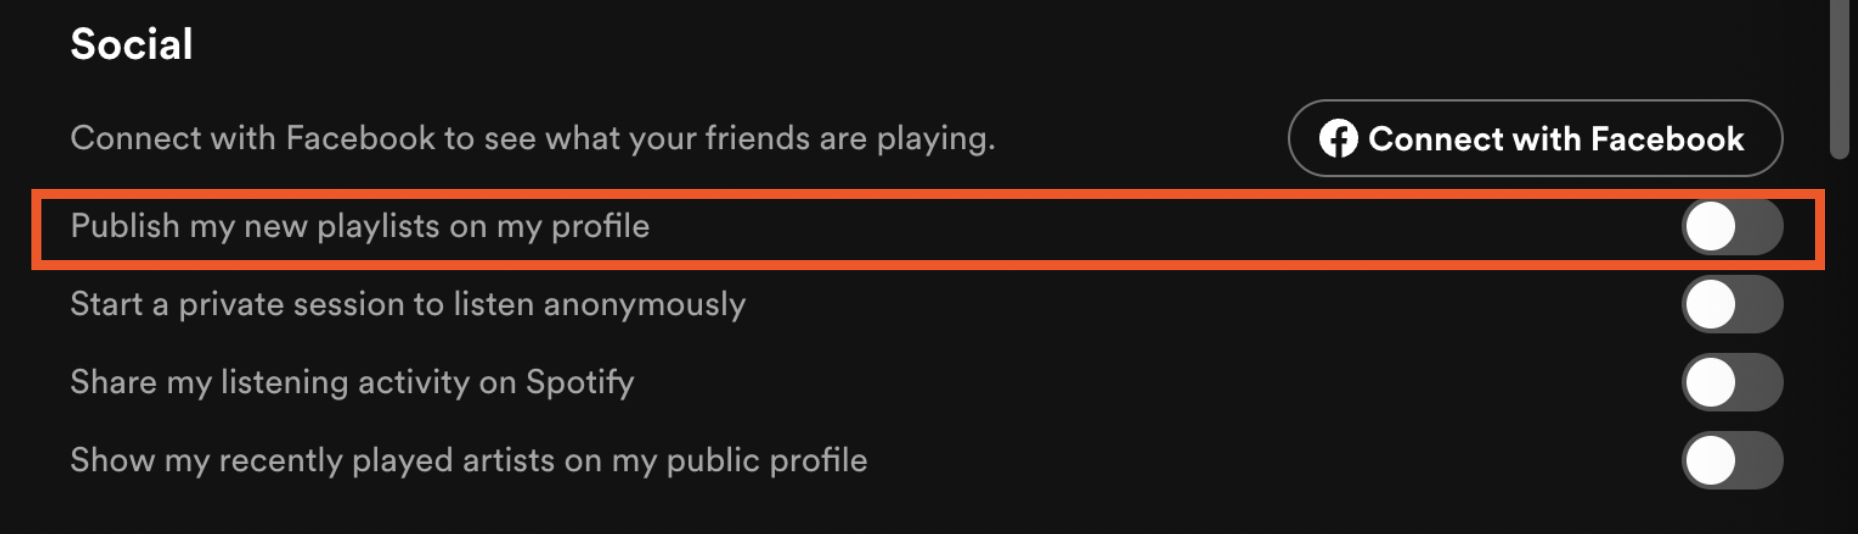
But remember, your playlists will (say it with me!) still be public, searchable, and shareable unless you make the playlist private.
How to make a playlist private on Spotify
If you want to take it one step further and make sure people can't find your playlists even via search, you'll need to make them private. Here's how to make playlists private on Spotify, depending on what device you're using:
On mobile: Open the playlist, click the three dots icon (. ) at the top of the playlist, and select Make private.
On desktop: Open the playlist, click the three dots icon (. ) at the top of the playlist (or right-click the playlist icon on your home page), and select Make private.

If the option to make it private doesn't appear for you, but you can see the option Make public, this means your playlist is already private. Past you already thought of it, apparently.
When you make a Spotify playlist private, it will automatically remove it from your profile as well (if it's on your profile, that is). Your followers won't be able to see it, and it won't be discoverable on Spotify search.
Can you share a private playlist on Spotify?
Yep! Even if you've made a playlist private, you can still share it individually with whoever you want.
You share a private playlist the same way you share a public playlist.
On mobile: Tap the three-dot menu (. ) icon at the top of the private playlist, select Share, and choose how you'd like to share it (via social, messaging apps, or just to copy/paste the link).
On desktop: Tap the three-dot menu (. ) icon at the top of the playlist (or right-click the playlist icon on your home page), select Share, and choose how you'd like to share it.
How to make a Spotify collaborative playlist private
Spotify recently added the option to make collaborative playlists, which means anyone with access can edit the playlist (versus just sharing a playlist, which only gives people listening access). You can make collaborative playlists private too—so if you and a friend have recently confessed a penchant for crooner love songs (nothing wrong with that!), you can make playlists together that no one else can access.
To do this, you first need to make a private playlist following the steps from the previous section. Then, do the following:
On mobile: Tap the three-dot menu (. ) icon at the top of the playlist, and select Invite collaborators.
On desktop: Tap the three-dot menu (. ) icon at the top of the playlist (or right-click the playlist icon on your home page), and select Invite collaborators.
Your invite message will be similar to the one you send when you share playlists. The difference is that the message says they can also "join and edit," not just listen.

How to remove yourself from Friend activity on Spotify
When you follow friends or other users (rather than artist accounts) on Spotify, their listening activity appears in the Friend activity bar on the right side of the Spotify desktop app.

I never used to pay much attention to it until, one day, it dawned on me how weird it was that I could see exactly what my friends were listening to at any given moment. And that meant they could do the same for me. ��
If you don't want your listening activity to be visible to people that follow you, you'll have to do it on desktop:
Click the arrow next to your username, and select Settings > Social.
Under the Social header, you'll see the option to Share my listening activity on Spotify.
Switch this option off, and your friends won't be able to see what you're listening to.
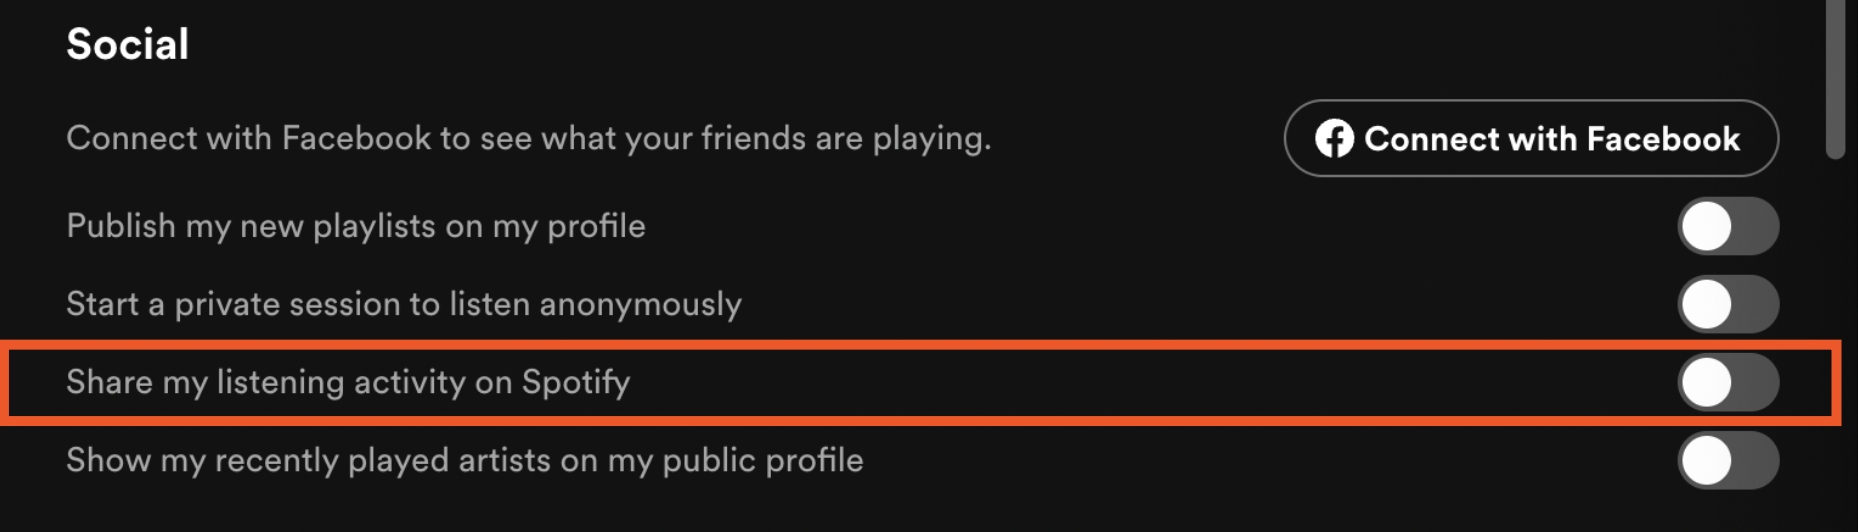
While you're there, you'll also want to turn off Show my recently played artists on my public profile.
How to start a Spotify private session
It's one thing if your friends don't know what you're listening to. But what if you don't want your three-week breakup mix binge to mess up your overall algorithm? That's when you need a private session. A private session on Spotify means that Spotify won't include your listening activity in their algorithms or in your Spotify Wrapped.
Here's how to start a private listening session:
Click the arrow next to your username at the top of the app.
Select Settings > Social.
Switch on the option for Start a private session to listen anonymously.
A blue padlock icon will appear next to your username to indicate you're listening anonymously.

Automate Spotify
Sharing music with friends and followers is what makes Spotify different from other listening apps, like iTunes and Amazon Music. But sometimes, you don't want the whole world knowing what your cry-in-the-car songs are. In those cases, you can manage your Spotify preferences.