Пошаговое руководство по установке Xubuntu 20.04 Linux
Xubuntu — это популярный облегченный дистрибутив Linux, основанный на Ubuntu. Он поставляется с настольной средой Xfce, легкой, стабильной и легко настраиваемой.
Будучи легким дистрибутивом, Xubuntu является идеальным выбором для пользователей, работающих на современных ПК с небольшим объемом оперативной памяти и ресурсов ЦП. Он также неплохо работает на старом оборудовании.
Xubuntu 20.04 — это LTS выпуск, основанный на Ubuntu 20.04 под кодовым названием Focal Fossa. Он был выпущен в апреле 2020 года и будет поддерживаться до апреля 2023 года.
В этом руководстве мы проведем вас через процесс установки Xubuntu 20.04 Desktop.
Предпосылки
Прежде чем приступить к работе, убедитесь, что ваша система соответствует следующим минимальным требованиям:
- Двухъядерный процессор Intel или AMD с тактовой частотой 1,5 ГГц и не менее 1 ГБ ОЗУ (рекомендуется 2 ГБ).
- 9 ГБ свободного места на жестком диске (рекомендуется 20 ГБ).
Скачать ISO-образ Xubuntu 20.04
Кроме того, вам потребуется ISO образ Xubuntu 20.04. Вы можете загрузить его с официальной страницы загрузки Xubuntu. Вам также потребуется USB-накопитель 16 ГБ, который будет использоваться в качестве загрузочного установочного носителя.
- Загрузить Xubuntu 20.04
Установка рабочего стола Xubuntu 20.04
Первым шагом является создание загрузочного USB-накопителя для установки Xubuntu с использованием загруженного образа Xubuntu ISO. Есть несколько способов сделать это.
Создайте загрузочный USB-образ Xubuntu
Вы можете использовать утилиту Rufus, чтобы сделать USB-накопитель загрузочным.

Начните установку Xubuntu
Теперь подключите загрузочный USB-накопитель к ПК и перезагрузите его. Просто чтобы убедиться, что ваш компьютер загружается с USB-накопителя, перейдите к настройкам BIOS и установите порядок загрузки с USB-накопителем в самом верху приоритета загрузки. Затем сохраните изменения и выйдите.
При запуске вы увидите на экране заставку журнала Xubuntu. Программа установки выполнит некоторые проверки целостности файловой системы. Это может занять некоторое время, поэтому просто наберитесь терпения.

Вскоре после этого появится графический установщик, который предложит вам два варианта. Чтобы попробовать Xubuntu без установки, нажмите «Попробовать Xubuntu». Поскольку наша цель — установить Xubuntu, нажмите «Установить Xubuntu».

Выберите раскладку клавиатуры
Затем выберите предпочтительную раскладку клавиатуры и нажмите «Продолжить».

Установите обновления Xubuntu
На следующем шаге вам предоставляется возможность загрузки обновлений и других сторонних программных пакетов для графики, WiFi и других форматов мультимедиа. В моем случае я выбрал оба варианта и нажал «Продолжить».

Создание разделов диска Xubuntu
Программа установки предоставляет два варианта установки Xubuntu. Первый вариант — Стереть диск и установить Xubuntu — стирает весь диск вместе со всеми файлами и программами. Он также автоматически разбивает ваш диск и рекомендуется для тех, кто не знаком с ручным разбиением жесткого диска.
Второй вариант позволяет вручную разбить жесткий диск на разделы. Вы можете явно указать, какие разделы вы хотите создать на жестком диске.
В этом руководстве мы нажмем «Что-то еще», чтобы мы могли вручную определить разделы, которые нужно создать.

На следующем этапе ваш диск будет выделен как /dev/sda (для жестких дисков SATA) или /dev/hda (для старые жесткие диски IDE). Прежде чем продолжить, вам необходимо создать таблицу разделов для диска.
У нас есть жесткий диск 27,5 ГБ, и мы разделим его следующим образом:
Чтобы продолжить, нажмите кнопку «Новая таблица разделов».

Во всплывающем диалоговом окне нажмите «Продолжить».

Будет создано свободное пространство, эквивалентное размеру вашего жесткого диска. Чтобы начать разбиение, нажмите кнопку со знаком плюс (+) прямо под ним.

Мы начнем с раздела boot. Укажите размер в МБ и точку монтирования как /boot . Затем нажмите «ОК».

Это вернет вас к таблице разделов, и, как вы видите, наш загрузочный раздел создан.

Далее мы создадим область swap. Итак, еще раз нажмите на запись об оставшемся свободном пространстве, нажмите на знак плюса (+) и заполните данные об обмене, как указано. Обратите внимание, что вы должны нажать на метку \Использовать как и выбрать область обмен, а затем нажать ОК.

Оставшееся место будет зарезервировано для корневого раздела (/) . Повторите упражнение и создайте корневой раздел.

Вот наша таблица разделов со всеми разделами. Чтобы продолжить установку Xubuntu, нажмите «Установить сейчас».

Нажмите «Продолжить» во всплывающем диалоговом окне, чтобы записать изменения на диск и продолжить установку.

На следующем шаге укажите свое географическое положение. Если вы подключены к Интернету, программа установки автоматически определит ваш регион.

Создать обычного пользователя
Затем создайте пользователя для входа в систему, заполнив свои данные пользователя, такие как имя вашего ПК, имя пользователя и пароль, и нажмите «Продолжить».

Установка системы Xubuntu
Программа установки начнет с копирования всех файлов, необходимых Xubuntu. Затем он установит и настроит все пакеты программного обеспечения с установочного носителя.
Это может занять некоторое время. В моем случае это заняло около 30 минут.

После завершения установки нажмите кнопку Перезагрузить сейчас, чтобы перезапустить систему.

Извлеките загрузочный USB-накопитель и нажмите ENTER.

После перезагрузки системы отобразится графический интерфейс входа в систему, после чего вам потребуется ввести пароль для доступа к рабочему столу.

После входа вы попадете в среду рабочего стола Xfce. Отсюда вы можете изучить свою новую систему и попробовать пару настроек, чтобы улучшить внешний вид и производительность.

Это подводит итог этому учебному пособию. Мы успешно провели вас через установку Xubuntu 20.04.
Introduction
Ubuntu can be installed from a USB flash drive. This may be necessary for most new portable computers without DVD drives and is handy for others because a USB flash drive is so convenient. Also, you can configure Ubuntu on the USB flash drive to save changes you make, unlike a read-only CD/DVD disk.
Booting from a USB flash drive created with usb-creator alias Startup Disk Creator and mkusb will behave just as if you had booted from the install CD. It will show the language selection and then the install menu, from which you can install Ubuntu onto the computer’s hard drive or launch the LiveCD environment. Other utilities, e.g. UNetbootin, may create slightly different boot drives or if on UEFI might not work at all with Debian iso files due to a bug
Note: This article uses the term "USB flash drive" alongside USB stick, USB drive, USB device, USB pendrive and thumb drive.
Prerequisites
Dummy headlines
After a major remake of this help page the following headlines are kept here because they may be linked to from other web sites. Several other headlines further down in the page are also kept for this reason.
Chapter 2. Installation
Visit the System Requirements page to ensure that your computer meets the necessary hardware requirements to install and run Xubuntu. In general, Xubuntu will run on most computers (PC or Mac) that were built since 2007 and shipped with an OS (Operating System) like Windows XP and Mac OS X 10.5 or higher.
If you are installing Xubuntu on a laptop, it is recommended to keep your laptop plugged in during the installation, in order to prevent a sudden power loss which can cause a corrupted system. If you are running Windows 10 and have Intel’s RST (Rapid Storage Technology) running, you will need to turn it off before installation.
Download the ISO
Visit the Download page to download the ISO image for your selected edition of Xubuntu. If you prefer stability, it is recommended to download the LTS (Long Term Support) release, which is supported for 3 years. The ISO file can be downloaded with a BitTorrent client, such as Transmission or qBittorrent, or through your browser from one of the many global mirror servers.
Write the ISO
The ISO file needs to be written to a bootable medium, like a USB flash drive, an SD memory card or a DVD optical disk.
Write to USB or SD
If you have a USB stick or an SD card with 2 GB of storage or more, you can use one of these apps to write the ISO file: Rufus (Windows), Etcher (Windows, Mac, Linux), GNOME Disks ( gnome-disk-utility ). For more information on how to write the ISO to USB or SD, please see these guides for Windows, Mac or Linux.
Write to DVD
If you have a blank DVD disk and a DVD writer drive, you can burn the ISO with one of these apps, if your operating system doesn’t have the built-in capabilities to do so: InfraRecorder (Windows), Brasero ( brasero ), Xfburn ( xfburn ). For more information on how to burn the ISO to a DVD, please see these guides for Windows, Mac or Linux.
Backup Data
If you plan to install Xubuntu alongside an existing OS, it is recommended to back up the data of the existing OS as a precaution in case something goes wrong. You can back up the data files to an external USB drive and/or to a secondary hard drive on your computer.
Booting
BIOS / UEFI Considerations
Some computers may require additional configuration before the Xubuntu installation medium can be booted. Please refer to this section if you are unable to boot into the installer or if your hardware is not properly detected.
Warning: This is an advanced computer feature and should only be attempted with caution. F2 and Del are common keys to access the BIOS settings.
macOS T.2 Security
Starting the Bootable Medium
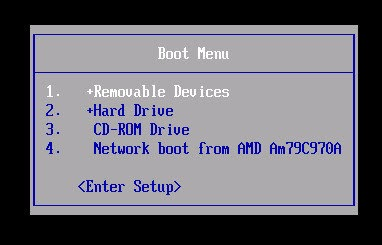
Insert the bootable medium into the respective device (the USB drive in a USB port, the SD card in the SD card reader or the DVD disk in the DVD drive) and restart your computer. If your computer is set to first boot from the bootable medium of your choice, then the medium will automatically boot. If it doesn’t start automatically, please refer to the computer manufacturer’s documentation for entering the boot menu. This could consist of pressing a key, such as F12 , or using a dedicated button on the computer. In some cases, you may need to boot into Windows to access the BIOS. Once you have entered the boot menu, select the appropriate boot medium device.
The key to press for your computer’s boot menu will depend on the manufacturer of the computer or motherboard. F12 is the most common boot menu key, but other common alternative keys are Escape and F10 . Less common keys include F11 , F9 , and F8 . If your computer is not capable of booting through USB, but has a CD or DVD drive, you can utilize PLoP.
Booting the Installer
Once the bootable media starts, a blank screen will appear with a keyboard and accessibility icons. At this point, you have 5 seconds to press any key to access the installer boot menu, if you wish to. The boot menu will initially present a language selection menu, followed by a simple menu with options to install or try Xubuntu, test memory, boot from the hard disk, as well as other options accessible by pressing the F1 through F6 keys (for more information about the Fn keys options, click here).
Xubuntu Installation
This tutorial is not only for those who are installing Xubuntu for the first time and would like to just double check their choices during the installation. We will be using this page as a template for setting up Xubuntu installations as quick as possible so that normal work will not be disrupted for longer than necessary.
This tutorial can be used for both «real PC» and «virtual PC» installations.
Precaution
For your own safety and to prevent unforeseen problems now or in the future, we strongly recommend that you only download installation CDs / DVDs from their official websites. To help you find the required official website we have listed official websites and their links in our «External Links / Useful Links» section for all installations mentioned on our website.
To obtain the latest ISO image for this tutorial, go to:
Environment
| Host OS: | Ubuntu 14.04 LTS (64 Bit) |
| Host RAM: | 8 GB |
| Virtual Machine Software: | VMWare Player v6.0.4 |
| Guest OS: | Xubuntu 14.10 (64 Bit) |
| Guest RAM: | 2 GB |
| Guest Hard Disk: | 20 GB |
Tutorial
This tutorial shows each of the steps required to install Xubuntu on a PC or in a virtual machine.
1. Boot the PC / VM from installation CD / DVD / ISO image.

This is the first screen which appears when booting from the Xubuntu installation CD. The little pictures at the bottom of the screen most likely mean something like «Press any key to show there is someone out there». I usually press the space bar as soon as I see this screen. The timeout period appears to be quite short. If some key on the keyboard isn’t pressed quick enough, the DVD starts booting the Live version. You can start the actual Xubuntu installation from within the Live version, but we would prefer to start it directly.
2. Which language should the installer use?

If you pressed some key quick enough, you should then see this screen.
Here you must select the language for the installer and press Enter.
3. Demo or Install or Test or. and how?

This screen gives us many options to choose from. Make sure the selected line is «Install Xubuntu» using the arrow keys, and then press Enter.
4. What does and doesn’t this PC have?

After pressing the Enter key, you will see this screen for quite a while. This is where the Xubuntu installer studies your PC’s hardware. On a later screen the Xubuntu installer will tell us if our hard disk is large enough and if we are connected to the internet.
5. Which language version of Xubuntu should be installed?

This screen asks us which language version of Xubuntu should be installed.
Select the language and click Continue.
6. Preparing to install Xubuntu

This screen shows if we have sufficient drive space and if we are connected to the internet.
Here we can choose if we would like to install the third-party software and if we would like to download updates while installing Xubuntu. In this tutorial, we will only select «Download updates while installing». We can then click Continue.
7. Installation Type

On this screen, we just select «Guided — use entire disk and set up LVM» and then click «Install Now«.
8. Write the changes to disks?

This screen appears to inform us about the changes which will be made on our disks. Check the information and if everything is correct, click the Continue button.
9. Where are you?

Once the disk changes have been completed, we will be taken to this screen where it will display our location based on the internet connection information.
If the location is not correct, change it to the correct location because Xubuntu will use this information to set our PC’s time and will use the closest Xubuntu server when fetching updates and new software. Once our location is correct, we can click on Continue.
10. Keyboard layout

On this screen we must make sure that the correct layout for our keyboard is selected.
We can click on Continue once the correct keyboard has been selected.
11. Who are you?

Here we need to enter our Name (Full Name if you like), the Xubuntu username, a password (for this user), and the computer’s name.
If you are not sure if you have selected the correct keyboard layout, rather click «Back» and make sure the correct keyboard is selected, otherwise you might not know what password has been entered.
When we enter our name into the first field, the Xubuntu installer will automatically generate your Xubuntu username and the computer’s name. We can leave them as they were generated OR we can change them to whatever we prefer as long as they are valid.
For this tutorial, we will also select «Log in automatically«.
At this point we should check that everything is correct and that we have documented any important information, because the Xubuntu installation will start when we click the Continue button.