Простой способ установить Google Play Store в Windows 11
В Windows 11 с помощью подсистемы Windows для Android (WSA) вы можете установить магазин Google Play Store, загружать и устанавливать любые приложения Android на свой компьютер с помощью определенных действий, которые включает в себя множество шагов.
Это был просто вопрос времени, теперь вы можете устанавливать Android приложения из Play Store в Windows 11, но не официально. Пользователь твиттера — ADeltaX, разработал процедуру, позволяющую обойти подсистему Windows для Android и установить приложение Google Play Store, что дает вам доступ в Windows 11 ко всему каталогу приложений для Android.
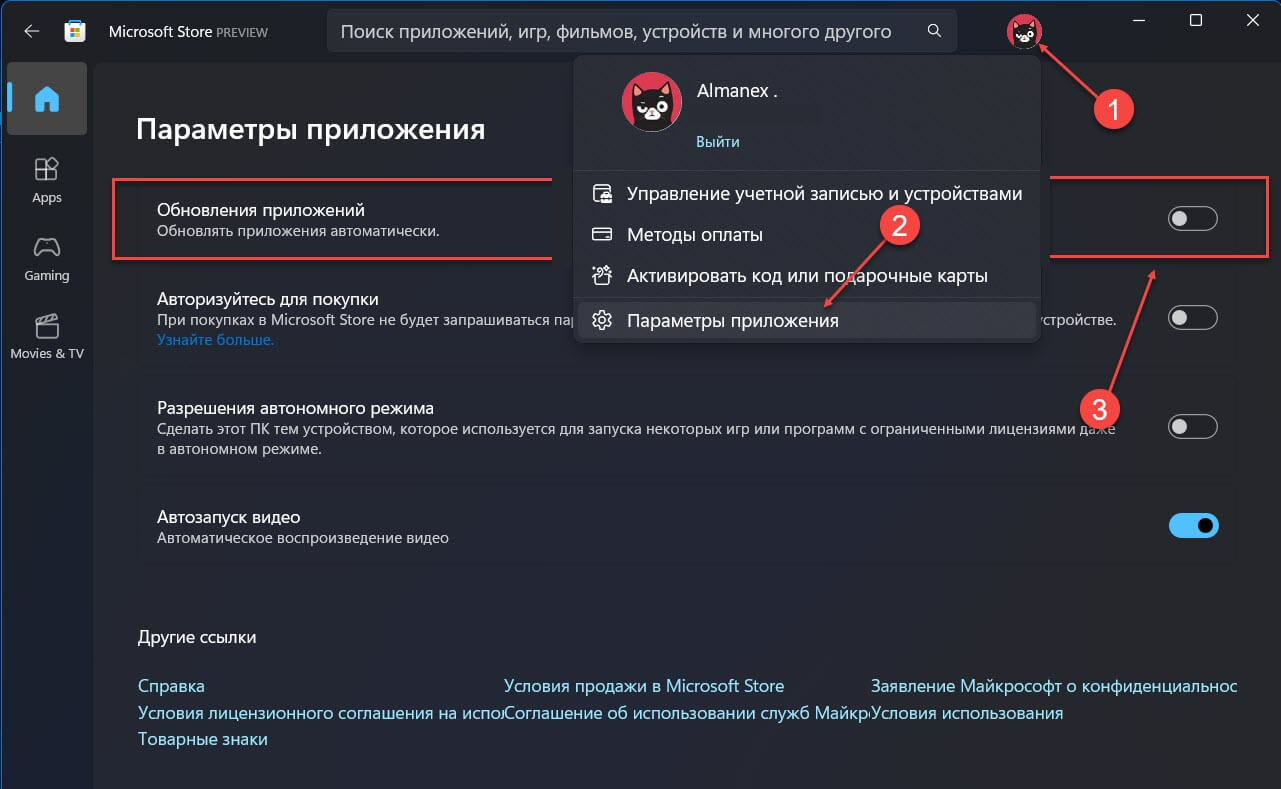
Пока, неясно, как это повлияет на будущие обновления. Другими словами, данный способ вполне может быть только временным решением, поскольку до сих пор не понятно, что произойдет после того, как WSA получит обновление через Магазин Microsoft. Вероятно, любому, кто использует этот метод, придется повторить весь процесс настройки. Конечно, если вы не отключите автоматическое обновление приложений в параметрах приложения Магазин Microsoft.
Этот способ установки магазина Google Play Store в Windows 11 является сокращением инструкций ADeltaX, но, если есть желание, вы можете следовать полной инструкции из репозитория Github.
Следуйте шагам ниже, чтобы установить магазин приложений Google и иметь возможность устанавливать приложения для Android в Windows 11.
Подготовка компьютера с Windows 11 для установки WSA
Прежде чем перейти к загрузке и установке, необходимо убедиться, что на вашем компьютере включены дополнительные функции Hyper-V и Virtual Machine Platform.
Шаг 1: Для этого, нажмите сочетание клавиш Win R , чтобы открыть диалоговое окно «Выполнить».
Шаг 2: Введите или скопируйте и вставьте:
Шаг 3: Здесь в окне «Компоненты Windows» для «Hyper-V» и «Платформа виртуальной машины» установите флажок, чтобы включить его.
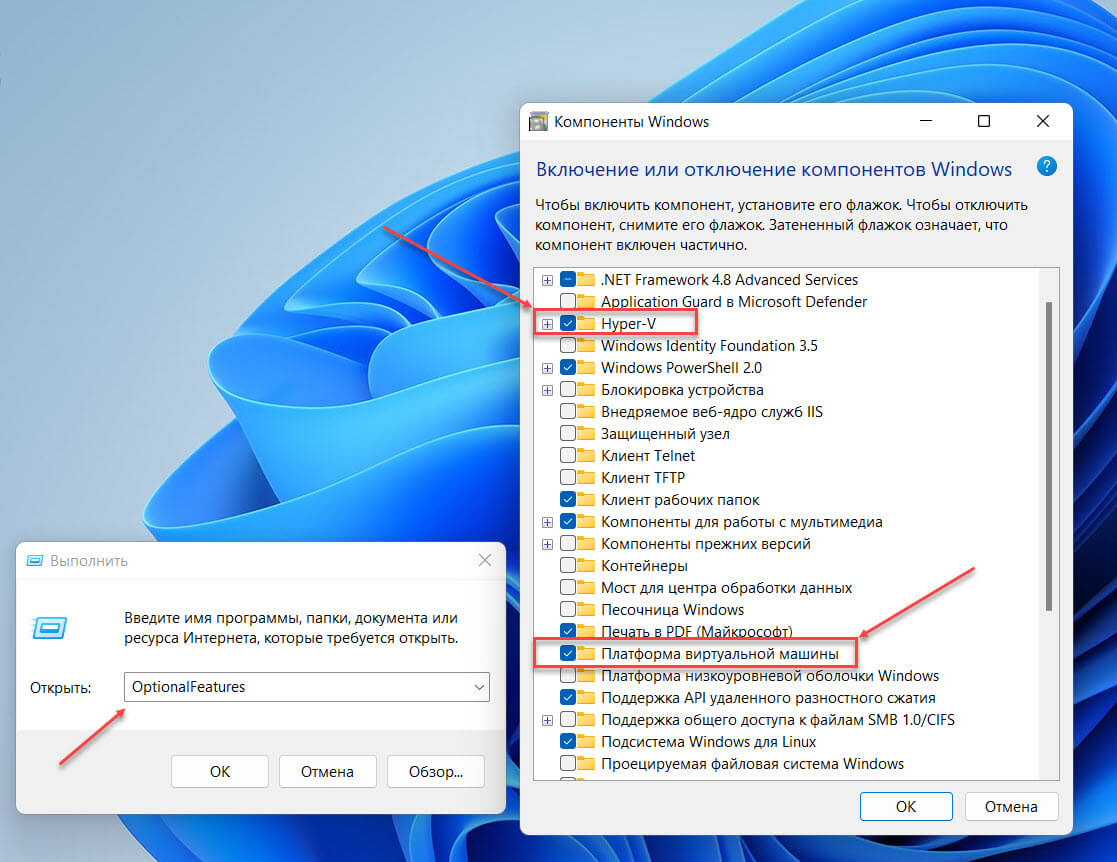
Шаг 4: Нажмите кнопку «ОК», чтобы установить эти дополнительные функции на свой компьютер с Windows.
Удалите любой ранее установленный пакет WSA
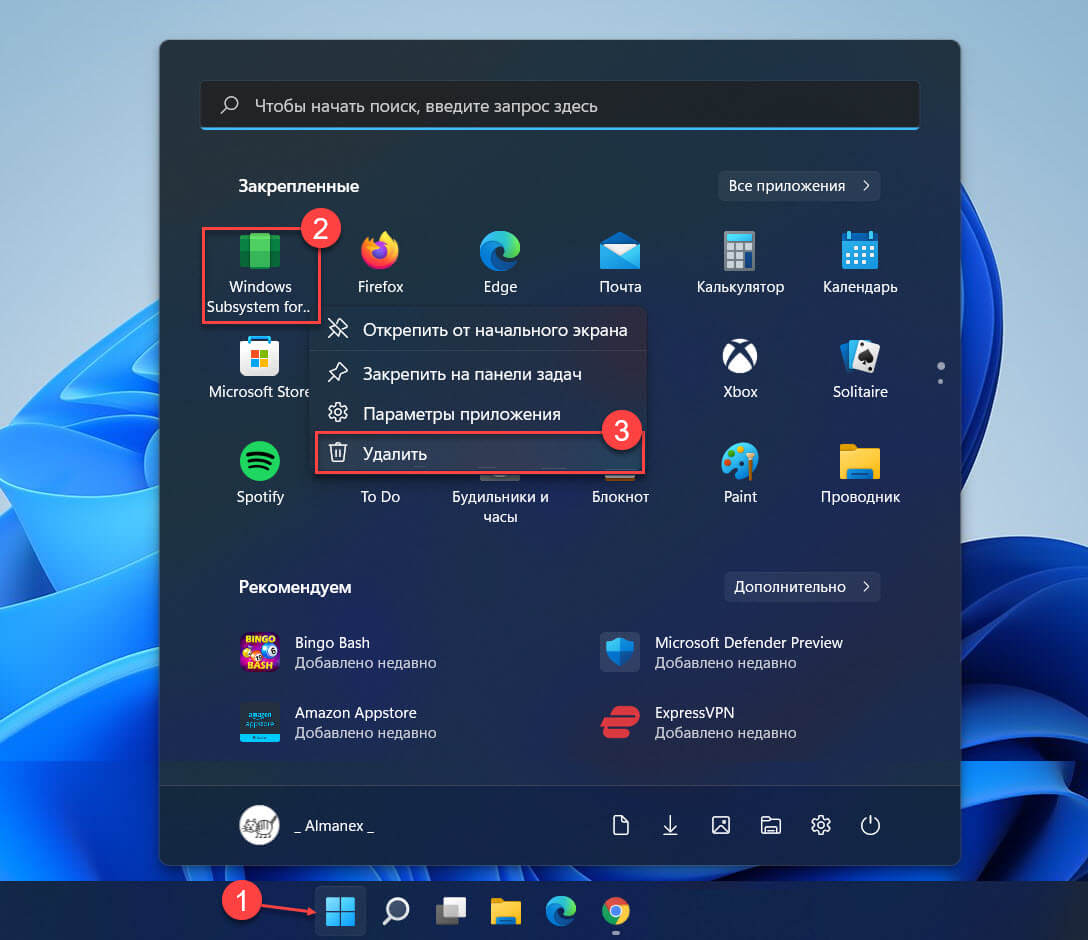
Удалите подсистему Windows для Android, если она уже установлена. Это связано с тем, что мы будем устанавливать новую подсистему Windows для Android, в которой существует интеграция Google Apps.
Шаг 5: Для этого, откройте меню «Пуск», найдите и кликните на подсистему «Windows Subsystem for Android» правой кнопкой мыши и выберите в контекстном меню пункт «Удалить». Затем следуйте инструкциям на экране, чтобы завершить процесс удаления.
Включите параметры разработчика в Windows 11.
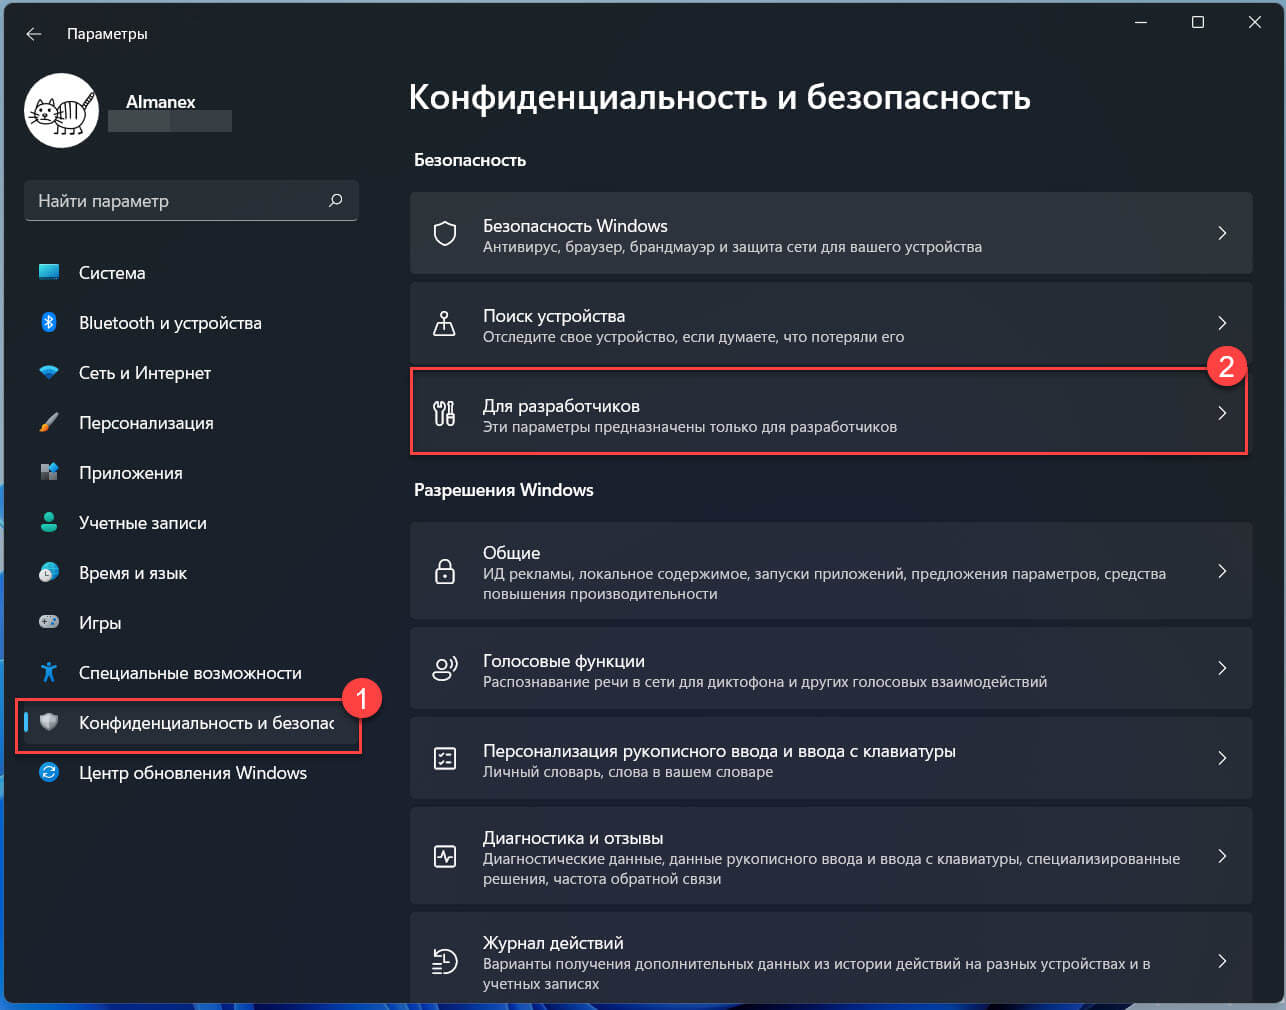
Вам нужно будет включить параметры разработчика в Windows (в Windows 11, а не в WSA!).
Шаг 6: Откройте параметры Windows 11, перейдите в раздел «Конфиденциальность и безопасность» → «Для разработчиков».
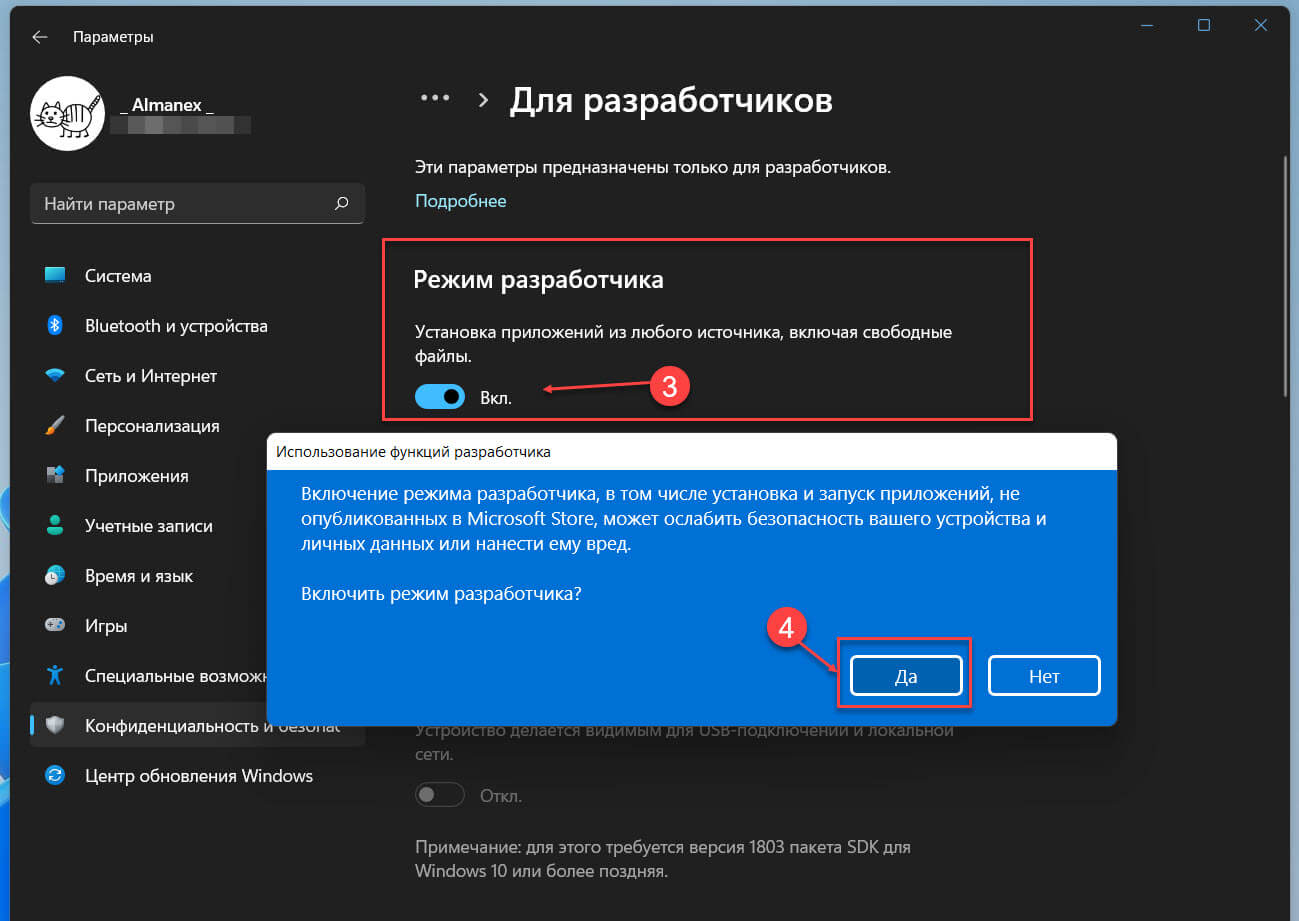
Шаг 7: В разделе режим разработчика передвиньте ползунок переключателя в положение «Вкл.»
Шаг 8: В следующем всплывающем окне подтвердите свои действия нажав кнопку «Да».
Загрузите WSA + GApps пакет MSIX:
Выберите для загрузки файл в зависимости от вашего устройства.
Модифицированная версия файл MSIX для 64-разрядных компьютеров ARM, таких как Surface Pro X.
Обновление: Благодаря новому методу от LSPposed у нас теперь есть WSA со встроенной поддержкой Magisk.
Вам понадобится приложение Magisk после установки одного из пакетов ниже.
- Модифицированная версия 64-разрядной версии WSA x86, в нее встроены приложения Google и поддержка Magisk.
- Модифицированная версия 64-разрядной версии WSA ARM, в нее встроены приложения Google и поддержка Magisk.
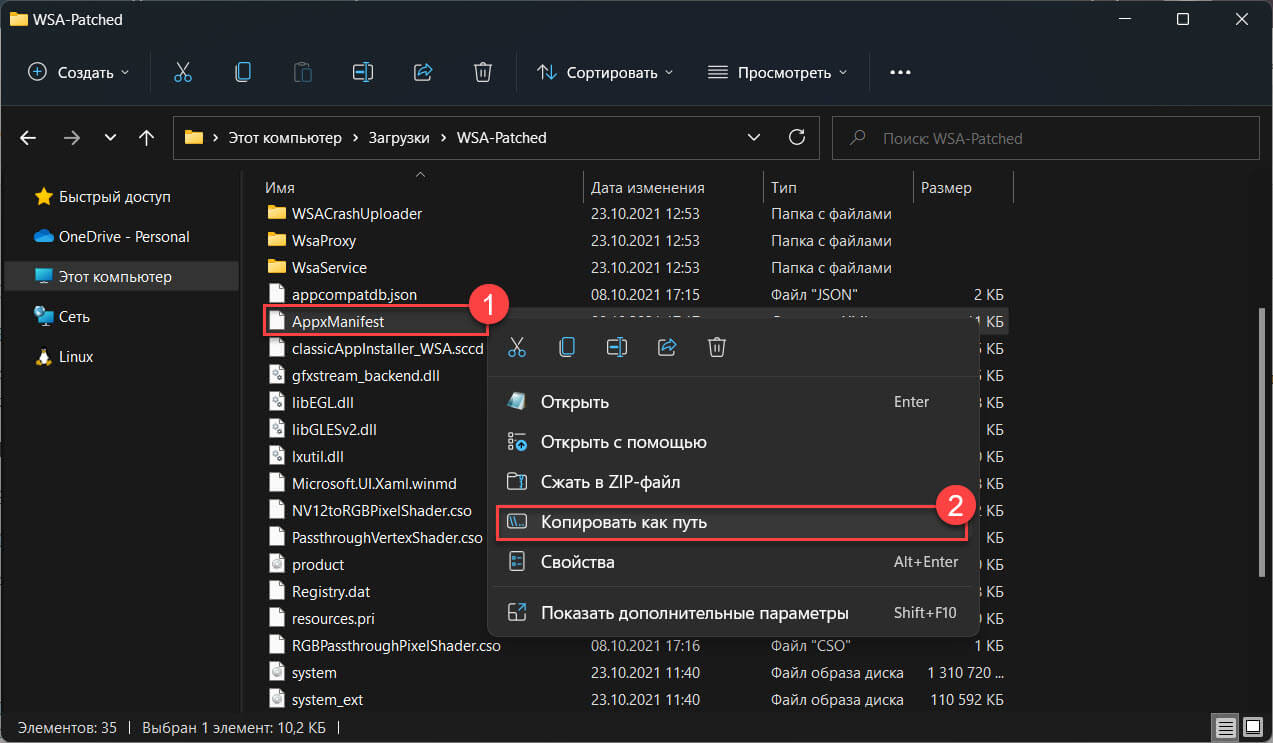
Шаг 10: Распакуйте загруженный Zip-архив в любое расположение, в дальнейшем нам потребуется указать путь к файлу AppxManifest.xml из этой папки.
Чтобы быстро получить путь к расположению файла, кликните на AppxManifest.xml правой кнопкой мыши и выберите «Копировать как путь», чтобы скопировать путь к файлу в буфер обмена ПК с Windows 11.
Зарегистрируйте пакет WSA + GApps:
Шаг 11: Запустите Powershell от имени администратора с помощью Терминала или любым другим удобным вам способом.
Шаг 12: Измените команду Powershell, указав расположение извлеченного Zip-файла
В моем случае команда выглядит так:
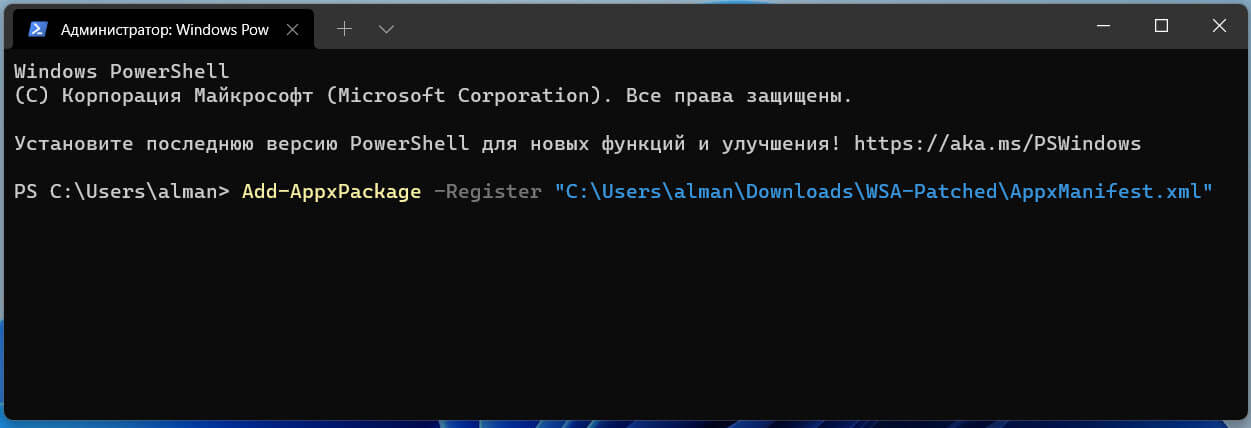
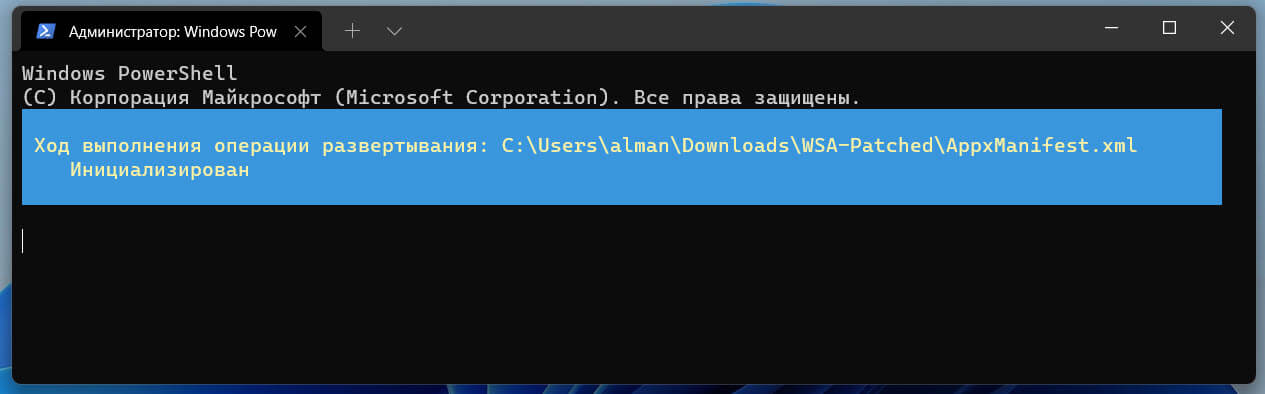
Приложение WSA будет установлено на ваше устройство в фоновом режиме. Если вы получите сообщение об ошибке, убедитесь, что все шаги были выполнены правильно.
После регистрации WSA, магазин Google Play должен быть доступен в меню «Пуск».
И последнее, что нужно сделать, прежде чем вы сможете войти в свою учетную запись Google.
Загрузите ADBKit:
Шаг 13: На странице developer.android.com загрузите «SDK Platform-Tools for Windows» .
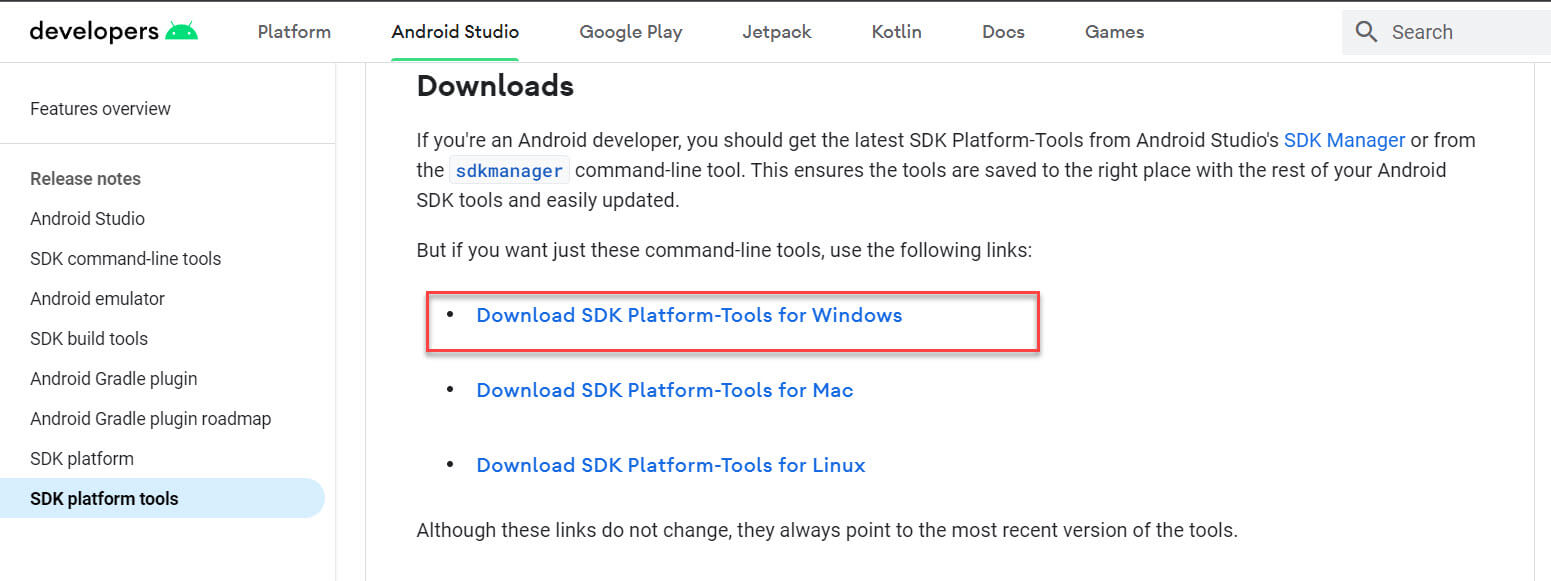
Шаг 14: Pаспакуйте zip-архив в любую папку.
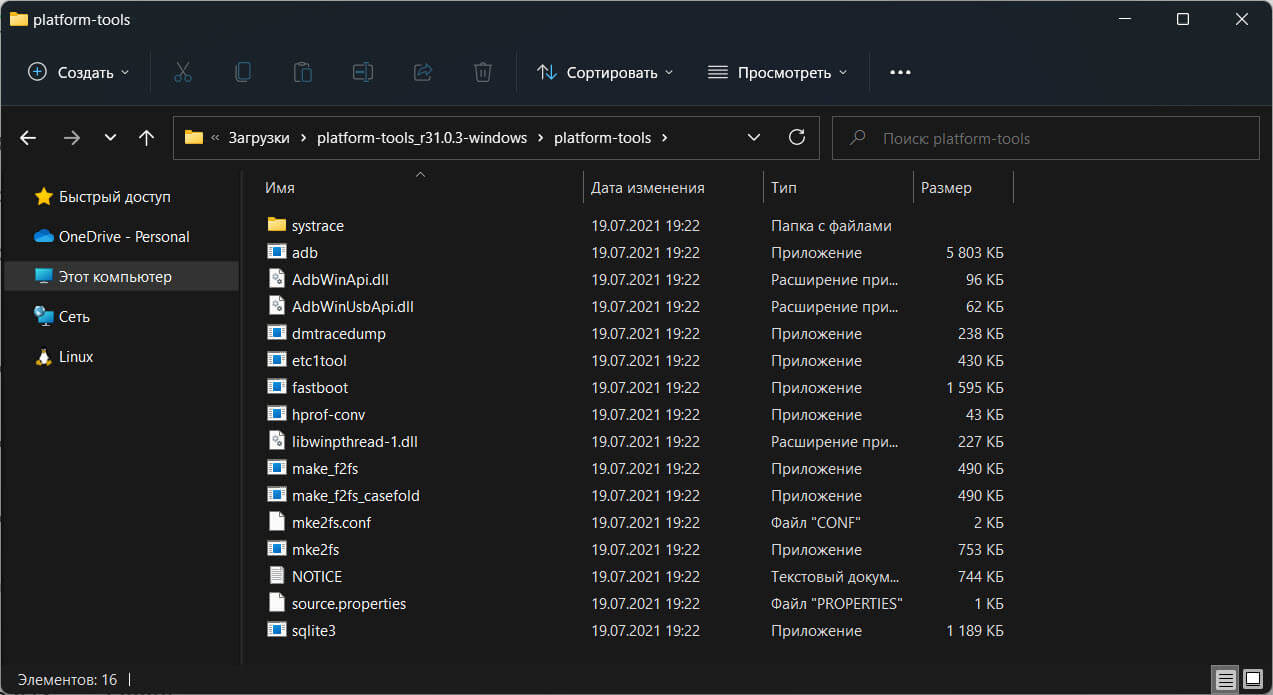
Настройка WSA
Шаг 15: С помощью меню «Пуск» откройте приложение «Windows Subsystem for Android».
Шаг 16: В разделе «Режим разработчика» передвиньте ползунок переключателя в положение «Вкл.», как показано на экране ниже.
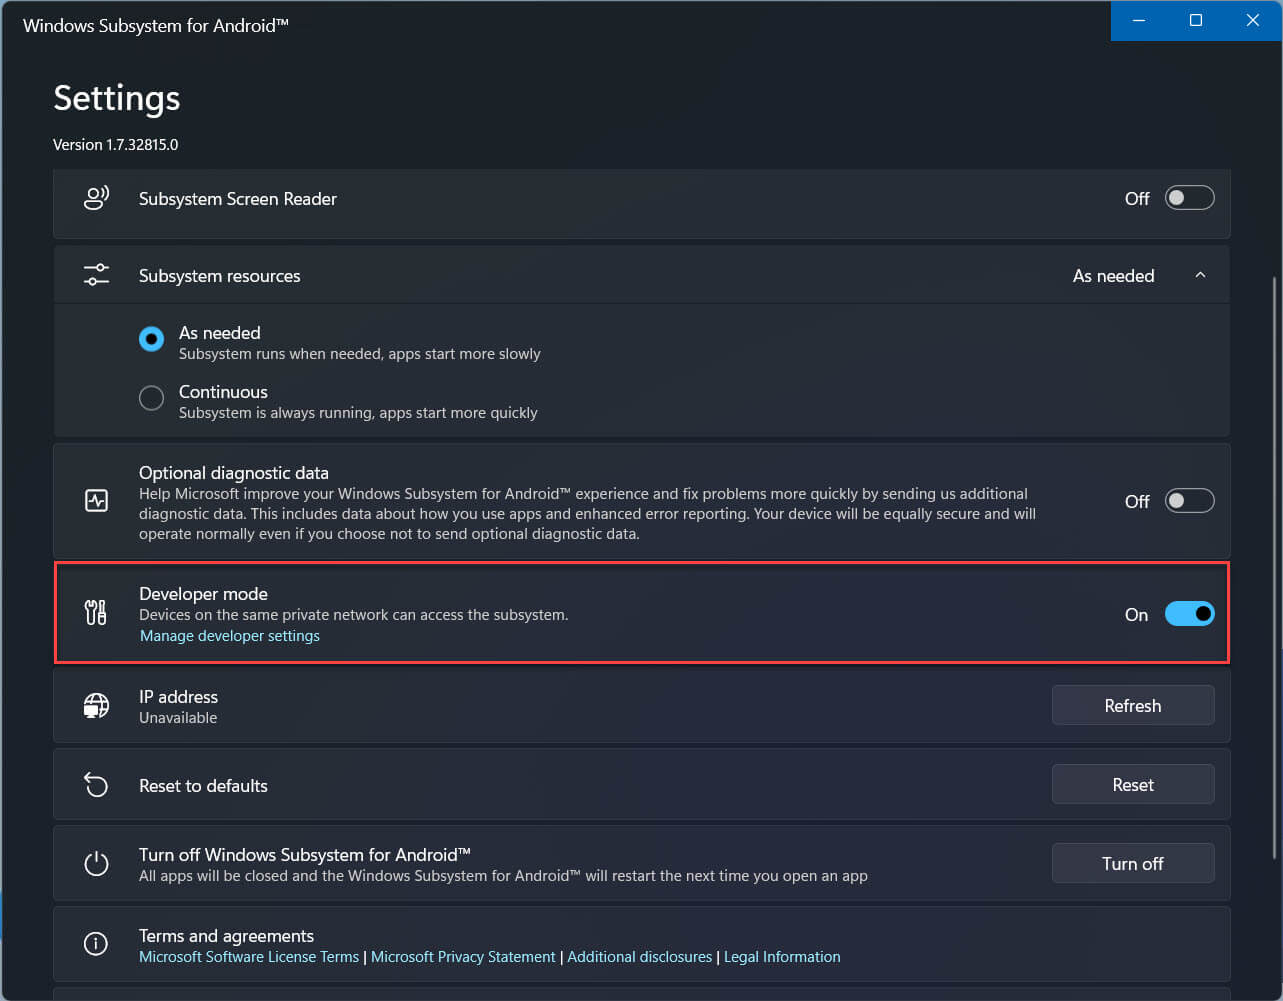
При появлении запроса брандмауэра разрешите доступ ADB.
Скопируйте IP-адрес
Шаг 17: Теперь в верхней части страницы параметров WSA откройте опцию «Файлы», в появившемся диалоговом окне нажмите «Продолжить».
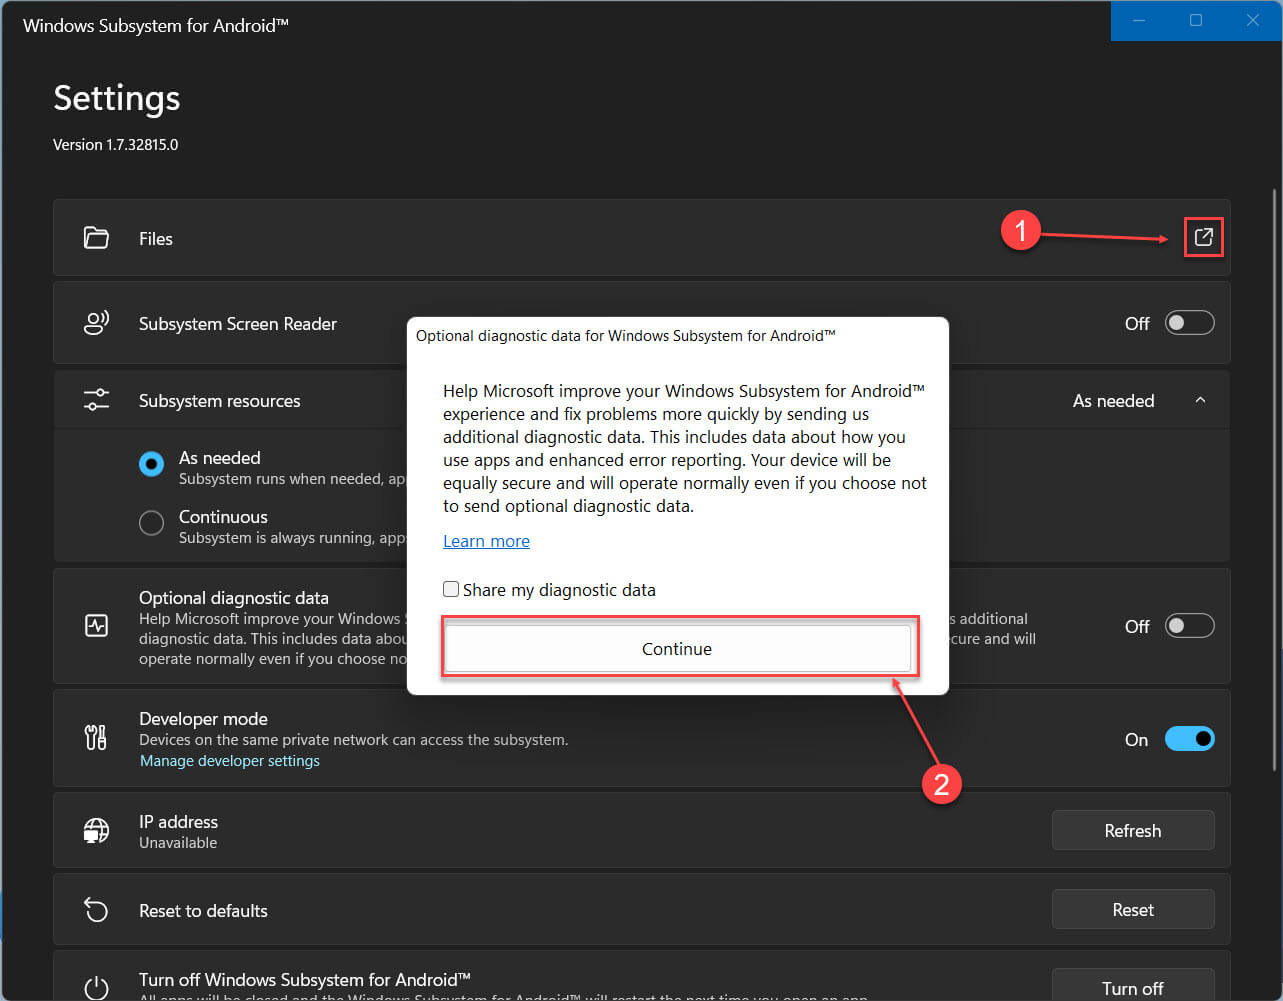
Шаг 18: Затем нажмите кнопку «Обновить» напротив опции IP-адрес.
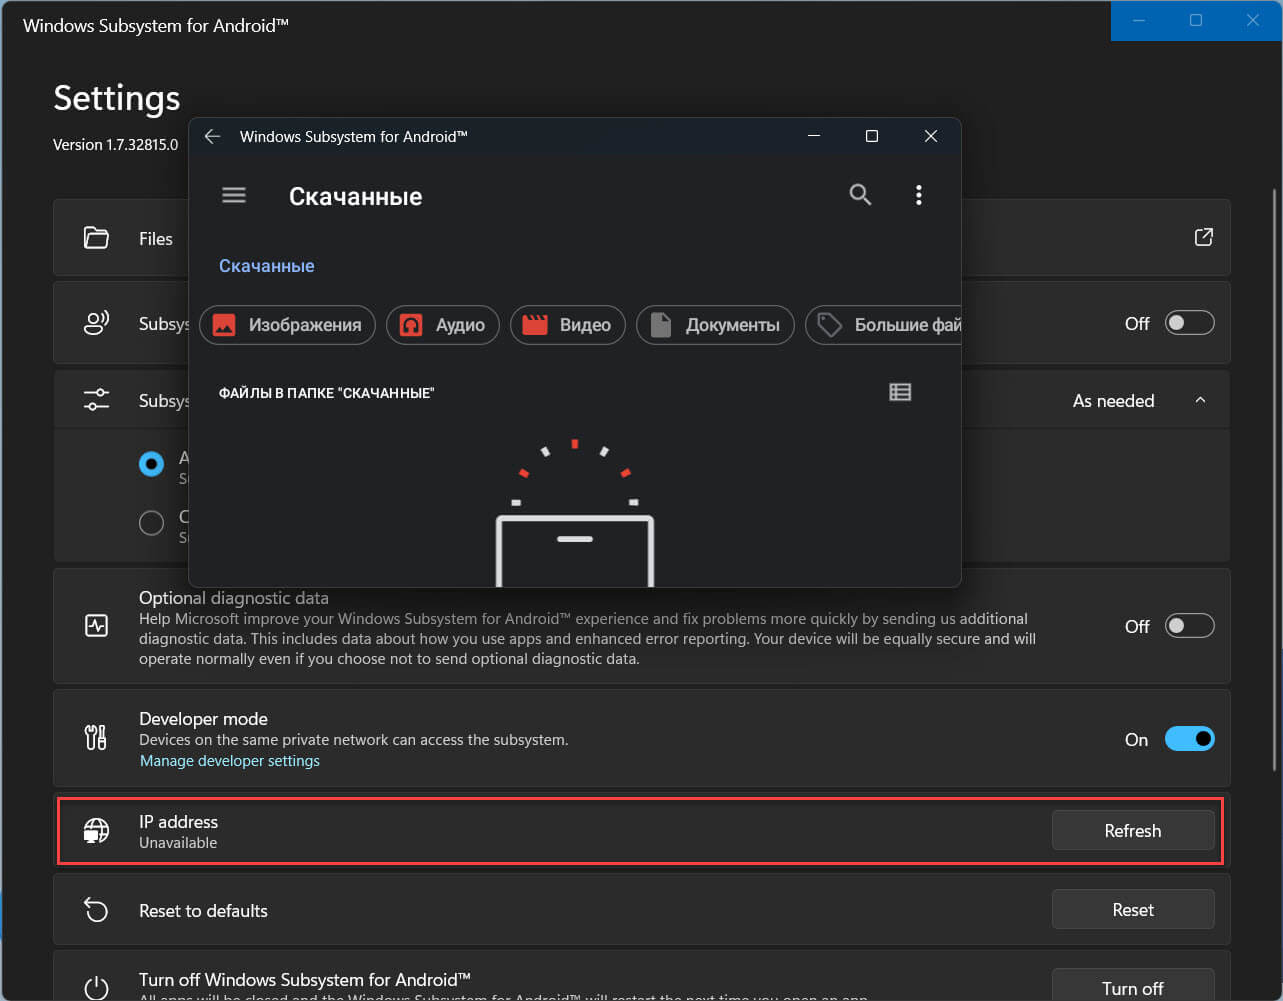
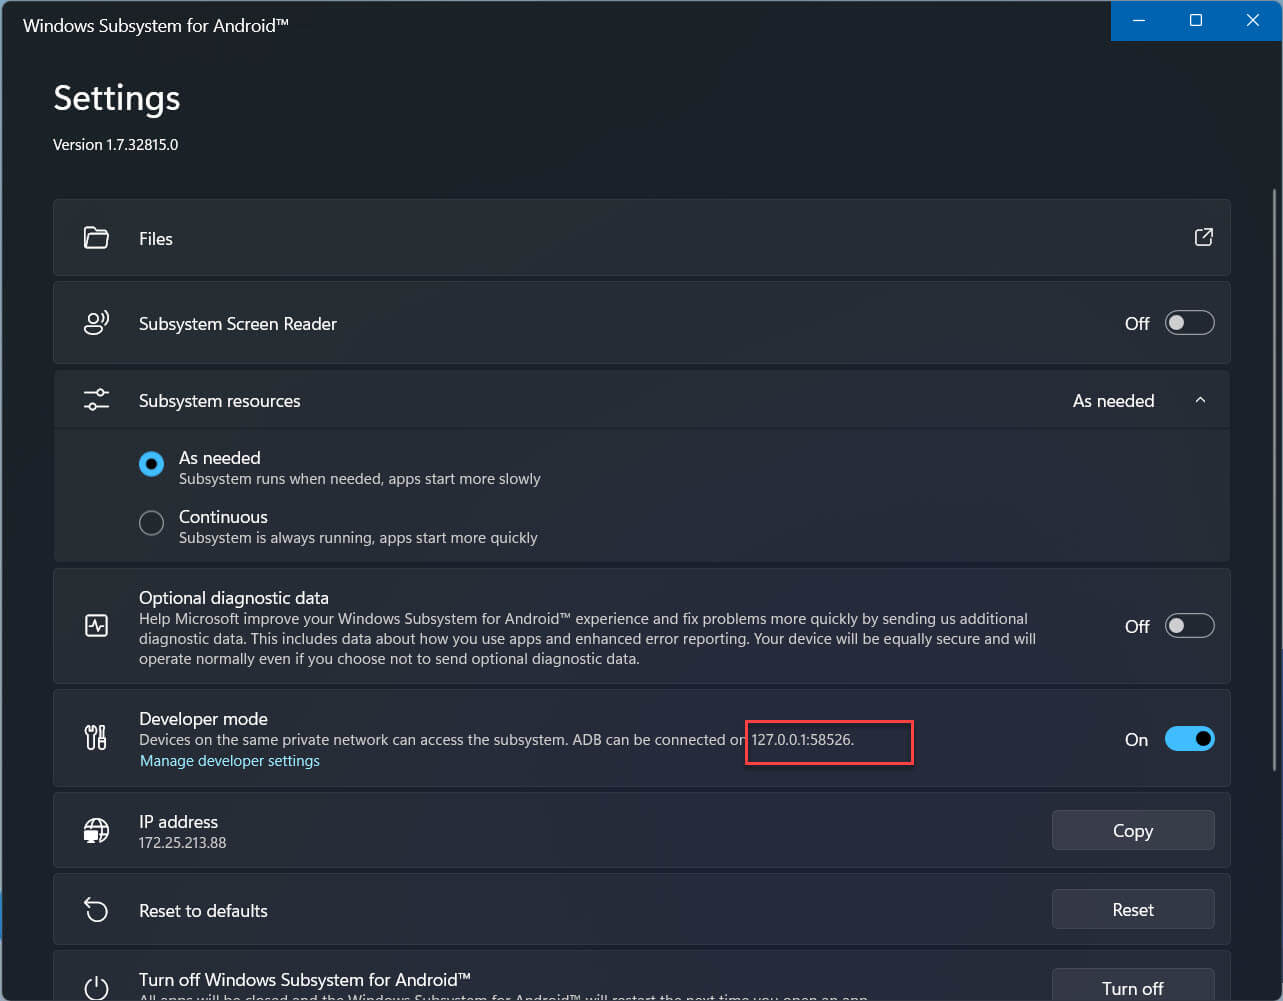
Шаг 19: Обратите внимание на адрес ADB, в разделе «Developer mode» отображается как 127.0.0.1:58526 (он должен быть таким же для вас)
Установите соединение
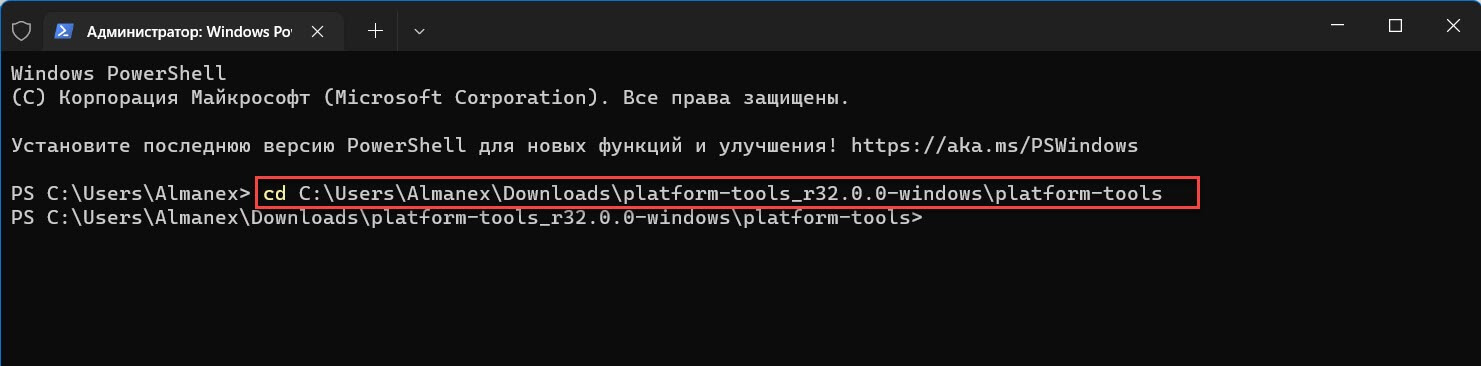
Шаг 20: Откройте Powershell от имени администратора и перейдите в папку «C:\Users\Almanex\Downloads\platform-tools_r32.0.0-windows\platform-tools» для этого можно использовать команду, предварительно заменив Имя_пользователя:
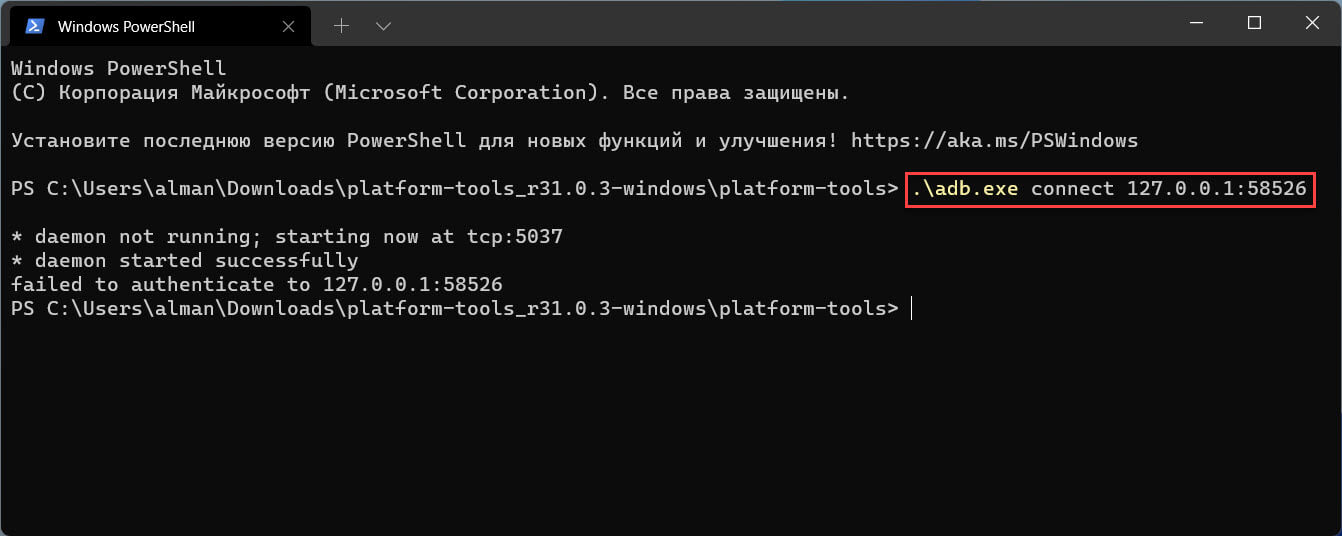
Теперь, выполните команду:
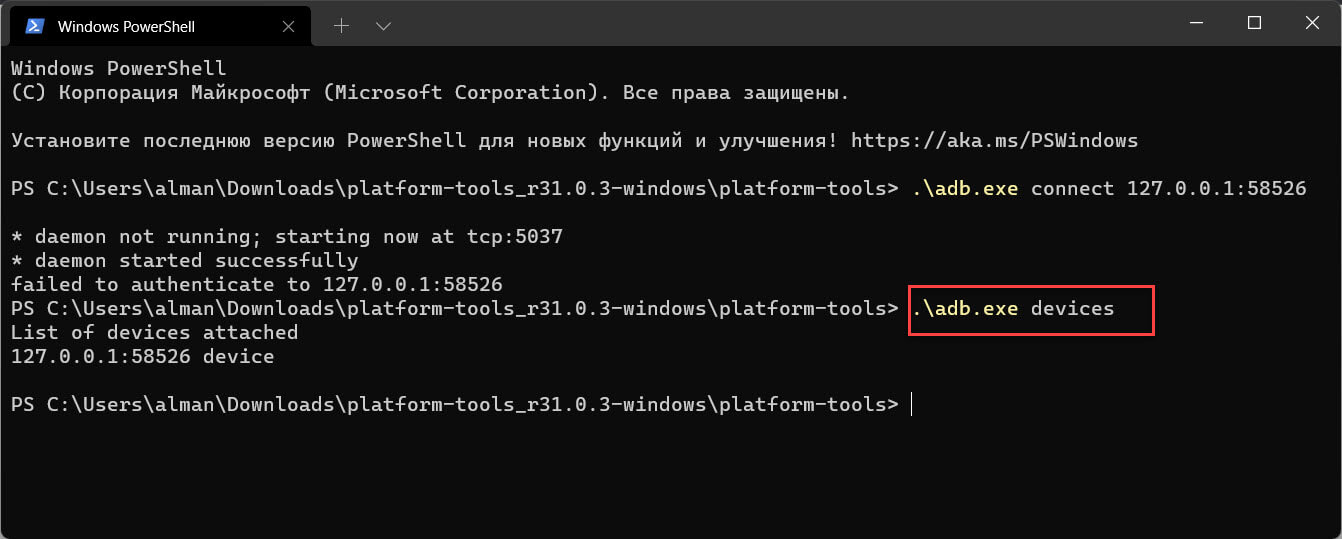
Шаг 21: Убедитесь, что adb подключен, выполнив:
Установите Google Play Store в Windows 11
Шаг 22: Чтобы иметь возможность авторизироваться в магазине Google Play, выполните по очереди три команды:
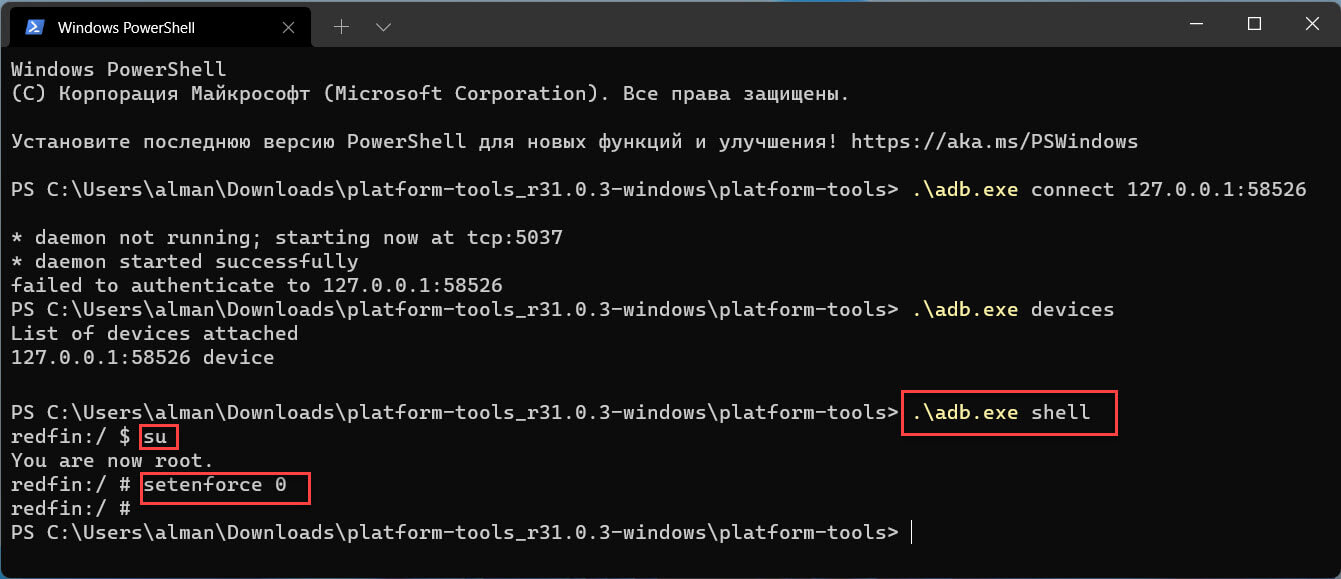
Если вы все сделали правильно, вы сможете войти в Google Play Store со своей учетной записью Google.
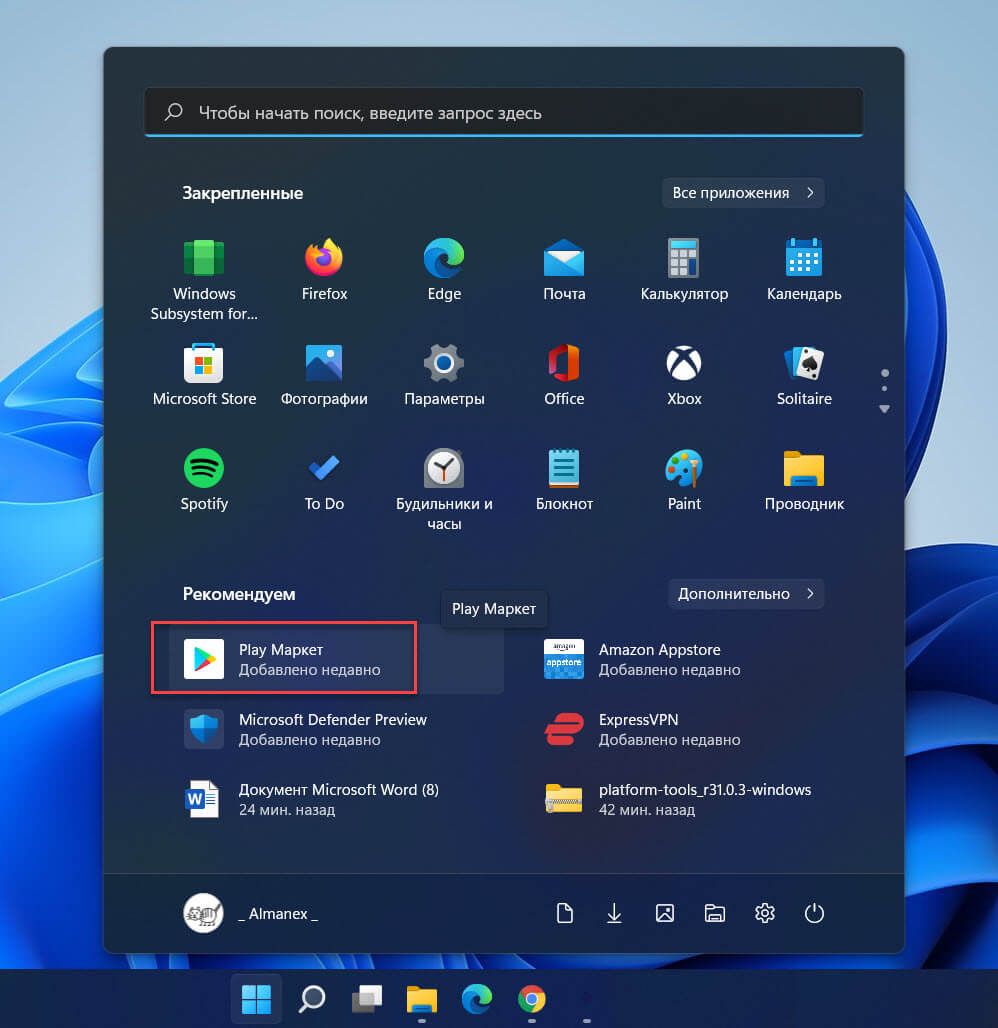
Теперь вы можете пользоваться полным набором приложений Google Play на наших компьютерах с Windows 11.
Большое спасибо ADeltaX, благодаря которому это стало возможным!
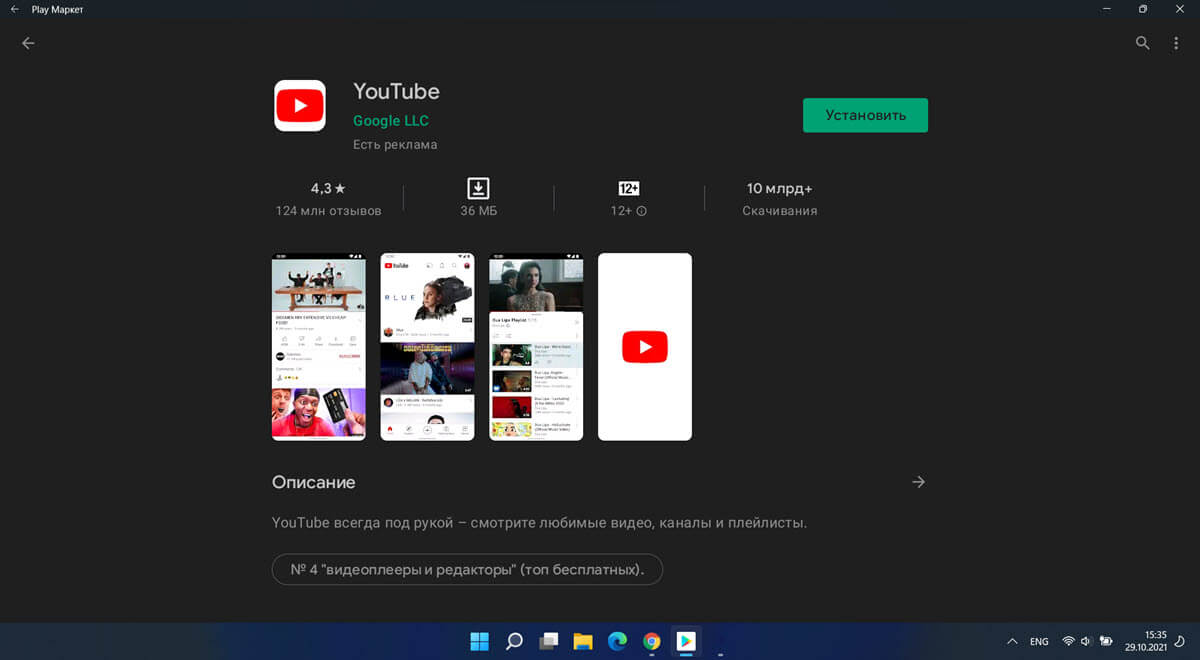
На этом мы завершаем руководство о том, как установить Google Play Store на ПК с Windows 11 с помощью подсистемы Windows для Android. Play Маркет, вероятно, лучший вариант, потому что он может похвастаться большим каталогом приложений и обеспечивает безопасную и надежную экосистему.
Если вы хотите, чтобы будущие обновления для подсистемы Windows для Android не сбросили выполненный вами процесс, вы можете отключить автоматические обновления для приложений в Магазине Microsoft: перейдите в меню «Профиль» → «Параметры приложения» и отключите автоматическое «Обновление приложений». Если вы хотите обновить другие приложения, вам необходимо обновить их вручную.
Вопросы.
- Могу ли я использовать Google Play Store для установки приложений в Windows 11?
Да, Google Play Store полностью работает в Windows 11. Спасибо пользователю Twitter ADeltaX.
Официально да. Но вы можете установить модифицированный пакет Msixbundle, чтобы он работал в любой сборке Windows 11.
Чтобы удалить приложение Android из Windows 11, откройте меню «Пуск» найдите приложение, которое хотите удалить. кликните приложение правой кнопкой мыши и выберите «Удалить».
5 Ways To Install Google Play Store On Windows 11
Prerequisites To Know Before Installing Google Play Store#
There are certain things that you need to know before you get started with the process. Ensure you download the following files and take care of the things below before downloading and installing Google Play Store on Windows 11.
1 Prerequisites To Know Before Installing Google Play Store2 Install Google PlayStore On Windows 112.1 Download WSA (Windows Subsystem for Android) Package On Your PC2.2 Managing The WSA Files2.3 Patching The WSA Package2.4 Install Google Play Store On Windows Subsystem For Android2.5 Restoring Kernel On WSA3 Conclusion
Download the GApps package on your PC. You can download the package from here. Ensure you download the version which complies with ‘x86_64’, ‘Android 11’, and ‘Pico.’Ensure you have downloaded and set up WSL 2/Windows Subsystem for Linux on your PC. You can download it from here.Download and install 7-Zip on your Windows PC. You can download 7-Zip from this link. If you use any other Zip converter, then you can use that instead of 7-Zip.Also, download the WSAGA script. You can download the link from GitHub from this link. Here, click on Code and then click on Download ZIP.
Install Google PlayStore On Windows 11#
You can easily run the Google PlayStore on Windows 11 by following the steps given in this article. We have divided the complete process into five steps to make it easier for you to follow. To run Google Play Store on Windows 11, follow the steps given below-
Download WSA (Windows Subsystem for Android) Package On Your PC#
Firstly, you will have to download the WSAP package on your PC. You can easily download the package from the Microsoft serves. Given below are the steps to download the WSA package on your PC-
Head to this website from where you can download the official WSA package.On the screen that appears, select the drop-down box saying URL (link), and from the list of options that appears, select ProductID. In the given field, enter the following Product ID 9P3395VX91NR.
Now select the drop-down menu saying RP. You will find this drop-down menu next to the field where you entered the product ID.Now, click on the Tick button to get ahead.The next screen that opens up will give you a list of various files to download. Here, search for msixbundle file that will be of the size of around 1.21GB.
Right-click on the appropriate file, and then from the context menu, select Save Link As, and you will be able to download the file on your PC.
Managing The WSA Files#
Now that you have downloaded the WSA files on your PC, you will also have to manage them. To manage the WSA (Windows Subsystem for Android) files, follow the steps given below-
Head to the location where you saved the WSA file and then open it with the 7-Zip software or any other alternative.
Here you will see two files; the first file will have ARM64 in the name while the other will have x64. Select the file with the x64 in the name and open it.Now open the File Explorer on your PC by pressing the Windows + E key combo. Head to the C: drive in the File Explorer and create a folder with the name WindowsSubsystemAndroid.
After you have created the folder, head back to the 7-Zip (or any alternative) window where you have opened the file with x64 in the name.Here, select all the files except with the names AppxMetadata, AppxBlockMap.xml, AppxSignature.p7x, and [Content_Types.xml]. You can select all the files by pressing Ctrl + A key combo. To deselect these particular files, press and hold the Ctrl key and click on these files individually.
Copy the files you have selected, and then paste all the files to the WindowsSubsytemAndroid folder you have created in the C: drive.
Now create a new folder with the name GAppsWSA in the C: drive.
Head to the location where you saved the WSAGA script and extract the script to the GAppsWSA folder you created.
Now, locate the GApps (Pico) ZIP file that we downloaded, and then copy it. Now head to the #GAPPS folder inside the GAppsWSA folder, and paste the file here. You don’t need to extract the file.
Head to the WindowsSubsystemAndroid folder in the C: drive. Here, copy the files with the name vendor.img, system.img, system_ext1.img, and product.img.
Now, head to the #IMAGES folder that you will find in the GAppsWSA folder in the C: drive, and paste these files here.
Patching The WSA Package#
Now the next thing that you will have to do is patch the WSA package on Windows 11. You will have to do this to include Google Apps on Windows 11. To do so, follow the steps given below-
Firstly, open the Linux on Windows Terminal.Here type sudo su and then hit Enter to continue. You will be asked to enter your PC password to have the root privileges to the Linux Enter your password and hit Enter to continue.After doing so, enter the following commands and execute them. If asked to confirm, you will have to press Y to allow the installation.apt install zip unzipapt install dos2unixNext, you will have to run the following commands. Run the command one by one to move to the GAppsWSA folder that you have created in the C: drive. Paste the command as it is, and do note that there is space between cd and dots. cd ..cd ..cd GAppsWSA/After you are in the GAppsWSA, execute the following commands in the terminal. Execute the following commands one by one-dos2unix apply.shdos2unix extend_and_mount_images.shdos2unix extract_gapps_pico.shdos2unix unmount_images.shdos2unix VARIABLES.shNext, execute the set of following commands one by one-./extract_gapps_pico.sh./extend_and_mount_images.sh./apply.sh./unmount_images.shAfter doing so, open the GAppsWSA folder in the C: drive and open the #IMAGES folder. Now copy all the files with .IMG extension. You will find four files here; copy all of them.
Now, head to the WindowsSubsystemAndroid folder in the C: drive, and paste all the four files here. You will be asked whether you want to replace the file, skip copying, or whether you have varying choices for each file. Select Replace the file in the destination.
Now, head back to the GAppsWSA folder, and here open the misc folder. Copy the kernel file here.
After doing so, move back to the WindowsSubsystemAndroid folder, and here open the Tools folder.
You will see a file name kernel already present here. Rename the already preset kernel file to kernel_bak and then paste the kernel file you copied here.
Install Google Play Store On Windows Subsystem For Android#
This part of the guide will help you install Google Play Store on your Windows 11 PC. This part is as essential as other parts of the article, so do not skip either this part or any other part. To install the Google Play Store on your PC, follow the steps given below-
Open the Start Menu on your PC by pressing the Windows key. In the Start Menu, search for PowerShell. Right-click on the Windows PowerShell and then click on Run as administrator. You will need to give administrative privileges to Windows PowerShell to install Google Play Store.
Now you will have to install the modified WSA on your PC. To do so, enter the following command and execute it-Add-AppxPackage -Register C:\WindowsSubsystemAndroid\AppxManifest.xml
If you do not get any errors, then you can continue with the steps ahead. However, if you get the error, then you will have to enable the Developer Mode. To enable Developer Mode, follow the steps given below-Open the Settings app on your PC by pressing the Windows + I key combo. Head to the Privacy & security section in the left sidebar. Now click on For Developers and then turn on the toggle for the Developer Mode on the right side. You will be asked to confirm turning on Developer Mode. Turn on the toggle.
After enabling the Developer Mode, try running the above code again. After doing so, search for Windows Subsystem for Android in the Start Menu and open it. Now, under the Windows Subsystem for Android window, enable the toggle for Developer Mode. This will assign an IP address to the Android container. Ensure you note down the IP address somewhere, as you will need it later.
Now, click on the Files button to run the WSA for Windows 11 PC. You can then close the Files window. Your IP address should show up in the WSA settings. If you cannot see the IP address, then click on the Manage Developer Settings option that you will see under the Developer mode. Now, scroll down in the Developer options and open Wireless debugging. You will see the IP address here; note it down somewhere.
Now download and install the ADB and fastboot tools on your PC. You can download the ADB and fastboot tools from this link.
Open the folder where you have extracted/installed ADB and fastboot tools. Now, in the address bar search for CMD and hit Enter to open the Command Prompt. Now type adb connect ipaddress in the Command Prompt and execute it. Here you will have to replace the ipaddress with the one that you have noted above. If the Command Prompt fails to authenticate it for the first time, then enter the command again. After doing so, you will have to enter the Shell Mode of the WSA and then grant it superuser rights. To do so, enter the following commands one by one-ADB shellsuNext, you will have to change the SELinux mode to permissive. To do so, enter setenforce 0 in the Command Prompt and execute it. Google Play Store will be installed on your PC now. Open the Start Menu and search for Google PlayStore on it. Click on Google PlayStore to open it.
Next, you will have to sign in to your Google account to download and install apps from the Google Play Store.
Restoring Kernel On WSA#
Now that you are done with everything, you will have to restore the kernel on the WSA. To do so, follow the steps given below-
Firstly, close all the windows that are opened on your PC and then open the Settings page of the WSA. Here, click on the Turn off button, then you see next to Turn off Windows Subsystem for Android. Wait till the loading sign disappears here.
After doing so, head to the WindowsSubsystemAndroid folder in the C: drive and head to the Tools folder.Rename the kernel file to the kernel_root and rename kernel_bak file to the kernel.
Once done, you will have successfully restored the kernel on WSA.
Fix Windows 11 Doesn’t Allow 4K Netflix StreamingHow To Redeem Codes or Gift Cards in Microsoft Windows 11How To Update Apps In Microsoft Windows 11How To Create Live Tiles And Widgets In Windows 11
Conclusion#
Following the above steps, you will be able to run Google Play Store on Windows 11. Ensure you follow all the steps correctly; only then will you run Google Play Store on Windows 11 without any issue.
Как в Windows 11 установить Google Play и GApps для Android
Эта статья расскажет, как установить Google Play Store на Windows 11 и GApps в подсистему Windows для Android. В октябре 2021 года Microsoft наконец-таки запустила тестирование подсистемы Android на Windows 11, благодаря чему у пользователей появилась возможность устанавливать приложения Android на свои компьютеры. Официально тестирование проходит только в США (Microsoft часто обходит вниманием другие страны при тестировании) и только в паре с магазином Amazon App Store, где выбор приложений, мягко говоря, не самый богатый. Обойти проблему можно установкой APK-файлов, но многие из них не будут работать из-за отсутствия Play Store и соответствующих сервисов.
Обратите внимание: эта статья описывает неофициальный способ установить Google Play Store на Windows 11, поэтому действуйте на свой страх и риск. Также стоит отметить, что вам не нужно регистрироваться в программе предварительной оценки Windows и скачивать ранние версии Windows 11. В процессе написания этой инструкции нам удалось запустить Google Play Store на стабильной версии Windows 11.
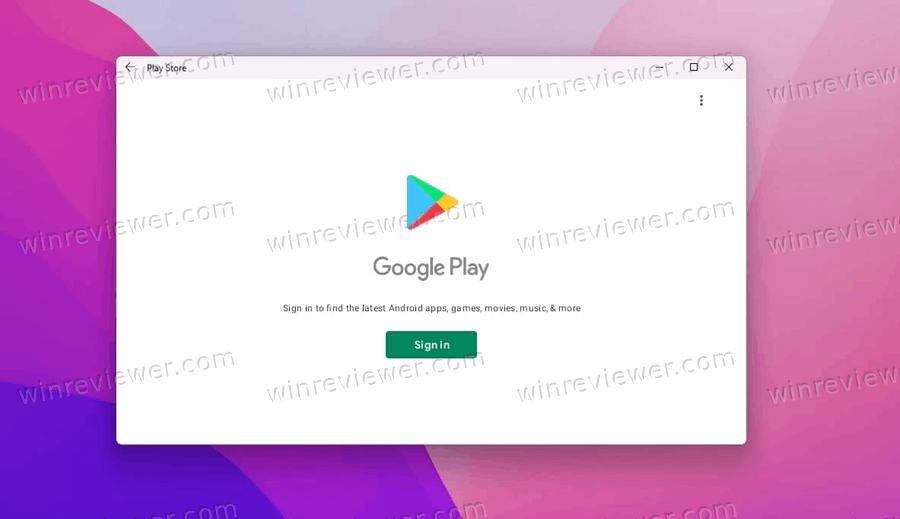
Установить Google Play в Windows 11 (GApps)
Чтобы установить Google Play в подсистему Windows для Android на Windows 11, вам надо выполнить следующие шаги.
- Удалить существующую подсистему Windows для Android.
- Включить подсистему Windows для Linux и платформу виртуальных машин.
- Добавить GApps в подсистему Windows для Android и модифицировать ядро WSA.
- Установить Google Play Store в подсистему Windows 11 для Android.
- Восстановить исходное ядро для подсистемы Windows для Android.
Рассмотрим каждый шаг подробно.
Удалите существующую подсистему Windows для Android
- Откройте приложение «Параметры» сочетанием Win + I .
- Щелкните Приложения.
- Нажмите на кнопку «Приложения и функции» справа.
- Выберите «магазин приложений Amazon«.
- Нажмите кнопку меню с тремя точками справа и выберите кнопку Удалить.
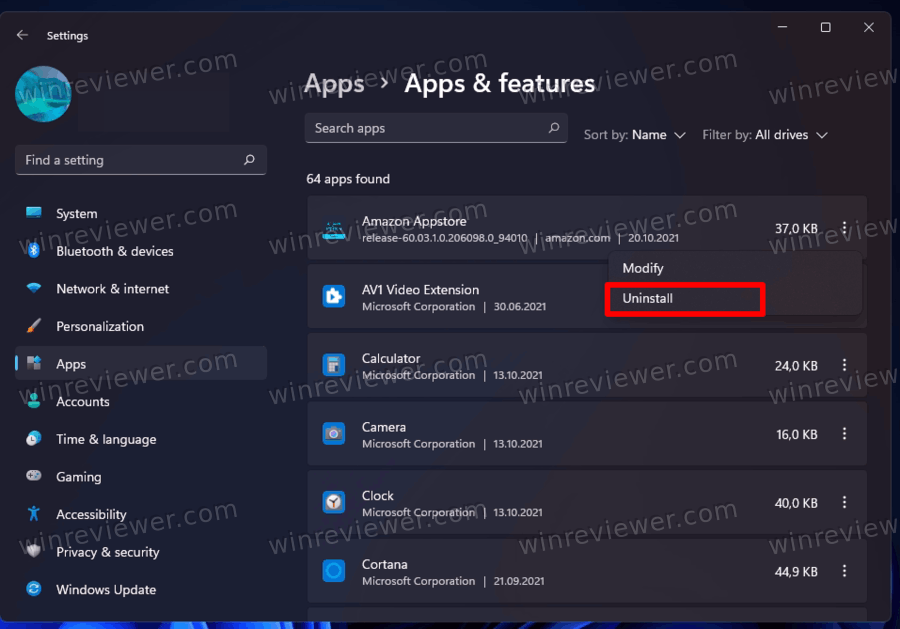
- Снова нажмите кнопку «Удалить» для подтверждения.
- Поищите в списке оставшихся программ подсистему Windows для приложений Android. Если она там есть — тоже удалите её.
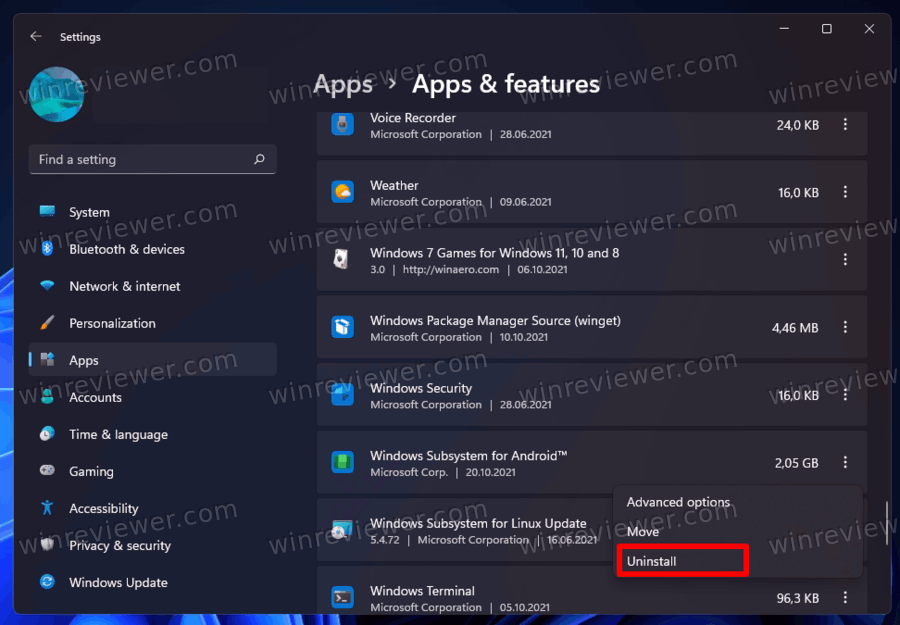
Готово, можно приступать к следующему шагу.
Включите подсистему Windows для Linux и платформу виртуальных машин
- Откройте меню Пуск и введите Включение или отключение компонентов Windows, затем нажмите Enter .
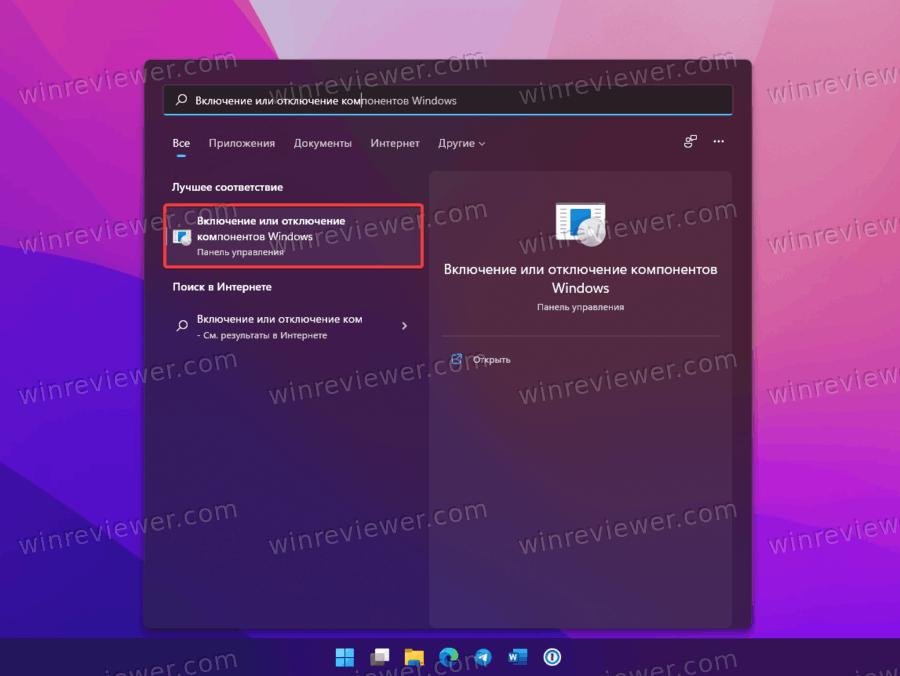
- В новом окне установите отметку возле пункта Платформа виртуальной машины, а затем Подсистема Windows для Linux.
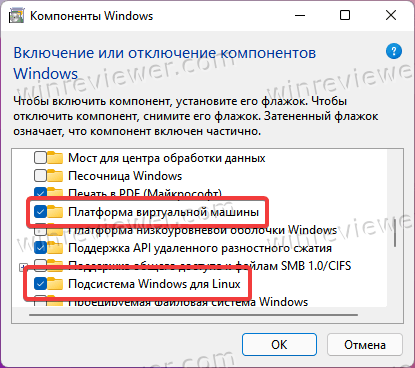
- Нажмите Ок и подождите, пока Windows скачает необходимые компоненты.
- Перезагрузите компьютер для применения изменений.
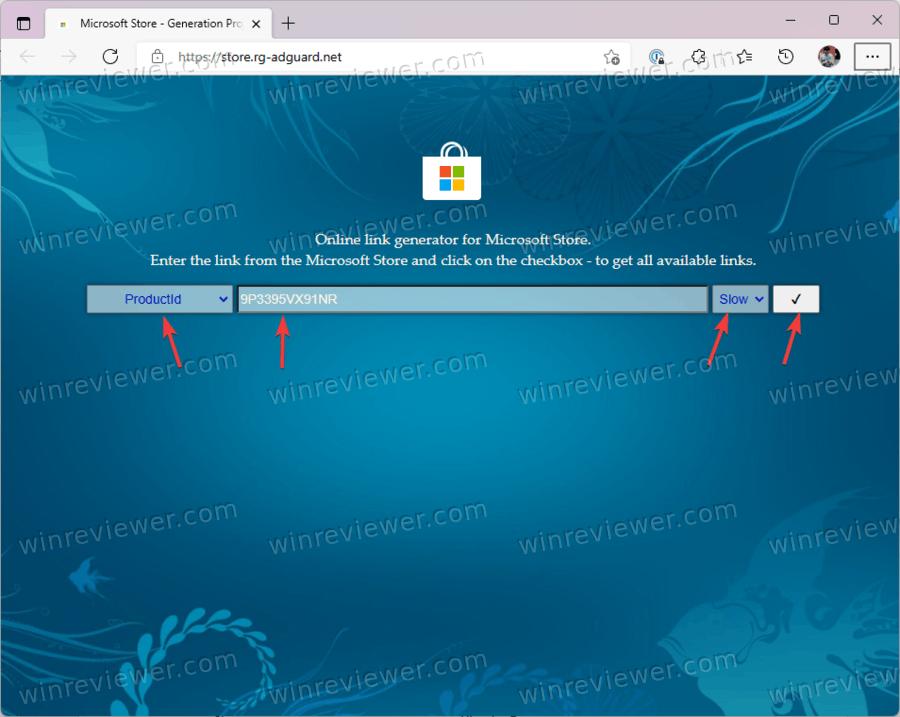
- После включения компьютера откройте любой браузер и перейдите по ссылке store.rg-adguard.net . На этом этапе вам надо скачать файлы подсистемы Android для последующей модификации и интеграции сервисов Google.
- В первом выпадающем списке выберите ProductID.
- В поисковую строку на странице (не в браузере) введите 9P3395VX91NR.
- В последнем выпадающем списке выберите Slow.
- Нажмите на кнопку с галочкой для поиска нужных компонентов.
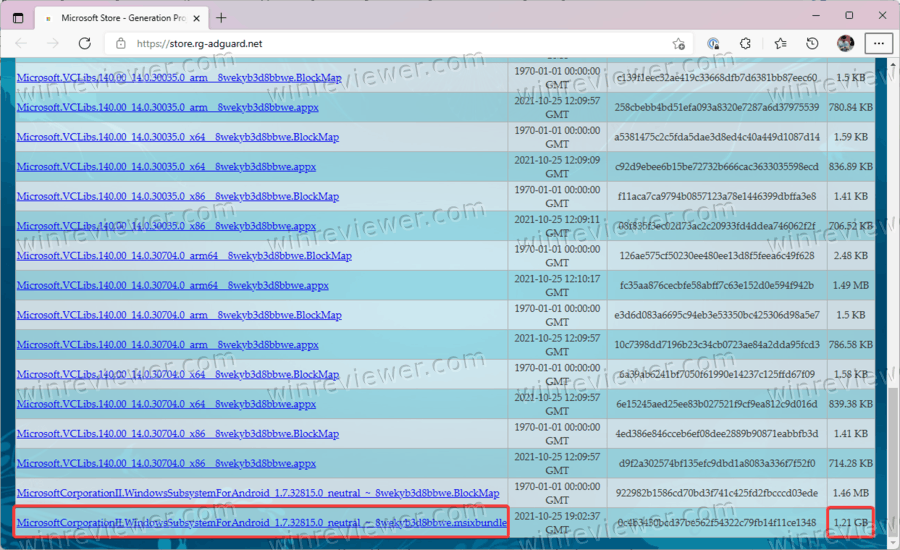
- Пролистайте список и найдите самый большой файл размером 1.2Гб. Скачайте его.
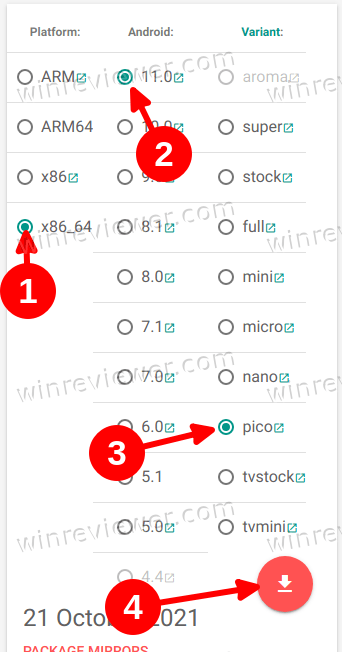
- Перейдите на сайт OpenGapps и установите платформу x86_64, Android 11, а затем выберите вариант Pico. Для загрузки выбранного набора нажмите на большую красную кнопку со стрелкой.
- Пока вы ждете загрузки подсистемы и сервисов Google, перейдите в магазин Microsoft Store по ссылке для загрузки и установки Ubuntu . Если Ubuntu в WSL уже установлена, пропустите этот шаг.
На этом этапе у вас есть все файлы, необходимые для объединения GApps и WSA. Теперь вам нужно распаковать оба пакета и выборочно объединить их компоненты.
Распаковка файлов
- Теперь откройте ранее скачанный msixbundle файл с помощью любого удобного вам архиватора. Например, 7Zip.
- Внутри файла найдите файл WsaPackage_1.7.32815.0_x64_Release-Nightly.msix. Он занимает приблизительно 700 Мб.
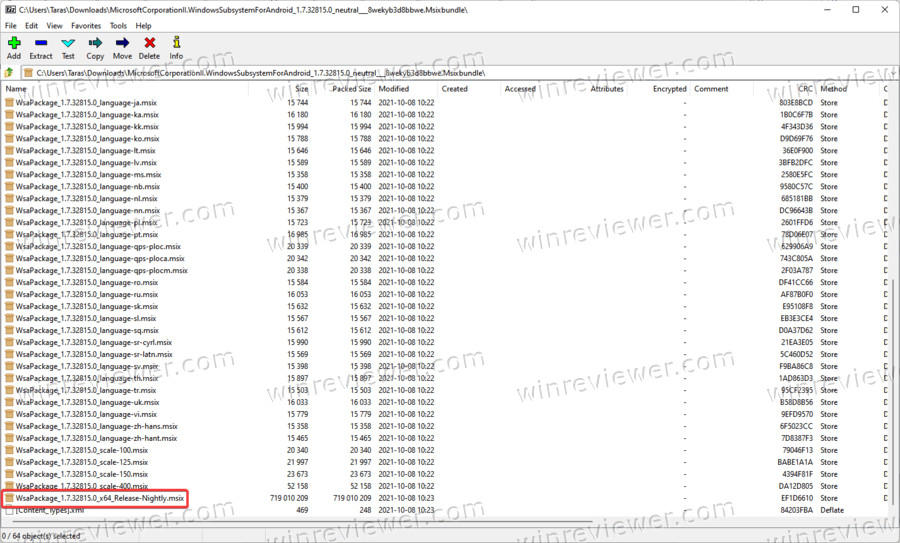
- Откройте Проводник и перейдите на диск С. Создайте папку WindowsSubsystemAndroid.
- Скопируйте в созданную папку все файлы из msix-файла в архиваторе.
- После копирования файлов удалите следующее: папку AppxMetadata и файлы AppxBlockMap.xml, AppxSignature.p7x и [Content_Types].xml.
- Вернитесь в корень диска С и создайте папку GAppsWSA.
- Откройте браузер и перейдите по ссылке на страницу репозитория проекта , с помощью которого стало возможным установить Google Play Store на Windows 11.
- Нажмите Code > Download ZIP.( прямая ссылка на архив )
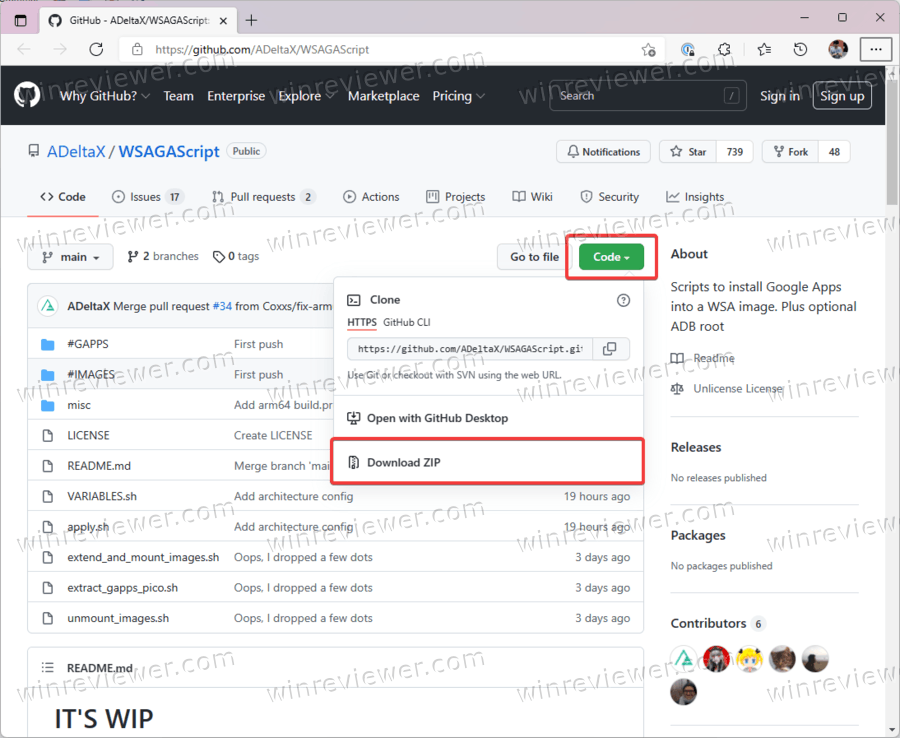
- Откройте загруженный архив, а затем папку внутри него. Скопируйте все содержимое папки в ранее созданную папку GAppsWSA.
- Теперь скопируйте ранее скачанный архив с сервисами Google (GAPPS) и скопируйте его в папку C:\GAppsWSA\#GAPPS.
- Перейдите в папку WindowsSubsystemAndroid и скопируйте следующие файлы: product.img, system.img, system_ext.img, vendor.img.
- Скопируйте файлы в папку C:\GAppsWSA\#IMAGES.
Готово. Теперь выполним пересборку ядра и включим GApps в состав WSA.
Пересборка ядра WSA
- Запустите Ubuntu в Терминале Windows и введите команду sudo su для получения рут-прав.
- Введите команду cd /mnt/c/GAppsWSA/ и нажмите Enter .
- Теперь надо установить lzip и unzip. Для этого воспользуйтесь следующими командой apt install lzip unzip. Нажмите Y для подтверждения действия.
- Теперь надо установить dos2unix. Для этого используйте команду apt install dos2unix.
- Выполните следующие команды одна за другой:
- dos2unix ./appli.sh,
- dos2unix ./extend_and_mount_images.sh,
- dos2unix ./extract_gapps_pico.sh,
- dos2unix ./unmount_images.sh, и
- dos2unix ./VARIABLES.sh.
- Введите команду clear для удобства в дальнейшей работе с консолью.
- Теперь вводите следующие команды последовательно одна за другой, каждый раз нажимая Enter для выполнения. Обратите внимание, что Терминал должен возвращать сообщения об успешном выполнении команд. Команды:
- ./extract_gapps_pico.sh,
- ./extend_and_mount_images.sh,
- ./apply.sh
- ./unmount_images.sh.
Теперь соберем все файлы вместе и установим Google Play в Windows 11.
Установка Google Play и GApps в Windows 11
- Перейдите в папку c:\GAppsWSA\#IMAGES и скопируйте файлы product.img, system.img, syste_ext.img и vendor.img.
- Вставьте скопированные файлы в папку WindowsSubsystemAndroid.
- Перейдите в C:\GAppsWSA\misc и скопируйте файл kernel.
- Перейдите в папку WindowsSubsystemAndroid > Tools и переименуйте файл kernel в kernel_bak.
- Вставьте сюда ранее скопированный файл kernel.
- Откройте Параметры Windows и перейдите в раздел Конфиденциальность и безопасность > Для разработчиков. Включите режим разработчика.
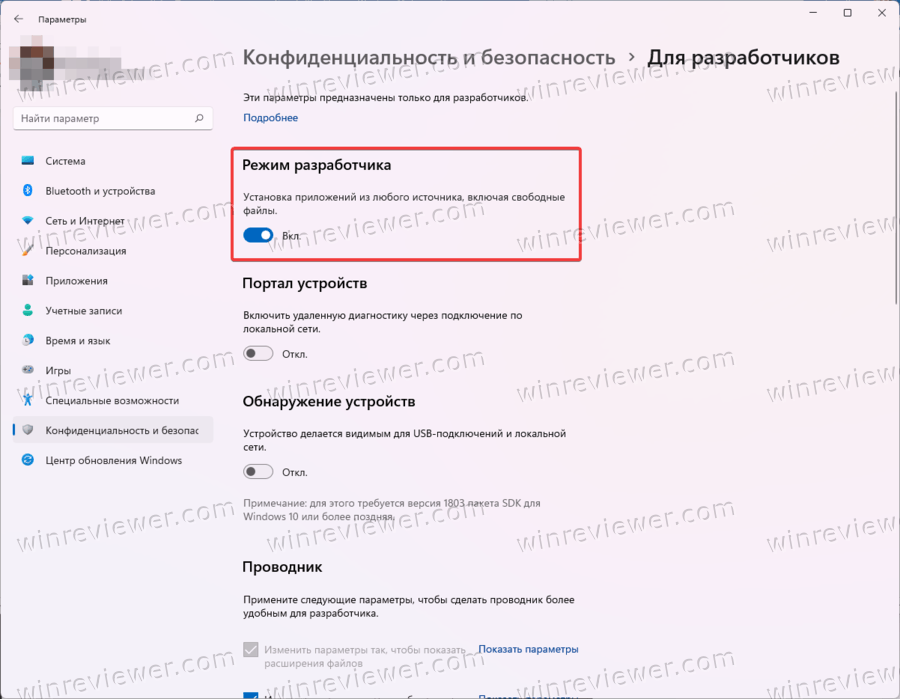
- Запустите Терминал Windows с правами Администратора и откройте профиль PowerShell (запускается по умолчанию).
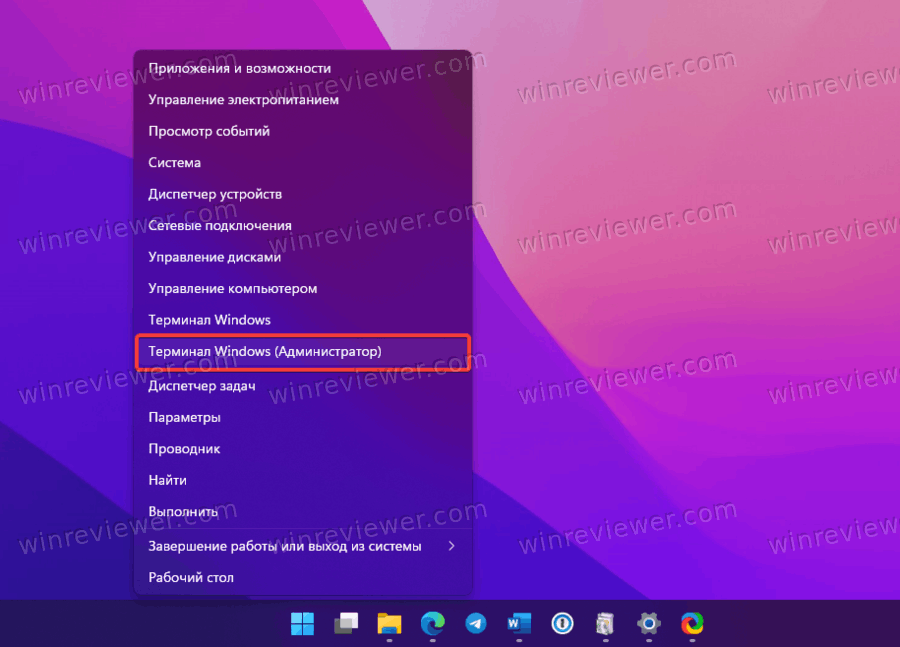
- В Терминале вставьте следующую команду: Add-AppxPackage -Register C:\WindowsSubsystemAndroid\AppxManifest.xml
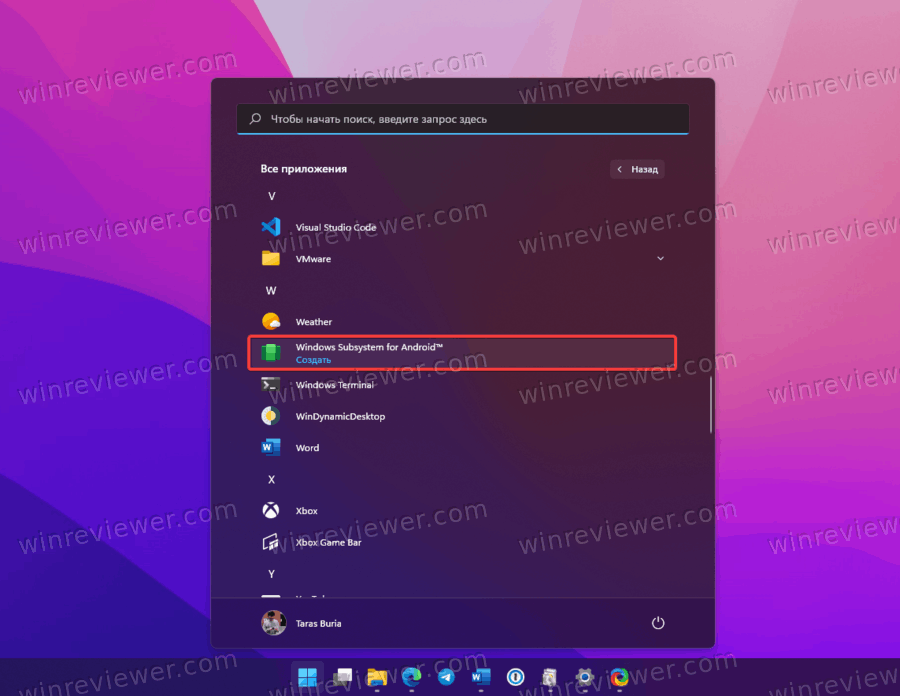
- Откройте меню Пуск и запустите Windows Subsystem for Android.
- Включите режим разработчика.
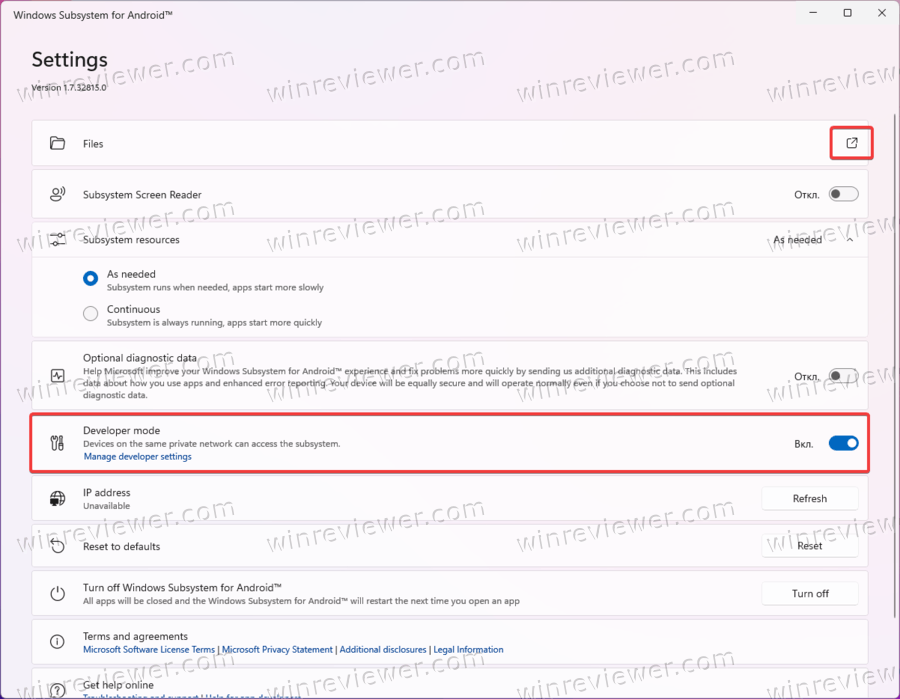
- Нажмите на кнопку со стрелкой возле Files.
- Снимите отметку возле пункта делиться диагностическими данными (в этом нет смысла, так как используется модифицированная подсистема).
- Закройте приложение Файлы и подождите минуту-две.
- Откройте меню Пуск и введите Google Play. Windows отобразит магазин Google Play Store в поисковой выдаче. Запустите магазин.
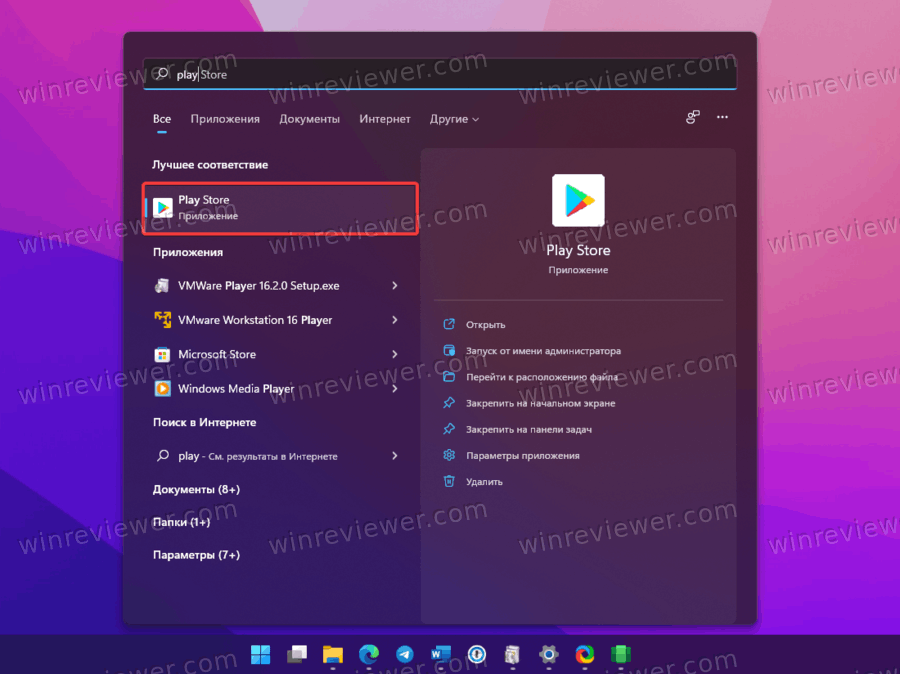
Готово! Теперь вы можете войти в свою учетную запись, после чего откроется главная страница магазина.
Однако, мы настойчиво рекомендуем на этом этапе закрыть магазин Google Play и вернуть на место оригинальный файл ядра в WSA.
Восстанавливаем оригинальный файл ядра
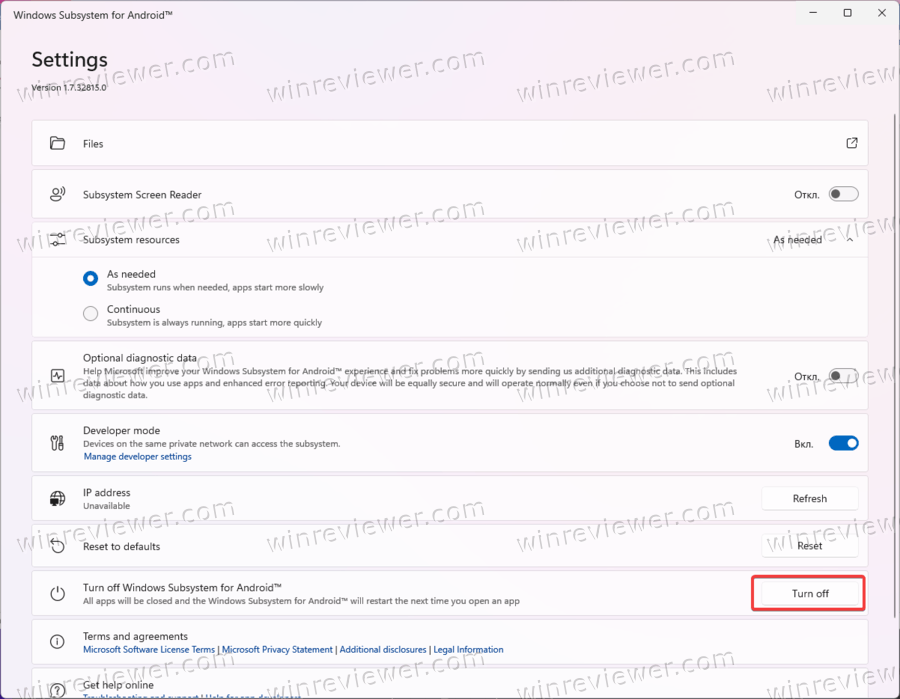
- Откройте Windows Subsystem for Android и нажмите кнопку Выключить. Подождите, пока не исчезнет анимация загрузки.
- Перейдите в C:\WindowsSubsystemAndroid\Tools и переименуйте файл kernel в kernel_root.
- Наконец, переименуйте kernel_bak в kernel.
Готово. Теперь вы можете запустить магазин Google Play на Windows 11 и устанавливать любые необходимые вам приложения. Обратите внимание, что не все из них могут работать корректно, но подавляющее большинство популярных программ все же работают без особых проблем.
��Узнавайте о новых статьях быстрее. Подпишитесь на наши каналы в Telegram и Twitter.
Судя по тому, что вы читаете этот текст, вы дочитали эту статью до конца. Если она вам понравилась, поделитесь, пожалуйста, с помощью кнопок ниже. Спасибо за вашу поддержку!
Вы здесь: Главная страница » Windows » Windows 11 » Как в Windows 11 установить Google Play и GApps для Android
Публикации по теме
Автор: Сергей Ткаченко и Тарас Буря
Сергей Ткаченко и Тарас Буря совместно работают над статьями на этом сайте. Благодаря их усилиям здесь появился целый пласт технических публикаций. Посмотреть все записи автора Сергей Ткаченко и Тарас Буря
How to install Android apps on Windows 11

One of the main new features that Microsoft has introduced in its new Operating System is the long-awaited ability to run Android applications natively. This guide was written to help you easily implement this feature on your computer.
Activate the required Windows 11 components
To run Android applications on Windows 11, you first need to enable some additional system components. To do this, type Turn Windows features on or off in the search. Click on the first result that appears.

Enable or disable Windows features
In the pop-up window, locate the Virtual Machine Platform and Windows Hypervisor Platform entries. Check the boxes next to them.

Enable the virtual machine and Hyper-V
It may be necessary to restart the computer to apply the changes.
Join the Insider Program
At the time this article was written, the installation of Android apps on Windows 11 was reserved for users belonging to the Insider program. They are those who receive early versions of the Operating System to help Microsoft improve its software. It is expected that, over time, the company will remove this requirement and Android applications will be available to all users.
If by the time you read this guide it is still necessary, all you have to do is open the settings, click on the Windows Update section, and click on Windows Insider Program. Then, click on Get started to link your computer. Keep in mind that you need to sign up with your Microsoft account from the official Insider program page.

Access the Insider program
After logging in, select the Beta channel. Then, use Continue to skip to the next step.

Join the beta channel
Again, proceed with the Continue button.

Confirm joining the program
Use the Restart Now command to complete the process by restarting the computer.

Restart your PC
When it starts up again, it will already be part of the Insider program and will be able to receive the corresponding betas.
Upgrade to Windows 11
It is time to upgrade to Windows 11. Make sure that all updates are installed, as it is thanks to them that your computer will receive the early versions of the system.

Update Windows 11
Depending on the speed of your connection and the performance of your computer, this process may take a few minutes.
Download and install the Android subsystem for Windows 11
Now, we have everything ready to install the Windows 11 Android Subsystem. This is the environment where Android applications will run on your computer. To download the latest version, use the link on this page.

You will get a file with the MSIXBUNDLE extension. Save it in the folder of your choice (just do not forget where you saved it). Next, open the search and type PowerShell. Click on Run as administrator to launch the console.

Open Power Shell
Now, it is time to install WSA (Windows Subsystem for Android) on your PC. Do it with the following command:
Add-AppxPackage -Path «C:UsersMalavidaDownloadsMicrosoftCorporationII.WindowsSubsystemForAndroid_<versión>.msixbundle»
Remember to change the file path to the path that corresponds to your case. Otherwise, the execution will not work. The command should look like the one you see in the following screenshot.

Install WSA
After these steps, WSA will be installed on your computer.
Install applications from the store
In the start menu, you already have a shortcut to the Windows Android subsystem. Click on it to see more options.

WSA installed
First, enable the developer options. You will need them later. Then, click on Files to «wake up» the subsystem and force it to install the Amazon App Store.

Open files to force the start
After the first run, the Amazon AppStore will be installed on your computer. It is available in the start menu, as if it were any other program.

Open Amazon’s app store
Before you can download applications, you must be logged in. At the moment, only US Amazon accounts are supported. It is possible to change the region of your profile from Amazon’s settings, although if you use it frequently for other services, such as Alexa, we do not recommend it.

Log in with a US account
When logged in, the Amazon store will appear on the screen. Use the Get button to download any application.

Download an application
Whenever you install an application from the store, it will be added to the start menu.
Install any APK on Windows 11
If you do not have an Amazon account set up with the North American region and you do not want to make that change in your profile, you have an alternative to use Android applications in Windows 11. We are talking about WSA Toolbox, a utility that you can download from Malavida safely and quickly.

When you have its executable on your computer, double-click on it. Here you will see several options. For example, Install Aurora Store, installed as an alternative store to the Google Play Store that shares the same catalog. It is also possible to install applications directly with the APK downloaded from a trusted source, such as Malavida. Just click on Install APK File.
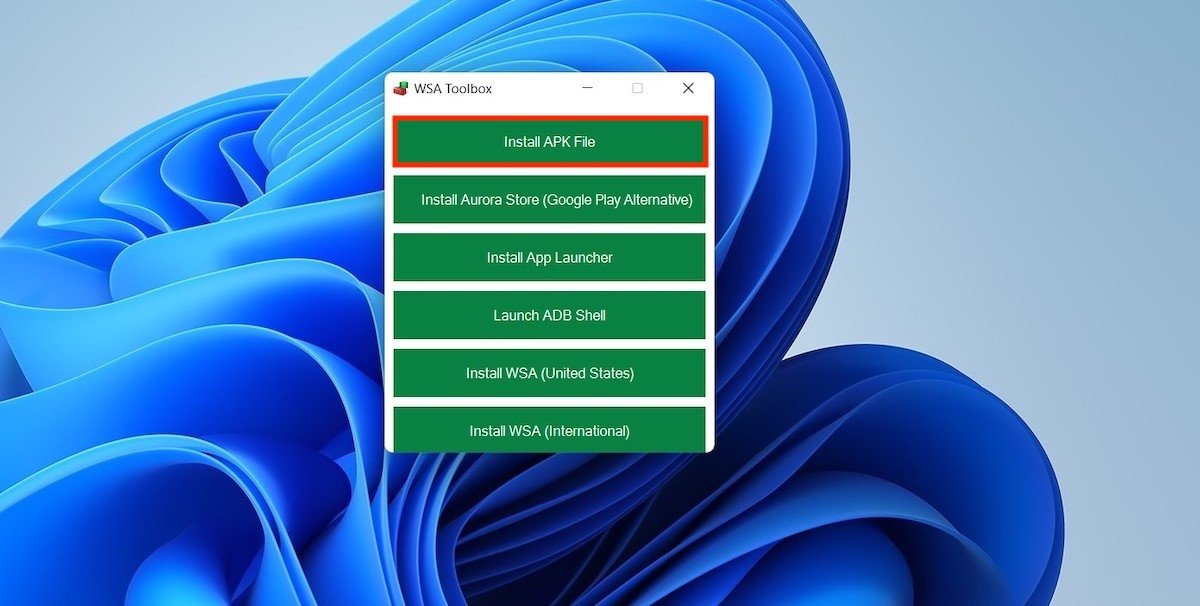
Install an APK with WSA Toolbox
In our case, we tried Spotify. We first downloaded its APK from Malavida and then opened it using the file explorer.

Select the APK
What is the result? Spotify has been successfully installed and pinned to the start menu.

APK installed correctly
Although this system will let you test a large number of applications in Windows 11, it has some limitations. Currently, the available catalog is limited to the one available in the Amazon store. And in case you do not have access to it, your only option is to get the APK of your favorite applications. Of course, all those that depend on Google services will not work because these, for the moment, are not officially implemented with the Android subsystem of Windows 11.