Как конвертировать PDF в DWG AutoCAD?
Чертежи в формате PDF встречаются часто. Их легко открывать и выводить на печать. Трудности начинаются, когда возникает необходимость их редактировать. Даже если речь идет о какой-то незначительной правке. В таких ситуациях существуют два решения. Первое и не самое оптимальное – это создать чертеж с нуля. Второе – сконвертировать чертеж в CAD формат. Также есть возможность скачать уже готовый чертёж нужного формата на сайте 2d-3d.ru
Сегодня я расскажу о 2 способах конвертации, которые в несколько кликов позволят перевести PDF файл в редактируемый DWG чертёж формата AutoCAD. В большинстве случаев результат перевода идентичен исходному файлу – то же расположение примитивов, те же размеры, те же цвета. Единственное возникли проблемы с адекватным импортом текста, поэтому его нужно будет редактировать.
1 способ перевод при помощи встроенного средства AutoCAD — команда импорт PDF.
2 способ при помощи CADSoftTools
Для эксперимента я взял объёмный план этажей с большим количеством элементов.
Запускаем Автокад. В AutoCAD должен быть открыть пустой файл. Далее нажимаете в левом верхнем углу «Файл», далее «Импорт» и выбираем тот pdf файл, который хотим перевести в Автокад в векторную графику, нажимаем ок.
Компания CADSoftTools предоставляет бесплатный онлайн-конвертер, который находится по следующему адресу: https://cadsofttools.ru/pdf-to-dwg-online/. Схема действий простая: выбираете PDF файл, вводите адрес своей электронной почты и нажимаете на кнопку «Конвертировать». Через несколько минут вы получаете письмо со ссылкой на сконвертированный файл в формате DWG.
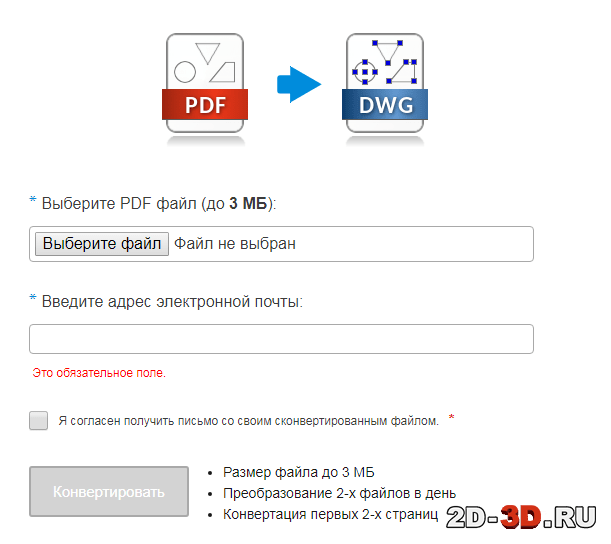
Онлайн-сервис имеет ряд ограничений (размер файла до 3 МБ, преобразование 2-х файлов в день, конвертация первых 2-х страниц файла). Но, как правило, предоставленных возможностей вполне достаточно. Если же нет, можно приобрести суточную подписку на сервис.
Теперь о результате. В большинстве случаев результат конвертации идентичен исходному файлу – то же расположение примитивов, те же размеры, те же цвета. Единственное возникли проблемы с адекватным импортом текста, поэтому его нужно будет редактировать.
Стоит отметить, что такой результат достигается при конвертации векторных PDF файлов. Если файл растровый, например, это отсканированный чертеж, то качество векторизации будет напрямую зависеть от качества растрового изображения.
PDF в DWG конвертер от CADSoftTools сбережет ваше время и силы и предоставит DWG файл, сразу готовый к редактированию. Его не нужно устанавливать на компьютер, и он доступен с любого устройства. А тот факт, что он бесплатный, делает его удобным решением для людей, которым нужно конвертировать чертежи время от времени.
Как перевести PDF в DWG
Конвертация файлов позволяет легко менять их формат для чтения, пересылки или выполнения редактирования. Очень часто приходится задаваться вопросом перевода документов из PDF в DWG.
Особенности форматов PDF в DWG

PDF – это формат электронных документов, который был разработан компанией Adobe Systems. Главное назначение – это презентация полиграфической продукции в электронном виде. Ее можно просматривать практически на любом устройстве, используя разноплановые программы. Редактирование выполнятся только с помощью специального ПО. Из преимуществ формата PDF стоит выделить:
- высокий уровень безопасности документов, возможность настройки дополнительной защиты от редактирования;
- небольшой объем файлов, что очень удобно для хранения;
- универсальность, о которой мы упоминали выше.
DWG – формат, используемый с целью хранения двухмерных и трехмерных проектных данных. По умолчанию он используется такими программами как AutoCAD, nanoCAD, IntelliCAD.
Важно! Для открытия файлов в формате DWG есть платные и бесплатные приложения. Последние позволяют просматривать документы, в некоторых вариантах выполнять редактирование. Платное ПО открывает максимально широкие возможности: преобразование документа по любым параметрам, интересующим пользователя.
Как перевести документ из PDF в DWG с помощью программы
Просматривая страницы Интернета, вы увидите большое количество программ, позволяющих перевести документ из формата PDF в DWG. Выберите одну из них, скачайте и установите на компьютер. Помните, что большинство ПО платное. Но и функциональность его на порядок шире.
Выбирать можно из таких программ:
- PDF to DWG;
- PDF to DWG Converter;
- ABViewer Enterprise.
Скачав программу и установив на компьютер, вам понадобится ее запустить. Зависимо от выбранного ПО интерфейс будет отличаться. Общая последовательность действий выглядит так:
- выбрать формат, в который нужно перевести документ;
- указать папку, куда будет помещен новый документ. Поле может называться «Output Folder»;
- в настройках выбрать версию AutoCAD;
- открыть файл PDF. Если программа англоязычная, это будет кнопка «Add PDF File». Выбрать документ, указав путь к месту его расположения;
- запустить конвертацию.
Новый файл будет располагаться по указанному вами адресу.
Важно! Подобные сервисы есть в сети Интернет и работают они в онлайн режиме. Вам не требуется устанавливать на компьютер дополнительное ПО. Здесь нужно только выбрать эффективный конвертер. Будьте готовы к тому, что он может оказаться платным.
Как конвертировать PDF в DWG через AutoCAD
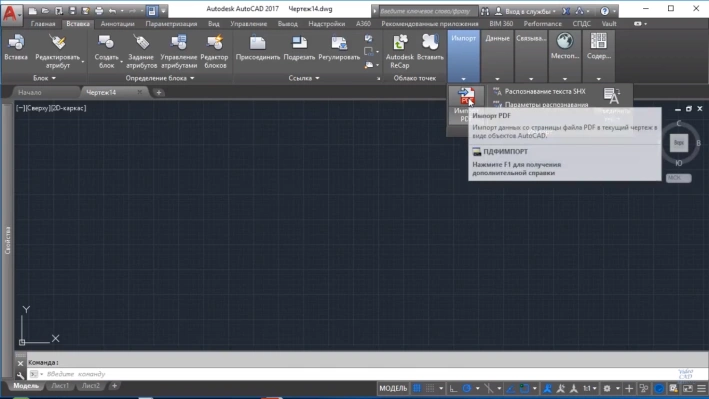
Рассматривая версии программы до 2017 года выпуска, отметим, что здесь конвертацию выполнить не получится. Файл можно использовать только в качестве подложки, осуществляя при необходимости его масштабирование. Версии программы 2017 года и более поздние варианты дают возможность импортировать содержимое PDF файла. Делается это очень просто.
Откройте программу AutoCAD и нажмите на панели меню «Импорт».
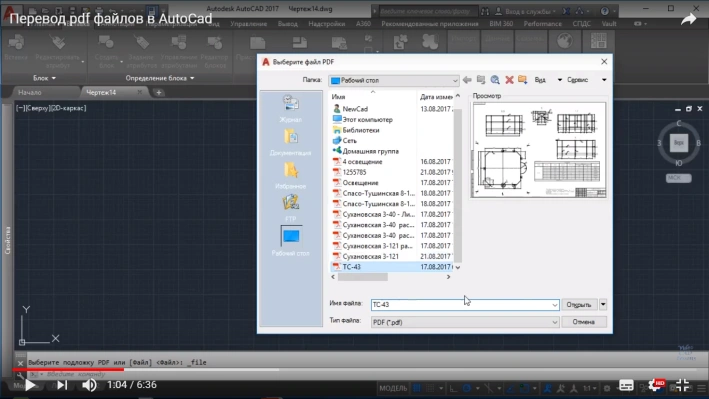
Выберите документ, который нужно открыть.
Настроить параметры импорта, если требуется.
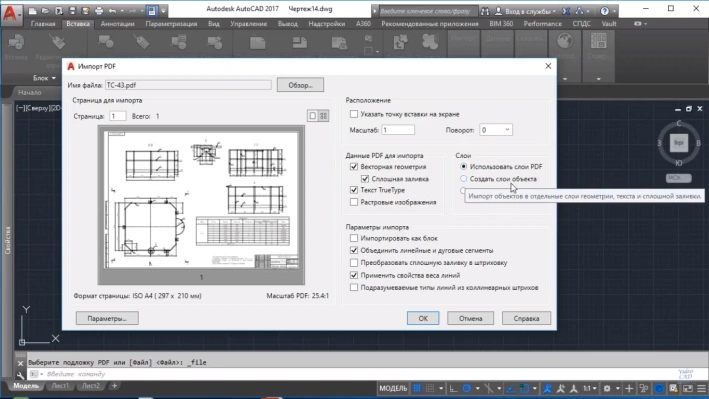
Нажать кнопку «ОК». Так вы запустите перемещение файла и его открытие в нужном формате.
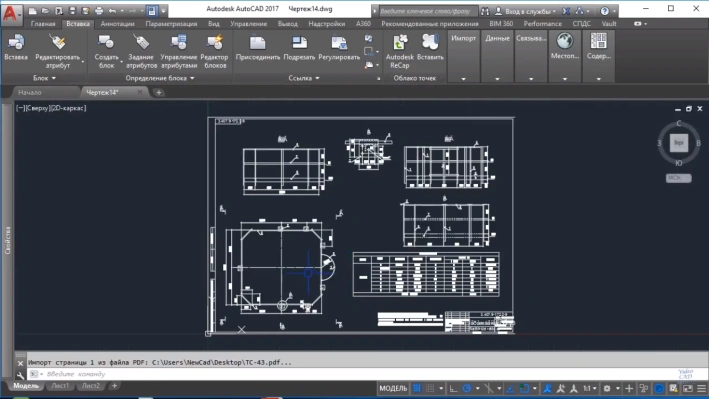
Важно! После импортирования, текст, который содержался в файле, может не распознаваться. В этом случае причиной становится создание PDF документа в неподдерживаемой кодировке.
Импортировать рассматриваемым способом можно не все файлы, а только те, которые создавались в соответствующих программах, в частности, AutoCad. Если вы пытаетесь перевести документ, где содержатся сканированные изображения, программа их не сможет распознать. Вы увидите сообщение о том, что импортированных объектов нет.
Когда импортирование выполняется в программе более ранней версии, пункта меню «Импортировать» вы не найдете. Здесь последовательность действий будет несколько другой.
На верхней панели меню нажмите кнопку «Присоединить».
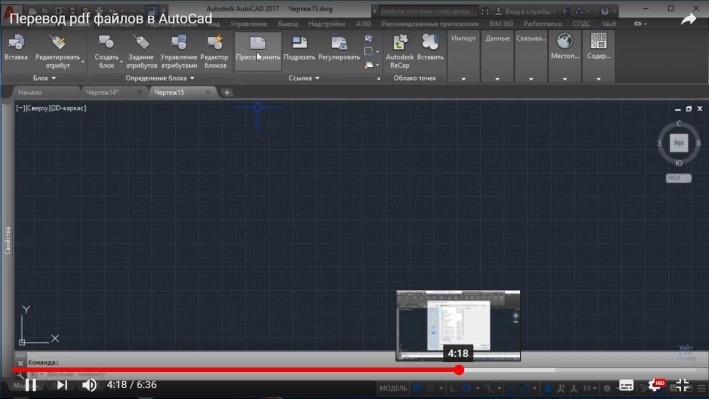
В открывшемся окне установить формат PDF, выбрать интересующий вас файл из нужной папки.
Конвертация PDF файл в AutoCAD
Формат документов «PDF» уже давно является стандартом для всех работающих с электронными документами, дизайнерскими макетами, чертежами, так как позволяет отображать практически на каждом устройстве совершенно одинаковое форматирование.

Конвертировать файл PDF в формат для Автокада можно несколькими способами.
Но у многих пользователей, в особенности начинающих, возникают затруднения: как перевести ПДФ в Автокад или, наоборот, как осуществить перевод в DWG из ПДФ в Автокад. Ответы на эти и другие вопросы и будут освещены ниже.
Способ 1
Для того чтобы преобразовать чертёж из «DWG» в «PDF», потребуется осуществить следующие нехитрые манипуляции:
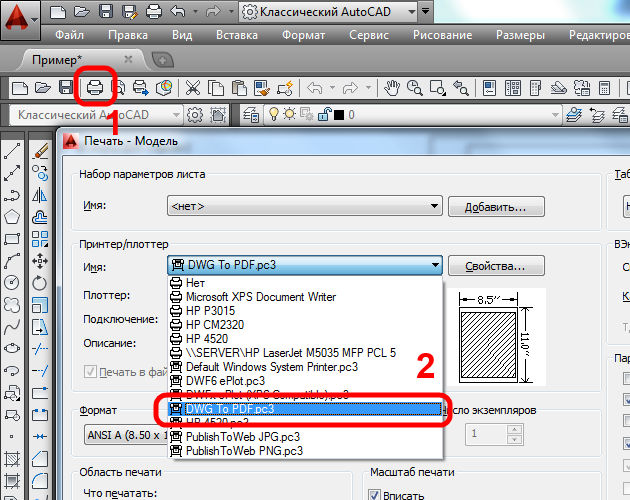
- На преобразуемом объекте откройте раздел «Печать», нажав сочетание клавиш «Ctrl+P» или введя команду «Plot».
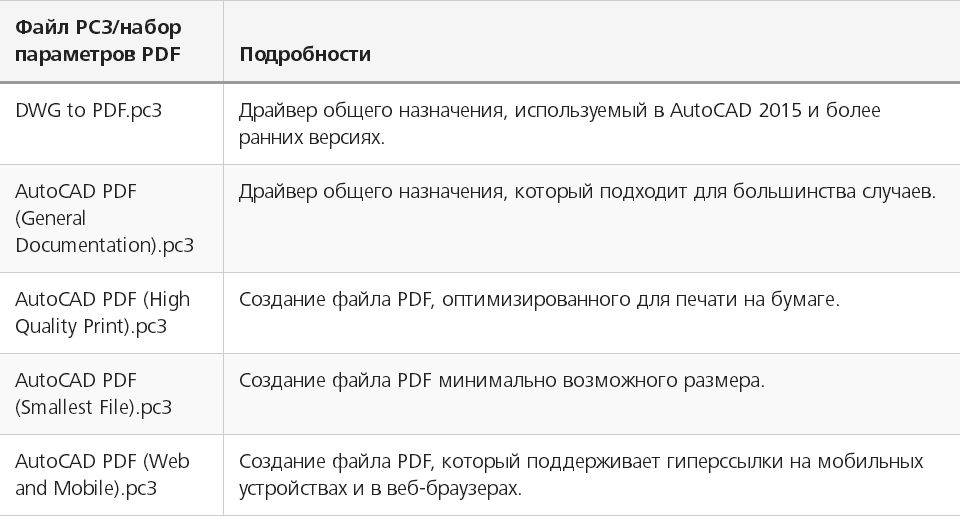
- В открывшемся окне, в блоке «Принтер/Плоттер», из списка укажите «DFG в PDF.pc3».
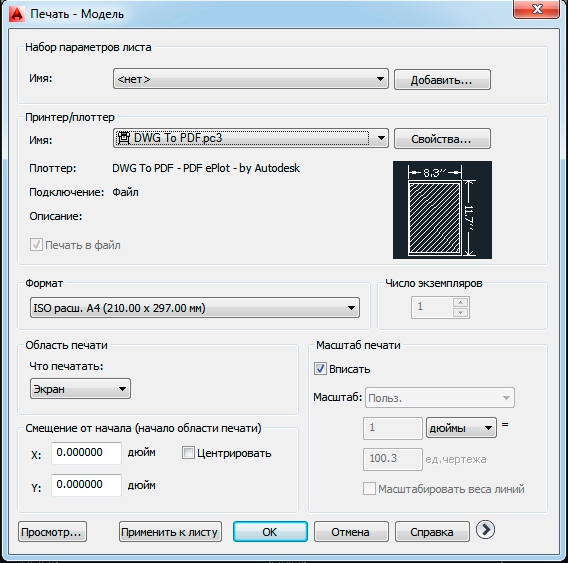
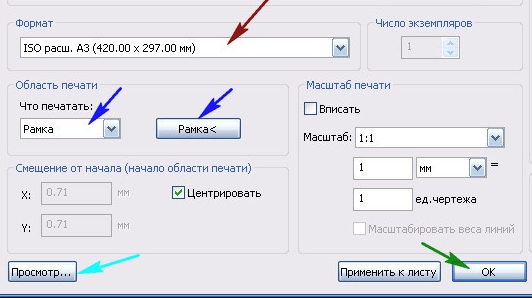
- В строке «Формат» укажите нужный вам вид листа, если ничего из предложенного не подходит, создайте новый:
- рядом с выбранным устройством «DFG в PDF.pc3» нажмите «Свойство»;
- перейдите на вкладку «Устройство и документы», далее – раздел «Нестандартный формат», нажмите «Добавить»;
- используя пошаговый мастер создания пользовательского формата, проведите все предложенные действия.
- Далее, для сохранения области печати в строке «Что печатать» укажите «Рамка», нажмите на одноимённую кнопку и с помощью мышки поместите нужный объект для сохранения в рамку.
Способ 2
Для конвертации до формата PDF в AutoCAD можно воспользоваться средствами дистрибутива «Универсальный Конвертер Документов», к слову, распространяется он бесплатно. Все действия аналогичны тем, что были описаны в «способе 1», за исключением того, что в списке «Принтер/Плоттер» потребуется указать «Universal Document Converter».
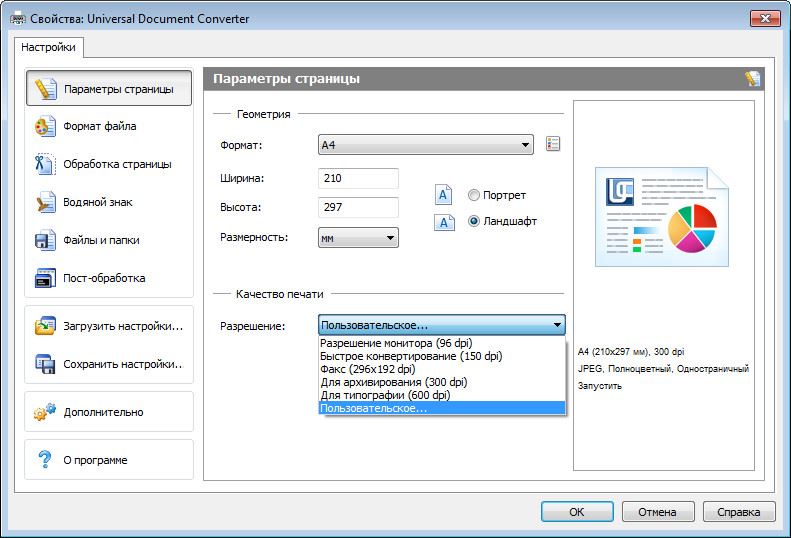
Можно применить и другой способ определения области печати и вместо рамки указать «Границы», а также установить «Выровнять чертёж по центру» и «Выровнять по размеру бумаги». Используя всё тот же дистрибутив, можно конвертировать чертёж и защитить его паролем.
Для этого потребуется следующее:
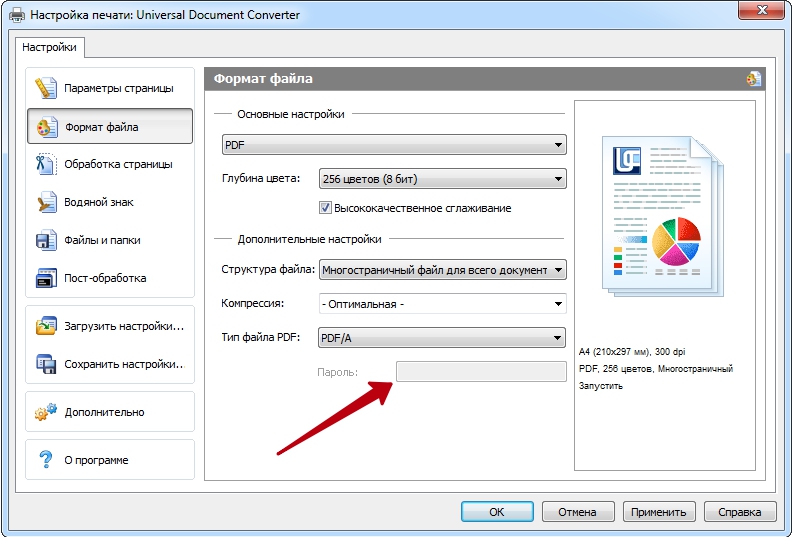
- Откройте «Свойства» и на вкладке «Устройство и документы» выберите «Дополнительные свойства»
- Откроется окно редактора, в котором выберите раздел «Формат»
- В строке «Стандарт» укажите «Защита паролем» и, соответственно, установите нужный для вас пароль. И в дальнейшем пользователям, которые открывают данный документ, потребуется вводить пароль, также с помощью этого раздела можно установить и водяной знак.
Как преобразовать (конвертировать) PDF в DWG
Реализуется данная возможность с помощью функции «Импорт». Подойдёт данный способ для версий программного обеспечения AutoCAD не старше 2010 года.
Итак, для того чтобы преобразовывать файлы PDF в Автокаде, необходимо следующее:
- Открыть раздел меню, нажав на букву «А» и выбрать пункт «Импорт», далее, выбрать «ПДФ».
- Откроется окно импорта файлов, в котором нажмите на кнопку «Обзор» для выбора загружаемого файла.
- Если загруженный объект имеет множество страниц, ниже в блоке «Страницы для импорта» укажите номер нужного фрагмента.
- Слева можно увидеть блоки с настройками параметров, установите необходимые для работы и в завершение нажмите «ОК».
Полезные команды и переменные
- «ЭКСПОРТ» – для сохранения объектов в другом формате;
- «ЭКСПОРТПДФ» – для отображения окна «Сохранить в ПДФ»;
- «EXPORTEPLOTFORMAT» – для установки расширения по умолчанию;
- «EXPORTMODELSPACE» – для определения части чертежа, подлежащего экспорту;
- «PDFSHX» – служит для сохранения текстовых объектов, используемых шрифт SHX, в файл ПДФ в виде комментариев при экспорте.
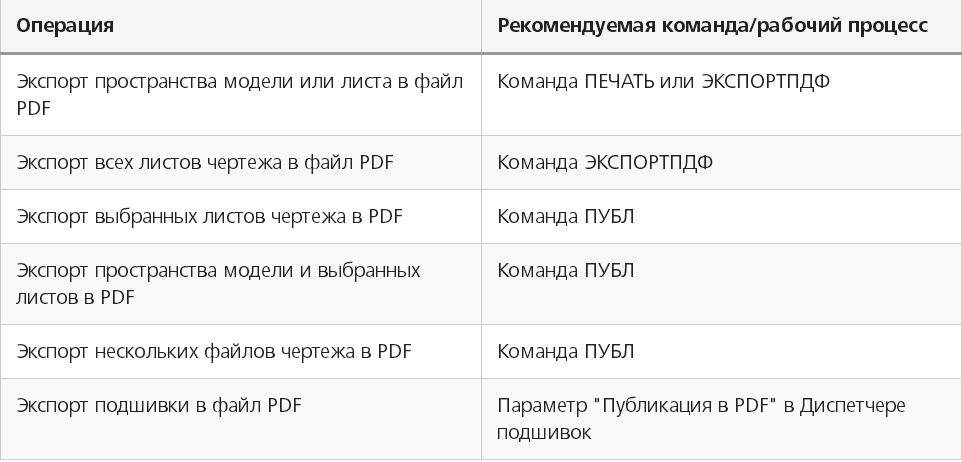
Конвертация файлов с расширением из PDF в DWG или наоборот осуществляется и с использованием сторонних конвертеров, к примеру «Aide Converter» или «PDF2DWG» и другие.
Просто скачиваем установщик программы, устанавливаем и конвертируем документы в необходимом для работы расширении.
How to Convert PDF to DWG in AutoCAD 2023

Video Tutorial: Converting PDF to DWG (AutoCAD 2023)
Let’s jump straight into the video tutorial for converting your (raster or vector) PDF files to DWG using Scan2CAD – the leading computer-aided design (CAD) conversion software.
Hi, there. So I have a file opened up on scan2cad here, it’s a raster file. As you can see, if you zoom in, things are getting pixelated and blurry. That doesn’t happen with vector files. So, what we want to do is convert this into a vector file using Scan2CAD. First thing’s first, you wanna clean this up a little bit. If the image isn’t already black and white, you’re gonna see this not grayed out. So in this case, it’s already black and white, so it’s already grayed out. But if it isn’t, then I would… The first step would be to click on this, to just turn the image into a monochrome image. Depending on how much you wanna clean in your original source image, you can choose to take on this, which removes speckles and holes. You can mess around with the speckle size and the hole size, but be careful not to… Too big or else it’s gonna start erasing things that we want to keep in. If we make the pixel size, speckle size, a bit too big, it’s gonna start erasing stuff like text. So let’s keep it a bit low for this particular image, same thing with the hole size. Once we’re happy with this, we’d click on “OK”. The next step would be to convert it into vector by clicking on “Convert Image”, here.
In this case it’s a technical image. If you wanna trace an outline or a solid, you can pick on these two other vectorization methods. But for this, it’s a bit technical. OCR means that it’s going to turn the raster text here into two-type text. So in this case, we want to vectorize the floor pen elements, and then turn the text in the document into editable text. So let’s click on vector and… Vectorize and OCR. You can actually edit the OCR settings here. In terms of the maximum character size, let’s just select from the image, and just get the biggest text here, and just click and drag. This should be okay. Once we’re happy with that, we click on “Run”, and a preview image will show here. So this is the preview image. The lines are pretty clean and most of the text is pretty good. Now, there’s still some edits we need to do with our text and lines, in our preferred CAD software, but this is good enough. We click on, “OK”. This is the converted raster image. We can edit it or actually erase a couple of the things if you want. But if you’re happy with this, the last step will be to click on, “File”, “Save As”, “Vector”, and then just choose the vector format that it is you wanna use. So I hope that this helps.
NEED TO CONVERT YOUR DESIGNS FOR CAD?
Scan2CAD is the market leading conversion software for CAD. Download your free trial.
- 14 Day Trial
- Fully Featured
AutoCAD 2023
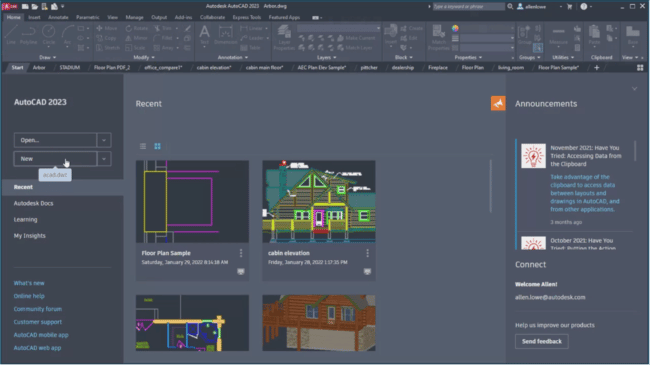
AutoCAD 2023 User Interface – My Insights Tab (source)
We’ve talked about AutoCAD plenty of times in the past here at Scan2CAD. It’s an industry standard and is the most recognizable name in CAD to date. It, in fact, commands the largest market share, according to several analyses.
To keep this commanding lead and improve the experience for its customers, AutoCAD’s developer Autodesk releases updates on an annual basis. The updates retain the capabilities introduced in older versions, such as the in-software PDF conversion originally introduced with the launch of AutoCAD 2019. We have explored more on this PDF conversion capability below.
The updates also improve some of the features, as is the case with the Trace feature, introduced with the AutoCAD 2022 and improved upon as part of the most recent launch – AutoCAD 2023. Additionally, the updates add new features. For instance, AutoCAD 2023 has added features aimed at promoting collaboration as well as automating processes. So, what’s new in AutoCAD 2023?
AutoCAD 2023: What’s New?
Autodesk unveiled AutoCAD 2023 toward the end of March 2022, promising users an experience anchored in deeper insight, automation, and collaboration. To that end, the latest edition of the software, which was first released in 1982, introduces the following:
- LISP API to AutoCAD web app
- Markup Import and Markup Assist
- My Insights: Macro Advisor
- Sheet Set Manager
LISP API for AutoCAD Web App
The LISP API offers you access to an environment created by AutoCAD programs that can be tailored to automate workflows, customize your user experience for added flexibility, and simplify common tasks. In addition, the API eliminates the need for users to possess a programming background to use the programs. With AutoCAD 2023, users of the AutoCAD Web App get to use the LISP API, which was previously available to users of the desktop software.
Markup Import and Markup Assist
The new Markup Import and Markup Assist capabilities are designed to enable you to automatically import feedback into the drawing. This feature rides on the success of the Trace feature, introduced with AutoCAD 2022 and improved in the latest update, which enables collaborators to add comments in the form of text that are enclosed in a cloud-like bubble.
My Insights: Macro Advisor
The newly introduced My Insights feature provides AutoCAD users with resources that enable them to learn about new workflows or features. The resources are uniquely tailored in accordance with how you use AutoCAD.
Sheet Set Manager
This new feature allows you to send and open document sheets, facilitating collaboration via Autodesk’s cloud-based document manager and data environment known as Autodesk Docs.
Autodesk has also made several enhancements to other aspects of the software. These include:
- Any active floating window now has its own command line
- The Trace feature has been enhanced to improve collaboration – collaborators can add notes and markups without modifying the drawing
- Autodesk has updated graphics for visualizing 3D models and objects
- The company has added the number of functions for the Count feature
YOU MIGHT ALSO LIKE:
Ultimate Guide: PDF to DWG Conversion
- Bethany
- November 25, 2016
How to Convert PDF to DWG Using AutoCAD 2023’s In-Software PDF Conversion
Though we already have blog posts detailing how to convert to a PDF for AutoCAD as well as how to convert PDF to CAD under our belts, the introduction of the AutoCAD in-software PDF conversion necessitates a separate discussion on how to convert a PDF to DWG using AutoCAD.
AutoCAD is a household name in the design, construction, and engineering industries. Workflows will typically include importing PDF copies of plans, blueprints, or technical drawings for editing on AutoCAD. The information included in such documents includes specified dimensions, 3D visualizations, and tabulated simulation and calculation results.
The introduction of the PDF import functionality with AutoCAD 2019 made the conversion of PDFs more seamless and hassle-free. (The feature has been made available in every subsequent release of AutoCAD.) But in choosing the right PDF to use for drafting, a few considerations have to be met.
First, users must consider the resolution and quality of the PDF. Most modern CAD-generated PDFs will usually come with vector information – these types of documents are ideal for importing into AutoCAD. Vector PDFs will be opened and translated into vector linework and elements when imported into AutoCAD. The alternative, raster PDFs, will still be openable on AutoCAD 2019 and every other subsequent version of AutoCAD, including AutoCAD 2023. However, do note that any raster image will be imported as full raster images, and its visible linework and drawing elements will not be editable.
With the basics out of the way, here’s how to convert PDF to DWG/DXF using AutoCAD:
Step 1: Import PDF to AutoCAD
- Open AutoCAD and create a new DWG file
- Click the Insert tab and subsequently click the PDF Import icon, which is positioned somewhat centrally on the AutoCAD user interface and is on its own ribbon group
- The Select PDF File window pops up, prompting you to select the exact file you wish to open; using the file explorer, browse to the file’s location, pick the PDF file, and click Open
Step 2: Specify Importation Options
AutoCAD will also prompt you to select a few import options to ensure the importation process is as seamless as you would want it to be.
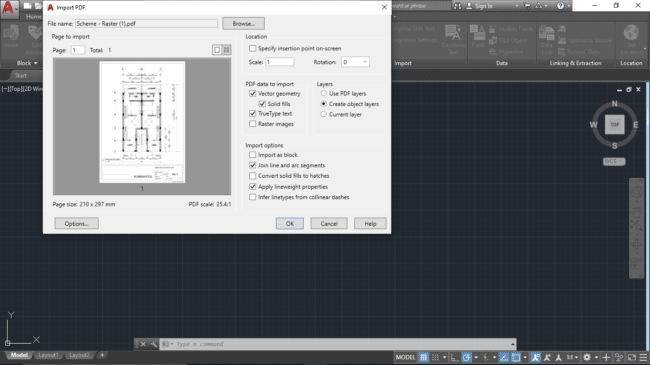
AutoCAD Import PDF Options Window
On the Import PDF dialog box, define the following parameters:
- Specify the number of pages to be imported – if you are dealing with a single-page PDF, don’t worry about this option
- Choose the scale and rotation
- Specify the insertion point on-screen
- Define the PDF data to import, including: the vector geometry, solid fills, TrueType Text, and raster images
- Select the appropriate options for the layers – specify whether AutoCAD should use PDF layers, create object layers, or use the current layer
- Define the import options – AutoCAD lets you tick various boxes to define how you want it to import the PDF. For instance, you can choose Import as block, Join line and arc segments, Convert solid fills to hatches, and more
- Click OK to complete the importation
Step 3: Save File
- To finish the conversion of the PDF to DWG, simply save the file using the DWG file format
If these steps are confusing, here’s a video that might clear things up –
It is noteworthy that the process above only applies to vector PDFs. You cannot import raster PDFs. Rather, you first have to convert the raster PDF to an image and subsequently import it using the underlay function. Next, you will then need totrace over the raster linework manually. The process is a bit tedious, but if time and elbow grease are in short supply, there are third-party software programs such as Scan2CAD that can automatically take care of the process.
Whether you choose to take care of raster conversion manually or automatically, a crisp, clean raster image will always be the biggest factor in determining the success of the conversion. So always make sure to import the best-quality raster PDF available if there simply aren’t any vector versions available.
Raster vs. Vector
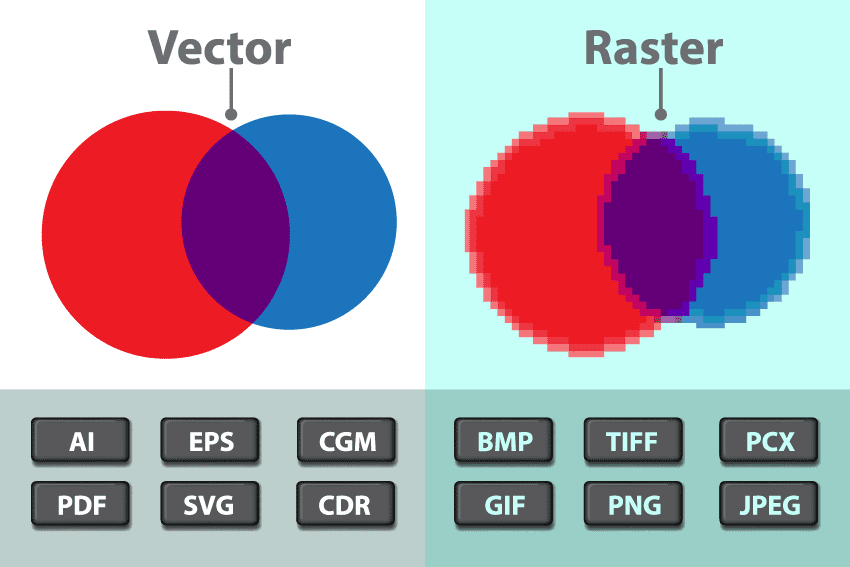
Raster and Vector Images Source
We’ve talked a lot about raster and vector PDFs when importing into AutoCAD 2023. For those of us unfamiliar, let’s take a moment to talk about the main differences between these two image types.
Raster images, also known as bitmap images, are visuals formed by color pixels that are clustered and arranged to create a coherent photo. BMP, PNG, JPEG, and GIF are typical raster file types and will be what you will commonly encounter when dealing with raster PDFs.
Raster images have varying image qualities depending on the number of pixels that they have. More pixels means crisper images, higher resolutions, and better legibility when manually or automatically converting into editable CAD objects.
Working with low-quality, blurry, pixelated raster images will have varying degrees of success, with incredibly pixelated images being outright unusable for conversions. So if you must use raster PDFs, get the best ones you can find.
Vector PDFs, on the other hand, are much easier to work with on AutoCAD. Vector images are made of editable geometric objects that can readily be imported into any software that handles vector editing and drafting. Most of the output files that you get from CAD software are actually vector files, including some of the more recent PDF files that are published from AutoCAD and other CAD software. Other vector file types include DWG, DXF, and G-Code . While raster images are made of pixels, these vector formats are composed of geometric elements and information that define the elements’ properties such as line weights, colors, and lengths.
So in short, all you need to know about raster and vector differences is that raster images are not directly editable why vector images are. So you generally want to be working with vector PDFs or find a way to convert your raster PDFs into vector files.
The only ways to do that are manually tracing over the raster elements or by using software such as Scan2CAD to automatically do that for you.
YOU MIGHT ALSO LIKE:
Can I Convert this Raster Image to Vector?
- Victoria
- January 20, 2017
Using Scan2CAD for Raster-to-Vector Conversion
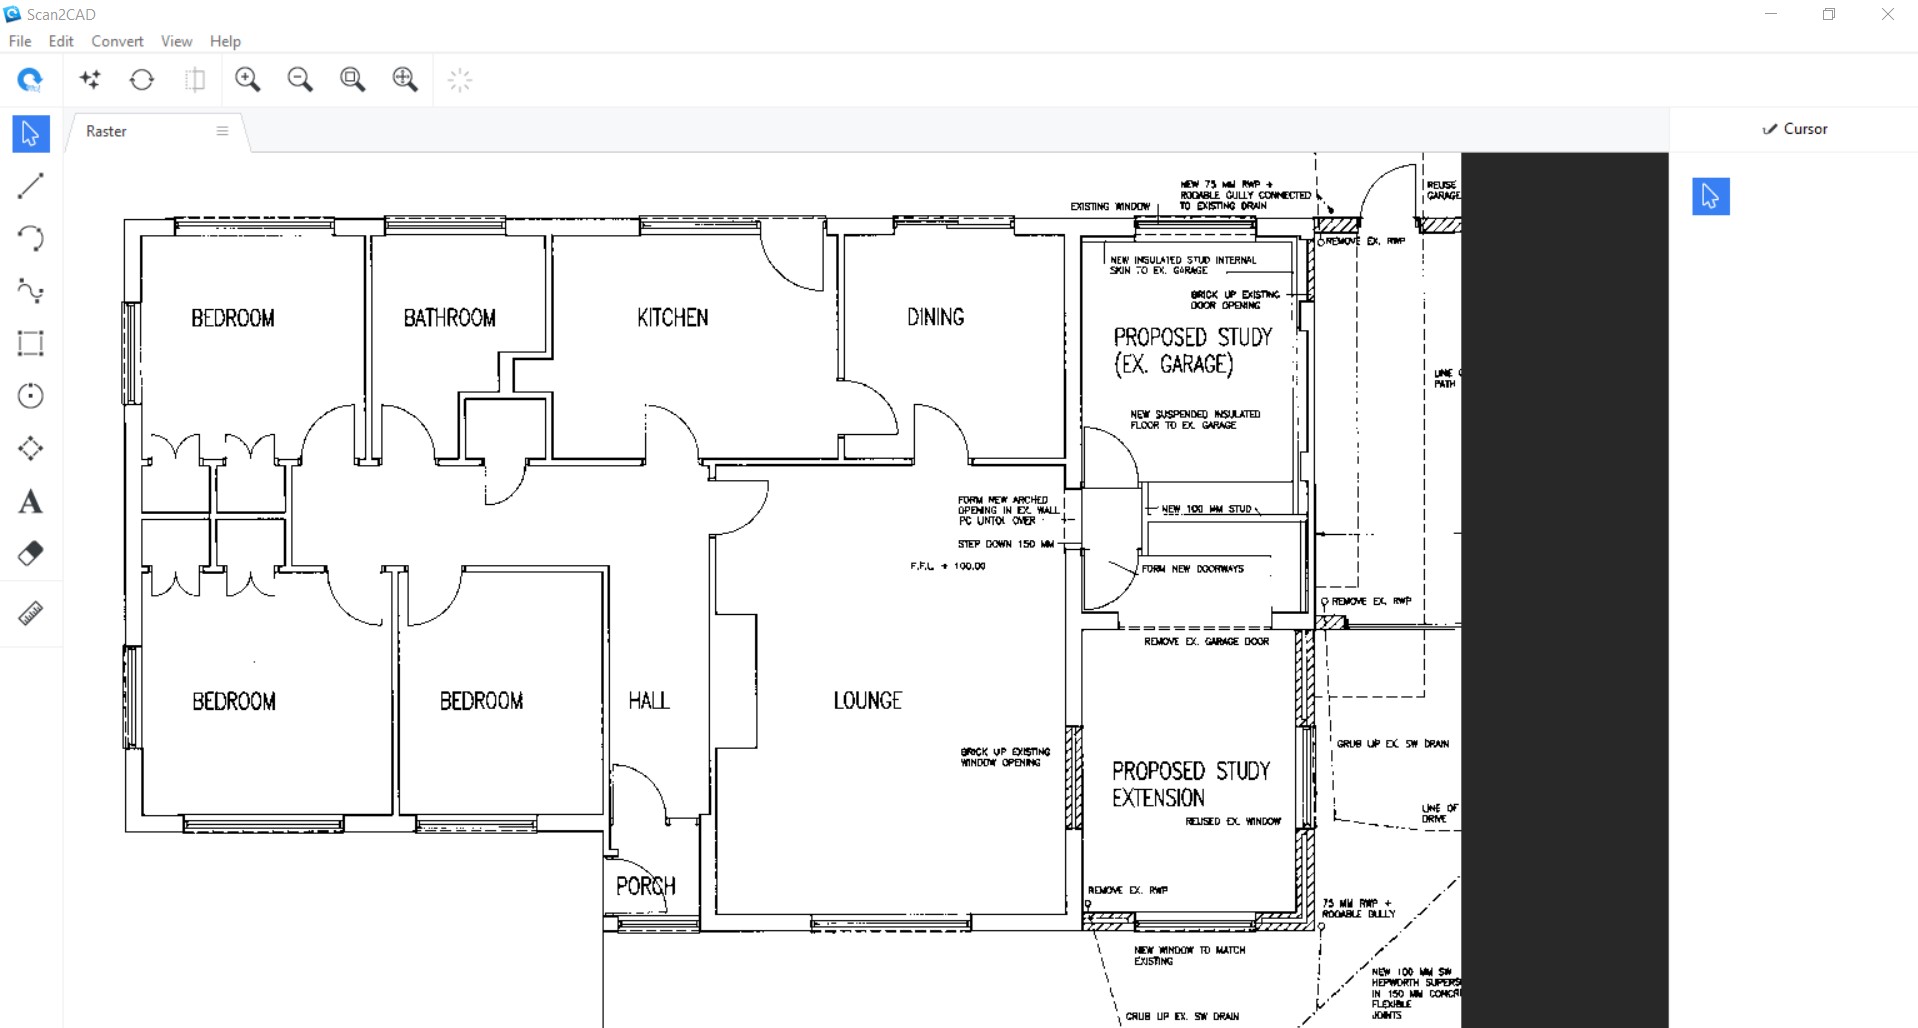
Typical Scan2CAD interface
In the video at the start of this post, we demonstrate how to can achieve accurate conversions using Scan2CAD. Here’s a step-by-step guide on how to convert raster/vector PDF to DWG using Scan2CAD:
Step 1: Import Raster/Vector PDF or Raster image to Scan2CAD
- Launch Scan2CAD
- Click Open a File on the welcome screen (if you have toggled the Show this welcome screen at startup option)
- If the option to display the welcome screen is off, simply click the Open a File on the home screen, select the PDF or image you wish to import into Scan2CAD
- Click Open
- Select the number of pages you wish to import on the Import PDF document window that pops up; you can also rotate the image. Finally, click OK
Step 2: Clean Raster Image
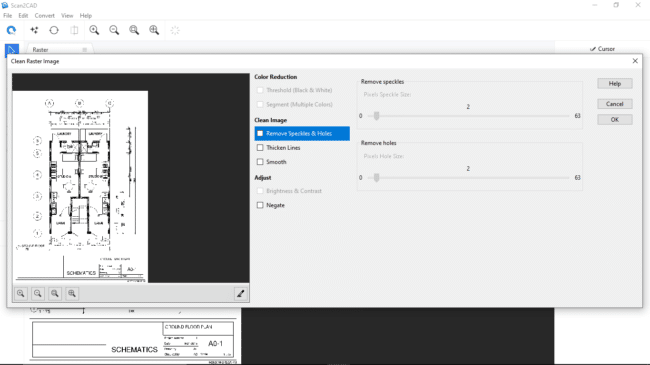
Scan2CAD Clean Raster Image Window
- Click the Clean image button
- On the Clean Raster Image window that displays, check the Threshold (Black & White) box
- Check the Remove Speckles & Holes, Thicken Lines, or Smooth boxes, depending on how clean the image is
- Click OK to complete the cleanup process
Step 3: Convert Raster to Vector
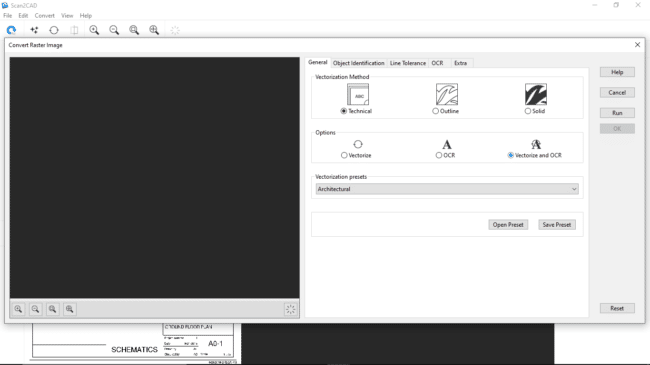
Scan2CAD Convert Raster Image Window
- Click the Convert image button
- On the resultant Convert Raster Image window, toggle Vectorize and OCR if your drawing features both geometric and text-based objects; also, select the appropriate vectorization preset
- Under the OCR tab, set the Character Size; you should also select the appropriate character rotation
- Click Run to enable Scan2CAD to create a preview of the vector drawing
- If satisfied with the preview, click OK
Step 4: Save the Drawing as a Vector File
- Click Export
- On the Save vector to file window, specify the file name and type (for the latter, choose DWG)
- Click Save
- On the DXF/DWG Export Options, ensure the Convert black vectors to white box is checked because AutoCAD, by default, features a dark background
- Click OK
You can also go through our tutorials to learn more on how to make the most out of Scan2CAD’s conversion process.