How to Solve Photos and Videos Synced from iTunes/Finder will be Removed
If you are facing the “photos synced from iTunes/Finder will be removed” error on your iPhone, the following guide will teach how you can fix the issue and keep your photos and videos secure. Read on to learn how to do it.
 Joy Taylor Last Updated: Jan. 18, 2022
iTunes Tips
Basic iTunes Tips
iTunes Music
For a while, my phone was not syncing with iCloud. Now when I go to iOS prefs and turn it on, it warns me that “Photos Synced from Finder will be Removed”. Syncing photos via Finder is not supported with iCloud Photos is turned on. 177 photos will be removed.”
Obviously, I would like not to lose 177 photos. What does this warning refer to? What exactly is “syncing from Finder”? and what photos am I likely to lose?
Although most iPhones nowadays ship with enough storage to help you keep your photos and videos stored for a long time on your devices, there are some users who exceed this limit on their iPhones. Then you can use the iCloud Photo Library on your iPhone to store your photos and videos on Apple’s iCloud servers. Doing so will free up the local storage memory on your iPhone.
However, some users encountered the error message “ Photos Synced from iTunes or Finder will be Removed ” when enabling iCloud Photos on iPhone. Just as the above user said, many people would not like to lose their precious photos and videos. Here in this post, we will introduce w hat does it mean when it says photos synced from iTunes will be removed, and show you how to fix the issue and keep your photos and videos intact.
Starting with macOS Catalina, syncing photos via Finder is similar to syncing with iTunes. So for Mac users, you may get the message “Photos Synced from Finder will be Removed”. And Windows users will get “Photos Synced from iTunes will be Removed”.
What Does “Photos Synced from iTunes or Finder will be Removed” Mean
This issue happens, because iTunes-based media syncing or Finder-based media syncing and iCloud Photos can not be used at the same time. If you synced iPhone with iTunes or Finder and tried to toggle on iCloud Photos on iPhone, then you will get the message like the below picture shows, which says Syncing photos via Finder is not supported when iCloud Photos is turned on. xxx photos will be removed.
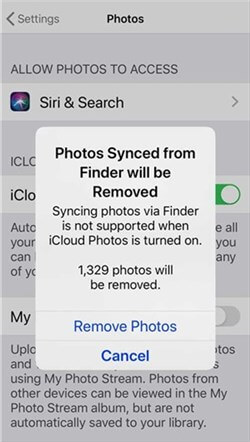
Photos Synced from Finder will be Removed
But don’t worry, there are ways for you to keep your iTunes/Finder synced photos and videos safe and secure with the iCloud Photos option. Before that, you need to transfer iPhone photos and videos to your Mac or Windows PC first. That way, you will have a copy of all of your photos and videos just in case something goes wrong and your data gets erased. Then you can click Remove Photos and enable iCloud Photos to keep your data safe continuously. Read the following methods to sync all your photos easily.
How to Fix Photos Synced from iTunes/Finder will be Removed
Use AnyTrans to Transfer Photos and Videos to Computer (PC/Mac)
AnyTrans is an application that works on both Mac and Windows and allows you to transfer data including photos and videos from iPhone to computer, and vice versa. It is easy to use the app to transfer your content and the following shows how you can go about doing it on your computer.
Step 1. Download and install the AnyTrans application either on your Mac or on your Windows machine.
* 100% Clean & Safe
Step 2. Launch the app on your computer and plug-in your iPhone to your computer using a compatible cable > On the main interface of the app, click on the option that says Content to PC or Content to Mac. It will let you transfer content over to your computer.
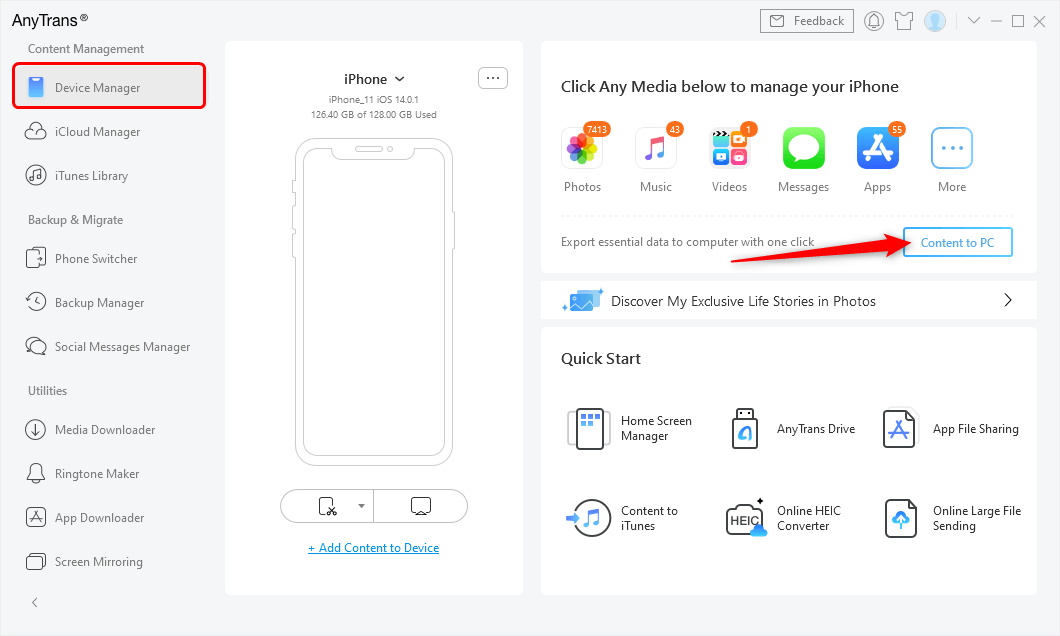
Click Content to PC Under Device Manager
Step 3. The following screen will let you select the content category you would like to transfer to your computer. Here we select all photo categories and click Next button to sync.
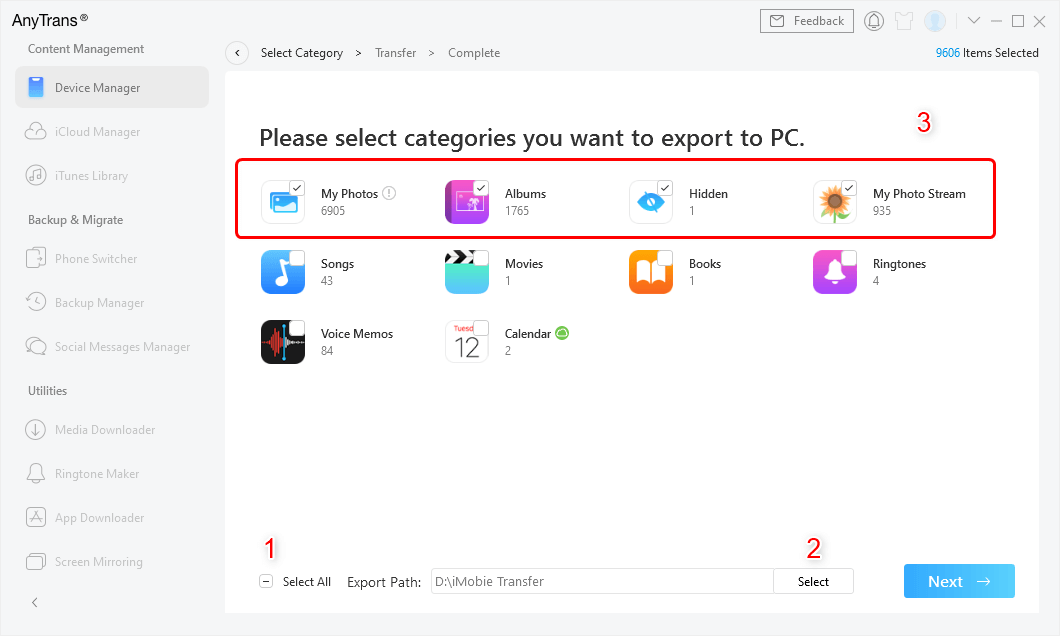
Select All Photos to Transfer
Step 4. Wait while the app transfers photos and videos to your computer. When it is done, you will find your content is now available on your computer.

Photos Successfully Transferred to Computer
One of the great things about using AnyTrans to transfer your content is it preserves your folder structure so your photos and videos will be in their original folder format on your computer.
Since a backup of your content has been created, you may enable the iCloud Photo Library option on your iPhone.
Use Image Capture to Transfer Photos and Videos to Computer
Image Capture is an application that comes preloaded on all the Mac machines out there. It allows you to import and manage multimedia content including photos and videos from your iPhones and other digital gadgets.
It is extremely easy to use the app to import photos from your devices as the app provides a single-click import feature to its users. If you have never used the app to transfer your photos, the following should teach you how you can do it.
Step 1: Click on Launchpad in your Dock and search for and click on Image Capture. It will launch the Image Capture app on your Mac.

Access the Image Capture app on your Mac
Step 2: When the app launches, plug-in your iPhone to computer using USB cable.
Step 3: Click on your iPhone under the Devices section in the app. You will see all the photos you have got on your device. Select the photos you would like to copy, click on the dropdown for Import To and choose a folder to save your photos in, and click on the Import button.
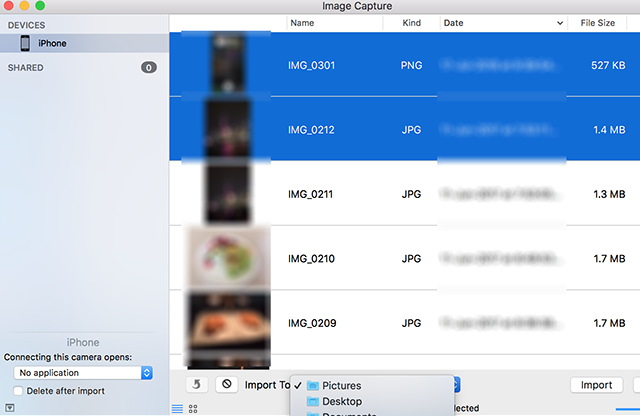
Import selected photos and videos to computer
Step 4: If you would like to import all the photos and videos from your iPhone to your computer, you can click on the Import All button and it will get the job done for you.
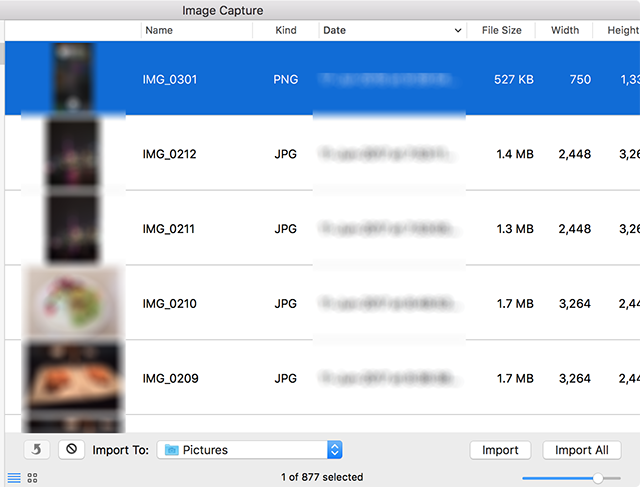
Import all photos and videos to computer
If you have a lot of content to be imported to your computer, the process will take a good amount of time to finish. When it is finished, you will find your photos and videos in the selected folder on your computer.
You may now enable the iCloud Photo Library option on your iPhone as a copy of your photos and videos is available on your computer. That is how you fix the “photos synced from iTunes will be removed” error on your devices.
The Bottom Line
If your iPhone is threatening you with a message that says the content you have synced from iTunes or Finder will be removed, the above guide shows how you can deal with the situation by creating a backup of your media files. We hope it helps you out.
Joy Taylor
Member of iMobie team as well as an Apple fan, love to help more users solve various types of iOS & Android related issues.
How to Fix: Photos Synced from Finder Will Be Removed
By Joakim Kling — Last Updated: Mar. 31, 2023 | Contact Author
It’s not a news that iPhone sometimes threatens to erase content synced from iTunes or Finder. For instance, if you go into your iPhone settings and turned on your iCloud Photo Library, a prompt will pop up warning "Photos synced from iTunes will be removed". Then you would inevitably get worried about your thousands of photos synced from computer. Actually, the above topic has repeatedly been discussed in Apple Community, but still many users cannot find a better solution.
 Update — After Apple killed iTunes app on Mac, now the dialogue box is re-phrased as " Photos synced from Finder will be removed". This is quite misleading and it actually means to say "Photos synced from a Computer will be removed". Because there are also Windows user who don’t use the Mac-only Finder app to sync photos.
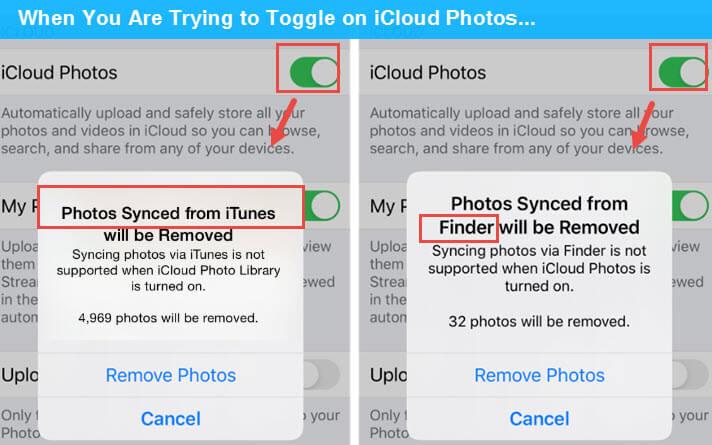
Why You Are Seeing the Alert: Photos Synced from Finder/iTunes Will be Removed
Apple adopts an either-or solution when it comes to iTunes and iCloud synced items. If you have photos synced from a computer, iPhone will threatens to delete these photos when you are trying to turn on iCloud photos; similarly, if you have turned on iCloud photos, you will not be able to sync photos via iTunes (on Windows/macOS Mojave and ealier version) or Finder (on macOS Catalina).
Find Your Way:
Analysis How to Turn on iCloud Photos without Removing Synced Photos
Apple’s mechanism is based on its assumption that you still have the original photos and videos on your computer, so the copies should be removed from your iOS device. But the real situation could be that you have already deleted original photos or videos from the computer, or photos are synced from another computer that you no longer have access to.
The brutal replacing and erasing isn’t the best solution to enable iCloud photos. A better workaround is to transfer these photos back to computer as viewable backup copies.
Then you can go on remove synced photos directly on iPhone. If tapping at that remove button won’t work, throwing at you the prompts of iCloud photos could not be turned on, then you need to delete synced photos via a PC or Mac. Please read on.
Method 1 Solve "Photos Synced from iTunes Will be Removed" Easily
Here is the work flow: we are going to transfer these synced photos from iPhone to computer for a safe backup, remove these photos from iPhone, and then you can turn on iCloud photos. With iCloud photo on, you can then import these photos into iPhone again if you prefer, but not via iTunes as it won’t work with iCloud. We are resorting to an iOS management tool DearMob iPhone Manage, and here are the steps.
Before you get started:
Download and install DearMob iPhone Manager for Windows (DearMob iPhone Manager for Windows) /> or for Mac (DearMob iPhone Manager for Mac) />.
Step 1: Connect your iPhone/iPad to your PC, launch DearMob iPhone Manager, and Click Photo Transfer icon on the main interface.

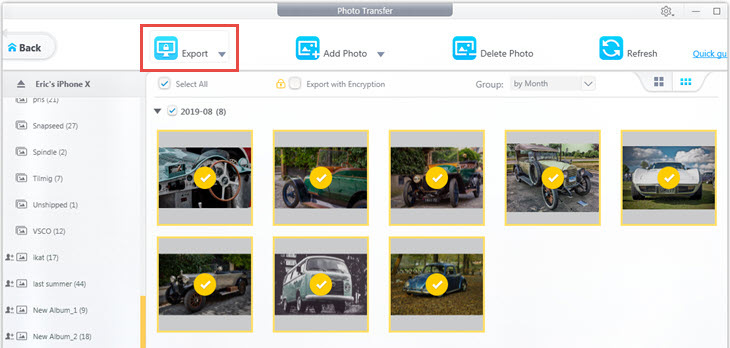
Step 2: Choose synced photo, and click Export to move them to your local drive.
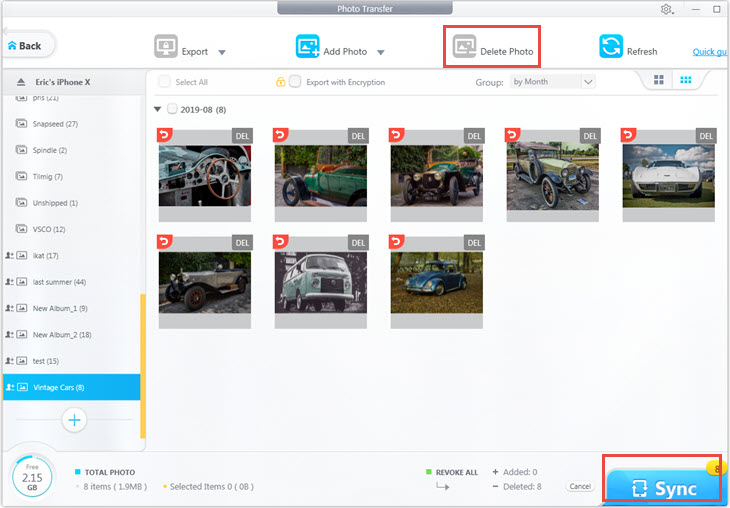
Step 3: Click Delete Photo and hit Sync. The operation will make sure photos synced from computer are now deleted from your iPhone, thus you can proceed to turn on iCloud photos on your iPhone.
Step 4: On your iPhone, go to Settings > Photos > Toggle on iCloud Photos. This time it’ll be accessible.
Please Note: Using this software, you can still transfer photos from PC to your iPhone even when iCloud photos is turned on, which is not supported in iTunes.
Method 2 iTunes and Finder Can Help, but in a Twisted Way
If you prefer using iTunes or its successor Finder on macOS 10.15, here is a workaround to delete photos. As iTunes cannot help transfer synced photos from iPhone backup to Mac, nor can Photos App on Mac see those synced photos, you need to duplicate the photos directly on iPhone.
Step 1. On your iPhone, go to Photos > Albums, scroll down and find synced photo albums. Go into each album and select photos, tap at the sharing icon at bottom left and hit Duplicate (not Copy Photo).
Please note, if you have a large size of photos synced from computer, duplicating them might require a long time or iPhone would get stuck in the process.
Step 2. Connect your iPhone to your PC.
Step 3. Start iTunes and hit the mobile icon lied next to the menu bar.
Step 4. Click photos > Tick Sync photos > Copy photos from > Choose folder.
Step 5. In the popped up window, create an empty folder and Select it.
Step 6. Hit Sync or Apply, this will erasing previously computer-synced photos from your iPhone, because you are syncing an empty folder now.
Step 7. Open your iPhone, Click Settings > Photos > Toggle on iCloud Photos. Then you’ll find it can be smoothly turned on without any prompt or warning.
Tips: Syncing photos or iCloud Photos can’t be conducted at the same time. You’d better return to the method 1 if you want more flexible iPhone photo management
Final Words
Apart from supporting iCloud and Computer syncing at the same time, it also allows you to fully back up iPhone data, and transfer all kinds of videos and music across the devices. As a computer-based iOS backup and transfer tool, DearMob iPhone Manager also incorporates data encryption, conversion and selective restore utilities to free you from iCloud & iTunes limits and make your management of Apple devices much easier.
Free download DearMob iPhone Manager for Windows and Mac:
 For mobile users, click here >
Photos synced from Finder will be removed
You had previously turned iCloud Photos off, then added some new photos or videos to the device via iTunes, a third-party app, or other tool. After some time, you decided to enable iCloud Photos again and got this message: Photos synced from Finder will be removed. Here’s what it really means and what you can do about it.
Photos and videos synced from Finder will be removed
What does Photos synced from Finder will be removed mean?
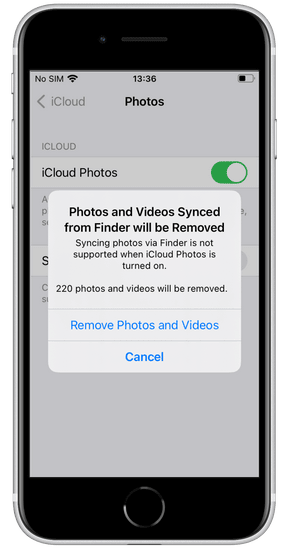
What is Finder on iPhone?
The Finder is a macOS feature for browsing and accessing content on your computer. There is no such thing as syncing photos via Finder on a Windows PC, but when you add photos and videos with a third-party app, you get the same message. If you’ve used iTunes to transfer new photos to your iPhone or iPad, you may see this pop-up: Photos synced from iTunes will be removed.
What to do if I see ‘Photos synced from Finder will be removed‘?
- choose not to turn iCloud Photos back on, keep the photos, and store your photo library on the device; ;
- or turn iCloud Photos on and lose the latest photos.
How to backup photos from iPhone to computer and enable iCloud Photos
If you wish to enable iCloud Photos, I recommend making a full backup of your photo library to your PC before doing so: this way you will be safeguarded against any changes that iCloud Photos might impose. Apple hasn’t provided Windows PC users with a tool to manage photos and videos stored on the device, so we’ve created our own app — CopyTrans Photo.
✓ back up all pictures and videos to the computer in 1 click,
✓ transfer photos between PC and iPhone and preserve the original EXIF data,
✓ copy your Live Photos and HEICs from iPhone to PC and back;
✓ organize photos and videos into albums.
Download and install CopyTrans Photo.
If you need help installing the program, please refer to the installation guide.
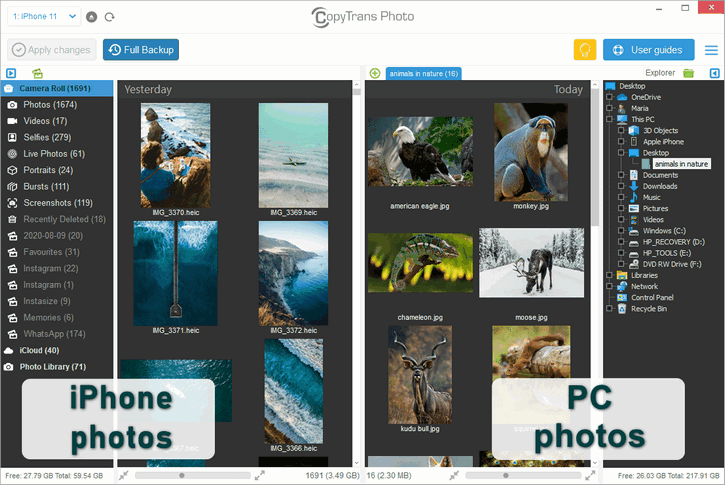
Run CopyTrans Photo and connect your iPhone. iPhone or iPad photos will be displayed on the left-hand side of the main program window. Your PC folders will appear on the right:
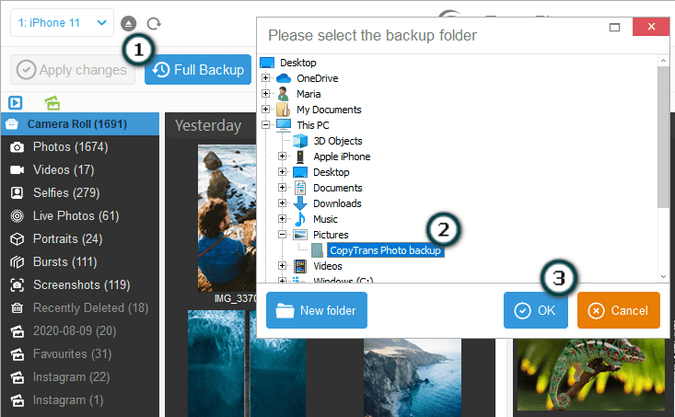
To download all iPhone photos and albums at once, click on the Full Backup button in the top-left corner of the app, then select the destination folder.

Wait until the backup is complete.
The iPhone photos are now transferred to the computer folder of your choice!
Now you can enable iCloud Photos back by going to Settings > Photos > flip the toggle on.
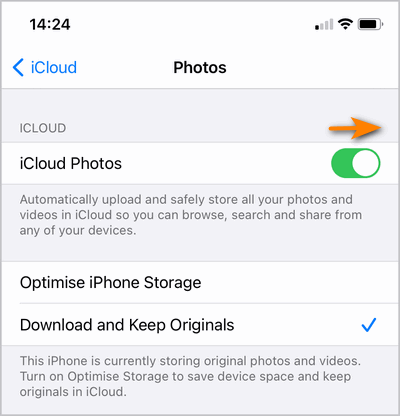
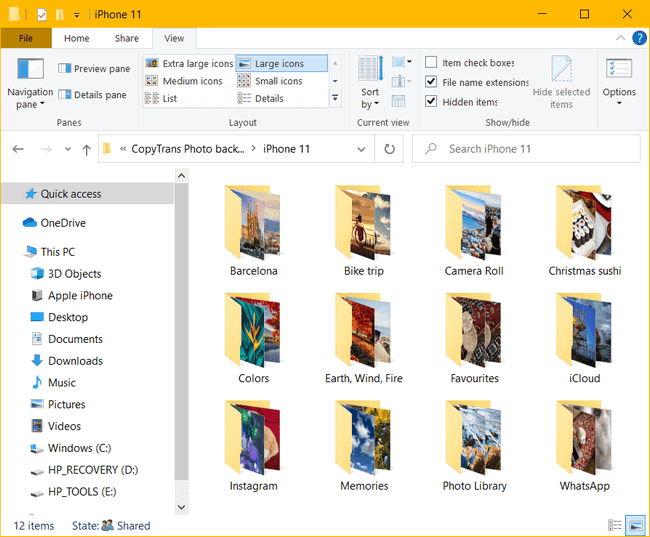
After that, you can choose to remove the synced photos because they are already safely backed up to your PC. You can also add the missing pictures to iCloud so that your iPhone Photo Library looks the same as before.
How to enable iCloud Photos and manage them
Let’s say you haven’t taken a lot of pictures while iCloud Photos were disabled and you are ready to lose them in order to be able to use your iCloud storage for storing photos.
To enable iCloud Photos, navigate to Settings > Photos > flip the toggle on > click Remove photos and videos.
After you have turned iCloud Photos on, your iCloud Photo Library will be downloaded to your iPhone or iPad. From now on, you’ll need to use a tool designed specifically to manage photos and videos stored in iCloud. Here’s our article where we compare a bunch of them: How to access iCloud Photos on PC.
Related articles:
- How to turn off iCloud
- How to view iCloud Photos on PC
- How to delete photos from iPhone but not from iCloud
Shares a name with two great women: Helga Hufflepuff and Helga Pataki. In charge of the company meme supply. Believes that kitten videos will heal the world and sweets strategically placed around the house will save even the worst day.
Не удаляются фото на iPhone или iPad, как удалить? Решение
Не удаляются некоторые фото с iPhone и iPad? В этом материале мы расскажем как удалить папки (альбомы) с фотографиями на iOS-устройстве, которое было синхронизировано с PC или Mac через iTunes.
Если на iPhone или iPad появилась папка с фотографиями, которые нельзя удалить, значит они были загружены с PC или Mac через iTunes.
Вариантов выхода из сложившейся ситуации всего два.
Как удалить фотографии с iPhone и iPad, синхронизированные с iTunes на Вашем компьютере
К примеру, чтобы убедиться в том, что фотографии были синхронизированы с компьютера, достаточно перейти во вкладку «Альбомы» штатного приложения «Фото» и отыскать интересующую вас папку. Если под её названием будет указано количество фото и надпись «с моего Mac (компьютера)», значит мы на правильном пути.


Для того, чтобы удалить фотографии необходимо:
1. Подключить iPhone, iPod touch или iPad к PC/Mac.
2. Запустить iTunes.
3. Перейти на страничку с устройством.
4. В левом боковом меню кликнуть по вкладке Фото.
5. Снять галочку с пункта Синхронизировать или с выбранной папки с изображениями (в этом случае удалится весь альбом).
Если необходимо удалить с iPhone или iPad не весь альбом, а выборочные фото, то необходимо перейти к папке с фотографиями на компьютере и удалить ненужные фото.
Если папка с изображениями уже была удалена с компьютера, то, как вариант, можно создать пустую новую с таким же названием как на iPhone или iPad и синхронизировать её со своим устройством.

6. Нажать кнопку «Синхронизировать».
Как удалить фото на iPhone и iPad, синхронизированные с iTunes чужого компьютера

В случае, если доступа к компьютеру, с которым был синхронизирован iPhone или iPad у Вас нет, то при синхронизации iTunes удалит ВСЕ ФОТО, загруженные с компьютера. Это не относится к фото и видео, созданным на самом iOS-устройстве (Фотопленка).
Для того, чтобы сохранить фото, загруженные с чужого компьютера, придётся либо копировать их через приложения iTools, iFunBox, iMazing и прочие аналоги iTunes для компьютера, пересылать в электронном письме, либо выгружать в облако.