How to Add a Favicon to WordPress Correctly, Including Webmanifests

Favicons and WordPress go together like Barbie and Ken. You can’t have one without the other. No doubt you’re familiar with both of them to a certain extent. If you aren’t then this How to Add a Favicon to WordPress setup guide is the article for you. Come into my boudoir, or maybe not, so I can tell you all about them.
We’ll also be touching on Web App Manifests and how they integrate your favicon serving strategies to ensure your progressive web app (PWA) smashes the Google Lighthouse audit without issue. Bit of a mouthful, but this sentence will be the hardest part of the talk. Promise.
Quick Links to All Headings
What is a Favicon?
A favicon is short for favourite icon. They aren’t just aligned with WordPress, but almost all websites and apps use them in one form or another. However, a favicon in its truest sense is what your browser uses next to the page title in the browser tab, which gives you a quick way to identify your favourite websites.
Traditionally a favicon differs from a desktop shortcut icon because a favicon lives in your browser tab, whereas a desktop or app icon lives on the device screen and especially the homepage.
How to Add a Favicon to WordPress the Easy Way
Luckily for the non-techies out there, WordPress offers a super simple way to add a favicon to your website. You simply navigate to your WordPress dashboard and follow the links below:
- Appearance — Customise — Site Identity — ‘Select Image’
Then once you are on Site Identity you will see a ‘select image’ buton. This is where you add your favicon, which has to be a minimum of 512 x 512 pixels, according to WordPress guidelines. You can install a .jpg or .png here and if possible try and optimise it beforehand, even if you have an image optimising plugin such as WP Smush.
The actual size of most favicons is only 32 x 32 pixels, but WordPress is asking for a bigger image in case somebody wants to save your website to their desktop or smartphone home screen. Effectively doubling your favicon up as a shortcut icon.
If you want a quick and easy solution this is the one for you. However, if you’re a geek like me and want to know the fastest or most optimal way to serve your favicon then read on…
The Problem with the Standard WordPress Option
When you run your website through a speed and performance checking website tool, such as GT Metrix or Pingdom tools is that because your favicon is currently doing two jobs, as mentioned earlier. It’s trying to be a favicon and also a desktop shortcut and WordPress has the 512 squared image that it is cropping for your 32 squared favicon.
For a performance benchmarking site this is sacrilege, as every time WordPress has to crop your icon on the fly, it’s costing time by adding a small latency penalty, but even small things add up. You know how pennies add up into pounds when you do the weekly shop, well for websites bytes add up into kilo-bytes and you get the picture. It costs you time and time is our enemy.
The standard WordPress way also only gives the browser two options. In the real world there are plenty more ways to serve favicons and their big brother, aka the desktop shortcut icon.
Ideally You Should use an ICO File
ICO files are beneficial because you can include more than one image in the same file. In fact, they are doubly useful, because as well as including several images, the images themselves can be scaled.
Whereas a regular raster image, like a .jpg or .png gets blurred and pixelated as you zoom out. ICO files are vector images, same as what is used in Adobe Illustrator images. They are based on mathematical points, rather than individual pixels, so you can zoom out as much as you want and they don’t get blurred. In truth, though, it’s not as if you will zoom into a favicon, but that’s the technical jargon behind them.
How to Add a Favicon to WordPress to Suit Every Device
In the olden days of computing, all everyone needed was a humble 16 x 16 pixel favicon. Then it was 32 x 32 and more colours. Eventually it went up to 48 x 48 for higher resolution displays. The great thing about favicon.ico is that you can have all three of these little critters snuggled up in the same file. This saves resources and network calls compared to downloading three separate image files.
Then things got more complicated… people started using phones and tablets, each with different operating systems on. For various reasons. Apple, always like to be different, even though they will tell you it’s for the customer and ease of use. Don’t believe them. They’re big fat liars, look at how many times they said you can’t get photographs off a device that’s been in water. Yet a mom managed to do it in her kitchen and started ipadrehab, but that’s another story.
In short, just don’t believe billion dollar companies when they tell you something. On the other hand, you can always trust individuals like me who do have your best interest at hand!
Right, where was I? Awe yeah, if you want to be serve your favicon to everyone that you come across then it gets slightly more complicated. Nothing to worry about, however.
Creating a Website Manifest for a Progressive Web Application
The criteria for Progressive Web Apps or PWAs is more intense than for regular websites. If you run your website through Google’s Lighthouse website audit it will ask for a web manifest. Quick tip, always try and run Lighthouse using an Incognito window in Chrome browser, as it will give you cleaner results.
Webmanifest Contents for Sonic SEO PWA
*I’ve probably gone overboard on the icons, purely because I combined the results from two different authorities. Rather than miss something out I played it safe and included the extra icons.
Webmanifest Essentials — What Google Expects
Although I’ve suddenly flipped to webmanifests it’s because they go hand-in-glove with our beloved favicons. Essentially all a webmanifest does is include a list of all your favicons and desktop shortcut ions, plus a start URL for your browser. It’s not difficult once you are familiar with the contents.
The two actual websites that I used to create my own manifest were from Real Favicon Generator and also Firebase web app manifest generator, which is now owned by Google.
Whenever you combine two similar, but still different, pieces of advice or content you will always get conflicting results or opinions. I could be wrong, but in the end decided to combine the two offerings into one and am pleased with the results, as all my PWAs pass the Lighthouse audit for Apps and Manifests.
Real Favicon Generator or Firebase App?
A good example of when two pieces of info conflict is right here; Real Favicon Generator offered up a site.webmanifest file and Firebase offered a manifest.json. Which one is correct? They both are, but seen as though the first solution is actually called a .webmanifest that seemed like the winner to me! It’s a bit like calling an image or photography file .photo. Of course that sounds better than .jpg or .png doesn’t it?
Since I’ve double checked, however, Mozilla reference the JSON text file for the Web App Manifest , so its another one of them personal preference things.
Choice is always good, but when you’re a pedant choice can be annoying. In truth, both solutions are perfectly fine because a .webmanifest file is still written in JSON, even if the file type isn’t actually .json
Here’s Google’s take on the Web App Manifest.
It seems like the one I’m using is derived from the W3C.Org or World Wide Web Consortium… linking to a manifest and here are some more manifest examples.
Another quick tip — if you use Real Favicon Generator to create your manifest and favicons, it’s best to choose a start URL. They only ask you to do so as an option, but Lighthouse throws an error if you don’t include one. If in doubt, all you need to do is use your homepage URL.
Ensure you have all the basics covered, such as making sure your URL paths to the icons work out.
You’ll also need a service worker if you’re turning your website into a PWA, but I’ll go over this in a minute.
Basic Service Worker Implementation
Although this article is about Favicons, to install each version will require a manifest and if you’re doing that the natural progression is to a PWA and you’ll need a service worker for that. The documents and details are on the AMP website, follow this link below.
A service worker is nothing more than a few lines of code that can run independently to your website and even when your website is offline. It’s not a magician so don’t expect it to download code when your viewers have no signal in the middle of the Sahara Desert. That said, however, it will get enough code while it can to keep people happier than having no content at all. Google thinks they’re the next big thing apparently so I’m really interested in them.
Actually they have been around for a couple of years now, but because we’re already in a really good place with website technology, uptake of the service workers hasn’t been as fast as web pioneers would have liked. Let’s be real, there’s so many different software ideas all competing for brain space, it’s impossible for even the most tech-savvy folks to know about them, never mind ordinary Joe and Janice sat watching the Kardashians.
If you’re running AMP, there is a specific link to a service worker that you can use without creating your own, which is what I am using on all my AMP and PWA sites. That being said, I did manage to get my own version working from code that I cobbled together from Google Developer website.
You simply need to save a file in your website root folder as sw.js and include this code inside the file.
- importScripts(‘https://cdn.ampproject.org/sw/amp-sw.js’);
AMP_SW.init();
Optional Service Worker Code
//This is the version I first used from Google Devs website instead of using the import script above. They both work, but I thought the import script was preferable as it’s ready made, although the one I made is still from code written by Googlers so it should be perfectly safe and I didn’t have any issues with it so use either one.
self.addEventListener(‘install’, function(event) <
// Perform install steps
>);
var CACHE_NAME = ‘parallax-cache’;
var urlsToCache = [
‘/’,
‘/wp-admin/css/’,
‘/wp-admin/js/’
];
self.addEventListener(‘install’, function(event) <
// Perform install steps
event.waitUntil(
caches.open(CACHE_NAME)
.then(function(cache) <
console.log(‘Opened cache’);
return cache.addAll(urlsToCache);
>)
);
>);
self.addEventListener(‘fetch’, function(event) <
event.respondWith(
caches.match(event.request)
.then(function(response) <
// Cache hit — return response
if (response) <
return response;
>
return fetch(event.request).then(
function(response) <
// Check if we received a valid response
if(!response || response.status !== 200 || response.type !== ‘basic’) <
return response;
>
// IMPORTANT: Clone the response. A response is a stream
// and because we want the browser to consume the response
// as well as the cache consuming the response, we need
// to clone it so we have two streams.
var responseToCache = response.clone();
caches.open(CACHE_NAME)
.then(function(cache) <
cache.put(event.request, responseToCache);
>);
Where to Upload Your Icons/Favicons
All you have to do is upload all your favicons to the root folder of your website. It doesn’t matter if that is WordPress or standard HTML. As long as their is some code in your site’s header or header.php file telling the browser where all your icons live it will work perfectly.
There is even a favicon checker, for peace of mind, to use once you’ve uploaded everything. If your results aren’t as expected, again make sure to check the basics such as flushing your caches. It might take a while before a clean version of your site gets through.
Favicon Links in Header.PHP File
If you’re using WordPress then include all your favicon links in your child theme’s header.php file. You don’t have to make a child theme, but it is best practice and using this plugin takes only seconds once you are used to using it. Honestly, I have found it that easy I’ve made a child theme for all of my websites.
Even though all the favicons are linked, your browser shouldn’t waste bandwidth downloading anything that it doesn’t need, unless you write code to tell it to do otherwise.
For example, if you run the same code as me and check your website in GT Metrix, it should only show that the favicon.ico file is downloaded. You shouldn’t need to preload or preconnect to a favicon.ico file because browsers look for a favicon automatically. If it can’t find one it will display the default blue box favicon.
Bear in mind that your favicon might not show up on your own computer until you’ve cleared your browser cache. Quite often I get a few weird results from the website speed checking tools, but once you go back the next day everything will be fine. You will be able to tell through experience whether it is generally the browser or caching issues that are affecting whether your favicons are getting displayed correctly or not.
Offloading Favicon Files to a CDN
If you’re not using Cloudflare you should be, it’s a free content delivery network. It also pairs up sweet with Stackpath, which is a paid CDN, but it’s only $10 dollars a month regardless of how many websites that you own. Well worth it in my opinion.
As you can see from lines 19/20 in the code above, I’m telling the browser that my favicon is available from my CDN, which is Stackpath and also Cloudflare, but my assets are stored on Stackpath. It’s not actually essential to call the link twice, because you’re really saying the same thing twice, but I got the idea from KeyCDN and thought that if it works for them then it should be okay for me. You can always experiment and delete the second call if you wish! Just check for duplicate calls in your performance reports and delete as necessary.
Conclusion
Let’s have a brief recap of what we’ve discussed and that you’ve learned, which is most important, because I’d have wasted your time otherwise…
- How to Add a Favicon to WordPress.
- What is a Favicon?
- What is an ICO file?
- Webmanifests and why Google requests them?
- Service workers — manifests — favicons — how they all interlink.
- How to offload your favicon to a CDN.
- Linking to your favicons from header.php file.
Hopefully you’ve found at least some of this information useful. If so please give it a like and a share, as I’d be super stoked for your help in getting this out to as many WordPress geeks as possible. Favicons are only small and often they go unnoticed, but they really do need to be loaded correctly, otherwise it can impact the speed and performance of your website. That isn’t good for you or your readers.
Alternatively, there are a couple of other blog posts that you might find interesting.
Should you require any information or perhaps the answer to something WordPress related, then without doubt hit me up on my email address or comment below.
A big help would be if you enjoyed reading this then please share the original story from my blog over at Sonic SEO — How to Add a Favicon to WordPress.
Create a Favicon
A favicon (short for “favorite icon”) is an icon associated with a particular website or web page. It is generally intended to be used when you bookmark a web page. Web browsers use them in the URL bar, on tabs, and elsewhere to help identify a website visually. Favicons are also used as application icons on mobile devices.
A favicon is typically a graphic 16 x 16 pixels square, and is saved as favicon.ico in the root directory of your server. You can use a favicon with any WordPress site on a web server that allows access to the root directories.
WordPress Version 4.3 or later
WordPress Version 4.3 implemented a Site Icon feature that enables favicons on your web site.
When you use the Site Icon feature, you don’t need to prepare the favicon.ico file by yourself, or modify your template file. All you have to do is navigate to the Customize screen and specify a square image that has a height and width of at least 512 px.
Later paragraphs in this article contain instructions for manually setting up your own favicon. However, it is highly recommended that you use the Site Icon feature (a feature that is built-in to WordPress) instead.
Follow the steps below to use Site Icon to set up a favicon for your site.
- Prepare the image file. (It must be square, having a height and width of at least 512 px.)
- Navigate to Administration Screen > Appearance > Customize
- Click Site Identity
- Click Select Image (located under the Site Icon subheading).
- Click on the Upload Files tab, then click Select Files to upload the image file that you prepared in the previous step.
Creating a Favicon
A favicon can be created by using any graphics/image editing software that allows the saving of .ico files. There are also online services that will allow you to create a favicon for free.
The image should be clear and visually appealing. Ideally it should be designed to match your site’s brand image and/or content.
To prepare the image to be saved as favicon.ico:
- Make the image square by cropping or adding space around it.
- Resize the image to 16 x 16 pixels.
- Save the file as favicon.ico .
If you’re using an online service to create your favicon (such as Faviconer.com or Dynamic Drive) follow the instructions provided by the site, and then download the favicon.ico image to your computer.
Installing a Favicon in WordPress
If your theme or your WordPress version does not support the Site Icon option described above, you can use this method to manually add a Favicon.
If there is already an old favicon.ico file in your current theme’s main folder, delete it using an FTP Client.
- Use an FTP Client to upload the new favicon.ico file into your current theme’s main folder.
- Upload another copy of your favicon.ico file to the main directory of your site (ex. http://example.com/favicon.ico ). This will display the favicon in your subscribers’ feed readers.
In order for your favicon to show up in some older browsers, you will need to edit your page header. (Remember, the best way to edit your theme’s files is via a Child Theme. As you follow along with the following instructions, it is highly recommended that you create and modify the copy of header.php that is located in your child theme.)
- Go to your WordPress Administration Screen.
- Click on Appearance.
- Click on Theme Editor.
- Select the file called Header or header.php to edit the file.
- Search for the line of code that begins with <link rel=»shortcut icon» and ends with /favicon.ico» /> . Overwrite it, if it exists, or add the following code below the HTML tag:
Save the changes.
How to create a favicon with a transparent background
Before implementing this method, please make sure that your source image already has a transparent background, which means it should be a GIF or a PNG. The rest of the steps are as mentioned above. The one difference in the code is that, instead of using a favicon.ico file, use favicon.png or favicon.gif instead.
Search for the line of code that begins with <link rel=»shortcut icon» and ends with /favicon.ico» /> . Overwrite it, if it exists, or add the following code below the HTML tag:
To see your new favicon, clear your browser’s cache. You may need to restart your browser in order to see the new favicon.
Advantages of using .ico over .png or .gif
- Compatibility – As of this writing, most modern browsers–except for iOS Safari and Opera Mini–support the .ico format.
- Avoid 404 server errors – Virtually all modern browsers will request a favicon.ico, so it’s best to always have a favicon.ico file, to avoid a “404 not found” error.
- An .ico file can hold more than one icon, so there is no need to include multiple files for 16×16 and 48×48 icons.
Was this article helpful? How could it be improved? Cancel reply
Log in to submit feedback. If you need support with something that wasn't covered by this article, please post your question in the support forums.
Как быстро и качественно установить favicon на WordPress: 3 подробных метода и пошаговые инструкции
В вордпресс существует стандартная функция. Чтобы добавить в панели WordPress заходим в Внешний вид > Настроить.
Вкладка настроить
Откроется окно (на сленге разработчиков) кастомайзера. Заходим в раздел Свойства сайта.
Свойства
Откроется новая вкладка, находим «Выберите значок сайта».
Выбор значка
Появится всплывающее окно с выбором файла изображения для установки или смены Favicon, можно загрузить с компьютера или выбрать с библиотеки имеющейся в базе.
Рекомендуется использовать размер не менее 512 на 512 пикселей (px).
Загрузка изображения
- Выбираем откуда загрузим изображение с жесткого диска или ранее доступных в библиотеке
- Отмечаем необходимое
- Жмем Выбрать
Появится окно в котором настраиваем отображение, область квадратная по умолчанию. Изменить размер и нажать обрезать.
Предварительный просмотр
В предварительном просмотре WordPress установит фавикон, и покажет, как он отображается в закладках браузера. Если все хорошо, то выбираем Опубликовать.
Публикуем
WordPress загрузит и сгенерирует несколько форматов для разных систем и браузеров, в зависимости откуда пришел посетитель:
- Mac OS
- Ios
- Android
- Приложения Windows
Установить favicon на WP с помощью плагина
Единственный вменяемый плагин это «Favicon by RealFaviconGenerator» , особенность заключается в том, что он проставляет фото для всех устройств:
- Mac
- Iphone
- Android
- IOS
- Surface
Устанавливаем стандартно и переходим к работе, в панели заходим Внешний вид > Favicon. В открывшемся окошке находим «Выберите из библиотеки мультимедиа».
Выбор изображения для плагина
Откроется форма с выбором картинки, можете загрузить собственное или воспользоваться ранее сохраненными в WordPress. Не забудьте заранее оптимизировать фото под WP.
Библиотека медиафайлов
Далее нажимаем кнопку Генерировать.
Генерация
Перекинет на официальный ресурс realfavicongenerator, если изображение выбрано правильно то нажимаем синюю кнопку «Continue with this picture».
Подтверждение и продолжение процесса
Смотрим, как будет отображение на разных устройствах и браузерах, если все нормально, то перелистываем страницу вниз и нажимаем Generate your favicon and HTML code.
отображение на разных устройствах
Ждем пока сервис обработает запрос и автоматически перебросит обратно в админку WordPress. Для надежности обновляем Ctrl+F5 и любуемся на установленный значок, который корректно отображается на всех устройствах.
Проверка работы плагина
Как поменять иконку кодом
Ввиду разнообразия тем, бывает что способы описанные выше не срабатывают. Тогда прибегнем к методу, прописываем favicon напрямую в тему.
Для начала нужно установить FTP соединение и в корень, обычно папка public_html, загружаем изображение, с каким расширением решайте сами, главное чтобы он был квадратным.
favicon.png в корне сайта
Даю код, который нужно добавить в раздел head в активной теме.
Идем в админпанели Внешний вид > Редактор и выбираем файл header.php то есть заголовок, и перед закрывающим тегом /head вставляем данный код.
Правильно устанавливаем фавикон в раздел head
- Редактор тем
- Заголовок header.php
- Закрывающий тег </header>
- Код для вставки
- Обновляем файл
В примере разобран файл в формате png, но если в другом, например, jpg, то в код меняем таким образом.
Видим что изменился атрибут type он стал со значением jpg, а так же расширение картинки изменилось на другое. Обновляем и смотрим на работу кода.
Favicon в браузере
Важный момент, что большинство браузеров могут сами найти в корне сайта favicon, только необходимо чтобы он был в формате ico. Но не всегда срабатывает, потратьте 5 минут времени и установите элемент как надо. Полезно знать как вставлять шорткоды в темы. Чтобы увидеть все наглядно предлагая посмотреть мое видео.
Где хранится иконка
Задают вопросы где хранится иконка на сервере. Ответ прост, если размещали с помощью первых 2 методов, то расположение будет такое wp-content/uplouads .
папка на хостинге со всеми фото
В папках по годам, будут каталоги по месяцам, в них размещены все медиафайлы блога. Вспомните, когда производили установку и найдите объект на сервере.
Яндекс не видит значок
После внесения правок любым способом, описанных в статье, пользователи хотят наблюдать значок в выдаче поисковиков. Но Яндекс и Гугл не сразу обновят информацию, потому что это связано с индексированием ресурса. Смотрите когда у поисковых систем апдейты и следите за изменениями в выдаче.
Чтобы ускорить индексирование заносите главную страницу на переобход, это сократит время обновления базы. Так выглядит настройка в яндекс вебмастере. Время изменений в выдаче от 5 до 90 дней.
Переобход страниц в Яндексе
На этом урок закончу, потому что ответ на вопрос как установить favicon на wordpress разобран полностью, жду ваших рекомендаций в комментариях.
How to add Favicon to Your WordPress Website ?
A favicon is a little symbol that acts as your website’s identity. Its main function to make it easier for users to find your website when they have many tabs open. In other words, a favicon(favorite icon) is an icon associated with a specific web page or website that is mainly intended to be utilized when we need to bookmark a web page. Web browsers use it in the URL bar, on tabs, and other places where it helps to identify a website visually. Mobile devices can also use the favicons as application icons. Favicons perform best as simple pictures or one-to-three characters of text due to their small size. Favicons are not to be misled with logos, although they are occasionally used interchangeably. Because of its small size or resolution, the icon may need to be a smaller spanner wrench or portion of a company’s original logo.
How to include a WordPress favicon on Your Site?
We will follow the below steps to include the favicons on the site.
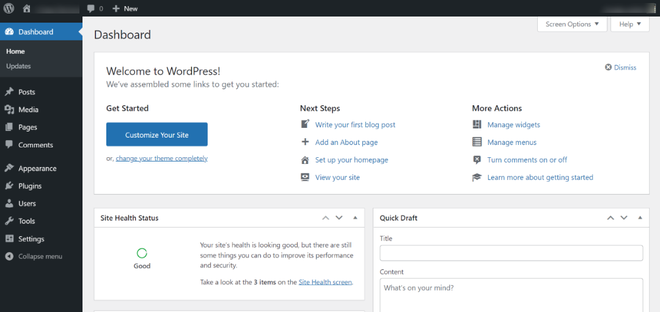
Step 1: Visit the admin area of your WordPress website.
On your WordPress site, you may wish to produce posts, install plugins, or perform other “backend” tasks from time to time. These are often accomplished using your WordPress Dashboard. This post will show you how to go to your WordPress Dashboard.
Step 2: Simply navigate to the Appearance area in the sidebar and click the modify button.
The purpose of the appearance section is to control your theme. Themes may be installed, deleted, updated, and activated from this page. Its menus enable you to customize the look and functionality of your website. Because some of the options under appearance are theme-based, portions of the appearance menu may not show to you depending on the theme.
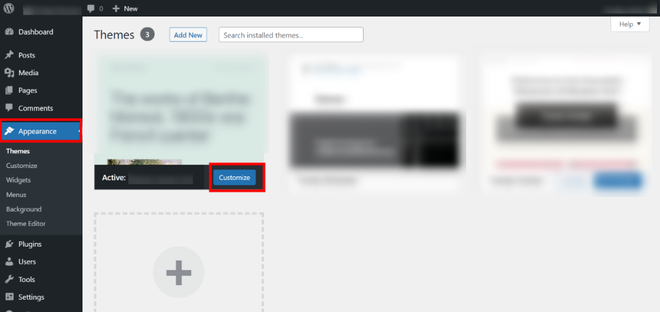
Selecting the Appearance
Step 3: From the side menu, select Site Identity.
The Site Identity option enables you to separate your business from the competition by giving users a more professional first impression. In WordPress, your website’s title, tagline, logo, and favicon are the main site identity options.
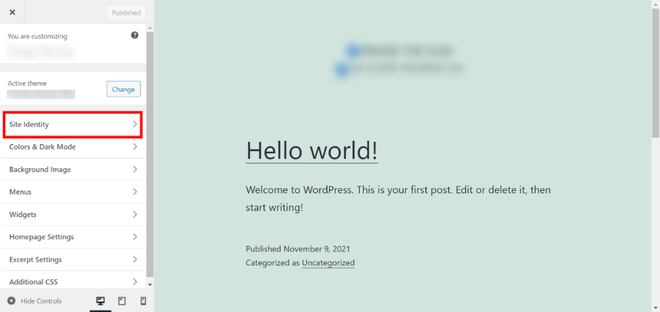
Selecting the site identity from the side menu
Step 4: Scroll down to the site icon area of the Site Identity and select “Select site icon.”
You may add, update, or remove your favicon under Site Icon. Select Image by clicking on it.
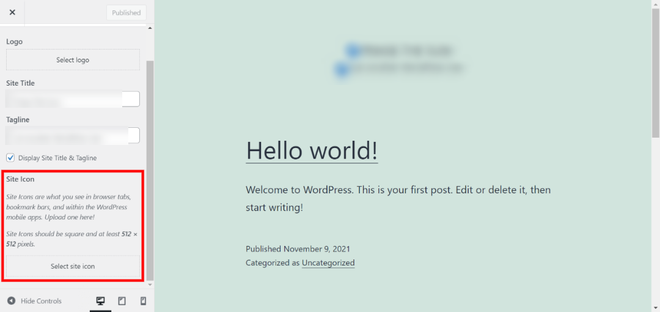
Uploading the icon
Step 5: Upload the site icon and then press the select button.
Your WordPress Media Library should now be visible on your screen. Choose the Upload Files option, then either drag and drop your favicon picture into the box or choose it from your computer.
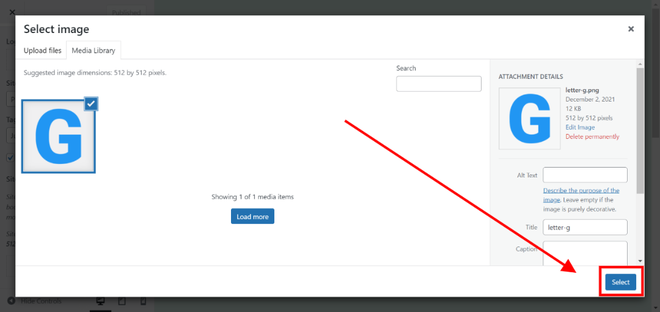
Selecting the site icon
Step 6: Press the publish button. Your Site Icon should now be visible around the internet.
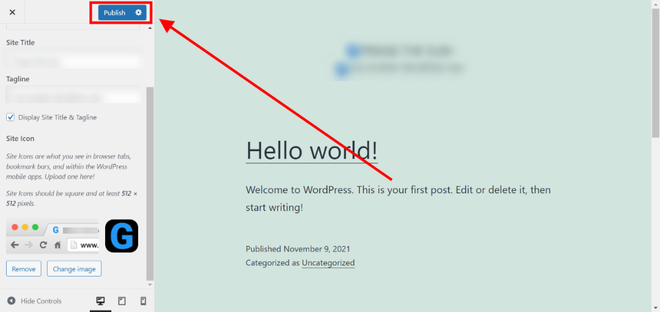
Publishing the site page
Now, you can preview your site and see how your favicon looks. You may also visit your site on a mobile device and then click “Add to home screen” from the browser menu. Your site’s symbol will be displayed on the home screen.