Center Align CSS Button
Styling and formatting are what all web developers and designers want to apply to their web pages and application to look attractive. It is up to the creator how they want to use Cascading Style Sheets and Hypertext Transfer Protocol to provide the best style for their web page and application.
Users specifically use CSS to add the best attractive look to their web pages and specify the arrangements of the page elements in a systematic order. This article will discuss how to center a button in the HTML page using CSS.
You can Center Align CSS Button using the following method:
1. By placing a text-align property of body tag to the center (text-align: center)
In this example, we are using `text-align` center property on the <body> tag, so everything inside the <body> tag will be center-aligned automatically.
.png)
1.1 By setting text-align property of parent div tag to the center (text-align: center)
In this example below, we are using `text-align` center property on <div> tag with a class ( button-container-div ) so everything inside this <div> will be center-aligned automatically.
2. Center CSS Button by using margin auto (margin: auto)
In this example, we are using the `margin` auto property. Margin auto moves the div to the center of the screen.
Output:
3. Center Button Vertically AND Horizontally
3.1: By setting the text-align property of the parent div tag to the center
We use the text-align property with the parent div tag to align the button to the center. Let us grab a look at this CSS code snippet and understand how to align the button to the center of the HTML page using CSS
In this example, we are using text-align: center property to the parent div and button position 50% from top «top: 50%;«.
Code:
Output:
In this example, we have used HTML and CSS to align the button on the web page to the center. Here, we discuss the code block in detail:
We have assigned the style information of the button using the HTML <style> tag. The text-align property of CSS aligns the inline-level content (here button) to a horizontal alignment. In this example, we used text-align: center property to the parent div and button position 50% from top «top: 50%;».
Then, we used the HTML <div> tag that acts as a container of the CSS text-align property. Lastly, we added a button on the web page using the HTML <button> tag. The web page will look like this:
3.2: By setting position property to 50% from top and bottom
We assigned only one property to the button element in the earlier example. This example will show two positions for the top and bottom. We use position property to <button> tag with left: 50% & top: 50%
Code:
Output:
Explanation:
The above example shows how to align the button in the HTML page using two position properties of the CSS element. Here, we set the position property as «fixed» and align the button to the center using two properties, namely left and top — to 50%. Finally, we used the HTML <button> tag inside the <div> tag to create the main page button.
3.3: By setting margin property to auto
In this example, we are using margin: auto CSS property to <button> tag
Code:
Output:
Explanation:
In this example, we are using margin: auto CSS property to <button> tag. This property will set the alignment of the CSS button with white spaces. The margin property creates spaces around elements, and we are assigning it to «auto.» Inside the button element of the <style> tag, we add some styles using properties like height, width, top, bottom, left, right, and position that define the button alignment. Finally, we add the HTML <button> tag inside the <div> tag to create the main page button.
4. Center CSS Button using Position fixed
In this example, we are giving a 50% margin from the left side of the page, and then we are taking the position: fixed so it will adjust the position on the center of the body.
Output:
5. By setting the display property to flex (display: flex)
In this example we are using `display` flex property, `justify-content` and `align-items` to the parent <div> tag with class (button-container-div). The button inside <div> will take place in the center of vertical and horizontal position.
- Display flex will move it to the center vertically.
- Justify-content will move the button to the center horizontally.
- Align-items center keeps it in the center; otherwise, it will start from the div and go at the bottom of the div.
Output
6. By setting the display property to the grid (display: grid)
In this example, we are using `display` grid property on the <div> tag with class ( button-container-div ). The button inside <div> will take place in the center of vertical and horizontal positions.
Output
7. Using CSS Bootstrap
In CSS Bootstrap we can use class «text-center» as given in the example
Code:
Output:
Explanation:
We will see how to use the CSS Bootstrap with the class «text-center» in this last example. Inside the <div> button, we used the <button> tag with type and class attributes. The rel attribute of the <link> tag defines the relation between the current and the linked document.
The integrity attribute allows the browser to check the fetched script, and the crossorigin attribute sets the request mode to an HTTP CORS Request.
Conclusion:
We hope this article has given a crisp idea of how to align the button in the HTML page using different approaches to CSS. We have shown alignment vertically and horizontally using text-align, margin, and position properties of the <style> tag in HTML and CSS Bootstrap.
HTML/CSS: How-to Centre Your New CTA Button

Scroll all the way to the bottom for the link to the full source code covered in this article.
Two Options to Centre Your Button
There are several ways to do this. I’m going to cover two options.
- Option 1: More, Intuitive, & Slick. Option 1 uses a DIV tag. There’s more code involved here, but IMHO (in my humble opinion) it’s more intuitive and elegant. It’s also using the slick CSS Flexible Box (flexbox). Read more on the flexbox here.
- Option 2: Minimalist, Cryptic, Oldie but a Goodie. Minimalist is nice when you want to reduce your code footprint (smaller file size). But, code reduction can/will make your code harder to read. Therefore, harder to maintain. This is a tried and trusted method. So, it can be more reliable than option 1. Ah, trade-offs. What can you do?
Centre Option 1: DIV Tags Before & After Your Button Code
Instructions
Copy and paste the first DIV before your button code. Then, copy/paste the closing DIV after your button code. See the marked-up code graphic above.
Here’s the exact code you should be adding as shown above.
<div style=”display: flex; justify-content: center;”>
Centre Option 2: Adding to Your Existing CSS
Instructions
Simply add the highlighted code above to your existing CSS for your button. I.e. copy/paste what you see here between the single quotes ‘margin: 0 auto;’. This includes the semicolon at the end.
Adding something to your existing CSS means this code must be in between the double quotes (“) that follow the style= inside your button HTML code.
Here’s the exact code again.
margin: 0 auto;
Just Want to Copy/Paste the Full Source?
The full source for this sample code is up on CodePen. Or, click on the CodPen embed below. Once you see the HTML button, click on it to view the HTML source.
Please share & enjoy!
Since You Made it This Far
You might be ready to dabble in DIY responsive buttons. Here are links to two CodePens that show two different responsive designs for this exact button.
Adding CSS to WordPress
Are you on WordPress and you want to move your CSS out of the inline HTML? Then, learn how to add CSS to WordPress here!
How to center a button element using HTML and CSS
To center an HTML <button> element, you need to add certain CSS properties that will put the button at the center of your HTML web page.
Button center horizontally with text-align
The text-align property is used to specify the horizontal alignment of text in a block element.
One trick of this property is that it can also be used to set the alignment of children elements in a parent <div> tag.
Please enable JavaScript
For example, suppose you have a <div> tag that contains two buttons. You need to add text-align to the <div> tag as follows:
The output will be as shown below:
Button center horizontally using margin auto
Alternatively, you can also set the button in the middle of the <body> tag.
Set the display property to block and add margin: 0 auto to the <button> tag as shown below:
Here’s the result:
This is useful when your button has no parent element.
How to center button horizontally and vertically
To center a <button> horizontally and vertically, you can use a combination of display , justify-content , and align-items properties.
Suppose you have a <div> as the container of the <button> element.
- Set the display property to flex or grid
- Set the justify-content property as center
Use css class to make your code tidy as follows:
Next, create another CSS class rule with the align-items property and set it to center .
Also add the display property here so that you can center vertically without the center-h class.
To see the content centered vertically, let’s add one more class to set the <div> element height to 500 :
Finally, add all the classes assigned to the CSS rule above to the containing <div> tag as follows:
The output will be as shown below:
To center the button vertically but not horizontally, remove the center-h class:
Now you’ve learned how to center a <button>
And that’s how you can center an HTML button element using CSS properties!
I’ve also written more articles on CSS tricks that you may be interested in:
CSS is very useful for styling your web page elements, but it’s quite tricky to learn what rule to write and what property to use.
The guides I’ve written will help you to understand how to style HTML elements with CSS.
Thanks for reading! ��
Take your skills to the next level ⚡️
I’m sending out an occasional email with the latest tutorials on programming, web development, and statistics. Drop your email in the box below and I’ll send new stuff straight into your inbox!
 report this ad
About
Hello! This website is dedicated to help you learn tech and data science skills with its step-by-step, beginner-friendly tutorials.
Learn statistics, JavaScript and other programming languages using clear examples written for people.
Вертикальное выравнивание текста в кнопках и элементах ввода

От автора: вы когда-нибудь боролись с вертикальным выравниванием содержимого интерактивных элементов? Вы не одиноки. Многие из сталкивались с этим. В этой статье мы рассмотрим, как центрировать содержимое кнопок и элементов ввода с помощью line-height, padding и flexbox.
Итак, какова наша цель?
Мы хотим построить систему, в которой:
содержимое кнопок и элементов ввода идеально выровнено
кнопки и элементы ввода имеют одинаковую высоту
font-size, line-height, padding и border определяют размер кнопок и полей ввода *
* Альтернативный подход — установить фиксированную высоту (например, height: 40px;) и высоту строки, равную значению высоты (например, line-height: 40px;) для всех кнопок и элементов ввода. Однако использование отступов (вместо фиксированной высоты) безопаснее, поскольку кнопка будет адаптироваться к содержимому при любых обстоятельствах.
Базовый стиль кнопок и элементов ввода
Высота и вертикальное выравнивание кнопок и элементов ввода определяется комбинацией границ, отступов, размера шрифта и высоты строки.
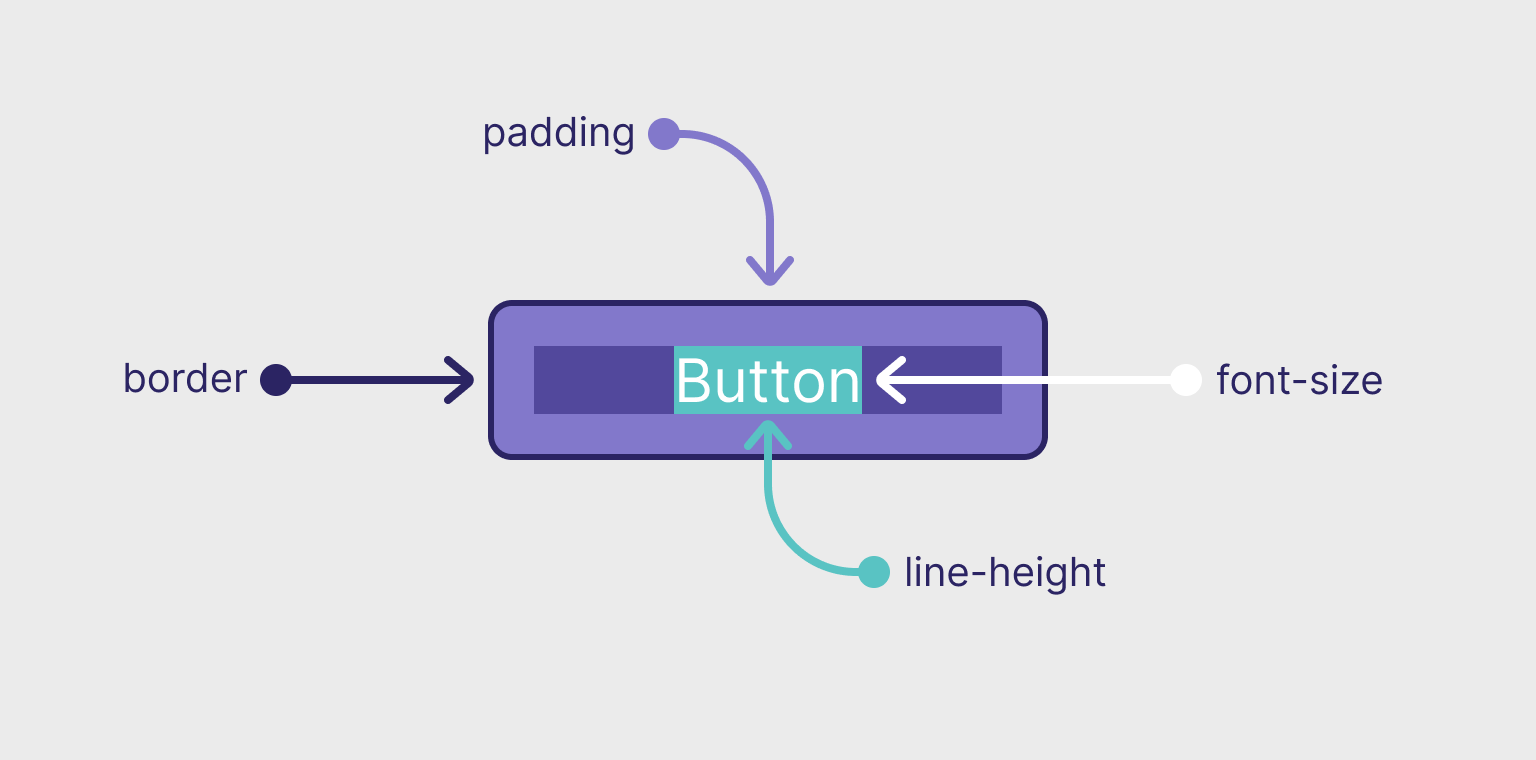
Факторы, влияющие на высоту кнопки / элемента ввода
Имея это в виду, давайте определим основной стиль кнопок и элементов ввода:
Выводы из приведенного выше фрагмента:
Мы устанавливаем отображаемое значение кнопок равным inline-flex, чтобы мы могли использовать свойства justify-content и align-items для центрирования содержимого (особенно удобно, если вы поместите иконку внутри кнопки).
Мы применяем одинаковые вертикальные отступы, размер шрифта, высоту строки и ширину границы к кнопкам и элементам ввода.
Несмотря на то, что мы не планируем добавлять видимую рамку к кнопкам, мы все равно применяем ее (с прозрачным цветом), чтобы кнопки и элементы ввода имели одинаковую высоту.
Значение высоты строки должно быть немного больше «1». Если вы используете «1», элементы ввода не примут его, и они будут выше, чем кнопки. В нашем примере мы применяем «1.2» (вы можете использовать «normal», если хотите).
Этот базовый стиль гарантирует, что кнопки и элементы ввода имеют одинаковую высоту и их содержимое выровнено по вертикали. Вы можете изменить их размер шрифта (например, установить фиксированный размер шрифта) или применить другое семейство шрифтов, и это не повлияет на выравнивание. В конце концов, мы просто смещаем контент, используя отступы и границы.
Вы также можете масштабировать их вверх / вниз, используя единицы Em.
Сделайте их красивыми
Все, что осталось сделать, это создать индивидуальную тему для кнопок и элементов ввода:
Исключения
Могут быть случаи, когда нам нужно установить фиксированную высоту для кнопок / элементов ввода, а высота строки по умолчанию нарушит выравнивание.
В таких случаях мы можем удалить вертикальный отступ и установить высоту строки равной значению высоты. Вот обходной путь, основанный на создании служебных классов высоты, которые ведут себя несколько иначе при применении к кнопкам и элементам ввода: