Toshiba Canvio Desktop External Hard Drive Disassembly
Today, I had the opportunity to pick up a 3TB version of the Toshiba Canvio Desktop Hard Drive for a good deal. My existing hard drive was running out of space and this 3TB version was the next step up. And much like my other external drives, the first thing I do after testing that it works is to take it apart and see what’s inside. In this article, I will show you the process and the hardware inside the enclosure.

Box Content
The Toshiba Canvio Desktop External Hard Dive comes in a big red box (see photo above). It’s well packed with lots of air cushion around it to prevent damage. The retail box includes the black external hard drive itself, an instruction sheet, a SuperSpeed USB 3.0 cable, and the AC adapter as shown in the photo below.

The external enclosure is made out of plastic. As shown in the photo below, there are enough rubber feet to allow it to stand up right, or sit horizontally. It’s box like shape allows you to stack multiple drives on top of each other. And there are tons of ventilation slits to cool the drive.

Connectivity
The hard drive enclosure only has two ports: 1) the SuperSpeed USB 3.0 port and the AC power port. As shown in the photo below, the AC port is 12 volts with a positive center. The SuperSpeed port is labeled with the SS logo. Not show in the photo is a single blue LED shows whether the drive is on or off.

Power
The AC adapter has the ability to supply 12 volts at 2 amps (label shown in photo below). It works with voltage all over the world. However, the version I got only has a power plug for the United States.

Disassembly
There are no screws anywhere on the case. They are not under any rubber feet, nor are they under the label. Instead, the case is snapped together with locking tabs. It’s obvious that the manufacturer didn’t intend you to open it.
Use a small flat-head screwdriver to pry between the seams on the top of the drive (see photo below). Because they are locking tabs, you will break off several, if not all, of the tabs to open the case. Apparently Toshiba had made this enclosure non-serviceable.

Inside the large plastic enclosure is the hard drive, mounted to a thin heat sink (see photo below).

The hard drive is easy to remove from the plastic case. Two screws at the bottom of the heat sink secures the drive and the SATA/USB adapter. Four additional screws on the rubber damper securely mounts the drive to the heat sink. Unscrew the screws shown in photo below to separate the hard drive from the heat sink.

SATA/USB Adapter
The following two images shows the SATA/USB adapter. It’s a small triangular adapter that can be easily secured onto a hard drive with a single screw. It can come in quite handy when you just want to use the adapter without the case.


Is the Internal Hard Drive Replaceable?
The question is whether it’s possible to replace the drive inside the case with another SATA drive. We might want to do this when the 3TB drive eventually fails. Or maybe we simply want to use the 3TB drive somewhere else and swap a different SATA drive into this case.
The answer is yes. I have swapped a 7200 RPM Seagate 1.5TB SATA drive into it. And it works just fine.
Internal Hard Drive

The 3TB 3.5″ internal hard drive is a Toshiba DT01ABA300. The following are the basic specs from the Toshiba web site:
- Up to 3TB capacity
- 6Gb/s SATA Interface
- 4kB sector size
- 5700 RPM performance
- Superb power utilization and heat emission
- Quiet acoustics
Does the Internal Hard Drive Work Without the Case?
Unfortunately, I was unable to test this possibility, because I do not have another USB adapter that support 3TB drives yet. But I don’t see why not, as long as your computer or drive connector supports 3TB drives.
Related Links
-
— Amazon User Reviews
Attach | Edit | Revisions
Related Content
Attachments
-
(650 KB) (1 MB) (1 MB) (28 KB) (687 KB) (31 KB) (30 KB) (31 KB) (35 KB) (33 KB) (28 KB)
77 Users Online
Fun for Photographers
Ремонт внешнего жесткого диска в домашних условиях (попытка восстановления работоспособности)
Если ваш внешний жесткий диск перестал отображаться при подключении, либо вообще не подает признаков жизни — не спешите его выбрасывать и списывать со счетов. Посидев 5-10 минут с отверткой — можно попытаться отремонтировать его и восстановить работоспособность. 👌
Вообще, я не занимаюсь профессионально ремонтом жестких дисков (профессионально только их нагружаю 😊), поэтому, все что описано ниже — всего лишь мой опыт и моя точка зрения.
Важно!
Руководствуясь написанным ниже — вы можете испортить диск и потерять все данные на нем. Если на диске есть важные документы — лучше отнесите в сервис-центр к специалистам.
Все что делаете далее по статье — делаете на свой страх и риск.
«Ремонт» внешнего HDD
Вообще, конечно, слово «ремонт» — в этой статье слишком громкое, но по другому не передать смысл.
Не так давно ко мне принесли один внешний жесткий диск, который отказывался работать: при подключении загоралась лампочка (свето-диод) и тут же гасла.
Далее жесткий диск никак не реагировал, пока снова не отключишь и не подключишь его к USB-порту. Диск, кстати, довольно популярная модель на сегодняшний день — Seagate Back Up Plus Slim 2 Tb BLACK.
Рис. 1. Внешний жесткий диск Seagate Back Up Plus Slim 2 Tb BLACK
Внешний жесткий диск представляет из себя небольшую коробочку с USB-проводом, внутри которой скрывается обычный жесткий диск и небольшая плата (контроллер), своего рода переходник с USB-порта к SATA входу диска.
Так вот, очень часто выходит из строя не сам диск (если вы, конечно, его не роняли) , а эта платка. Кстати, во многих моделях дисков она очень тонкая и хрупкая, повредить ее можно на раз-два.
Поэтому, прежде чем ставить «крест» на внешнем жестком диске — можно попробовать вскрыть его, достать сам диск и подключить его напрямую к ПК/ноутбуку, либо вставить в другой BOX.
Как разобрать внешний диск
Конкретно модель Seagate Back Up Plus Slim 2 Tb BLACK вскрывается очень легко — достаточно поддеть крышку ножом (см. красная стрелка на рис. 1) .
Важно!
Далеко не все модели дисков так легко разобрать. Некоторые вообще запаяны «намертво», и чтобы открыть их — нужно сломать корпус (при этом, есть большой риск убить сам HDD).
Собственно, на рис. 2 ниже 👇 изображен внешний диск, как он выглядит изнутри: небольшая плата/переходник, соединенная с обычным диском 2,5 дюйма. Ничего хитрого.
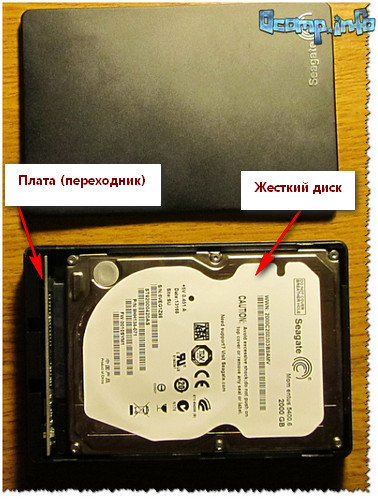
Рис. 2. Внешний жесткий диск — вид изнутри
👉 Кстати!
Нередки случаи, когда открыв корпус, вы увидите отошедшие контакты, трещину на плате и пр. дефекты — если есть опыт пайки, можно попытаться восстановить плату.
Далее нужно аккуратно отсоединить от этой платы диск и извлечь его из корпуса.
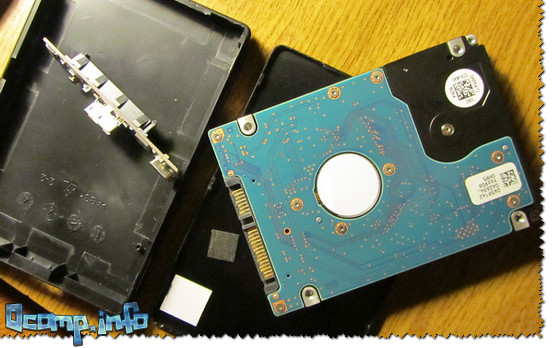
Рис. 3. Диск извлечен
Следующий шаг — подключение диска к компьютеру/ноутбуку. Здесь есть два варианта:
- либо купить отдельный BOX (👉 например, на AliExpress за пару сотен рублей) для диска и вставить его туда. Получиться такой же внешний жесткий диск, только в другом корпусе;
- либо подключить его напрямую к ПК, как любой другой диск (кстати, именно это я и рекомендую сделать (для начала 👌), чтобы удостовериться, работает ли он) .
Ниже на фото показано, как я просто «навесил» этот диск на SATA-кабеле для диагностики его работоспособности.
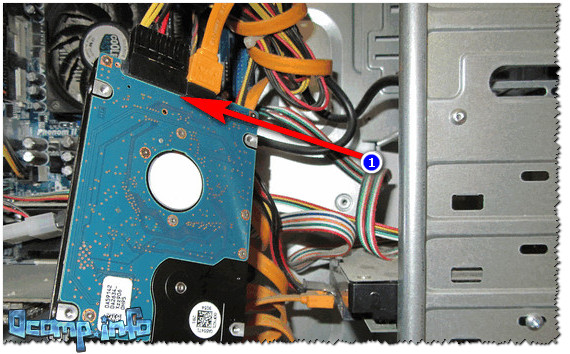
Рис. 4. Извлеченный диск подключен к ПК
Так вот, извлеченный мной диск оказался полностью исправным. Подключив его к SATA порту компьютера — смог с него скопировать всю информацию. В общем-то, докупив внешний BOX — он до сих пор служит верой и правдой.
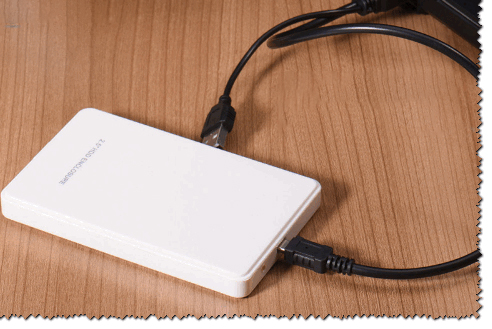
Рис. 5. Внешний контейнер (BOX) для диска — выглядит так же, как будто таким и был внешний HDD изначально
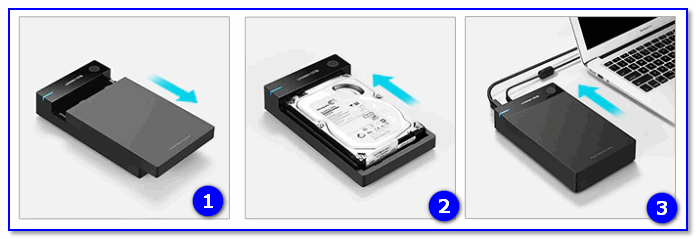
Рис. 5.1. Что такое BOX. BOX для подключения диска к USB (примерная схема для понимания)
Мотив статьи такой: прежде чем выкинуть свой старый нерабочий внешний HDD, проверьте сам диск, возможно и вы сможете его так просто и быстро «отремонтировать». ☝
How to: Disassemble Toshiba Canvio Desk (3Tb) External Hard Drive
Since I published an article concerning the Toshiba Canvio Desk 3Tb External Hard Drive, many visitors to the site had arrived looking for instructions to disassemble the drive. The product itself is very well priced – and in some countries, disassembling such a drive may be the only way to get storage at the best price, while getting the best performance out of the drive.
Please remember – you do anything at your own risk. Further to this, by disassembling the drive, you will void all warranties.
The drive itself is manufactured quite solidly, and is a completely screw-less plastic shell design. The way to get it open is not obvious, however, any attempt to open it will damage the casing permanently.
Begin by identifying the bottom rear of the drive where the grille is the widest.

You will need a relatively stiff, thin and wide tool to insert into the casing to separate the halves. In my case, I repurposed an I/O rear cover, but a knife or a metal ruler could be just as adequate.

You will need to insert the spudger where I’ve indicated and move it towards the power/USB connector, where the shell will separate enough for you to tear it apart with your hands.

Unfortunately, you will damage the clips, so being able to reuse this case may be limited to one or two openings at most – but you could always glue/tape it back together if you wanted.

The drive itself is as I reported earlier.

The drive itself is shielded by a metal EMI shielding cover which is attached with rubber-grommeted screws on the side. You must undo these four screws.

There are also two screws on the underside which must be undone to release the shield.

You can then remove the SATA to USB 3.0 bridge, which has a minimized triangular footprint! Wow! That’s the smallest I’ve ever seen it!

The chip used on this bridge is a VLI VL701 USB 3.0 to SATA II Bridge Controller. The PCB is marked with PI-539 V1.3 dated 11th May 2012 and the PCB is made by Shenzhen Sun and Lynn Circuits Co. Ltd.

I hope this has helped you achieve happiness, if opening a Toshiba Canvio Desk was your quest. As a side note, Google has now encrypted all search terms, so I won’t be able to read your mind the next time …
Addendum: Reader Question on SMART Values
At the request of Dave, here are the SMART dump values for the three 3Tb drives I have shucked from my cases, and one last one that’s still inside of its enclosure. Note that I have set CrystalDiskInfo to report in base 10 [DEC] rather than 16 [HEX] – you can change this by going to Function, Advanced Feature, Raw Values and toggling the base value there.


The value of concern in the comment was attribute 02, labelled Throughput Performance. All of my values are hovering about 80-84 for raw value, with a SMART value of 144. As far as I can tell, you should really be concerned if the current or worst figures are below the threshold of 54 (the level the manufacturer deems “critical”). However, if you’re experiencing slow reads or writes, it may indicate drive difficulty in which case you are advised to back up your data ASAP.
Note that the values themselves may vary depending on your drive model and the way the firmware interprets the values. The value of 0 for raw or SMART value is suspicious and would trigger a warning, and may deserve an RMA erring on the side of caution. If it’s slow or making unusual noises – send it back. I have noted in the past that some drives may start getting “unexpected” or unusual SMART values due to firmware problems or many improper power-downs as well.
Like it? Share it!
Related
About lui_gough
57 Responses to How to: Disassemble Toshiba Canvio Desk (3Tb) External Hard Drive
Hi! Love your blog, haven’t had a reason to comment yet but here goes.
I recently bought some Hitachi 4TB USB3 external drives because they were (much) cheaper than buying the bare drives.
Unbeknownst to me the bridge board only supports advanced format disks so I’m wondering whether the VLI controllers on your drive’s bridge board might have the same limitation.
You do raise an interesting and rather “complicated” point which I might have to devote an entire blog post to once I confirm what’s happening. It’s rather technical – I apologize in advance if it’s a bit difficult to follow.
I will try to summarize, but it seems that the bridge chips that *are* capable of 2+Tb (i.e. they break the 2.1Tb barrier) are often “switched” to present the drive as 4k “native” sector size so that the drives can be (strangely) partitioned in MBR so that 3+Tb drives attached to Windows XP machines (which don’t understand GPT) via USB3.0 still operate properly. This works because the number of blocks in the drive doesn’t exceed the 32-bit size limit when you represent each block as 4k in size rather than 512 bytes.
The hard drives themselves are 4k “internally” but present 512e (i.e. 512 byte emulated sectors), so the Advanced Format drives are (at a low level) pretty much identical. They have specific information flags which can tell the OS they “prefer” transfers aligned and sized to 4k, but will still process 512 byte accesses just with some performance penalty. There are no drives which present native 4k sectors to the OS directly without 512e, at least, to my knowledge on the consumer market. Despite the drives themselves having information that signals to the OS what its “real” self is (i.e. 4k native, 512e), the bridge chips do not pass these commands – so instead, the OS relies on what the bridge chip reports (which will be 4k native).
The *magic* is really happening at the bridge chip level where some translation is happening, thus I believe that drives which are *not* AF and are used in computers directly (and partitioned with LBAs of 512 bytes) may have trouble when transferred to bridge chips which do the sector-lumping translation as the block numbers no longer align as each block is 8 times bigger than before and vice-versa. There may even be a slight funny-thing going on with sector slipping as normally, MBR does start the first partition at sector 63 (which isn’t going to be aligned with a straight mapping). This was one of the big issues with migrating to AF drives back in the “XP” days. I’m really only speculating with the sector slipping, but I’ve seen the sector size reporting as native 4k with my own eyes. The effects of this I will need to confirm by experiment. It does, however, bear strong relations to when we had capacity barriers which we had to break – especially in the days of 528Mb – 8.4Gb barriers where CHS translation was the way (i.e. swapping numbers between cylinders, heads, sectors to make a geometry which fits into the limitations).
The fun seems to happen in the bridge chip’s programming – many of these options can be set in the EEPROM but the utilities to do so are restricted to factory distribution, and may be password protected too. I know because I’ve seen the utility for the Asmedia chips which have the option, and no doubt other bridge chips might as well. Maybe if you could obtain the appropriate EEPROM utility, you can upgrade the firmware, and change the compatibility flags (amongst other things, like the VID, PID, and friendly name strings).
Another issue I have come across in certain bridge chips is timing compatibility issues, where replacing drives with others leads to unreliable detection of the drive, and thus it didn’t work at all. This happened with an Initio chipset when combined with a certain SSD, but I’m sure edge cases may pop up from time to time despite the well-meaning standards which do their best to maintain interoperability.
I would usually not recommend people to buy encased drives with any intention of “reusing” the bridge chip except for in an emergency – but if there are problems with the bridge chip, I agree, you really need to know before you need to use it and find it doesn’t work! After all, some also use the friendly name to “hide” the true device name of the drive which is placed within the case, just one of the “features” which you expect to see if you do these kinds of things.
I’ll do my best to explore and investigate – I’ve got several different bridge chipsets and some AF and some pre-AF drives, so I’ll see what my digging turns up :).
This also works for opening the 2tb model DWC120. It’s the exact same setup. Thanks!
Thanks for letting us know! I’m sure it will come in handy for someone else :).
Ho usato questo post per aprire il toshiba stor.e canvio, (voglio usare il suo capiente disco in un NAS che ho appena comprato.
E’ un pò difficoltoso da aprire il tutto, ma poi è possibile riusare facilmente il case di plastica della toshiba, mettendo dentro un diverso HD
grazie
I used this post to open the Toshiba Canvio STOR.E, (I want to use his capacious disk into a NAS that I just bought.
It ‘sa bit difficult to open the whole thing, but then you can easily reuse the plastic houses of toshiba, putting in a different HD
thanks
I got much help from “How to: Disassemble Toshiba Canvio Desk (3Tb) External Hard Drive”
Thanks a lot…….:)
Nasim, Dhaka, Bangladesh.
[E-mail removed to avoid spam]
thank’s for the information.
I’ve bought a refurbished Toshiba Stor.E Canvio 3,5 3TB USB 3.0 and it has a weird SMART value on ID 02 Throughput Performance with Crystal Disk Info 5_0_0.
My 2TB Canvio has a value of 0. I would be pleased if you could add a screen shot of the SMART values from your drive.
I’ve dumped the SMART data from my four 3Tb Canvio Desks of which three were removed from their enclosure, with the final one still in its enclosure. The results have been added to the end of this post. I hope you find the information useful.
Thanks for the neat review ….
Bought two brand new Toshiba stor.e canvio 3 TB HDWC130EW3J1 both have failed in less than a week 1st one straight out of the box with bad sector count going sky high and the 2nd a few days later with a failing usb 3 board not being able to be recognised .So very unhappy do not recommend Toshiba at all i understand one drive may have a problem but both and there customer support is slow unresponsive and its also hard to find the right info re RMA warranty service ect…All in all a bad experience
You must have been unlucky. I’ve heard of a few batches with early failures, it’s likely due to poor handling or shipping problems.
I have EIGHT drives, all have lasted at least 9 months of active use with 0 bad sectors on any of them. All drives healthy, alive and mostly filled with data. Likewise, the experience of Backblaze in their recent article on hard drive reliability places Hitachi in a favourable position. We know that Toshiba inherited and continued to produce Hitachi designs in the same facilities under this particular branding, especially due to the physical shape, labelling and product name still being Hitachi, and as such, I’ve expected these drives to be reliable.
Everybody gets unlucky from time to time – I’ve heard issues with drives of every brand, replacement deaths etc. Stay away if you must, but I can say it’s definitely not an issue for me.
Thanks for the response Gough
I totally agree re the reliability of Hitachi drives this is the reason i got these i have always been happy with all Hitachi’s i bought in the past so yes you are right i must just be darn unlucky…Its just very frustrating being down 6TB’s at a time when i most need it for data sorting …..
I am also looking into trying to open these without damaging the case i know its near impossible but surly there is a way to do so as i do not want to throw away the warranty that’s all….
Peeps are buying externals much cheaper than the oem counterpart bare drive and pulling the drive out thinking there saving money which they are but most do not realize there throwing there warranty away so in turn do not gain really
I will let you know my progress of opening one up unhurt and crying
Yeah, I’d probably get my drives *from somewhere else* to try and avoid what is likely to be a batch of drive that might have “fallen off a forklift”. Removing the case is definitely a void warranty, and there’s really not much you can do to hide it. The plastic tabs break easily, and the gouge marks are apparent.
The funny thing is that they don’t realize that if they buy the “bare drive” – they can often get the 7200rpm version for the same price as the 5940rpm versions that are in the case. At least, that’s been the case in Australia where the drives are gaining a little popularity as the cheapest, best performing 3Tb drive on the market at the moment.
Hitachi have had their bad spell back in the early 2000’s with their “Deathstar” fiasco when they changed over to glass platters and “pixie dust” fine magnetic coating. The coating would wear off the disks and cause crashes, bad sectors, noise and loss of data. Others had click-of-death due to lost NVRAM data and or bad heads. Every brand has it’s own series of issues, some Maxtor Diamondmax series drives have cost my friends plenty too.
The safest way is always to back-up if you can afford it, or keep close eyes on the SMART data and performance of the drive (speed, sound) which you seem to be doing.
I couldn’t agree more, all hard disks are prone to dying so it’s important to backup your data. I always put an extra drive in my machines for such a purpose and back up really important stuff to multiple machines. If you’re really paranoid you store a copy off-site so a disaster like fire or flood isn’t a problem.
I used to see a lot of dead disks when I was working in IT support. Whilst brand and model of disk can influence how many and how often disks fail, the truth is any disk can stop functioning.
External disks sometimes don’t have the highest quality Hard disks a manufacter offers. For instance the green economical drives are common in western digital externals. So I only use them typically for low-speed or backup drives and only really when portability is a huge concern.
1st i will take it back saying stay clear of a brand as it can happen to any so maybe i was being a little biased regarding this but you have to understand its very frustrating having to RMA waiting and then be unsure if you end up with a repaired defective drive again which i will not be happy about …been back and forth in the past with Seagate think it was between 5 or 6 rma’s of the same drive in the end they sent a new one and that’s still running today
BUT i can not stress how important it is the have multiple backups of your most important data ..data that CAN NOT be replaced is a must on multi backup..and as these 2 3tb where intended for that role the positive way of looking at this is that its better for them to both fail now then say they both fail a few months on and lose all the precious data ..so even though its a pain in the backside having to rma ect i can be rest assured i have not lost any important data..touch wood
So i sent off both of the faulty 3tb ext drives back to Toshiba but must admit that finding out about how to RMA return ect with Toshiba hard drives is very scarce hard to find ect….
But once done and filled out the relevant info they send you an email requesting that they must be sent to there hard drive centre which is based in Germany as i am in the UK….
They supply you with a tel & ref number to ring which is UPS… so i arranged this and gave them the reference number easy done booked they pick up and re post the replacement and this is with no extra cost which is great….
So i received a package yesterday from Toshiba thinking it would be a refurbished or repaired unit i was amazed to find it was a complete new sealed replacement….and is on test as i type all looking good so far …..I am just waiting now on my 2nd replacement drive to come back….the whole process sending and getting back took around 10 days and was all with no cost so all in all very happy with Toshiba…… Even though i had two die on me it happens i suppose…just wish Toshiba made it easier for peeps to find the return info …
It’s a bit of a shame to see quite a few people having trouble with their Toshiba branded drives, although, it does sound like you had a decent RMA experience once you tracked them down. I have yet to RMA a Toshiba from AU, although my experiences of RMAing WD and Seagate have cost me a significant proportion of the drive cost in postage fees (needless to say, if the drive is a little old, I won’t bother doing that again!).
As for drive testing, I hope you like using the command prompt in Linux. Most of the commands will need to be done as a superuser as you will be accessing block devices directly. If you make any mistakes, you can totally destroy the data on any attached device – my advice (for beginners) is to use a spare system with ONLY the drive you want to test on it. You may find most Linux live-CDs to have the tools needed for the job (maybe even Ubuntu install CD’s Live CD mode does too, although I won’t guarantee it).
Step 1 is to identify where your “target” device you want to test is. You might be able to find it if you execute dmesg right after plugging it in – it might be sdb, sdc, etc. (if you have an internal hard disk, it might be hda or sda – multiple disks will then follow down). Don’t guess! Find out by looking carefully at it. Alternatively, you can try fdisk -l which will list all drives and partition tables – you will probably be able to tell which drive is your target by the size and the partitioning.
Step 2 is to fill the drive with random data. Easily done with the dd command. You need to execute something like dd if=/dev/random of=/dev/sd* bs=32M where * is replaced with the correct letter corresponding to the device you want filled. It will look like nothing’s happening for a long time, as dd doesn’t print output as it goes. If you want updates, in a new console window you will have to find the process number for that dd instance (by using ps -A) and then executing watch -n 1 kill -USR1 * where * is the process ID number. This will cause it to print a status update each second, although you would probably like to kill (CRTL+C) the console window with watch running, once dd has completed.
Step 3 is to take the MD5 of the whole drive as a single block device. Easily done by executing md5sum /dev/sd* where * is the letter corresponding to the drive you wish to test. Unfortunately, this won’t print the progress, so you might want to just make a short .sh script with this command typed in three times – you should see three lines of identical output consisting of the sum, followed by a tab, and the device name. If they are all identical, you have just proven that you have filled the drive completely (unpartitionable sector slack area and all) with random data, read it back three times, and the results were the same all three times. This normally is enough for me to “certify” that the drive is sufficiently healthy to go into service.
Step 4 is a prudent one as well – check the SMART health of the drive. Unfortunately, if it’s over USB, I find Linux to be inconsistent – doing it under Windows using CrystalDiskInfo is often a better way. In CrystalDiskInfo, if you have “just attached the drive” before opening the program, you will have to choose to rescan drives to see the SMART data. Note that some USB chipsets do not support passing SMART commands, so in that case, you’ll either have to go blind or put the drive into a supported internal port. For those which are bare drives, directly attached to the controller, you can often use smartctl -A /dev/sd* to get a printout of the attribute and raw value table. I hope you already know how to interpret these – if not, please do some research online (as I’ve explained this too often over the years).
If you don’t want to use Linux, there’s a few options. You could use DBAN (Darik’s Boot and Nuke) which is a bootable “mini” Linux disc already set up for data destruction and sanitation purposes. It’s capable of doing a random fill and (to my knowledge) once-over verify, which could be enough for you.
Under Windows, because of the lack of ease of working with block devices directly, my preferred route is to use WinHex. This software is not free, and can be quite expensive if you’re not using it for other purposes (data recovery, forensics, etc.). You will need to ensure you have the right edition for your needs (at this point, you should just use Linux …). It’s also a bit slower than Linux (likely due to non-optimized routines), but you can achieve the same thing by using the Open Disk command, then Fill Disk Sectors with Random for 1 pass. Then you can Select All, then choose Compute Hash, then MD5. Repeat the Compute Hash, then MD5 command twice more to get three MD5 results.
If you don’t get the same result every time, and receive say, one “bad” one, check to make sure that you have no viruses or rogue programs in your test-bed (anything that can “accidentally” write to the disk and alter it during a test). If that has been eliminated, what you may be finding are transient flaws in the compatibility of the USB bridge chip with your USB controller, or the USB bridge chip with the Hard Drive, or the Hard Drive with your internal controller (the latter being least likely, as most internal controllers are now quite decent). This may be driver related (so maybe there’s a bug in Linux if you’re using that) or maybe the hardware itself has timing issues. I discovered the reason behind random file-system corruption on a 2.5″ Pocket HDD I owned was down to the ITE Bridge Chip in use that would randomly mangle one sector in every 60Gb of writes or thereabouts. Needless to say, once I changed the bridge chip (by moving the drive to a new enclosure), the problem disappeared.
So the value in testing is beyond just testing the hardware, it also tests it under some stress to ensure there’s a good level of compatibility.
Toshiba Canvio Basics USB 3.0 2.5" — внешний накопитель на 2TB (модель HDTB320YK3CA)

Давно уже фотографии и рабочие проекты не помещаются в память ноутбука. Назрел вопрос о расширении в виде внешней памяти — переносного жесткого диска с USB3.0. А поиск в оффлайновых магазинах ввергал в уныние. Подвернулся купон в магазине Cafago.com, в итоге диск был приобретен с выходной стоимостью относительно местных цен. Сейчас действует другой купон, скидка также хорошая, получается на $20 примерно дешевле. 
Итак, диск Toshiba Canvio является одним из неплохих по качеству, а низкая стоимость делает его лидером в своей ценовой категории. За рубежом такое называют cost-effective, то есть имеющим высокий показатель цена-качество. Комплектация Basics говорит о том, что наворотов типа алюминиевого корпуса или wi-fi у него нет. Чехла в комплекте также нет
Диск идет с интерфейсом USB3.0 и кабелем. Забегая вперед скажу, что интерфейс USB3.0 реализован в контроллере нативно, без всяких адаптеров или переходников. Далее на фото можно будет это увидеть.
Сразу хочу отметить, что нужен был не дорогой, но качественный диск. то есть не Qumo, не Трансенд, ни прочие А-даты, которые покупают OEM диски у производителей. Я искал жесткий диск производителей WD, Seagate, Toshiba и подобные.
Характеристики:
Модель: Toshiba Canvio HDTB320YK3CA
Интерфейс: USB 3.0 (совместимый с USB 2.0)
Количество оборотов диска: 5400RPM
Cache: 8MB
Средняя скорость записи: 107. 130 МB/s
Средняя скорость чтения: 110. 135 МB/s
Максимальная пропускная способность шины данных:
5,0 Гбит
Средняя скорость передачи данных:
130 МБайт
Корпус: пластиковый корпус с защитой от ударов
Цвет: черный матовый
Емкость: 2TB (есть версия на 1 ТВ)
Файловая система: NTFS (MS Windows) *
Потребление по шине USB: не более 900 мА
Гарантия: на диск действует официальная гарантия TOSHIBA сроком 2 года.
Габаритные размеры: 119 x 79 x 15 (мм)
Масса: 230 г
Системные Требования: Процессор Windows® 10 / Windows 8.1 / Windows 8 / Windows® 7 с частотой 750 МГц
или выше, 10 МБ системного пространства на жестком диске, 256 МБ системной памяти,
один свободный порт USB 3.0 или USB 2.0
* Привод можно переформатировать в файловую систему HFS для полной совместимости с Mac или EXT для Linux
Комплект поставки:
Жесткий диск Тошиба Canvio,
кабель USB 3.0 (micro-B),
Краткое руководство пользователя,
Руководство пользователя (предварительно установленное на жестком диске),
Гарантийный листок
Итак, перейдем к обзору покупки.
Посылка в пакете, с с пупыркой, ничего не обычного 
Вес посылки 320 гр 
Внутри retail-упаковка с жестким диском. 
На задней стороне упаковки присутствует полезная информация 
На нижнем торце есть штрих-код, партнамбер и серийный номер накопителя 
Распечатываем и осматриваем накопитель. Он продается в прозрачном блистере, внутри есть еще кабель и краткое руководство 
На фото представлен весь комплект поставки. Дополнительно на самом диске записано расширенное руководство пользователя. 
Обратите внимание на фирменную голограмму «Toshiba» на упаковке 
Собственно говоря сам накопитель Toshiba Canvio 
Внешний вид жесткого диска. На нижней стороне присутствуют резиновые «ножки», которые не дают ему скользить по столу 
Диск представляет собой черный матовый бокс в классическом формфакторе для 2.5" жестких дисков. Это коробочка размерами примерно 120мм х 80 мм х 15 мм.
При работе диск практически не нагревается, шума исходящего от него почти не слышно, даже наверное совсем не слышно. На диске имеется индикатор активности.
Дизайн минималистический: на верхней панели присутствует рельефная надпись Тошиба, 


На нижней части информационная наклейка. 
С переднего торца диска присутствует гнездо micro USB 3.0 для подключения интерфейсного кабеля 
Длина кабеля из комплекта примерно 45 см (с разъемами) 
В разъеме фиксируется хорошо, не болтается 

Кабель выглядит достаточно качественно. 
Вид со стороны штекера USB 3.0 
Со стороны micro USB 3.0. При желании можно подключать к USB 2.0 обычным кабелем USB-micro USB, из минусов — будет ограничена скорость передачи данных, да и «шнурок» нужен такой, который передает без потерь 1А для питания диска.

Для подключения подойдет USB 3.0/3.1 или USB 2.0 порт, отличий нет, только скорость будет отличаться в зависимости от интерфейса 
При обращении к накопителю индикатор активности загорается (моргает) 
Теперь небольшая информация о диске
Скриншот свойств из проводника. Проводник показывает 1.81 в пересчете на терабайты (то есть с округлением). 
Скриншот из Диспетчера устройств 
А вот так называется накопитель при безопасном отключении 
И ряд основных тестов.
Общая информация из программы CrystalMark Info. Обратите внимание на счетчик включения выключения и циклы загрузки/выгрузки. Диск абсолютно новый, я первый, кто начал им пользоваться 
Далее SSD-Z 
Теперь проведем тест копирования проводником файлов большого размера (c HDD на HDD). В самом начале кеш выручает и скорость более 160 MB/с, затем скорость падает до 130 MB/с 
Бенчмарк ATTO это подтверждает (скорость чтения/записи около 135 МБ/с) 
AS SSD показывает результаты чуть меньше (
125 МБ/с) 
Бенчмарк CrystalMark с различным размером блоков. Особенность HDD — низкая скорость случайного доступа, здесь SSD имеют преимущество перед HDD 
Aida disk бенчмарк 
Тест на скорость линейного доступа Aida делался около 6 часов 
Особенность HDD — постепенное падение скорости доступа при чтении от начала к концу секторов
Итак, тесты подтвердили высокую скорость передачи данных по USB 3.0. Для HDD это вообще отличный результат.
Вскрытие бокса
Открывается без отвертки, если что ниже будет информация, как его разобрать 
Внимание, защелки можно очень легко повредить 
Обратите внимание на демпфирующие вставки и резины и пористого материала… 
… они защищают жесткий диск от внешних воздействий 
Вынимаем жесткий диск из бокса. Аккуратнее с USB гнездом, его нужно извлечь из корпуса движением вверх и назад 
Внешний накопитель Toshiba Canvio реализован на жестком диске Toshiba MQ03UBB200 объемом 2 ТБ. 
На диске указана следующая информация:
Toshiba disk drive MQ03UBB200 2TB
ревизия AZA AA00/JP050U
Параметры питания: 5В, 1.0А
Дата изготовления: 14.04.2016
Изготовлено в Филлипинах.

Диск имеет достаточно большую толщину, в ноубтук он не влезет, да и ни к чему это 
«Фишка» этого диска — это то, что он сразу спроектирован для питания и связи по шине USB. То есть 5В и в него нет переходника, интерфейс реализован на плате контроллера. Справа от разъема видно светодиод активности диска 
Еще раз обращаю внимание, что диск подключается напрямую в USB и нет возможности установить его в SATA.
Итог покупки.
Это весьма бюджетный качественный внешний накопитель от известного бренда Toshiba, большого объема (2ТБ) и имеющий встроенный контроллер USB3.0 интерфейса. Итоговое соотношение цена-качество очень высокое. Диск показывает высокие скорости записи и чтения, что в купе с надежностью делает его хорошим решением для бекапа данных. А «карманный» размер и питание по USB шине без переходников — удобным для повседневного переноса файлов.
Из положительных качеств накопителя выделю следующие:
— Высокая скорость передачи данных;
— Интерфейс USB 3.0;
— Компактный и легкий корпус;
— Качественная сборка
— Индикатор активности диска
— Отлиное соотношение цена-качество
— Наличие порта USB B micro и возможность использовать обычный кабель USB-microUSB
Минусы диска:
— отсутствие чехла в комплекте
— отсутствие возможности подключить жесткий диск к SATA
Вот чуть было не купил, пока не увидел данный диск в магазине 
В итоге разница по купону вышла около 800 рублей, что весьма неплохо
Диск брал за свои, с купоном на скидку. Без купона цена не очень интересная.
Вот два купона на покупку Toshiba Canvio Basics
"ALC2870" для версии 1TB, стоимость $56.99
"ALC2872" для версии 2TB, стоимость $94.99