Create your first Java application
In this tutorial, you will learn how to create, run, and package a simple Java application that prints Hello World! to the system output. Along the way, you will get familiar with IntelliJ IDEA features for boosting your productivity as a developer: coding assistance and supplementary tools.
Prepare a project
Create a new Java project
In IntelliJ IDEA, a project helps you organize your source code, tests, libraries that you use, build instructions, and your personal settings in a single unit.
Launch IntelliJ IDEA.
If the Welcome screen opens, click New Project .
Otherwise, from the main menu, select File | New Project .
In the New Project wizard, select New Project from the list on the left.
Name the project (for example HelloWorld ) and change the default location if necessary.
We’re not going to work with version control systems in this tutorial, so leave the Create Git repository option disabled.
Make sure that Java is selected in Language , and IntelliJ is selected in Build system .
To develop Java applications in IntelliJ IDEA, you need the Java SDK ( JDK ).
If the necessary JDK is already defined in IntelliJ IDEA, select it from the JDK list.
If the JDK is installed on your computer, but not defined in the IDE, select Add JDK and specify the path to the JDK home directory (for example, /Library/Java/JavaVirtualMachines/jdk-20.0.1.jdk ).

If you don’t have the necessary JDK on your computer, select Download JDK . In the next dialog, specify the JDK vendor (for example, OpenJDK), version, change the installation path if required, and click Download .
Leave the Add sample code option disabled as we’re going to do everything from scratch in this tutorial. Click Create .
After that, the IDE will create and load the new project for you.
Create a package and a class
Packages are used for grouping together classes that belong to the same category or provide similar functionality, for structuring and organizing large applications with hundreds of classes.
In the Project tool window, right-click the src folder, select New (or press Alt+Insert ), and then select Java Class .
In the Name field, type com.example.helloworld.HelloWorld and click OK .
IntelliJ IDEA creates the com.example.helloworld package and the HelloWorld class.
Together with the file, IntelliJ IDEA has automatically generated some contents for your class. In this case, the IDE has inserted the package statement and the class declaration.
This is done by means of file templates. Depending on the type of the file that you create, the IDE inserts initial code and formatting that is expected to be in all files of that type. For more information on how to use and configure templates, refer to File templates.
The Project tool window Alt+1 displays the structure of your application and helps you browse the project.
In Java, there’s a naming convention that you should follow when you name packages and classes.
Write the code
Add the main() method using live templates
Place the caret at the class declaration string after the opening bracket < and press Shift+Enter .
In contrast to Enter , Shift+Enter starts a new line without breaking the current one.
Type main and select the template that inserts the main() method declaration.
As you type, IntelliJ IDEA suggests various constructs that can be used in the current context. You can see the list of available live templates using Control+J .
Live templates are code snippets that you can insert into your code. main is one of such snippets. Usually, live templates contain blocks of code that you use most often. Using them can save you some time as you don’t have to type the same code over and over again.
For more information on where to find predefined live templates and how to create your own, refer to Live templates.
Call the println() method using code completion
After the main() method declaration, IntelliJ IDEA automatically places the caret at the next line. Let’s call a method that prints some text to the standard system output.
Type Sy and select the System class from the list of code completion suggestions (it’s from the standard java.lang package).
Press Control+. to insert the selection with a trailing period.
Type o , select out , and press Control+. again.
Type p , select the println(String x) method, and press Enter .
IntelliJ IDEA shows you the types of parameters that can be used in the current context. This information is for your reference.
Type " . The second quotation mark is inserted automatically, and the caret is placed between the quotation marks. Type Hello World!
Basic code completion analyzes the context around the current caret position and provides suggestions as you type. You can open the completion list manually by pressing Control+Space .
For information on different completion modes, refer to Code completion.
Call the println() method using a live template
You can call the println() method much quicker using the sout live template.
After the main() method declaration, IntelliJ IDEA automatically places the caret at the next line. Let’s call a method that prints some text to the standard system output.
Type sout and press Enter .
Type " . The second quotation mark is inserted automatically, and the caret is placed between the quotation marks. Type Hello World! .
Build and run the application
Valid Java classes can be compiled into bytecode. You can compile and run classes with the main() method right from the editor using the green arrow icon in the gutter.
Click in the gutter and select Run ‘HelloWorld.main()’ in the popup. The IDE starts compiling your code.
When the compilation is complete, the Run tool window opens at the bottom of the screen.
The first line shows the command that IntelliJ IDEA used to run the compiled class. The second line shows the program output: Hello World! . And the last line shows the exit code 0 , which indicates that it exited successfully.
If your code is not correct, and the IDE can’t compile it, the Run tool window will display the corresponding exit code.
When you click Run , IntelliJ IDEA creates a special run configuration that performs a series of actions. First, it builds your application. On this stage, javac compiles your source code into JVM bytecode.
Once javac finishes compilation, it places the compiled bytecode to the out directory, which is highlighted with yellow in the Project tool window.
After that, the JVM runs the bytecode.
Automatically created run configurations are temporary, but you can modify and save them.
If you want to reopen the Run tool window, press Alt+4 .
IntelliJ IDEA automatically analyzes the file that is currently opened in the editor and searches for different types of problems: from syntax errors to typos. The Inspections widget in the top-right corner of the editor allows you to quickly see all the detected problems and look at each problem in detail. For more information, refer to Current file.
Package the application in a JAR
When the code is ready, you can package your application in a Java archive (JAR) so that you can share it with other developers. A built Java archive is called an artifact .
Create an artifact configuration for the JAR
From the main menu, select File | Project Structure ( Control+Alt+Shift+S ) and click Artifacts .
Click , point to JAR and select From modules with dependencies .
To the right of the Main Class field, click and select HelloWorld (com.example.helloworld) in the dialog that opens.
IntelliJ IDEA creates the artifact configuration and shows its settings in the right-hand part of the Project Structure dialog.
Click Apply to save the changes and close the dialog.
Build the JAR artifact
From the main menu, select Build | Build Artifacts .
Point to HelloWorld:jar and select Build .

If you now look at the out/artifacts folder, you’ll find your JAR there.
Run the packaged application
To make sure that the JAR artifact is created correctly, you can run it.
Use Find Action Control+Shift+A to search for actions and settings across the entire IDE.
Create a run configuration for the packaged application
To run a Java application packaged in a JAR, IntelliJ IDEA allows you to create a dedicated run configuration.
Press Control+Shift+A , find and run the Edit Configurations action.
In the Run/Debug Configurations dialog, click and select JAR Application .
Name the new configuration: HelloWorldJar .
In the Path to JAR field, click and specify the path to the JAR file on your computer.
Scroll down the dialog and under Before launch , click , select Build Artifacts | HelloWorld:jar .
Doing this means that the HelloWorld.jar is built automatically every time you execute this run configuration.
Run configurations allow you to define how you want to run your application, with which arguments and options. You can have multiple run configurations for the same application, each with its own settings.
Execute the run configuration
On the toolbar, select the HelloWorldJar configuration and click to the right of the run configuration selector. Alternatively, press Shift+F10 if you prefer shortcuts.
As before, the Run tool window opens and shows you the application output.
The process has exited successfully, which means that the application is packaged correctly.
Как создать проект в intellij idea java

В прошлой теме мы рассмотрели, как создавать первую программу с последующим ее запуском в командной строке. Однако в реальности, как правило, крупные программы разрабатываются не при помощи простого текстового редактора, а с использованием таких средств как IDE или интегрированные среды разработки, которые упрощают и ускоряют написание кода и создание приложений. На данный момент одной из самых популярных сред разработки для Java является IntelliJ IDEA от компании JetBrains. Рассмотрим, как использовать данную среду.
Прежде всего загрузим установочный дистрибутив с официального сайта https://www.jetbrains.com/idea/download. По этому адресу можно найти пакеты для Windows, MacOS, Linux. Кроме того, сама среда доступна в двух версиях — Ultimate (платная с триальным бесплатным периодом) и Community (бесплатная). В данном случае выберем бесплатную версию Community .
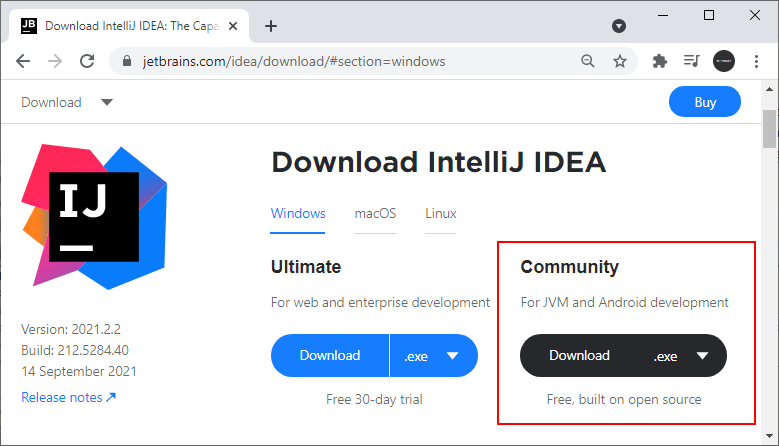
Конечно, Community-версия не имеет ряда многих возможностей, которые доступны в Ultimate-версии (в частности, в Community недоступны опции для веб-приложений на Java). Но Community-версия тоже довольно функциональна и тоже позволяет делать довольно много, в том числе приложения на JavaFX и Android.
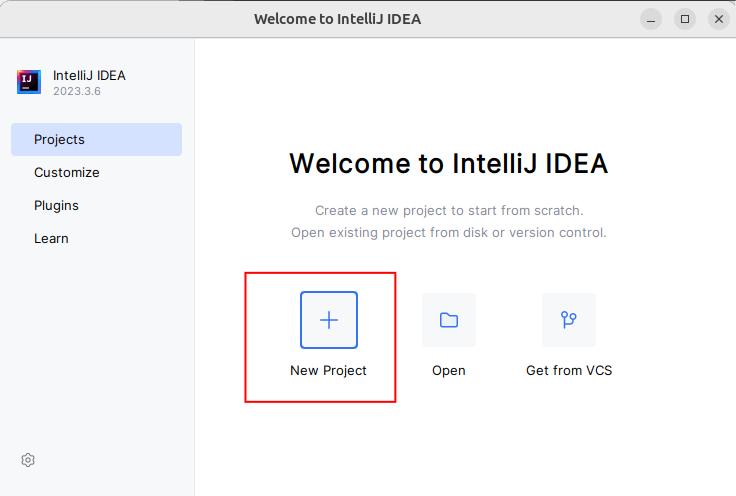
После установки запустим IntelliJ IDEA и создадим первый проект. Для этого на стартовом экране выберем New Project :
Далее откроется окно создания проекта. В левой части в качестве типа проекта выберем Java.
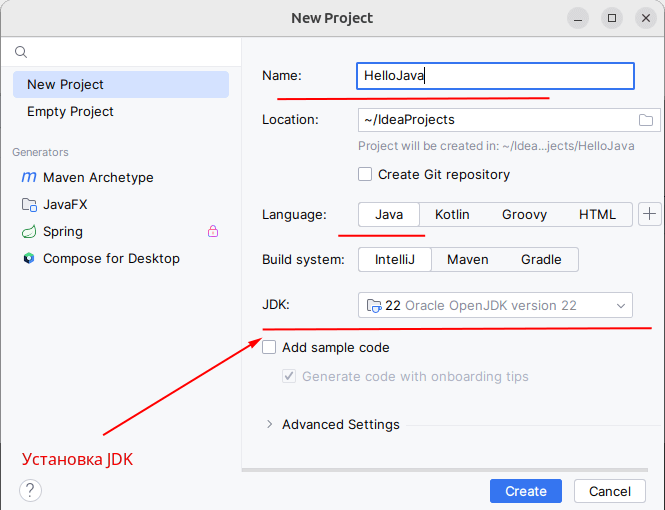
В поле Name укажем имя проекта. В моем случае проект будет называться HelloApp.
В поле Location можно указать путь к проекту, если не устраивает путь по умолчанию.
Поскольку мы будем работать с языком Java, в поле Language выберем пункт Java
Кроме того, в поле JDK можно указать путь к Java SDK, который будет использоваться в проекте. Как правило, это поле по умолчанию уже содержит путь к JDK, который установлен на локальном компьютере. Если это поле пусто, то его надо установить.
После этого нажмем на кнопку Create. После этого среда создаст и откроет проект.
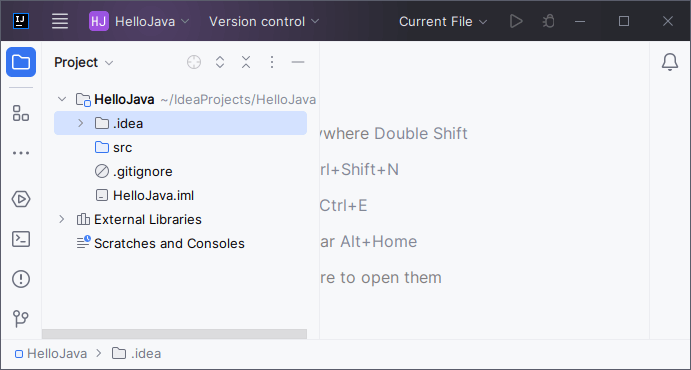
В левой части мы можем увидеть структуру проекта. Все файлы с исходным кодом помещаются в папку src . По умолчанию эта папка пуста, никаких файлов кода у нас в проекте пока нет. Поэтому добавим файл с исходным кодом. Для этого нажмем на папку src правой кнопкой мыши и в контекстном меню выберем пункт New -> Java Class :
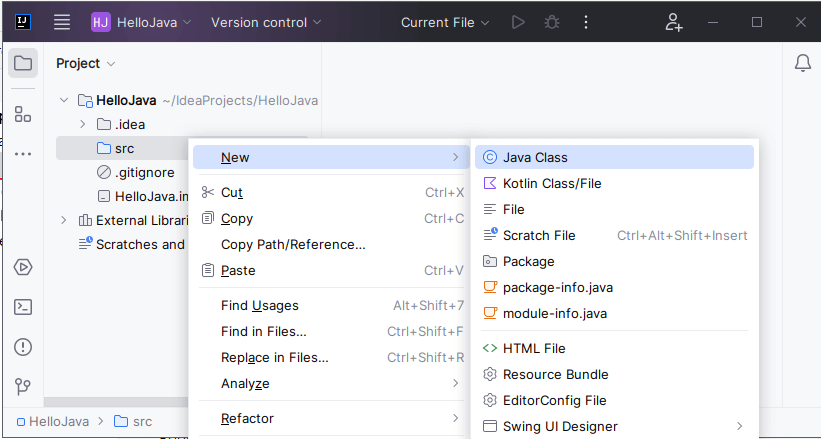
После этого нам откроется небольшое окошко, в которое надо ввести имя класса. Пусть класс будет называться Program :
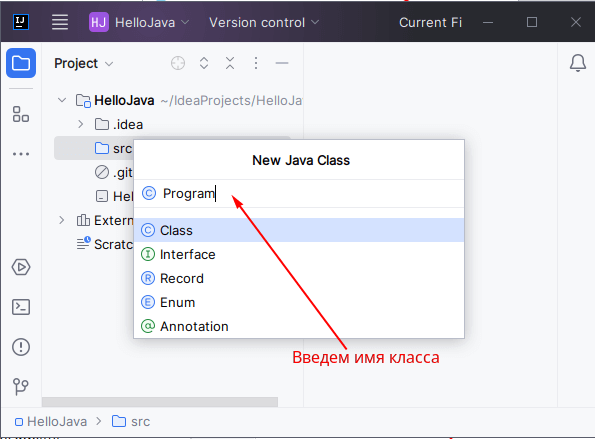
После нажатия на клавишу Enter в папку src будет добавлен новый файл с классом java (в случае выше класс Program). А в центральной части откроется его содержимое — собственно исходный код:
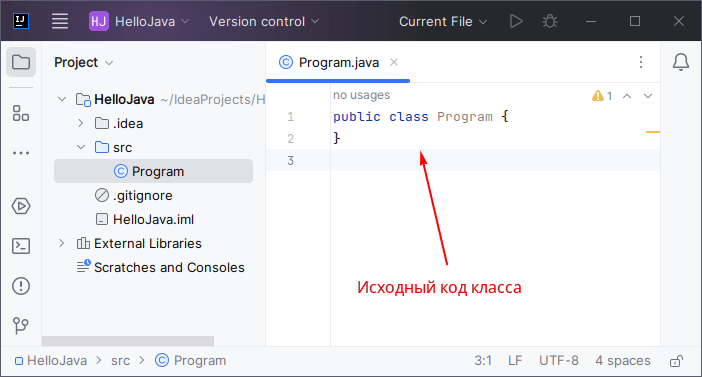
Изменим код класса следующим образом:
С помощью зеленой стрелки на панели инструментов или через меню Run -> Run. запустим проект.
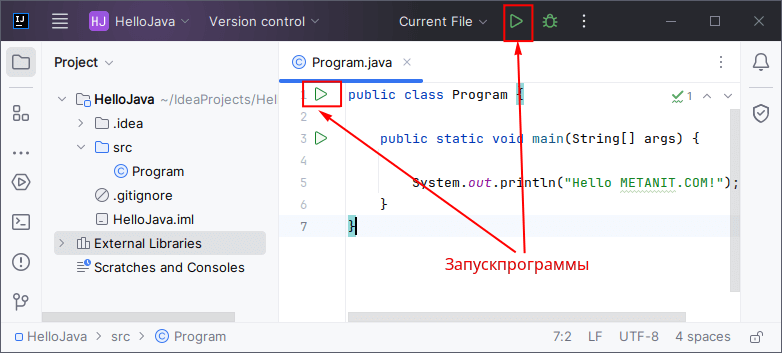
И внизу IntelliJ IDEA отобразится окно вывода, где мы можем увидеть результат работы нашей программы.
Write Hello World in Java Using Intellij and Maven

Learn how to code Hello World in Java using IntelliJ and Maven.
1. Introduction
This blog will teach you how to create a Hello World application using a Maven archetype in Java using IntelliJ IDE.
2. Requirements
You must have the following installed on your local machine.
- OpenJDK 11
- Maven
- IntelliJ community edition
3. Creating a new Java project from a Maven archetype
3.1 Creating the project
Open IntelliJ and you should be greeted with IntelliJ’s Welcome screen.
If this is your first time running IntelliJ then the projects’ panel should be empty.
Click New Project and select Maven. In the right panel, click “Create from archetype” and find and select “maven-archetype-quickstart”.
*archetype is a project template that automatically includes dependencies depending on the purpose of the project. The particular template that we have selected includes JUnit dependency.
*You can search for dependency signature from https://mvnrepository.com.
In the next screen, you must enter the project’s artifact coordinates:
In this case, our project name is hello-intellij-training, normally you should use the same for artifact id.
GroupId: must be something unique to your organization, here we are using this blog’s domain name. Doesn’t really need to be a domain name nor must it exists as an active URL. But this is the standard.
Click Next and a project summary should be presented.
Click Finish. Give it some time to download the archetype and initialize your project.
This is how our project should look like. Notice that it’s using Java 1.7 (<maven.compiler.source>1.7</maven.compiler.source>) by default? We should replace it with 11.
3.2 Setting the correct Java version in IDE
Before we could print our hello world message, we should first configure the Java version for the project.
Select hello-intellij-training in the Project’s panel and click File in the top menu, select Project Structure.
There are two things to check here related to Java.
3.2.1 Under Project Structure / Project Settings / Project, left panel Project SDK select 11. If the dropdown is empty click Edit and finds the directory where you installed OpenJdk 11.
3.2.2 This time open, Project Structure / Project Settings / Module and select hello-intellij-training. In this case, we only have one module. But if you are working on a multi-project then you should have several entries here. In the rightmost panel, under Sources / Language level, select 11. This is the common source of compilation issues. Always make sure that you are compiling and running on the same version of Java.
Now we are ready to print our very first hello world message.
4. Printing our Hello World message
By default, the archetype should already make available an App class that prints the hello world message. Let’s change it to “Hello IntelliJ!”.
5. Running the application
Let’s build the application first.
In the right panel, toggle Maven, expand hello-intellij-training / Lifecycle. Right-click on install and select Run Maven Build.
This should build our project. Whenever you have revisions on your project select install. If you remove some files run “clean” first followed by install.
Another approach to building the module is by using IntelliJ’s builder.
You can right-click on the module, and select Build Module hello-intellij-training.
You can also do the same using the main navigation. Build project or module.
By default IntelliJ uses ant, to delegate the building process using Maven we need to do the following.
In the main menu, select File / Settings.
Expand Build, Execution, Deployment / Build Tools / Maven and select Runner. In the right panel, click Delegate IDE build/run actions to Maven. Click Ok.
Now try building the module again and in the Build log, you should see maven logs.
There are several ways to run the maven application.
5.1 In your App class, there should be a green arrow in the gutter, click it and it should show a popup where you can either select Run or Debug.
You could also, put the cursor in the class and press the Run shortcut Ctrl + Shift + F10.
The Run panel should show at the bottom.
5.2 If you run 5.1 first, then you should see App in the top right run configuration. Otherwise, it should be empty.
From here, you can click the dropdown (whether you have App or not).
If you already run the App class, it should look like this:
But in some cases, you might want to create a Run Configuration from a template. For example, Spring Boot.
In the Run/Debug Configurations panel, click the plus icon and select Add New Configuration.
You should be presented with a list of IntelliJ’s supported Run/Debug configuration templates.
Создание проекта в IntelliJ IDEA


IntelliJ IDEA и аналогичные ей среды разработки — одни из первых инструментов, которые нужно освоить начинающему программисту. В этом материале рассмотрим установку и настройку ПО, а также порядок создания проекта в IntelliJ IDEA.
Что такое IntelliJ IDEA
| Чтобы посмотреть, как все устроено, нужно иметь аккаунт на JavaRush — онлайн-курсе по изучению программирования на Java с акцентом на практику: 1200+ задач с моментальной проверкой, мини-проекты, задачи-игры, сотни лекций по основам Java. |

Хоть IntelliJ IDEA известна как среда разработки для Java, в ней из коробки поддерживаются несколько языков программирования. Кроме того, IntelliJ IDEA интегрирована с рядом современных фреймворков. В данную среду разработки встроены все популярные системы контроля версий и системы сборки приложения. В IDEA реализована поддержка многих серверов приложений. Начиная с шестой версии, IntelliJ IDEA предоставляет интегрированный инструментарий для разработки графического пользовательского интерфейса. У этой среды разработки есть мощные аналитические возможности. Благодаря им эта IDE на лету подсказывает разработчику лучшие варианты кода в текущем контексте. IDEA располагает набором инструментов для рефакторинга существующего кода и быстрого написания шаблонных конструкций.
Условия использования IntelliJ IDEA
- Community Edition
- Ultimate Edition
- JavaScript
- TypeScript
- SQL
- CSS, LESS, Sass, Stylus
- CoffeeScript
- ActionScript
- XSL, XPath
- Ruby, JRuby (через плагин)
- PHP (через плагин)
- Go (через плагин)
- Java
- Groovy
- Kotlin
- Scala (через плагин)
- Python, Jython (через плагин)
- Dart (через плагин)
- Erlang (через плагин)
- XML, JSON, YAML
- AsciiDoc, Markdown (через плагины)
- Spring (Spring MVC, Spring Boot, Spring Integration, Spring Security and others)
- Java EE (JSF, JAX-RS, CDI, JPA, etc)
- Grails
- GWT, Vaadin
- Play (через плагин)
- Thymeleaf, Freemarker, Velocity, Tapestry
- Struts, AspectJ, JBoss Seam, OSGI
- React
- AngularJS (через плагин)
- Node.js (через плагин)
- Apache Flex, Adobe AIR
- Rails, Ruby Motion (через плагин)
- Django, Flask, Pyramid (через плагин)
- Drupal, WordPress, Laravel (через плагин)
- Android (включает функциональность Android Studio)
- Swing (incl. UI Designer)
- JavaFX
- Team Foundation Server
- Perforce
- Git, GitHub
- Subversion
- Mercurial
- CVS
- Tomcat
- TomEE
- Google App Engine and other clouds (через плагины)
- GlassFish
- JBoss, WildFly
- WebLogic
- WebSphere, Liberty
- Geronimo
- Resin
- Jetty
- Virgo
- Kubernetes (через плагин)
- Docker, Docker Compose
- NPM (через плагин)
- Webpack
- Gulp
- Grunt
- Maven
- Gradle
- SBT
- Ant
- Gant
- Ivy (через плагин)
- Database Tools
- Diagrams (UML, Dependencies, и т.д.)
- Dependency Structure Matrix
- Detecting Duplicates
- Settings synchronization via JetBrains Account
- REST Client
- Darcula (темная тема)
- Debugger
- Decompiler
- Bytecode Viewer
- Unit Tests Runner (JUnit, TestNG, Spock; Cucumber, ScalaTest, spec2, etc)
- Интеграция с баг-трекинговыми системами (YouTrack, JIRA, GitHub, TFS, Lighthouse, Pivotal Tracker, Redmine, Trac, и т.д)
- Поддержка 24/7
- Баг-трекинговая система и форумы
Преимущества InteliJ IDEA
Данная IDE помогает максимизировать эффективность разработчика. Забота об эргономике среды разработки прослеживается в каждом аспекте. Интерфейс среды спроектирован так, что большую часть времени разработчик видит только редактор кода:  Кнопки, активирующие дополнительные инструменты, расположены на боковых и нижней панелях экрана. Каждый инструмент можно быстро отобразить или скрыть:
  В IntelliJ IDEA практически каждое действие можно выполнить через определенное сочетание клавиш. Разработчик может сам назначать новые и менять старые сочетания клавиш для частых действий. В интерфейсе IntelliJ IDEA в каждой древовидной структуре, списке или всплывающем окне, будь это дерево проекта или же окно настроек среды разработки, есть навигация и поиск. Достаточно сфокусироваться на нужном месте и начать вводить искомый текст:
  IntelliJ IDEA удобна при написании кода и его отладке. Дебаггер IDEA показывает значения переменных прямо в коде. И каждый раз, когда переменная изменяет свое значение, она подсвечивается дебаггером:
  В среде разработки есть несколько тем оформления. По умолчанию доступны две темы — светлая и темная. Начиная с версии 2019.1, темы оформления можно кастомизировать и загружать новые через плагин:


Инструменты для работы с кодом в IntelliJ IDEA
- Поиск класса по имени
- Поиск файла или директории по имени
- Поиск по проекту
- Поиск по модулю
- Поиск по директории
- Поиск по области, среди:
- файлов проекта
- тестовых файлов проекта
- открытых файлов
- недавно просмотренных файлов
- недавно измененных файлов
- и т. д.
Недостатки среды разработки
Создание проекта в IntelliJ IDEA
Чтобы создать проект, необходимо нажать в меню File -> New -> Project…
 Далее, в открывшемся окне, нужно выбрать тип проекта. IntelliJ IDEA поддерживает несколько — выбираем Maven в левом боковом меню. В пункте Project SDK выбираем предустановленную версию JDK и нажимаем кнопку Next.
  В следующем окне нужно определить GroupId и ArtifactId для нашего Maven проекта. В поле Version оставим значение по умолчанию — 1.0-SNAPSHOT.
  В следующем окне нам останется определить имя проекта и его расположение в файловой системе. В нашем случае подойдут значения, которые предложила IntelliJ IDEA:
  Все готово — наш проект создан.