Make older apps or programs compatible with Windows
Most apps (and other programs, like games or utilities) that were created for earlier versions of Windows will work in the most recent versions of Windows 10 and Windows 11, but some older ones might run poorly or not at all. Here are some ways to fix common issues with older programs.
To check which version and build of Windows you’re running, in the search box on the taskbar, enter winver and then select Enter.
If you have printer or scanner problems after a Windows upgrade or update, see Fix printer connection and printing problems in Windows.
If you have Bluetooth problems after a Windows upgrade or update, see Fix Bluetooth problems in Windows.
Try running the compatibility troubleshooter:
In the search box on the taskbar, type Run programs made for previous versions of Windows and select it in the results.
Select Next, select the program you’re having trouble with, then select Next again.
Select Troubleshoot program (or you can select Try recommended settings to try that).
Select the problem you’re having and follow the process.
First, try running the compatibility troubleshooter:
In the search box on the taskbar, type the name of the program or app you want to troubleshoot.
Select and hold (or right-click) it, and then select Open file location .
Select and hold (or right-click) the program file, select Properties, and then select the Compatibility tab.
Select Run compatibility troubleshooter.
If that didn’t work, you can try adjusting the settings Compatibility tab. Here’s what to look for and what each setting does when it’s selected.
Run this program in compatibility mode for
Runs the program using settings from an earlier version of Windows. Try this setting if you know the program is designed for (or worked with) a specific version of Windows.
Reduced color mode
Uses a limited set of colors in the program. Some older programs are designed to use fewer colors.
Run in 640 × 480 screen resolution
Try this setting if the graphics for the program appear jagged or are rendered incorrectly.
Change high DPI settings
If your program isn’t displayed correctly on a PC with a high-DPI display (its features are blurry or are too big or too small), select Change high DPI settings, and then try one of these options in the Properties dialog box:
Choose which DPI to use
In the Program DPI section, select Use this setting to fix scaling problems for this program instead of the one in Settings to use the DPI settings you want to use for this program.
Note: This changes the DPI only for the app you’re adjusting. If you want to adjust this for all apps, select Start > Settings > System > Display > Advanced scaling settings and follow the instructions.
For more info about changing the setting for all apps, see Fix apps that appear blurry.
For Use the DPI that’s set for my main display when, select one of the following:
I signed in to Windows Use the DPI that was set for your main display when you signed in to Windows. This is the default setting.
I open this program – Use the DPI that was set for your main display at the time you open the specific program.
Change the application’s high-DPI scaling mode
In the High DPI scaling override area, select Override high DPI scaling behavior, and then try one of the following options:
Application – Disable all Windows scaling settings and only use the app developer’s setting. This option was called Disable display scaling on high DPI settings in previous versions of Windows.
System – Overrides the program’s DPI settings and makes it run like it would on a low-DPI display. On a high-DPI display, this will make the program appear blurry.
System (Enhanced) – Windows will try to use enhanced DPI scaling for this program. As a result, some programs will display with crisp text on high-DPI displays. This won’t work for all programs.
Run this program as an administrator
Some programs require administrator permissions to run correctly. Sign in to your PC as an administrator to use this option.
Change settings for all users
Apply the settings for that program to all accounts on the PC, and select  Change settings for all users. You might be prompted for an admin password or to confirm your choice.
Решение проблем с запуском старых игр в Windows 11
Существуют специальные библиотеки с файлами, которые необходимы для функционирования компонентов приложений и их взаимодействия с системными объектами в Windows 11. Большинство старых игр нуждаются в таких библиотеках, однако по умолчанию в последней версии операционной системы они отсутствуют, поскольку считаются устаревшими. По большей части это относится к DirectX, поэтому далее речь пойдет непосредственно о данном компоненте.
Отметим, что речь пойдет именно об установке прежних версий DirectX, ведь в Windows 11 по умолчанию уже установлены последние файлы библиотеки. Однако имеющиеся по умолчанию DLL и файлы других форматов никак не связаны со старыми играми и не влияют на их запуск. Тогда и приходит на помощь установка старых компонентов (2005-2009 годов релиза).
Вариант 1: Поиск установщика в каталоге с игрой
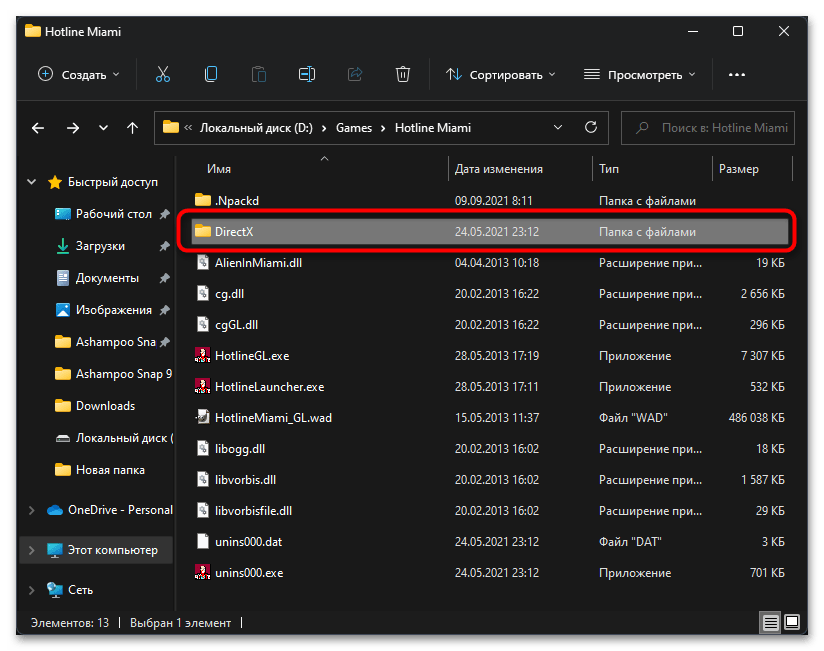
Часто вместе с основными файлами игры в комплекте идут и дополнительные библиотеки, установка которых как раз и необходима для запуска. Нужный инсталлятор может находиться как в установщике, так уже и в корне папки с игрой после ее добавления на компьютер. Вам понадобится ознакомиться с содержимым и отыскать те объекты, которые могут оказаться полезными.
-
Если игра уже установлена, откройте ее корневой каталог и ознакомьтесь с папками. В нашем примере имеется каталог «DirectX», который и нужен для установки недостающих компонентов. В вашем случае папка может находиться в установщике.
Вариант 2: Установка DirectX End-User Runtimes
Существует отдельный набор компонентов DirectX, который позволяет установить на компьютер сразу все версии файлов даже из самых старых библиотек. Его можно скачать с официального сайта, поэтому такой вариант будет оптимален для тех пользователей, кто не нашел установщика в каталоге со старой игрой, проблема с запуском которой наблюдаются в Windows 11.
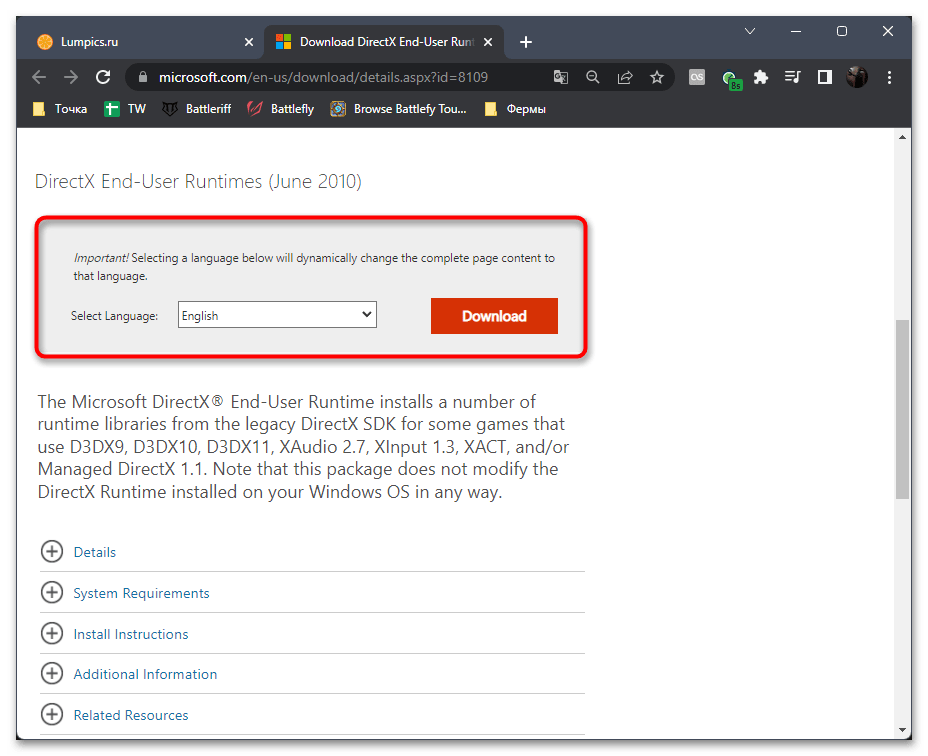
- Перейдите по ссылке выше для открытия соответствующей страницы сайта. На ней выберите предпочитаемый язык и нажмите кнопку «Download».
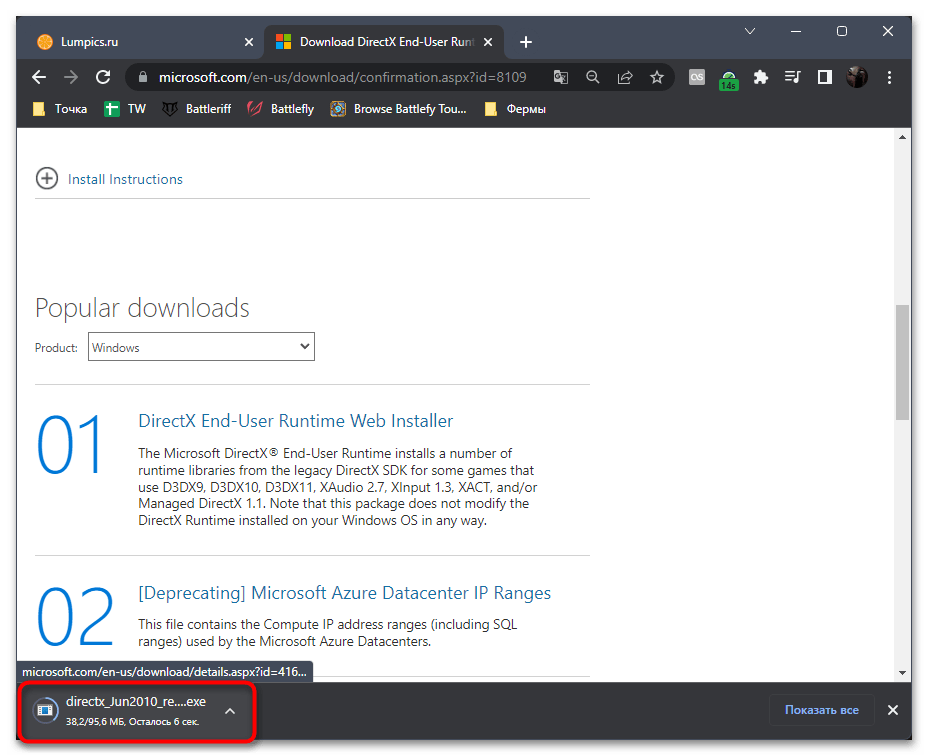
- Страница перезагрузится, и скачивание исполняемого файла начнется автоматически. По завершении запустите этот компонент прямо через браузер или каталог, куда он был загружен.
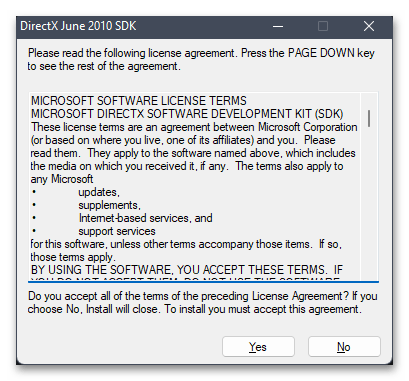
- В новом окне нажмите «Yes», подтверждая тем самым условия использования.
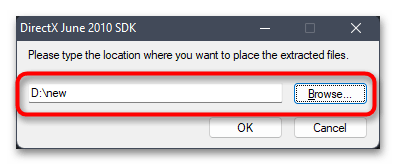
- Теперь понадобится выбрать любую папку на вашем компьютере, куда будут распакованы архивы с компонентами библиотеки. Обязательно запомните этот путь, поскольку дальше понадобится перейти к нему.
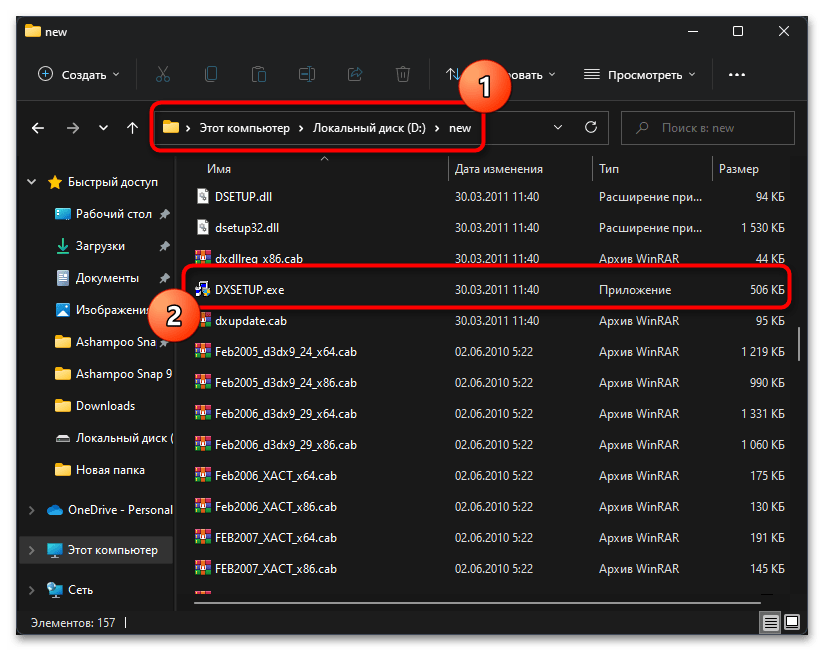
- Ожидайте окончания распаковки, перейдите по указанному ранее пути и найдите в каталоге файл «DXSETUP». Щелкните по нему дважды левой кнопкой мыши для запуска.
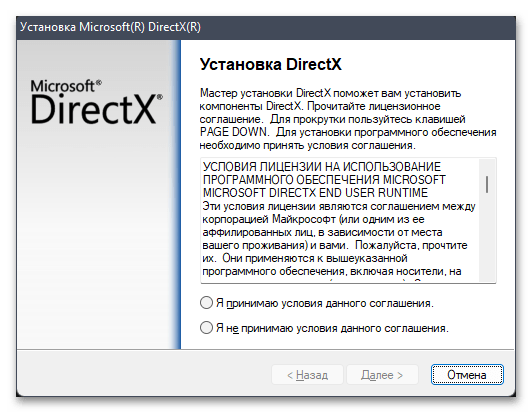
- После появления установщика подтвердите условия использования и переходите далее. Ожидайте конца установки и следите за тем, какие уведомления будут показаны в окне во время этого процесса. Компьютер перезагружать не обязательно, поэтому можете просто закрыть текущее окно и перейти к проверке работоспособности старой игры.
Способ 2: Включение режима совместимости
В Windows 11, как и во многих предыдущих версиях данного семейства операционных систем, есть встроенная функция, позволяющая активировать режим совместимости для любой программы или игры. Это позволяет использовать параметры запуска, подходящие под конкретную, более старую версию ОС. Данная функция иногда оказывается полезной и действительно решает проблемы с открытием старых игр.
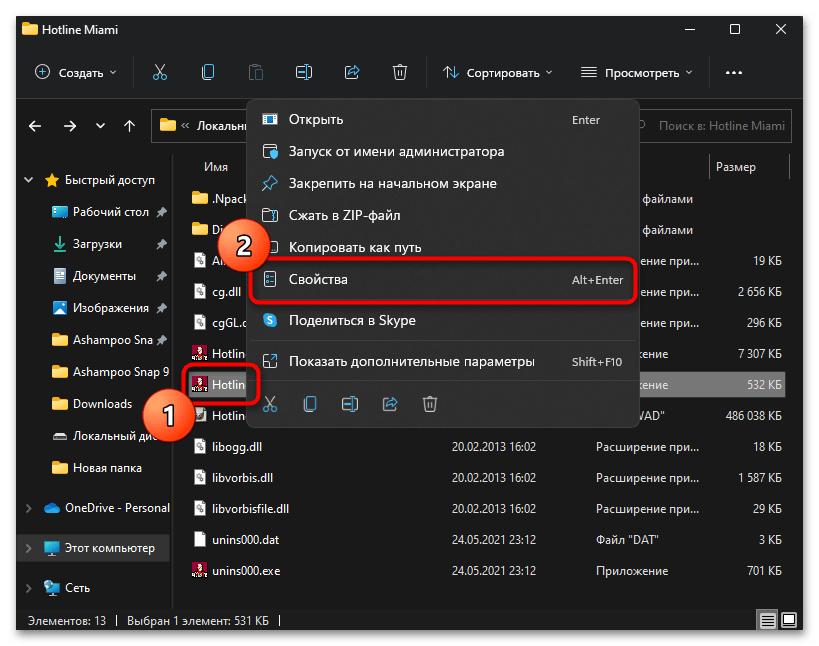
- Для ее активации понадобится сначала отыскать исполняемый файл игры, затем кликнуть по нему правой кнопкой мыши и из контекстного меню выбрать пункт «Свойства».
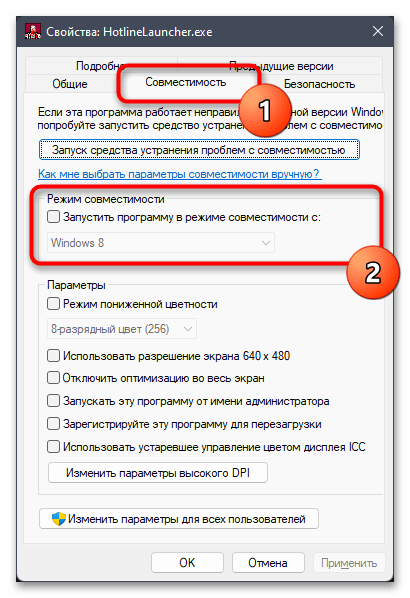
- После запуска нового окна перейдите на вкладку «Совместимость» и поставьте галочку возле пункта «Запустить программу в режиме совместимости с:».
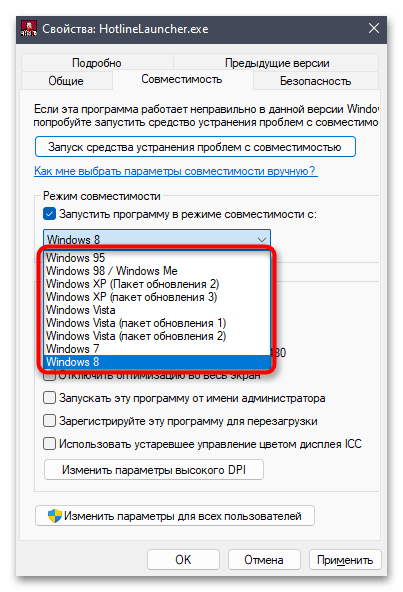
- Теперь понадобится развернуть меню снизу от данного пункта и выбрать Windows, в которой старая игра точно запускалась. Если не уверены по поводу этого параметра, то можете изменить его несколько раз, тестируя запуск в режиме совместимости с разными ОС.
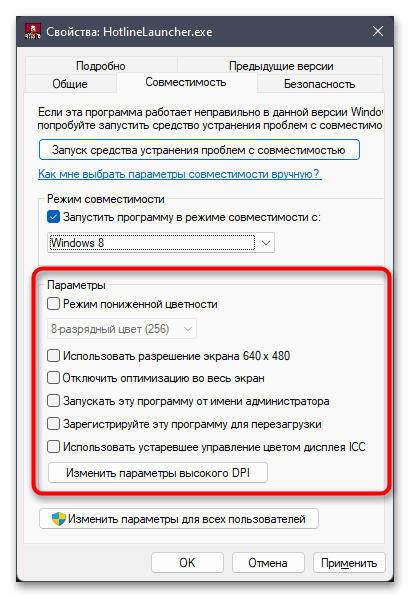
- Дополнительно предлагается установить режим пониженной цветности, задать стандартное разрешение экрана и отключить оптимизацию. Активируйте галочки на свое усмотрение и проверяйте, как поведет себя игра при использовании таких параметров.
Способ 3: Включение компонентов прежних версий
Дополнительно в Windows 11 можно активировать поддержку компонентов прежних версий, чтобы обеспечить совместимость с определенными типами файлов, которые используются библиотеками старых игр. По умолчанию эта функция отключена, поэтому придется найти и включить ее самостоятельно, выполнив такие действия:
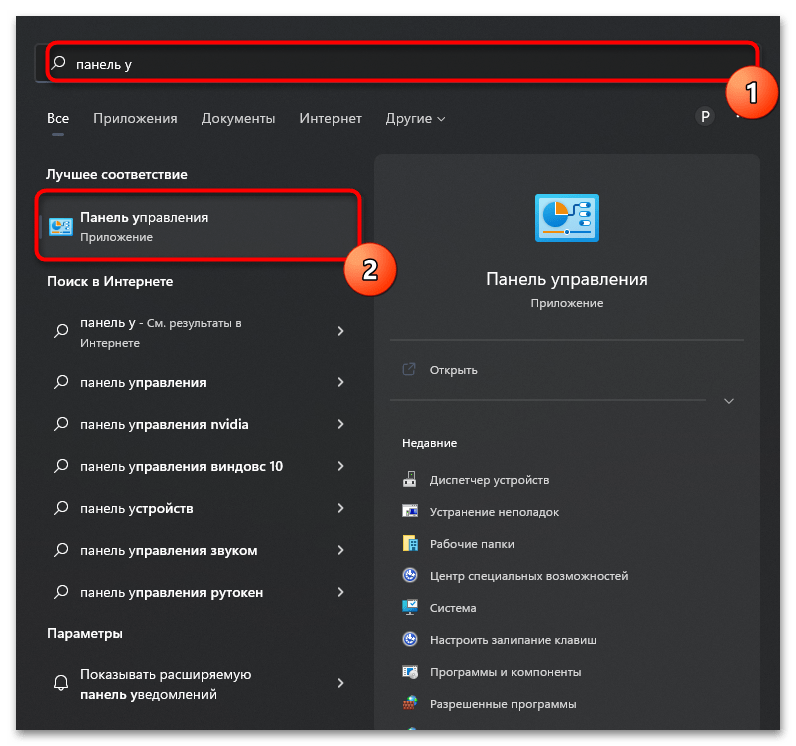
- Откройте меню «Пуск» и через поиск отыщите «Панель управления».
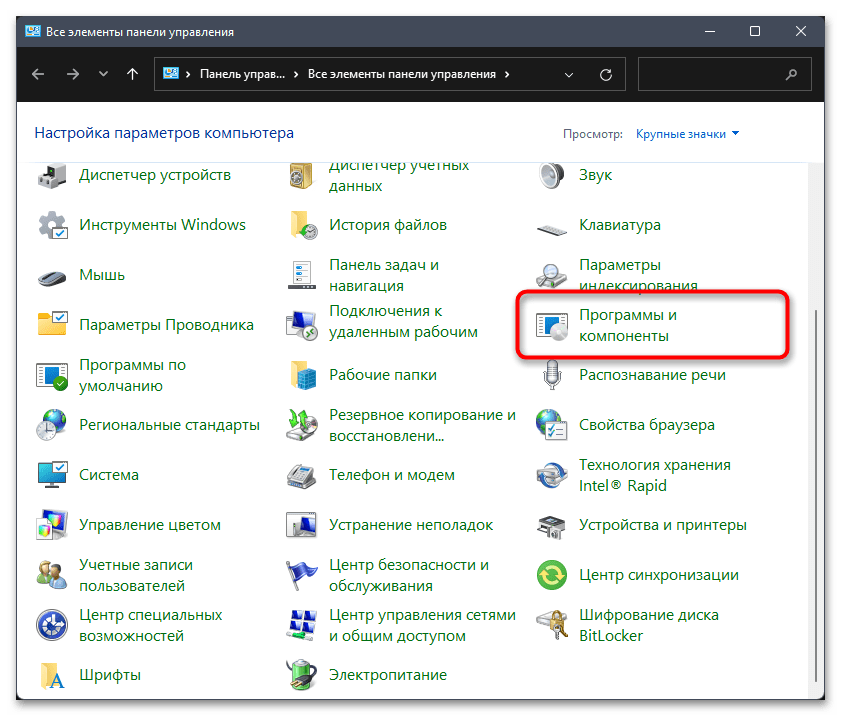
- После перехода к приложению найдите значок «Программы и компоненты» и кликните по нему левой кнопкой мыши.
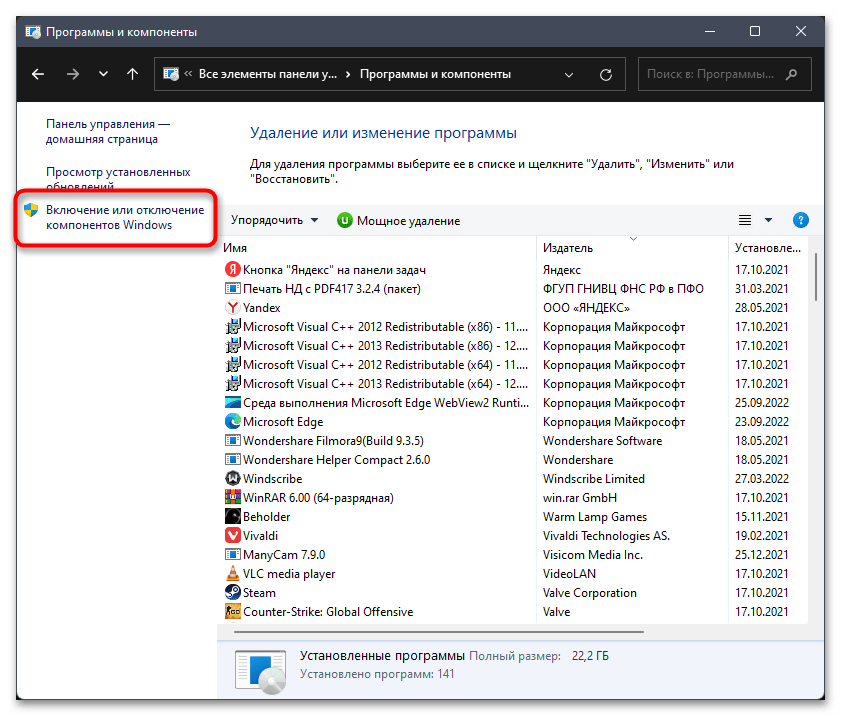
- На панели слева вас интересует кликабельная надпись «Включение или отключение компонентов Windows».
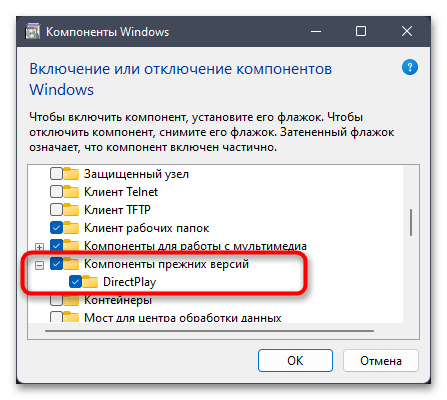
- Нажатие по этой надписи откроет отдельное окно, в котором следует отыскать «Компоненты прежних версий» и поставить галочку возле этой директории. Для выхода нажмите «ОК», перезагрузите компьютер и проверьте, запустится ли на этот раз старая игра.
Способ 4: Поиск патчей и решений на форумах
Фанаты практических всех известных старых игр общаются на форумах и помогают друг другу решать различные проблемы, связанные с этими играми. Вместе с этим есть и энтузиасты, которые занимаются созданием модов и патчей. В некоторых случаях они создают специальные обновления, позволяющие старым играм быть совместимыми с Windows 11. Мы рекомендуем искать информацию на таких форумах и читать рекомендации. Иногда даже появляется информация о том, что есть официальные патчи от разработчиков, которые можно скачать из магазина, где еще продается эта игра.
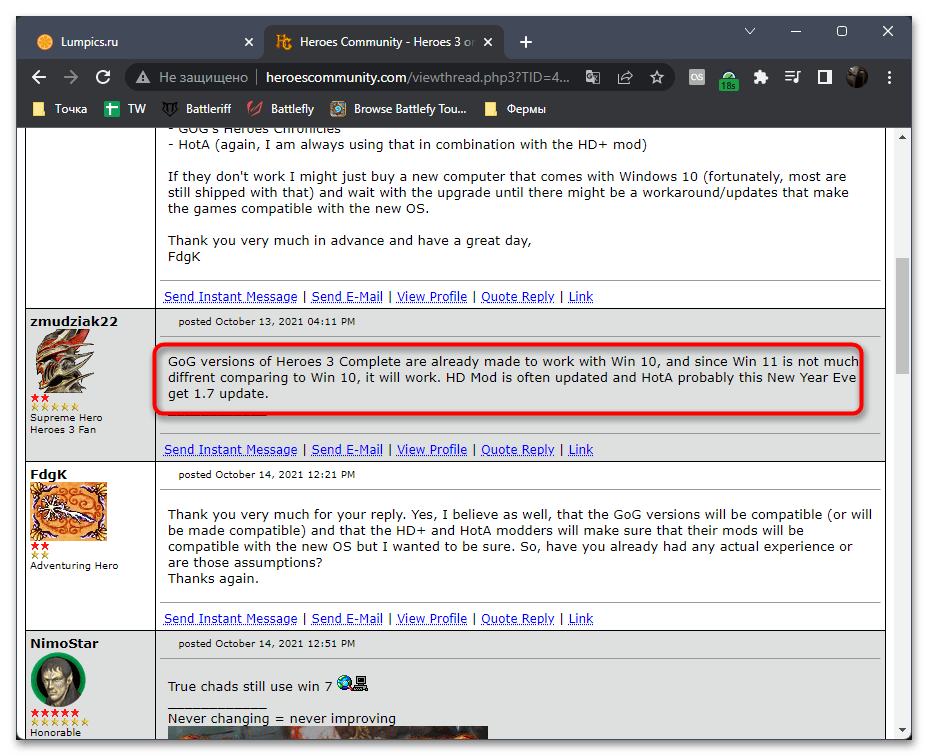
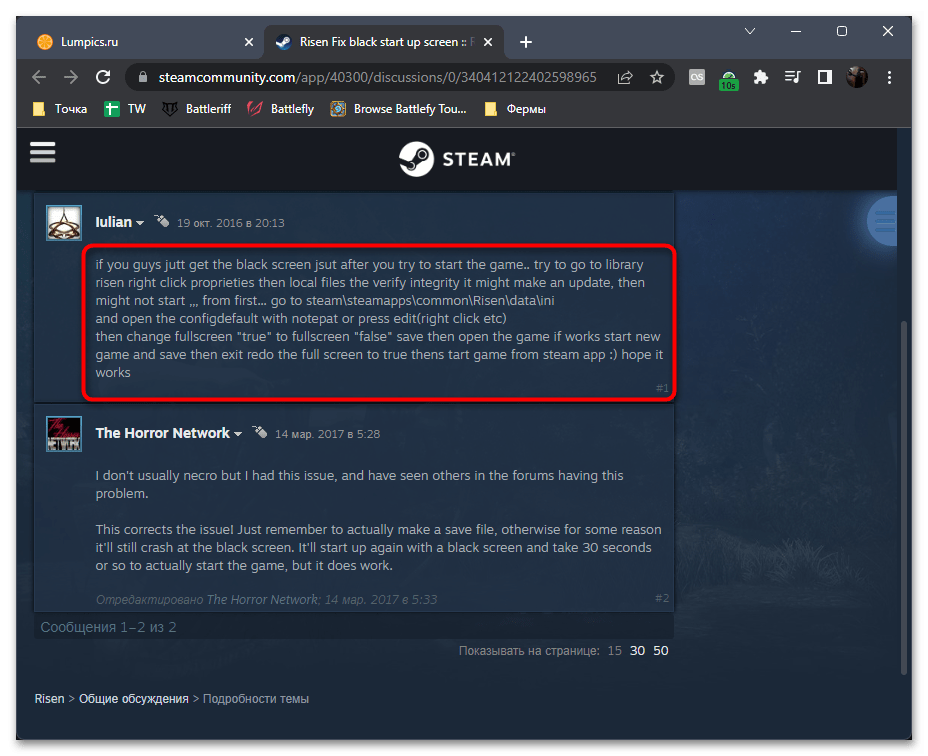
Вместе с этим часто предоставляется информация о том, какие изменения в файлах конфигурации нужно выполнить, чтобы обеспечить запуск игры в Виндовс 11. Часто понадобятся знания английского или переводчик, поскольку много полезной информации нет на русском языке. Впрочем, совет тут только один — используйте поисковик, находите форумы по игре и читайте ветки, связанные с запуском в новых версиях ОС (в большинстве случаев подойдут даже решения для Windows 10).
Однако отметим, что если вы собираетесь скачивать подозрительные файлы с таких форумов или сторонних сайтов, никогда не помешает сначала проверить их через любой удобный антивирус, даже в режиме онлайн. Это поможет обезопасить ваш компьютер от заражения различными вирусами и скрытыми майнерами. Детальнее об этом читайте в другой статье на нашем сайте по следующей ссылке.
Способ 5: Использование программ для запуска игр в оконном режиме
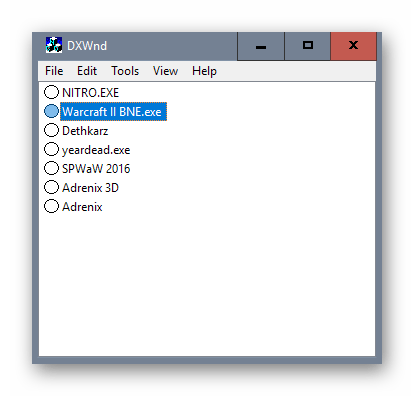
Существуют сторонние программы, обеспечивающие запуск приложений и игр в оконном режиме, что актуально в тех ситуациях, когда при помощи системных или встроенных настроек не удается добиться нужного результата. Такие программы могут оказаться полезными и при попытке запуска старых игр, которые отказываются поддерживать новые разрешения мониторов. Вы можете выбрать абсолютно любую из существующих программ, затем настроить ее под конкретную игру и проверить, окажется ли этот способ действенным.
Способ 6: Использование виртуальной машины
Если ничего из описанного выше не помогло достичь необходимого и запустить старую игру в Windows 11, остается только один выход — эмуляция старой версии операционной системы, в которой раньше эта игра работала. В большинстве случаев для таких целей подходит Windows XP, поэтому сначала понадобится отыскать образ ОС, затем виртуальную машину, произвести установку операционной системы и установить на нее старую игру. О том, как осуществляется эмуляция, более детально написано в статье от другого нашего автора по ссылке ниже.
How to Run Old Games on Windows 11
Some games never get old. Even as the gaming industry takes long strides every year, creating titles that only the next-gen PCs can handle, a look back at games from yesteryears is well warranted, at least for those of us old enough to remember them.
But trying to run those gems on the latest iteration of Windows comes with its own set of problems. Fortunately, there are a few ways that you can still run old games on Windows 11. Here’s everything you need to know about it.
- Why does Windows 11 not support old games?
- 8 Ways to run an old game on Windows 11
- Method #01: Run as Administrator
- Method #02: Using Compatibility mode
- Method #03: Run Program Compatibility Troubleshooter
- Method #04: Install old, unsigned drivers
- Method #05: Run games using an emulator (DOSBox)
- 5.1 Run downloaded DOS games
- 5.2 Install CD-ROM games
Why does Windows 11 not support old games?
Modern PCs have come so far that backward compatibility for games is nigh impossible. Unlike other forms of media, games aren’t as easily remastered or updated to work with the latest technology. But why is that the case? Let’s find out:
Internal dependencies on obsolete software: Many old games heavily depend on hardware and software that are no longer used. So, unless you want to replace your next-gen PC with a dinosaur, there’s little you can do to turn the clock back.
DOS is dead: DOS has been abandoned ever since Windows XP came out. There still may be DOS abandonware (abandoned programs) that can pull its weight on Windows 11. But most dated games, unfortunately, just don’t make the cut.
16-bit software: Modern, sophisticated 64-bit operating systems have no support or backward compatibility for 16-bit games. So, if you’re looking to run games for a couple of decades back on Windows 11 straight up, you’re out of luck.
Having said that, you can benefit from a few workarounds and tricks to run (some of these) games. Read on to find out how.
8 Ways to run an old game on Windows 11
Now, even though it is less likely that older games will run straight up without any intervention, you do not have to give up hope just yet. Here are some of the methods that you can try to give your favorite retro games a spin.
Method #01: Run as Administrator
The newer versions of Windows are chock full of security features, such as the UAC. These features limit one’s daily use and permissions so they don’t accidentally delete something they shouldn’t. In short, they’re not administrators.

But in the good ol’ days of Dune, Duke Nukem, and Sid Meier’s Civ games of yore, there were no such restrictions. Everyone was an administrator, and the games didn’t have to worry about these limitations.
Fortunately, there’s a simple way to get over them. When you’re running a game, don’t just double-click the executable file. Instead, right-click the .exe file and select Run as administrator.

For some games, this is all that you need to do in order to play them. But others may require additional tasks.
Method #02: Using Compatibility mode
There’s another trick in the book that you can try – changing the compatibility settings manually. The Windows 11 compatibility mode can be accessed via the game’s properties menu. Right-click on your game’s executable file, and select Properties.

Click on the Compatibility tab.

Under “Compatibility mode”, place a check next to Run this program in compatibility mode for.

Then, from the drop-down menu, select the version of Windows that you think would work well for your game. This will depend entirely on how old your game is. If your game came well before the millennium, try Windows 95 or Windows 98. For our example, we’re selecting Windows XP (SP2).

Next, under the “Settings” section, you have the option to choose your compatibility settings.

You can try out which settings to enable by trial and error. Once you’re done, click OK.
Method #03: Run Program Compatibility Troubleshooter
If running a game as an administrator doesn’t bear any fruit, you can run the program compatibility troubleshooter and let Windows determine what the game’s compatibility settings should be. To run the program compatibility troubleshooter, follow the steps given below:
Press Start, type Run programs. Then select the first option.

Click Advanced.

Then click on Run as administrator.

Click Next.

Windows will now look for any and all program compatibility issues. Now select your game and click Next. If it’s not listed here, select the Not listed option. Then click Next.

Click on Browse and find your game’s executable file.

Click Next.

Then, click on Try recommended settings.

Once the recommended compatibility settings are applied, click on Test the program to do so.

If it runs, congratulations! Click Next.

Then click Yes, save these settings for this program.

If the game doesn’t run, move on to the next methods.
Method #04: Install old, unsigned drivers
Modern 64 – and 32 – bit PCs have driver signature enforcement which necessitates all drivers on your computer to have a valid signature. Without them, Windows won’t be able to safeguard your system against incompatible or unstable drivers.
However, your game might be of the era that didn’t have driver signature enforcement requirements or use drivers of its bygone time. If that’s the case, Windows may not allow you to run or (in some cases) even install the game. You could, in practice, disable this driver signature enforcement to allow the game to run. But before we get to how to go about it, know that doing so will leave your system a little more vulnerable than before. But if you’re just raring to play, here’s how to go about disabling driver signature enforcement:
First up, press Start. Then, while holding down Shift, click on Restart. This will lead you to the advanced boot menu as your system is booting back up. Click on Troubleshoot.

Then Advanced Options.

Click on Startup Settings.

Press Restart.

Then choose number 7) Disable driver signature enforcement.

Then press Enter to restart. Now, you will be able to install the unsigned drivers that your game requires.
Method #05: Run games using an emulator (DOSBox)
If you’ve got games from previous years that don’t play natively anymore, emulators like DOSBox can help. This emulator runs a complete DOS environment on the latest Windows systems allowing you to run all your DOS-based games on it.
Download: DOSBox
Once you’ve downloaded and installed DOSBox, here’s how you can configure it to run your game.
5.1 Run downloaded DOS games
If you have downloaded the DOS game, follow the steps given below to run it on DOSBox. For our example, we are running the first installment of the genre-defining Sid Meier’s Civilization game.
Right-click the DOSBox and select Show more options.

Select Create shortcut.

Right-click the shortcut and select Properties.

Under the shortcut tab, find the “Target” path.

Here, you’ll be adding the complete address of your executable game file. The simplest way to do that is to go to the game’s executable file, right-click it and select Copy as path.

Now, go back to the “Target” path and paste it after the “-userconf”.

Make sure that you do not delete the path that’s already there and there’s a space between the two paths.
Our Civilization game file is in the D drive. So, our complete path looks like this:
“C:\Program Files (x86)\DOSBox-0.74-3\DOSBox.exe” -userconf “D:\games\Civ\civ\CIV.EXE”
Then click on OK.

Now, anytime you want to play your game, double-click this DOSBox shortcut. You can rename this to reflect the name of the game if you wish.
When you first run this shortcut, you may be asked to select the graphics mode, sound mode, etc. Press the number associated with your choice, and finally, start playing the game.

5.2 Install CD-ROM games
If you have game CDs, here’s how you can install them via the DOSBox.
First up, create a new folder where you want to install the game. For our example, we’re installing it in D:\oldgames. Now, run DOSBox and enter the following command:
mount c d:\oldgames
Now, insert the CD into your system and mount it to DOSBox. If ‘e’ is the CD drive on your system, the command to mount it will look like this:
Mount e e:\ -t cdrom -iotcl
Now, change the active drive to the CD drive by simply entering the drive letter in the command. So, for our example, it will be just this:
Finally, open the CD in file explorer and check the name of the game installer. In most cases, it will be ‘setup’, ‘install’, or something similar. Enter this in the next line of the DOSBox, so it will look something as follows:
Your game’s setup should now start. Follow the on-screen instructions to install your game and start playing.
Method #06: Use a Virtual Machine
Another way to run an old game on Windows 11 is to make the game believe that you’re running it on a previous version of Windows. To do this, you will have to use a virtual machine like the Oracle VM Virtual Box.
A virtual machine lets you run Windows inside Windows. And it’s up to you which version of Windows you want to use for your virtual machine. Based on the game that you want to play, you may want to get a much older version of Windows. You might still need your Windows license for those versions to install it.
Method #07: Check out open-source games and community patches
If you acquired games from an online retailer, you may face issues such as having the game resolution limited to 1024 x 768 (or worse, even lower than that) and graphical glitches. Sometimes, the game may not work at all.
3D games that were released in the early years of the new millennium are particularly fraught with such problems, with graphics meant to leverage APIs and hardware that seem to be from the dark ages.
Fortunately, there are various open-source games that have been patched up to look at least halfway decent (by today’s standards) with better FPS, HD resolutions, DirectX support, etc.
Sites such as My Abandonware and ModDB are veritable treasure houses where you can find a bunch of old games patched up to work well on Windows 11. If you don’t find the title that you’re looking for here, a simple search on the web for your favorite game’s community or unofficial patch should give you some results that you can work with.
Method #08: Patched games on Steam & GOG
If the aforementioned methods don’t work to run your precious little game from well before the turn of the century, fret not just yet. Online retailers like Steam and GOG may have a version of older games patched to work on Windows 11.
If you find that your game is available on either of these platforms, all you have to do is purchase it to start playing. No-fuss!
So these are some of the ways that you can still run old games on Windows 11. We hope you were able to turn back the clock and reminisce the days when games made up the simple pleasures of life.
3 лучших способа запуска старых программ в режиме совместимости в Windows 11

Windows 11, как и предыдущие версии, включает режим совместимости, позволяющий запускать старые программы и игры, разработанные для более ранней версии Windows. Таким образом, если старое программное обеспечение не загружается корректно в Windows 11, вы можете запустить его в режиме совместимости в Windows 11. Однако никто не обещает, что все старое программное обеспечение будет работать безупречно.
Существует несколько способов запуска программ в режиме совместимости в Windows 11. В этом посте мы покажем вам, как это сделать. Итак, давайте приступим к делу.
1. Изменить свойства программы
Вы можете настроить программу для работы в режиме совместимости, изменив ее свойства. Это позволит вам указать правильную версию Windows для запуска программы. Вот что вам нужно сделать.
Шаг 1: Нажмите клавиши Windows + E, чтобы открыть проводник и перейти к программе, которую вы хотите запустить в режиме совместимости.
Шаг 2: Щелкните правой кнопкой мыши исполняемый файл программы или приложения и выберите «Свойства».

Шаг 3: В окне «Свойства» перейдите на вкладку «Совместимость». Установите флажок «Запустить эту программу в режиме совместимости для».

Шаг 4: Используйте раскрывающееся меню, чтобы выбрать нужную версию Windows из списка.

При желании, если ваша программа не отображается должным образом на вашем ПК, вы можете изменить параметры DPI, разрешение экрана и другие параметры.

Шаг 5: После внесения необходимых изменений нажмите «Применить», а затем «ОК».

Дважды щелкните файл программы, и Windows запустит ее с указанными параметрами совместимости.
2. Запустите средство устранения неполадок совместимости программ.
Если вы не знаете, какая версия Windows необходима для правильной работы программы, вы можете воспользоваться средством устранения неполадок совместимости программ. Это позволит использовать Windows 11 для выбора подходящих параметров совместимости для программного обеспечения. Вот как.
Шаг 1: Щелкните правой кнопкой мыши значок «Пуск» и выберите «Настройки» из списка.

Шаг 2: На вкладке «Система» нажмите «Устранение неполадок».

Шаг 3: Перейдите к другим средствам устранения неполадок.

Шаг 4: Прокрутите вниз и нажмите кнопку «Выполнить» рядом с «Устранение неполадок совместимости программ».

Шаг 5: Инструмент покажет список программ. Выберите свою старую программу и нажмите «Далее».

Если вы не можете найти свою программу в списке, выберите «Нет в списке» и нажмите «Далее», чтобы добавить программу вручную.

Шаг 6: Инструмент автоматически предложит несколько параметров совместимости для вашей программы. Нажмите «Попробовать рекомендуемые настройки», чтобы продолжить.

Шаг 7: Нажмите «Проверить программу», чтобы запустить программу в режиме совместимости.

Шаг 8: После тестирования программы нажмите «Далее».

Шаг 9: Если программа запускается без проблем, нажмите «Да, сохранить эти настройки для этой программы».

Если программа не загружается правильно, выберите «Нет, попробуйте еще раз, используя другие настройки».
Шаг 10: Выберите проблему, с которой вы столкнулись, и нажмите «Далее».

Шаг 11: Windows порекомендует различные параметры совместимости в зависимости от проблем, с которыми вы столкнулись, и попросит вас снова протестировать программу.

После успешного запуска программы вы можете сохранить сработавшие настройки совместимости. После этого Windows всегда будет запускать вашу программу с сохраненными настройками совместимости.
3. Используйте командную строку
Вы также можете запустить приложение или программу в режиме совместимости, выполнив одну команду. Для этого вы должны знать путь к файлу вашей программы.
Шаг 1: Нажмите клавиши Windows + E, чтобы открыть проводник и перейти к программе, которую вы хотите запустить в режиме совместимости.
Шаг 2: Щелкните правой кнопкой мыши файл программы и выберите «Копировать как путь».

Шаг 3: Затем щелкните правой кнопкой мыши кнопку «Пуск» и выберите «Терминал (Администратор)» из списка.

Шаг 4: В окне командной строки выполните следующую команду:
Заменять Путь к файлу в приведенной выше команде с фактическим путем к программе, скопированной на шаге 2. Замените ЗначениеДанные со значением, связанным с версией Windows. Вот значения для разных версий Windows:
- Windows 8: WIN8RTM
- Windows 7: WIN7RTM
- Windows Vista SP2: VISTASP2
- Windows Vista SP1: VISTASP1
- Windows Vista: VISTARTM
- Windows XP SP3: WINXPSP3
- Windows XP SP2: WINXPSP2
- Windows 98: WIN98
Так, например, если вы хотите запустить старую игру в среде Windows 7, вам нужно ввести следующую команду и нажать Enter:

После того, как вы запустите команду, Windows изменит параметры совместимости по умолчанию для вашей программы, и вы сможете запустить ее без проблем.
Найдите правильный режим
Приятно видеть, что Windows 11 дает вам возможность запускать старые программы на вашем современном ПК. Это может пригодиться, если вы хотите использовать программное обеспечение, которое больше не доступно, или играть в старые игры последнего десятилетия.
Итак, какой из вышеперечисленных способов вам понравился больше всего? Дайте нам знать в комментариях ниже.