How to Save GIMP as PNG

If you’re feeling a bit frustrated because you can’t save your GIMP image as a PNG file, you’re not alone. The GIMP development team decided to restrict the basic “Save” command to GIMP’s native file format, XCF, and then relocated the saving process for all other image formats.
Saving your images in the PNG format in GIMP is easy once you realize that the “Save” command isn’t the place to be looking. Instead, scroll further down the File menu to Export As, select PNG from the file format menu, and click Export to choose your PNG format settings.
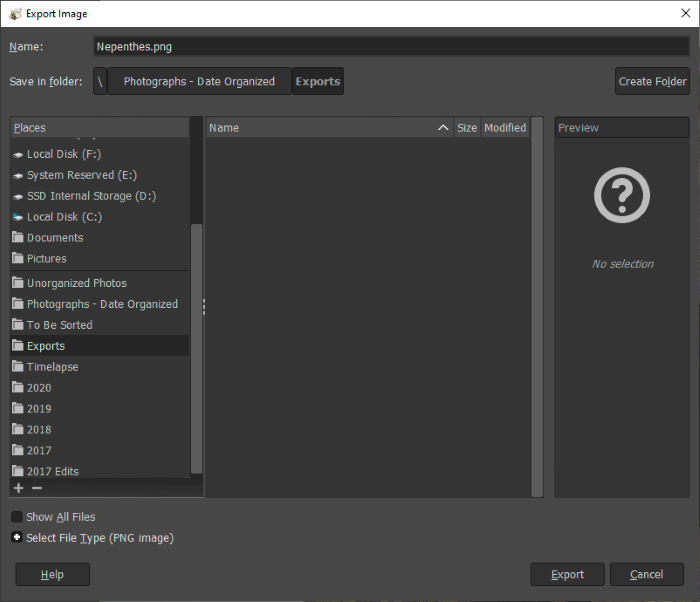
In most cases the default settings are fine to use, so you can just click Export again, and you’re done!
That’s the super-simple guide to saving your GIMP images as PNG files, but if you’re not quite comfortable with GIMP’s processes, I’ll break down the steps a bit more and explain the settings we skipped over in the short guide like interlacing, transparency, and compression levels.
Saving Your PNG Files Step By Step
Note: These instructions are the same for all operating systems, but my screenshots show the Windows 10 version of GIMP 2.10.22 and you may have slightly different layouts in dialogs.
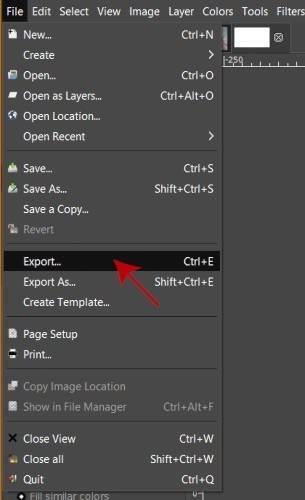
When you’re ready to save your GIMP masterpiece as a PNG file, start by opening the File menu in the top left of the menu bar and selecting Export As.

If you’re saving a new file, it doesn’t matter if you choose Export or Export As, but if you’re resaving an old file as a PNG be sure to choose Export As. If you’re not careful, you might overwrite your original file, and it’s a good idea to hang on to backup copies whenever possible.
You can also launch the Export process using the keyboard shortcut Ctrl + Shift + E or Command + Shift + E if you’re using GIMP on a Mac.
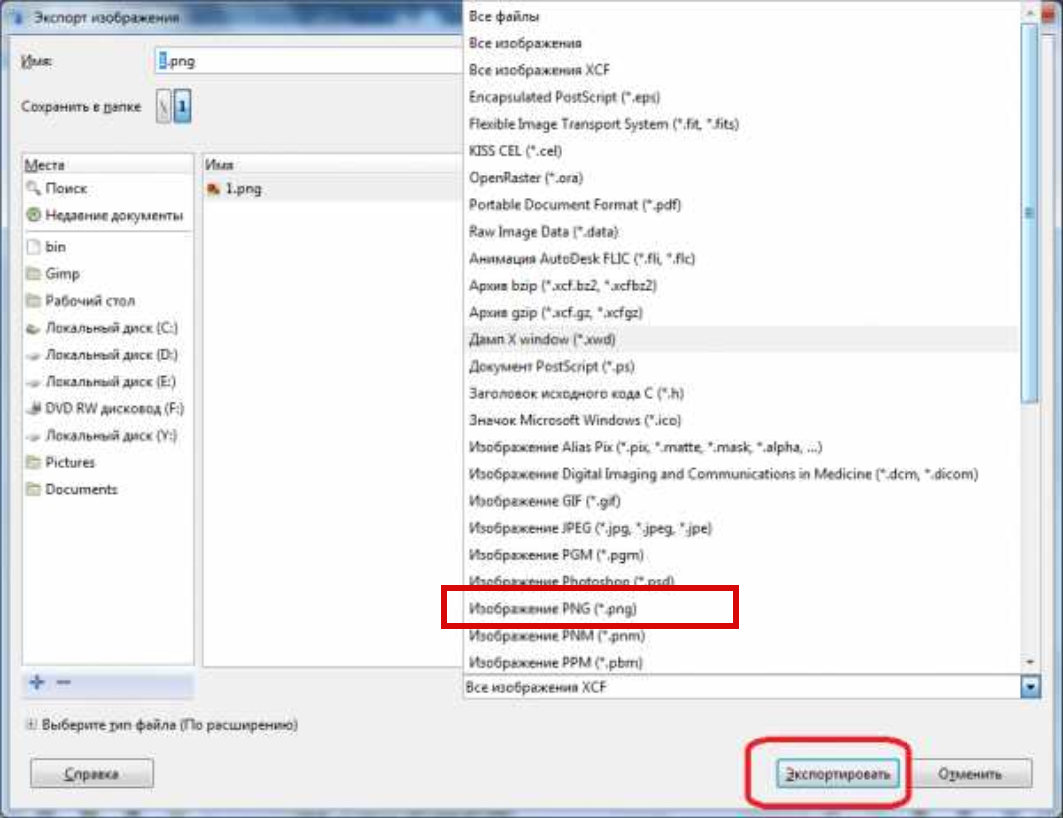
The Export Image window will appear, allowing you to choose the save location for your image as well as the file type. This is where we’ll tell GIMP that we want to use the PNG format. You can either end your file name with .png or click Select File Type at the bottom of the window.

Click the Export button, and you’ll move on to the Export Image as PNG window, where you can customize all your PNG format options. Unless you need to adjust something specific the default settings should be fine, so you can click Export one last time to save your image.
That’s all of the steps for how to save GIMP images as PNG, but if you want to dig into the specific save options in that last step, read on to see how you can save time and space during your next PNG export.
PNG Save Options in GIMP
Most of the PNG save options relate to metadata standards, such as EXIF, XMP, and IPTC, but they’re pretty self-explanatory and they don’t affect your image quality at all. You might be able to shave off a few bytes by skipping the data, but it won’t make a huge difference.
You’re also better off leaving the pixel format set to automatic. Like TIFF files, the PNG format is capable of handling 16-bit images and that presents some unique byte order configurations that most users won’t need to use. If you do need them, then you probably already know what to do!

The more important settings are Interlacing (Adam7) and Compression level. Interlacing is useful for images on mobile websites because interlaced PNGs begin to display even before being fully downloaded on slow mobile internet connections, but otherwise can be disabled.
Compression level plays an important role when saving your PNG images to the smallest possible file size, which is also useful in mobile web design (and many other places). 9 is the highest setting and 0 is the lowest setting, but your images are always perfectly compressed.
Unlike the compression method in JPG files, PNG uses lossless compression so your image always looks perfect. Higher compression levels simply mean that the computer will take longer to save the file, telling it to dedicate more time to compressing it into the smallest size possible.
When to Use PNG Format
PNG stands for Portable Network Graphics, and the format was created in the early days of the internet before the JPEG format reigned supreme in the world of digital imagery. Lossless compression and transparency are great features, but PNG isn’t always the best format to use.
As you might guess from the name, PNG is often used in web design thanks to small file sizes and the design flexibility that you get with transparent images. PNG is great for this type of small-scale application where image quality is essential even through wide color areas.
However, if you’re saving a large high-resolution photo, PNG files can seriously slow down your computer during the saving process, especially when you’re using the highest compression setting. I’ve even crashed editing programs while experimenting with large-scale PNG exports!
You probably won’t run into these issues if you’re saving small images for use on the internet, but keep it in mind when working with large photos. There’s always a file format perfectly suited for your need, as long as you know where to look – the TIFF format would be perfect, in this case.
Saving PNG files with GIMP might seem a bit difficult at first, but once you realize that you’re supposed to be exporting instead of saving, the rest comes easily. Hopefully, you’re now confident in your ability to save your GIMP images as PNG files!
Do you have any questions about using PNG files that I might have missed? Be sure to let me know in the comments below!
Leave a Reply Cancel Reply
Perhaps you could help me out? I haven’t used Gimp in a while, and when I export it as a PNG it says that it saves (even asks me if I want to overwrite the file), but when I go to the folder it does not show up. What might be causing that?
Hi Niels, that’s a very strange issue! I haven’t encountered anything similar before, so I’m not sure what to suggest. Nothing in the PNG export options should have an impact on the results in this way.
Does the same problem occur if you save the PNG file in a different location?
I use Gimp and I wonder why export of png files is so much slower than export to jpg. Another program – Avidemux exports png files very fast, compared to Gimp.
I’m not sure exactly, but my guess would be that PNG encoding algorithms have improved a lot since the release of GIMP 2.10, which was back in 2018!
Sorry …. just a path changing i didn’t saw….
have a nice day to all the readers….
Hi Phil, glad you got it sorted out! Thanks for following up.
Hello,
when i try to export as .png…. GIMP writes me “Save with a known format” (Le nom de fichier donné n’a aucune extension connue. Saisissez une extension connue ou sélectionnez un format de fichier dans la liste des formats de fichier.)
no JPG, no PNG, no GIF since 2.10 of GIMP… i use a very old 2.8 version of GIMP juste to be abled to export my pictures .
How I must do ?
Search
Hi There!
 My name is Thomas Boldt, and I’m the writer and image editor on the team here at TheGIMPTutorials.com, your free source for learning materials about the GNU Image Manipulation Program, better known as GIMP. Read more about me and why I created this website here.
Related Posts
 What is GIMP Software?
  How to Merge Layers in GIMP
  How to Make a High Dynamic Range (HDR) Photo in GIMP
  How to Change Background Color in GIMP
  How to Draw Arrows in GIMP
  How to Split GIFs Into Frames in GIMP
  How to Make Geometric Shapes in GIMP
  How to Do Line Art in GIMP
Disclaimer
GNU Image Manipulation Program is a free cross-platform image editor made by The GIMP Team. We are not associated with them. This site is built by a GIMP user for GIMP users.
How To Save an Image as a PNG in Gimp

By Lee Stanton Lee Stanton Author Lee Stanton is a versatile writer with a concentration on the software landscape, covering both mobile and desktop applications as well as online technologies. Read more • Edited by Jan Jan Editor Read more August 23, 2022
Saving image files as PNG is a key feature in any image editor. PNGs allow for much more flexibility than other popular formats. Unlike program-specific project file formats, they can also be opened with any image editor.

Gimp users might thus be puzzled when they don’t see the option to save their picture as PNG using their app’s save command. Does Gimp support PNGs? How do you save an image as PNG using this program? Read on to learn everything you need to know about the topic.
Exporting Your Image as a PNG
Gimp is a popular free alternative to image editor giants like Adobe Photoshop. While the latter uses PSD as its default file format, Gimp files will be saved in XCF. This file format is essential for everyone who wants to get the most out of their Gimp, as it retains all layer and other crucial information inside the file. You can save your project and pick up where you left off or tweak details before finalizing them, thanks to the XCF format.
That said, the XCF format isn’t without its disadvantages. While you can open PSD files with Gimp and various other apps, you won’t be able to open XCF files with Photoshop and other image editors. Therefore, saving your project in a file format compatible with other platforms is crucial.
Since version 2.8, Gimp’s Save menu only allows you to save files in XCF format. However, that doesn’t mean you can’t produce other file formats in this app. Instead of saving the file, you will need to export it. Here’s how to export your project as a PNG file in Gimp.
- Launch Gimp app and open your project by clicking “File,” then “Open…”

- Select the file you want to save as a PNG and import it. Once you’ve opened the image, click “File” and find the “Export as…” option. You can also press your Shift, Ctrl, and E keys on Windows or Shift, Command, and E keys on Mac simultaneously to open the Export window.

- Choose where you want to save your file.

- Expand the “Select File Type” option at the bottom of the window and select “PNG image” from the list. You can also type “.png” at the end of your file’s name to get the same result.

- Hit “Export.”

The “Export Image as PNG” window will pop up. You can tweak several settings here to fine-tune your PNG. Nevertheless, the default settings will be just fine if you don’t have a specific preference. Click “Export” and enjoy your PNG.
If you want to customize your settings, here are some of the things you can tweak in the Export window. Most options have to do with the file’s metadata and won’t actually affect the quality of your image.
- Check “Interlacing” if you want the PNG to load progressively on a web page.
- Change the compression level to decrease the file size of your PNG.
- The “Save background color” option will define a background color for your PNG when variable transparency is not supported.
- “Save Gamma” increases color accuracy in browsers.
Saving Your PNG With Transparency
One of the biggest advantages of PNG files is that they offer multi-level transparency. The default export settings will allow your image to retain this quality. If your saved PNGs aren’t coming out transparent, you might have skipped a crucial step. Here’s how to save a file as PNG with transparency in Gimp.
- Open the Gimp app.
- Click “File,” then “Open” to import your project.

First, the file needs to have an alpha channel to leverage transparency. Look at the Channels dialogue box to see if your image has one. If there’s no alpha channel on the list, add one.
- Click “Layer” in the menu bar.

- Move your cursor over “Transparency.”

- Select “Add Alpha Channel.”

If the file has multiple layers, disable the background layer for a transparent backdrop. In the case of a flat image with a background, you’ll need to remove the background first. There are many ways to go about this, depending on the complexity of the image. To remove a simple background, follow these steps.
- Choose the Fuzzy Select tool from your toolbar.

- Click the background to select it.

- Hit your “Delete” button.

To get a smoother result, you can try the following method.
- Select the background with the selection tool of your choice.

- Click “Colors” in the menu bar.

- Choose “Color to Alpha.”

You’ll see a checkered background indicating transparency. Now, it’s time to export the image.
- Click “File,” then “Export as…” or press “Shift+Ctrl+E” on Windows or “Shift+Command+E” on Mac.

- Select a location for your PNG file.

- Type “.png” at the end of the file name or browse for “PNG image” under “Select File Type.”

- Click “Export” and do so once again in the PNG dialogue box.

The default settings will allow your image to have transparency. If you’re unsure whether your settings are on default, check Gimp’s recommendations.
When You Should Save Your Project as PNG
When you’re done with your project, exporting the file in the appropriate format is essential. PNGs are some of the most versatile image formats out there. They not only allow for lossless compression but also offer multi-level transparency. Saving your work as a PNG is often a better option than going for JPEG, especially if you plan on editing the image again. A PNG won’t lose its quality even when edited multiple times, so you can tweak your project in the eleventh hour without compromising on quality.
That said, PNGs have some drawbacks, so they aren’t the most suitable image format in all cases. While their size is smaller than other formats and might seem insignificant initially, storing many large PNGs will quickly consume your disk space. Large-scale, high-resolution PNGs can also present challenges to image editors. Attempting to export a sizeable PNG with high compression can slow down your PC or even crash your program. Don’t risk losing your work. If you’re editing a large image, save your final project as XCF before attempting the export process.
Learn to Export as PNG
While Gimp’s dedicated file format is useful for keeping projects editable, its compatibility is limited. Fortunately, you can save your file in PNG using the program’s “Export” feature to create a high-quality, lossless image with transparency.
Did you convert your file to PNG by following the steps above? Do you have any additional tips about exporting PNGs you’d like to share? Let us know in the comments section below.
Как в GIMP сохранить в формате JPG или PNG
Если в меню GIMP выбрать «Файл» и одну из опций «Сохранить» или «Сохранить как», то вы увидите, что предлагается сохранить файл с расширением .xcf и изменить это расширение нельзя.

Это может показаться проблемой, поскольку обычно мы хотим сохранять изображения в JPG или PNG форматах.
Формат .xcf — это собственный формат GIMP, который поддерживает слои и все возможности данного редактора изображений.
В формате .xcf хранятся изображения в процессе обработки, это скорее «исходники», чем готовая картинка.
Но почему нет вариантов с другим расширением, неужели GIMP не поддерживает другие форматы?
Если кликнуть «Выберите тип файла (По расширению)», то вы увидите ещё несколько опций, но все они вряд ли вам подходят.
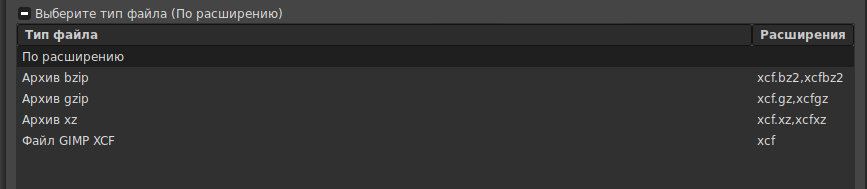
Как в GIMP сохранить картинку в нормальном формате (JPG, PNG, BMP, GIF)
Для сохранения в привычном формате нужно выбрать в меню «Файл» и затем одну из опций:
- Экспортировать как
- Перезаписать
Опция «Перезаписать»
Эта опция доступна в случаях если:
- В GIMP вы открыли файл в отличном от .xcf формате, например, вы открыли JPG или PNG. В этом случае внесённые изменения будут сохранены в исходный файл.
- Вы создали новый файл в GIMP, но уже хотя бы раз воспользовались действием «Экспортировать как».
Будьте осторожны с этой опцией, поскольку программа не будет спрашивать никаких подтверждений, а просто перезапишет исходный файл.
На самом деле, исходный файл ещё можно вернуть, если вы случайно перезаписали его — в GIMP с помощью Ctrl+z откатите все сделанные изменения и вновь перезапишите файл.
Опция «Экспортировать как»
При выборе этого варианта вам будет предложено выбрать имя файла и его расширение (формат).
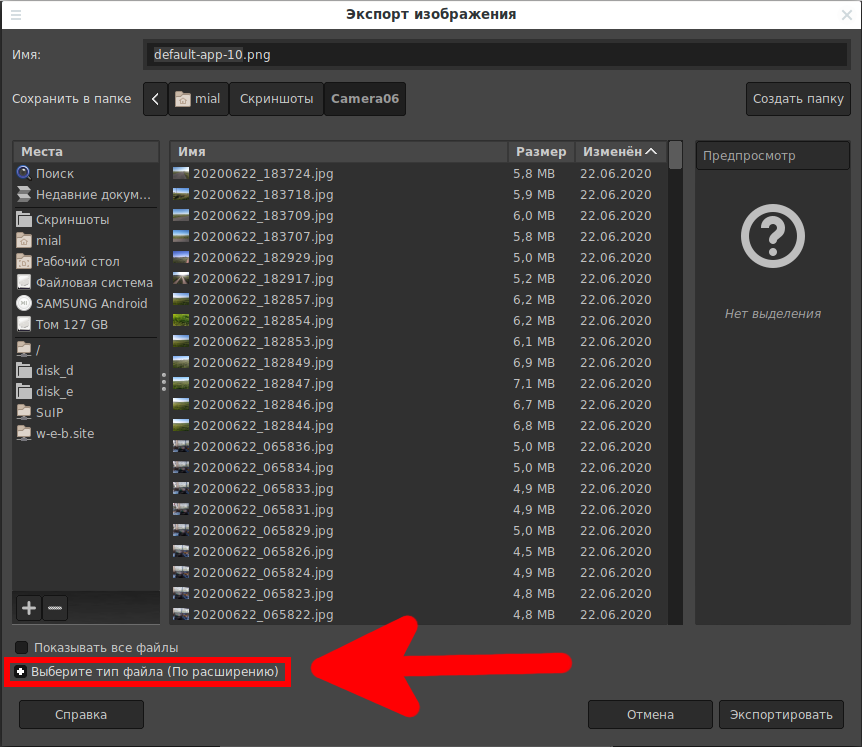
Кликните на «Выберите тип файла (По расширению)».
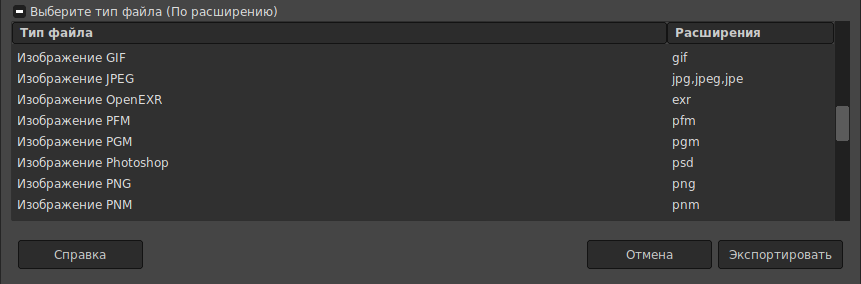
Вы увидите, как много форматов на самом деле поддерживает GIMP.
Вам будет предложено выбрать параметры сохранения файла. Для каждого расширения свои собственные настройки параметров сохранения.

Итак, для вывода готового результата GIMP поддерживает все популярные форматы. Просто помните, что для сохранения промежуточных результатов работы по редактированию изображения, выберите опцию «Сохранить». А для сохранения конечного результата, выберите опцию «Экспортировать как» или «Перезаписать».
Как в GIMP сохранить изображение
GIMP — свободный графический редактор, который поддерживает разнообразие форматов изображений, умеет работать со слоями, масками, режимами и фильтрами. В арсенале программы выбор десятка инструментов для цветокоррекции или обработки фотографий и изображений. Благодаря комфортному интерфейсу и особенностям, научиться работать в GIMP сможет даже начинающий пользователь. После того, как привыкните к этому графическому редактору, другие будут казаться не теми, даже платные не впечатлят.
Как сохранить изображение в GIMP
В гимпе сохранить фото легко, но те, кто работают с графическим редактором GIMP в первый раз, сталкиваются с трудностями. В новых изданиях действия для сохранения отличаются, поэтому у новичков появляется масса вопросов. Предлагаем расставить по полочкам.
В период работы или по окончанию, проделанные действия лучше сохранить. GIMP поддерживает десяток графических форматов. Обратим внимание встроенному формату XCF, который копирует в память компьютера полную информацию о файле в период работы. Благодаря этому формату, у пользователя исключается случайная потеря процесса, а файлы формата XCF можно позднее открыть вновь без никаких затруднений. Если работа происходит с файлом, который до этого был сохранен в XCF и внесенные правки не хочется терять — в меню окна редактирования найдите пункт «Файл => Сохранить». Тогда, исправления будут моментально внесены без лишних действий.
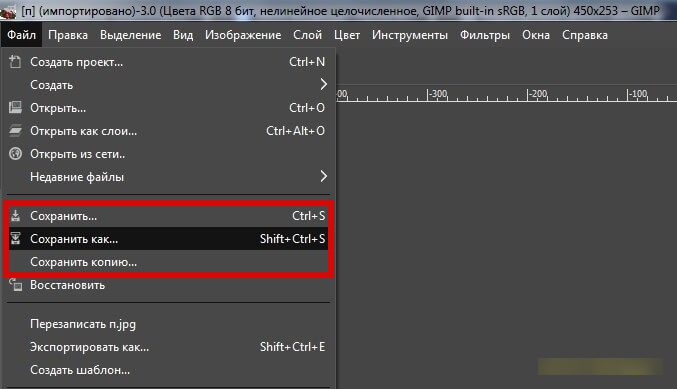
Однако здесь прячется и загвоздка. Файлы в формате XCF часто игнорируются и не поддерживаются. Следовательно, когда работа подойдет к завершению, понадобится сохранить в PNG, JPEG или других распространенных форматах — файл преобразовывается в подходящий формат дальнейшего использования.
Чтоб сохранить картинку через меню графического GIMP редактора, имеются команды «Файл => Сохранить» и другие функции. Напоминаем, что об изображении, включая информацию о слоях, уровне прозрачности и так далее, сохраняет исключительно программный XCF формат редактора графики GIMP. При сохранении файла, на экране появляется диалоговое окно с оповещением о возможной потери данных при неудачном сохранении или полном отсутствии.
Как сохранить картинку в гимп в формате JPEG
Теперь, когда проект сохранен, рассмотрим вариант верного сохранения проекта в популярных форматах. Файлы JPEG справляются сжимают картинки, исключая плохое качество в дальнейшем.
В гимп сохранить фото в формате JPEG крайне легко. Это распространенный формат с особенностью сжатия для облегчения файла в весе. В меню графического редактора найдите вкладку в левом верхнем углу «Файл => Экспортировать…» и выберите формат JPEG.
В диалоговом окне с сохранением укажите параметры качества изображения. По умолчанию стоит 85 и как правило, дает результат в разы лучше. В гимпе сохранить в JPG со значением качества больше 95 не особо полезно, эффект может не сильно отличаться от 85. Заметной может быть и потеря качества, если применяются высокие уровни сжатия. Она особо значительна при увеличении или уменьшении фотографии.
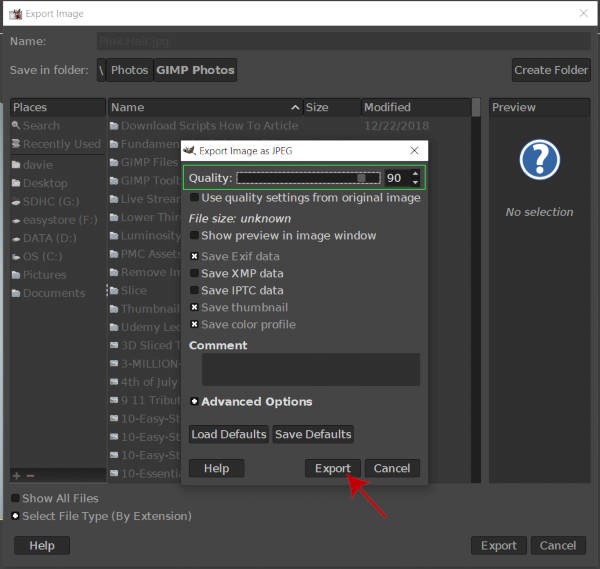
Если нажать на кнопку «Показать предварительный просмотр в окне изображения», на экране отобразится размер сохраняемого файла, с использованием вставленных настроек. Обновление этих значений может занять после настройки ползунка пару секунд. На экране представлен предварительный просмотр после сжатия картинки, следовательно, убедитесь в качестве перед тем, как сохранить файл.
Как экспортировать в формате PNG
В гимпе сохранить в PNG также легко! Проделайте те же действия, но вместо JPEG в поле с форматом выберите PNG, выбрав параметры, которые необходимы. Cделать PNG в GIMP – одна часть задачи, теперь понадобиться выбрать настройки изображения. В полях для заполнения, видите черезстрочность, которая бесполезна — возникнут проблемы с показом на сайтах. Сохранение цвета фона помогает браузерам, которые тянут на себе исключительно два уровня прозрачности. В случае, если у картинки много уровней прозрачности, используется цвет, который взят из инструментов. Восстановить исходные настройки можно через нажатие «Загрузить исходные параметры» и тогда параметры вернутся на значения по умолчанию.
Как сохранить в формате TIFF
Этот параметр определяет алгоритм сжатия изображения:
- • Нет: по итогу получается тяжелый файл, но без потерь.
- • LZW: сжатие без потерь, быстро по алгоритму Lempel-Ziv-Welch.
- • Упакованные биты: алгоритм кодирования длин серий данных,
- • Уменьшить: сжатие без потерь по алгоритму кодирования Huffman и комбинации LZ77
- • JPEG: сжатие без потери качества.
- • CCITT Group 3 fax и CCITT Group 4 fax: черно-белый формат для передачи изображения по факсу.
Сохранение изображения в MNG формате
Главная проблема сохранения этого формата состоит в том, что только браузер Konqueror распознает такой формат анимации.
Так в графическом редакторе GIMP сохраняются проекты. Процесс с первого взгляда вводит в заблуждение новичков, потому что, нажимая пункт меню «Файл => Сохранить» не находят других форматов, помимо XCF. Теперь не возникнет трудностей с сохранением процесса работы в графическом редакторе GIMP в качестве проекта или изображения