How To Use Filezilla to Transfer and Manage Files Securely on your VPS

Are you a recent cloud hosting convert and find yourself struggling to figure out how to best manage the files on your first virtual private server (VPS)? Do you find yourself intimidated by the command line? If so, you will be happy to learn that FileZilla provides a user-friendly graphical interface that can securely transfer files to-and-from, as well as move files around within, your VPS.
Secure Communication
The two most common methods of securely transmitting information between two computers are the (i) Secure Shell (SSH) and (ii) Transport Layer Security (TLS), and its predecessor Secure Sockets Layer (SSL), cryptographic protocols. Both are public-key cryptography tunneling protocols that aim to create a secure, confidential exchange of data and connection across a network (particularly the internet). The encryption technologies used by both protocols are very reliable, and are (when configured correctly) nearly impossible for hackers to break into. However, while both protocols provide similar services, they are not the same. In fact, they have several significant differences that are beyond the scope of this article.
Today, OpenSSH is a default software package found on Unix-like operating systems such as Mac OS X and Linux. Thus, programs or subsystems that are based on the SSH protocol will work “out-of-the-box” without having to go through the additional steps of either purchasing or creating the requisite SSL certificate needed for certain modes of secure data transmissions via TLS/SSL.
FTP vs. SCP vs. SFTP vs. FTPS
When needing to upload or download files from your VPS in real time, you essentially have the following options:
-
;
- Secure Copy Program (SCP);
- SSH File Transfer Protocol (SFTP); or
- FTP over TLS/SSL (FTPS).
FTP *not secure
Among the various file-transfer options, one should never, ever, ever connect to a remote server via FTP; SCP and SFTP are just as easy to use, but provide much more security. In addition, while FTP requires the installation of FTP server software such as vsFTP or ProFTP, both SCP and SFTP utilize the SSH protocol and, as a result, will work “out-of-the-box” when connecting to a remote Unix-like machine, such as Mac OS X or Linux.
SCP vs. SFTP
Given that both SCP and SFTP utilize the SSH protocol in connecting to another computer, the two methods are fairly equal in regard to security. SFTP has a slight edge in regard to efficiency, because an interrupted file-transfer can resume where it left off in the event of a broken connection that is later re-established.
SFTP vs. FTPS
SFTP should not be confused with FTPS, because the two methods are incompatible with each other. While FTPS can provide equal security, it does require additional steps to deploy if one does not already have an SSL certificate.
SFTP Clients
There are several quality SFTP clients out there: Cyberduck, Filezilla or WinSCP, to name a few. This article, however, will focus on Filezilla – an open-source (i.e. free) FTP client for Windows, Mac OS X and Linux. In addition to being able to download the program, the filezilla-project.org site also contains a documentation Wiki and a Support Forum.
Key-based Authentication
With SFTP, you have two user-authentication options when connecting to a cloud server: (i) passwords or (ii) SSH keys. For a discussion on the benefits of SSH keys over passwords and/or instructions on setting up password-less logins on your server, please refer to How To Create SSH Keys with PuTTY to Connect to a VPS.
SFTP via SSH2 Key-based Authentication
FileZilla has a built-in key management page in the Settings dialog, which allows you to save your Public (SSH) Key and to (securely) automate the process of connecting to a remote server.
Prequisite
If you have yet to create an SSH key pair, you can do so by following one of two DigitalOcean tutorials:
- Windows users:How To Create SSH Keys with PuTTY to Connect to a VPS
- Mac OSX & Linux users:How To Set Up SSH Keys
Follow these steps once you have an SSH key pair that you would like to use to connect to your VPS:
- Open the FileZilla client.
- From the top of the home screen, click on Edit and select Settings.
- On the left side of the menu, expand the Connection section and highlight SFTP.
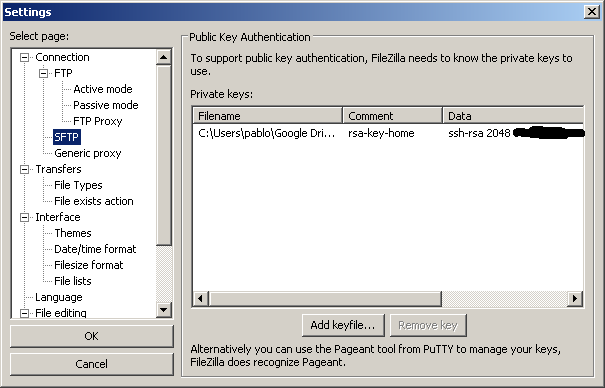
- Click on the [Add keyfile…] button and browse your local machine’s directories and select your Private Key file.
- Then, again from the top of FileZilla’s home screen, click on File and select Site Manager.
- Finally, on the left side of the Site Manager, click on the New Site button and type a unique name under My Sites that will allow you to easily identify this particular remote server in the future.
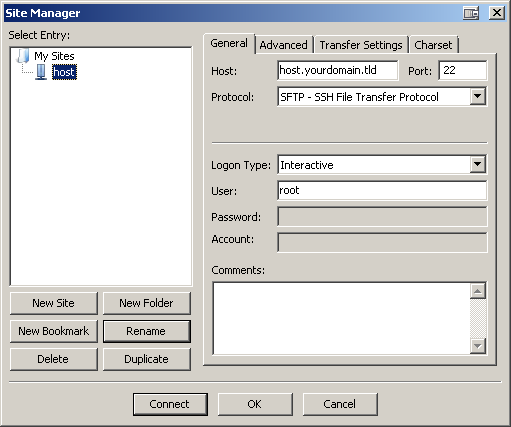
- Now, under the General tab, fill in the Host (with either an IP address or FQDN) and Port fields (default is 22).
- In the Protocol dropdown menu, select SFTP — SSH File Transfer Protocol.
- In the Logon Type dropdown menu, select Interactive.
Note for PuTTY users with passphrase-protected public keys: If your original .ppk file is password-protected, FileZilla will convert your .ppk file to an unprotected one when importing the key into FileZilla. As of version 3.0.10, a password-protected key file is not yet supported.
If a password-protected key file is desired, FileZilla is able to utilize PuTTY’s Pageant tool.
- Simply run Pageant; in your system tray, you will see the Pageant icon appear.
- Right-click on the icon and select Add Key and select your private key (.ppk) file.
- Then, follow the prompt to enter your passphrase.
- Finally, launch FileZilla and connect to your virtual private server via SFTP using SSH2 with a username and an empty password (do not forget to close pageant when you are done).
Editing Text Files
In managing your VPS, you will inevitably encounter a situation where some programming (text) files require edits. FileZilla does not carry a built-in text editor, which gives you the freedom of using any text editor of your choice. A popular editor among Windows users is Notepad++ because it is lightweight and can work with many of today’s popular programming languages.
By default, FileZilla is configured to utilize your local system’s default editor. If you do not wish to make Notepad++ your system’s default text editor, but would nevertheless like to use it to edit HTML, XML, Python, CSS, PHP & other programming files on your VPS:
- From the FileZilla home screen, click on Edit and select Settings.
- Along the left side of the Settings window, highlight File editing.
- Then, select the radio button associated with Use custom editor and click on the Browse button.
- Find your desired editor’s executable (.exe on Windows machines), double-click on it, and click the OK button to save your changes & close the Settings window.
Thanks for learning with the DigitalOcean Community. Check out our offerings for compute, storage, networking, and managed databases.
Настройка входа на SFTP сервер по ключам в FileZilla
В данном HOWTO мы подробно рассмотрим как настроить вход на SFTP (over SSH) сервер с использованием ключей в популярном FTP/SFTP клиенте FileZilla.
Введение
SSH ключи используются в качестве наиболее безопасной замены паролей для входа в учётные записи на UNIX системах. SSH ключ имеет открытую и закрытую части. Открытая часть (public key) помещается на сервер в файл
/.ssh/authorized_keys (по умолчанию), а закрытая (private key) должна храниться у пользователя в надёжном месте.
Закрытая часть SSH ключа может быть защищена паролем. В таком случае для авторизации с использованием данного ключа потребуется его указать. Настоятельно рекомендуется всегда защищать SSH ключи сложным паролем, т.к. в случае хранения его в открытом виде и утечки, злоумышленник получит полный доступ над учётной записью, вход в которую возможен с помощью данного ключа.
Генерирование SSH ключа в UNIX
Если у вас нет личного SSH ключа, то вы должны его сгенерировать. Для UNIX систем это делается штатно утилитой командной строки:
Для идентификации ключа рекомендуется указывать свой адрес электронной почты в качестве комментария. Это поможет в дальнейшем администратору определять где чей ключ.
На следующем этапе у вас будет запрошен пароль для защиты личной части (private key). Придумайте и введите сложный пароль.
Генерирование SSH ключа в Windows
На операционных системах семейства Microsoft Windows сгенерировать SSH ключ можно бесплатной утилитой PuttyGen. Загрузите её и запустите.
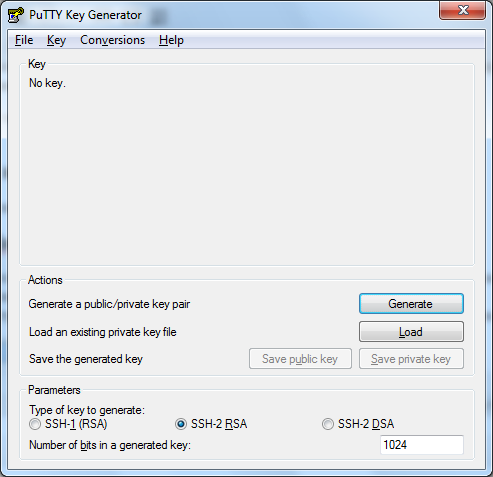
Главное окно PuttyGen
Для начала процесса проверьте переключатели в самом низу окна. Параметры должны быть установлены как на нашем скриншоте, а именно: Type of key to generate -> SSH-2 RSA, Number of bits in a generated key -> 1024 (допускаются варианты 2048 и 4096).
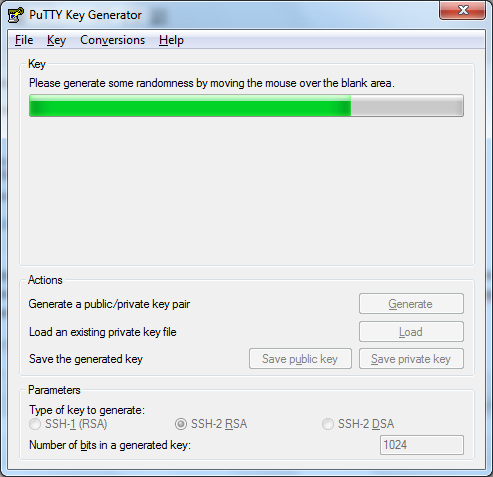
Сбор энтропии PuttyAgent
После проверки нажмите кнопку Generate и начинайте перемещать курсор мыши в области с прогресс-баром для сбора энтропии до его полного заполнения.
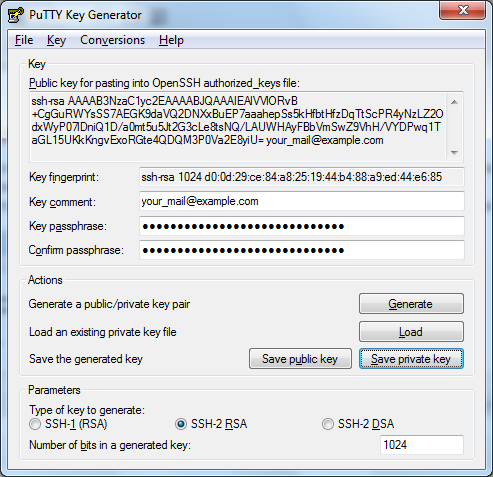
Результат работы PuttyGen
Через несколько секунд вы увидите, что программа завершила генерирование SSH ключа. Вам будет предложено заполнить некоторые поля и сохранить обе его части. Рассмотрим подробнее.
В разделе Public key for pasting into OpenSSH authorized_keys file находится открытая часть ключа. Её следует прописывать в файл
/.ssh/authorized_keys на сервере.
Key fingerprint содержит уникальный отпечаток ключа, который служит для его идентификации и проверки.
В поле Key comment следует указать свой адрес электронной почты. Это поможет в дальнейшем определять где чей ключ.
Обязательно защитите закрытый ключ паролем, для этого укажите его в Key passphrase и Confirm passphrase (они должны совпадать).
Чтобы сохранить SSH ключ, нажмите кнопку Save private key. Ключ будет сохранён в формате Putty (*.ppk), пригодном для использования в Putty Agent и самом Putty (данный формат содержит связку открытый + закрытый ключ).
Если вы не сохранили публичную часть ключа через Save public key, то всегда можете снова загрузить свой ранее сохранённый закрытый ключ (файл *.ppk) кнопкой Load и скопировать открытую часть из верхней части окна.
SSH ключи и FileZilla
Штатно FileZilla поддерживает только личные (private) ключи, хранящиеся напрямую в конфиге программы в расшифрованном виде (без пароля).
Это категорически не рекомендуется, т.к. злоумышленнику будет достаточно похитить файл с настройками программы и получить полный доступ ко всем учётным записям.
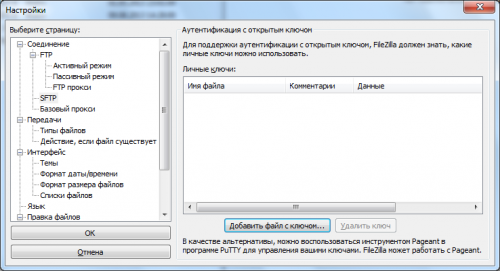
FileZilla — настройки SSH ключей
Если хотите рискнуть, то для добавления SSH ключа, необходимо нажать кнопку Добавить файл с ключом и найти ключевой файл на диске. Ключи допускаются только в формате Putty без пароля. Если ключ защищён паролем, будет выдан запрос на его расшифровку. Ещё раз напоминаем о том, что так хранить ключи не следует.
В качестве рекомендуемой альтернативы, следует использовать утилиту Putty Agent (pageant). Далее мы подробно рассмотрим как их «подружить» с FileZilla.
Используем Putty Agent
Скачайте и запустите утилиту Putty Agent (pageant). Вы увидите его значок в системном лотке (около часов Windows). Нажмите по нему правой кнопкой мыши и в открывшемся контекстном меню выберите пункт View Keys.

Главное окно Putty Agent
Для добавления ключа необходимо нажать кнопку Add Key и найти файл с закрытым ключом в формате Putty (*.ppk) на диске, после чего ввести пароль (если он защищён паролем).
Вы можете автоматизировать все действия по добавлению ключа в утилиту Putty Agent, создав батник или ярлык с таким содержанием:
Здесь C:\Putty\ — путь, в который вы скопировали утилиту Putty Agent, а C:\mykeys\mykey.ppk — полный путь к закрытому ключу.
Если в путях имеются пробелы, то необходимо использовать кавычки (как на нашем примере).
Putty Agent и FileZilla
Как мы уже писали выше, FileZilla может использовать Putty Agent для авторизации на SFTP-серверах. Для этого нужно сначала запустить Putty Agent с нужным закрытым ключом (как это сделать указано выше).
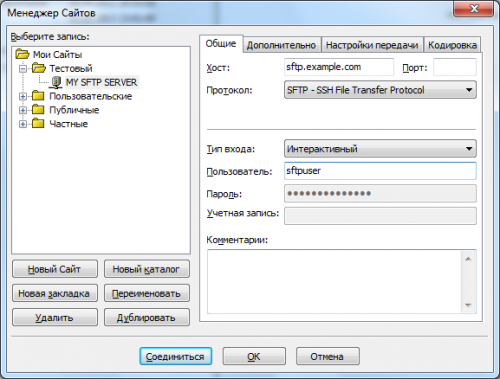
Добавление сервера в FileZilla
Откройте менеджер серверов FileZilla, добавьте новый сервер кнопкой Новый сайт, укажите его адрес (поле Хост) и порт (если работает на нестандартном).
В комбо-боксе Протокол укажите SFTP — SSH File Transfer Protocol, а Тип входа — Интерактивный. Далее укажите имя пользователя, под которым вы будете подключаться к серверу (можно не указывать, тогда потребуется вводить вручную при каждом входе; полезно при наличии нескольких учётных записей на сервере). Все остальные поля заполнять не требуется.
Нажмите OK и запустите подключение к серверу. Если утилита Putty Agent запущена с нужным закрытым ключом, то авторизация пройдёт в полностью автоматическом режиме и вы увидите файловую систему удалённого сервера, иначе будет выдана ошибка.
Окончание работы
Сразу после окончания работы с SFTP из соображений безопасности рекомендуется закрыть программу Putty Agent, нажав по её значку в системном трее правой кнопкой и выбрав пункт Exit.
2 commentary to post
Команда h-keygen генерит ключ который файлзилла не принимает! Как сгенерировать ключ то в убунту для файлзиллы?
SFTP. Подключиться к хранилищу c помощью Filezilla
Подключаться к SFTP-хранилищу можно через терминал. В примере используется FTP-клиент Filezilla.
Установить Filezilla
Скачать и установить Filezilla можно по ссылке.
Настроить подключение
1. Для создания подключения откройте менеджер сайтов:

2. В открывшемся окне выберите Новый сайт:

3. Придумайте название и перейдите к заполнению данных в разделе Общие (справа). Выберите способ подключения:
1) Подключиться с паролем
Для поля «Протокол» выберите SFTP — SSH File Transfer Protocol.
В поле «Хост» введите Hostname, полученный в Личном кабинете, укажите порт 2200.
«Тип входа» — Запросить пароль.
«Пользователь» — имя хранилища из личного кабинета.
2) Подключиться с SSH-ключом
Для поля «Протокол» выберите SFTP — SSH File Transfer Protocol.
В поле «Хост» введите Hostname, полученный в Личном кабинете, укажите порт 2200.
«Тип входа» — Файл с ключом.
«Пользователь» — имя хранилища из личного кабинета.
«Файл с ключом» — путь до файла, в котором хранится приватный ключ, публичную часть которого вы добавили в хранилище.
4. Нажмите ОК для сохранения внесённых изменений или Соединиться для установки соединения.
How to Use SFTP with FileZilla to Securely Transfer Files on RunCloud

In this tutorial, you will learn how to use SFTP with FileZilla to securely transfer and manage files on RunCloud server.
FTP is not secure
FTP (File Transfer Protocol) uses clear text for all transmissions. Anyone is able to read the FTP usernames, passwords, commands and data by packet capture (sniffing) on the network. By default, RunCloud Firewall blocks FTP (port 21) at your server. You are recommended to use SFTP for file transfer instead.
Tip: You can use RunCloud File Manager in RunCloud panel for simple file management.
What is SFTP?
SSH or Secure File Transfer Protocol (SFTP) is a secure file transfer protocol for file access, transfer, and management. It adapts the Secure Shell (SSH) protocol with encryption and secure authentication on both server and client.
SFTP provides two user-authentication options when connecting to your server: a)passwords or b)SSH2 key-based authentication. The SSH Keys is more secure than password.
What is FileZilla?
FileZilla is a free, open source FTP client that supports FTP, SFTP, FTPS. It is available for Windows, Mac OS X, and Linux. Download FileZilla Client.
SFTP via Passwords

- Open FileZilla client
- Open Site Manger by clicking the top left icon in menu bar, or press Ctrl+S
- Click New Site button and gives a name to the new site connection
- At the right side panel enter the following information:
- Host: [RunCloud server IP address]
- Port: 22
- Protocol: SFTP – SSH File Transfer Protocol
- Logon Type: Normal
- User: [System User’s username]
- Password: [System User’s password]
- Click Connect button to connect (OK button to save the connection)
- Accept fingerprint warning when prompt
- You are now connected to RunCloud server via SFTP using password
SFTP via SSH2 Key-based Authentication
If you have not yet create an SSH key pair, then follow one of the two tutorial below:
- Windows users: How To Use SSH Keys with PuTTY on RunCloud
- Mac and Linux users: Generating SSH Keys
Method #1

- Open FileZilla client
- Open Site Manger by clicking the top left icon in menu bar, or press Ctrl+S
- Click New Site button and gives a name to the new site connection
- At the right side panel enter the following information:
- Host: [RunCloud server IP address]
- Port: 22
- Protocol: SFTP – SSH File Transfer Protocol
- Logon Type: Key file
- User: [System User’s username]
- Key file: [select your SSH private key in .ppk or .pem format]
- Click Connect button to connect (OK button to save the connection)
- You are now connected to RunCloud server via SFTP using SSH key
Method #2

- Open FileZilla client
- In the Edit – Preferences menu, select SFTP under Connection
- Click Add key file… button to add your SSH private key (If your key is in OpenSSH format, FileZilla will prompt you to convert it to PuTTY’s PPK format)
- Click OK button to save setting and exit Preferences window
- Follow Method #1 above but select Interactive for Logon Type
Sources
Simplifying Server Management
RunCloud is a cloud server management tool that allows you to maintain full control of your server and host multiple WordPress, WooCommerce, Laravel, and PHP applications with fast and easy configuration.