How to Export Jira Projects to Microsoft Excel (2 Methods)
Developers work in Jira, team leads work in Jira, and maybe even support specialists work in Jira. But the rest of the organization probably has their own tool they prefer, and that means someone has to jump back in forth between that tool and Jira. Or, if everyone’s in Jira, you’re struggling to build the reports your stakeholders want. Either way, you’re looking for a way to export Jira issues to excel. Creating that spreadsheet manually and copying the information in takes time you could be doing something more effective. So how can you get it done automatically?
There are two methods. One is exporting Jira issues as a CSV file. The other is using Unito.
First method: export Jira to Excel as a CSV
Jira has a lot of options for exporting issues to different formats, from HTML to RSS, Word, and, yes, a CSV file. That means you can potentially import that file into all sorts of databasing tools, from Excel to Sheets and Airtable. Here’s how it’s done.
First, you’ll want to go to your Jira project.
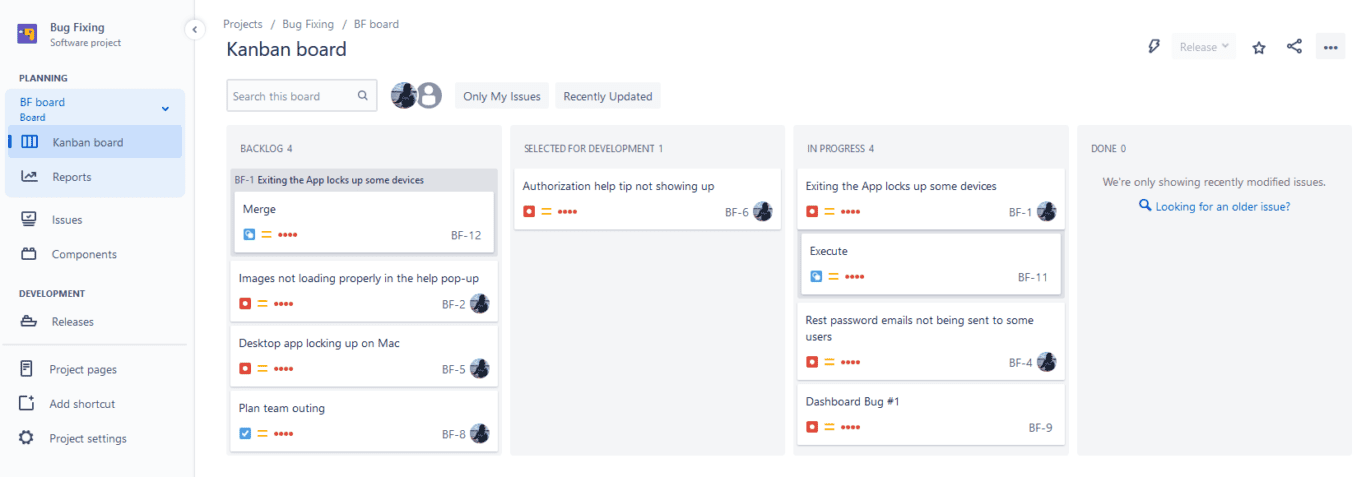
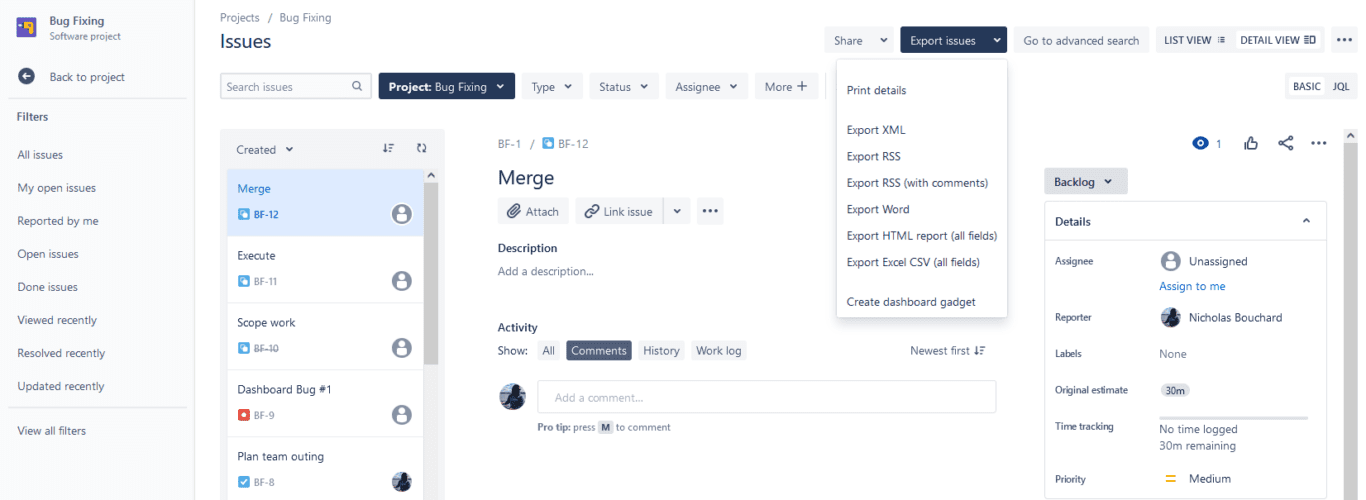
Then, click on Issues on the left. You’ll get a full list of all the issues that are part of this project. Click on Export issues, then on Export Excel CSV. Your CSV file will download automatically.
Now go to Excel.
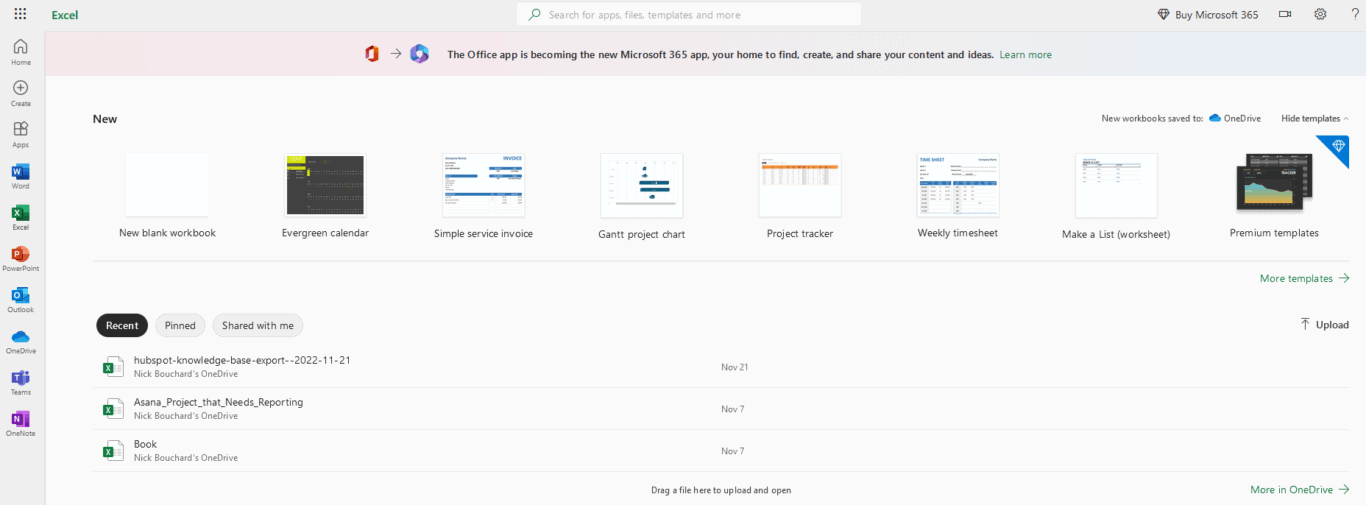
Drag your CSV file into your Excel workspace.
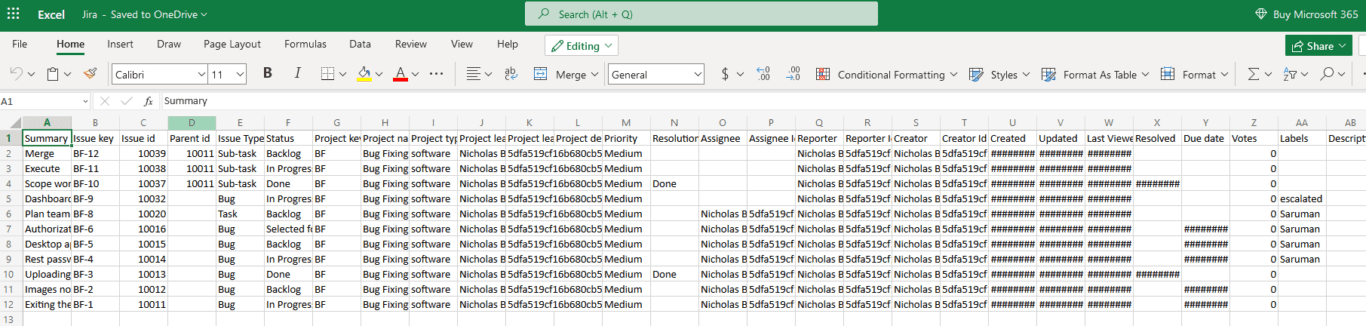
Just like that, you have all your Jira issues exported to Excel. Each column represents a field in Excel, from the issue number to the assignee and labels. From here, you can clean this up, use data visualization tools to turn it into a report, or send it off to anyone who needs it.
Limitations of this method
It’s pretty hard to beat this method as far as ease-of-use goes. Go to Jira, hit export, and put the CSV file in Excel. But does simplicity make for the best method? Well that depends on whether these are dealbreakers for you or not:
- Manual exports: The unfortunate thing about this sort of export is that it becomes outdated the minute you do it. That’s because work is still happening in Jira after you export your issues. If you want to reflect those updates, you’ll need to export your issues again.
- One-way exports: If you ever want to get data from Excel into Jira — or make it flow back and forth — this method won’t work for you.
- Cleanup is required: Look at that screenshot again. How’s someone used to Jira — or any other project management tool — supposed to make sense of that spreadsheet? Exporting Jira issues to Excel with this method isn’t a one-and-done process. You’ll need to clean up the result to get the most use out of it.
If you only need to do a direct export from Jira to Excel every so often, and you already have workflows in place to make that data presentable, then this method might work for you. But if you want a better method, read on.
Second method: export Jira projects to Excel with Unito
Unito is a no-code workflow management solution with some of the deepest two-way integrations for the most popular tools on the market, including Asana, Excel, Google Sheets, Jira, GitHub, and more. With a Unito flow, you can automatically export Jira issues to Excel, where they’ll be turned into rows. Then, whenever an issue is updated in Jira, you’ll see those updates in Microsoft Excel. No manual exporting required.
The best part? We built a template you can use to build automatic reports in Excel from data in Jira. Get the template here.
Here’s why Unito is the best way to export your Jira issues to Microsoft Excel:
- It’s automatic: Once you’ve set up a Unito flow between Jira and Excel, issues will be automatically exported to Excel as they’re created in Jira. No need to check in or run the automation yourself.
- It’s one-way and two-way: If you’re building reports in Excel, you can use Unito to send Jira issues to Excel. But if you want to automatically update Jira projects from Excel, you can do that with Unito, too. At the same time.
- It’s automatically cleaned up: When you build a Unito flow, you can decide how much data you want to export, where it lands, and what it’ll look like when it gets there.
You can build your first Unito flow and start exporting Jira issues in minutes. Here’s how.
-
First, connect Jira and Excel to Unito

You’ll also pick the Jira project you want to export data from and the Excel spreadsheet you want it sent to.

You could exclude issues with specific labels, only sync tasks with a specific assignee, and more.
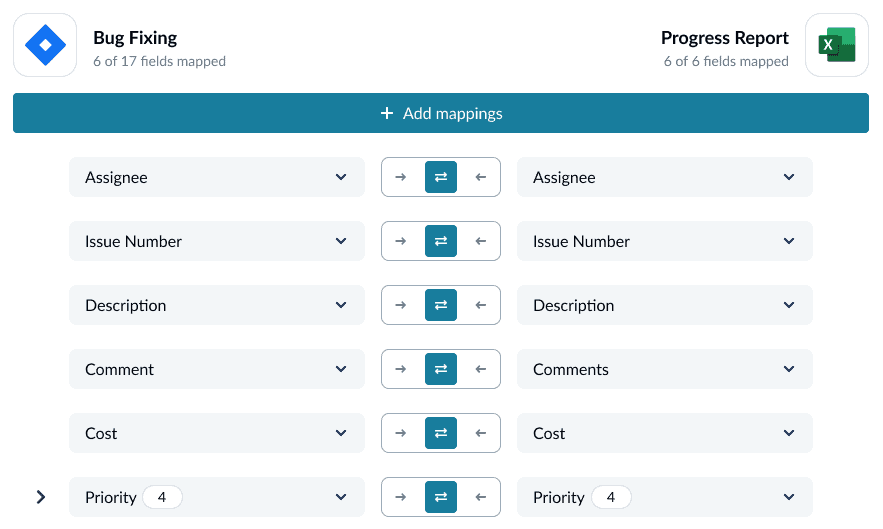
And that’s it! Now just launch your flow and watch as your Jira issues are automatically exported to your Excel spreadsheet.
Выгрузка эпиков и задач по релизу JIRA для Delivery manager (в excel)

Подготавливаем строку фильтров к выгрузке, переключаем на Продвинутый режим и Список:

В появившейся строке вводим данные проекта и версию релиза для поиска:

JQL: project = «XXX» AND fixVersion = X.X
JQL epic: project = «XXX» AND fixVersion = X.X AND type = Epic
В случае правильно введенных данных появится таблицы выгрузки
Выбираем нужные поля для выгрузки, например:
Тип, Код, Тема, Статус, Исполнитель, Создано
В зависимости от типа запроса определите необходимый набор полей
Если вам нужна выгрузка в excel выбранных полей, то рекомендую Better excel
7 ways to export issues from Jira

Since the early days, Atlassian has promoted an open model where customers can tinker with source code, integrate seamlessly between applications, or check how suggestions for product improvements get traction (or not).
A symptom of Jira’s openness is the ability to export issues into a few standard formats that can then be read, reused, and repurposed. The great thing about exporting issues is that issue granularity is perfect for a spreadsheet, where each issue takes one row, and each metadata field takes one column.
Why would you export issues?
It’s unsurprising that issue exports are a highly used feature. But since we keep meeting Jira fanboys and girls who ask us “why would you want to export issues from Jira,” we’ve gathered some of the most common use cases:
- To share information with external stakeholders. It’s not uncommon for customers to demand full issue reports in different formats, like excel or pdf. What they do with that information may fall under some of the uses below.
- To analyze data in excel. The unstoppable desire to dive into datasheets and understand issue data with formulas and pivot tables, also known as “the excel syndrome” is still one of the top reasons for exports. If you have a skilled analyst, there will be no need to learn any other reporting tool.
- For auditing purposes. Sure, you could audit your instance directly on Jira, but that implies that your auditor 1) is a proficient Jira user, 2) has Administrator permissions and 3) finds sufficient information in Jira reports and dashboards. Instead, exporting the raw data and letting them explore at their own pace is usually a good idea.
- To analyze compliance with SLAs. Add the excel syndrome to the need to see trends in how issues are being transitioned and determine what’s impacting your company’s SLAs, and voilà! You’ll be exporting your issues every month to run your compliance analyses.
- For migration projects. Yup, migrations happen, and they’re (usually) painful. An easy way to extract all your issue data without any losses is of great help in these situations.
Pitfalls and pains of exporting issues from Jira
While it’s true that you can export issues from Jira in three simple steps…
- Search in the issue navigator.
- Click the export button.
- Select the format.
It’s also true that the UI method has several limitations:
1) Unsupported formats: excel, pdf
Starting with Jira 7.2, Atlassian decided to discontinue native exports to excel due to a Microsoft Office security update that prevented users with high-security settings from opening them.
Up until that point, whenever a user requested an excel export, Jira created an HTML file and saved it as an .xls file. When that operation was blocked, the export was preserved with the original HTML format.
This might seem no change at all; but since Atlassian has repeatedly warned that HTML exports would be discontinued altogether, it seems reasonable to have an alternative or two in sight.
2) Missing data and extra content
Ok, so you are a heavy CSV user and have no problem moving back and forth between text files and large spreadsheets. The option to export issues to CSV should suit you perfectly!
At least in theory– Your satisfaction will depend on how much information you need to preserve.
You should know that native issue exports lack important data, including:
- Transitions
- Comments
- Attachments
Just think for a moment of how many specs refer to screenshots, diagrams, and illustrations –if your goal is to migrate issues to another system, there will be a lot to be missed.
3) The 1,000 limit
A thousand. That’s a totemic number for Atlassian, and many restrictions are set against it (for example, the bulk change maximum, query results, or even the indexing batches).
Issue exports fall within this limitation as well. Unless you use the workaround that I’ll explain in a minute.
Click here to learn more about different ways to exporting issues from Jira like a boss
Как экспортировать данные Jira в Excel или Google Sheets
Когда вы работаете в команде, собрания команды могут быть важной частью вашего дня. В ежедневных выступлениях или еженедельных обзорах отчеты необходимы для предоставления обновлений и демонстрации команде и/или заинтересованным сторонам того, на каком этапе разработки продукта вы находитесь. В идеале вы хотите, чтобы отчеты были автоматизированны и в доступном формате для всех участников команды.
Хотя в родной Jira есть варианты отчетов (отчеты на доске и стандартные отчеты на панели), они ограничены и не очень настраиваются.
Хотя лучший вариант — приобрести приложение для создания отчетов в Atlassian Marketplace, чтобы создавать настраиваемые диаграммы в самой Jira, многим командам удобнее использовать традиционные конструкторы электронных таблиц, такие как Microsoft Excel и Google Sheets. С этой целью Atlassian создала интеграцию с Microsoft Excel и Google Sheets, чтобы пользователи могли создавать диаграммы и таблицы из своих данных Jira на наиболее знакомых им платформах.
В этой статье объясняется, как.
Создание отчета Jira в Excel и Google Sheets
Вы можете экспортировать свои задачи Jira с помощью расширенного поиска, доступ к которому можно получить несколькими способами. Самый простой способ — выбрать «Фильтры» на верхней панели навигации, затем «Расширенный поиск задач». В качестве альтернативы, если вы начинаете в своем проекте Jira, вы можете перейти к панели «Проблемы», которая должна выглядеть примерно так, как показано на снимке экрана ниже. После того, как вы отфильтровали проблемы до тех, которые хотите экспортировать в Excel, нажмите «Перейти к расширенному поиску».
Вы заметите, что панель задач изменилась, и теперь в правом верхнем углу экрана больше значков.
Щелкните значок электронной таблицы Excel, если вы хотите экспортировать свои задачи в Excel, а затем разрешите Jira подключиться к вашей учетной записи Microsoft. Если вы хотите экспортировать в Google Sheets, щелкните значок Google Sheets и разрешите Jira подключиться к вашей учетной записи Google.
Затем ваши данные Jira будут экспортированы в электронную таблицу Excel или Google, чтобы вы могли создавать там отчеты и диаграммы.
Автоматическое обновление данных Jira в Excel и Google Sheets
Раньше пользователям приходилось просматривать свои проблемы в Jira и вручную обновлять свои электронные таблицы в Excel и Google, чтобы перестроить свои отчеты. Этот процесс занял много времени, поэтому теперь есть надстройка, позволяющая планировать автоматические обновления.
Начнем с Google Таблиц. Когда вы находитесь в пустой электронной таблице, вы увидите кнопку с надписью «Установить сейчас» со ссылкой на дополнительное приложение под названием «Jira Cloud для Google Таблиц». Нажав «Установить сейчас», вы перейдете на GSuite Marketplace, где сможете загрузить приложение.
Сделав это, вернитесь к электронной таблице Google, нажмите «Дополнения», выберите «Jira Cloud for Sheets», затем нажмите «Открыть». Это открывает интеграцию Jira непосредственно в электронной таблице.
Интеграция с Jira должна открыться на правой боковой панели экрана. Нажмите «Получить задачи из Jira», затем перейдите к «Запланировать обновление данных». Теперь вы можете выбрать, как часто вы хотите, чтобы ваши данные обновлялись.
Теперь давайте посмотрим на Эксель.
При выборе экспорта в Excel из расширенного поиска Jira вам будет предложено выбрать, используете ли вы Excel онлайн или на рабочем столе. Пользователи настольных компьютеров увидят поле с описанием надстройки «Jira Cloud for Excel». Выберите «Доверять этой надстройке», чтобы авторизовать Excel в браузере.
Вы также можете включить эту функцию с чистого листа, нажав «Вставить» на панели навигации и выбрав «Надстройки». Это приведет вас в магазин надстроек Microsoft Office. Найдите «Jira Cloud for Excel» и нажмите «Добавить».
Конфигурация этого приложения аналогична Google Таблицам. У вас будет панель в правой части электронной таблицы, которая позволит вам сузить свой запрос, поля и параметры обновления.
Интеграция с Excel не позволяет планировать обновления в выбранные даты и время, как в случае с Google. Вместо этого вы можете настроить свой лист на автоматическое обновление всякий раз, когда вы открываете файл. В качестве альтернативы вы можете выбрать ручную синхронизацию данных.
Теперь, если вы проводите ежедневные стендапы или еженедельные обзоры из Microsoft Excel или Google Sheets, вы можете быть уверены, что ваши данные всегда актуальны. Вы также можете импортировать свои формулы для создания более полных и подробных презентаций.
Вывод
Причина, по которой Atlassian решила интегрировать Jira с Excel и Google Sheets, заключается в том, что эти платформы остаются популярными и широко используемыми. Atlassian знает, что если люди не смогут использовать те инструменты, которыми они умеют пользоваться, это может ухудшить процессы и способствовать внедрению неверных методов работы. Дело в том, что многие люди все еще гораздо лучше знакомы с программным обеспечением для работы с электронными таблицами, чем с Jira. Таким образом, возможность экспорта в Excel и Google Sheets помогает людям выполнять свою работу, не приспосабливаясь к незнакомой платформе или методу.
В то же время растет желание держать все в Jira. Экспорт данных Jira на внешнюю платформу создает информационный и коммуникационный бункер и замедляет поток данных внутри организации. Внезапно данные больше не управляются внутри Jira, а изолируются в отдельной электронной таблице. Мы живем в эпоху, когда быстрое цифровое сотрудничество стало столь же необходимым, как электричество, воздух и кофе. Но на самом деле быстрое цифровое сотрудничество требует, чтобы все были на одной волне и работали с одними и теми же инструментами.
Вот почему надстройка Atlassian, позволяющая создавать настраиваемые оперативные отчеты, не выходя из Jira , будет гораздо лучшим вариантом в будущем. Таким образом вы избежите дублирования, избыточности и узких мест, возникающих из-за того, что ваши данные находятся в разных местах. Хотя продолжение использования проверенных временем Excel и Google Таблиц может показаться путем наименьшего сопротивления, в долгосрочной перспективе это вызовет больше проблем, чем пользы.