Shahzeb Ihsan
«The reasonable man adapts himself to the world; the unreasonable man persists in trying to adapt the world to himself. Therefore, all progress depends on the unreasonable man.» — George Bernard Shaw
Blog | Archive | About Me | Projects
Installing Arch Linux on VirtualBox
Arch Linux has to be installed manually since the official Arch Linux ISO doesn’t contain an installer, additionally, no packages are included in the ISO, so a working internet connection is required during installation. If you’d rather just download a pre-configured Arch Linux VM, go here.
Most of the information below can be found in the official installation guide but some other information requires some Googling and a little bit of digging around on the Arch Linux wiki and forums.
Virtual Machine Configuration
Create a new virtual machine in VirtualBox for Arch Linux (sample configuration shown below). Once the VM is created, add the Arch Linux ISO to the CD/DVD drive.

Configuration of the highlighted settings in the screenshot below are important and the rest are optional. Arch Linux can run on a pretty low memory configuration so you can set the size of the display and base memories according to your preference.
For storage, I configured a “dynamically allocated” 8.0 GB hard drive image since I wanted to upload the resulting VMs to Dropbox, but I would recommend using a “fixed size” hard drive if you have space to spare on your host machine.
Network settings are important: at a minimum, you need to bridge your host machine’s network interface (which is connected to the internet) with your VM as shown in the following image:
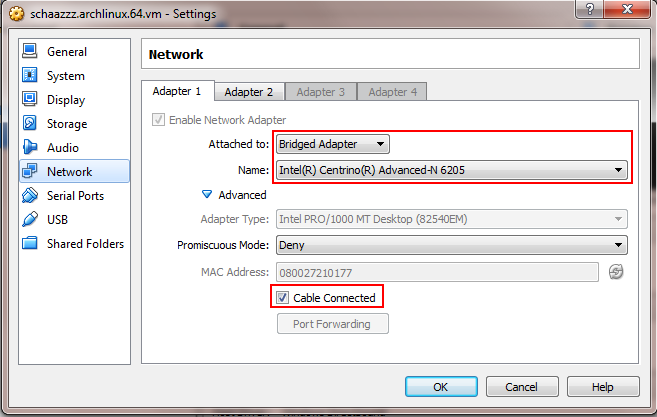
In case you would like any folders from your host machine to be accessible in your VM, the simplest way is to add them to the “Machine Folders” section under “Shared Folders” but do not select the “Auto-mount” option otherwise they will only be accessible as root (I’ve since moved to using sshfs for mounting my Windows host machine folders).
Installing Arch Linux
Now that the VM has been created with the ISO already inserted, start the virtual machine and login with user ID and password “root” .
Partitioning the VM’s Hard Drive
You can partition the hard drive using either a single root partition or discrete partitions. I’ve chosen a mixture of the 2 partitioning schemes: 200MB as /boot for installing GRUB, 1024MB swap file and the rest allocated as a single root partition.
- Let’s use the lsblk command to take a look at all the available storage devices:
- In the example above, “sda” is the VM’s hard drive image. We can find out a bit more about “sda” using parted /dev/sda print :
- The following set of parted commands will create the desired partitions (200MB as /boot for installing GRUB, 1024MB swap file and the rest allocated as a single root partition):
- Using lsblk again, we can see the new partition table, note that “sda” now has 3 subentries: “sda1” (/boot), “sda2” (swap) and “sda3” (root partition).
- Let’s format the boot and root partitions to Ext4. For this we will use the mkfs.ext4 command:
- Now we’ll format and activate the swap partition. mkswap will format “/dev/sda2” as swap and swapon will tell the kernel that this is our swap partition.
Mount the root and boot partitions:
Install the base system using pacstrap :
And finally, generate “fstab”:
Chroot into Your Newly Installed Base System
- Since our Arch Linux system is now installed, we can chroot into and configure it…
- Set the root password…
- If you want, you can now create a user (recommended):
I would also recommend adding the user you created above to the SUDOers list by using the visudo command to open sudo’s configuration file. First we’ll have to install Vim using pacman -S vim . Once Vim is installed, search for “## User privilege specification” and below the configuration for root add your username: <username> ALL = (ALL) ALL
Download, install and configure grub…
- Almost, done — exit from chroot, unmount the mounted partitions and reboot (or shutdown). You can also remove the Arch Linux ISO from the VM’s CD/DVD drive…
Network Configuration
After you restart your VM (you can now login as the new user you created above) and boot into your shiny new Arch Linux installation, you’ll realize that the network doesn’t work. Even though the network worked out-of-the-box in the ISO, for some reason, it has to be configured from scratch now . I find this feature very strange extremely annoying. I’ve seen this in other distros as well, even in some with fancy Live CDs. I wonder why the network configuration is not copied during installation (did I miss something during installation?).
- The following network configuration is based on the VM’s network configuration shown above. enp0s3 is the bridged network adapter and ensp0s8 is the host only network. You need to create network files for both interfaces, e.g. sudo nano /etc/systemd/network/enp0s3.network and sudo nano /etc/systemd/network/enp0s8.network . The contents of these files for my installation are shown below:
- I manually specified public DNS for the interface which connects to the internet, you only need to do this if you have internet connectivity but are unable to resolve host names. In case you add public DNS to your network configuration, you might still need to update resolv.conf. The contents of my resolv.conf:
- Now enable DHCP for both network configurations and restart your network service.
- Now that our network is all configured, lets update the system:
Installing VirtualBox Guest Additions
This is required if you want to auto-resize the guest display, mount shared folders using vboxsf or would like to share your VM’s clipboard with your host machine or vice-versa.
Installing LXQT
This step is only required if you want to install LXQT (which I prefer over XFCE). In case you would like to use XFCE, you can move on to the next section which lists the steps for installing XFCE.
- Let’s download and install the LXQT program group, OpenBox (LXQT’s default window manager), OpenBox Configuration Utility and SDDM (LXQT’s preferred display manager)
- We still need to install a couple of more packages before we can start LXQT. XFCE4 terminal and LXTerminal are optional (you can install another terminal of your choice).
Now add exec startlxqt to the start of /etc/X11/xinit/xinitrc and cp /etc/X11/xinit/xinitrc
Generate the configuration for the display manager (we need root to do this) and enable the display manager service.
- Now you can start LXQT by executing startx . Next time you restart your VM, you should see a graphical login manager and once you log in, LXQT should start automatically.
Installing XFCE
Since Arch Linux’s preferred desktop manager is XFCE, it is really easy to install. Just install the XFCE program group, XORG and LXDM (Arch Linux’s recommend display manager for XFCE). Afterwards, enable the display manager service and then you can start XFCE. Next time you restart your VM, you should see a graphical login manager and once you log in, XFCE should start automatically.
Answered: Installing Arch Linux In A Virtual Machine (2022)
Arch Linux is a popular Linux distribution that can be installed on a virtual machine. This guide will show you how to install Arch Linux in a virtual machine.
So bear in mind that these notes in places are relative to me.
Download Here: Arch Linux Source Download Page
1 – Initial Shell Prompt#
After being presented with a shell prompt where you are automatically logged in as root. Begin by setting the keyboard language to your relevant country.
1 – Initial Shell Prompt2 – Partitioning3 – Filesystems4 – Mounting5 – Mirrors & System Packages6 – fstab7 – chroot8 – hostname9 – localtime10 – locale11 – passwd12 – GRUB Bootloader13 – unmount & reboot
The shell in use is Zsh.
Show the possible keyboard layouts available with this command.
To set it use loadkeys plus your keyboard layout choice:
The dhcpcd network daemon starts automatically during boot, and it will attempt to start a wired connection by default.
Use ping to check connectivity.
$ ping -c 5 www. google. co. uk
In a Virtual Machine that shares the host’s network connection, the ping should be successful as long as the host itself is connected and working, when using a bridged hardware network setting. If not this then… improvise.
2 – Partitioning#
This will list all devices connected to your system along with their partition schemes, including those used to host and boot live Arch installation media (e.g. a USB drive). Not all devices listed will, therefore, be viable or appropriate mediums for installation. To filter out inappropriate results, use this grep.
$ lsblk | grep -v “rom|loop|airoot”
Devices (e.g. hard drives) will be listed as sdx, where x is a lower-case letter starting from a for the first device (sda), b for the second device (sdb), and so on. For the VM only one device is available (sda) which is the allocated host hard drive space.
Open the device (host HDD) that the partition table is to be created with and create a new MBR/msdos partition table for BIOS systems. All done using the following command:
$ parted -s /dev/sda mktable msdos
Here I’m making two partitions in total for the VM. The first with line 1 and second with line 2.
$ parted -s /dev/sda mkpart primary 0% 100m $ parted -s /dev/sda mkpart primary 100m 100%
You can run the earlier grep pattern again to see the newly created partitions.
$ lsblk | grep -v “rom|loop|airoot”
Or use parted instead to see the partition table.
$ parted /dev/sda print
3 – Filesystems#
The boot filesystem is formatted and placed on the first partition created (smaller of the two) with:
$ mkfs. ext2 /dev/sda1
The root filesystem is formatted on the other main partition now via:
$ mkfs. btrfs /dev/sda2
4 – Mounting#
This will mount the main partition:
$ mount /dev/sda2 /mnt/
Make a boot directory in /mnt/ which is now mapped/mounted to /dev/sda2 .
Mount the boot partition to the newly created boot sub-directory in the main root partition.
$ mount /dev/sda1 /mnt/boot
5 – Mirrors & System Packages#
Begin by appending the system’s mirrorlist file name with .orig and the mv command.
$ mv /etc/pacman. d/mirrorlist /etc/pacman. d/mirrorlist. orig
Then run rankmirrors on the aforementioned file with the -n parameter to find and redirect the fastest 6 mirrors into a new mirrorlist file.
$ rankmirrors -n 6 /etc/pacman. d/mirrorlist. orig >/etc/pacman. d/mirrorlist
After this use pacman to update and sync the systems package listings.
“Whenever you change your mirrorlist, refresh all package lists with pacman, to ensure that the package lists are updated consistently.”
Next install all the system’s base packages. Time to download packages will vary on your internet connection and the respective mirrors.
Adding a -i parameter to this command enables a prompt for every package to be installed during the process, if preferred.
$ pacstrap /mnt/ base base-devel
Copy the mirrorlist(s) from earlier over also.
$ cp /etc/pacman. d/mirrorlist* /mnt/etc/pacman. d
6 – fstab#
Here generate fstab like so in this directory:
$ genfstab -p /mnt/ »/mnt/etc/fstab
7 – chroot#
chroot into a bash shell in /mnt/ .
$ arch-chroot /mnt/ /bin/bash
8 – hostname#
Set the hostname to today’s date, or whatever you prefer. [alert-announce]
$ echo “archlinux-vm-$(date +”%d-%m-%y”)” >/etc/hostname
9 – localtime#
Set the localtime to London’s current time (obviously change this in relation to your own timezone.)
$ ln -s /usr/share/zoneinfo/Europe/London /etc/localtime
10 – locale#
Locales define which language the system uses and other regional considerations like currency denomination, numerology and character sets.
Using vi do this:
$ vi /etc/locale. gen
Uncomment the relevant language you wish to use (UTF-8 support recommended).
en_GB. UTF-8 UTF-8
Then generate the locales.
The /etc/locale.conf file does not exist by default. Create it, where LANG refers to the first uncommented entry in /etc/locale.gen from earlier.
See the next command for an example:
$ echo LANG=en_GB. UTF-8 > /etc/locale. conf
Lastly export the chosen locale.
$ export LANG=en_GB. UTF-8
11 – passwd#
Change the root user’s password for the VM.
12 – GRUB Bootloader#
Here installation with GRUB and MBR/msdos is demonstrated.
Install the grub package and then run grub-install to install the bootloader:
$ pacman -S grub $ grub-install –target=i386-pc –recheck /dev/sda
Next automatically generate the main grub config file.
$ grub-mkconfig -o /boot/grub/grub. cfg
13 – unmount & reboot#
Exit from the chrooted shell environment:
While partitions are unmounted automatically by systemd on shutdown, you may do so manually with the next command as a safety measure.
Finally if using a CD image you may have to remove it from your VM manager software, before rebooting.
“Your new Arch Linux base system is now a functional GNU/Linux environment ready to be built into whatever you wish or require.”
How to Install Arch Linux in VirtualBox?
Arch Linux is a special Linux distribution of the Linux operating system. It helps to provide a stable Linux distribution which is being used for updating other software. Arch Linux is based on the rolling-release model. This helps to update the software which is already installed on Arch Linux. The software which is being installed in the Arch Linux will get minimum updates from time to time. It helps users to add those configurations which are only needed by them. There is a special package manager called Pac-Man. This helps to regulate & update the software in Arch Linux. For installation of the Arch Linux, we should have the virtual box installed on the machine.
Features:
- Arch Linux is an open-source Linux distribution model that helps to update the system software from time to time.
- Arch Linux is an independently developed model which runs over the rolling-release basics.
- There is a regular system update in Arch Linux. There are no big releases are applicable. The software gets a regular update.
Requirements:
- A computer that is compatible with x86 64 (64 bit)
- At least 512 MB of RAM (recommended 2 GB)
- 2 GB or more of available storage space (recommended 20 GB for basic usage with a desktop environment)
- Having a working internet connection
- USB drive with no less than 2 GB of storage
- Knowledge of the Linux command line
Installation Of Arch Linux on VirtualBox:
We are going to use Virtual Box to install Arch Linux on our machine. Though there may be some other way to install Arch Linux. Like, we can use the pen drives to install it. But in those cases. The probability of getting an error is much bigger. Also, there is a drawback to such methods. Like the existing operating system will get disappeared. This might be a big issue. All the flies & software related to that operating system will also get deleted. But if we use Virtual Box to install Arch Linux, there will be no such problems. Also, we can install many operating systems. This has a relatively less probability of getting errors. But in other methods, making a small mistake can bring a fatal result to the machine.
Step 1: First, we need to download the ISO file of Arch Linux.
Step 2: After downloading the file, we have to open the Virtual Box. Then we have to click on New to add new operating systems there.
Step 3: After clicking on New, a new window will get opened. There we need to write Arch Linux in the space of the Name. Other things will get filled automatically. Then we have to click Next.
Step 4: After that, a new window gets opened. There, we don’t have to make any changes. Only 1 GB space is needed to install the Arch Linux file. So, it is already selected. We have to just click on Next.
Step 5: We don’t have to make any changes there. Just we need to click on the Create button.
Step 6: A new window will again open here. Also in this case, also we don’t need to make any changes. Just, we need to click on the Next button.
Step 7: Here, in the new window, we have to opt for the Dynamically Allocated option. We just need to click on it. Then we have to click on the Next button.
Step 8: In the next window, it will ask for the file location. The Arch Linux will install at that location. In this case, we have to remain it the same as it is. Then we have to click on Create.
Step 9: Then the Virtual Box will land on its home page again. But this time, the Arch Linux operating system is configured with the Virtual Box. Just we need to click on the Start option to install the Arch Linux now.
Step 10: After clicking on the Start button, it will start installing. We have to click on the first option. Then more processes will be executed.
Step 11: Then in the next window, we have to execute the below command. This will help to start the installation of Arch Linux.
Step 12: Now, it will take some time to configure the environment for the installation of Arch Linux. We have to wait till the process is completed.
Step 13: Now, after the configuration, there will be an option called as Install. We have to click on it to finally install Arch Linux on the machine.
Step 14: We have to be connected to the internet at this time. As it will download more flies from the internet. This is a long process. And we have to wait till the process is completed.
Step 15: Now after that, a message will be displayed on the screen. That will show that the installation is successful. Now we have to press the Esc key from the keyboard to close the window.
Step 16: Now, it will again land on the home page of the Virtual Box. There we have to again click on the Start button. It will now start the Arch Linux. As the installation is completed, it is now time to run the Arch Linux.
Step 17: It will open the Arch Linux environment there. In this way, we can install Arch Linux without creating problems with the existing operating systems.
Installing Arch Linux with GNOME Desktop on Oracle VM VirtualBox

Arch Linux is a Linux distribution for computers with x86–64 processors. It adheres to five principles: simplicity, modernity, pragmatism, user centrality and versatility. Its unique package manager pacman is responsible for installing, updating, and removing software packages with complete tracking. It is designed entirely for free and open-source software, along with the support from the Linux community.
Sounds like a cool Linux distro, let’s install it! But the catch is — it ain’t as easy to install as with any other popular distribution, the reason being — Arch Linux doesn’t have a graphical installer. It is entirely command based.
A curious me wanted to find out what Arch was all about and tried to install it as a VM(coz I didn’t want to dual boot it for a trial — and thank god I didn’t!), until I ran into a nightmare of being stuck badly. After a few times of trying, I finally managed to install it. Yay!!
Seems daunting, but don’t worry, if you’ve got a good grip of working with a terminal (which I think you do — just because you are trying to install Arch��), then it’s not as much of a challenge.
There is a saying,
Installing Arch can teach you Linux, unlike Ubuntu which will teach you Ubuntu.
I feel this is true. So let’s get started.
Step 1: Creating the VM
- Head over to the official downloads page of Arch Linux to download the ISO image. There are both torrent links and HTTP direct download links available.
- Open VirtualBox and click on New. Give a name to it, select a storage folder and select the Type & Version of the OS. In our case Type is Linux and Version is Arch Linux (64-bit).
- Next, select the amount of RAM. If you plan on installing a GUI desktop environment (which I recommend you should), then a minimum of 2 GB of RAM is required. If you wanna stick to the CLI, then a minimum of 512 MB would suffice.
- For the hard disk, select Create a virtual hard disk now and then select any of the disk file types you would prefer. Also select whether the storage should be dynamically allocated(recommended) or should be of a fixed size. Then select the virtual disk size — 8 GB recommended minimum (10 GB if you’re installing a GUI) and then click on Create.
- The VM is now created. Power it on and in the Select start-up disk menu, click on Add and select the previously downloaded ISO image to boot from. Once you do that and the system boots, you should see a screen like this:
- Select Boot Arch Linux and wait for the terminal to appear with root user automatically logged in.
Step 2: Partitioning disks
VMs usually boot in Legacy Mode which is an important point to remember. It means we need to create only a single partition — a root partition, no EFI partition required. We will be using the command line based partition manager fdisk for this purpose. Alternatively, you can also use cfdisk, an interactive version of fdisk.
Use this command to list all the disk and partitions on your system:
Alternatively, you can also use to list the partitions:
Other than loop/rom (which can be ignored), you must only see a disk /dev/sda and select it for partitioning:
If there are any existing partitions, I suggest you to delete them. This can be done by typing d in fdisk prompt, until no partitions are remaining. Then you can create a new partition by typing n. Then press p for primary partition and press enter for remaining options. It will by default assign a partition number 1 and uses the whole disk space — this is the root partition. Type w to write changes to the disk, and exit the fdisk command.
Step 3: Creating filesystem and modifying mirrorlist
Since there is a single partition, it will by default be /dev/sda1 and an EXT4 filesystem can be created as follows:
Next, check whether you’re connected to an active internet connection:
If you get reply bytes, you are connected. Use Ctrl+C to stop the ping reply. If not, check your host machine connection or VM Network settings.
The mirrorlist in Arch Linux is a file that contains various mirrors around the world form which packages are downloaded. But the problem is, the first mirror is automatically selected and they are not sorted in a right order for you. So if you just head to the install, it might be so slow that would take a long time to install or it might as well fail, wasting your time and bandwidth(��). The solution is to retrieve a list of nearest and fastest mirrors. For this install the reflector tool:
Then, get a good list of mirrors and save them to the mirrorlist. You can change the country IN(India) to your own.
Step 4: Mounting the partition and Bootstrapping
Now you need to mount the root partition so that you will be able to install all the packages for Arch Linux.
Now use the pacstrap script for bootstrapping the OS, which will install all the necessary packages:
I have included nano because you need to edit some files later on. You might as well use vim instead. It will take a while to download and install the packages. If it fails in the middle, you can re-run the command and it will resume the download.
Step 5: Configuring the installed system
Now, generate the File Systems Table(fstab) file to define how disk partitions and file systems are mounted:
Now use arch-chroot to log into the mounted disk as root. You need to do some configurations here so that it can run properly when booted from disk.
Setting up the locale
This is for configuring language settings, date and currency formats for the system. The file /etc/locale.gen contains all the local settings and system language, but in a commented format. Open the file using vim/nano and remove the comment(the # symbol) from the line that contains the language you prefer. In my case, it is en_US.UTF-8. Next, generate the locale config file:
Setting up the timezone
Use the timedatectl command to set the timezone. Find your timezone by:
And then set it up like:
Configuring network
You need to enter your hostname to the file /etc/hostname , which can be anything. I’ll use the name arch.
Then create the hosts file,
and add the following lines to it:
Setting the root password
Set the password for root account using the passwd command:
Step 6: Installing grub bootloader
In order to boot the OS into memory, you need the grub bootloader. First get the grub package:
Then, install and configure it with:
Step 7: Installing GNOME desktop environment (Optional)
If you need a GUI, you can proceed with the following steps. First install the X environment display server xorg:
Next, install GNOME desktop environment and enable the display manager GDM:
Next, enable NetworkManager service:
Step 8: Final Steps
If you have NOT enabled the NetworkManager service and want to stick to CLI, then you need to enable dhcpcd service:
Now, exit from the chroot command,
and reboot your system:
You will again encounter the boot menu you saw at the start, choose Boot Existing OS. And in the grub menu, choose Arch Linux. If you’ve followed the steps correctly(and are lucky enough ��), you will see a login screen/prompt. Login with your password and have a good time exploring!
Troubleshooting
- If you are stuck in the grub prompt after rebooting, then unfortunately your installation might have failed. You need to do it again. Don’t give up!
- If you are stuck in a login loop in the GUI, then you can try restarting the GDM service,
or, stop the service and start again:
Bonus
Not a big one, but if you don’t want the boot menu to appear every time you power on the VM, there is a workaround(��). Create a new VM and instead of creating a new Virtual Hard Disk, choose the already existing one from the VM you created above and power it on. And voila, you enter the grub menu directly and then to the login screen!