1.1: Your first Android app
This chapter describes how to develop applications using Android Studio, which is an integrated development environment (IDE) for Android.
The development process
An Android app project begins with an idea and a definition of the requirements necessary to realize that idea. You may want to sketch user interfaces (UIs) for the various app functions. To show what a UI would look like and how it would work, use drawings, mockups, and prototypes.
When you are ready to start coding, you use Android Studio to go through the following steps:
- Create the project in Android Studio and choose an appropriate template.
- Define a layout for each screen that has UI elements. You can place UI elements on the screen using the layout editor, or you can write code directly in the Extensible Markup Language (XML).
- Write code using the Java programming language. Create source code for all of the app's components.
- Build and run the app on real and virtual devices. Use the default build configuration or create custom builds for different versions of your app.©
- Test and debug the app's logic and UI.
- Publish the app by assembling the final APK (package file) and distributing it through channels such as Google Play.
Using Android Studio
Android Studio provides a unified development environment for creating apps for all Android-powered devices. Android Studio includes code templates with sample code for common app features, extensive testing tools and frameworks, and a flexible build system.
Starting an Android Studio project
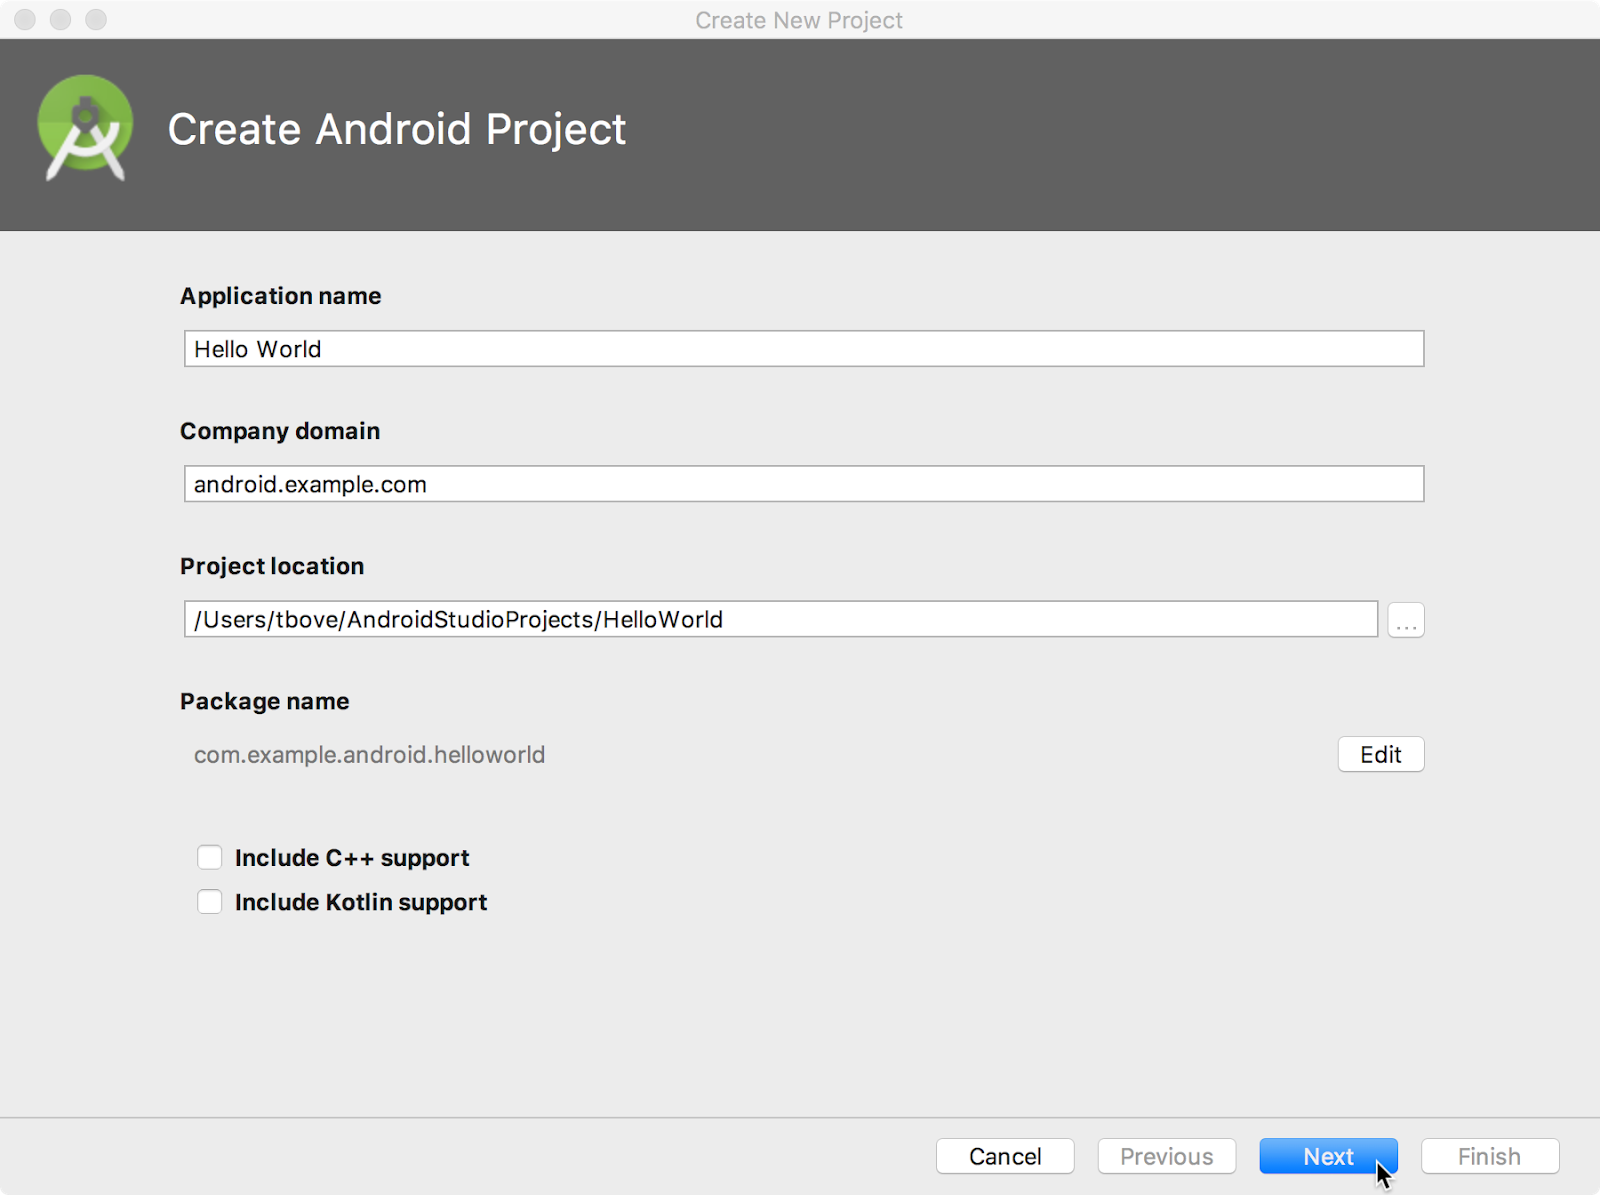
After you have successfully installed the Android Studio IDE, double-click the Android Studio application icon to start it. Click Start a new Android Studio project in the Welcome window, and name the project the same name that you want to use for the app.
When choosing a unique Company domain, keep in mind that apps published to Google Play must have a unique package name. Because domains are unique, prepending the app's name with your name, or your company's domain name, should provide an adequately unique package name. If you don't plan to publish the app, you can accept the default example domain. Be aware that changing the package name later is extra work.
Choosing target devices and the minimum SDK
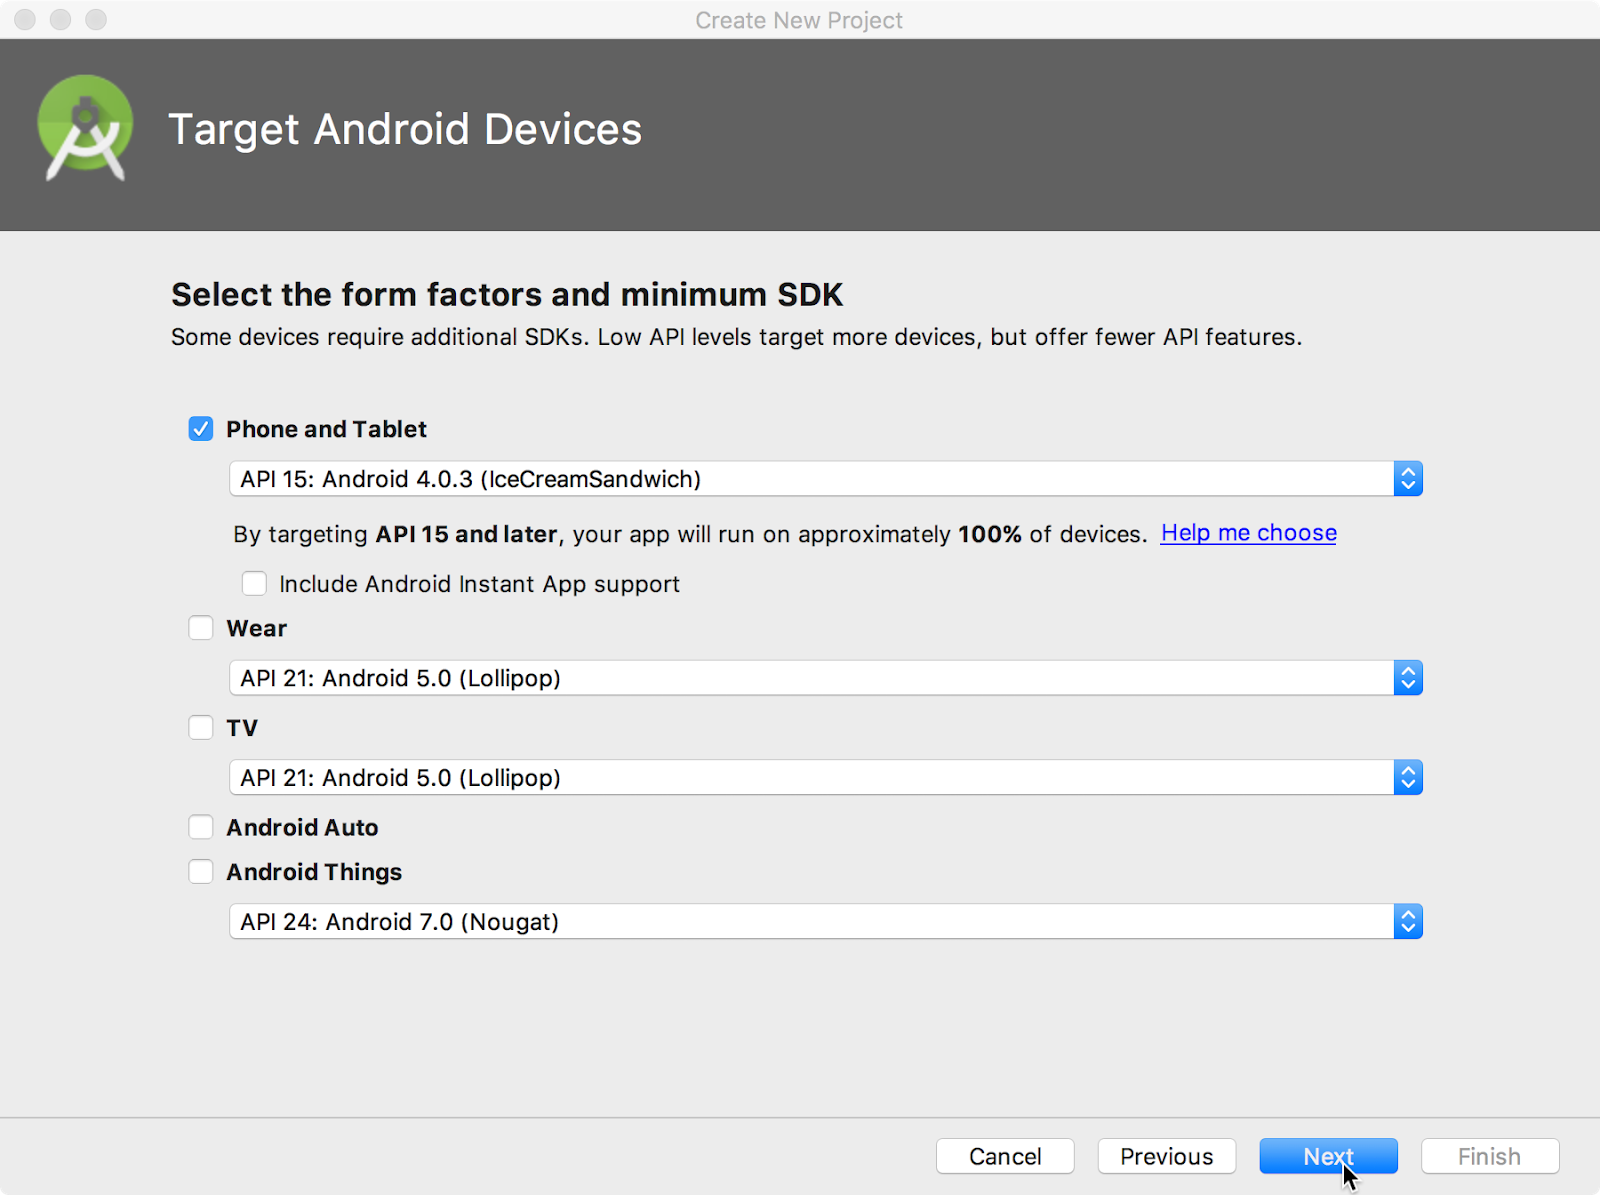
When choosing Target Android Devices, Phone and Tablet are selected by default, as shown in the figure below. The choice shown in the figure for the Minimum SDK—API 15: Android 4.0.3 (IceCreamSandwich)—makes your app compatible with 97% of Android-powered devices active on the Google Play Store.
Different devices run different versions of the Android system, such as Android 4.0.3 or Android 4.4. Each successive version often adds new APIs not available in the previous version. To indicate which set of APIs are available, each version specifies an API level. For instance, Android 1.0 is API level 1 and Android 4.0.3 is API level 15.
The Minimum SDK declares the minimum Android version for your app. Each successive version of Android provides compatibility for apps that were built using the APIs from previous versions. That means your app should always be compatible with future versions of Android, if you use the documented Android APIs.
Choosing an Activity template
An Activity is a single, focused thing that the user can do. It is a crucial component of any Android app. An Activity typically has a layout associated with it that defines how UI elements appear on a screen.
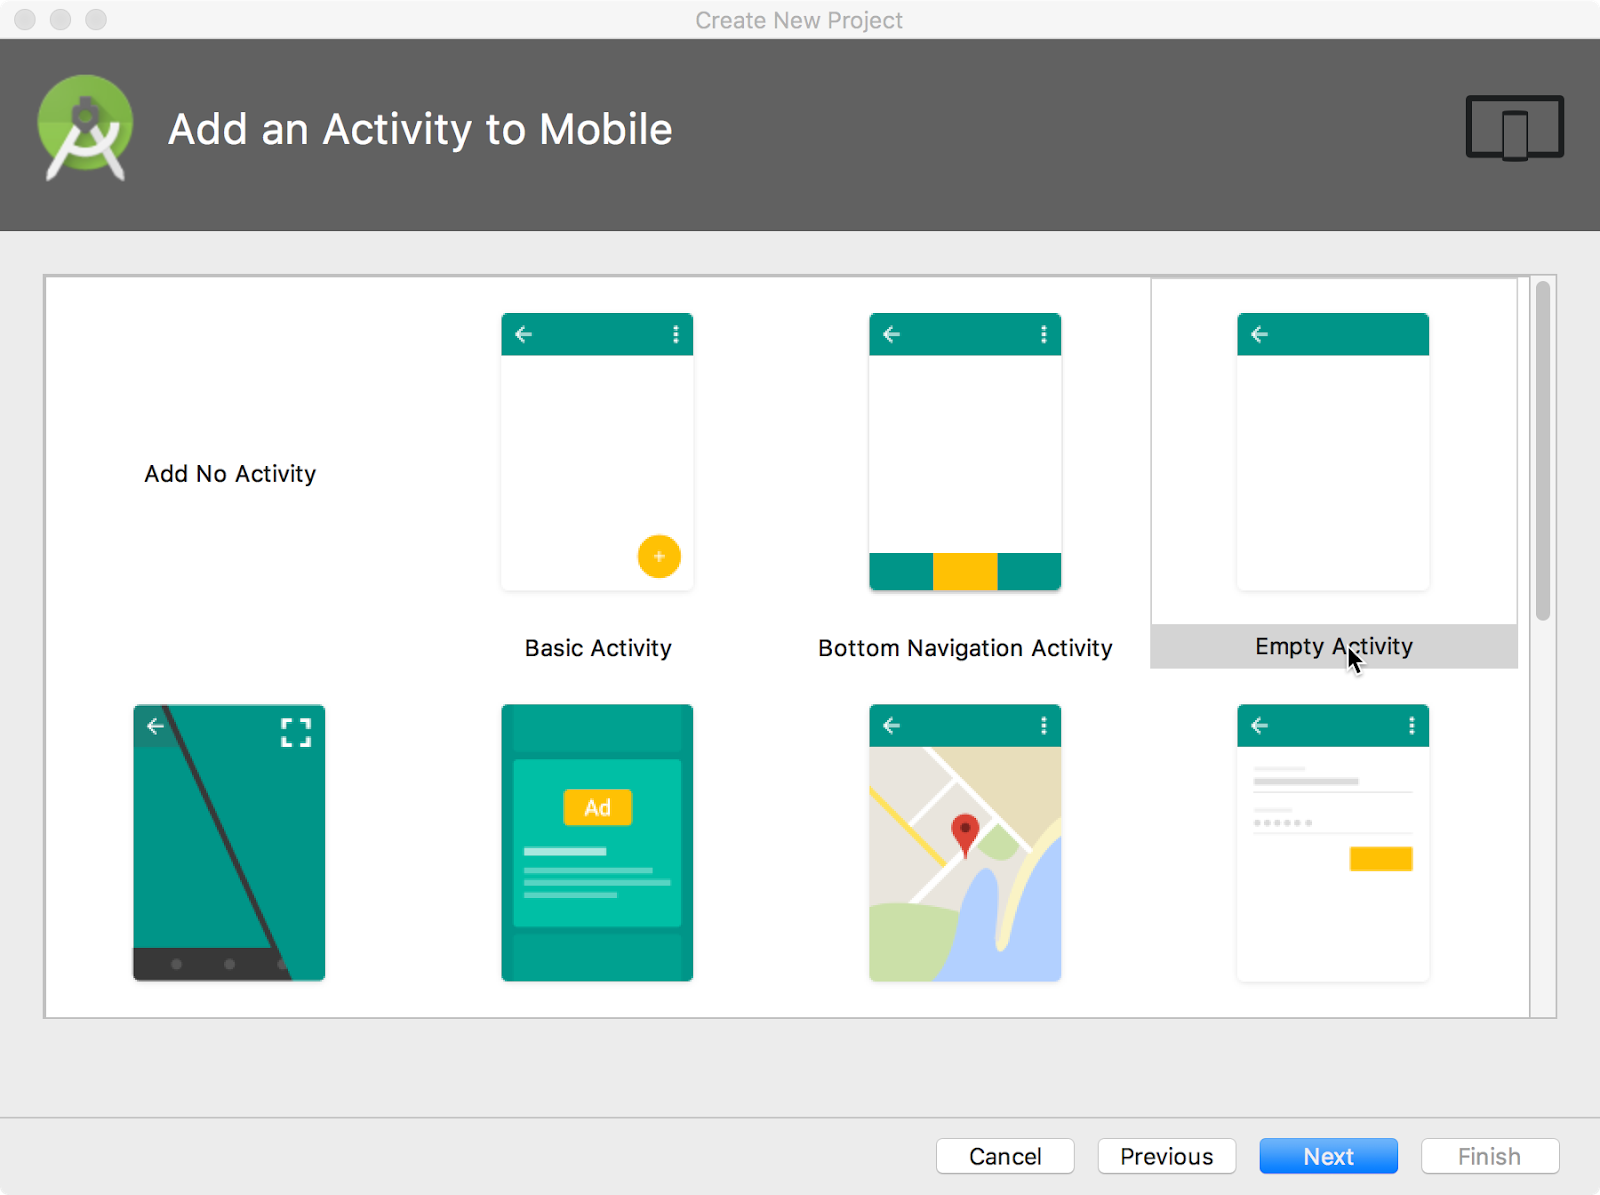
Android Studio pre-populates your project with minimal code for an Activity and layout based on a template. Available Activity templates range from a virtually blank template (Add No Activity) to an Activity that includes navigation and an options menu.
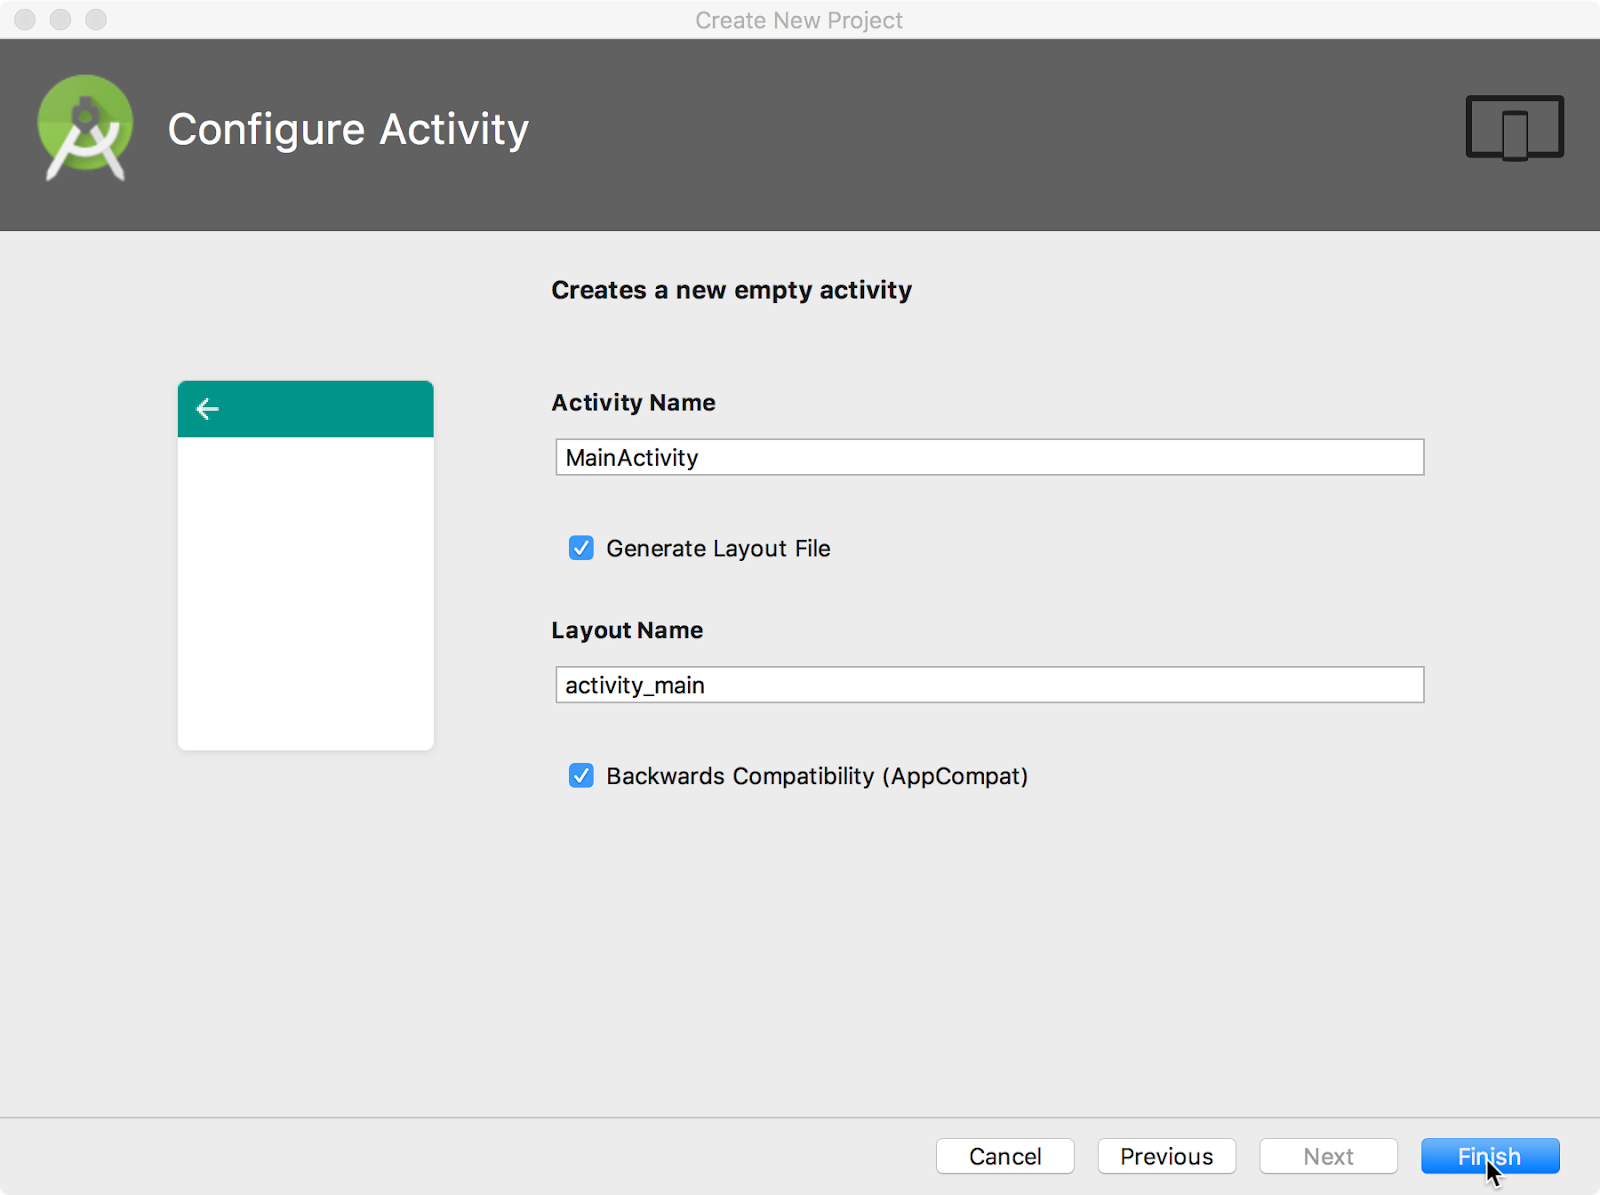
You can customize the Activity after you select your template. For example, the Empty Activity choice provides a single Activity with a single layout resource for the screen. The Configure Activity screen appears after you click Next. On the Configure Activity screen you can accept the commonly used name for the Activity (such as MainActivity ), or you can change the name.
Tip: This course covers the Activity class in more detail in another practical. You can also read Introduction to Activities for a comprehensive introduction.
The Configure Activity screen differs depending on which template you chose. In most cases you can select the following options, if they are not already selected:
- Generate Layout file: Leave this checkbox selected to create the layout resource connected to this Activity , which is usually named activity_main . The layout defines the UI for the Activity .
- Backwards Compatibility (AppCompat): Leave this checkbox selected to include the AppCompat library. Use the AppCompat library to make sure that the app is compatible with previous versions of Android, even if the app uses features found only in newer Android versions.
Android Studio creates a folder for your projects, and builds the project with Gradle.
Tip: See the Configure your build developer page for detailed information.
Exploring a project
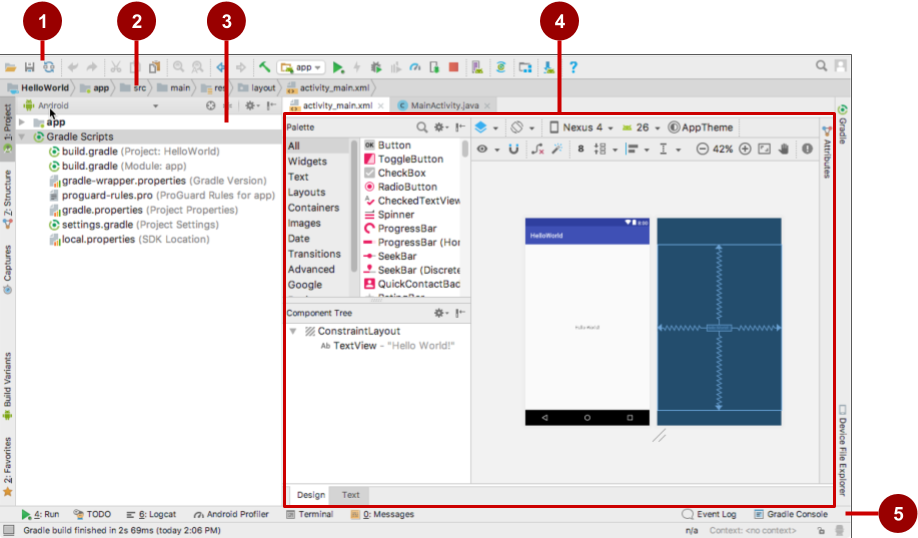
An Android Studio project contains all of the source code and all resources for an app. The resources include layouts, strings, colors, dimensions, and images. The Android Studio main window is made up of several logical areas, or panes, as shown in the figure below.
In the figure above:
- Toolbar: Provides a wide range of actions, including running the Android app and launching Android tools.
- Navigation bar: Navigate through the project and open files for editing.
- Project pane: Displays project files in a hierarchy. The selected hierarchy in the figure above is Android.
- Editor: The contents of a selected file in the project. For example, after you select a layout (as shown in the figure above), the editor pane shows the layout editor with tools to edit the layout. After you select a Java code file, the editor pane shows the Java code with tools for editing the code.
- Tabs along the left, right, and bottom of the window: You can click tabs to open other panes, such as Logcat to open the Logcat pane with log messages, or TODO to manage tasks.
The status bar at the bottom of the Android Studio window displays the status of the project and Android Studio itself, as well as any warnings or messages. You can watch the build progress in the status bar.
Tip: You can organize the main window to give yourself more screen space by hiding or moving panes. You can also use keyboard shortcuts to access most features. See Keyboard Shortcuts for a complete list.
Using the Project pane
You can view the project organization in several ways in the Project pane. If it is not already selected, click the Project tab. (The Project tab is in the vertical tab column on the left side of the Android Studio window.)
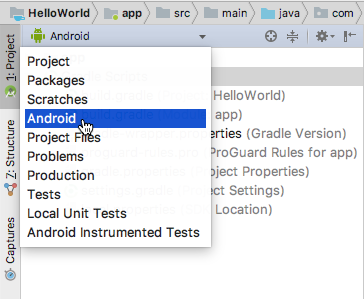
The Project pane appears. To view the project in the standard Android project hierarchy, select Android from the Down arrow at the top of the Project pane.
Gradle files
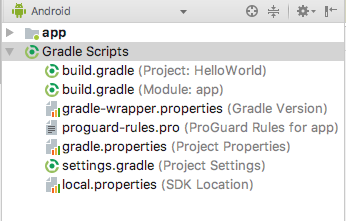
When you first create an app project, the Project > Android pane appears with the Gradle Scripts folder expanded as shown below. If the Gradle Scripts folder is not expanded, click the triangle to expand it. This folder contains all the files needed by the build system.
The build.gradle(Module:app) file specifies additional libraries and the module's build configuration. The Activity template that you select creates this file. The file includes the minSdkVersion attribute that declares the minimum version for the app, and the targetSdkVersion attribute that declares the highest (newest) version for which the app has been optimized.
This file also includes a list of dependencies, which are libraries required by the code—such as the AppCompat library for supporting a wide range of Android versions.
App code
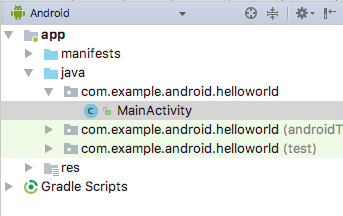
To view and edit the Java code, expand the app folder, the java folder, and the com.example.android.helloworld folder. Double-click the MainActivity java file to open it in the code editor.
The java folder includes Java class files. Each Activity , Service , or other component (such as a Fragment ) is defined as a Java class, usually in its own file. Tests and other Java class files are also located here.
The java folder contains three subfolders:
- com.example.hello.helloworld (or the domain name you have specified): All the files for a package are in a folder named after the package. For your Hello World app, there is one package, and it contains only MainActivity.java . The first Activity (screen) that the user sees, which also initializes app-wide resources, is customarily called MainActivity . (The file extension is omitted in the Project > Android pane.)
- com.example.hello.helloworld(androidTest) : This folder is for your instrumented tests, and starts out with a skeleton test file.
- com.example.hello.helloworld(test) : This folder is for your unit tests and starts out with an automatically created skeleton unit test file.
Layout files
To view and edit a layout file, expand the res folder and the layout folder to see the layout file. In the figure below, the layout file is called activity_main.xml .
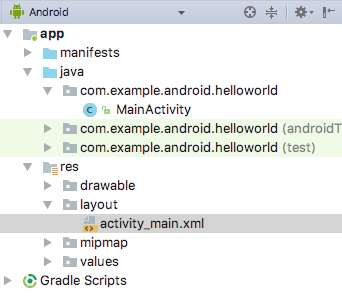
Double-click the file to open it in the layout editor. Layout files are written in XML.
Resource files
The res folder holds resources, such as layouts, strings, and images. An Activity is usually associated with a layout of UI views that are defined as an XML file. This XML file is usually named after its Activity . The res folder includes these subfolders:
- drawable : Store all your app's images in this folder.
- layout : Every Activity has at least one XML layout file that describes the UI. For Hello World, this folder contains activity_main.xml .
- mipmap : The launcher icons are stored in this folder. There is a subfolder for each supported screen density. Android uses the screen density (the number of pixels per inch) to determine the required image resolution. Android groups all actual screen densities into generalized densities, such as medium (mdpi), high (hdpi), or extra-extra-extra-high (xxxhdpi). The ic_launcher.png folder contains the default launcher icons for all the densities supported by your app.
- values : Instead of hardcoding values like strings, dimensions, and colors in your XML and Java files, it is best practice to define them in their respective values files. This practice makes it easier to change the values and keep the values consistent across your app.
The values subfolder includes these subfolders:
- colors.xml : Shows the default colors for your chosen theme. You can add your own colors or change the colors based on your app's requirements.
- dimens.xml : Store the sizes of views and objects for different resolutions.
- strings.xml : Create resources for all your strings. Doing this makes it easy to translate the strings to other languages.
- styles.xml : All the styles for your app and theme go here. Styles help give your app a consistent look for all UI elements.
Using the editor pane
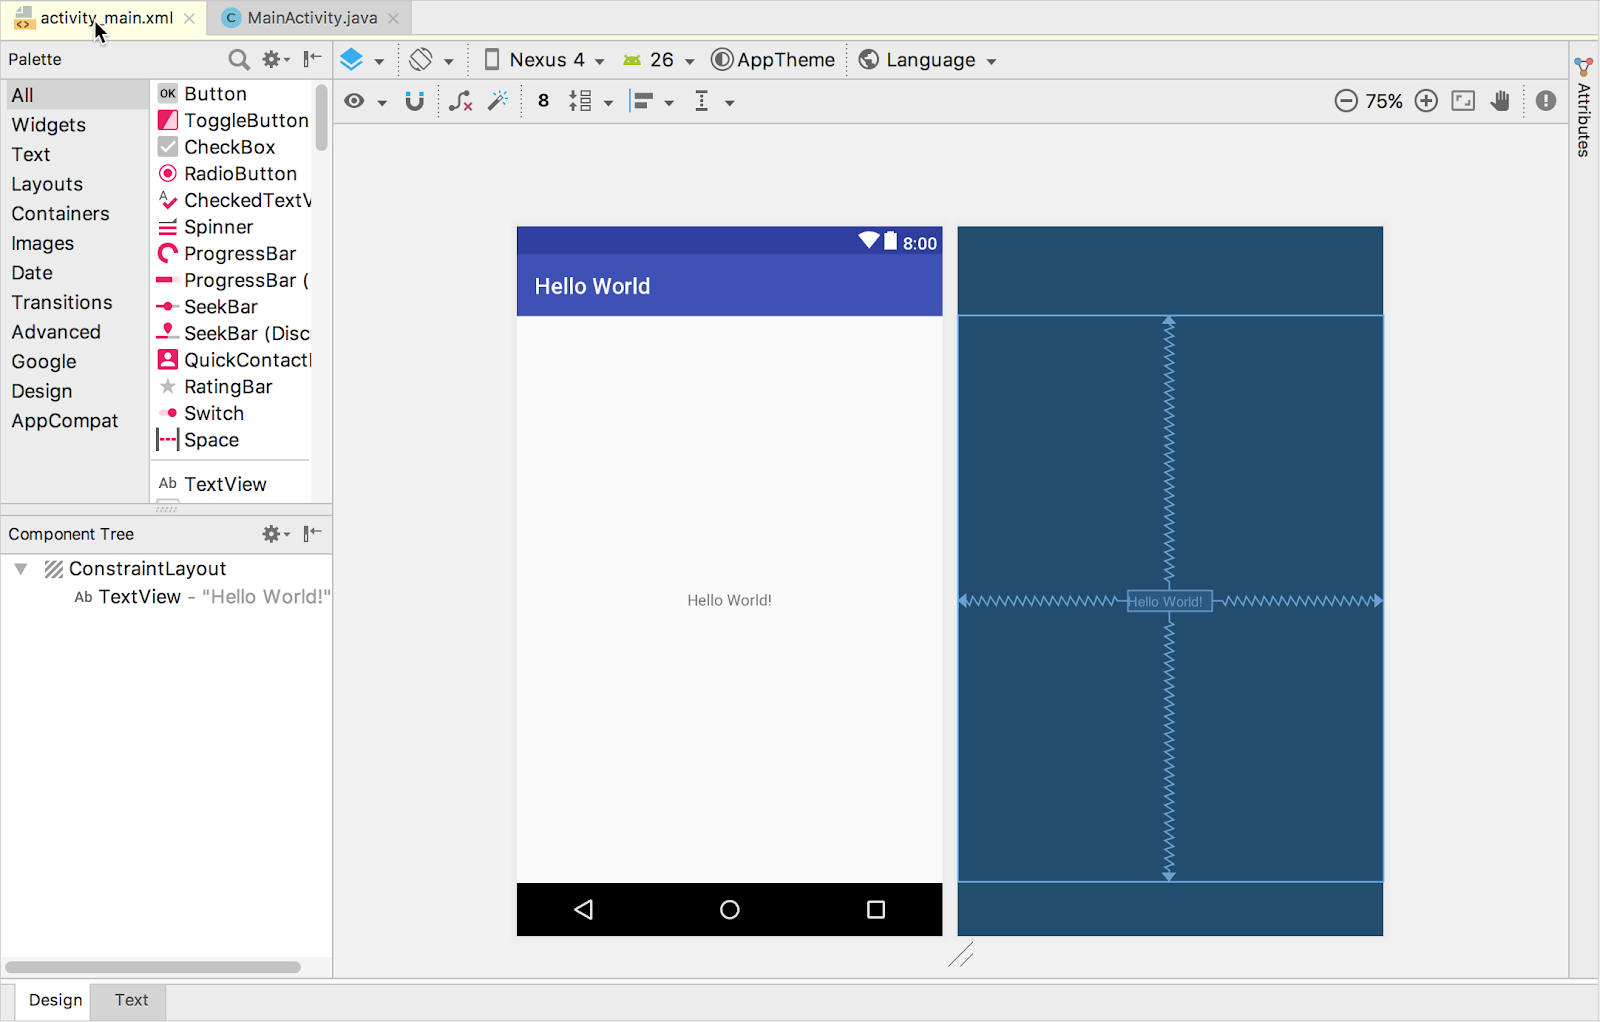
If you select a file, the editor pane appears. A tab appears for the file so that you can open multiple files and switch between them. For example, if you double-click the activity_main.xml layout file in the Project > Android pane, the layout editor appears as shown below.
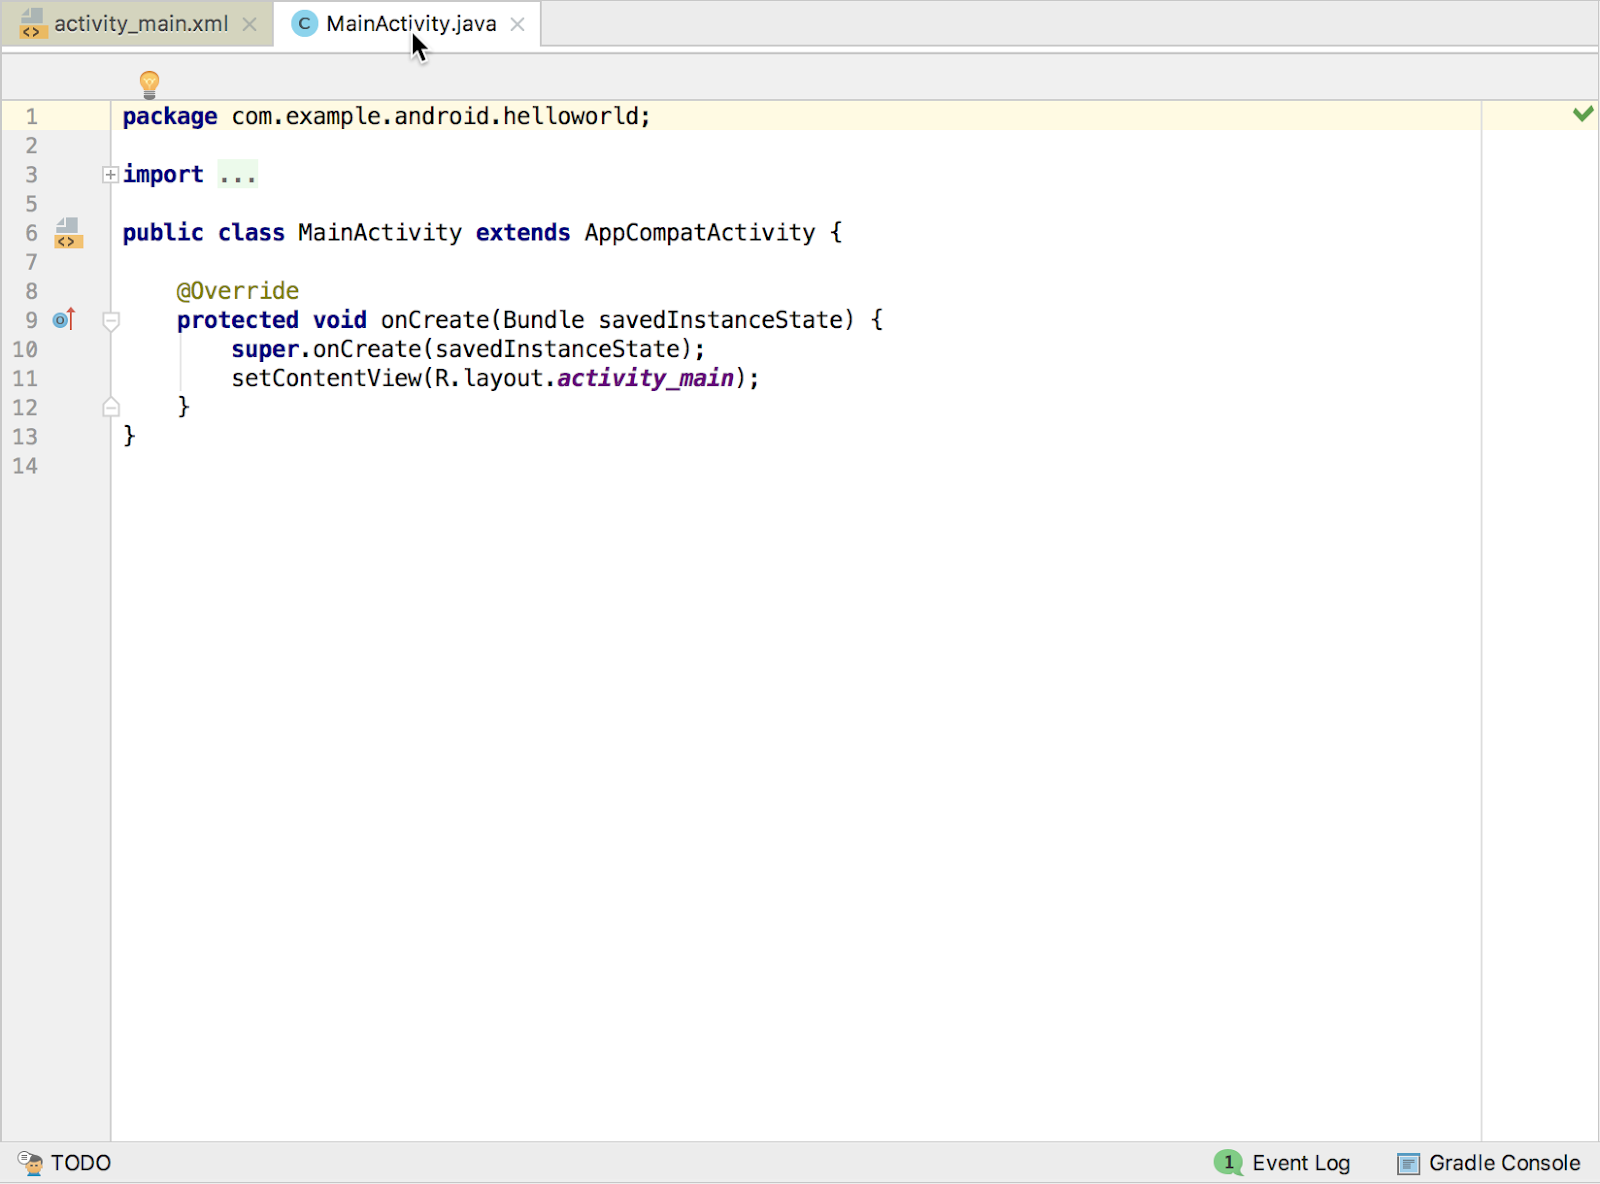
If you double-click the MainActivity file in the Project > Android pane, the editor changes to the code editor as shown below, with a tab for MainActivity.java:
At the top of the MainActivity.java file is a package statement that defines the app package. This package statement is followed by an import block condensed with . , as shown in the figure above. Click the dots to expand the block to view it. The import statements import libraries needed for the app. For example, the following statement imports the AppCompatActivity library:
Each Activity in an app is implemented as a Java class. The following class declaration extends the AppCompatActivity class to implement features in a way that is backward-compatible with previous versions of Android:
Understanding the Android manifest
Before the Android system can start an app component such as an Activity , the system must know that the Activity exists. It does so by reading the app's AndroidManifest.xml file, which describes all of the components of your Android app. Each Activity must be listed in this XML file, along with all components for the app.
To view and edit the AndroidManifest.xml file, expand the manifests folder in the Project > Android pane, and double-click AndroidManifest.xml . Its contents appear in the editing pane:
Android namespace and application tag
The Android Manifest is coded in XML and always uses the Android namespace:
The package expression shows the unique package name of the new app. Do not change the package expression after the app is published.
The <application> tag, with its closing </application> tag, defines the manifest settings for the entire app.
Automatic backup
The android:allowBackup attribute enables automatic app data backup:
Setting the android:allowBackup attribute to true enables the app to be backed up automatically and restored as needed. Users invest time and effort to configure apps. Switching to a new device can cancel out all that careful configuration. The system performs this automatic backup for nearly all app data by default, and does so without the developer having to write any additional app code.
For apps whose target SDK version is Android 6.0 (API level 23) and higher, devices running Android 6.0 and higher automatically create backups of app data to the cloud because the android:allowBackup attribute defaults to true if omitted. For apps < API level 22 you have to explicitly add the android:allowBackup attribute and set it to true .
Tip: To learn more about the automatic backup for apps, see Configuring Auto Backup for Apps.
The app icon
The android:icon attribute sets the icon for the app:
The android:icon attribute assigns to the app an icon in the mipmap folder (inside the res folder in the Project > Android pane). The icon appears on the home screen or in the Search Apps screen for launching the app. The icon is also used as the default icon for app components.
App label and string resources
The android:label attribute shows the string "Hello World" highlighted. If you click the string, it changes to show the string resource @string/app_name :
Tip: To see the context menu, ctrl-click or right-click app_name in the editor pane. Select Go To > Declaration to see where the string resource is declared: in the strings.xml file. When you select Go To > Declaration or open the file by double-clicking strings.xml inside the values folder in the Project > Android pane, the file's contents appear in the editor pane.
After opening the strings.xml file, you can see that the string name app_name is set to Hello World . You can change the app name by changing the Hello World string to something else. String resources are described in a separate lesson.
App theme
The android:theme attribute sets the app's theme, which defines the appearance of UI elements such as text:
The theme attribute is set to the standard theme AppTheme . Themes are described in a separate lesson.
Declaring the Android version
Different devices may run different versions of the Android system, such as Android 4.0 or Android 4.4. Each successive version can add new APIs not available in the previous version. To indicate which set of APIs are available, each version specifies an API level. For instance, Android 1.0 is API level 1 and Android 4.4 is API level 19.
The API level allows a developer to declare the minimum version with which the app is compatible, using the <uses-sdk> manifest tag and its minSdkVersion attribute. For example, the Calendar Provider APIs were added in Android 4.0 (API level 14). If your app can't function without these APIs, declare API level 14 as the app's minimum supported version like this:
The minSdkVersion attribute declares the minimum version for the app, and the targetSdkVersion attribute declares the highest (newest) version which has been optimized within the app. Each successive version of Android provides compatibility for apps that were built using the APIs from previous versions, so the app should always be compatible with future versions of Android while using the documented Android APIs.
The targetSdkVersion attribute does not prevent an app from being installed on Android versions that are higher (newer) than the specified value. Even so, the target attribute is important, because it indicates to the system whether the app should inherit behavior changes in newer versions.
If you don't update the targetSdkVersion to the latest version, the system assumes that your app requires backward-compatible behaviors when it runs on the latest version. For example, among the behavior changes in Android 4.4, alarms created with the AlarmManager APIs are now inexact by default so that the system can batch app alarms and preserve system power. If your target API level is lower than "19" , the system retains the previous API's behavior for your app.
Understanding the build process
The Android application package (APK) is the package file format for distributing and installing Android mobile apps. The build process involves tools and processes that automatically convert each project into an APK.
Android Studio uses Gradle as the foundation of the build system, with more Android-specific capabilities provided by the Android Plugin for Gradle. This build system runs as an integrated tool from the Android Studio menu.
Understanding build.gradle files
When you create a project, Android Studio automatically generates the necessary build files in the Gradle Scripts folder in the Project > Android pane. Android Studio build files are named build.gradle as shown below:
build.gradle (Project: apptitle)
This file is the top-level build file for the entire project, located in the root project folder, which defines build configurations that apply to all modules in your project. This file, generated by Android Studio, should not be edited to include app dependencies.
If a dependency is something other than a local library or file tree, Gradle looks for the files in whichever online repositories are specified in the repositories block of this file. By default, new Android Studio projects declare JCenter and Google (which includes the Google Maven repository) as the repository locations:
build.gradle (Module: app)
Android Studio creates separate build.gradle (Module: app) files for each module. You can edit the build settings to provide custom packaging options for each module, such as additional build types and product flavors, and to override settings in the manifest or top-level build.gradle file. This file is most often the file to edit when changing app-level configurations, such as declaring dependencies in the dependencies section. The following shows the contents of a project's build.gradle (Module: app) file:
The build.gradle files use Gradle syntax. Gradle is a Domain Specific Language (DSL) for describing and manipulating the build logic using Groovy, which is a dynamic language for the Java Virtual Machine (JVM). You don't need to learn Groovy to make changes, because the Android Plugin for Gradle introduces most of the DSL elements you need.
Tip: To learn more about the Android plugin DSL, read the DSL reference documentation.
Plugin and Android blocks
In the build.gradle (Module: app) file above, the first statement applies the Android-specific Gradle plug-in build tasks:
The android < >block specifies the target SDK version for compiling the app code ( compileSdkVersion 26 ) and several blocks of information.
The defaultConfig block
Core settings and entries for the app are specified in the defaultConfig < >block within the android < >block:
The minSdkVersion and targetSdkVersion settings override any AndroidManifest.xml settings for the minimum SDK version and the target SDK version. See "Declaring the Android version" previously in this chapter for background information on these settings.
The testInstrumentationRunner statement adds the instrumentation support for testing the UI using Espresso and UIAutomator. These tools are described in a separate lesson.
Build types
Build types for the app are specified in a buildTypes < >block, which controls how the app is built and packaged.
The build type specified is release for the app's release. Another common build type is debug . Configuring build types is described in a separate lesson.
Dependencies
Dependencies for the app are defined in the dependencies < >block, which is the part of the build.gradle file that is most likely to change as you start developing code that depends on other libraries. The block is part of the standard Gradle API and belongs outside the android < >block.
In the snippet above, the statement implementation fileTree(dir: 'libs', include: ['*.jar']) adds a dependency of all ".jar" files inside the libs folder.
Syncing your project
When you make changes to the build configuration files in a project, Android Studio requires that you sync the project files. During the sync, Android Studio imports the build configuration changes and runs checks to make sure the configuration won't create build errors.
To sync the project files, click Sync Now in the notification bar that appears when making a change (as shown in the figure below), or click the Sync Project with Gradle Files button  in the menu bar.
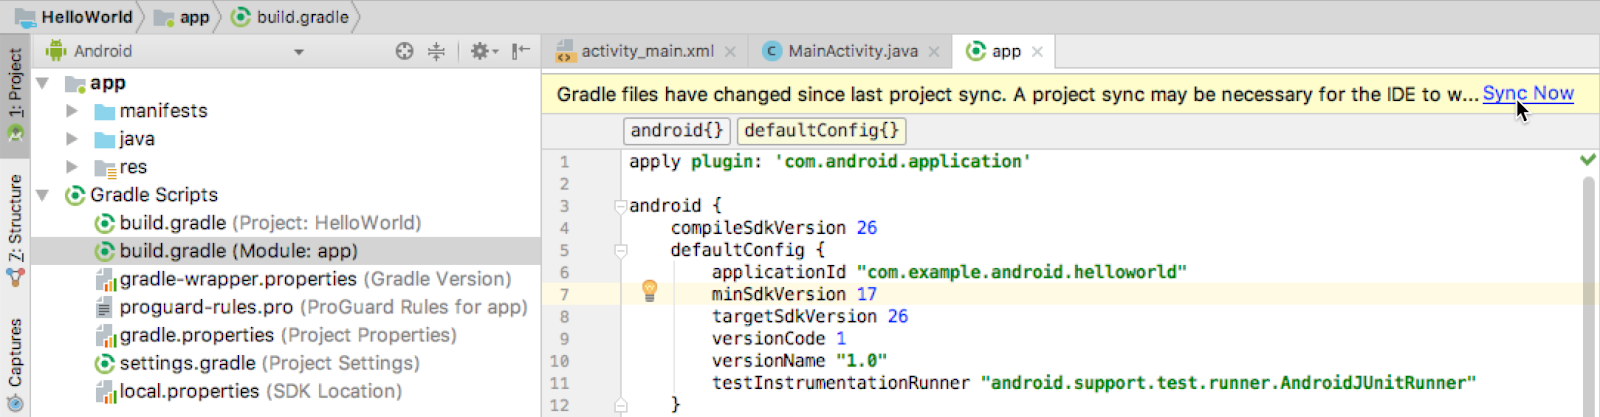
If Android Studio notices any errors with the configuration — for example, if the source code uses API features that are only available in an API level higher than the compileSdkVersion —the Messages window appears to describe the issue.
Running the app on an emulator or a device
With virtual device emulators, you can test an app on different devices such as tablets or smartphones—with different API levels for different Android versions—to make sure it looks good and works for most users. You don't have to depend on having a physical device available for app development.
The Android Virtual Device (AVD) manager creates a virtual device or emulator that simulates the configuration for a particular type of Android-powered device. Use the AVD Manager to define the hardware characteristics of a device and its API level, and to save it as a virtual device configuration. When you start the Android emulator, it reads a specified configuration and creates an emulated device on your computer that behaves exactly like a physical version of that device.
Creating a virtual device

To run an emulator on your computer, use the AVD Manager to create a configuration that describes the virtual device. Select Tools > Android > AVD Manager, or click the AVD Manager icon in the toolbar.
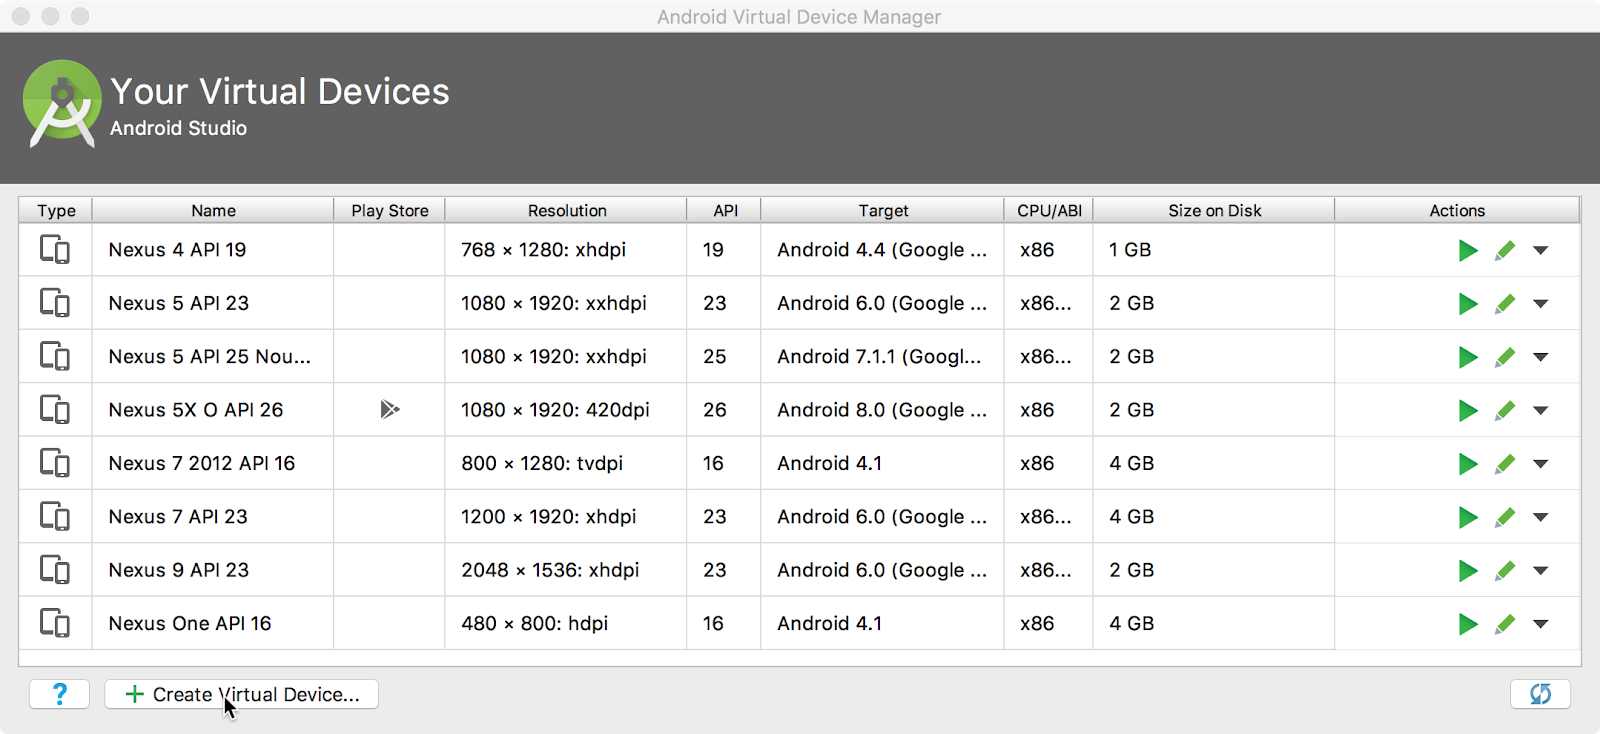
The Your Virtual Devices screen appears showing all of the virtual devices created previously. Click the +Create Virtual Device button to create a new virtual device.
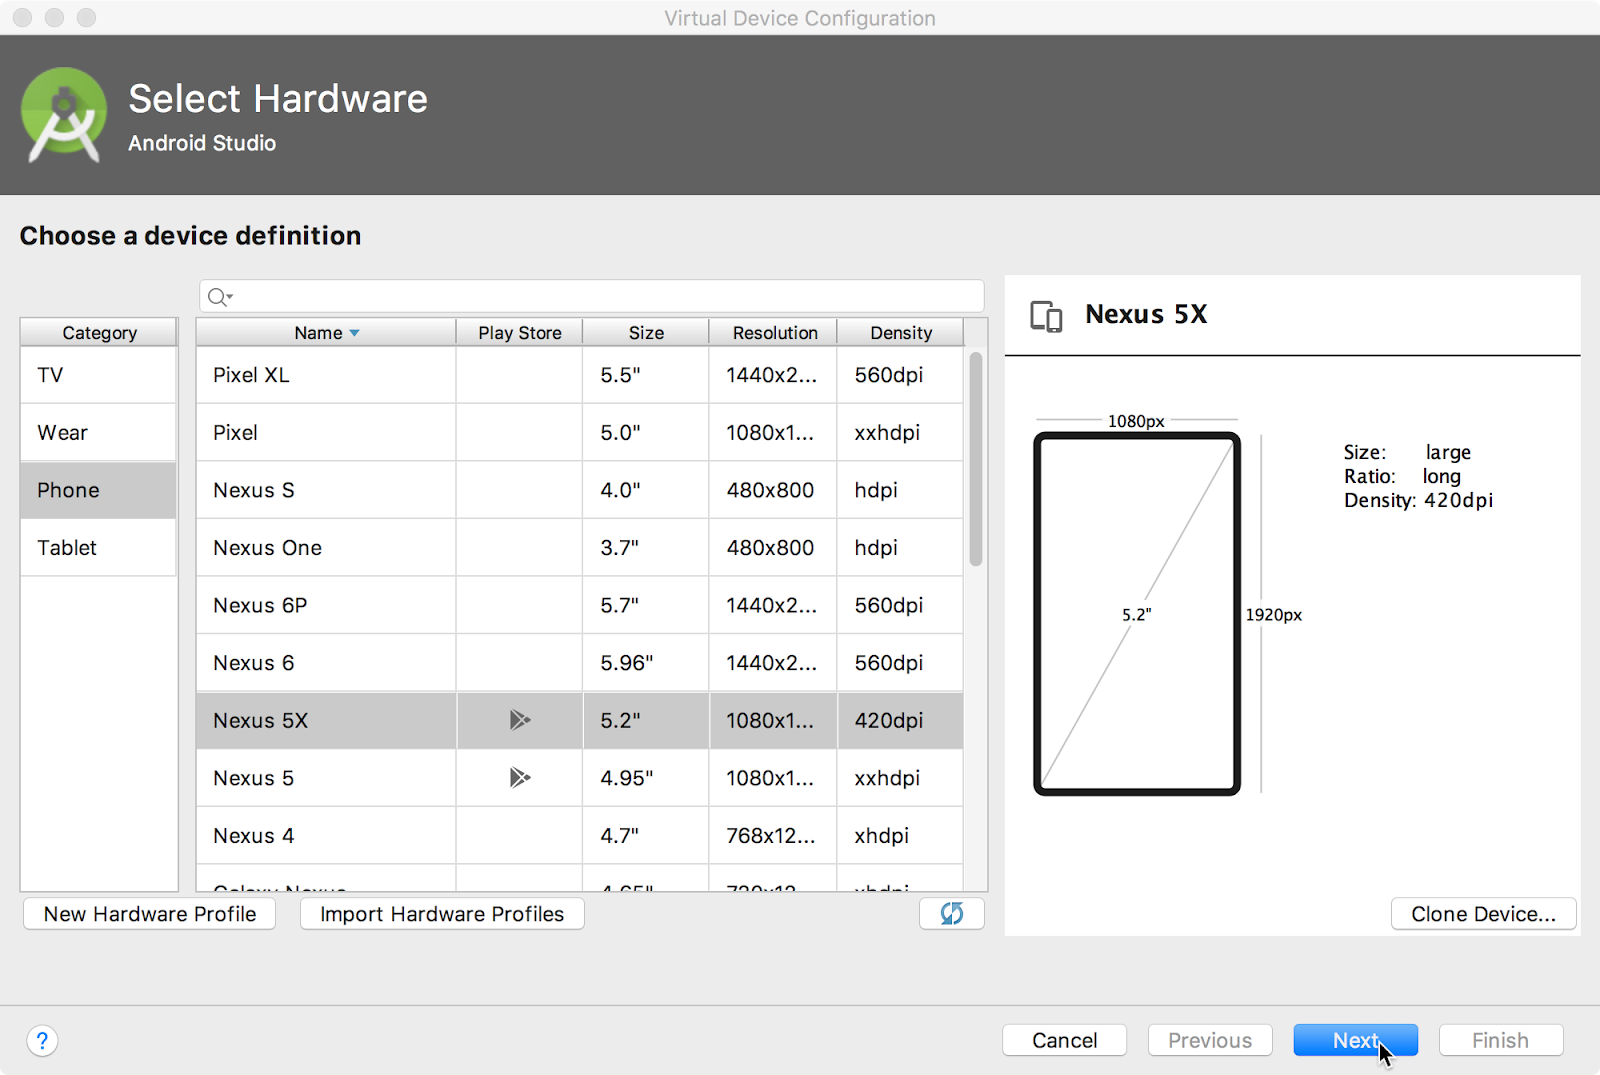
You can select a device from a list of predefined hardware devices. For each device, the table provides a column for its diagonal display size (Size), screen resolution in pixels (Resolution), and pixel density (Density). For example, the pixel density of the Nexus 5 device is xxhdpi , which means the app uses the icons in the xxhdpi folder of the mipmap folder. Likewise, the app uses layouts and drawables from folders defined for that density.
After you click Next, the System Image screen appears for choosing the version of the Android system for the device. The Recommended tab shows the recommended systems for the device. More versions are available under the x86 Images and Other Images tabs. If a Download link is visible next to a system image version, it is not installed yet. Click the link to start the download, and click Finish when it's done.
Running the app on the virtual device
To run the app on the virtual device you created in the previous section, follow these steps:

In Android Studio, select Run > Run app or click the Run icon in the toolbar.
In the Select Deployment Target window, under Available Emulators, select the virtual device you created, and click OK.
The emulator starts and boots just like a physical device. Depending on the speed of your computer, the startup process might take a while. The app builds, and once the emulator is ready, Android Studio uploads the app to the emulator and runs it.
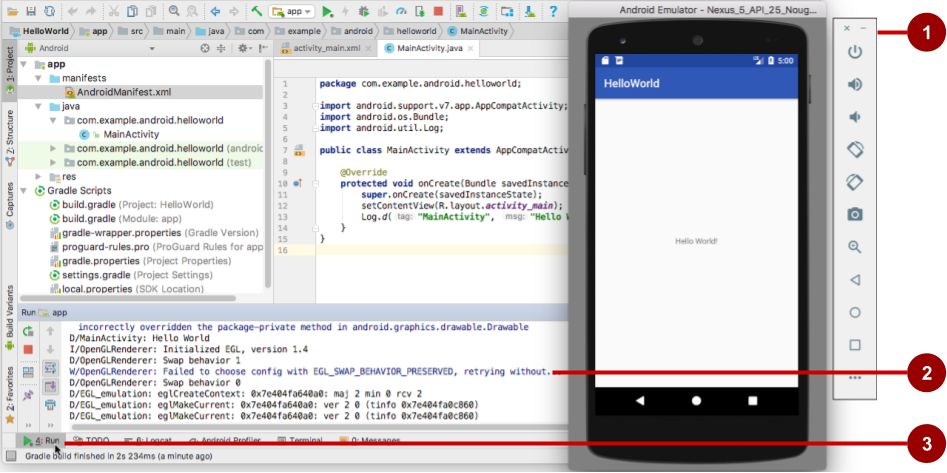
You should see the app created from the Empty Activity template ("Hello World") as shown in the following figure, which also shows Android Studio's Run pane that displays the actions performed to run the app on the emulator.
Tip: When testing on a virtual device, it is a good practice to start it up once, at the very beginning of your session. Do not close it until you are done testing your app, so that your app doesn't have to go through the device startup process again. To close the virtual device, select Quit from the menu or press Control-Q in Windows or Command-Q in macOS.
The figure above shows the emulator and the run log:
- The Emulator running the app.
- The Run pane, which shows the actions taken to install and run the app.
- The Run tab, which you click to open or close the Run pane.
Running the app on a physical device
Always test your apps on a physical device. While emulators are useful, they can't show all possible device states, such as what happens if an incoming call occurs while the app is running. To run the app on a physical device, you need the following:
- An Android-powered device such as a phone or tablet.
- A data cable to connect your Android-powered device to your computer via the USB port.
- If you are using a Linux or Windows system, you may need to perform additional steps to run on a hardware device. Check the Using Hardware Devices documentation. You may also need to install the appropriate USB driver for your device. See OEM USB Drivers.
To let Android Studio communicate with your Android-powered device, you must turn on USB Debugging on the device. You enable USB Debugging in the device's Developer options settings. (Note that enabling USB Debugging is not the same as rooting your device.)
On Android 4.2 and higher, the Developer options screen is hidden by default. To show developer options and enable USB Debugging:
- On your device, open Settings > About phone and tap Build number seven times.
- Return to the previous screen (Settings). Developer options appears at the bottom of the list. Tap Developer options.
- Select USB Debugging.
- Connect the device and run the app from Android Studio.
Using the log
The log is a powerful debugging tool you can use to look at values, execution paths, and exceptions. After you add logging statements to an app, your log messages appear along with general log messages in the Logcat pane.
Viewing log messages
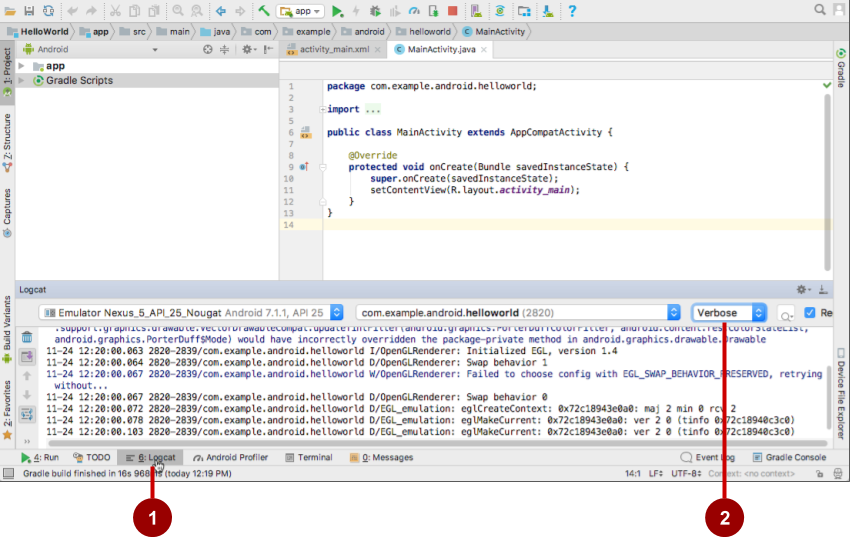
To see the Logcat pane, click the Logcat tab at the bottom of the Android Studio window as shown in the figure below.
In the figure above:
- The Logcat tab for opening and closing the Logcat pane, which displays information about your app as it is running. If you add Log statements to your app, Log messages appear here.
- The Log level menu set to Verbose (the default), which shows all Log messages. Other settings include Debug, Error, Info, and Warn.
Adding logging statements to your app
Logging statements add whatever messages you specify to the log. Adding logging statements at certain points in the code allows the developer to look at values, execution paths, and exceptions. For example, the following logging statement adds "MainActivity" and "Hello World" to the log:
The following are the elements of this statement:
- Log : The Log class for sending log messages to the Logcat pane.
- d : The Debug Log level setting to filter log message display in the Logcat pane. Other log levels are e for Error, w for Warn, and i for Info. You assign a log level so that you can filter the log messages using the drop-down menu in the center of the Logcat pane.
- "MainActivity" : The first argument is a tag which can be used to filter messages in the Logcat pane. This tag is commonly the name of the Activity from which the message originates. However, you can name the tag anything that is useful to you for debugging.
- "Hello world" : The second argument is the actual message.
By convention, log tags are defined as constants for the Activity :
Use the constant in the logging statements:
After you add the Log.d statement shown above, follow these steps to see the log message:
Как начать программировать под Android? Пошаговый план

В этой статье мы рассмотрим, как начать программировать под Android. Пошаговый план с ссылками на ресурсы, курсы и книги и типичные вопросы, которые задают на собеседованиях на позицию junior Android-разработчика. Ну а если вы хотите быстро за 12 занятий вникнуть в азы Android — то приглашаю на практический онлайн-интенсив где вы с наставником разработаете собственный проект.
Итак, вы решили начать программировать под операционную систему Android. Для начала, вам нужно изучить язык программирования. В мире Android на момент написания статьи (март 2020) года используются как Java, так и Kotlin, однако второй официально рекомендован компанией Google и набирает всё большую популярность, так что, если вы не знаете ни одного языка программирования — то можете изучать Kotlin, если же вы уже знаете какой-либо объектно-ориентированный язык программирования, то изучить Java или Kotlin для вас не составит труда. На рынке тренд идет в сторону Kotlin.
Изучаем язык
Kotlin
Чтобы освоить Kotlin, вам могут пригодиться, следующие ресурсы:
-
— набор примеров и заданий по Kotlin cразу с консолью, в которой можно ввести код и проверить — туториал от Google — набор мини-курсов для быстрого старта в Android — разработке — Книга Джоша Скина и Дэвида Гринхола основана на популярном курсе Kotlin Essentials от Big Nerd Ranch. Яркие и полезные примеры, четкие объяснения ключевых концепций и основополагающих API не только знакомят с языком Kotlin, но и учат эффективно использовать его возможности — хороший видеокурс, объясняющий основы программирования на Kotlin
Чтобы освоить Java, вам могут пригодиться, следующие ресурсы:
-
— эта книга не только научит вас теории языка Java и объектно-ориентированного программирования, она сделает вас программистом. В ее основу положен уникальный метод обучения на практике. В отличие от классических учебников информация дается не в текстовом, а в визуальном представлении. — курс от Udacity, который поможет вам изучить Java — эта книга является классикой для Java-программистов. Для новичков может быть несколько сложновата, но постарайтесь прочитать ее хотя бы половину и вернитесь к ней через годик, все сразу станет на свои места. Кстати, многие вопросы на собеседовании по Java взяты именно отсюда, так что не ленитесь, почитайте. — Эта книга давно уже признана авторитетным, исчерпывающим руководством и практическим справочным пособием для опытных программистов, стремящихся писать на Java надежный код для реальных приложений. Быстро освоить основной синтаксис Java, опираясь на имеющийся опыт и знания в программировании.
Изучаем Android SDK
Как только вы освоили базовый синтаксис и поняли базовые концепции, переходите к изучению Android SDK, параллельно читая перечисленные выше книги. Изучение Android SDK вы можете начать с таких ресурсов как:
-
— набор туториалов для начинающих Android-разработчиков от Google на языке программирования Kotlin. Из курса вы узнаете об основных компонентах Android SDK, таких как Activity, Intent, BroadcastReceiver и других. — курс на Udacity, где за 6 месяцев вам расскажут от том как разрабатывать мобильные приложения под Android — набор лекций об устройстве Android от Яндекс. Часть материала немного устарела, но даже сейчас будет очень полезна как начинающим, так и уже более-менее опытным разработчикам. — достаточно понятная книга для новичков, чтобы понять программирование под Android OS — книга, которая уже, наверное стала классикой для Android — программистов, один из самых полных источников знаний по Android OS
Это далеко не полный список, материалов огромное количество, но изучив вышеперечисленные ресурсы, вам с запасом хватит знаний для программирования под Android. Главное — не забывайте ежедневно практиковаться, общаться с наставником или ментором чтобы быстрее понимать свои ошибки и учиться на них.
Изучаем популярные библиотеки
Итак, вы неплохо знаете синтаксис языка, понимаете ООП, умеете применять наследование там где оно нужно и ваши приложения более-менее работают. Возможно, еще без применения архитектуры (MVP/MVVM/VIPER/RIBs) и без навороченных библиотек или фрэймворков. Самое время изучить и их.
В этом разделе я приведу список наиболее популярных библиотек, который используются в большинстве Android — проектов. Изучив их, вы смело сможете претендовать на звание junior или даже middle — разработчика.
Для многопоточного программирования
-
или бесплатный базовый курс по RxJava — набор туториалов и документация по корутинам от Jet Brains
- Основы работы с WorkManager— туториал по работе с WorkManager — туториал от Google как рабоать с корутинами и LiveData
Библиотеки для Dependency injection
- Dagger2
- Koin — пошаговый туториал для изучения основ
Библиотеки для сетевого взаимодействия
-
— пошаговый туториал, где вы создадите приложение для поиска фильмов
Библиотеки для обработки изображений
- Picasso
- Glide
Библиотеки для работы с Json
- GSON
- Jackson
- Moshi
Библиотеки для хранения данных
-
— мини-курс, который поможет понять основы Room + LiveData
- Realm
Изучив, материалы из этого списка вы уверенно сможете претендовать на роль джуниор-разработчика, а в следующем посте мы рассмотрим наиболее часто задаваемые вопросы на собеседованиях. А прямо сейчас приглашаю вас на онлайн-интенсив по разработке
Руководство по программированию под Android для начинающих
Android – базирующаяся на ОС Linux операционная система с открытым исходным кодом, предназначенная для мобильных устройств – таких, как, например, смартфоны или планшетные компьютеры.
Это руководство предназначено для введения в основные понятия программирования под Android, так что после его изучения вы будете понимать некоторые базовые концепции программирования под эту ОС.
От вас же, в свою очередь, требуется только желание и базовое понимание программирования на языке Java. Не так много, правда? Что ж, начнём!
Для разработки приложений под Android можно использовать любые из перечисленных операционных систем:
- Microsoft Windows XP или более поздняя версия
- Mac OS X 10.5.8 или более поздняя версия с чипом Intel
- Linux, включающая GNU C Library 2.7 или более позднюю версию
При этом все необходимые инструменты для разработки Android-приложений находятся в свободном доступе и вы можете загрузить их из Интернета. Для того, чтобы начать создавать приложения под Android, вам понадобятся:
Поздравляем, ваше оборудование готово к работе! Однако прежде чем приступить к вашему первому приложению, поговорим о том, что из себя представляет приложение на Android и из чего оно состоит.
Компоненты приложения являются своего рода «строительными блоками» для приложения Android. Эти компоненты связаны файлом-манифестом приложения AndroidManifest.xml, который описывает каждый компонент приложения и взаимодействие этих компонентов между собой.
Есть четыре базовых типа компонентов, которые могут быть использованы в приложении Android:
- Операции (Activities) представляют собой элементы пользовательского интерфейса (одна операция – один экран) и отвечают за взаимодействие пользователя с экраном мобильного устройства;
- Службы (Services) представляют собой длительные операции, работающие в фоновом режиме и не имеющие пользовательского интерфейса (например, передача данных), вместо этого они, как правило, запускаются иными элементами, уже имеющими пользовательский интерфейс, и взаимодействуют с ними;
- Приемники широковещательных сообщений (Broadcast receivers) представляют собой компоненты, реагирующие на объявления самой ОС, передаваемые всей системе (как хороший пример – объявление о низком уровне заряда батареи устройства). Они также не имеют пользовательского интерфейса, однако могут передавать данные другим компонентам, где они демонстрируются пользователю в виде уведомлений;
- Поставщики контента (Content providers) представляют собой компоненты, управляющие взаимодействием приложения с его базой данных — посредством поставщика контента другие компоненты приложения могут запрашивать или изменять данные.
Помимо четырех базовых типов, существуют дополнительные типы компонентов, используемые для выстраивания взаимодействий и связей как между базовыми типами компонентов, так и между компонентами и внешними элементами. К ним относятся:
- Фрагменты (Fragments) – части пользовательского интерфейса в Операциях (см. выше);
- Виды (Views) – элементы пользовательского интерфейса, отображаемые на экране, например, кнопки, списки и т. д.;
- Макеты (Layouts) – определяют элементы пользовательского интерфейса, их свойства и расположение;
- Намерения (Intents) – соединяют вместе различные компоненты приложения или связывают друг с другом работу разных приложений;
- Ресурсы (Resources) – внешние элементы, такие, как строки, константы или изображения;
- Манифест (Manifest) – конфигурационный файл приложения.
Теперь, когда вы получили базовое понимание о структуре приложений на Android, хотелось бы предложить вам самим попробовать создать свое первое приложение.
Итак, давайте приступим к созданию простого Android-приложения, которое будет выводить на экран «Hello World!».
У вас к этому времени уже должен быть установлен Android Studio последней версии. Ниже будет приведена небольшая пошаговая инструкция:
- Откройте Android Studio.
- В открывшемся окне кликните на «Start a new Android Studio project», чтобы создать новый проект.
- В открывшемся окне в строку «Application name» введите название вашего будущего приложения. Нажмите Next.
- В следующем окне вам нужно выбрать тип устройств, для которых создается приложение – в нашем случае необходимо выбрать «Phone and Tablet» (смартфоны и планшетные компьютеры), а в выпадающем списке под названием «Minimum SDK» нужно выбрать версию Android, для которой создается приложение (обычно указывается самая ранняя версия, способная запустить приложение) – в нашем конкретном случае выберем версию Android 6.0. Если в вашей версии есть возможность выбрать язык программирования (выпадающее окно Language), выберите пункт “Java”. Остальные опции можно оставить без изменений. Нажмите Next.
- На следующем этапе выберите пункт Empty Activity – это будет означать, что экран нашего приложения не будет иметь никаких дополнительных элементов. Нажмите Next.
Теперь перед вами открылась привычная среда разработки. К сожалению или к счастью, но сейчас вам не нужно будет писать код – среда разработки уже сделала это за вас, создав файлы для приложения, выводящего «Hello world!» на экран, по умолчанию. Вместо этого хотелось бы обратить ваше внимание на несколько созданных файлов и папок, найти которые вы можете в колонке слева, отображающей все элементы проекта.
- Файл MainActivity.java
В папке «Java» содержатся исходные файлы формата .java для вашего приложения. По умолчанию в ней находится исходный файл MainActivity.java, имеющий класс Операция – он запускается при нажатии пользователем на иконку приложения на устройстве. Этот файл содержит главный код приложения, и именно он преобразуется в файл .exe для запуска приложения на устройстве.
- Файл AndroidManifest.xml
Это файл типа «Манифест», который описывает основные характеристики приложения и определяет каждый из его компонентов. Он является своего рода интерфейсом между ОС Android и вашим приложением – если компонент не упомянут в этом файле, он не будет отображен и в операционной системе.
- Файл Build.gradle
Это автоматически генерируемый файл, содержащий определённые данные касательно приложения – такие, как, например, версия SDK.
Запустить приложение можно двумя способами: на реальном устройстве или на эмуляторе в самой среде разработки. В нашем случае мы рассмотрим более универсальный случай – запуск на эмуляторе, полностью имитирующем работу устройства с операционной системой Android.
Попытайтесь запустить приложение кнопкой «Run» – в появившемся диалоговом окне выберите пункт «Create New Virtual Device». В последующих окнах нужно будет выбрать размер экрана и версию Android – помните, что она должна быть не ниже, чем указанная на этапе создания проекта. В случае, если данная версия Android будет отсутствовать на компьютере, Android Studio предложит ее загрузить. Остальные пункты можно оставить без изменений – на данный момент нет необходимости их изменять. После выбора всех настроек нажмите кнопку «Finish», и если вы увидели на своем мониторе экран телефона с названием вашего приложения сверху и с надписью «Hello world!» на экране, значит, вы можете себя поздравить – вы создали свое первое Android-приложение!
Теперь у вас есть базовое понимание и минимальный опыт в создании приложений на Android. Этого, разумеется, совершенно не хватит, чтобы заниматься разработкой, но это необходимый для дальнейшего развития фундамент – продолжайте изучать и практиковаться! Всего наилучшего!
Как сделать приложение для Android самостоятельно
Платформа Android открытая, поэтому каждый может написать своё приложение и распространять его через каталоги программ. Все инструменты бесплатны.


Язык программирования для мобильной разработки на Android очень простой — это Java. Сейчас Google активно продвигает Kotlin как язык, который сможет заменить Java. Приложения пишут и на C++.
Создание простейшего приложения состоит из нескольких этапов:
- проект в Android Studio;
- создание пользовательского интерфейса;
- добавление активностей, навигации и действий;
- тест-драйв приложения в эмуляторе.
Необходимые инструменты
Первым делом установите программу Android Studio. Это официальная среда разработки (IDE) для Android, она работает на Windows, macOS и Linux. Хотя при разработке программ для Android можно использовать и другие среды, кроме Android Studio.
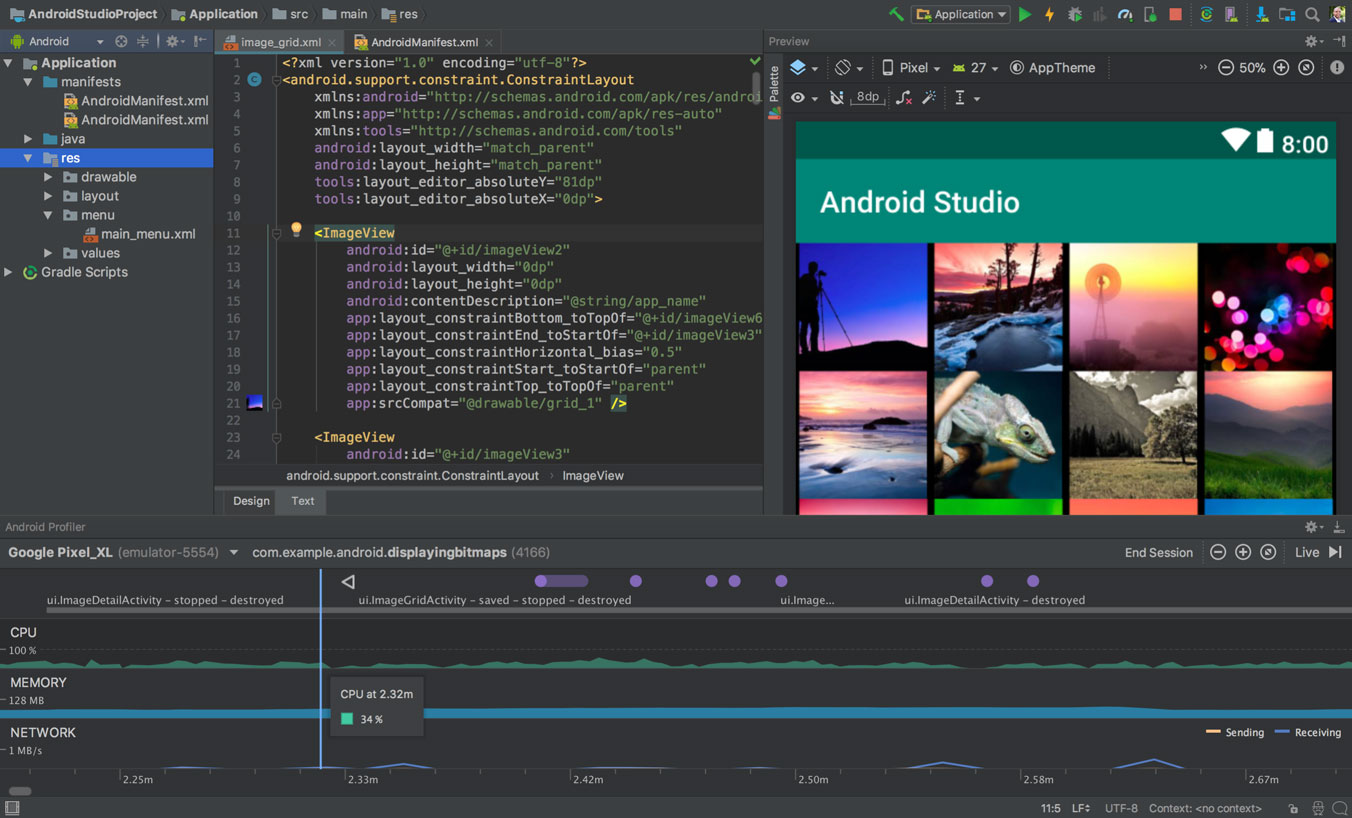
Если на компьютере не установлены Android SDK и другие компоненты, то Android Studio автоматически скачает их. Android SDK — это среда программирования, в которую входят библиотеки, исполняемые файлы, скрипты, документация и т.д.
Android SDK компилирует код вместе с любыми данными и ресурсами в файл с расширением .apk. Он содержит всё необходимое для установки приложения на Android-устройство.
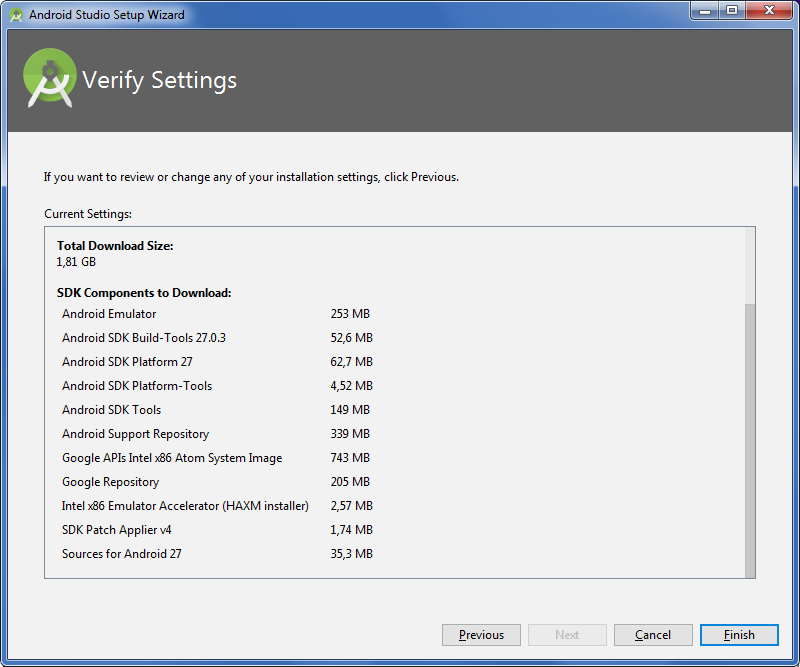
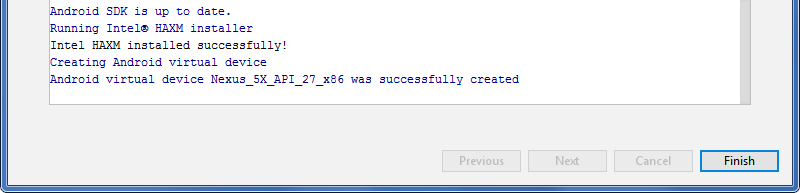
Полезно установить и эмулятор Android, чтобы запускать и тестировать приложения. Эмулятор поставляется в комплекте с Android Studio.
Когда все инструменты установлены, можно создать первый проект. Но сначала нужно разобраться с основными понятиями.
Из чего состоит приложение
на Android
Android-приложение состоит из четырёх компонентов. Каждый компонент — это точка входа, через которую система или пользователь может получить доступ.
-
(activity) — элементы интерактивного пользовательского интерфейса.
Одна активность задействует другую и передаёт информацию о том, что намерен делать пользователь, через класс Intent (намерения). Активности подобны веб-страницам, а намерения — ссылкам между ними. Запуск приложения — это активность Main.
(service) — универсальная точка входа для поддержания работы приложения в фоновом режиме.
Этот компонент выполняет длительные операции или работу для удалённых процессов без визуального интерфейса.
(broadcast receiver) транслирует нескольким участникам намерения из приложения.
Теперь попробуем сделать своё приложение для Android.
Создаём Android-приложение
в Android Studio
Шаг 1
Выбираем название приложения, домен компании, путь к проекту и название пакета. Указываем, включить ли поддержку опциональных языков программирования C++ и Kotlin.
Шаг 2
Задаём одну или несколько целевых платформ для сборки. Для этого используется SDK и AVD, менеджер виртуальных устройств Android. Инструмент позволяет устанавливать в SDK пакеты, которые поддерживают несколько версий ОС Android и несколько уровней API (интерфейсов программирования приложений).
Справка
Чем ниже версия Android, тем больше устройств, на которых приложение запустится. Чем выше версия, тем богаче функциональность API.
Шаг 3
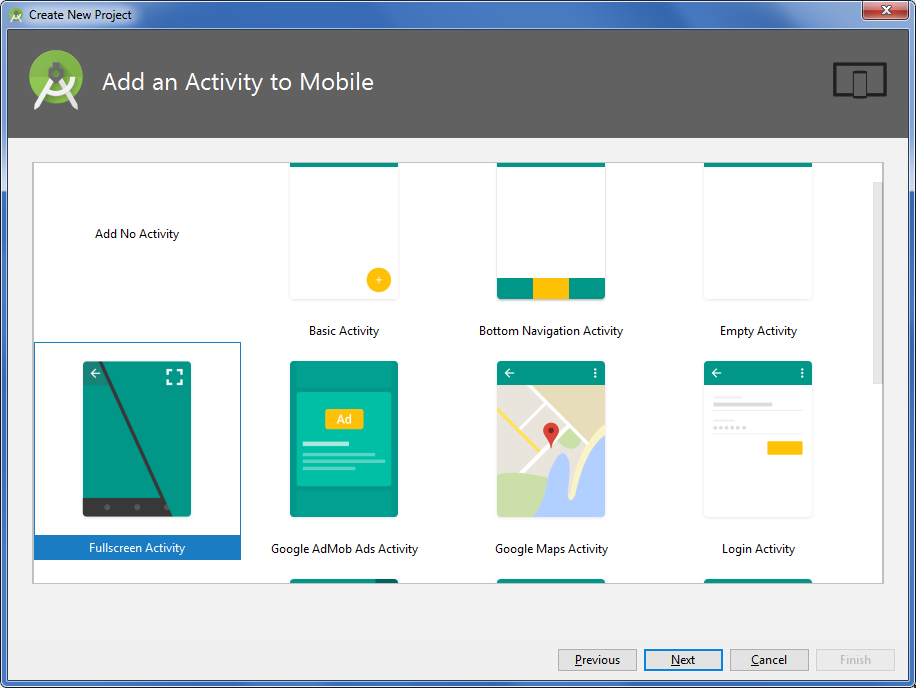
Выбираем основную активность, которая будет запускаться при нажатии на иконку приложения, и даём ей имя.
Шаг 4
После нескольких минут сборки Android Studio открывает интерфейс IDE. Здесь три основных момента.
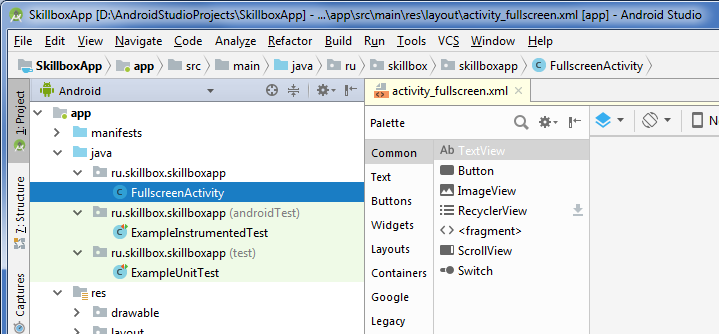
Если выбрать в выпадающем меню вид Android, то вы увидите файлы проекта. Например, наша основная активность называется app > java > ru.skillbox.skillboxapp > FullscreenActivity. При создании проекта мы указали вместо активности Main полноэкранную активность.
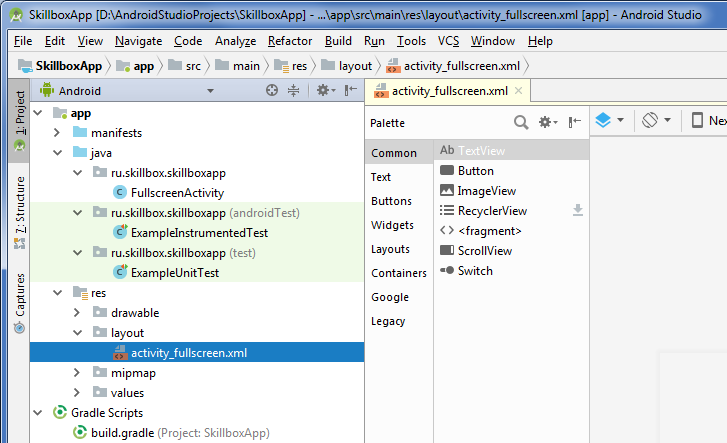
Далее можно посмотреть файл app > res > layout > activity_fullscreen.xml. Это XML-файл с макетом для UI нашей основной активности.
Наконец, третий важный файл app > manifests > AndroidManifest.xml описывает фундаментальные характеристики приложения и определяет все его компоненты.
Содержимое манифеста
Запускаем на реальном устройстве
Созданное нами приложение — это одна активность, которая запускается в полноэкранном режиме и не имеет графических элементов.
Запускаем на Android-устройстве или в эмуляторе.
Смартфон или планшет для этого подключаем в режиме USB-отладки, которая активируется в Настройках разработчика в меню Настройки.
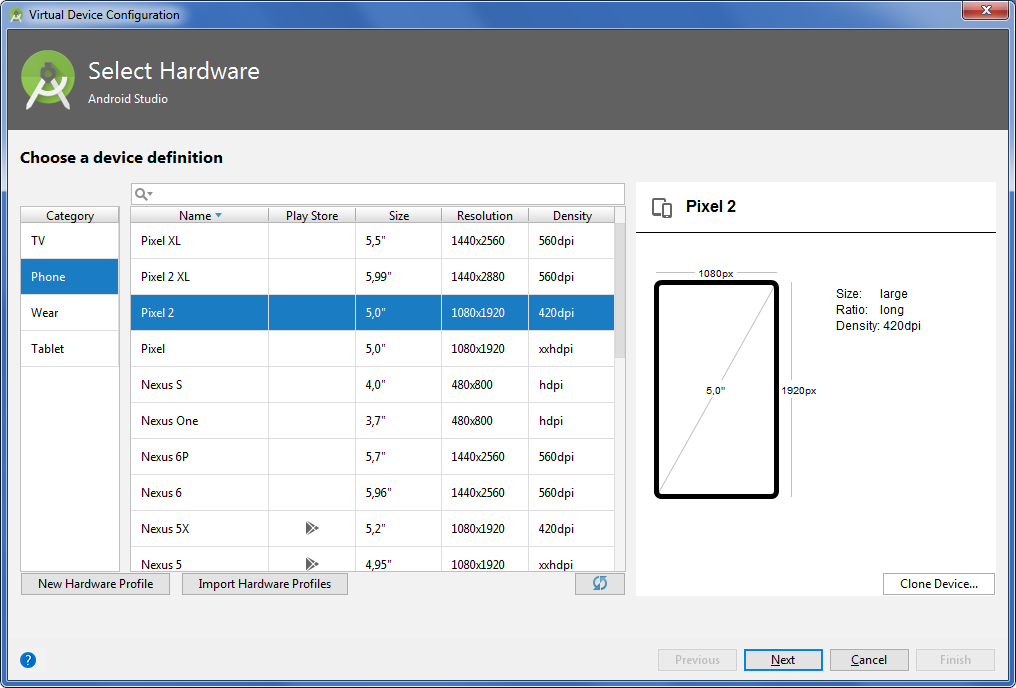
Для запуска в эмуляторе нажимаем в Android Studio кнопку Run в меню Run (Shift+F10). Выбираем подходящее устройство и версию ОС, портретную или ландшафтную (альбомную) ориентацию.
Создаём простой пользовательский интерфейс
Пользовательский интерфейс Android-приложения создаётся через иерархию макетов (layouts, объекты ViewGroup) и виджетов (объекты View). Макеты управляют расположением дочерних виджетов на экране. Сами виджеты — это непосредственно компоненты UI: кнопки, текстовые поля на экране и т.п.
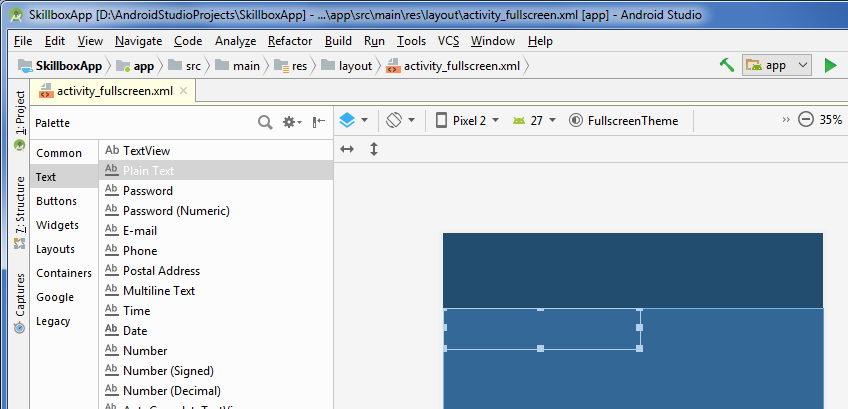
Интерфейс активностей создаётся в Android Studio в редакторе макетов (Layout Editor) и хранится по большей части в XML-файлах.
- Открываем файл app > res > layout > activity_fullscreen.xml.
- Добавляем на экран из палитры (Palette) виджеты перетаскиванием мышью.
- Например, берём текстовое поле (PlainText). Это виджет EditText, куда пользователь может вводить текст.
- Добавляем кнопки и другие нужные элементы.
Добавляем действия, активности и навигацию
Предположим, мы создали активность с текстовым полем и кнопкой «Отправить». После этого нужно написать, что конкретно будет происходить при нажатии кнопки «Отправить».