Удаление встроенного чата Microsoft Teams в Windows 11
 15.02.2023
 itpro
 Windows 11
 комментариев 5
Microsoft решила добавить в Windows 11 встроенный клиент чата Microsoft Teams, и его кнопка его запуска по-умолчанию отображается в панели задач. Если вы не используете Microsoft Teams, то можете удалить его и убрать значок Chat в панели задач.
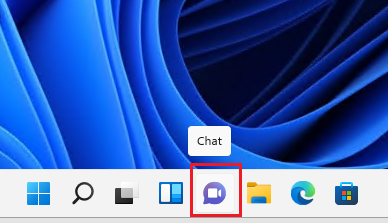
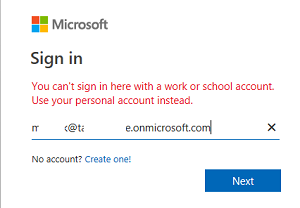
Скрыть значок чата Teams в панели задач Windows 11
Если вы не хотите полностью удалять клиент Чат Teams, можно просто убрать его из автозагрузки и скрыть значок с панели задач.
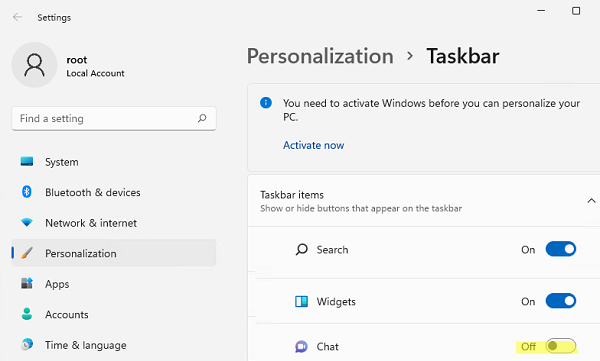
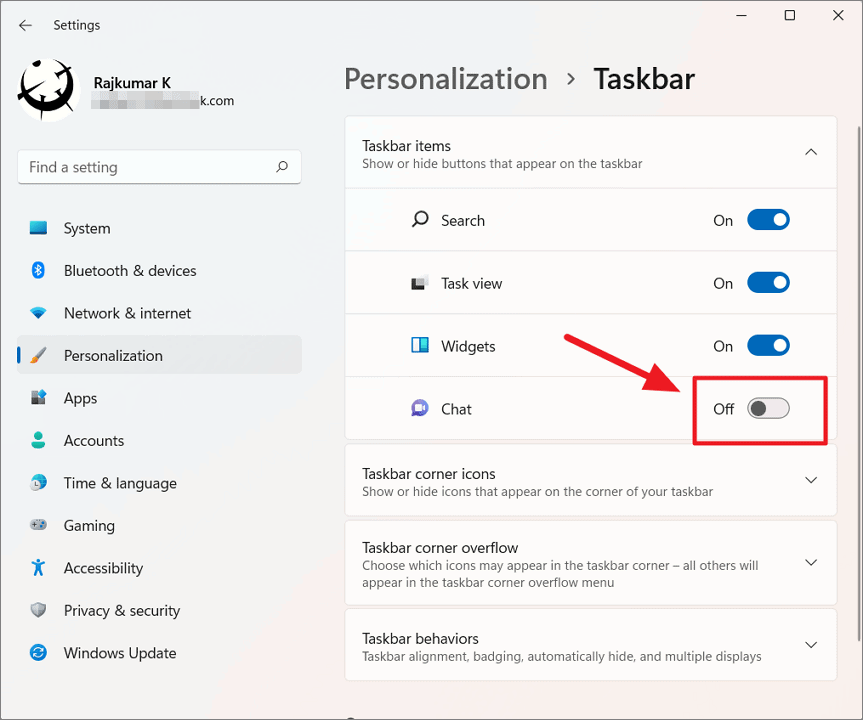
Чтобы скрыть значок Chat Teams в панели задач, перейдите в Settings -> Personalization -> Taskbar (можно выполнить команду быстрого доступа ms-settings:taskbar )и отключите Chat.
Отключить автозапуск Microsoft Teams можно через Settings -> Apps -> Startup ( ms-settings:startupapps ).
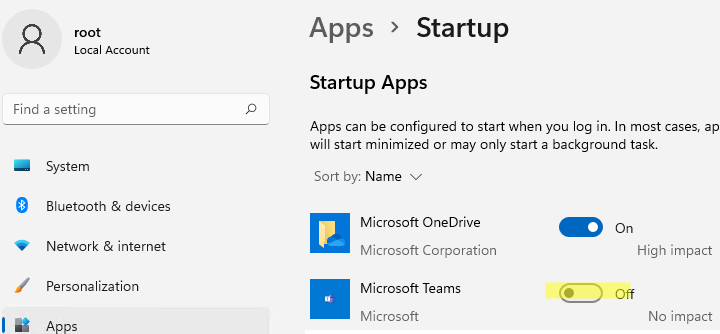
Обратите внимание, что недостаточно просто отключить автозапуск Teams через Settings или Task Manager -> Startup. Если вы запустите клиент Teams, то он автоматически пропишется в автозагрузку.
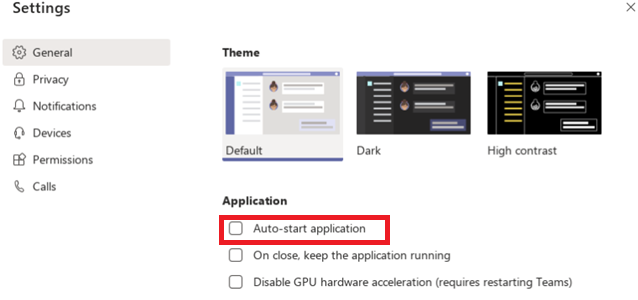
При установке очередного билда Windows 11, чат Teams опять может вернуться в панель задач и автозагрузку. Поэтому можно использовать другие способы отключения иконки Teams.
- В новых административных admx шаблонах GPO для Windows 11 появилась опция Configure the Chat icon on the taskbar (Computer Configuration -> Administrative Templates -> Windows Component -> Chat). Если изменить эту политику на Disabled, значок Teams перестанет отображаться в панели задач;
- Также можно скрыть значок чата Teams через реестр: reg add «HKEY_LOCAL_MACHINE\SOFTWARE\Policies\Microsoft\Windows\Windows Chat» /f /v ChatIcon /t REG_DWORD /d 3
Удаление Microsoft Teams в Windows 11
Чтобы удалить клиент appx приложение Chat Teams у текущего пользователя, перейдите в Settings -> Apps -> Apps and features ( ms-settings:appsfeatures ). Найдите Microsoft Teams в списке установленных приложение и удалите его (Uninstall в меню).
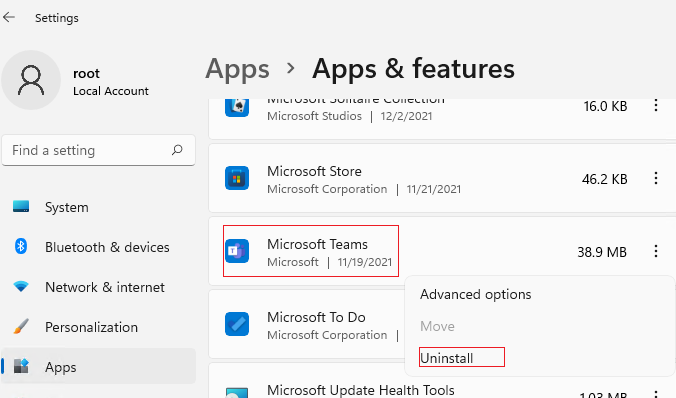
Но это удалит приложение Teams только у текущего пользователя. Если вы хотите удалить Teams у всех пользователей и из образа Windows 11 (как Staged приложение), воспользуйтесь PowerShell.
Get-AppxPackage MicrosoftTeams*|Remove-AppxPackage -AllUsers
Get-AppxProvisionedPackage -online | where-object <$_.PackageName -like "*MicrosoftTeams*">| Remove-AppxProvisionedPackage -online –Verbose

Dir “C:\Program Files\WindowsApps”| where-object
После удаления Teams можно запретить его автоматическую установку:
reg add HKLM\SOFTWARE\Microsoft\Windows\CurrentVersion\Communications /v ConfigureChatAutoInstall /t REG_DWORD /d 0 /f
По умолчанию в Windows 11 22H2 у пользователя нет прав на внесение изменений в ветку реестра HKLM\SOFTWARE\Microsoft\Windows\CurrentVersion\Communications.
При попытке создать параметр реестра ConfigureChatAutoInstall появится ошибка
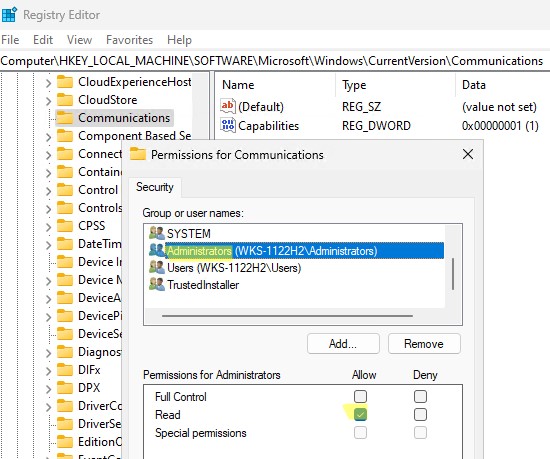
Права на запись в ветку реестра есть только у Trusted Installer.
Чтобы создать этот параметр реестра, нужно использовать параметр файла автоответов:
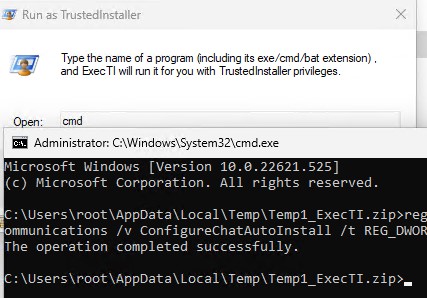
Или вы можете выполнить команду добавления в реестра от имени TrustedInstaller с помощью утилиты ExecTI от Winaero (https://winaero.com/download-execti-run-as-trustedinstaller/).
Что интересно: приложение Chat Teams не встроено в дистрибутив Windows 11, этот APPX пакет устанавливается автоматически после установки Windows. Поэтому вы не сможете удалить его из установочного образа Windows (install.wim) по этой методике.
На данный момент единственный способ запретить автоматическую установку Teams – прописать параметр реестра ConfigureChatAutoInstall во время установки Windows.
Проще всего это сделать с помощь файла AutoUnattend.xml, который нужно положить в корень установочного образа/ флешки с Windows 11 (по аналогии со статьей Установка Windows 11 без TPM, Secure Boot и других проверок). Вот фрагмент файла автоответов:
 Предыдущая статья Следующая статья

How to Fully Disable and Uninstall Teams in Windows 11
If you are not using Microsoft Teams app, hide the Chat icon from the taskbar, remove it from Startup, or uninstall it from your Windows 11.


Microsoft really wants you to use its Microsoft Teams app that why the app is deeply integrated into Windows 11 as the native experience. Microsoft Teams is a free collaboration platform for audio and video calls, one-on-one chat conversations, group messaging, and synchronizing schedules, among other things.
When you login into your Windows 11 PC, you would see that the Microsoft Teams Chat app is integrated into your Taskbar (by default) and the Teams app is running in the background. Not everyone needs Microsoft Teams since most people are already using other services such as Zoom, Google Chat, Slack, or Skype.
Besides, Microsoft Teams icons can clutter your taskbar and system tray and the app will be running in the background every time you start the computer. If you are not a fan of Microsoft Teams and not going to use it, you can hide the Microsoft Teams icon from the taskbar and the system tray, stop it from starting automatically, remove the app from Startup or uninstall it completely from your Windows 11 computer.
Hide the Microsoft Teams Chat Icon from Taskbar
In Windows 11, you will see the Microsoft Teams Chat icon in the middle of the Taskbar whether you have use for it or not. Unlike other taskbar icons, you cannot remove the Chat icon simply by right-clicking on the taskbar and selecting ‘Hide from taskbar’.
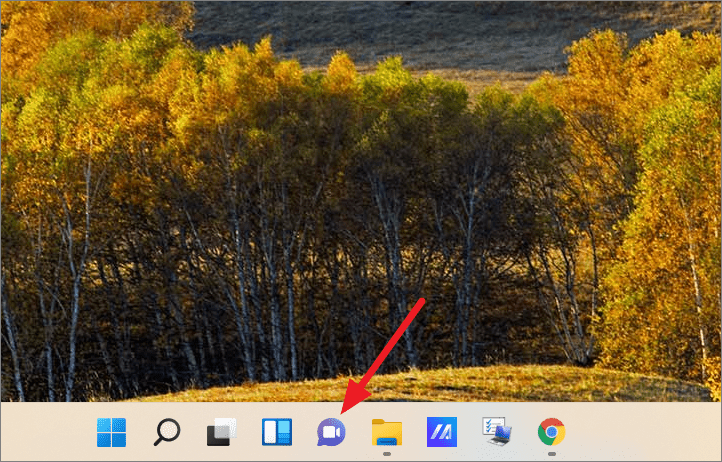
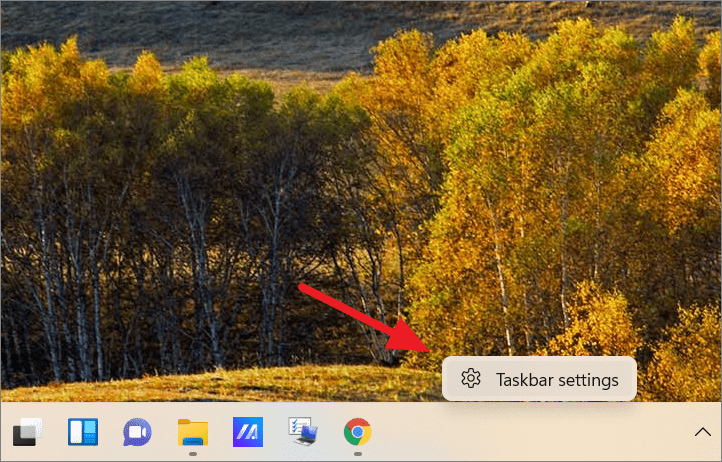
If you want to hide the Teams Chat icon from the taskbar, you do it through the taskbar settings. To do this, right-click any empty area on the taskbar and select ‘Taskbar settings’.
This will open up the Taskbar settings page. Here, simply turn off the toggle next to ‘Chat’ under Taskbar items to hide the Teams Chat icon.
If you want to hide the Microsoft Teams icon from the taskbar corner near the tray area, follow these steps:
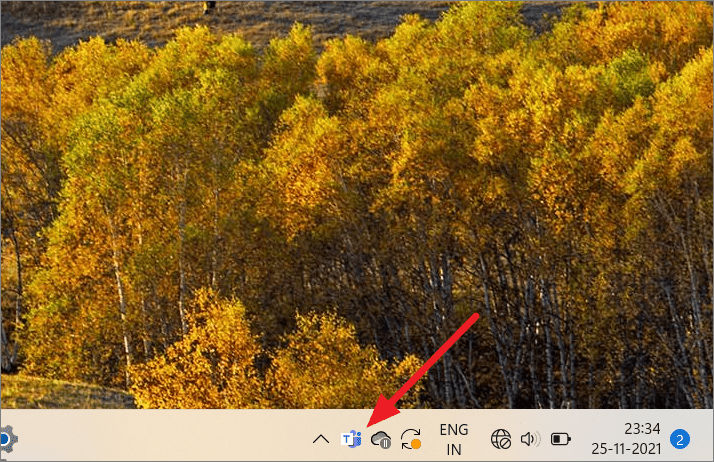
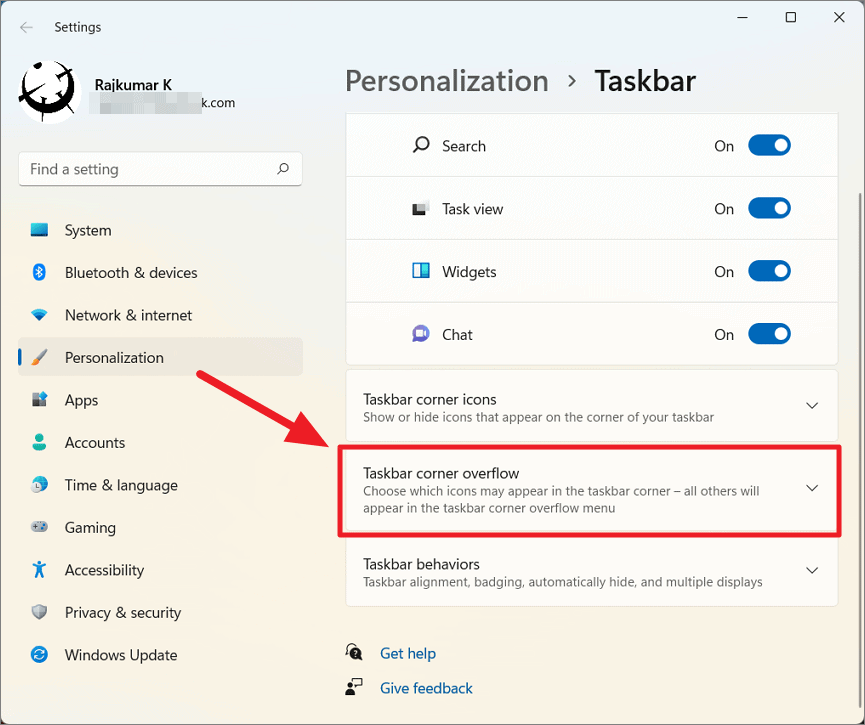
First, right-click anywhere on the taskbar and choose ‘Taskbar settings’ as you did above. Then, expand the ‘Taskbar corner overflow’ option in the Taskbar settings.
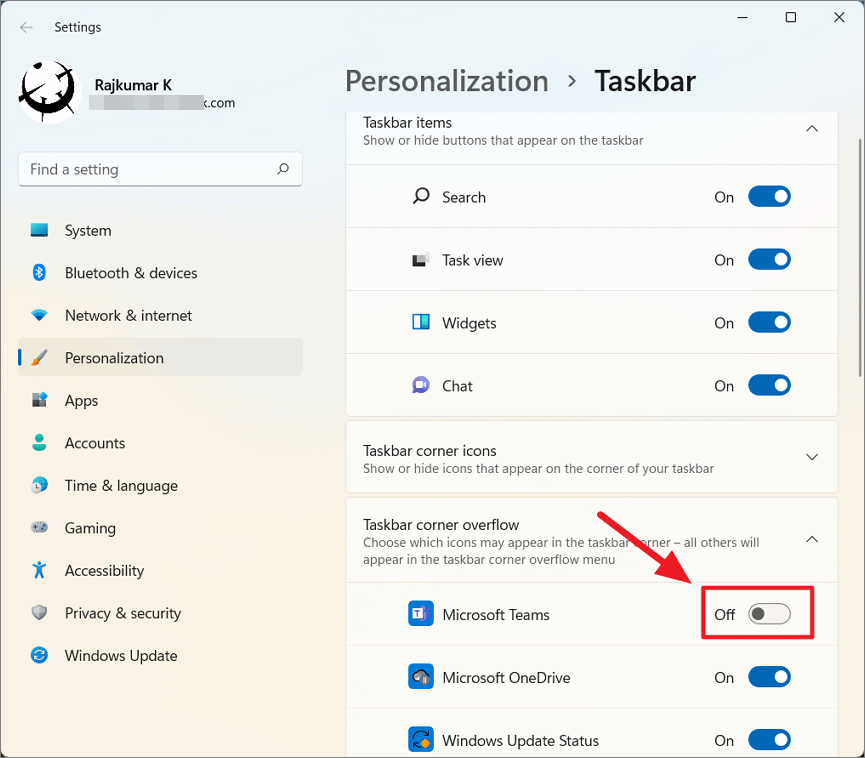
After that turn off the toggle next to ‘Microsoft Teams’ to remove the Teams icon from the Taskbar corner.
Stop Microsoft Teams from Running in the Background
Even when you are not using Microsoft Teams, the app would be running in the background consuming quite a resource. If you want to stop the Teams app from running in the background when you are not using it, follow these steps:
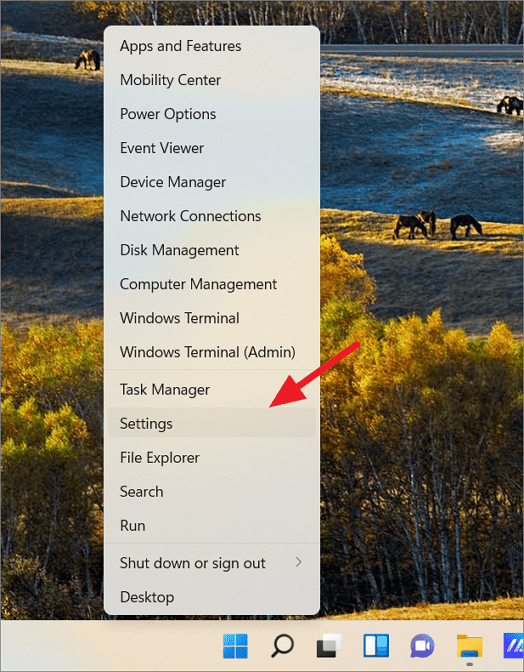
To start with, right-click the Start menu and select ‘Settings’ or press Win + I shortcut to open the Settings app.
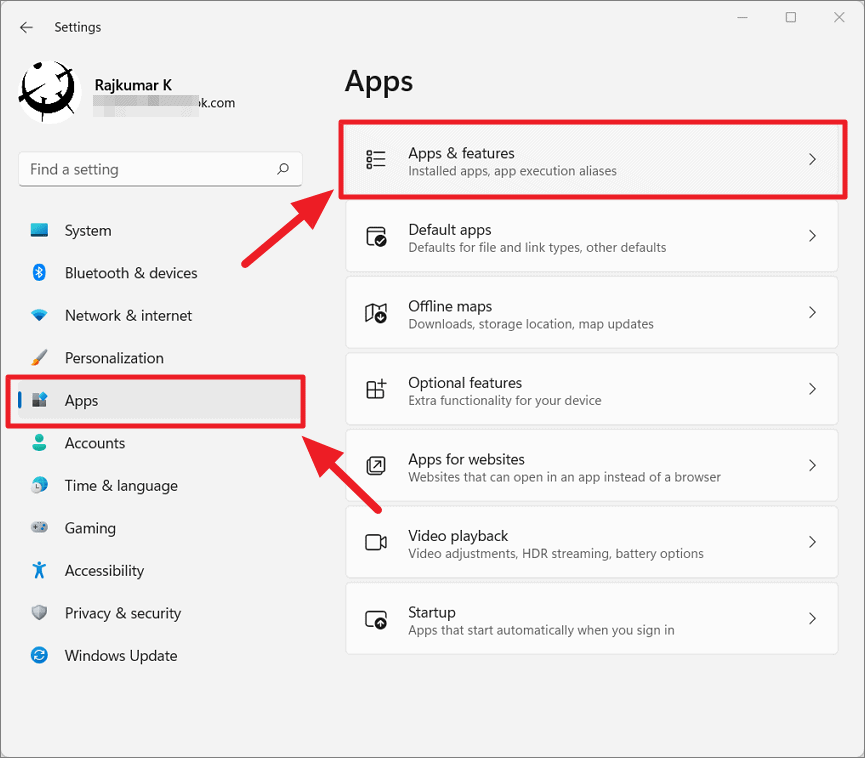
On the Setting app, click on the ‘Apps’ tile on the left and select ‘Apps & features’ on the right.
Next, scroll down the list of apps and locate the ‘Microsoft Teams’. Then, click the vertical three-dot icon next to Microsoft Teams app and select ‘Advanced options’.
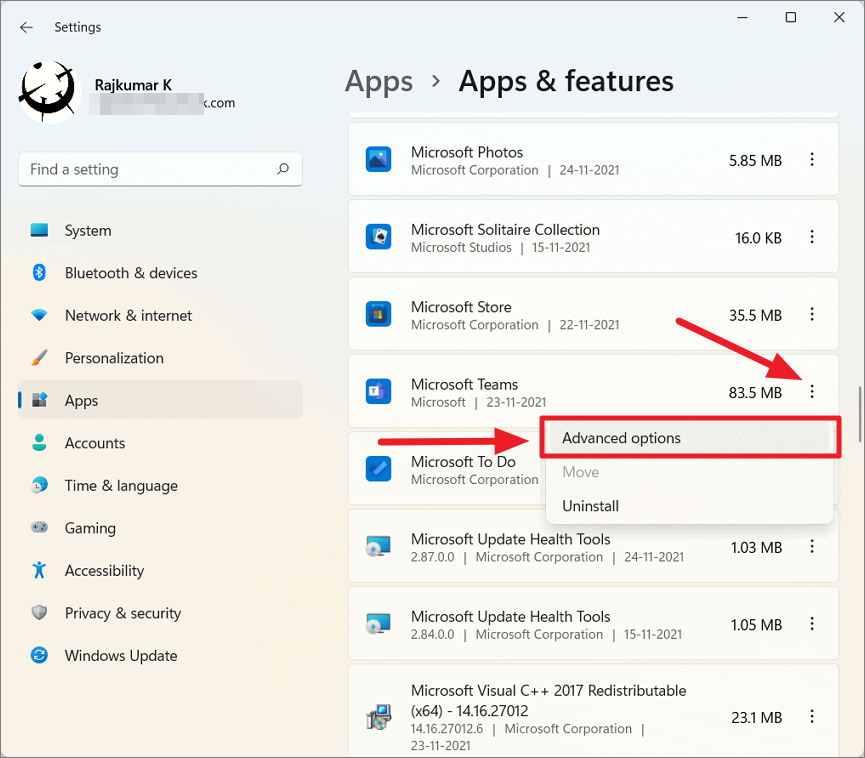
This will open up the Microsoft Teams app settings page. Here, you will find the ‘Let this app run in background’ drop-down under Background apps permissions.
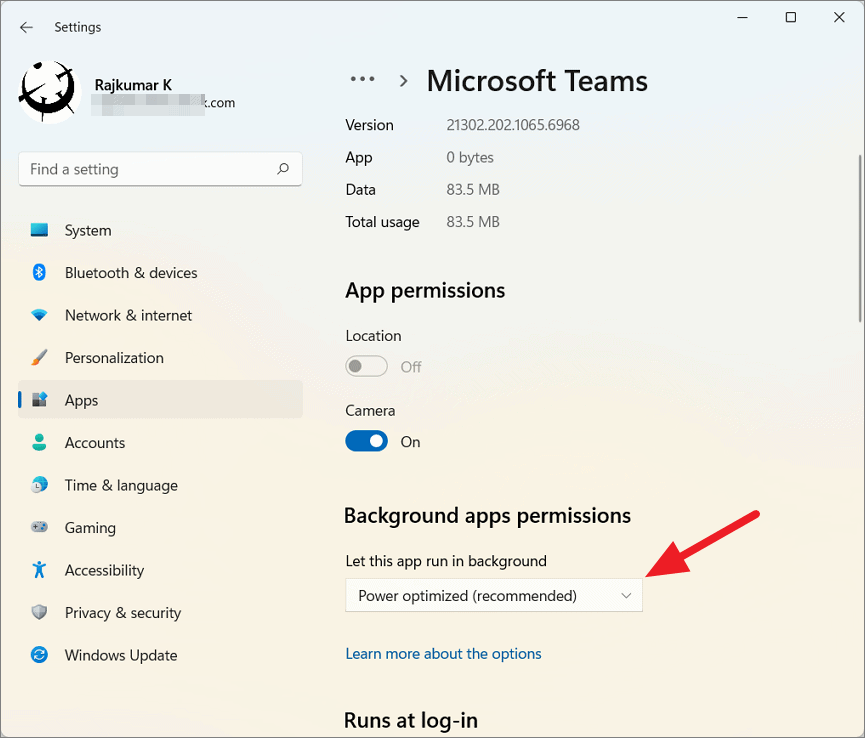
Click on that drop-down and choose ‘Never’ to stop the app from running in the background.
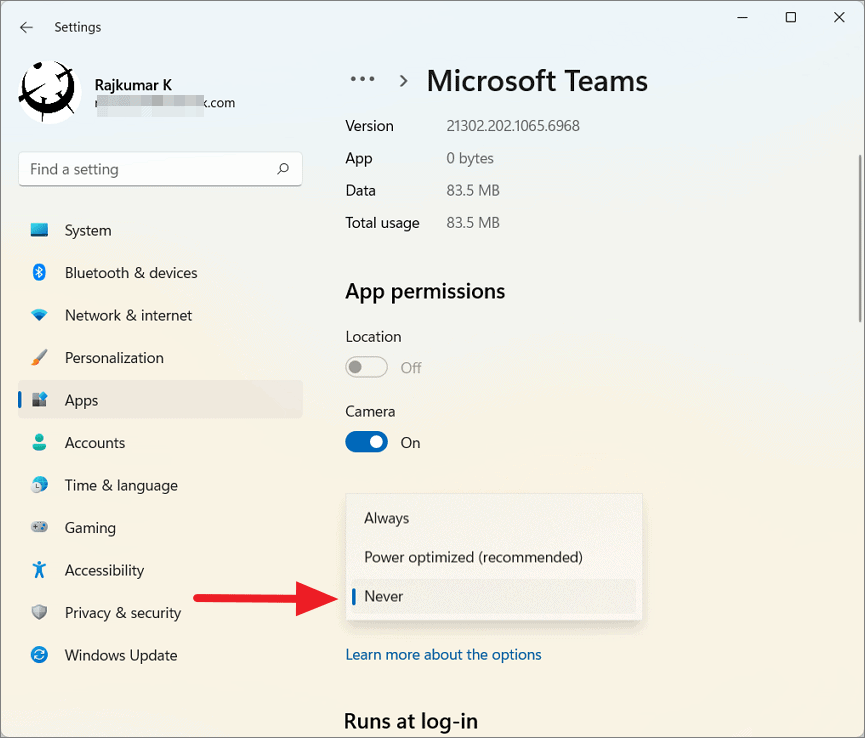
This will prevent the Microsoft Teams app from running in the background when you are not actively using it. This will also turn off notifications or updates for the app when it’s inactive. Doing this can also help save power, free memory, and disk.
Disable Microsoft Teams Without Uninstalling it in Windows 11
Microsoft Teams is pre-configured to start automatically every time you turn on your Windows 11 computer and log in to your user account. If you don’t use Microsoft Teams often, you can disable it from starting automatically using Settings, Task Manager, or from within the app itself. Disabling Teams at automatic startup can significantly increase your system boot time and free resources to perform other tasks.
Stop Microsoft Teams for the Current Session
If you finished your chats and meeting for the day in the Microsoft Teams and close it, the application won’t stop instead it will run in the background unnecessarily eating up precious resources. If you only want to kill the app for the current session, here’s what you need to do:
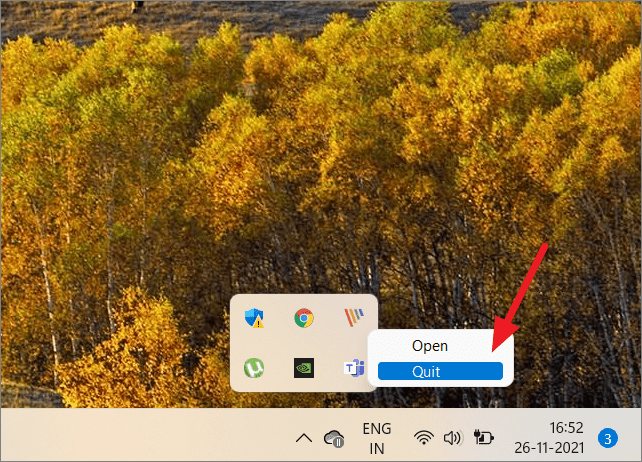
First, locate the Microsoft Teams icon in the taskbar corner on the right. If you don’t see the Teams icon there, then click the ‘Show hidden icons’ up arrow (overflow area) and find the app icon there.
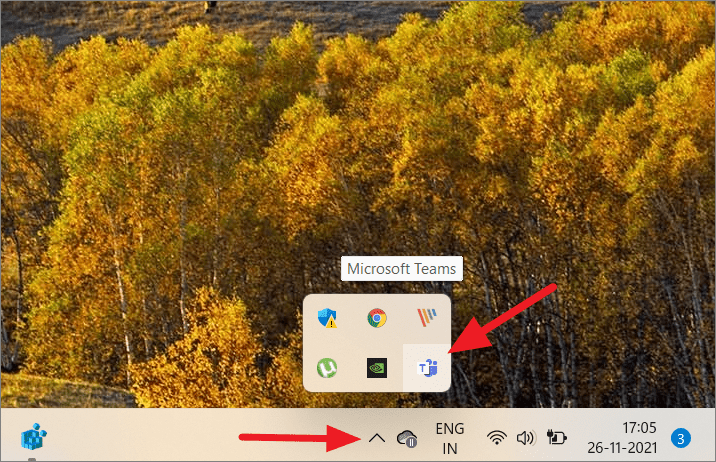
Then, right-click the Teams icon and select ‘Quit’ to kill the app immediately.
Prevent Microsoft Teams from Starting Automatically from Team settings
If you don’t want Microsoft Team to pop up on your screen unnecessarily, you can restrict the app from automatically starting up from the app settings. Follow these steps to do that:
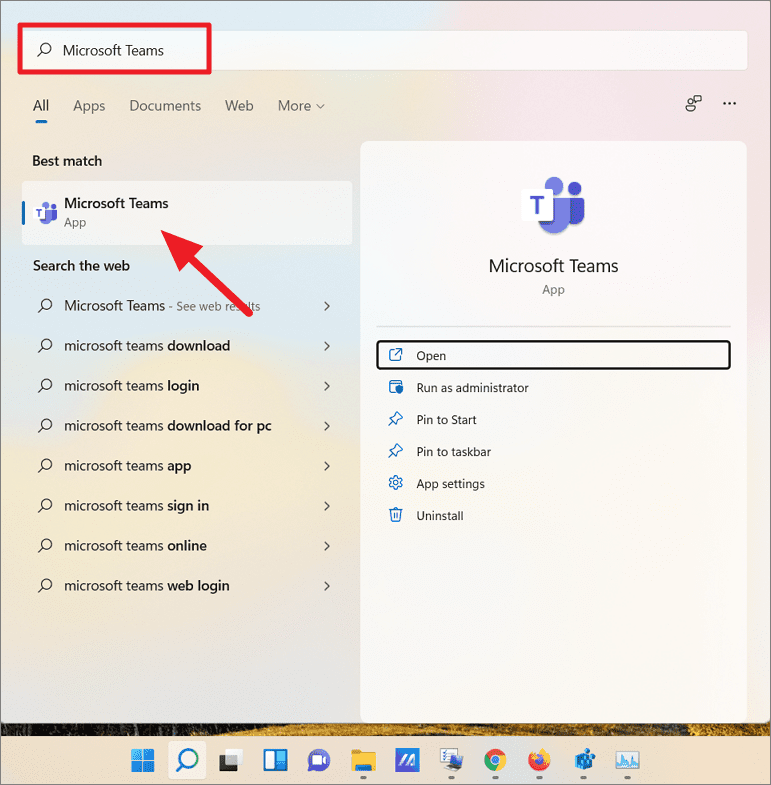
First, open the Microsoft Teams app. To do that, search for ‘Microsoft Teams’ in the Windows search and select the app from the result or click on the Teams icon from the Taskbar corner or the overflow.
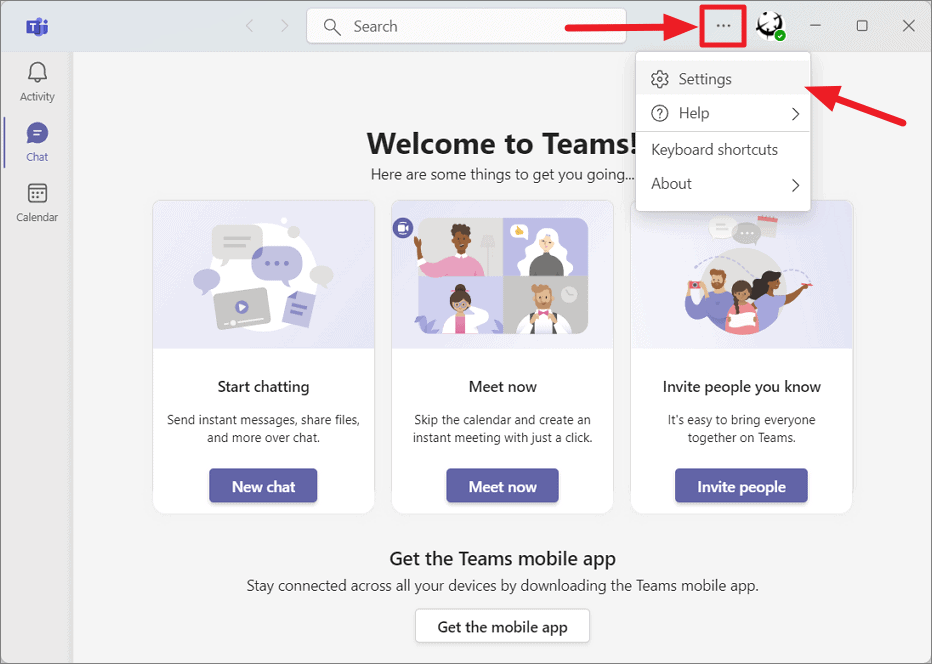
On the Microsoft Teams app, click the ‘Settings and more’ button (three-dot menu) on the Title Bar, and select ‘Settings’.
On the Settings page, go to the ‘General’ tab on the left and deselect the ‘Auto-start Teams’ option under System.
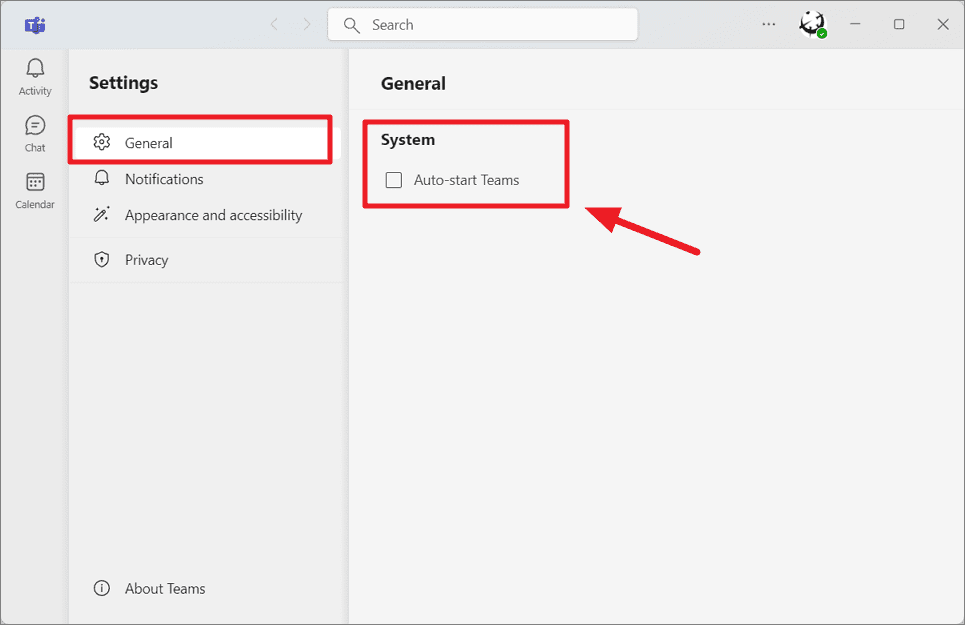
Now, Microsoft Teams won’t start unless you open the Teams app or the Chat app from the Taskbar manually.
Disable Microsoft Teams from Startup using Settings
If you don’t want to completely remove Microsoft Teams app, you can remove it from the Windows Startup list to stop it from automatically loading every time you start your device. Here’s what you need to do:
Open the Settings app on Windows 11 and head over to the ‘Apps’ section on the left.
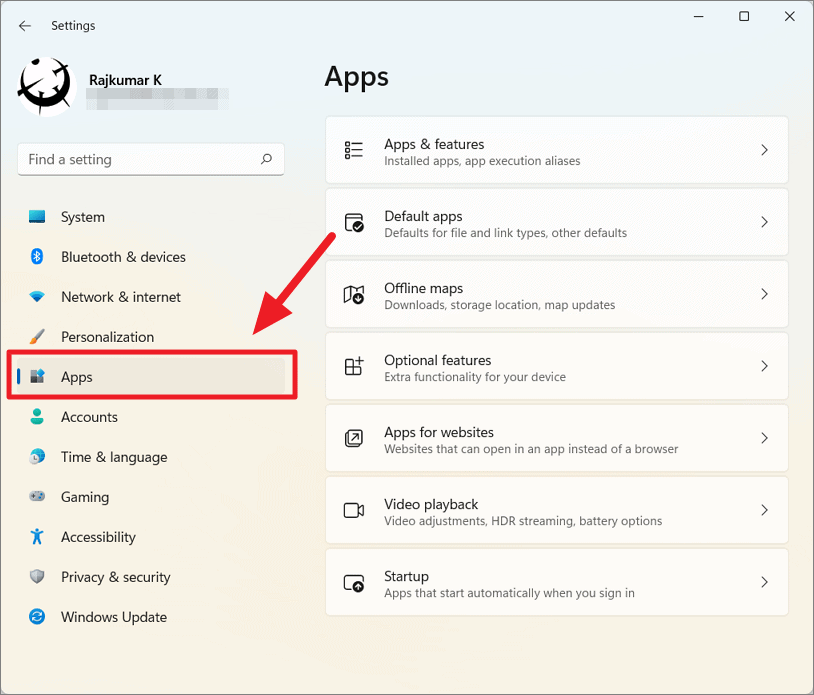
Then, select the option for ‘Startup’ on the right.
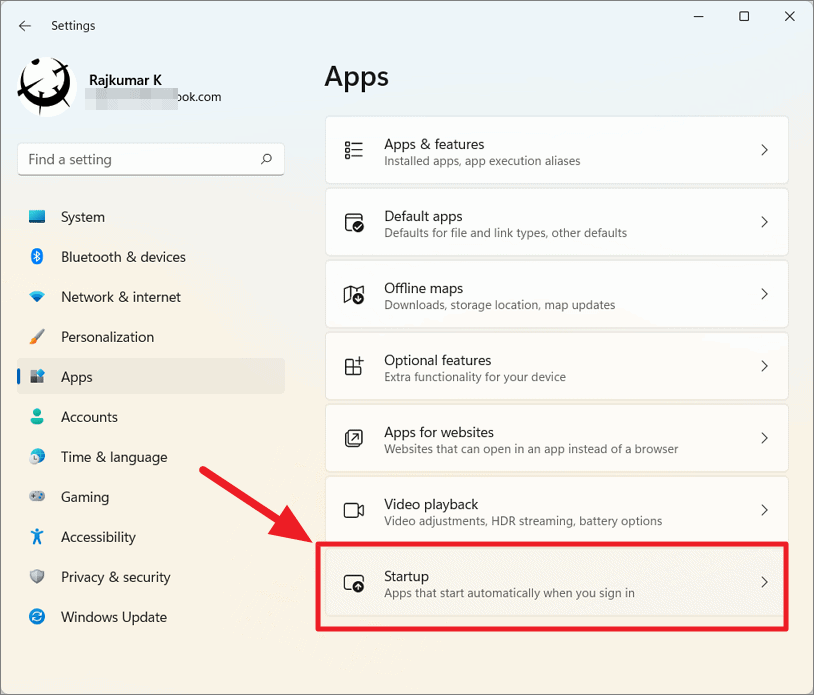
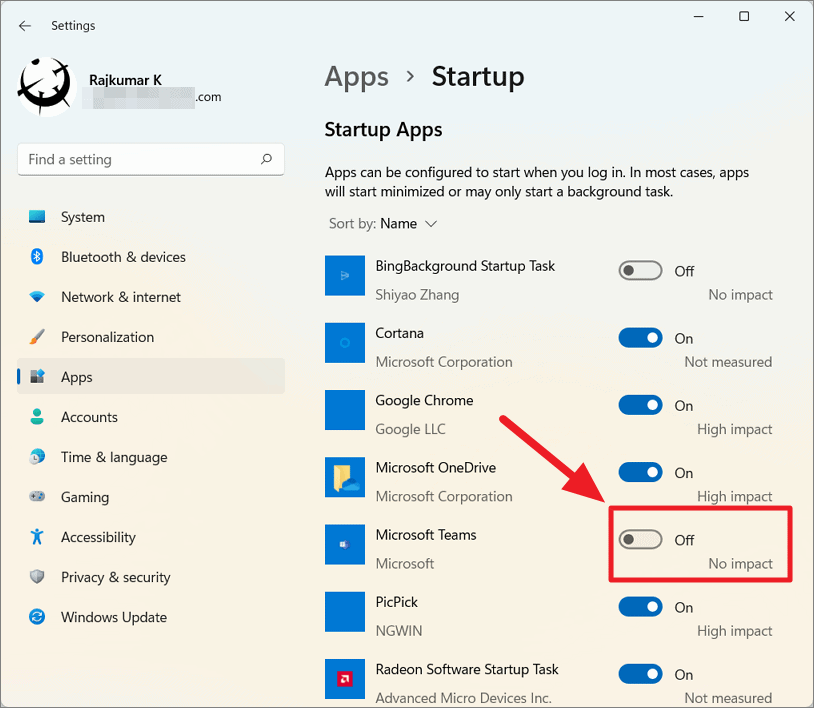
In Startup Settings, you’ll see a list of apps that start when you log in to your PC. Here, locate ‘Microsoft Teams’ and turn off the toggle to remove it from the startup apps.
Disable Microsoft Teams from Startup using Task Manager
Another way to remove Microsoft Teams from the startup list is through the task manager. Here’s how:
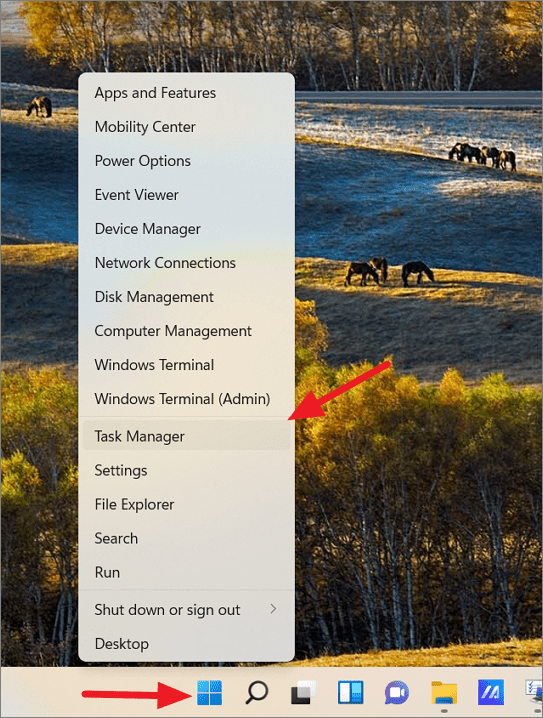
Open Task Manager by right-clicking the Start menu and selecting the ‘Task Manager’ from the overflow menu or pressing Ctrl + Shift + Esc keys at the same time.
In the Task Manager, go to the ‘Startup’ tab and locate ‘Microsoft Teams’. Then, either right-click on the app and select ‘Disable’ or select the app and click the ‘Disable’ button at the bottom.
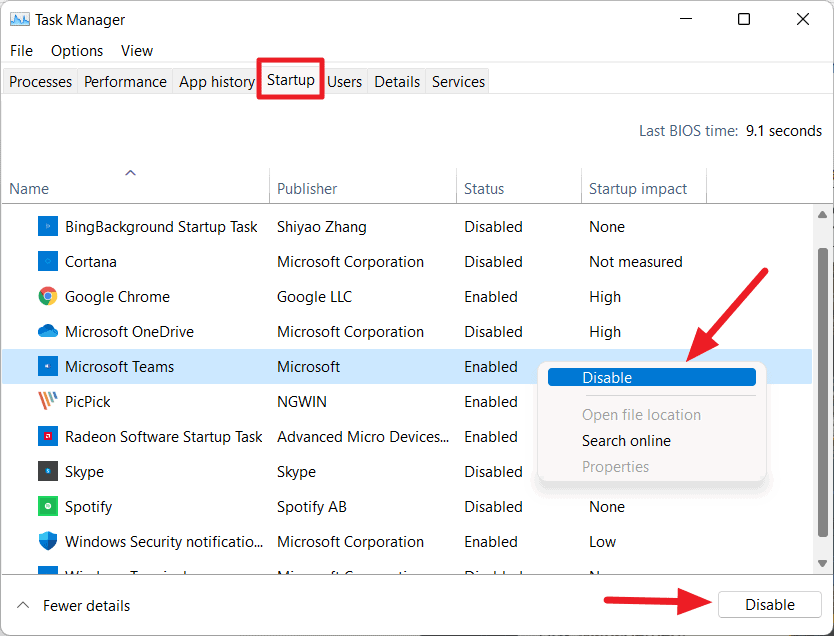
Now, Microsoft Teams will not run automatically when you turn on your PC.
Uninstall Microsoft Teams in Windows 11
In case you have other communication apps like Skype, Zoom, Google Chat, etc., and don’t want Teams around or you no longer need it, you can uninstall it from your system. There are three ways to go about this:
Uninstall Microsoft Teams using Settings
If you want to completely remove Microsoft Teams from your Windows 11 system, follow these steps:
First, open Settings by pressing Windows + I . In the Settings app, go to ‘Apps’ on the left navigation pane and select ‘Apps & features’ on the right pane.
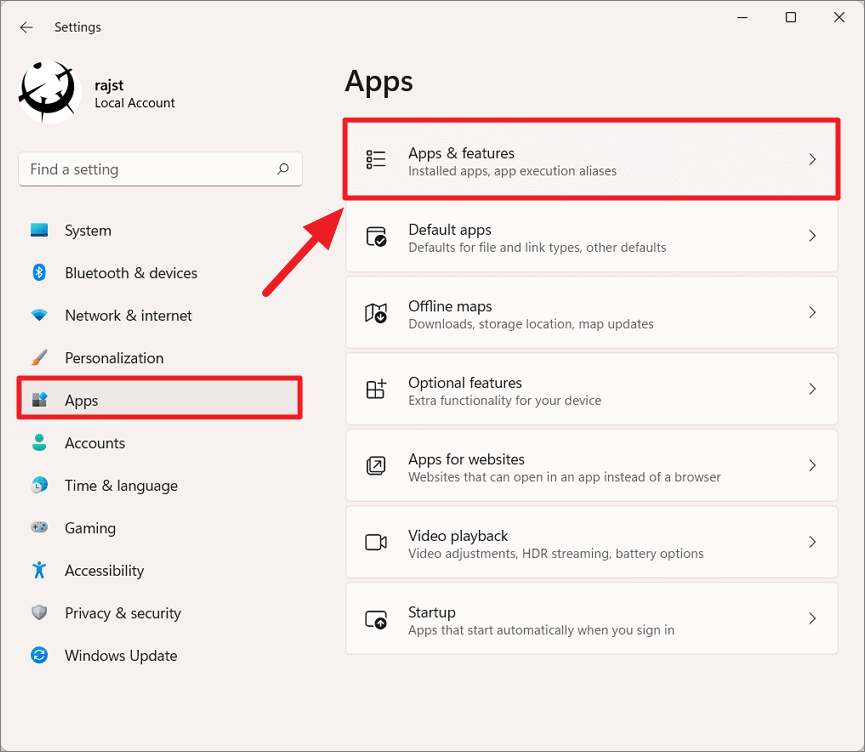
Scroll down the list of apps and find ‘Microsoft Teams’. If you can’t find it, search for it in the search bar above. Then, click on the three-dot menu next to the app name and select ‘Uninstall’.
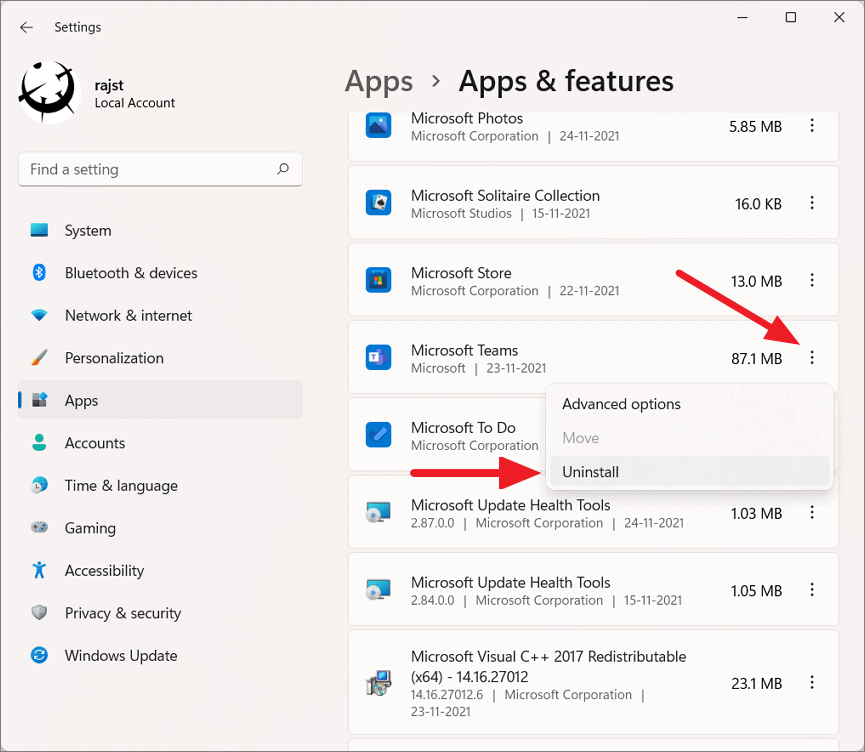
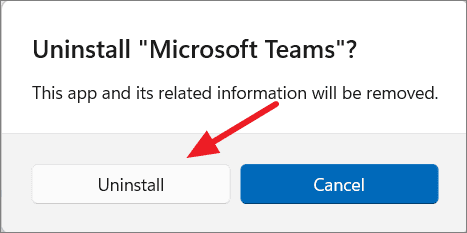
Then, click ‘Uninstall’ again in the pop-up to remove the app.
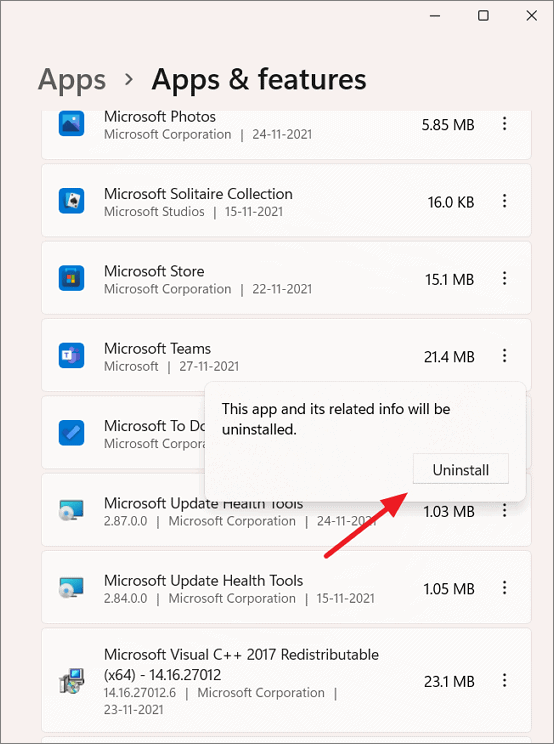
Now, the Microsoft Teams app is uninstalled from your PC.
Uninstall Microsoft Teams from the Start Menu
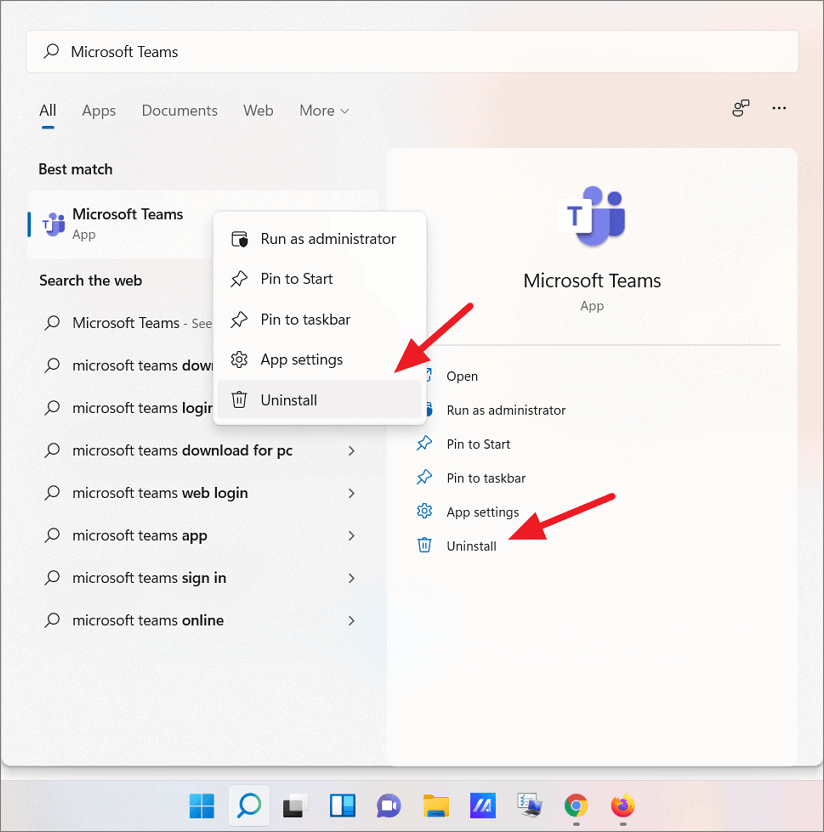
The easiest way to remove the Teams app from Windows 11 is from the Start menu.
First, click on the ‘Start’ menu icon in the Taskbar and search for ‘Microsoft Teams’. Then, right-click on the ‘Microsoft Teams’ app from the result and choose ‘Uninstall’ or select the ‘Uninstall’ option on the right.
In the confirmation box, click ‘Uninstall’ again to fully uninstall the app.
Uninstall Microsoft Teams using PowerShell
You can also uninstall the Microsoft Teams app using Windows PowerShell. To do this, follow these steps:
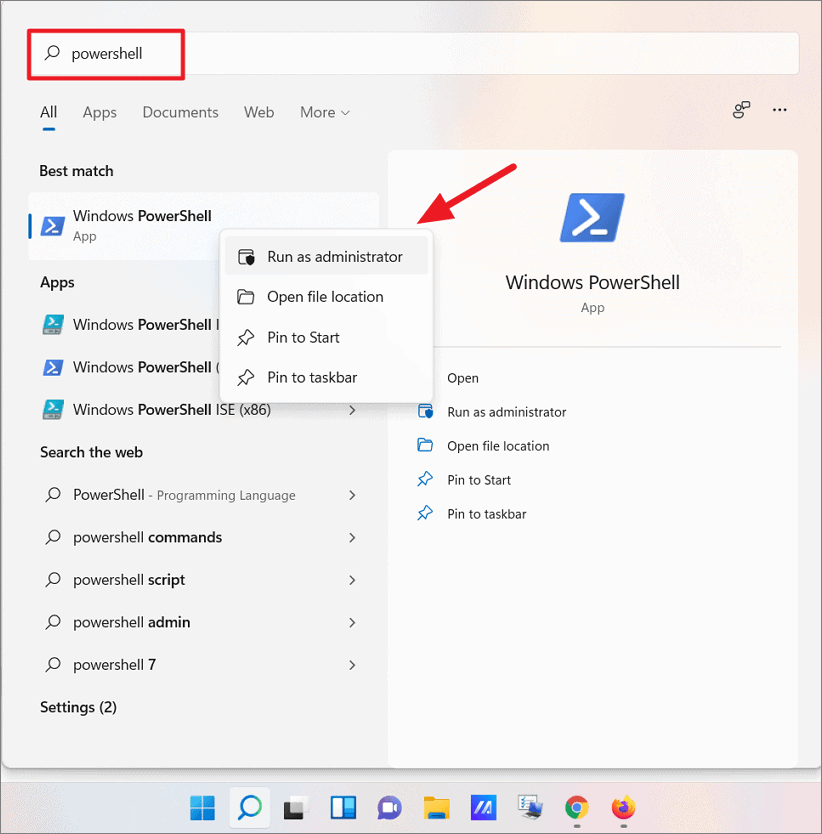
First, open Windows PowerShell with administrative privileges. To do this, search for ‘PowerShell’ in the Windows search, right-click on the top result, and select the ‘Run as administrator’ option. Click ‘Yes’ to continue if you see the User Account Control window.
Type the following command or copy and paste the below command to PowerShell and press Enter :
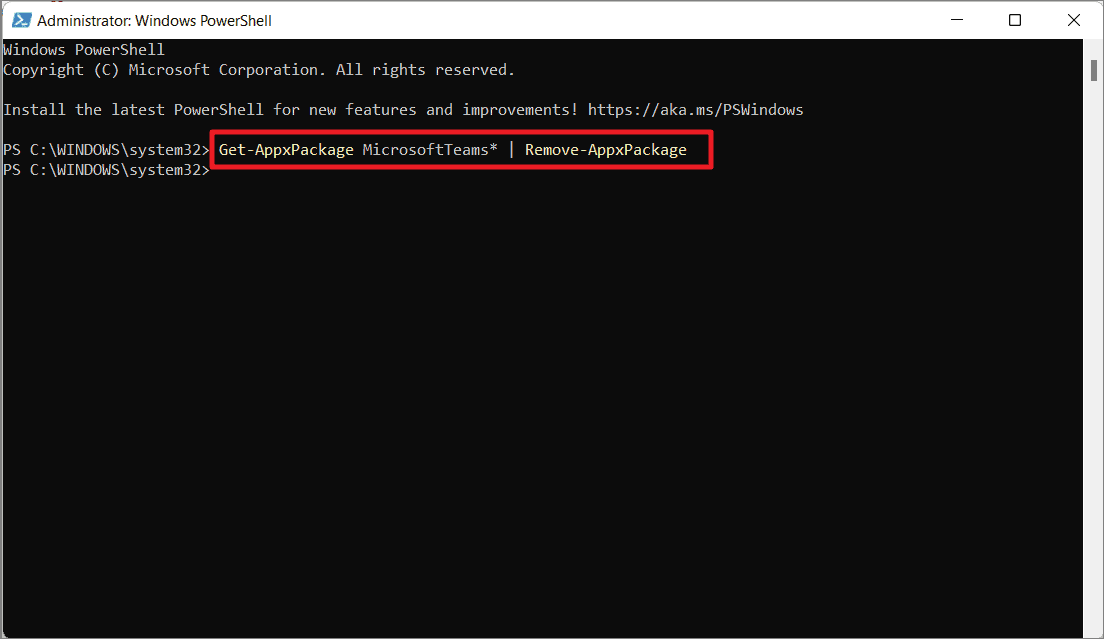
This will completely remove the Microsoft Teams application from your computer.
Reinstall Microsoft Teams on Windows 11
If you have a need for Microsoft Teams again after uninstalling the app, you can easily reinstall it with a single click. Even after uninstalling the app, the Microsoft Teams Chat icon will remain in the Taskbar unless you have hidden it using the Settings. Here’s how you reinstall the Teams app:
All you have to do is click the Microsoft Teams’ ‘Chat’ icon on the Taskbar and in the flyout window, click the ‘Continue’ button to reinstall the application.
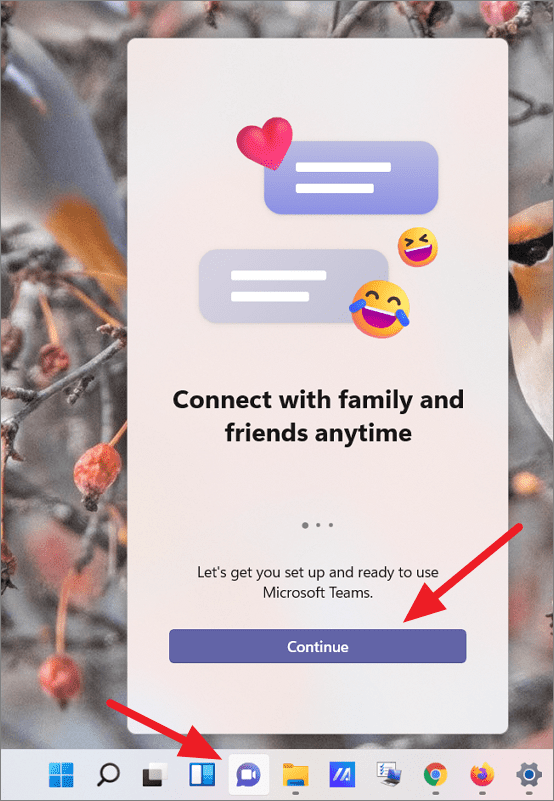
Windows keeps the app packages of the default Windows apps in the system files. When you click the ‘Continue’ button, it will reinstall the app from the backup copy. It will take only a few seconds to reinstall the app.
If you don’t see the Chat icon on the Taskbar, it is probably hidden. To show the Teams ‘Chat’ icon, right-click on an empty on the taskbar and select ‘Taskbar settings’.
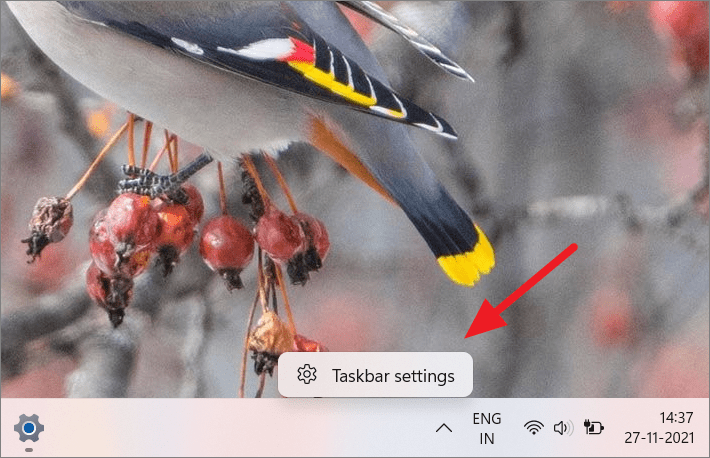
Then, toggle the slider in front of Chat to the ‘On’ position to show the icon on the Taskbar.
Удалить Microsoft Teams
Необходимо удалить два элемента для всех пользователей на компьютере, чтобы полностью удалить группы, поэтому убедитесь, что выполнены все необходимые действия.
Чтобы завершить работу групп, щелкните правой кнопкой мыши значок группы на панели задач и выберите закрыть окно.
В Windows нажмите кнопку Пуск  > Параметры > приложения.
В разделе Приложения и функции найдите «группы».
Выделите Microsoft Teamsи выберите Удаление.
Появится поле, а затем еще раз нажмите кнопку Удаление, чтобы подтвердить операцию. Появится новое поле, в котором будет предложено Вы хотите разрешить этому приложению вносить изменения на вашем устройстве? Нажмите кнопку Да.
Теперь выберите Установщик Teams Machine-Wide, нажмите Удалить. Затем выполните тот же процесс, который описан в шаге 5.
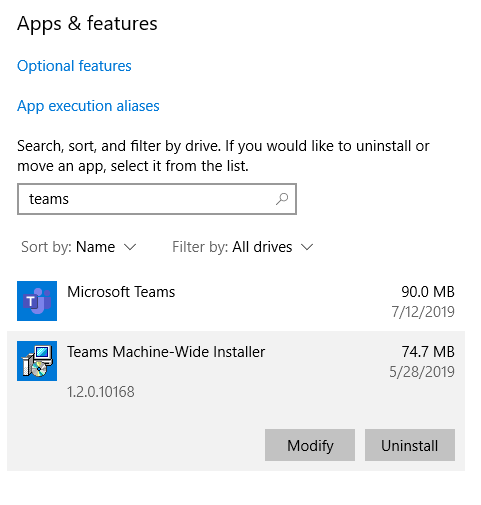
Чтобы удалить Команды, вам необходимо удалить оба Microsoft Teams и Teams Machine-Installer.
Команды также будут удалены, если вы удалите Office.
Если вы переустановите или выполните онлайн-ремонт в Office, команды будут включены.
Администраторы могут запретить установку команд при установке Office. Дополнительные сведения об этом процессе смотрите здесь.
Выйдите из команд, щелкнув правой кнопкой мыши приложение Teams в доке, затем удерживая Параметры и нажав Принудительно выйти. Откройте папку приложениявыберите Microsoft Teamsи переместите ее в корзина.
Вы можете удалить Команды так же, как вы удаляете другие приложения на своем мобильном устройстве.
Как удалить Microsoft Teams с компьютера полностью?
 BY
Как удалить Microsoft Teams с вашего компьютера? Возможно, вам кажется, что убрать ненужную программу сложно – это не так. Рассказываем, какие действия необходимо предпринять в разных версиях операционной системы.
Windows 10
Если вы больше не хотите пользоваться приложением, логично, что возникает вопрос, как удалить Майкрософт Тимс! Зачем оставлять ненужную программу – особенно, если вы уже нашли замену?
Давайте перейдем к практической стороне вопроса. В десятой версии операционной системы не так уж сложно полностью удалить ту или иную программу. Наша задача – разобраться, как удалить Майкрософт Тимс с компьютера быстро и безвозвратно.
Первый шаг – полностью завершить работу платформы. Без этого нельзя, поэтому уделите действию должное внимание:
- Найдите иконку сервиса на пусковой панели;
- Нажмите правой кнопкой мышки;
- Из появившегося меню выберите пункт «Выйти» .
Платформа полностью остановила процессы – теперь переходим к тому, как удалить Teams с компа. Способ классический, знаком каждому более-менее уверенному пользователю Windows:
- Нажимаем на кнопку меню «Пуск» ;

- Жмем на значок шестеренки «Параметры» на панели слева;

- Из открывшегося окна выбираем вкладку «Приложения» ;

- Как только загрузится список программ, ищем слева раздел «Приложения и возможности» ;

- Находим в окне справа название сервиса – можно вручную, можно через поисковую строку.

Вот мы и пришли к тому, как полностью удалить Майкрософт Тимс с компьютера!
- Выделяем программу щелчком мышки – снизу справа появится кнопка «Удалить» ;

- Нажимаем на этот значок, затем подтверждаем действие;
- Появится небольшое оповещение о том, что приложение будет вносить изменения в работу ОС;
- Нажимайте «Да» , выражая свое согласие.
Остается подождать пару секунд! Деинсталлятор запустится автоматически, процесс вы можете наблюдать на экране. Как только программа будет стерта полностью, вы получите соответствующее уведомление.
Windows 11
Отдельно поговорим о том, как удалить Microsoft Teams в Windows 11. В последней версии операционной системы есть свои тонкости – сервис по умолчанию встраивается в оболочку, поэтому избавиться от него сложнее.
Следите за безопасностью паролей? Тогда самое время узнать, как сменить пароль от почты Gmail.
Можно ли удалить Microsoft Teams – да. Но нужно понимать, чего вы хотите: полностью избавиться от программы или просто отключить отображение значка в панели задач.
Если вас интересует, как отключить Microsoft Teams в Windows 11, делаем следующее:
- Нажмите на кнопку меню «Пуск» и перейдите к значку параметров;


- Найдите на панели слева раздел «Персонализация» и откройте его;
- В окне справа ищем блок «Панель задач» ;

- Внутри меню находим вкладку «Чат» и переключаем ползунок в неактивное положение.

Вот как отключить Microsoft Teams! Сама программа останется в памяти устройства, но значок быстрого доступа исчезнет и не будет вам мешать. При желании вы сможете снова вернуть значок «Чат» в любой момент.
Хотите полностью деактивировать платформу? Тогда действуем по известному алгоритму:
- Откройте параметры меню «Пуск» ;
- Найдите раздел «Приложения» и войдите в подраздел «Приложения и возможности» ;

- Через поиск или вручную найдите название программы и выделите ее кликом мыши;

- Нажмите на три точки справа и выберите пункт «Удалить» .
Остальное произойдет автоматически! Вам нужно только подождать несколько секунд, на экране появится оповещение о том, что процедура завершилась успешно.