Ошибка сброса BIOS: как продолжить после сообщения "BIOS has been reset"?
Одной из наиболее распространенных проблем, с которой сталкиваются пользователи компьютеров, является сообщение об ошибке "BIOS has been reset" (BIOS был сброшен). Это сообщение указывает на то, что система обнаружила, что настроек BIOS по умолчанию были восстановлены или сброшены. В этой статье мы рассмотрим причины возникновения ошибки сброса BIOS и как продолжить работу после нее.
Что такое BIOS?
BIOS (Basic Input/Output System) представляет собой набор программ, находящихся на материнской плате компьютера. Они отвечают за инициализацию системных компонентов, обнаружение подключенных устройств и управление некоторыми базовыми функциями компьютера. BIOS также хранит настройки, которые определяют, как компьютер будет работать.
Причины сброса BIOS
Сброс настроек BIOS может происходить по нескольким причинам. Некоторые из самых распространенных причин включают:
Изменение батареи. BIOS хранит свои настройки в постоянной памяти, но для поддержания этих настроек во время выключения компьютера используется небольшая батарейка. Если батарейка слаба или полностью разряжена, настройки BIOS могут быть потеряны при каждом выключении компьютера.
Неправильное обновление BIOS. Обновление BIOS может иметь благоприятный эффект на производительность и стабильность компьютера. Однако, если процедура обновления не выполняется должным образом или обрывается посреди процесса, это может привести к некорректной работе BIOS и сбросу его настроек.
Повреждение микросхемы BIOS. В редких случаях микросхема BIOS может быть повреждена, что также может привести к сбросу настроек.
Как продолжить после сообщения "BIOS has been reset"?
Перезагрузите компьютер. В большинстве случаев после сброса BIOS необходимо перезагрузить компьютер, чтобы изменения вступили в силу. Некоторые компьютеры могут автоматически загрузиться с новыми, по умолчанию, настройками.
Проверьте настройки BIOS. После перезагрузки компьютера активируйте настройки BIOS и убедитесь, что они соответствуют требуемым параметрам. Обычно, можно нажать определенную клавишу (чаще всего Delete, F2 или F10) сразу после включения компьютера, чтобы открыть меню BIOS.
Восстановите сохраненные настройки. Если вы ранее делали резервное копирование настроек BIOS или использовали программное обеспечение для их сохранения, попробуйте восстановить эти настройки. Это может помочь вернуть компьютеру привычную конфигурацию.
Замените батарейку. Если причиной сброса BIOS является слабая или разряженная батарейка, замените ее на новую. Батарейка находится на материнской плате компьютера и обычно имеет форму монеты.
Обратитесь к производителю компьютера. Если проблема с сбросом BIOS не удается решить самостоятельно, рекомендуется обратиться в сервисный центр производителя компьютера или квалифицированному специалисту, чтобы проверить и восстановить настройки BIOS.
Ошибки сброса BIOS могут вызывать проблемы со стабильностью и работой компьютера. Однако, в большинстве случаев, эти проблемы можно решить, следуя указанным выше шагам. Если проблема сохраняется или возникают другие ошибки, рекомендуется обратиться к специалисту для получения дополнительной помощи.
[SOLVED] BIOS settings resetting after reboot.
Very rarely is it cmos battery especially being relatively new since those batteries last for years. Check that it’s in properly though, in the battery holder and + symbol facing up.
Bios resetting itself is most likely memory or storage related. I would suspect memory first since there’s a few discussions on this issue on GB 5xx boards over at Reddit and ram and xmp are the main points.
Check for bios updates and try single ram in 2nd slot from cpu. Try with and without xmp enabled.
What’s your memory configuration, speed and slots used? And were you enabling xmp each time bios reset?
Titan
- Jan 1, 2022
- Solution
- #2
Very rarely is it cmos battery especially being relatively new since those batteries last for years. Check that it’s in properly though, in the battery holder and + symbol facing up.
Bios resetting itself is most likely memory or storage related. I would suspect memory first since there’s a few discussions on this issue on GB 5xx boards over at Reddit and ram and xmp are the main points.
Check for bios updates and try single ram in 2nd slot from cpu. Try with and without xmp enabled.
What’s your memory configuration, speed and slots used? And were you enabling xmp each time bios reset?
turtleshock
- Jan 1, 2022
- #3
Very rarely is it cmos battery especially being relatively new since those batteries last for years. Check that it’s in properly though, in the battery holder and + symbol facing up.
Bios resetting itself is most likely memory or storage related. I would suspect memory first since there’s a few discussions on this issue on GB 5xx boards over at Reddit and ram and xmp are the main points.
Check for bios updates and try single ram in 2nd slot from cpu. Try with and without xmp enabled.
What’s your memory configuration, speed and slots used? And were you enabling xmp each time bios reset?
Thanks for the quick response
Yes, I’ve checked and the CMOS battery and its placed correctly.
The RAM that im using is Team group t-force xcalibur rgb black ddr4 — 16gb (2x 8gb) 3600mhz cl 18-20-20-44 1.35
They are placed in slots 2 and 4 although i had them before in slot 1 and 3 and i still had the same problem.
Every time i enable xmp or do any change to the bios settings the moment i click save and exit and my pc boots the options are not saved and it works with the default bios settings.
[7 Fixes] Please Enter Setup to Recover BIOS Setting
If you’re seeing the error message “Please Enter Setup to Recover BIOS Setting” on your computer, it means that your system’s BIOS (Basic Input/Output System) settings have been corrupted or lost. This can happen due to several reasons, such as a power outage, a system crash, or a failed BIOS update. Usually, it can be solved by restarting your PC or updating your BIOS setting. But, if these actions fail to solve this error, don’t worry, we’ll guide you through several other solutions in this article.
Please enable JavaScript
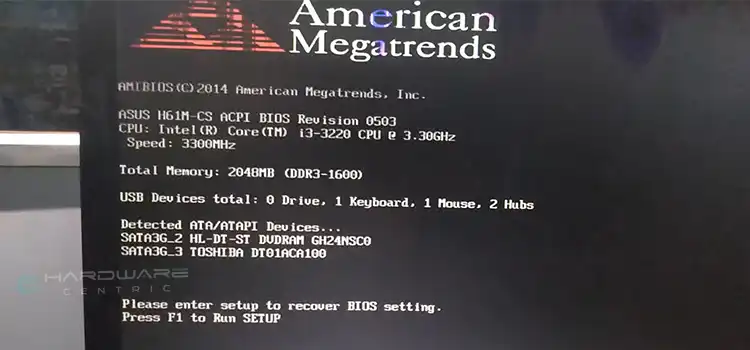
What Usually Causes the “Please enter setup to recover BIOS setting” Error?
- The CMOS battery is failing.
- The computer’s BIOS is out of date.
- There may be some corrupted system files on the computer.
- Not choosing the right BIOS setting that matches the computer hardware.
How to Solve Please Enter Setup to Recover BIOS Issue?
The good news is that this issue is usually fixable with some simple troubleshooting steps. Here are some methods you can try to recover your BIOS settings:
Method 1: Restart Your Computer
Restarting the computer can erase the software’s present state. Any code that is trapped in a bad condition will also be removed. Thus, the very first thing you should do is try restarting your PC. If that doesn’t work, try the alternative solutions listed below.
Method 2: Enter BIOS Setup and Load Default Settings
The first thing you should try is to enter the BIOS setup and load the default settings. This will reset all the BIOS parameters to their original values and may fix any issues that were causing the error. Here’s how to do it:
1. Restart your computer and press the key (usually Del, F1, F2, or F10) to enter the BIOS setup.
2. Look for an option to “Load Default Settings” or “Load Optimal Defaults.”
3. Select the option and save the changes. This will restart your computer with the default BIOS settings.
4. Check if the error message still appears. If it does, move on to the following method.
The video in the following link can show you how to enter BIOS settings:
Method 3: Substitute the CMOS Battery and Adjust the F1 Settings
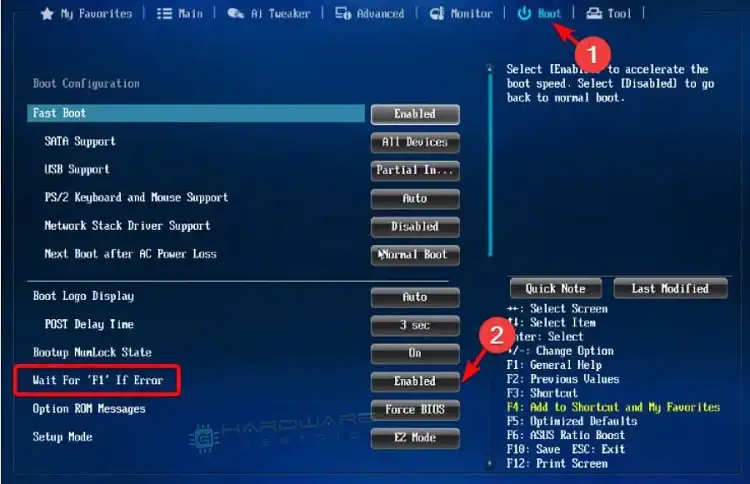
- To change the F1 settings and replace the CMOS battery, first enter the BIOS and select Advanced Mode by pressing F7.
- In the Boot tab of the Advanced Mode, locate the Wait for ‘F1’ If Error option and disable it.
- Turn off your computer and disconnect all power sources, including the battery.
- Prior to dismantling your PC (especially if it’s a laptop), make sure to discharge any static electricity to avoid damage.
- The CMOS battery, which resembles a coin, can be accessed by removing the bottom panel or dismantling the laptop. It is typically located near the PCI slots, but its location may vary depending on the motherboard manufacturer.
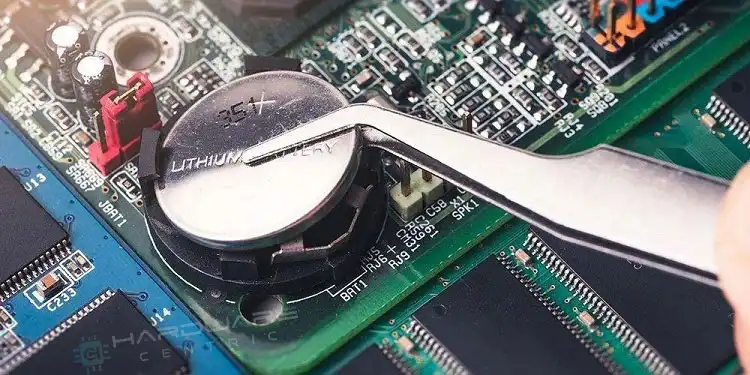
- Once you have located the CMOS battery, remove it.
- Hold the power button on your laptop for 10-15 seconds to discharge any remaining power, which will reset the CMOS memory and BIOS.
- Place the CMOS battery back in its location, reassemble your laptop, and reconnect the power source. Then, boot up your laptop.
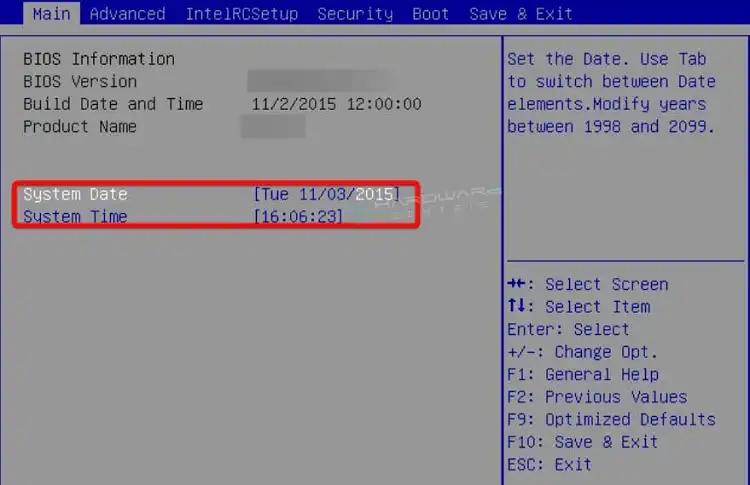
- Enter the BIOS again to reset the time and date, and press F10 to save the settings and exit.
Method 4: Change the Boot Order
Changing the boot order in BIOS settings can be a useful way to troubleshoot issues with your computer’s startup process. In some cases, you may need to change the boot order to prioritize a specific device or drive, such as a USB drive or DVD, to boot from. Here are the steps to change the boot order in BIOS settings:
- Restart your computer and press the key to enter the BIOS setup. This key can vary depending on your computer’s manufacturer, but commonly used keys include F2, F12, and Del.
- Once you are in the BIOS setup, look for the “Boot” or “Boot Order” options. The location and name of this option can vary depending on your BIOS version.
- Use the arrow keys to navigate to the boot order list. This list should show all available devices that can be used to boot your computer.
- To change the boot order, use the arrow keys to highlight the device you want to prioritize and move it up or down the list using the “+” or “-“ keys.
- Once you have arranged the boot order to your desired configuration, save the changes and exit the BIOS setup. This can usually be done by pressing the “F10” key, but the exact key can vary depending on your BIOS version.
Method 5: Clear CMOS
You may want to consider clearing the complementary metal-oxide-semiconductor (CMOS) by using the jumper method. The CMOS is a small amount of memory on the motherboard that stores the Basic Input/Output System (BIOS) settings. Follow these steps to clear the CMOS:
- Turn off your computer and unplug it from the wall outlet.
- Press the Power button several times to discharge any residual power.
- Open the computer case to access the motherboard.
- Find the CMOS jumper, usually located near the battery, by consulting the motherboard manual.
- The CMOS jumper usually has positions 1-2 and 2-3. Move the jumper from the default position (1-2) to clear the CMOS (2-3). Wait for 1-6 minutes, then move the jumper back to the default position (1-2).
- Close the computer case and turn on the computer.
Method 6: Flash the BIOS
If the above methods don’t work, you may need to flash the BIOS with a new version. This will replace the current BIOS firmware with a fresh copy and fix any issues that were causing the error. Here’s how to do it:
1. Go to your motherboard manufacturer’s website and download the latest BIOS version for your system.
2. Create a bootable USB drive with the BIOS file.
3. Restart your computer and enter the BIOS setup.
4. Look for an option to “Flash BIOS” or “Update BIOS.”
5. Select the option and follow the on-screen instructions to flash the BIOS with the new version.
6. Once the update is complete, restart your computer and check if the error message still appears.
Method 7: Enable CSM
- Enter the BIOS menu on your computer.
- Navigate to Security Options and set Secure Boot to Disabled.
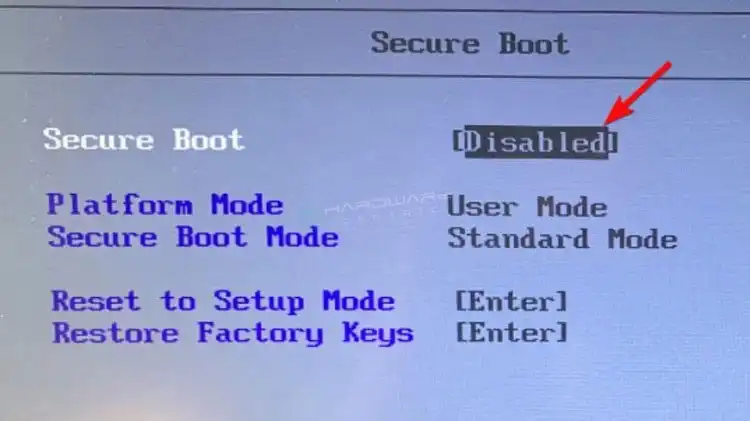
- Save your changes and restart your computer.
- Enter the BIOS again and go to the Boot tab.
- Set Fast Boot to Disabled.
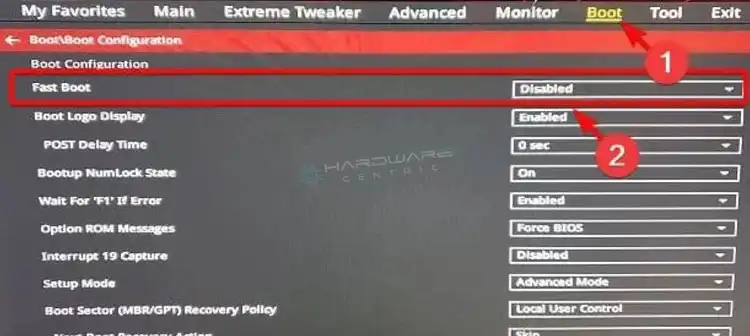
- Scroll down to the Launch CSM option and set it to Enabled.
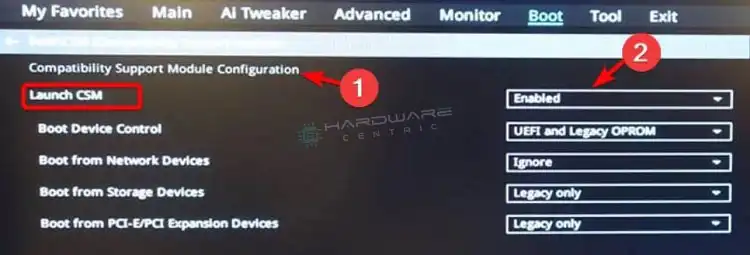
- Save all changes and restart your computer.
- Perform a cold boot of your computer and check if the error has been resolved. If the error persists, enter setup to recover BIOS settings and press F1 to run setup.
Frequently Asked Questions and Answers
Cannot enter BIOS setup?
If you are unable to enter the BIOS setup utility, there may be several reasons for this issue, such as a malfunctioning keyboard, incorrect BIOS settings, or a hardware problem. You can try troubleshooting by checking the keyboard connection, resetting the BIOS to default settings, or updating the BIOS firmware.
How do I complete the BIOS setup?
To complete the BIOS setup, you need to navigate through the different options in the BIOS setup utility and configure the settings according to your preferences. This includes options such as boot order, date and time, system security, and hardware settings. Once you have made your changes, save and exit the BIOS setup utility.
Conclusion
If you’re seeing the error message on your computer, don’t panic. Try the above methods one by one, and you should be able to recover your BIOS settings. If none of the methods work, you may need to seek professional help to diagnose and fix the issue. Remember to always back up your important data before making any changes to the BIOS settings.
Исправление ошибки «Please enter setup to recover BIOS setting»

При запуске компьютера всегда производится проверка на различные программные и аппаратные неполадки, в частности, с BIOS. И если таковые будут обнаружены, то пользователь получит сообщение на экране компьютера или услышит звуковой сигнал.
Значение ошибки «Please enter setup to recover BIOS setting»
Когда вместо загрузки ОС на экране отображается логотип производителя BIOS или материнской платы с текстом «Please enter setup to recover BIOS setting», то это может значить, что произошли какие-то программные неполадке при запуске БИОС. Такое сообщение говорит о том, что компьютер не может загрузиться с текущей конфигурацией BIOS.
Причин этому может быть много, но самыми основными являются следующие:
- Проблемы с совместимостью некоторых устройств. В основном, если такое случается, то пользователь получает несколько другое сообщение, но если установка и запуск несовместимого элемента вызвали программный сбой в BIOS, то пользователь вполне может увидеть предупреждение «Please enter setup to recover BIOS setting».
- Разрядка батарейки CMOS. На старых материнских платах часто можно встретить такую батарейку. В ней хранятся все настройки конфигураций BIOS, что позволяет избежать их потерю при отключении компьютера от сети. Однако если батарейка разрядилась, то они сбрасываются, что может повлечь за собой невозможность нормальной загрузки ПК.
- Неверные настройки BIOS, выставленные пользователем. Самый распространённый вариант развития событий.
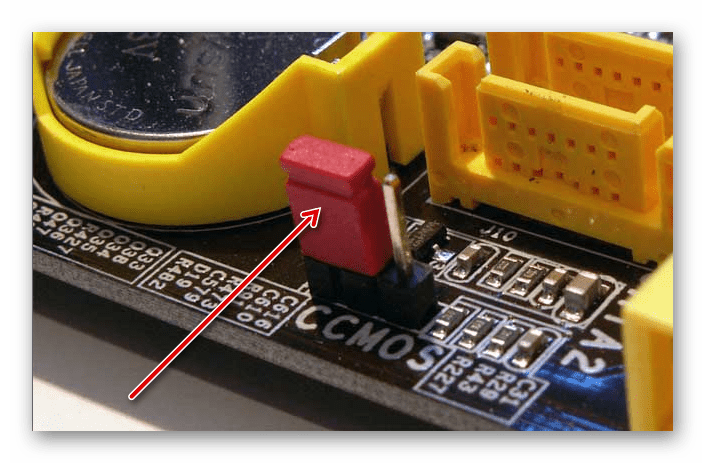
- Неправильное замыкание контактов. На некоторых материнских платах есть специальные CMOS-контакты, которые нужно замкнуть для сброса настроек, но если вы их замкнули неправильно или забыли вернуть в исходное положение, то скорее всего вместо запуска ОС вы увидите такое сообщение.
Исправление проблемы
Процесс возвращения компьютера в рабочее состояние может выглядеть немного по-разному в зависимости от ситуации, но так как чаще всего причиной подобной ошибки является некорректная настройка BIOS, всё можно решить простым сбросом настроек до заводского состояния.
Если же проблема связана с аппаратной частью, то рекомендуется воспользоваться следующими советами:
- Когда есть подозрения на то, что ПК не запускается из-за несовместимости определённых компонентов, то демонтируйте проблемный элемент. Как правило, проблемы с запуском начинаются сразу после его установки в систему, поэтому выявить дефектный компонент не составит труда;
- При условии, что вашему компьютеру/ноутбуку уже более 2 лет, и на его материнской плате есть специальная CMOS-батарейка (выглядит как серебристый блин), то это значит, что её нужно заменить. Найти и произвести замену несложно;
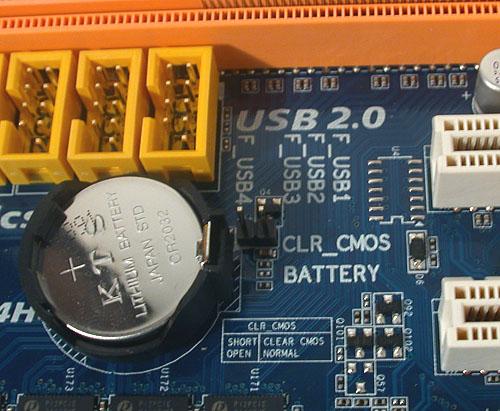
- Если на материнской плате есть специальные контакты для сброса настроек BIOS, то проверьте правильно ли установлены на них джамперы. Верную расстановку можно посмотреть в документации к материнской плате или найти в сети под вашу модель. Если вы не можете найти схему, где было бы нарисовано правильное расположение джампера, то попробуйте его переставлять до тех пор, пока компьютер не заработает нормально.
Исправить данную проблему не так трудно, как это может показаться на первый взгляд. Однако, если ничего из этой статьи вам не помогло, то рекомендуется отдать компьютер в сервисный центр или обратиться к специалисту, так как проблема может лежать глубже, чем в рассмотренных вариантах.