Расширенные настройки Wi-Fi на Android-устройствах
Настройки Wi-Fi на Android устройствах, а на сегодняшний день это самый широкий рынок мобильных устройств – должен знать всякий владелец такого девайса. Существует несколько видов настроек:
- Ручной режим wi-fi.
- Автоматическая настройка wi-fi.
Автоматическая настройка Wi-Fi сети на Android
Чаще всего пользователи системы Андроид, используют автонастройку доступа к беспроводной сети. Это показывает, что мобильный аппарат изначально настроен и готов к работе. Вам же потребуется только войти в раздел Wi-Fi на вашем аппарате и активировать Wi-Fi модуль.
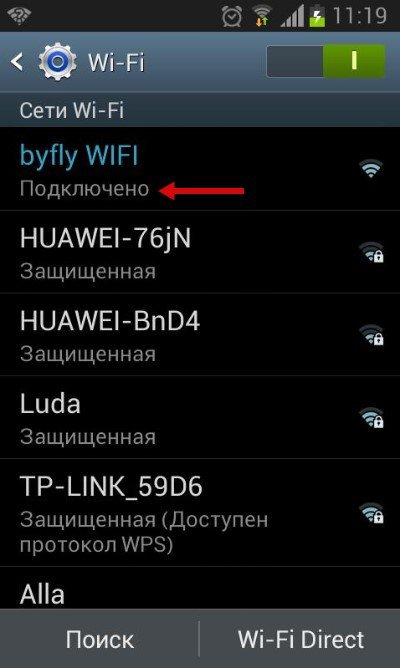
После включения модуля, система начнет искать возможные подключения и выдаст вам целый список доступных. Выберите интересующее подключение и если для синхронизации потребуется пароль, то введите его в отдельное поле.
Расширенные настройки сети Wi-Fi могут потребоваться, когда:
- Беспроводная сеть, к которой вы собираетесь совершить подключение, скрыта от общего доступа.
- Если в настройках доступа отключен протокол DHCP.
Ручная настройка Wi-Fi на Android
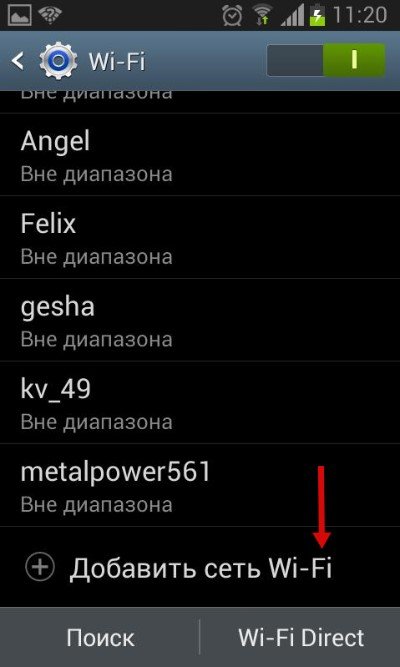
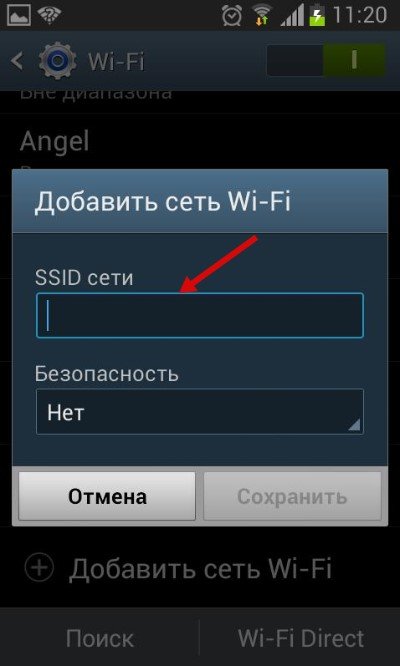
Для начала возьмите смартфон и перейдите в настройки Wi-Fi, после чего включите адаптер. После того как на экране возникнет список возможных подключений, у вас появится два варианта:
-
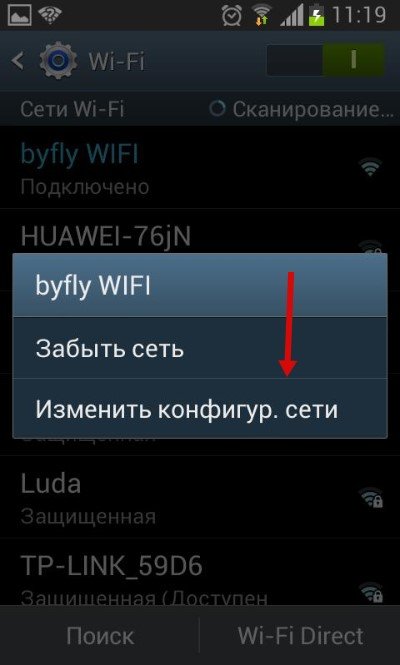
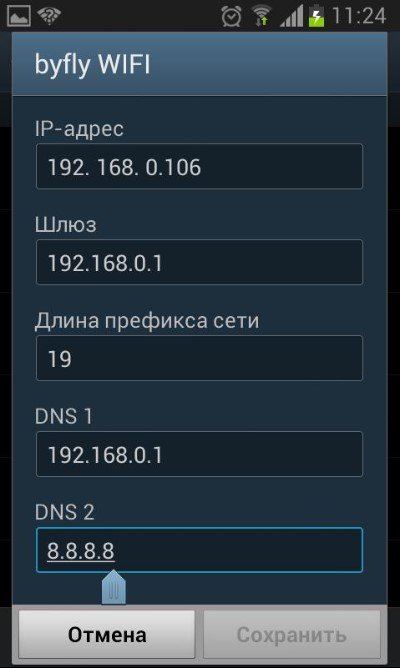
Если требуется поменять конфигурацию уже имеющейся точки в связи со сменой настроек доступа, то найдите в списке, нужное название сети и удерживайте на ней палец, пока на экране не всплывет дополнительное меню. В нем и нужно выбрать функцию «Изменить конфигурацию сети Wi-Fi».
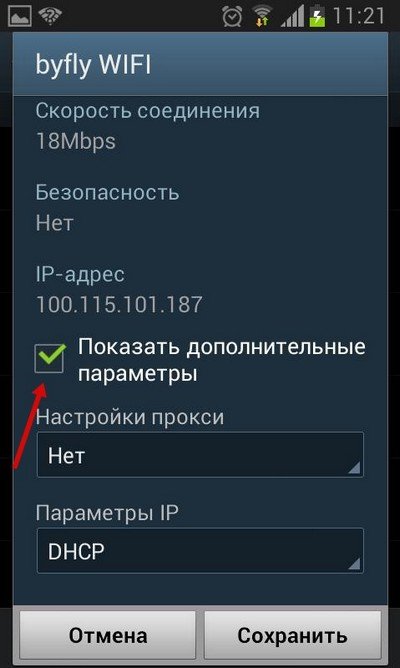
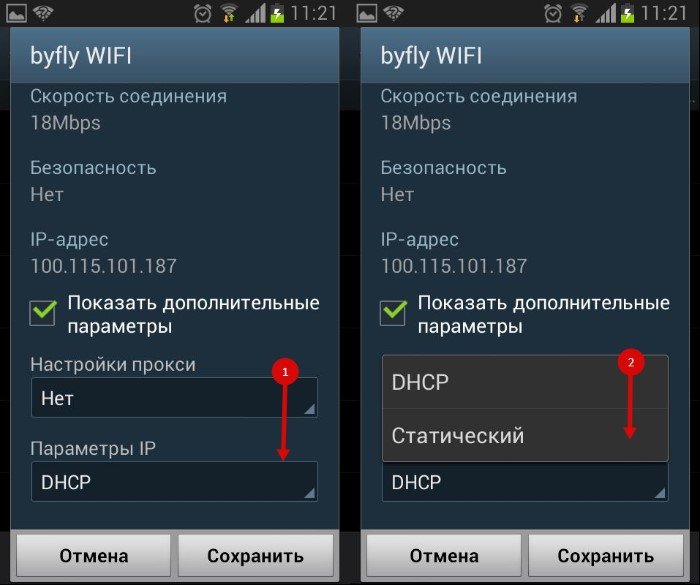
-
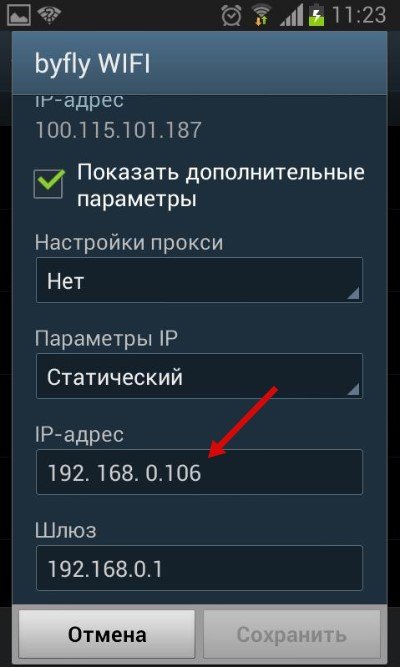
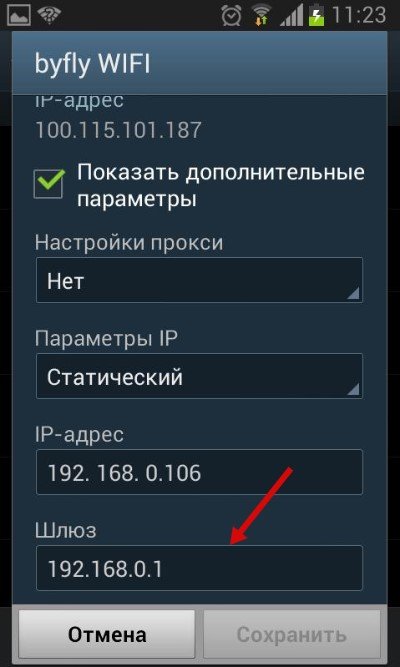
IP-адрес – это адрес смартфона. Этот адрес должен оказаться в диапазоне, который указан в настройках точки доступа. Например, от 192.168.0.100 до 192.168.0.199. Иначе говоря, у вас имеется сотня вариантов. Изменению подвергается только конечное значение (100-199). Диапазон может быть менее широким. Да и сам адрес также может отличаться. Все эти особенности зависят от конфигураций маршрутизатора.
Настройка Wi-Fi на планшете или смартфоне с Андроид: Видео
Как сбросить настройки Wi-Fi
В самом начале нужно сказать, что вы изменяете конфигурацию только для выбранного подключения. То есть данные настройки не будут распространяться на остальные точки. Иначе говоря, чтобы сбросить конфигурацию Wi-Fi в вашем смартфоне для конкретного соединения, вам потребуется просто активировать модуль Wi-Fi и ту сеть, которую хотите удалить. В новом окне тапните на «Забыть сеть» или же нажмите на «Изменить конфигурацию».
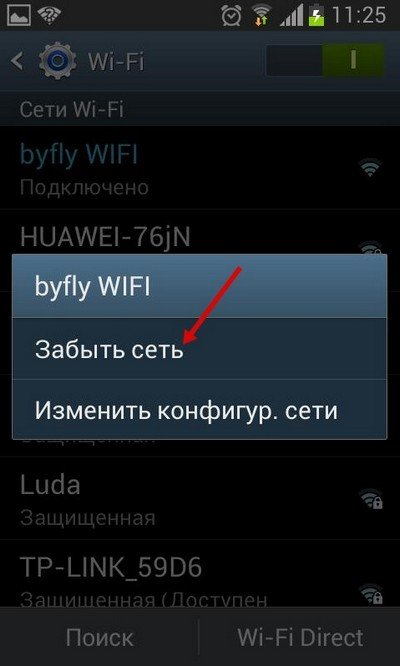
В первом варианте, конфигурации для этого подключения удалятся, и вам придется вводить пароль. Во втором варианте вы можете включить функцию DHCP в настройках IP. Она позволит вашему смартфону получать нужные настройки в автоматическом режиме.
How To Enable WiFi Verbose Logging?
The utilization of technology has increased in the past few years, given the launch of top-notch electronic devices, such as computers, PCs, and laptops, that promise the highest standards of performance. However, tech geeks want to know everything about the systems that they are using. As a regular user, we would be happy with the information available in Local Disk C of our computers.
In contrast, the tech geeks want more than that, which calls for the logging. Through logging features, users can get in-depth information about the system. However, some people aren’t aware of verbose logging and to let you all know; it’s one of the most commonly used computer logging methods that provide additional information about the system as compared to standard logging processes.
The verbose logging provides additional information about the system as compared to standards, but according to some experts, it tends to hinder the system processing and operating time. This is because verbose logging consumers more time to collect information and display the information. Well, the time consumption is pretty normal, given the fact that information collection is more in-depth.
When it comes to verbose logging, every system poses different operational guidelines, but it has been widely used for troubleshooting, and when it’s no longer needs, the simple turning off is all it takes to get rid of everything. However, when it comes to enabling WiFi verbose logging, it’s an entirely different field.
What Is Enable WiFi Verbose Logging?
With the paradigm shifts in the tech world, active internet communication has become essential. However, there are some devices that show issues in connecting to the WiFi due to ineffective settings. So, with enabling WiFi verbose logging, the users can gain information about the Wi-Fi connectivity and logging issues. Even more, a similar function can help enhance app performance through on-device developer options. So, let’s start!
1. Configuring The Developer Options
The number of Android users is increasing, and if you are one, it is pretty easy to find the developer option through the settings through which users can imply updates in enable WiFi verbose logging and debug the app performance.
2. Enabling Developer Options
The developer options are available easily available on the screen with versions 4.1 and below. However, if you move higher, the screen needs to be enabled manually. For instance, if you are using the Android 9, the users can enable the developer options from build number through about phone section of the settings app.
Coming to the Android 8.0 series, a similar pattern needs to be followed, but the about the phone and build number can be accessed through the system section of the settings. For Android 7.1, the process shall stay similar to Android 9. Through these settings, you will be able to enable or disable the developer options for verbose logging, but it is better to keep it enabled at all times to ensure access for high performing features.
3. Additional Options
The quick settings are easily accessible for selecting the developer options, and the pencil is readily used to edit the settings. There are multiple additional options for users and people who are aware of verbose logging would know how developer options can help with different settings, such as;
- Memory – Through this section, the verbose logging will help attain information and logs about the average memory consumption, memory used, memory stats, memory performance, memory used by apps, and available memory
- System User Interface – Through this section, the verbose logging will help clear the excessive notification by clearing out the screenshots. However, this function works when the low battery warnings are prompted
- Bug Report – As we have already mentioned that verbose logging is all about gaining in-depth information about the system, so it will positively help with designing the device log files. The verbose logging will create the bug report after analyzing, and users will get a prompt or notification once the report is ready
- HCI Snoop Log – It’s needless to say that verbose logging is all about logging and with this feature, it helps in the development of host controller interface snoop log and save the information packs which can be retrieved, troubleshoot, and analyzed
- Backup Password – This might be the biggest perk of verbose logging as it helps in setting up the backup password through which ADB commands will help. Through the backup log, the users will be able to get their hands on password protections and app data
Apps
It is needless to say that verbose logging helps create the logs, and analyzing the log can have a positive impact on the app performance. However, let’s dive in deeper to see how app options can be amplified with the implication of verbose logging. Have a look!
- The reset shortcut manage section will help analyze the shortcut APIs that enhance the performance of the apps, even in the background. Also, it helps share logs and in-depth information about rate limits and shortcuts.
- The “doesn’t keep activities” option will help check on the battery to enhance the battery life. This is established by cutting out the app or activity once the user has stopped using it, so there is nothing unwanted running in the background.
- Through the background process limits, verbose logging will help keep a tab on a number of activities that can be conducted at one time without hindering the system performance.
Network
Through the network option, enable WiFi verbose logging is pretty similar, and it will help with DHCP settings, along with WiFi, of course. The additional ways that verbose logging will help in the network include the Bluetooth. The Bluetooth system can be analyzed to gain in-depth information about the Bluetooth equipment that has been connected to the system.
What Is Wi-Fi Verbose Logging and Should You Enable It? Simply Explained
Disclaimer: This post may contain affiliate links, meaning we get a small commission if you make a purchase through our links, at no cost to you. For more information, please visit our Disclaimer Page.
Whether you go to malls, airports, or even across the street, your phone can pick up over five Wi-Fi networks. But can you be so sure that you’re connecting to the right Wi-Fi network? How would you know if it’s suspicious, or if the network is congested before you browse the web? Wi-Fi activity can be read in full detail, and this is something that I learned simply by navigating around my phone.
Wi-Fi Verbose Logging is an advanced feature found in smartphones that enable its users to keep a log of their phone’s Wi-Fi activity. Enabling Wi-Fi verbose logging depends upon your need and understanding of such detailed information.

I will explain everything I have learned when I explored this very useful option in the developer mode present in every Android device.
This article shall contain all the features that Wi-Fi verbose logging can offer, such as the terms shown in the verbose logs. I will also explain the key benefits of utilizing it at its full potential for your Wi-Fi connectivity preferences.
Table of Contents
What Is A Verbose Log?
In software terms, a verbose log is a record of almost every detail of a system or network activity. This is why networking specialists and developers review verbose logs to understand how an error occurs to find the best means to fix it.
The word verbose is an adjective that means to use or express in more words than needed, hence the abundant amount of details present in each verbose log.
Should You Enable Wi-Fi Verbose Logging?
Turning this feature on depends on the situation. If you feel like something wrong is going on, such as slow connection or security issues, it is best to turn it on. But if you feel that your connection at home is fine, there is no need to turn it on.
The only time where it is most needed is when reviewing the activity conducted by a public Wi-Fi network to your phone.
If you want to feel much safer browsing online with your phone when on a network you’re not entirely familiar with, this option is perfect to use.
How To Enable Wi-Fi Verbose Logging?
If you’re still learning what this feature is, it’s best to learn how to enable it by doing:
First, developer mode must be enabled by tapping the Build Number option seven times in the About phone menu under Settings. The steps vary depending on the device’s version.
For Android 9 and above, go to Settings > About phone > Build Number.
For Android 8 and 8.1, go to Settings > System > About phone > Build Number.
For lower versions, go to Settings > System > Build Number.
Go back to the Settings main menu > Developer Mode. Though some phone models may require you to go to Settings > Additional settings > Developer mode/options.
Scroll down to find Wi-Fi Verbose Logging, enable by flipping the switch at the right.
Is Important Information Stored in The Logs?
Verbose logs contain detailed information about the Wi-Fi activity of your phone. You will see the access (APs). The AP shown in the log can let you view the following information:
The RSSI being shown on every AP will show the signal strength of your Wi-Fi connection. RSSI means Received Signal Strength Indicator.
It is a type of measurement based on how well your phone or tablet can gather the current Wi-Fi network’s radio frequency (RF).
You can view the type of band you are using. The two bands available in a Wi-Fi network are 2.4GHz and 5Ghz band connection. This is good for understanding how your streaming and download speed will work. It also reads your latency, which is often observed when playing online games through your phone.
All APs that are available in your current location that is connected under the same SSID can be viewed through the verbose logs.
I find this useful in identifying how secure the network infrastructure of a public Wi-Fi network can be. Check this information in your logs when visiting a cafe, mall, or airport to learn more about this.
I can also identify any occurring network congestion in your current connection by viewing the handover algorithm. This algorithm is based upon the performance of your phone and is also seen along with the verbose logs.
You can view detailed information about your current Wi-Fi network such as viewing the MAC address of the router in question.
As a computer user, I can view the packets sent (tx) and received (rx) by my computer in the system’s terminal to monitor the internet connection.
Viewing the verbose logs also lets you find out the packets received and sent through your phone to track data usage.
How To View the Logs
To view the logs stored by the developer option, you need to use Logcat. The Logcat is a feature in Android Studio that can read logs about the app and network activities of your Android device.
It is already built-in, making it very easy to find. I utilize this immediately to view the details of the verbose logs generated by my phone’s system.
In your Android Studio, go to View > Tool Windows > Logcat. This lets you view all the log messages present in a phone’s app once you connect it to your computer.
You can easily view the logs in Logcat by looking at the top portion of the window, which shows the phones plugged into your computer or laptop.
There is another drop-down list containing all the app activities that contain log messages and not just the Wi-Fi verbose logs.
This window will let you see all the information I have enumerated in the first question. Note that the window cannot save the logs that were recorded before the device was plugged into the computer.
The window cannot save all the logs, and might only show the most recent activity conducted by your Wi-Fi connection.
Though there is a setting in Logcat that can let you save history for reference. You may also save a screenshot of the logs (or use a screen recorder all) for the quickest way to save them.
Some several apps claim to read network logs, but it is best to stick with Logcat due to its security and the fact that it is part of Android Studio. However, it is best to learn more about how the app works in all aspects for you to understand its overall features.
So after reading everything about Wi-Fi verbose logging, as using Logcat is a complex topic as well, see how to view logs with Logcat.
NOTE: Do not forget to allow USB debugging in developer options to access the logs when using Logcat and other log viewer apps.
Advantages Of Wi-Fi Verbose Logging
Based on experience, Wi-Fi verbose logging had given me the following benefits:
Secures Your Phone And Information
Your security will greatly boost once you familiarize yourself with the information stored in each log. Keeping a record of your logs is also important if you feel like your information within the network is getting compromised.
Enabling Wi-Fi verbose logging when connecting to a public network gave me an understanding of how a public Wi-Fi infrastructure works in transmitting data.
Viewing vital information such as router MAC address, APs, and SSIDs, along with basic knowledge in networking, allowed me to identify vulnerabilities within the network that might compromise my information.
Makes Troubleshooting Easier
Keeping a log of my Wi-Fi activity at home helps me identify if the network is congested, or if there is an issue with the internet service provider.
Viewing the RSSI, packets sent and received within the logs help identify network issues. It can also help you identify hardware problems when comparing the difference between the two devices in terms of packet loss.
Easy To Navigate
Just as how all logs work, there is a date and time written in each. It helps you identify which time the network connection went bad, or if there is an anomalous activity present right at this very moment.
It is a live recording that I often keep simply by copying and pasting the text to your note, or by simply taking a screenshot. However, you need to spend some serious time learning how to navigate it.

Disadvantages of Wi-Fi Verbose Logging
Not all systems and their features are perfect, which is why it also has drawbacks that some may not prefer.
Logging Bloats Over Time
Since logs are messages, keeping them over time may cause your data to bloat. This does not just add up unnecessary memory to your storage; it also confuses you from reviewing the more important logs than the irrelevant ones.
Bloats can become time-consuming when pruning some of them. So, be sure to review the logs if you find them useful before saving them.
Confusing
I had the mistake of keeping too many logs to the point where I wasted an hour just looking for a single log critical for your investigation or troubleshooting among the pile of useless logs that I just dumped into the notes.
ILogs are unstructured and are only sorted out by date and time since it is a live recording of activities.
Third-Party Apps Are Needed To View Logs
At first, I thought enabling the Wi-Fi verbose logging option will cause the system to create a text file or will display the logs at some part of the system.
It turns out that it will require me to use Logcat on my Android Studio for me to view everything. There are some other third-party apps that you can use, but they might not be safe for your security.
On the other hand, Logcat is known to be very secure because it is a part of Android Studio, which is meant for Android users at a developer level.
Keep in mind that the following disadvantages are not discouraging. These are drawbacks that prevent the verbose logging too inefficient to read.
But all-in-all, the logs are a vital component of analysis if you need to review your Wi-Fi network in a much detailed way. Network specialists and self-taught phone experts alike may require reviewing these logs at most times.
The Bottom Line
Wi-Fi verbose logging might be complicated at first, but getting a grasp of it helps you feel more secure when monitoring your Wi-Fi connection.
Each piece of information is relevant for the performance and security of the network you’re connected to.
It’s my go-to before I do work at a public Wi-Fi network. Just be sure to understand how each info on the log works to use its advantages to its fullest.
What is Wifi Verbose Logging? How to Enable It
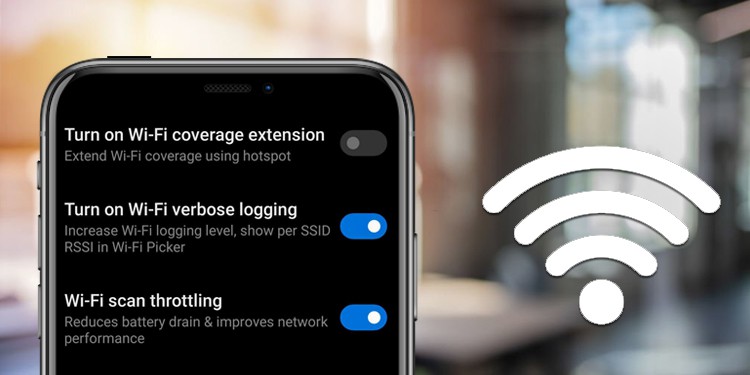
If you are concerned about any public network’s security or are trying to troubleshoot your network, you may have encountered the term Wi-Fi verbose logging.
A verbose log is a detailed record of what any system process is doing at the moment, and Wi-Fi verbose logging is the verbose log of your network connections. This feature is used by developers to troubleshoot any errors or issues within your system.
You can also review Wi-Fi verbose logs to see if any public network performs a harmful activity on your device.
How to Enable Wi-Fi Verbose Logging?
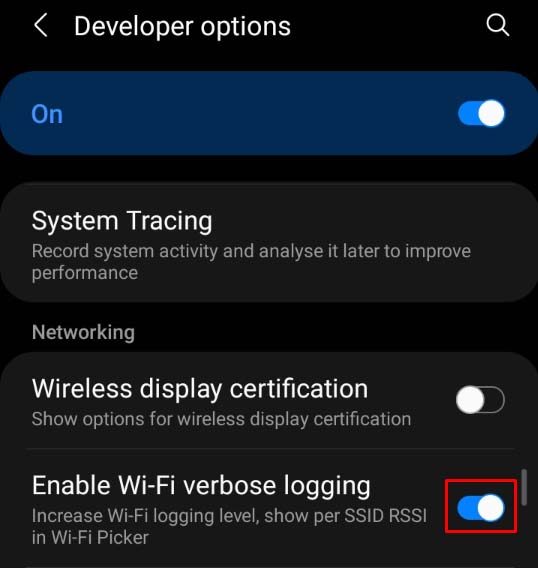
Enabling the Wi-Fi verbose logging feature is as simple as a few taps. You can simply go to the developer’s options and toggle on the feature.
Here’s how you can do it:
- Launch Settings on your smartphone.
- Navigate to About phone > Software information. (If you already have Developer options enabled, skip to step 5.)
- Tap on the Build Number five times to enable Developer options. (For some phones, you may need to tap it seven times.)
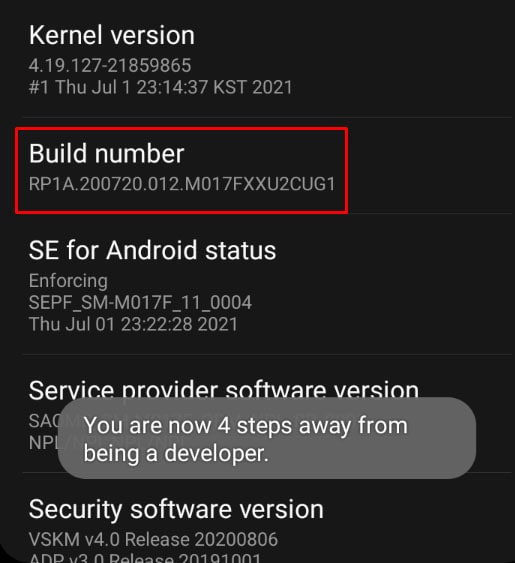
- As some Android versions and smartphones have different settings options, you can search Build Number in the search bar if you can’t find it.
- In the main settings menu, open the Developers option setting.
- Locate Wi-Fi verbose logging option and toggle it on.
What Does Wi-Fi Verbose Logging Display?
After Wi-Fi verbose logging is enabled on your device, you should see some extra information beneath every available internet connection in Wi-Fi settings.
The extra text beneath the Wi-fi connection displays several network information. The incomprehensible string of letters and numbers is the mac address of your device. The RSSI means Received Signal Strength Indicator, which displays the Wi-Fi connection’s signal strength.
The “tx” represents the signal latency, and the “rx” text displays the total amount of data your device has received.
How to View Full Wi-Fi Verbose Logs?
While enabling the Wi-Fi verbose logs does display extra information in the Wi-Fi setting, it does not directly let you view the Wi-Fi verbose log files. Furthermore, Android has no setting that lets you natively view your Wi-Fi verbose logs.
However, if your Android device is rooted, you can view the verbose logs in /data/misc/wifi/wpa_supplicant.conf . If your device is not rooted, you can use third-party applications to view them, or you can also use the Android studio application.
While using third-party applications to view verbose files may carry some risks, Android Studio is open-source software provided by Google. However, you will need to install the Android Studio software on a computer.
Follow the methods below step-by-step to view your Wi-Fi verbose files in Android Studio:
Create Project
Here’re the steps to create a project:
- On your computer, download Android Studio and follow the instructions in the setup file to install it.
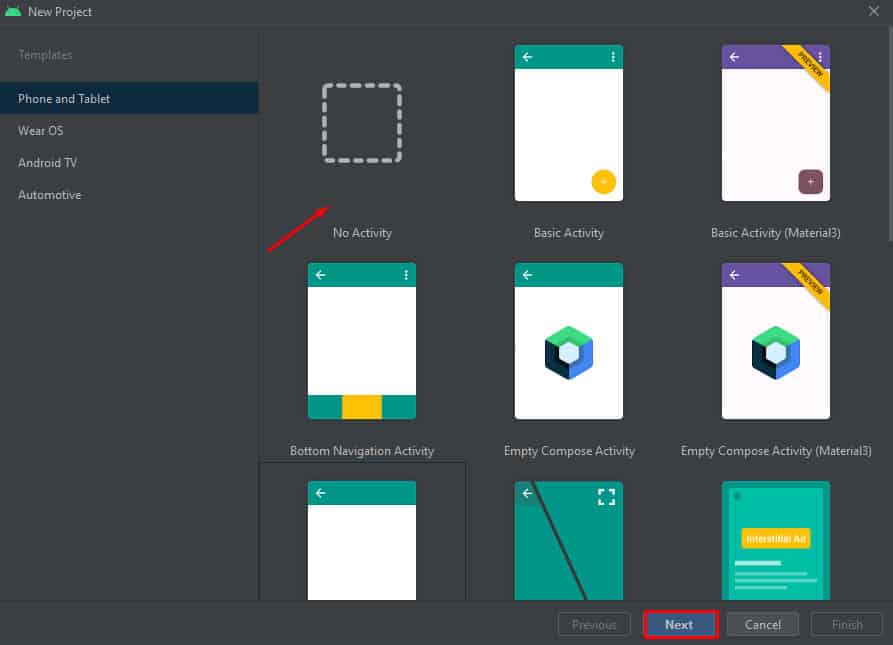
- In Android Studio, click on New Project and make sure the Phone and Tablet template is selected.
- Click on No Activity and Next.
Connect Using USB or Wirelessly
Here’re the steps for a USB connection:
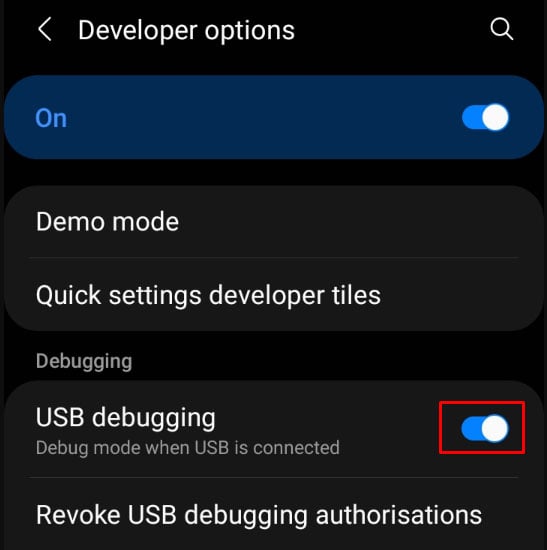
- On your smartphone, open settings and go to the Developers option.
- Toggle on USB debugging.
- Connect your PC and smartphone with a USB cable.
Here’re the steps to connect Wirelessly:
- In Android Studio, tap on the phone icon at the top.
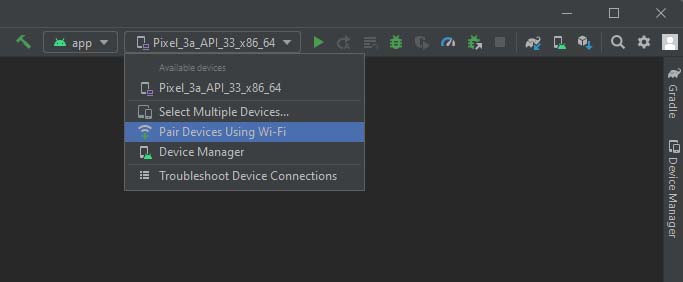
- Select Pair Devices Using Wi-Fi option, which will display a QR code.
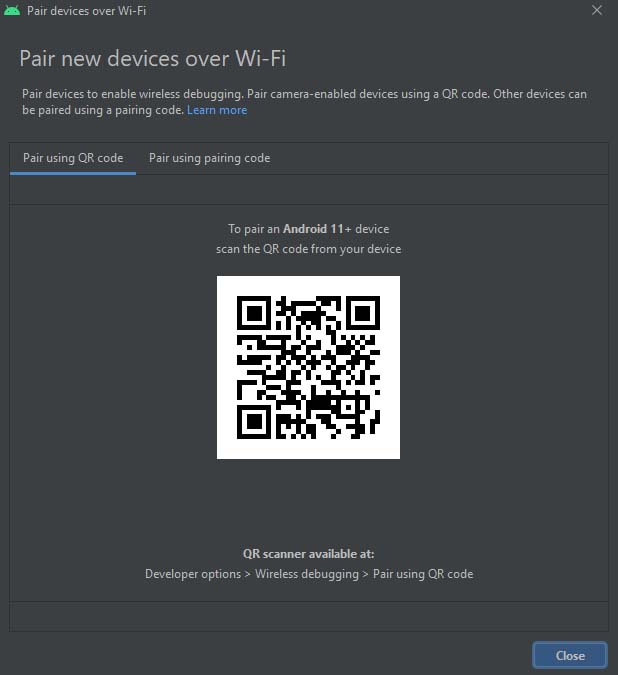
- Go to the Developers option on your smartphone and toggle on Wireless debugging. (Make sure your computer and mobile are on the same network.)
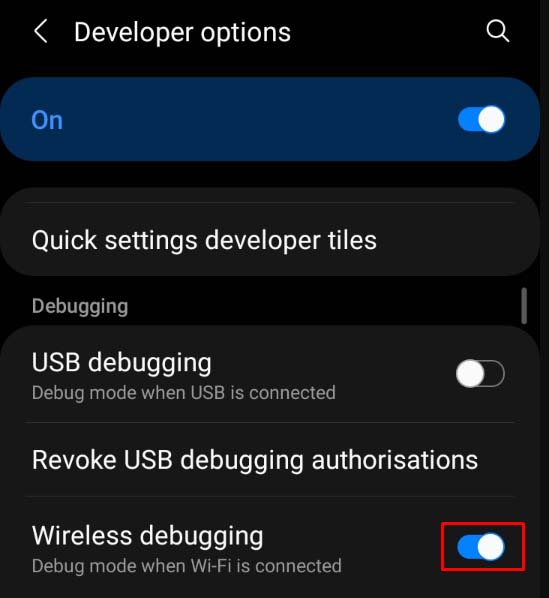
- Click on the Wireless debugging option.
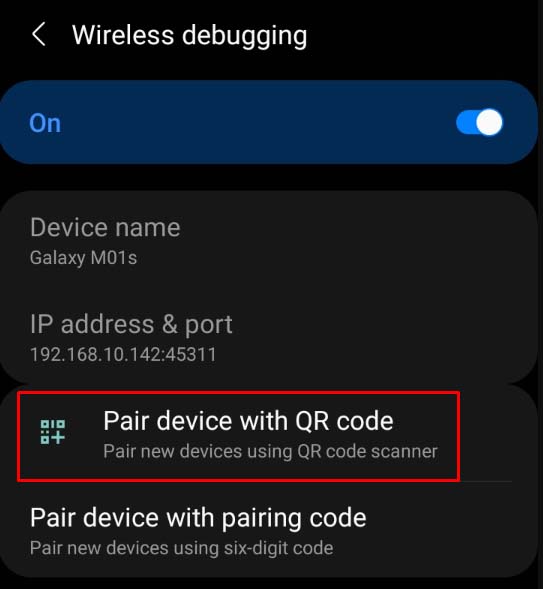
- Select Pair device with QR code and scan the QR code displayed in Android Studio.
- Your mobile and Android Studio should now be connected. If you can’t connect them using the QR code, you can also use the Pair using pairing code option.
View Your Wi-Fi Log Files
Follow these steps to view the Wi-Fi log files:
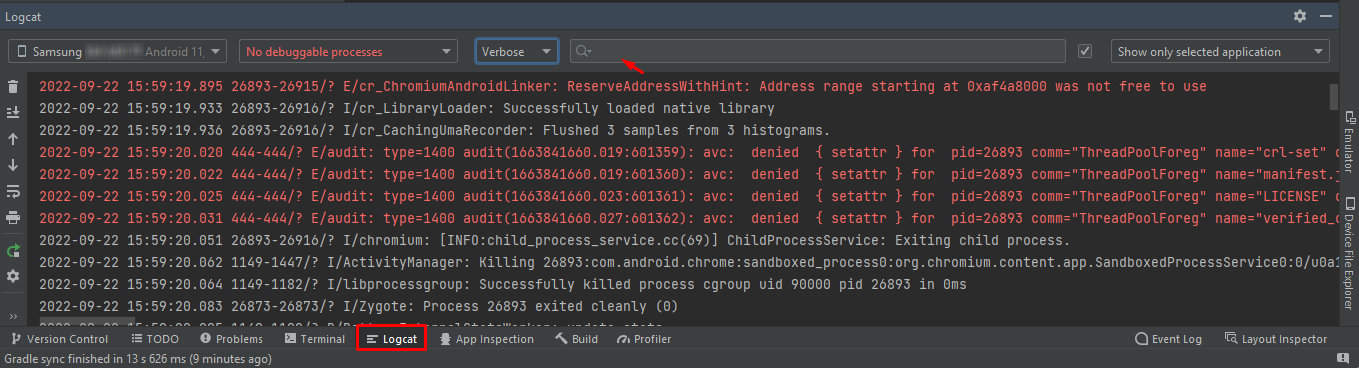
- In Android Studio, Click on the Logcat option in the bottom menu.
- All your device’s log files will start being displayed.
I’m a tech enthusiast, and I’ve always been troubleshooting errors by myself for years. I also like keeping up to date with the latest technology and gadgets.